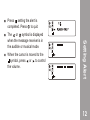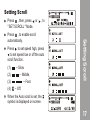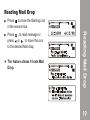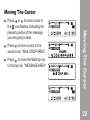
1
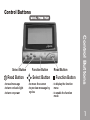
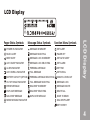
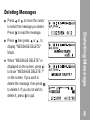
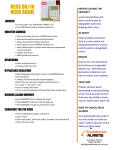
USER MANUAL
Alpha-Numeric Display Pager
MODEL : TP200 / TP201 Series
Control Buttons .................................................... 1
Features and Functions ....................................... 2-3
LCD Display ......................................................... 4
Function Operation .............................................. 5-19
X
X
X
5
6
7
8
9
10
11
13
14
15
16
17
18
19
20
21
22
23
24
25
26
27
28
29
CONTENTS
Reading a Message ............................................................
Locking Message ...............................................................
Unlocking Message .............................................................
Deleting Message ...............................................................
Deleting All Message ..........................................................
Move Message to Memo .....................................................
Setting Alert .........................................................................
Pager On / Off .....................................................................
Setting Auto Sleep...............................................................
Setting Alarm .......................................................................
Setting Time And Date ........................................................
Setting Scroll .......................................................................
Setting Zoom In or Zoom Out .............................................
Reading Mail Drop ..............................................................
Moving The Cursor .............................................................
Reading Personal Message ................................................
Reading Full Message ........................................................
Backlighting / Duplicate .......................................................
Error Message / Battery Gauge ..........................................
Set Mail Drop Alert ..............................................................
Set Mail Drop History ..........................................................
Back Up Batteries ...............................................................
Connector ...........................................................................
Relay Output / Data Output ................................................
Control Buttons
MODEL : TP200 / TP201
Read Button
Select Button
- to read message
- to turn on back-light
- to turn on power
- to move the cursor
- to preview message by
cycles
X
X
X
Read Button
Function Button
- to display the function
menu
- to enable the function
mode
Control Buttons
Function Button
Select Button
X
1
Features and Functions
Features and Function
4 - Line, 84 English Alpha Character Memory
Easy - To - Read Back - Lit Display
Up To Memory Capacity 259,056 Characters
16 Memory Slots + Message Full 10 sets
Personal Message Memory : 20 sets, Mail Drop Available
Show Time Of Day And Date
User Selectable 12 / 24 Hour Clock
Message Date And Time Stamping
Incomplete Massage - In Indication
Duplicate Message Indicator
Locks Important Message (Up To 10 Sets)
All Or Individual Message Delete
Unread Message Indicator, Reminder Alert
Battery Indicator (Option)
2
Features and Function
Zoom The Display - To Enlarge Message For Easy Read
Ability
Message Full Indication, Message Full Auto Storage
Message Preview For A Quick Look At Each Message
Message Move to Memo ( User selectable )
Service Area Indication
5 Built - In Alarm Clocks
4 Beep Alerts / 8 Musical / Sleep Mode / Volume Control
Private Time - For The Ability To Turn Off All Pager Alerts
During Pre - Selected Times
Mail Drop Alerts
Save Message When Off And When Charging Battery
Selectable Auto Scroll Speed; Fast, Middle, Slow, or Off
3
LCD Display
Message Status Symbols
Function Menu Symbols
POWER ON INDICATOR
MESSAGE IN MEMORY
SET ALERT
MUSIC ALERT
MESSAGE SELECTING
PAGER OFF
BEEP ALERT
MESSAGE LOCK IN MEMORY
SET AUTO SLEEP
AUTO SLEEP INDICATOR
MESSAGE LOCK SELECTING
SET ALARM
ALARM INDICATOR
PERSONAL MESSAGE
SET TIME
AUTO SCROLL INDICATOR
FULL MESSAGE
SET SCROLL
BATTERY CAPACITY (OPTION)
PERSONAL MESSAGE SELECTING
ZOOM IN / ZOOM OUT
OUT OF RANGE INDICATOR
FULL MESSAGE SELECTING
MESSAGE LOCK
ERROR MESSAGE
MAILDROP IN MEMORY
MESSAGE DELETE
DUPLICATE MESSAGE
MAILDROP SELECTING
DELETE ALL
MAIL DROP MESSAGE
DUPLICATE MESSAGE
MEMO MESSAGE INDICATOR
LCD Display
Pager Status Symbols
MOVE TO MEMO
MAIL DROP ALERT
SET HISTORY
4
Receiving And Reading Your Message
X
Press
or
message.
, to preview the
X
Press
to display your message.
Press
again, to view the next
screen.
H If you have set " Auto Scroll " ,
your pager will scroll through
your message screen by screen
automatically.
Reading Your Message
A flashing
symbol indicates you
have a message that has not been
read.(The symbol
mail drop
shows on screen by flashing).
5
Locking Messages
Press
or
, to move the cursor
to the desired flashing symbol
.
X
X
Press
to lock the message.
X
The symbol " " is displayed,
indicating the status of the
message in memory.
Locking Message
Press
then press
or
to
select the desired message to lock.
6
Unlocking Messages
Press
or
, to move the cursor
to the lock message
to unlock.
Press
, then, press
or
, to
" MESSAGE UNLOCK " Mode.
X
Press
, to unlock the message.
Unlocking Message
X
7
Deleting Messages
X
Press
then press
or
, to
display " MESSAGE DELETE "
Mode.
X
When " MESSAGE DELETE " is
displayed on the screen, press
to show " MESSAGE DELETE ? "
on the screen, If you want to
delete the message, then press
to delete it. If you do not wish to
delete it, press
to quit.
Deleting Message
Press
or
to move the cursor
to select the message you desire.
Press
to read the message.
8
Deleting All Messages
( All unlocked and the read messages )
, to
X
Press
to show " DELETE ALL ? "
on the screen. If you want to delete
all messages then press
, all
unlocked and the read messages
are deleted. If you do not wish to
delete them, then press
to quit.
Deleting All Message
Press
then press
or
" DELETE ALL " Mode.
9
Move Message To Memo
X
Press
then press
or
, to
move to " MOVE TO MEMO ".
X
Press
, to move the flashing
icon message automatically into
your memo mail.
Move Message To Memo
Press
or
, to move the cursor
to the desired storing message.
Press
to read the message.
10
Setting Alert
Press
, then, press
or
once to display " SET ALERT "
Mode.
X
, to enable " SET ALERT ".
Press
or
, to move the cursor
to the desired alarm mode. ( Alert
/ Musical
/ Sleep
are
optional / Volume
)
X
Press
or
, to move to the
cursor to the desired tone or music.
Setting Alert
Press
X
11
Press
setting the alert is
completed. Press
to quit.
X
X
When the cursor is moved to the
symbol, press
or
to control
the volume.
Setting Alert
The
or
symbol is displayed
when the message receiver is in
the audible or musical mode.
12
Turning Your Pager Off
or
, to
X
Press
, till " PAGER OFF ? "
appears on the screen.
X
Press
, to turn the pager off.
X
After turning your pager off, the
screen will be blank.
X
Press
on.
, to turn the pager power
Setting The Pager Off
Press
, then, press
" PAGER OFF " mode.
13
Setting Auto Sleep
Press
, then, press
or
display " Auto Sleep " mode.
to
X
Press
or
to select " open " or
" close " (symbol
or
) and
adjust the digits, press
or
for
moving the cursor.
X
Press
setting auto sleep mode
is completed. The screen returns
to stand-by status.
X
is displayed when the Auto Sleep
mode is set.
Setting Auto Sleep
Press
, to enable " Auto Sleep
Set " Mode.
X
X
The enable
symbol indicates
your pager is under auto sleep
mode.
14
Setting Alarm ( 5 alarms )
Press
, then, press
" SET ALARM " Mode.
or
to
X
Press
, to enable.
Press
or
, to move the cursor.
X
Press
or
, to set the alarm
status either alarm enabled, alarm
disabled or set time.
X
Press
setting the alarm is
completed. Press
to quit.
Setting Alarm
X
15
Setting Time And Date
X
Press
, to enable set time.
X
Press
or
, to move the cursor
to the hour / minute digit. Then
press
or
adjust each set of
digits : AM / PM / 24 hr / month /
day.
X
Press
to activate the time and
date change. Press
to quit.
Setting Time And Date
Press
, then, press
or
once until " SET TIME " Mode is
displayed.
16
Setting Scroll
Press
, then, press
or
" SET SCROLL " Mode.
, to
X
X
Press
to set speed high, press
to set speed low or off the auto
scroll function.
X
(1)
(2)
(3)
(4)
X
X
X
-- Slow.
-- Middle.
-- Fast.
-- Off.
Setting Scroll
Press
, to enable scroll
automatically.
X
When the Auto scroll is set, the
symbol is displayed on screen.
17
Setting Zoom In / Zoom Out
or
, to
), Then,
X
The letters on screen enlarge and
become two lines for reading.
X
Or press
or
to move the
cursor again to " ZOOM OUT "
(symble
), and press
to
complete.
X
The letters on screen change
back to four lines.
Setting Zoom In / Out
Press
, then press
" ZOOM IN ". (symbol
press
to confirm.
18
Reading Mail Drop
Press
to move the flashing icon
in the second row.
Press
, to read message or
press
or
, to move the icon
to the desired Mail drop.
H The feature allows 14 sets Mail
Drop.
Reading Mail Drop
X
19
Moving The Cursor
X
Press
to move cursor to the
second row ; " MAIL DROP AREA ".
X
Press
to move the flashing icon
to the top row; " MESSAGE AREA ".
Moving The Cursor
Press
or
to move cursor to
the
icon flashes, indicating the
present position of the message
you are going to read.
20
Reading Personal Message
Press
, to read message.
X
When the
symbol is shown on
the top left - hand corner of the
display, this indicates the message
status as a personal message.
Reading Personal Message
Press
or
, to move the
flashing icon to the
symbol.
X
21
Reading Full Message
Press
, to read message.
X
When the
symbol is shown on
the top left - hand corner of the
display, it indicates the message
status as a full message.
Reading Full Message
Press
or
, to move the
flashing icon to the
symbol.
X
22
Backlighting
Duplicate Message
When the pager receives a duplicate
message, only the latest message will
be displayed on the LCD screen.
The
symbol shown on the top
left - hand corner of the display,
indicates the message status as a
" Duplicate Message ".
Backlighting / Duplicate
You can manually activate the back-lit at any time by pressing
and holding
for three seconds. If no other buttons are pressed,
the back-lit will automatically turn off when the pager returns to
the standby mode.
23
If an error message is received.
The
symbol is shown on the top
left - hand corner of the display,
indicates the message status as an
Error message.
Battery Gauge ( Option )
The battery indicator is located on the
status screen and keeps you informed
of battery energy level. The three
indicators range from
(full),
(1/2),
(low). Whenever the low battery
shows on display, Please plug AC
power to charge the Batteries to make
sure the pager is in receivable condition.
Error Message / Battery Gauge
Error Message
24
Set Mail Drop Alert
Press
to move the cursor to the
" MAIL DROP AREA ".
Press
menu.
, to display the function
X
Press
or
, to move the cursor
to set mail drop alert, " CHIRP ON ".
If you already turned on the alert,
the screen will show " CHIRP OFF ".
X
Press
, to activate the function.
Or press
, to exit the function.
Set Mail Drop Alert
X
25
Set Mail Drop History
X
Move the cursor to " MAIL DROP
AREA ".
X
Press
then press
HISTORY ".
to the " SET
X
Press
to into select "Sets".
X
Press
or
to move the " ".
When you move the " " under
" 5 ", it means you select 5 sets
under this cursor. Move to " 8 ",
means 8 sets.
Set Mail Drop History
The user could select how many
sets they want under " Mail Drop "
cursor.
X
Press
to confirm your setting.
26
Back Up Batteries (Option)
X
Back Up Batteries
Please don't use the alkaline battery with TP200 / TP201
charger to avoid dangerous accidents.
With Back up Batteries option "
" will appear on the
display.
27
Connector
Connector
Antenna
(For TP201 only)
DC Power
Programming
Relay Output
(Option)
* NOTE: DC input power is protected by Fuse: 1A 250V.
28
Relay Output / Data Output ( Option )
8. RTS
7. CTS
6. NC
5.GND
4. NO
3. RXD
2. TXD
1. COM
* NO,NC. can not connect to AC220V directly.
( NO: Normal Open ; NC: Normal Close )
* Contact Current: DC 12V, 2A max; AC 100V, 1A max.
* Data Output: TXD, RXD, CTS, RTS, Standard RS232 Level.
x
Relay Output / Data Output
ACCESSORY:
x
29
672- 00037- 0
762-00047-0