1
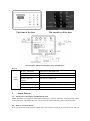
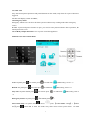
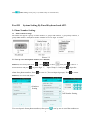
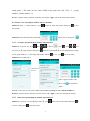
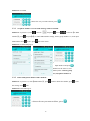
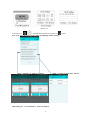
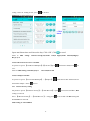
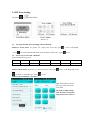
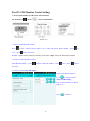
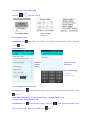
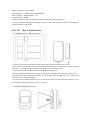
GSM Alarm System
GSM+PSTN+Contact ID
User Guider
0
Menu
Part I, Packing Details and System Feature..................................................................2
Part II, Setup Ready To Use..........................................................................................4
Part III ,System Setting By Keyboard and APP............................................................8
Part IV, CID Monitor Center Setting............................................................................18
Part V, Query Alarm System.........................................................................................21
Part VI, Default Factory Setting and System Parameters.............................................21
Part VII, How to Install Sensor......................................................................................22
Part VIII, Troubleshooting..............................................................................................23
1
Part I, Packing Details and System Feature.
1. Packing Details:
1 x Panel, 1 x PIR, 1 x Door Sensor, 2 x Remote, 1 x Power Adapter, and Few Brackets.
2. The Original Password:
1234. The password will be asked when User call or SMS to
panel.
3. System Functions
■ TFT color display, humanized menu, voice prompt and easy to use.
■ Up to 99 wireless zones, each wireless zones can be defined as one of the 8 zone types, each zone
can setup the siren independently.
■ Four groups of scheduled arm/disarmed function, each timed arm/disarm you can select the period of
time and different defense zone
■ 6 groups preset telephone number for alert calling; not lost number without power
■ Support ISD automatic voice mailbox for playback message upon alert. Maximum length of voice
message is 10 seconds.
■ Remote control for arming, disarming, monitoring and speaking, setting up for relay and
siren.
■Wireless intelligent study coding, compatible with PT2262 normal encoding and 1527 encoding,
Maximum support 150 remote control and 150 sensors.
■ Integrated clock chip,time will not lose without power
■ Unique black box feature, display most recent 72 disarmed records and 102 recent alarm recording
with accurate alarm time and zones.
■ Compatible with the international alarm networking protocol CONTACT ID
4. Alarm Feature
Install alarm panel at the central of apartment, panel will easy to connect with all the wireless sensors
and accessories. Keep the panel away from large metal objects or appliances with high-frequency
interference, and avoid barriers such as concrete walls with metal frame inside and fire doors.
2
The front of the host
The touch-key of the host
■Notice
TFT
display
5
Display ”DISARM”
Alarm host in DISARM status
Display ”ARM”
Alarm host in ARM status
Display ”STAY ARM”
Alarm host in STAY ARM status
Display ”XX zone
arming”
XX zone in a ARM status,
Display”98 zone arming”
Emergency arming by pressing the emergency button
Display”97 zone arming”
The host was defused or moved
“SIM Card” light
SIM Card loaded correctly
Alarm Process
5.1 Alarm process description and Monitoring Call
ARM→Detectors was triggered, Send signal to the panel→The host will alarm→Panel report the alarm
to the CID center/ call/SMS to the user→User receive the phone/SMS and remote control the panel.
5.2 Remote control the Panel :
User can operate the alarm system by phone call: User will not be asked for password upon host call, but
3
User will be asked for password upon User Call to the host. Alarm will automatically hang up call after
no operation within 20 seconds.
The Operation are:
[1] key: arming
[2] key: disarming
[3] key: monitoring open
[4] key: monitoring closed
[5] key: turn on announcement
[6] key: turn off announcement
[7] key: siren ringing
[8] key: stop siren sound
[9] key: turn on relay
[0] key: turn off relay
[*] key: hang up, system will not dial the next number on list.
Remark:
For host alarm call: If not hang up with [*] key or disarm with [2] key, the system will retry to call the
next phone numbers on list until one connected.
Note: the monitoring and announcement time is 20 seconds, please press [3] or [5] key to continue if
you need.
(改此图名:5.2)
Part II Setup Ready To Use
Alarm System Basic Settings and Working Mode
1, Alarm Panel Initial Setup
Step 1: Connect the external phone line, subline, siren, sim card and power adapter rightly to the panel.
(Adapter keep power off at this time.)
Step 2: Turn on the battery switch, panel will voice prompt “Welcome to use alarm system”
4
Step 3: Power on the adapter.
Add/Delete Accessories
Press【menu】
to enter main menu. Press 【2】
to enter Add accessories. As Picture 5-1
Picture 5-1
1.1 Add Remote Control
Press【1】to enter ‘Add Remote Control’→Input Zone Number you want to add remote control→then
press
→ press any key of the remote control to send a signal to the alarm panel→ press
voice "Set successful" and LCD display "has been saved"→
. panel
to back.
Remarks: a, If beep only once means this remote control was configured before and cannot be added
again. b, If want to add more remote control in this zone, can press any key of other remote control.
Alarm panel can configure up to 150 remote control.
1.2 Delete Remote Control
As picture 5-1, press【3】→Input Zone No.(0-99) or (press【**】to delete all remote controls)→ press
to delete certain zones remote control or all remote controls.
1.3 Add Detector
As picture 5-1, press【2】→ Input Zone No. (0-99)→ → Press
→ trigger the detector to send a
signal →Panel beep twice, voice prompt "Set successful" and LCD display "has been saved" →
to
back
Remarks: a, If beep only once means this detector was configured before and cannot be added again. b,
If want to add more detector in the same zone, can trigger other detector. Alarm panel can configure up
to 150 detectors .
1.4 Delete Detector
As picture 5-1, Press【4】→ Input Zone No (press【**】 to delete all zones)→ press
to delete certain
zones detector or all detectors.
2. APP Installation and Initial Setup.
User can download the APP by name ‘GSM Smart Alarm System’ from Android Market, Google Play,
IOS APP market. Then, Install it freely, and startup it. This APP support 5 different languages: English,
5
France, Russian, Spanish, Portugal, and Chinese. It will auto-choose the language upon the language of
User’s mobile device. If User’s mobile device adopt other language, the APP will auto-choose English
version to install. Initial Setting as below:
P1
P2
P3
P1: Press Setting for font size and
Language
Press ‘Ok’ return to P1 and Press
‘Add Account’ to P2
P2: Choose the right Model Number
Create a User Name
Input the Sim card No. Of panel
Input the password of panel.
Press ‘Done’ to enter P5
P4
P5
3 Introduction of Work Mode (ARM/Disarm/Stay arm/ Emmergency Alarm/ Relay)
3.1 Arm
Arm for general protection. In this mode, system will alarm if any detector is triggered.
The panel will display ‘Arm’
3.2 DISARM
Disarm for dormant. In this mode, system will not alarm if any detector is triggered.
The Panel will display ‘Disarm’
6
3.3 STAY Arm
Stay Arm means partial protection and partial dormant. In this mode, only alarm for a part of detectors
triggered.
The host will display “STAY ALARM”,
3.4 Emergency alarm
Emergency: Means User can force the alarm system to alarm in any working mode when emergency
occurs.
Remark: If password protect function is open, you need to enter password before other operations, the
initial password is 1234.
3.5 Set Relay Output ON/OFF: Use it to power on/off the Appliances.
Methods to Set Above Work Mode:
Arm: On panel press
Disarm: On panel press
/ On remote press
/On remote press
Stay arm: On panel double press
/ on APP click
/ SMS setting: 1234+1 +#
/on APP click
/ On remote press
/SMS setting 1234+0 +#
/ on APP click
/SMS setting 1234+2
+#
Emergency Alarm: On panel press
Turn on/off relay: On panel: Press
Out】,press
/ On remote press
→Press
/
→press 【5.Phon&SMS setting】→【Alarm
switch ON or OFF. On means relay short circuit when system alarm/ On APP
7
slide
/ SMS Setting 1234+[3/4] +# (3 means relay on. 4 means off.)
Part III
System Setting By Panel Keyboard and APP.
1: Phone Number Setting.
1.1 Phone Number Settings
The model can support 6 groups of alarm numbers, 2 groups CID numbers, 3 groups help numbers, 6
groups SMS numbers. Each phone number shouldn't exceed 31 digits. As follow:
Picture 5-2
1.1.1 Set up voice alarm phone number ( Two Method )
Method 1, Set it from panel: Press
Alarm numbers’ and press
→ Press
or
or press digit ‘1’,
alarm alert phone number, Press
to choose
, then press
Input Group 1-6 and press
→Choose ‘1.
, input the
to save it. (You can input 6 groups). Press
to return.
Method 2, Set it from APP, Page 2:
→Numbers
Setting
→
Call Number Setting
User can input 6 alarm phone numbers, then press
8
one by one to send the numbers to
alarm panel. ( The same as User send a SMS to the panel sim card: 1234 + 3 + group
number + phone number +#)
Remark : If panel connect with line extention, please add a ‘digit*’ before the alarm phone number.
1.1.2 Delete voice alarm phone number with two Methods:
Method 1: Enter ‘1, Alarm numbers’, press
button to delete the number then press
to save
the settings.
Method 2: Delete alarm numbers from APP,
Choose the No. And press
1.2.1 Set up for help alarm phone number with 2 Method.
Method 1: As picture 5-2, Press
, Press
the cursor to【3. Help numbers】and press
or
to choose
press
, Press
or
move
or directly input digit【3】to enter help number settings,
choose group number 1-3 , then input help number and Press
to save, press
back to the menu.
Method 2: From APP page 2:
→Numbers Set
→
Choose A
Input 3 groups Number and
Press each
to send it to
panel.
Method 2 is the same as User send a SMS setting: 1234+3+(Gruop No.7-9 )+ Phone Number+#
Remark : If panel connect with line extention, please add a ‘digit*’ before the alarm phone number.
1.2.2 Delete for help alarm phone number with 2 methods
Method 1: As picture 5-2, enter【Help number】, press
save the settings. Press
back to the menu.
9
button to delete the number than press
to
Method 2: from APP:
Choose the one you want to delete, press
1.3.1 Set phone number to receive SMS message with two method.
Method 1: As picture 5-2, Press
numbers】 press
SMS number. Press
→choose
and press
, Press
or
to choose【4. SMS
(or input【4】) to enter SMS number settings, choose group number 1-6 , then input
to save, press
back to the menu.
Method 2: Set from APP page 2.
→
→
Input Number and press
Method 2 is the same as send
SMS to panel: 1234+4+group
No.(1-6)+phone number+#
1.3.2 Delete SMS phone number with 2 method:
Method 1: As picture 5-2, enter【SMS number】, press
the settings. Press
button to delete the number, press
back.
Method 2: From APP Page 2:
→choose the one your want to delete, press
1.2 Voice call
10
to save
As picture 5-2, Press
then input number, Press
→
→choose【5. Voice calls 】press
to dial, press
, (or press number【5】directly)
hang up the call.
2: DIY System Setting
2.1 Pre-record Voice Message
Alarm panel will play a pre-recorded voice message in the alarm call. As follow:
Picture 5-3
As picture 5-3, press
→Press
to enter voice alarm recording→press【1】to start recording ,
speak warning alert to the panel for recording.
System will record 10 seconds and then automatically exit. Massage should be simple like “This is
whose house be intruded, please help”.
2.2 Delay/Time Setting
2.2.1 Set delay for system arm
Picture 5-4
As picture 5-4, press
→choose
→【1.Delay settings】, input the delay time 0-99 seconds after
【Arming delay】, “0” means arming without delay.
2.2.2 Set the time of delay for alarming
As picture 5-4, choose 【1.Delay Setting】press
→ Choose【Alarm Delay】→then input (0-99 seconds)
you want. ‘0’ means no delay.
2.2.3 Set the time of alarm system
11
Picture 5-5
As Picture 5-5,
→
→input the date and time as picture,press
to save.
Note: 2.2.1, 2.2.2 and 2.2.3 can be setting by APP page 2 Time setting :
Press ‘Confirm’ to send it to Panel
‘Send’ to panel, System time will be
updated
SMS Setting for 2.2.1 Arm Delay : 1234+51+(0-99)+#
12
2.2.2 Alarm Delay: 1234+52+(0-99)+#
2.2.3 System Time: 1234+56+Year(4 digits)+Month(2digits)+Date(1-31)+Hour
(0-23)+Minute(0-59)+Seconds(0-59)+#
2.3 Set the alarm system password with two methods
Method 1: As picture 5-4, press 【2.Password Setting】, input four new password behind 【Password】
(the original password is 1234).
Method 2: Change it by APP Page3:
→
Input new password and press
send.
Same as SMS setting Content:
1234+50+password(4digits)+#
2.4 Set keyboard password protection feature
As picture 5-4, press 【 2.Password Setting 】,press
(4digits) and press
to save. Press the
, choose【Keypad Lock】, input new password
switch ON or OFF.
2.5 System voice volume adjustment
As picture 5-4,press 【3.Voice Setting】→press
→【System volume】→input volume level (1-7) , Press
【OK】to save.
SMS setting:1234+79+digit(1-7)+#
2.6 Set system voice ON or OFF
As picture 5-4.press【3.Voice Setting】→【System voice】.press
switch ON or OFF.
2.7 Set the external alarm volume
As picture 5-4,press 【4.Siren Setting】→press
button →choose 【External volume】
,input 00-99, 99
the maximum sound→press
13
2.8 set the Internal alarm volume
As picture 5-4,press 【4.Siren Setting】,→choose 【Built-in volume】→input 0-7,
sound→press
7 the maximum
.
SMS setting: 1234+87+digit (0-7)+#
2.9 Set length of Siren sound
As picture 5-4,press 【4.Siren Setting】,→【Siren on time】,input 0-20 minutes.0 means no siren.
SMS setting: 1234+53+Minutes(0-20)+#
2.10 Set times of rings for monitor call
Picture 5-4, press 【5.Phon&SMS setting】→press
button →choose【Ring time】→input 0-20→
to
save. 0 means refuse monitor call
SMS Setting: 1234+18+times(0-20)+#
2.11 Set the anti-tampering of telephone call ON/OFF
As picture 5-4, press 【5.Phon&SMS setting】→【Test line】→press
switch ON or OFF→
2.12 Set the SMS Messaging reply ON/OFF
As picture 5-4,press 【5.Phon&SMS setting】→【SMS reply】,press
switch ON or OFF .
On means panel will reply after it receive SMS setting.
2.13 Set remote control sound
Picture 5-4
As picture 5-4,press【6.sound setting】→Input Digit(01-99), 01 is lowest voice→
to save, press
to switch ON or OFF. ‘On’ means press remote, siren will "di di".
2.14 Scheduled arm and disarm with two methods (4 groups).
Method 1: As picture 5-4.press 【7.Timing Setting】→Input Group Number (1-4)→ press
Arming, Time,Disarm time,Day( 1-7 means Mon-Sun). (
14
to move the cursor.) Press
→input the
to save
setting. Cursor to ‘Timing on/off’, press
to on/off it.
Method 2: Set from APP Page 2:
→
→Click
blank
Input arm/disarm time and choose the day. Click ‘OK’, Click
to send.
Same as SMS setting: 1234+57+Group(1-4)+Time Arm(4 digits)+Time Disarm(4digits)+
Day(1-7)+#
2.15 Set the LCD ‘Power Save’ ON/OFF
As picture 5-4,press 【9.LCD Save&Tamper】→【Lcd Save】,press
save.
Same as SMS Setting: 1234+84+[1/0]+#
switch ON or OFF, Press
to
1 for OFF, 0 for ON
2.16 Set Tamper ON/OFF
As picture 5-4,press 【9.LCD Save&Tamper】→【Tamper】→
alarm when tamper→Press
switch ON or OFF. OFF means not
to save.
2.17 Restore factory setting
AS picture 5-4,press 【0.Restore Factory】→【1 Part Recover】→press
. Accessories still there, DIY
setting is removed.
Press 【0.Restore Factory】→【2 Full Recover】→ Long press
Accessories are removed.
SMS setting as: 1234+9898+#
15
for 10 seconds. All DIY setting and
3: DIY Zone Setting
On panel
→
, enter below:
Picture 5-6
3.1. Set siren ON/OFF when Alarming with two Method.
Method 1 From Panel: As picture 5-6,→input zone No.(1-99)→press
→press
to switch ON/OFF.Off means siren not alarm for this zone→press
→ move to【Siren】
to save.
3.2 Set the type of zone with 2 methods:
System default zone types are:
Normal
Stay
Intelligent
Help Senior
Chime
Welcome
Emergency
01-59
60-79
80-89
90
91
92
93-99
User can DIY every zone by two method:
Method 1 from Panel: As picture 5-6→Input zone No.(1-99)→press
to choose 1 of 8 kinds type→Press
→move to the 【Types】→Press
to save
Method 2 from APP Page 3 for above:
Input Zone Number, Choose
Zone Type, and siren on/off
Click Send.
The Same as SMS Setting:
1234+60+Zone NO.(00-99)+
Type(1-8)+Siren No.(0/1)+#
→
16
3.3 Set zones banded with alarm phone number.
From Panel: As picture 5-6→input zones No.(1-99) →press
number group(1-6) →press
→move to【Zone dial】→input phone
to save. ( Help zones fix to help phone number group.)
3.4 Set NO /NC for wired zone
From Panel: As picture 5-6→Input wired zones No. (51-52) →press
model】→press
switch the NO / NC →press
→move cursor to【Wired
to save.
Same as SMS setting: 1234+61+Zone No.(51-52)+(0/1)+# (0 for NO, 1 for NC)
3.5 Set SMS message content /Query the SMS message content of every zone by APP Page 3
SMS Message setting→ Input
Zone number and Content→
Click send
SMS:[1234]+[80]+[zone
number 01-99] +[Content] +[#]
→
→
Query SMS content
→Choose Zone→
Click Confirm
SMS: [1234]+[81]+
[zone number 01-99] +[#]
17
Part IV CID Monitor Center Setting
1, Set the phone number of CID center with 2 method:
On Panel: Press
→Press
→Choose CID number
Picture 5-2
1.1 Input Contact ID phone number
Press
to enter →choose group number (1-2)→ input CID Center phone number →Press
save→ press
to
back to the menu.
Remark : If panel connect with line extention, please add a ‘digit*’ before the alarm phone number.
1.2 Delete Contact ID phone number
button to delete the number →press
Enter【CID number】→ press
to save→Press
back to
the menu.
1.1 and 1.2 can be set By APP Page 2
Input Center Phone Number→
Press
to send it to Panel.
Same as SMS setting:
1234+4+group number 7-8+phone
number +#
→
Press
18
to delete it.
2. Set the User code for CID system
On Panel:
→
→【8.CID setting】
Picture 5-6
2.1 Set CID User Code
Set On Panel: Press
→press
to enter【8.CID setting】→input 4 digits CID coding behind 【User Coding】
to save.
Set On APP Page 3:
→Click CID
Number
Setting
→ Input User Code,
Click Send
Same As SMS Setting:
[1234]+[92]+
[AAAA 0-9] +[#]
3. Set the Signal Accuracy for CID
Set On Panel: Press
to enter【8.CID setting】→Input the (0-9) to behind【CID Accuracy】→Press
to save.
Set by SMS: [1234]+[83]+[ Accuracy level 0-9] +[#] Normally Choose No. 4
4. Set the report of arm/disarm to CID
Set On Panel: Press
to enter【8.CID setting】→then press
【No sent】/【Arm】/【Disarm】/【All】,press
to save
19
behind 【Arm&Disarm】to switch
Set by SMS: [1234]+[91]+[0-3] +[#] 0 for No Report to CID
disarm 3 for report ARM and DISARM
5. Set scheduled self-checking test time
Set On Panel: Press
digits)】→then press
1 for report Arm to CID
2 for report
to enter【8.CID setting】→input the self check test time behind 【Test Time (4
to save
6. Set scheduled self-checking test day.
Set on Panel: Press
Week】→then press
to enter【8.CID setting】→input the self check test day(1234567) behind 【Test
to save (1~7 means Mon~Sun)
Set by SMS for 5.27+5.28: [1234]+[94]+[Self-checking time 4 digits] +[week number (1~7) ]+[#]
7. Event Code Setting
On panel
→
, enter below:
5-6
Setting CID event code
Set On Panel: Input Zone No.(1-99)→press
→input the event code behind【 CID event codes】.
(100 is medical, 110 is fire, 121 is robbery, 122 is mute robbery, 130 is burglary, 131 is peripheral
burglary, 151 is gas)
Set On APP Page 3, bar ‘Zones feature code setting’:
Choose Zone, Click
Event code, press send
SMS Setting:
[1234]+[64]+
[zone NO 01-99]
+[CID feature codes]
+[#]
→Click
Here
20
Part V Query Alarm System
1, Query [alarm list] or [Arm/Disarm List] record
Picture 5-8
Press
→press
→press
to History list→choose [alarm list]/ [Arm/Disarm List].The
maximum 102 history record. Max 102 [Alarm List] and 72 [Arm/Disarm List]
2, Other SMS query.
Query the General Parameters : SMS:[1234]+[11] +[#]
Query the arm/disarm status: SMS: [1234]+[20] +[#]
Query the number of ring tones and anti-tamper: SMS :[1234]+[13] +[#]
Query the phone alarm number: SMS :[1234]+[30] +[group NO 01-06] + [#]
Query the Helpline number : SMS :[1234]+[30] +[group NO07-09] + [#]
Query SMS number : SMS :[1234]+[40] +[group NO01-06] + [#]
Query alarm center number: SMS:[1234]+[40] +[group NO 07-08] + [#]
Query the system date and time: SMS :[1234]+[56]+[#]
Query the scheduled time of arm and disarm: SMS:[1234]+[57]+[group NO 01-04]+[#]
Query the defense zone type: SMS:[1234]+[60]+[zone number 01-99]+[#]。
Query the alarm mode of the wired zone: SMS : [1234]+ [61]+[zone number 51-52]+[#]。
Part VI Default Factory Setting and System Parameters.
1 System default setting
Operation password
1234
SMS message
Enable
Remote Control
Enable
Number of ring tones before picking up
8 times
Siren sound
1 minute
Audible confirmation for remote operation
Enable
Delay ARM
0s
Delay alarming
0s
Cut-line detect
Off
1-99 zone alarming
Siren sound
51-52 wired zones
NO
1-99 Zone SMS message content
Zone alarm
2 Fitting parameters:
Input voltage: DC9V-12V
Standby currents:<25mA
Alarm current: <450mA
21
Wireless frequency : 315/433MHz
GSM frequency :GSM850/900/1800/1900MHz
Back-up battery:Lithium Battery 7.2V
Alarm loudness:110dB
Detailed parameters: Panel is compatible with Code PT2262, PT2240 and EV1527.
If sensor is PT2262 encoding, the resistance must be 1.5M-4.7M; If sensor is EV1527 encoding, the
resistance must be 150K-470K.
Part VII How to Install Sensor
7.1, Installing Door or Window Sensor
A
B
a, Firstly, user should clean the door/window surface before the door/window sensor locate.
b. Every door sensor include sensor (A as in diagram) and magnet (B as in diagram). B must be the right
hand side. (A and B, one on fixed door frame, another one on movable door.)
c. A and B must aline,the distance between A and B shorter than 1 cm.
d. Before installation, please use B to trigger A. (Trigger the LED light side, wrong side will not react. )
e.The light lit for one second, means normal. In case the door sensor is battery low, the indicator will
keep lit as a low-voltage notification.
f. A, B can also be reinforced with screws, (A, bottom out, then screw in the bottom, buckle the cover to
the bottom, B can be directly fixed on the screw back.)
7.2 Installing PIR Motion Sensor
22
Notice:
1, Before use, make sure the PIR is powered ON.
2, Installation height is about 2.2 meters above ground
3, PIR should face the detected area for best coverage.
4, PIR should face perpendicularly to the moving of people.
Installation:
1, Reinforce bracket on the wall with screws.
2, Install the connector stick into PIR.
3, Press the ball head of the sticker into bracket.
4, Adjust the installation angle.
Attention:
1. In detection coverage, no obstacle.
2. Only 1 PIR in the same detection area.
3. Not face to window, cooling or warming machines, or other appliances that cause the temperature
change sharply.
4. PIR need 5 minutes to adapt to environment before working.
5. Indoor use.
6. When intruder is detected, PIR will take seconds to confirm detection, then transmitter signal to avoid
fault alarm and missed alarm.
Part VIII. Troubleshooting
Troubleshooting
Reasons
1,No dial for alarm
1. no arming
2. alerting phone unsetted
3. parts improperly installed,
distance too far away
4. code no match
1. do arming operation
2. re-set according to the
specification
3. coordinating the location of
parts
4. re-coding
2,Can’t
operate
password input wrongly
password input or changed to
new password Or forced always
clear factory set back
3, no ISD recorded voice
prompt when alerting
ISD Voice prompt un-recorded
Record it again according to
user manual
4, remote controller no work
1. coding unmatched with the
host
2. insufficient power
3. battery pieces poor contact
or corroded
4. unmatched with host
1. re-coding
2. change battery in the same
type
3. eliminating the dirt on the
pieces caused by corrosion
4. contact the local dealer to
change the matched remote
controller
long-distance
Methods
23
5, infrared detector no work
low power
change to the same type battery
6, Infrared Beams not work
1、not power on
2、Electrically shorted
3、Beam tube dislocation
-
7, siren no sound
1. siren plug or jack in short
circuit or broken-line
2. plug line in short circuit
3. siren closed
1. repair or change plug or jack
2. change the jack line
3. set siren ringing time on the
host
8, The transmitter distance
for host is shortened
1.a nearby emitter is sending
code
2. host receiver stoppage
3.standby battery of the host
insufficient
1.find the interfering source and
eliminate it
2.post back to the factory for
amendment
3.check host power whether
plugged well
9, Consistently alarm once
power open
Telephone lines not connected
and telephone
Lines anti-tamper function
activated
connect telephone line or close
anti-tamper line function
下半部份,贴保修卡
24
Power on
Reconnect wire
Adjust beams