1
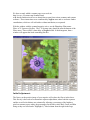
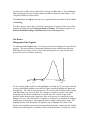
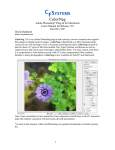
NegPos
Adobe Photoshop* Plug-In
Complete User's Manual
Release 1.23
September, 2006
David Dunthorn
www.c-f-systems.com
Fast Track
NegPos is the predecessor of our ColorNeg plug-in, so you probably are already familiar
with the concepts involved. However, getting the most from the NegPos Photoshop
plug-in - or even getting a good start with it - really does require reading the manual. If
you want to try it first: First, install the NegPos.8bf file in the Photoshop filters folder (for
more detail see Installation). Then load in a good 16-Bit/Channel RGB color or
grayscale negative that has been produced by an unaltered linear scan so that the negative
looks like a (dark) negative. Then start the C F Systems filter NegPos (for more detail
see Loading the Negative - in particular it tells how to deal with registration and the film
list file). You should see something similar to the large dialog box shown below. If the
positive image is less than perfect, first single click in a percent edit box (any one of R,
G, or B) under where it says "Gang/Highlight," at the bottom, third column from the right
in the big table. Now use the scrollbar to lighten or darken the image, not worrying about
color balance at the moment. The "thumb" button and the other scrollbar controls will all
work but changes in the image will become visible only as you release the mouse button.
When you have the image at approximately the correct lightness, if the color balance
needs to be adjusted, the easiest and often most effective method is to find a patch in the
preview image that should be gray (colorless) and click on it. "Gray" can be anywhere
from quite dark to white. If possible, click several gray patches and see what happens to
the image, choosing the best result.
NegPos has many features designed to give you a high degree of control over the
appearance and quality of your color negative images while retaining the color integrity
of the image. For instance, there are images which do not have well-defined gray patches
in them, so the Auto option and color controls, described below, take care of those and
provide for more critical color balance in general. The remainder of this manual explains
NegPos features and how to use them.
*As used in this manual, Adobe and Photoshop are registered trademarks of Adobe
Systems, Inc.
Introduction
C F Systems NegPos is a Photoshop filter plug-in that acts as a photographic negative
inverter. But Photoshop has an "Invert" (Image→Adjustments→Invert). Why is NegPos
necessary? Photoshop says of its Invert command: "Because color print film contains an
orange mask in its base, the Invert command cannot make accurate positive images from
scanned color negatives." While it is certainly true that the Invert command cannot make
accurate positive images from scanned color negatives, it is just as true that the Invert
command cannot make accurate positive images from scanned black and white negatives,
which have no orange mask - it is just less obvious that the result is wrong when only
tones of gray are skewed. The orange mask is not the problem. The orange (or blue or
whatever color) mask of a color negative is never the problem - when you read that it is,
be assured that the writer just does not understand the problem and needs a handy excuse.
Mathematically, Photoshop Invert subtracts where it should divide, and the results are
quite different. The details of the NegPos method and why it is the correct treatment for
negatives are explained in CFS-244 Negative to Positive, available on the www.c-fsystems.com web site. Most scanner software seems to use the same method that
Photoshop does, adding profiling in an effort to partially compensate for the this incorrect
treatment. We continue to believe that some scanner software uses a method similar to
NegPos – after all, the technological basis is as old as photography – but we have yet to
find a confirmed case of scanner software doing correct inversions. We believe you will
find that NegPos provides more flexibility and a more complete and accurate treatment
than you will find in most other systems.
NegPos is distributed by e-mail to current ColorNeg/ColorPos users who e-mail us their
valid registration code. The Registration code is also required to make NegPos work.
NegPos only works on PCs, not Macs.
Legal Notice
This software is provided "as is" without any warranty or condition, whether expressed,
implied or statutory. In no event will C F Systems be liable for any lost profits or other
consequential, incidental or special damages (however arising, including negligence) in
connection with the NegPos software even if C F Systems has been advised of the
possibility of such damages. In no event will C F Systems' liability in connection with
the NegPos software regardless of the form of action, exceed the purchase price of the
software, if any. C F Systems retains all right, title, and interest in and to the NegPos
software. This software and manual are Copyright © 2004-2006 by C F Systems. All
rights reserved. You may make copies of this software for personal use or for use within
your own single business location, not to exceed six (6) copies total. You are prohibited
from making copies for distribution in any other form.
Installation
We have not provided an installation program, but have taken the same approach as
Adobe has in distributing "RAW" conversion plug-in revisions. You have downloaded a
zip file which contains this PDF manual and a file NegPos.8bf. All that needs to happen
is the NegPos.8bf file needs to be put in the Photoshop filters folder. For an all-default
installation, that folder will be
C:\Program Files\Adobe\Photoshop x\Plug-Ins\Filters
where “Photoshop x” specifies the version of Photoshop. If your installation is not the
default, you probably already know how to find the corresponding filters folder on your
system. If you are unable to find the folder we suggest using the Windows “find files or
folders” to locate it. Find files or Search is on the Start menu, and a search for file names
of “*.8bf” should locate the folder. The Filters folder should have a number of other files
with 8bf extension already in it. Once the NegPos.8bf file has been placed in the folder,
Photoshop will automatically configure for NegPos the next time it is started.
NegPos will not start without a valid registration key. If you have previously installed
NegPos, the registration key will not need to be entered again. Otherwise, you will be
required to enter the registration code before the plug-in will start. When NegPos starts
for the first time, it will first display a "file open" dialog, asking for a film list file. This
dialog can be cancelled for immediate use of the plug-in. See the section later in this
manual on how to use the film list feature. Once film list file has been selected, the
initial file open dialog will not longer appear.
Loading the Negative
To use NegPos, start Photoshop and load in a scanned negative, either from a file or
directly from a scanner. The working file must be in 16-Bits/Channel RGB Linear mode
(scanners which scan at 12-Bits/Channel and produce a 16-Bits/Channel file should be
adequate). This is not a preference, but a requirement. It is not possible to accurately
invert an 8-Bits/Channel negative image, so NegPos will not allow this. (Read CFS-244
Negative to Positive or our Color Negative FAQ for a full explanation.) Of course it is
possible to convert an 8-bit per channel image to 16-bits per channel and then run
NegPos, but do not expect satisfactory results if you do. (It might be of interest to know
that Photoshop really only uses 15 of the 16 bits in any case. There seems no reasonable
excuse for this, but that is how Photoshop works.)
The negative can be scanned as a negative, but you may get more satisfactory results
scanning it as a slide. A 16-bit linear scan is required in either case. Scanning as a
negative will usually look better on the display; the scan as a slide will have the same
color cast as the negative (usually orange) and will be very dark. However, the scanner
merely does an automatic adjustment of that same dark, orange scan to produce the
better-looking result, and that automatic adjustment may make the final positive image
less accurate, especially in the shadows. You also run the chance that the scanner
software may make adjustments unwisely, and which could be impossible to correct. If
you wish, you may remove the orange (or other color) mask yourself at this point as
explained in CFS-244 Negative to Positive. It is not necessary to do so and we do not
believe it is particularly helpful or harmful. NegPos also works with 16-Bit grayscale
negatives. For grayscale images the dialog box appears the same, but the three channels
are grouped together to act as one.
We have recently added a scanner page to our web site
http://www.c-f-systems.com/Scanners.html
with detailed instruction of how to obtain linear scans from various scanners and scanner
software. These instructions were contributed by NegPos users and we welcome further
contributions, which we will add with or without attribution, as requested.
With the window with the scanned negative active, use the Photoshop Filter menu:
Filter→C F Systems→NegPos. The C F Systems entry should be near the bottom of the
Filter menu. There will be a short delay as NegPos builds 16-bit histograms, then a
window will appear that looks something like this:
Initial Adjustments
The first try at the positive image of your negative will replace the flower in the above.
This first try is the result of an automatic exposure adjustment, where both the exposure
and the overall color balance are estimated by allowing a percentage of the brightest
pixels to saturate to pure white, the percentages for the three colors Red, Green, and Blue
being as they are listed under "Highlight %," third column from the right in the large
table. Our experience has been that this “Ex by %” image often is close, especially if the
percentages are small (0.1% to 1%) and identical percentages are used for the three
colors. This first try may be too light or too dark and may have a color cast but in
established, regular usage, a well-behaved negative may not require changing any values,
or a very minor adjustment in overall lightness darkness (done with the Highlight %).
Preview Image Clicking for Color Balance
When you click a point in the preview image in NegPos, the image is adjusted to make
the clicked point gray (colorless) while keeping the image lightness approximately the
same. This is the preferred tool for setting a color balance of an image; that is, for
removing any color casts. If there is a good gray area, mid-tone, light, dark, or even
white and if the image has color integrity this is sufficient to remove any color cast from
the image.
Three things must be recognized in using this tool. First, color negatives can be quite
grainy and images of real gray objects may be uneven, so take several clicks to be certain
that the gray patch reading is stable. Second, while NegPos has a primary goal of
producing images with color integrity, there is no way to absolutely guarantee this. If
your image has different color casts in the shadows, mid-tones, and highlights it does not
have color integrity, which usually means that film is incorrectly characterized. Third,
with natural objects, what you think is gray may not quite be gray. It is always better to
try several different "gray" objects to see how the image changes.
Auto
NegPos also has an Auto feature which can be of great help in making initial
adjustments. To adjust the image using the Auto method, first single click a percent edit
box (any one of R, G, or B) under where it says "Gang/Highlight," at the bottom, third
column from the right in the big table. Use the scrollbar to lighten or darken the image
until the depth of tone is approximately correct, but ignore the color during this step. The
"thumb" button and the other scrollbar controls will all work but changes in the image
will become visible only as you release the mouse button. Alternatively, the up-arrow
and down-arrow keys can be used for fine adjustment and the page-up and page-down
keys for coarser adjustment, but you must first touch the scrollbar with the mouse before
the keys will work. When you have the image at approximately the correct lightness,
check the Auto checkbox in the upper right corner. The colors should now change as you
move the scrollbar, going through a range of more-or-less acceptable color balances for
this image. The action of the auto control can be expected to be quite different for
different images and the action of the scrollbar may be quite uneven, possibly having
little effect over a long range and then a marked effect over a shorter range. There may
be very little change over the entire range in the color balance of some images and quite a
bit of change in other images. This is normal. A good color balance will normally
appear somewhere in the scroll range. After this adjustment, click a pixel edit box (not
%) under "Gang/Highlight," at the bottom (forth column from the right in the big table) to
readjust lightness with the scrollbar slightly if necessary. The R G B C M Y checkboxes
just above the scrollbar select which of the colors the scrollbar affects. If any additional
final tweaking is necessary use these and the scrollbar to adjust the color balance. (See
Using the Scrollbar for more detail.)
The Auto feature in NegPos is the same as is explored by the lower half of the ScrollBar
in ColorNeg.
The above process works quite well for the vast majority of negatives if the correct film
gammas are being used (see Setting the Positive Gamma). For problem negatives see
General Problems Getting a Good Inversion in the ColorNeg manual.
The Basics
Histogram of the Negative
To understand what NegPos does, it is necessary to look at a histogram of a typical color
negative. The general nature of histograms should already be familiar from using the
Photoshop Levels control. Here we look at the histogram for one color, but the same
process will occur for all three primaries:
←255
0
Shadow
Tail
Shadow
Highlight Highlight
Tail
We are working with a negative, so the highlights are toward the "0" end of the scale and
we have plotted the histogram reversed left to right so that the highlights still appear on
the right side. The scale is set to run from 0 to 255 because that is familiar from working
with Photoshop, even for 16-bit files. For a negative scanned as a positive, the whole
histogram may be shoved considerably toward the zero end. If there is any of the
negative border showing in the image area, there will typically be a small peak in the
Shadow Tail area. Since the border of a negative is unexposed, it represents the brightest
possible part of the negative, representing the blackest black in the positive image. The
highlight portion of the histogram will typically stop at Highlight Tail, short of zero
because zero normally represents the maximum density that the scanner can read, and the
densest area of the negative is normally a little less black than that. In actual use, a lesser
portion of the histogram is normally taken in inverting the negative to a positive, running
from the darkest black at Shadow to the brightest white at Highlight on the diagram. But
NegPos has the ability to recover some of the detail lost in the Tails.
The Histogram Table
The dialog box has a table which shows (numerically) and controls the positions of these
four points:
If we look at the Highlight point, we find two columns. The first column says that the
point is at (Red = 75.54, Green = 76.36, Blue = 53.53). The second column is the
percentages of pixels we have lost to blocked highlights by picking that point. 0.08671%
of the red pixels are below 75.54, 0.35816% of the green pixels are below 76.36, and
0.31808% of blue pixels are below 53.53. If you edit a pixel value, say changing 75.54 to
70.0, when you finish the edit, either by tabbing or mouse-clicking another box (do not
hit Enter as you will exit the dialog!) the corresponding percentage will change
automatically. If you edit the percentage, when you finish that edit the pixel value will
change to match the changed percentage.
If the "Gang" box is checked, editing any box will change the values in all six boxes. If a
pixel value is edited, the other values will be automatically adjusted to maintain the same
pixel color, so only the overall lightness or darkness of the image is changed. If a
percentage is changed, however, the Gang box will act as a Same box for the percentages,
forcing all percentages to be the same as the one that has been changed.
Normally the scrollbar is used to adjust the values, rather than directly editing the
numbers. Simply click in one of the pixel value boxes under Highlight to set the scrollbar
to control the Highlight point and it will act to preserve color, just as editing the pixel
value directly would do. If you click in a Highlight percentage box, the scrollbar will
change each of the percentages by the same proportion. This gives a little extra
flexibility, but typically one would gang the percentages to the same value (by editing
one of them in gang mode) before using the scrollbar so they move in unison. The
scrollbar also can be used in the same manner to adjust any of the other three points,
Shadow, Highlight Tail, and Shadow Tail. Since both columns of numbers change when
the scrollbar is moved, it is hard to tell which is controlling. There is checkbox above
each percentage column. If the box is checked, the percentage values control and if
unchecked, the pixel values control. These boxes are grayed out and cannot be set
directly. Click a percentage box or pixel box to set the active column indicator and the
scrollbar.
The Shadow point is adjusted similarly to the Highlight. The pixel values of the Shadow
point are given in the first column and the percentages show the percentage of pixel
values remaining above the pixel value for R, G, and B. The values for Shadow can be
edited just like the Highlight values, but the effect on the image will not be as large.
The Shadow Tail and Highlight Tail points behave similarly for the pixel values, but the
percentages have a different meaning. Here we are trying to pick up pixels that are
beyond the Highlight and Shadow points we have set, so the percentages are the
percentage of the out-of-range pixels that still remain out of range beyond the Tails. For
instance, the above table says that 0.08671% of the red pixels are below 75.54, and that
we are leaving 10% of that 0.08671% to still remain below 63.91 pixel value of the
Highlight Tail. 10% of 0.08671% is 0.008671%, a very small amount. Both the Tails are
normally set by entering a percentage while in gang mode - or by leaving the default 5% although the values may be edited or scrollbar adjusted just like the Highlight and
Shadow points.
It might appear logical to set the Highlight Tail point to 0 and the Shadow Tail point to
255, but final results will suffer if these points are not set to where the histogram data
actually stops for practical purposes. In our example the negative already had been
adjusted to remove the orange mask, so the Shadow Tail really is not far from 255, but
the Highlight Tail clearly is not 0. It is nearly always a mistake to set (or end up with)
tails percentages so low that the tails pixel values are essentially zero or 255. This
normally means that there will be a long tail with values which very few or even none of
the pixels in the image have. The symptoms of such incorrect settings are either that the
brightest highlights go gray if all three colors are affected or that they become speckled if
only one or two of R, G, and B are affected. Shadows symptoms are similar but less
obvious.
Using the S-Curve Feature
In an effort to better handle negatives, NegPos can simulate the S-curve behavior of real
silver-based print materials, so that instead of being driven to the full white patches so
commonly seen in digital imaging, very bright areas are gradually curved into being full
white, retaining most of the highlight detail. In NegPos, this is done in a way that does
not produce color shifts. The same technique can be applied to shadows that would be
driven into full black patches. The applied S-Curve will extend from full white at
Highlight Tail to full black at Shadow Tail.
The S-Curve sub-box allows selection of whether the S-Curve is to be applied to
Highlights and Shadows, and the Tail Start sub-box defines where the curve is to start,
with reference to the final positive image (gamma-c adjusted; the image you see on your
computer display). Find a setting that suits your work, but we suggest starting with either
0.90 - 0.10 or 0.95 - 0.05.
Using the Scrollbar
The scrollbar tool can be used with Highlight, Shadow, Highlight Tail, Shadow Tail, and
Gamma. Set the scrollbar to one of those by simply clicking the edit box under Gamma
or either the pixel edit box or the percentage edit box under the others.
The scrollbar will directly control the selected column, but other values will also change
in accord with the selected column. Selecting and changing the percentage column will
also change the corresponding Pixel values, but the percentages will control. Dragging
the thumb button will change the values in the edit boxes. Clicking or clicking and
holding in the area above or below the thumb button will change the numbers
incrementally, and clicking or clicking and holding the arrow buttons will also change the
numbers incrementally, but by a smaller amount. With any of these methods, the
changes will become visible in the image as well. For fine adjustment, the up-arrow and
down-arrow keys also may be used and the page-up and page-down keys will give a more
coarse adjustment. Please note that the scrollbar must be active for the keyboard controls
to have any affect. The easiest way to assure this is to mouse-click the scrollbar thumb
button before starting to use the keys.
The action of the scrollbar is controlled by the RGBCMY checkboxes above it. It will
alter only the selected color. Please note that this means the Gang and Same checkboxes
have no effect on the scrollbar action. Using the scrollbar set to the Highlight pixel
boxes is the primary way for adjusting overall image brightness and with the individual
colors, for adjusting overall color balance. Its action is exactly the same as color
compensation filters in darkroom photography. Direct selection of Cyan, Magenta, and
Yellow as well as Red, Green, and Blue is provided for the adjustment scrollbar, and only
one box can be checked at a time. Cyan adjusts Blue and Green simultaneously by the
same amount, Magenta adjusts Blue and Red, and Yellow adjusts Red and Green. For
fine adjustment, the up-arrow and down-arrow keys also may be used and the page-up
and page-down keys will give a more coarse adjustment. Please note that the scrollbar
must be active for the keyboard controls to have any affect. The easiest way to assure
this is to mouse-click the scrollbar thumb button before starting to use the keys.
Most adjustments will be done using the scrollbar and it cannot be overemphasized that
the Highlight adjustment is the most important. With the color channels ganged together,
if you click in one of the Highlight pixel value boxes first, the scrollbar serves exactly the
same function as setting the f-stop and exposure time in an enlarger (or the f-stop and
shutter speed on a camera) - color will be unaltered and only the lightness/darkness will
be changed. When single color scrollbar controls are selected, the Highlight adjustment
is exactly the same as adjusting color compensation filters on an enlarger or camera. To
maintain color integrity, all adjustment of overall image density and color balance should
be done with the Highlight control if at all possible. There may not be one specific
highlight adjustment that applies to all areas of an image. If there are important, detailed
areas that are darker, lighter, or differently lighted than most of the image it may be best
to use the Selection feature or to invert the negative more than once, adjusting the
Highlight control for the different areas, and combine the multiple inversions in
Photoshop.
Active Column Indicators
The "ganged" action of the scrollbar depends upon whether a percentage column or a
pixel column was selected to initialize it. (Percentage means the ratio of clipping
percentages will be maintained - adjusting the color balance - and pixel means the gamma
adjusted ratio of pixel values will be maintained, thus keeping the same color balance.)
Since both columns of numbers change when the scrollbar is moved, it is hard to tell
which is controlling. There is checkbox above each percentage column. If the box is
checked, the percentage values control and if unchecked, the pixel values control. These
boxes are grayed out and cannot be set directly. Click a percentage box or pixel box to
set the active column indicator and the scrollbar.
While the Auto checkbox is checked, the scrollbar is in a special "Auto" mode and
highlight pixel values and percentages are changed in accord with that mode. As soon as
the Auto check mark disappears the scrollbar reverts to the mode described above.
Initial Adjustments
The scrollbar can also be used in a different mode to aid in making make initial
adjustments of color and lightness/darkness. Set the Gang checkbox above Highlight,
then set the Highlight % to 0.5 or 1.0 and tab. This will set all the Highlight percents to
the same value and will also set the scrollbar to control the Highlight %. Scrolling
through percentages in the range of 0.01 to perhaps 5 will in most cases should produce a
result that is acceptable or nearly so (particularly if the gammas have been set properly,
see below). The same method can be used for the Shadow. In each case remember that
you are clipping off and assigning to blocked white or black the percentage of pixels
shown in the Highlight and Shadow percentages. Using the S-Curve compensates for this
loss, but still the highlight and shadow percentages normally should be kept low.
Although the above remains a valid method, we now recommend using the gray clicking
or the Auto feature for making the adjustments to highlights (which is the color balance).
Adjusting the shadow, which is more rarely needed, is still done as above.
Setting the Positive Gamma
NegPos has a film list feature which can be used to store and recover gamma information
once it has been obtained. See below for a description of film lists.
Gamma adjustment is an important part of negative inversion and use of the correct
gamma is necessary to maintain color integrity. It is important to understand that this
gamma is not a general image adjustment tool. A specific type of film that receives
consistent processing has a specific characteristic gamma as a property of the film. When
you start to use the correct gamma for the film type you are inverting the difference in
color fidelity will be remarkable. For each type of film, the matching complimentary
gamma should be used to invert the negative. If possible, it is best to determine the
matching complimentary gamma using a negative of a step grayscale gradient for which a
known good digital image is available for similar lighting.
Film Description
Kodak* Gold GA 100
Kodak* Gold GB 200
Kodak* MAX GC 400
Kodak* Royal Gold 100
Kodak* Portra 160NC
Kodak* Portra 160VC
Kodak* Portra 400NC
Kodak* Portra 400VC
Kodak* Portra 800
Kodak* Portra 800 Push 1
Kodak* Portra 800 Push 2
Kodak* Supra 100
Kodak* Supra 400
Kodak* Supra 800
Kodak* Supra 800 Push 1
Kodak* Supra 800 Push 2
Kodacolor* II
R
1.763
1.761
1.760
1.774
1.866
1.722
1.881
1.731
1.732
1.483
1.288
1.757
1.651
1.766
1.482
1.299
1.719
G
1.677
1.660
1.719
1.687
1.818
1.644
1.799
1.650
1.766
1.458
1.282
1.719
1.618
1.687
1.425
1.261
1.586
B
1.420
1.439
1.575
1.471
1.618
1.496
1.647
1.492
1.500
1.352
1.191
1.476
1.484
1.516
1.337
1.233
1.470
Table I
Red, Green, and Blue Positive Gammas
Measured from Kodak Characteristic Curves for Several Negative Films
Above is a table of gammas measured directly from Kodak data sheets using the method
described at the end of this manual. Characteristic curves for most films are available on
the web and the calculation is not a difficult one.
Although using these gammas will certainly get you closer to a good negative inversion
than you are likely to get elsewhere, it has been our experience that even better results
may be had by measuring your own gammas for the film that you shoot, processed the
way your film is processed and scanned the way you scan film. These measured gammas
can differ significantly from the manufacturer's data that has been taken under ideal
conditions and with a different purpose in mind. We have worked out an elegant, simple
method for doing this, “Dunthorn Calibration” which you will find on our web site at
http://www.c-f-systems.com/DunthornCalibration.html. Both ColorNeg and NegPos
have built-in capability of determining the positive gammas from a negative containing a
Dunthorn grayscale, or a negative containing any grayscale for which the tonal values are
either known or unknown, or even some negatives of normal scenes. The gammas
determined in this way may be used for other negatives of the same film type. The
Calibration feature in NegPos is identical to the same feature in ColorNeg and there is a
complete description of how to use it in the ColorNeg manual.
The following table shows some gammas we have measured for our own negatives.
Since these values reflect the peculiarities of our own processing and scanning they may
or may not work for you, but it will give an idea of the difference we observe from
manufacturer's data and also the variations we see in our own film.
Film Description
Kodak 120 Portra VC
Kodak 120 Portra VC
Kodak 120 Portra VC
Kodak 120 Portra VC
Kodak 120 Portra NC
Kodak 120 Portra NC
Kodak 35mm Gold 100
Kodak 35mm Gold 100
Kodak 35mm Gold 100
Kodacolor II (1980)
Old Kodak Film (1971)
R
1.7
2.6
2.5
2.4
1.9
2.5
1.8
2.5
2.0
1.1
1.8
G
1.65
1.6
1.5
1.6
1.8
1.5
1.7
1.65
1.3
1.5
1.8
B
1.5
1.5
2.0
1.8
1.6
1.5
1.44
1.8
1.45
2.0
3.6
Source
Kodak Data
Dunthorn
Dunthorn Approx
Dunthorn Approx
Kodak Data
Dunthorn Approx
Kodak data
Dunthorn
Dunthorn + 1 stop
Dunthorn Approx
Dunthorn
Table II
Red, Green, and Blue Positive Gammas
for Several Kodak Negative Films
ColorNeg has built-in characterization for many film types, based on manufacturer's
data. However, any effort you put into actually measuring or estimating the matching
gamma for the films and processing you use most often will put you well ahead.
Blackpoint Adjustment
The need for blackpoint adjustment arises from imperfections and non-ideal behavior of
photographic materials and equipment. As such, a blackpoint setting is normally
required, but the "correct" setting for blackpoint is not easily defined. The choice of
blackpoint will affect both overall saturation and color integrity. NegPos is designed to
minimize the effect of blackpoint selection on color integrity, insofar as possible limiting
its effects to the darkest shadows.
NegPos allows three possible selections for the blackpoint adjustment. No adjustment,
Minimum adjustment, where the Highlight adjustment is allowed to set the entire
lightness/darkness curve and the blackpoint is set in agreement with that curve, or Tail
adjustment, where the Shadow point is used to set the blackpoint. We do not believe that
"No Adjustment" is ever appropriate, as it requires that the photographic materials and
equipment be ideal, which they are not. The choice between Minimum and Tail
adjustments is more nebulous. While the Minimum adjustment is attractive from a
technical standpoint, it suffers from assuming the photographic media is well-described
by extrapolating the same (log) linear slope at both the light and dark ends, which is often
only marginally true. If the Shadow point is set with care, either the Minimum or the Tail
settings should maintain color integrity reasonably well, with the main difference being
in saturation.
Exposure By Percent
As explained briefly above, when started, NegPos can use previously set Highlight %
values (and the other % values) to make an estimate of both the Highlight point
lightness/darkness setting and the overall color balance. It will do this if the Ex by % box
is checked the last time NegPos was exited with OK. The % values which are saved and
which will be used for Ex by % when the next image is first treated will be the last %
values that are typed into a % edit box while "Gang" is checked for that box. This means
that the saved % values for R, G, and B will all be the same which is normally what is
wanted for Ex by %. So, in order to change the effective values for Ex by % for later
images, you will need to manually enter the desired % value into a % edit box while the
appropriate Gang box is checked.
If the box is not checked, then NegPos will use the previous pixel settings rather than
percentages to evaluate the next image. This may be useful if a series of very similar
images is being processed. In general we recommend that the Ex by % box be checked.
Registration
A registration key will be required to make NegPos function. Copy the key using
control-C or Edit→Copy. If the Registration box does not come up automatically, press
the Register button and a transparent dialog box will appear:
Paste the registration key into its box and click OK. Then click either OK or Cancel on
the NegPos filter box and the registration will be complete.
Film Select Feature
NegPos features a film select pull-down that allows easy saving and setting of gamma
values for different film types:
The data for the film type pull-down is kept in a text file with a *.negpos extension. This
file may be located anywhere the user wishes, and there may be more than one such file.
A file Kodak Data.negpos is supplied that contains film types and corresponding gamma
values as derived from Kodak data sheets. The file is a standard tab-delimited text file
and may be altered and edited using any text editor capable of saving the file in pure text
format. For example, the first two lines in Kodak Data.negpos are:
1.765
1.761
1.677
1.660
1.420
1.439
Kodak* Gold GA 100
Kodak* Gold GB 200
Which are the red, green, and blue gammas followed by the name that is to appear in the
pull-down. The items are separated by tabs. It is possible to produce your own *.negpos
data files for other films using manufacturer's data that is often readily available on the
web. There is a description of how this is done in the ColorNeg manual.
Although we provide Kodak Data.negpos as an example of data derived in this manner,
and manufacturer's data is certainly not a bad starting point, our experience is that
calibration in either ColorNeg or NegPos, as described in the ColorNeg manual, will
work better.
When the pull-down is activated and a film name selected:
the gammas from that film type replace the gamma values in NegPos.
The Add/Chg button is used to add or change values in the film list. When this button is
pressed, the current NegPos gamma values will be entered into the film list, replacing the
current values if the film name is already on the list or making a new entry if the name is
a new one. To create a new entry, simply edit the film name in the pull-down edit box,
insure that the correct gamma values are in place and then press Add/Chg. Similarly, the
Delete button will delete the named entry from the film list (if the name exists on the list).
Both Add/Chg and Delete affect only the list currently in use by NegPos. This list will be
lost when NegPos is exited. Changes do not become permanent until the Save button is
pressed. The Save button brings up a standard file save dialog allowing the user to pick
the name and location of the *.negpos file to be saved and will save the entire file list
under the chosen name. Similarly, the Load button brings up a file open dialog allowing
the user to select a *.negpos file from any location. The name of the currently active
*.negpos file (or as much of the name as will fit) is shown at the upper right of the
NegPos dialog, under the registration as shown just below:
Message Box
There is a pair of message boxes under the normal dialog box OK and Cancel controls.
These show the registration state of NegPos and also the name of the film list file, if there
is one specified.
Calibration
The Calibration feature in NegPos is identical to the same feature in ColorNeg and there
is a complete description of how to use it in the ColorNeg manual.
Feathered Selections
NegPos allows the use of feathered selections. Negative film has a very wide exposure
latitude and often contains more highlight detail and more shadow detail than can be
accurately produced in a positive image. Feathered selections can often be used to bring
out this detail in a way that is not foreign to the eye. To use this feature select an area or
areas that are brightly lighted, as when sunlight falls directly on part of a scene while the
remainder is in shadow. Feather the selection suitably for a smooth transition - choosing
the right amount of feathering varies with every image and comes with experience. Then
in NegPos work on the entire image using Auto, etc. until the most prominent part of the
image looks good. Then click either In or Out:
to work on the area in the selection or outside the selection. Start with whichever part
you paid least attention to as you worked on the entire image. When you have that part
adjusted to your liking, adjust the other part so that the balance between In and Out is
smooth. It may take going back and forth a few times. When viewing a real scene, the
eye naturally accommodates as you gaze at bright and dark areas and the brain blends it,
so the result of working on selections like this can be quite natural. You may find that
Auto is less useful in working with selections, so be sure to get what you can from it
before starting on the selections.
NOTE: Once you start to use selections, there is no going back. You will no longer be
able to work on the entire image without restarting NegPos. Undo will not go back past
the start of using selections, either. Additionally, calibration uses selections in an entirely
different way. Any time you call up NegPos with an image that has selections you can
try to run a calibration or work with selections as explained above, but you will not be
able to do both.
How to Make Selections on a Negative
The above sounds all well and good, but how do you make meaningful selections
working with a dark negative that is hard to read in the first place? It is a lot easier and
more accurate to first use NegPos to create a preliminary positive and make the selections
using the positive image. If you are working with Photoshop 7 or earlier, you may even
want to convert the positive to 8-Bit/Channel first so that the magic wand and other aids
are available in making the selection. Once you have accurately made the selection, save
the selection in a new file: Select→Save Selection. Make sure the Document: pulldown
says New and give the selection a Name: - anything convenient. When you OK this will
save the selection in a separate image, typically Untitled-1. Now you can revert if you
haven't overrun the History list, or reload the original negative image and Select→Load
Selection to put the selection over the negative.
Miscellaneous Controls
There are two miscellaneous items. Scans of negatives can have light leaks around the
edges, and such light leaks can seriously distort the histogram table percentage entries,
making the percentages of bright pixels of any color artificially high. For this reason,
NegPos normally ignores a 10% border around the edges of the negative when producing
the histograms. In cases where this is undesirable, check Edges in Histogram and the
edges will be included.
The Gamma C value is the normal system gamma in which gamma adjusted images are
stored for your system. It is normally 2.2 for PC systems and 1.8 for Macintosh (which
we currently cannot serve). Unless you specifically know that your system gamma is
other than 2.2, leave this value alone. It is not intended for individual image adjustment
purposes.
Undo
NegPos has an undo capability.
Revert will take you back to the initial entry state. Back and Ahead will cycle you
through a loop of the last twenty or so saved states. Particularly when using the scrollbar
controls the concept of saved states becomes blurred. Try the control for a better
understanding of "saved states."