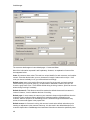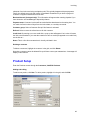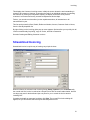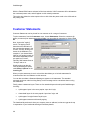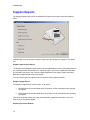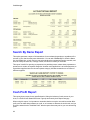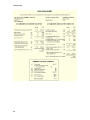
1
CashManager
Table Of Contents
Introduction ...................................................................................................................................... 1
CashManager............................................................................................................................... 1
CashManager Versions ............................................................................................................... 1
Evaluating CashManager............................................................................................................. 4
GST / VAT in CashManager ........................................................................................................ 5
Setting Up ........................................................................................................................................ 7
Installation .................................................................................................................................... 7
Registration .................................................................................................................................. 7
Networks ...................................................................................................................................... 8
Company Selection...................................................................................................................... 8
Adding a new company................................................................................................................ 9
Deleting Companies..................................................................................................................... 9
New Company Wizard ............................................................................................................... 10
Chart of Accounts Setup ............................................................................................................ 11
Chart of Accounts Add and Edit................................................................................................. 12
Chart of Accounts Deletion ........................................................................................................ 12
Bank Account Setup .................................................................................................................. 13
Multiple Bank Accounts.............................................................................................................. 15
Names Setup ............................................................................................................................. 16
Invoicing Layouts ....................................................................................................................... 16
Opening Balances...................................................................................................................... 18
Passwords.................................................................................................................................. 19
Report Categories...................................................................................................................... 20
System Setup............................................................................................................................. 20
Setup - Cashbook Column Headings ........................................................................................ 21
Setup - Cheque Printing............................................................................................................. 21
Email Setup................................................................................................................................ 22
Setup - Features ........................................................................................................................ 22
Setup - GST / VAT ..................................................................................................................... 24
Setup - Invoicing ........................................................................................................................ 25
iii
CashManager
Setup - Other.............................................................................................................................. 28
System Preferences................................................................................................................... 29
CashManager Plus Options ....................................................................................................... 30
Club Membership Tracking ........................................................................................................ 31
Uninstalling CashManager......................................................................................................... 32
Transaction Entry........................................................................................................................... 33
Bank Account Transactions ....................................................................................................... 33
Transaction Entry....................................................................................................................... 33
Data Entry Tips .......................................................................................................................... 35
Cheque Printing ......................................................................................................................... 36
Deposit Slip ................................................................................................................................ 37
Chart of Accounts Easysearch................................................................................................... 37
Easysearch with names and details .......................................................................................... 38
EFT Payments ........................................................................................................................... 39
Importing Transactions .............................................................................................................. 39
Interbank Transfers.................................................................................................................... 39
Move, Find and Copy Transactions ........................................................................................... 40
Recurring Transactions.............................................................................................................. 41
Processing Recurring Transactions ........................................................................................... 42
Budgets ...................................................................................................................................... 42
Transaction Browse-and-Edit..................................................................................................... 44
Invoice Logs ............................................................................................................................... 45
Receipt Printing.......................................................................................................................... 45
Using Invoice Logs..................................................................................................................... 45
Journal Entries ........................................................................................................................... 46
Invoicing......................................................................................................................................... 47
Customer Setup ......................................................................................................................... 47
Product Setup ............................................................................................................................ 49
Customer Invoicing .................................................................................................................... 50
Streamlined Invoicing................................................................................................................. 51
Creating and Editing Customer Invoices ................................................................................... 52
Customer Adjustments............................................................................................................... 55
iv
Table Of Contents
Customer Quotes....................................................................................................................... 56
Printing Customer Invoices ........................................................................................................ 56
Invoice Messages ...................................................................................................................... 57
Recurring Invoices ..................................................................................................................... 57
Supplier Setup ........................................................................................................................... 58
Supplier Invoicing....................................................................................................................... 59
Creating and editing Supplier Invoices ...................................................................................... 60
Paying and Receipting Invoices................................................................................................. 62
Paying Supplier Invoices............................................................................................................ 63
Matching Invoicing Transactions................................................................................................ 65
Invoicing Easysearch ................................................................................................................. 66
Parent-Child Customers............................................................................................................. 67
Customer Statements ................................................................................................................ 68
Customer Reports...................................................................................................................... 69
Supplier Reports ........................................................................................................................ 72
Bulk Emailing ............................................................................................................................. 73
Price Update .............................................................................................................................. 74
Stock Received .......................................................................................................................... 75
Merge Customers and Products ................................................................................................ 76
Purging Old Invoicing Transactions ........................................................................................... 76
Contact Management................................................................................................................. 77
Customer and Supplier Import/Export ....................................................................................... 79
Bank Reconciliation ....................................................................................................................... 81
Bank Reconciliation ................................................................................................................... 81
Bank Reconciliation Wizard ....................................................................................................... 81
Bank Reconciliation Out of Balance .......................................................................................... 83
Bank Statement Import .............................................................................................................. 83
Bank Statement Import Wizard Steps........................................................................................ 84
Reports .......................................................................................................................................... 89
Reports and Graphs................................................................................................................... 89
Summary Cashbook Report....................................................................................................... 90
Detailed Cashbook Report......................................................................................................... 91
v
CashManager
Account Details Report .............................................................................................................. 91
Search By Name Report ............................................................................................................ 92
Cash Profit Report ..................................................................................................................... 92
Invoice Log Report..................................................................................................................... 93
GST Return / BAS Worksheet / VAT Worksheet ....................................................................... 94
GST Audit Trail........................................................................................................................... 97
Cash-based GST in general ledger system............................................................................... 98
Non-Payments-Based GST Return ........................................................................................... 98
Monthly Analysis Report ............................................................................................................ 99
Budget Report ............................................................................................................................ 99
Budget Actual Comparison Report ............................................................................................ 99
Actual Last Year Comparison Report ........................................................................................ 99
Cashflow Forecast Report ....................................................................................................... 100
External Report Writer ............................................................................................................. 100
Financial Statements Generator .............................................................................................. 100
Report Preview Window........................................................................................................... 101
Chart of Accounts List.............................................................................................................. 102
Bank Accounts List .................................................................................................................. 102
Transaction List........................................................................................................................ 102
Reports for your Accountant .................................................................................................... 102
Account Totals Export.............................................................................................................. 103
Bank Balance Graphs .............................................................................................................. 103
Category Graphs...................................................................................................................... 104
Account Graphs ....................................................................................................................... 105
Pie Charts ................................................................................................................................ 107
Other Functions ........................................................................................................................... 111
Creating Accountant's Export File............................................................................................ 111
Transferring data to your accountant....................................................................................... 112
CashManager Transfer Files ................................................................................................... 112
Converting from CashManager for DOS.................................................................................. 113
End of Year .............................................................................................................................. 114
Links to other Accomplish packages ....................................................................................... 115
vi
Table Of Contents
Backing Up............................................................................................................................... 115
Restoring from a Backup ......................................................................................................... 117
Dashboard................................................................................................................................ 117
Data File Validation.................................................................................................................. 118
Appendix...................................................................................................................................... 119
You and your accountant ......................................................................................................... 119
Accomplish Contact Details ..................................................................................................... 119
vii
Introduction
CashManager
CashManager is an extremely simple to use small business cashbook and accounting package
designed for the Windows environment. It has been designed with the needs of small business
owners and their accountants in mind.
With CashManager, all you need to do is enter your bank account transactions, allocating each to
a category from your chart of accounts. Then, using the Bank Reconciliation Wizard, you can
quickly and easily reconcile your bank statement. CashManager also allows you to import your
bank statement directly from a file downloaded from your bank’s Internet banking web site, or
obtained from the bank’s dial-up software.
CashManager also helps you keep track of unpaid customer and supplier invoices, by utilising
either Invoice Logs or full customer or supplier ledgers.
Budgeting is a very important part of managing a small business these days, and the Budget
Setting and Monitoring feature is ideal for this. You can set a budget for each month for every
category in your chart of accounts, and CashManager will merge this information into your actual
data, letting you compare actual against budget, both graphically and numerically, and also
project forward to the end of the financial year. Budgeting is not available in CashManager Lite.
CashManager works on any PC running Windows 98 or later, though Windows XP is
recommended. Forms have been designed for minimum screen resolution of 600 x 800.
CashManager Versions
CashManager comes in four versions, Lite, Standard and Plus and Home. The chart below
illustrates the key differences. Users can upgrade to a higher level simply by purchasing the
upgrade, and obtaining a new registration code.
In brief, CashManager Lite is suitable as a bookkeeping package for users to keep track of their
bank balance and to present meaningful summary and detailed data to the accountant.
CashManager Standard adds some powerful management tools to the system. CashManager
Plus (favoured by accountants for in-house use) provides some powerful options as well as
allows the basic cashbook to be converted into a full general ledger system.
Customer and Supplier Invoicing can be added to any level except CashManager Home.
CashManager allows 3 separate companies to be set up, and an unlimited number of prior year
files for those companies. Additional company licences can be purchased (excluding
CashManager Home).
(The UK version does not yet include EFT payments, bank statement import or accountant's
export.)
Simple intuitive
transaction entry
CashManager
Lite
CashManager
Standard
CashManager
Plus
CashManager
Home
x
x
x
x
1
CashManager
with search-asyou-type and
Easysearch
lookup
Bank
reconciliation –
classic
x
x
x
x
Bank
reconciliation –
import bank
statements from
bank web sites
2
x
x
x
Unlimited number
of bank accounts
x
x
x
x
Fully compliant
with Australian
and New Zealand
GST
x
x
x
Prints Australian,
New Zealand and
UK GST/VAT
Returns
x
x
x
Direct credits (i.e.
EFT payments)
2
x
x
Cheque printing
x
x
x
Recurring
payments (e.g.
loan, lease
payments)
x
x
x
Quantities
tracking (useful
for primary
producers)
x
x
x
Deposit slip
printing
x
x
x
x
Range of userfriendly reports
and graphs
including
Summary
Cashbook, MultiColumn
Cashbook,
Account Details
x
x
x
x
2
x
Introduction
Report, Name
Search Report,
Cash Trial
Balance and
more
Optional 3-level
password
protection
x
x
x
x
Data transfer to
accountants'
software
including Solution
6, MYOB
Accountants
Office, Global,
APS,
Handiledger,
Teletax and
others
2
x
x
Easy two-way
transfer of data
files between
user and
accountant
2
x
x
Contact
management
1
x
x
Invoice logs (for
simplified
customer/supplier
account
management)
1
x
x
Budget setting
and comparison
x
x
x
Monthly Cashflow
Analysis, Budget
Comparison and
Cashflow
Forecast Reports
x
x
x
Sub accounts for
departmental
reporting
x
x
Trust account
option for
solicitors, real
estate agents etc
x
x
3
CashManager
Financial
Statements
generator built in
x
Transaction
browse-and-edit,
ideal for
accountants to
review and edit
client’s account
code allocations
x
Full general
ledger system
x
Multi-business
option available
x
x
x
Optional full
customer and
supplier system,
complete with
customer invoice
and statement
printing, and
supplier cheque
printing and EFT
payments
x
x
x
1
Feature available in CashManager Lite if Invoicing module purchased separately
2
Feature not available in UK version
Evaluating CashManager
CashManager is available on different levels. See CashManager Registration for more details.
CashManager comes with different types of demonstration data, and you choose the type of
business that best represents your business.
When running CashManager in evaluation mode, you can enter up to 200 transactions in the
cashbook side, and up to 50 transactions in the Invoicing side. If you want to reset the evaluation
data, simply click File | Reset Evaluation, and you will be taken to a screen when you can
change the level you are evaluating, and re-select the sort of business that the demo data
portrays. This will also revert the data to the evaluation data as shipped.
You can also load evaluation data from a Transfer File by selecting File | Load Evaluation Data.
When you have purchased CashManager, simply click File | Register or Upgrade, and enter the
Licence Number and Registration Code supplied by Accomplish.
4
Introduction
Reviewing additional CashManager features
Even though you have a fully licensed version of CashManager, you can still review features that
aren't contained in your version. For example, users of CashManager Lite can review the
CashManager Standard features by loading the Tutorial Company, and if necessary, reset the
evaluation data to the appropriate level.
You can load the Tutorial company by selecting the Companies toolbar button, and choosing the
Tutorial company.
To return to your live data files, select the Companies toolbar button, and choose your live
company.
GST / VAT in CashManager
CashManager offers full GST/VAT reporting suitable for users operating under Australian, New
Zealand and United Kingdom GST / VAT regimes.
Note that in this documentation, the terms GST and VAT are used interchangeably.
A GST component is attached to every transaction entered into CashManager. Detailed reports
that show individual transaction amounts also show that GST component separately, and
summary reports accumulate the GST component of each transaction and present it as one
amount.
GST on transactions is linked to the chart of accounts. Every account in the chart has a GST
category: (Income, Expense, Zero-rated or Exempt in New Zealand; the various G-code BAS
classifications in Australia; and Income / Expense for 5% and 17.5% plus Exempt categories in
the UK version).
Whenever a transaction is allocated to an account, a GST amount is automatically calculated,
based on the GST rate set up under the Chart of Accounts This amount can be overridden at the
time of data entry if necessary.
For Australian users, CashManager prints a BAS Worksheet which shows all the necessary GST
information required by the Business Activity Statement.
For New Zealand users, CashManager prints a New Zealand GST Return, suitable for lodgement
with the IRD.
For UK users, CashManager produces a pro forma VAT Return details from which can be copied
to the VAT Return supplied by HM Customs and Excise.
The GST option has been disabled in CashManager Home.
5
Setting Up
Installation
The procedure for installing CashManager is described in the Quick Start Guide. The information
offered here is supplementary to that.
This section describes the technical aspects of a CashManager installation. It is not necessary for
users to read or understand it.
As with all software installations, network users should be logged on as a user with full rights
when installing CashManager. Typically, the Administrator logon will have full rights. Of course,
once CashManager has been installed, users can log back on with their normal login, and
operate CashManager normally.
A standard CashManager installation creates a program folder (decided by the user during
installation, with a default of C:\CashWin) into which program and related files are installed.
Company data folders are established within the program folder, and data files for each company
are stored in separate folders. Users can choose codes for companies, and these codes become
the folder names. Company codes can contain upper and lower case characters as well as
spaces.
CashManager uses the Borland Database Engine (the BDE). The BDE is a shared component
that may be utilised by other software packages. The installation program will search for an
existing copy of the BDE, and if one is located, it will suggest that the user bypass this aspect of
the installation. If there is no reference to the BDE, the installation will ask the user where it is to
be installed and create a folder accordingly. The default folder in such cases is C:\Program
files\Borland\Common Files\BDE.
Installation of CashManager will not place any files into your Windows directory, except for
temporary back-up files during installation of program updates. These are placed in a sub-folder
called \CMWBack under your C:\Windows\Temp folder. This directory can be deleted once you
are happy that the upgrade was successful.
Installation of CashManager and the BDE will create all necessary entries in your Windows
registry.
Registration
CashManager comes in various levels •
Home
•
Lite, Standard and Plus
•
Customer and Supplier Invoicing Add-on
New users of CashManager, except for CashManager Home, will be issued with a Licence
Number and a separate Registration Code, which sets the level of CashManager. CashManager
Home is a free program, and doesn't require a Licence Number or Registration Code.
With the exception of CashManager Home users, when running CashManager for the first time,
CashManager will ask for your Licence Number and Registration Code. Until these numbers are
7
CashManager
entered, CashManager will operate in evaluation mode, which limits the number of transactions
you can enter to 200 bank transactions and 50 invoicing transactions.
If you are operating CashManager on a network, the Licence Number needs to be entered only
once. However, the Registration Code is specific to the workstation, and will need to be entered
the first time each workstation launches CashManager.
Consequently, if you launch CashManager from a different workstation on your network,
CashManager will know the licence number, but will ask you for the Registration Code.
If you need to change your level, or add CashManager’s Invoicing module, you will simply be
issued a new Registration Code. Enter this code as prompted under Help | Register or Upgrade
and the new features will appear.
CashManager 2009 also offers the concept of software rental, allowing users to use the full
program on a fixed time basis. Contact Accomplish for more details.
Networks
CashManager is fully network aware, and can be operated by several users simultaneously, with
the limitation that only one user can be operating on each company at one time.
If you only intend that one user operate the program from one workstation, installation is carried
out in the normal way, and no special setting up is required. The program can be installed on a
local drive or network drive.
If however, you want to be able to access CashManager from different workstations, or want to
have more than one user operating it at one time, some additional setting up steps are required.
The Borland Database Engine
CashManager for Windows uses the Borland Database Engine (the BDE) which is a database
utility that other software packages may also use. The BDE must be configured for your network.
Install CashManager for Windows in the usual way but ensure that you nominate the network
drive for CashManager. The BDE should be installed locally (ie on the workstation C drive) in
C:\Program files\Borland\Common files\BDE.
Having installed CashManager once, you now have to install the BDE onto each workstation by
running the “Workstation Setup” option during the installation. This will ask you for the location of
CashManager in order to create a shortcut on the workstation desktop.
You will need to run this program once on each workstation from which you want to operate
CashManager.
CashManager’s Licence Number needs to be entered only once. However, the Registration
Code, that determines the “level” of CashManager you are using, is specific to each workstation,
and will need to be entered the first time each workstation launches CashManager.
Consequently, when you launch CashManager from a each workstation for the first time,
CashManager will ask you for the Registration Code.
Company Selection
8
Setting Up
You can have up to 3 companies in CashManager. However, this can be increased to an
unlimited number by purchasing additional company licences. Prior year files (i.e. files that have
been through the end-of-year process) do not count as companies for this purpose.
When you open CashManager, the last accessed company will be loaded, and up to nine most
recently accessed companies will appear at the foot of the File menu. All companies can be
accessed from the Company Selection window, accessed with the Companies toolbar button, or
from the File | Open Company menu option. Once the Company Selection window is open,
either double click on the required company, or scroll through the list of companies and click
Open when the required company is highlighted.
Each company has a unique company code. This code is actually a sub-directory or folder under
your CashManager program folder. The company code can be up to 55 characters in length, and
may consist of upper and lower case characters and spaces.
Apart from the company code and name, the Company Selection form also shows the year end,
GST / VAT close-off date and the Accountants close-off date. If the company is currently open,
the network name of the user (if any) is also displayed.
If your company menu becomes out of date (usually because files have been added or removed
using Windows Explorer) click the Rebuild button. This will force CashManager to examine every
company file and update its master index.
There is also a Print List button. This prints a full list of all CashManager companies, showing
name and current year end, along with GST / VAT and Accountants close-off dates.
If you have data files covering different financial years, you can elect to show one particular year
by clicking the Filter checkbox at the top of the screen, and choosing the desired year. You can
also choose to suppress from the list any files that have been through the end of year process.
Users can elect to have CashManager start with all companies closed, and with the Company
Selection window open, by choosing this option under Setup | Options, under the Preferences
tab. This may suit bureaus and accounting firms with many client files.
The Company Names form can be resized in the normal way, and its last size and position will be
remembered for next time you load this form – ideal for users with many companies and high
resolution screens. Also, the last chosen sort order (i.e. name or code) will hold between
sessions.
See also Adding a new company and Deleting a company.
Adding a new company
New companies are created by clicking the New button on the Company Selection form, or by
selecting the File | New Company menu option. This launches the New Company Wizard.
Deleting Companies
To delete a company, simply highlight the company on the Company Selection window and click
Delete. After confirmation that you want to delete that company, it will be completely removed
from your system.
Deleting a company places the company folder and related files in the Windows Recycle Bin, and
if you need to resurrect a deleted company, it can be done in the same way as resurrecting other
9
CashManager
files from the Recycle Bin. However, once restored under your CashManager program folder, you
will need to click Rebuild in the Company Selection window to have that company re-appear in
the list of companies.
New Company Wizard
The New Company Wizard is a step-by-step method of setting up a
new company file.
(Note that users of CashManager Home will see a simplified version of
the New Company Wizard.)
Step 1: First, nominate the starting point for the new file. You can start
with empty files, restore files from a CashManager back-up disk, or
load existing data from a CashManager Transfer file.
Step 2: Choose a company code. If you are
starting a new file, also record the company
name. The company code can be up to 55
characters in length, and may consist of upper
and lower case letters and numbers as well as
spaces. If you are importing from a transfer file, or restoring from a back-up, the name does not
need to be entered here, because it will be read from the data files being imported / restored.
Step 3: If you are restoring from a back-up
disk, or starting with a CashManager
Transfer file, this is all you need to do. Just
click OK, and after you have browsed to the
location of the backup or transfer file, the
data will be loaded. However, if you are
starting with empty files, indicate which kind
of file it is (Normal Cashbook or Trust Account Ledger, or General Ledger if you have
CashManager Plus) then click Next. (The Trust Account option is not available in CashManager
Lite, and the General ledger option is not available in the UK.)
Steps 4 and 5: Next, enter the ending date of your first financial year, and the take-up date of
your opening bank reconciliation, then click Next.
Step 6: You now need to make a
decision about your chart of
accounts. The standard charts
shipped with CashManager are
based on charts used by most
accountants. Your accountant or
adviser may suggest that you use
one or other of the standard
charts, or may have arranged for a
special chart to be provided with
CashManager. If there is a special
10
Setting Up
chart, it will appear as a separate option titled “Chart from …” . Alternatively, you can elect to
“adopt” a chart of accounts from another company. This may be from a back-up disk or another
company on your system if you have a multi-company CashManager. To adopt a chart of
accounts, nominate the location of the accounts file (Accts.db) that you wish to use (this may be a
back-up drive or another company directory ie C:\CashWin\MyCompany\Accts.db). Remember
that you can still make changes to your chart of accounts at any time, even if you have selected a
standard chart.
This completes the New Company Wizard. To finish, click OK, and you will be taken to the Bank
Account Setup section where you can setup your bank accounts.
Chart of Accounts Setup
The Chart of Accounts is a list of income, expense and other categories to which you allocate all
transactions. Examples include Rent, Interest Received, Stationery, Bank Loan etc.
Each one of these categories has a unique Account Code which is used in data entry and
reporting.
To work on your Chart of Accounts, select Chart of Accounts from the Setup menu.
See Chart Add and Edit and Chart Deletion.
11
CashManager
Chart of Accounts Add and Edit
To add an account to
your chart, click New
from the main Chart of
Accounts grid.
Enter an Account Code,
an Account Name,
Reporting Category and
the code for this account in your accountant’s chart, if different from the Account Code above.
An account code can be up to eight characters long, and may consist of any combinations of
letters and numbers and may include a sub-account separator. It is best if account codes consist
of numbers only.
You should get your accountant's advice about which numbers to use. This will ensure that
your chart will be structured in a manner that suits their needs as well as yours.
Users will also need to classify the account for GST/VAT purposes - for NZ users: as Income,
Expense, Zero-rated or Exempt, for Australian users: in accordance with G-code BAS
classification, and for UK users: Income / Expense / Exempt and the appropriate VAT rate . This
classification is used during transaction entry to calculate the default GST amount, and in the
production of the GST Return, BAS Worksheet or VAT Return pro forma.
You can also nominate the default GST rate for the account, though you should seek your
accountant's confirmation if you alter this from the standard rate.
If you are operating on a special Trust Account Ledger, you won’t be given the GST options, but
you can record a two-line client address and a one-line matter. This information prints out on
selected reports.
If you have activated the Quantity Tracking feature, you can also indicate whether you want to be
able to attach quantities to transactions posted to this account. (CashManager Plus users will
also be able to enter an opening quantity.)
When editing an account in your Chart, note that if you change the code to one that already
exists, you will be asked if you wish to transfer all the transactions from the old code to the new
code, effectively merging all transactions into one account code.
Similarly, if you change the GST category of an account such that the rate of GST applicable
changes, you will be asked if you want CashManager to scan all existing transactions, and
recalculate the GST portion based on the revised GST rate.
Click Accept to add the new account to the file or accept edits, and click Close when you have
finished adding or editing your chart.
Chart of Accounts Deletion
To delete an account from your chart, highlight the relevant account in the grid, and click Delete.
You will be asked to confirm the deletion before the account is removed from your chart.
12
Setting Up
You cannot delete an account that has been used for any existing bank transactions or recurring
transactions. Further, accounts with opening balances in CashManager Plus general ledger file,
or in Trust Account Ledger files, cannot be deleted (this is so the ledger doesn't become out of
balance), and nor can accounts that have been setup as “control accounts” under the Invoicing
Setup area be deleted.
Bank Account Setup
With CashManager,
you can operate as
many bank accounts
as you wish, and most
of the reports have
the flexibility of
reporting on one,
several or all bank
accounts. Current
users have many
varied applications for
the multi-bank feature.
Click here to get some
ideas.
To open a new bank
account, select Setup
| Bank Accounts.
Click on New.
On the Account Details tab, enter an identifier number of your choice, the account name or type,
account number, bank and branch. These details appear on selected reports for easy
identification. The identifier number also controls the sequence in which the bank accounts
appear in the bank account list boxes, so if you want to change the sequence, simply edit the
identifier. It is best to start with an identifier of 1 and work your way up.
If you have the EFT option activated, you will need to be mindful of the exact way in which your
bank account number appears on your statement. Australian users should enter their account
number in the style 999-999-999999999 (referred to as 3-3-9) and New Zealand users should
adopt the 99-9999-99999999-999 style (referred to as 2-4-8-3).
Opening Bank
Reconciliation
Next, click on the Opening
Reconciliation tab to move
to the Opening Bank
Reconciliation section. Enter
the details from your opening
bank reconciliation. To enter
details of individual
outstanding deposits and
unpresented cheques, click
on the ellipsis, and a window
will open allowing you to
enter individual transactions.
13
CashManager
Every transaction that makes up the outstanding deposit list or unpresented cheques list in your
opening bank reconciliation needs to be entered. Outstanding deposits and unpresented cheques
are, of course, entered separately.
To add a new transaction, click New, then enter the date (using the Quickdate feature if desired),
deposit or cheque number, payee or payer name and amount. Then click Accept. The
transaction you have added will appear in the grid at the foot of the panel.
When entering subsequent transactions, you can use Names Easysearch to locate previously
used drawer or payee names.
To edit a transaction, highlight it in the grid, then click Edit, make any changes, then click Accept.
To delete a
transaction, highlight it
in the grid, then click
Delete.
When you have
entered all the
transactions of this kind (i.e. opening outstanding deposits or opening unpresented cheques),
click Close. This will take you back to the Opening Bank Reconciliation panel.
You can print the Opening Bank Reconciliation at any time by clicking the Print button. This
should be done when you have set up the bank account as a record for your accountant.
Statement Import
The items on this tab
serve as defaults when
using the bank
statement import
method of reconciling
your bank account.
(This feature not yet
available in the UK.)
The bank and format
will need to be
completed if you intend
to import bank statements, as it tells CashManager what file format to expect. Completing your
bank’s web address is optional, and if completed, will present a link to that web page as part of
the Import Bank Statement wizard.
Other Details
On the Other Details
tab, you can record
your accountant’s
account code for this
particular bank
account (optional used when creating
an Accountants
Export File).
14
Setting Up
You can also record an expected opening balance for this bank account if you intend to use
CashManager for developing next year's cashflow budget.
EFT Options
With the EFT feature activated, you can create a file of supplier payments and electronically
transmit it to your bank, which will then credit the various amounts to your suppliers' bank
accounts. (Not available in UK version.)
Once
activated,
additional
fields appear
on your
transaction
entry screen,
where you can
record the
bank account
and other
payee details,
and another button appears on the main transaction entry form, enabling you to create the
transfer file.
On the EFT Options tab, Australian users will be asked to record their company name (as you
wish it to appear on your suppliers’ bank statement), and EFT Registration Number, their bank
mnemonic (a standard 3-letter abbreviation), and indicate whether or not a debit record is
required (your bank will advise this, but if uncertain, answer “Yes”). None of this information is
required from users in the New Zealand banking system.
Editing a Bank Account
Under normal circumstances, the need to edit a bank account should never arise, as all
housekeeping activities are performed automatically by CashManager.
However, should you need to edit a bank account, select the desired bank account from the
listbox and click Edit. Make any changes to the bank account details or the opening bank
reconciliation, and click Accept when done.
Deleting a Bank Account
Select the desired bank account from the dropdown list, and click Delete.
After confirming that you do wish to delete this bank account and all transactions for that account,
the bank account will be permanently removed.
You should consider the effect of such a deletion on any data you have transferred to your
accountant. You should also consider the effect of such an action on previous Business Activity
Statements and GST Returns.
Multiple Bank Accounts
Apart from keeping tabs on your main bank account, with the multi-bank account feature, you can
track:-
15
CashManager
•
Investment and deposit accounts;
•
Credit cards (record credit card purchases as Direct Payments and payments into the
card as Direct Deposits);
•
Cash payments out-of-till (record out-of-till payments as Direct Payments and then
periodically record a Direct Deposit (allocated to Sales) equal to the balance of this bank
account, bringing the balance of your “Out-of-Till Bank Account” back to zero;
•
Out-of-pocket expenses (record cash expenses paid as Direct Payments and then
periodically enter a Direct Deposit equal to the balance of this bank account, bringing the
balance of your “Out-of-Pockets Bank Account” back to zero).
Names Setup
Names used in transactions are automatically added to a look-up file, and this file is accessible
during transaction entry (see Name Easysearch). Names in this file can be edited or deleted
under Setup | Names.
Details used in bank transactions can be recorded in the same way if you elect to activate this
option under System Setup.
These files are only used as a look-up files, and it doesn't matter if you edit or delete Names or
Details that have been used for existing transactions.
To edit an entry in the Names file, locate and highlight it in the grid, and click Edit. Make any
necessary changes and click Accept. If you changed the name, you will be asked if you want
CashManager to scan all the transaction files, and make that same change to the name wherever
it has been used. This is useful for correcting spelling mistakes.
To delete an entry, highlight it and click Delete. If there are several entries you want to delete,
you can hold the Control key down as you click to select multiple names, then click Delete to
remove them all.
For Names entries, the default account code is offered whenever you use this name in a
transaction. It can, of course, be changed at the time of transaction entry, and in such cases, the
default account code for that name is also changed. You can also set up an automatic split,
whereby you nominate a second and third account code, and a percentage to go to the each
default code. This means that whenever you use this name in a transaction, two dissections will
be offered, with the transaction amount broken into the two or three components. These amounts
can be edited if necessary.
If you have activated the Deposit Slip feature or EFT feature, you also have access to the bank
account details for this name, although these details are updated automatically with any changes
whenever the name is used during transaction entry.
Invoicing Layouts
CashManager offers some standard Invoice, Quote, Statement and Remittance Advice layouts.
However, these layouts can be altered and new layouts can be created, using the RAVE
Designer that ships with CashManager.
Standard layouts reside in files called Invoice.rav, Quotes.rav, Statemt.rav and Cheques.rav in
your company data folder. Additional RAV files can be added to the folders, and layouts in those
16
Setting Up
additional files can be accessed by CashManager as long as the following file naming convention
is followed (where the asterisk is substituted for any letters/numbers):Type of layout
File naming
convention
Invoice layouts
Inv*.rav
Statement layouts
Sta*.rav
Quote layouts
Quo*.rav
Cheque/remittance
layouts
Che*.rav
Note also that RAV file names must adhere to the standard 8.3 convention, whereby the prefix
must be no longer than 8 characters and must only consist of letters, numbers and/or
underscores.
The RAVE Designer is a separate tool that ships with CashManager. It has not been developed
by Accomplish, and it is recommended that only users who are familiar with these sorts of
programs attempt to use it. The Accomplish Support Team can create layouts for you for a
nominal fee.
The RAVE Designer is accessed through Stationery Layouts located on the Setup menu. It is
composed of 3 parts:
Project Tree: Top right is the project tree, which shows a list of all the layouts (“reports”) and
provides drill down to each element of each report.
Property Panel: The top left panel is the property panel that shows all the attributes (“properties”)
of each element of the report. If you highlight an element on the project tree a green tick will
appear and the attributes will appear below. These can be changed to alter the appearance or
position etc of the element on the report. Properties include text, database field, font
characteristics etc.
Page Designer: The main window is in the middle of the screen, and shows the layout of the
page as it will appear.
You will notice that the page is made up of different “bands” like header, footer etc, and each
band contains “objects” like text boxes, data fields from the CashManager files, a graphic like a
bitmap or line etc. When you highlight an object, its various properties appear on the left of the
designer in the Property Panel. When you click on each property, you will see a description
about it underneath the properties panel.
Various toolbars show at the top of the screen to assist in designing layouts. These allow you to
add new objects to your layout, align objects, etc.
Editing a layout
To edit a layout (e.g. to reposition some data, or add a picture), launch the RAVE Designer as
described above. In the Project Tree, select the report from the Report Library list. If there is a
plus sign next to the Report Library, double-click it – this will expand the branch and display the
reports. Edits to the report layout are done in the Main Page area.
17
CashManager
For more details on the RAVE designer, you can obtain additional notes from the Accomplish
Help Desk or the web site.
If you wish to create your own layout or modify one of the standard stationery layouts, it is
strongly recommended that you copy an existing layout to a new report and modify the new one.
You can then delete the original one when you are happy that the new one functions properly.
To do this, do the following:
•
Load the RAVE designer as described above.
•
Click on the Project menu item then select New Report. (A new layout (ie report) will
appear in the project tree called Report1) Go to the Property Panel and edit the name to
a name of your choosing.
•
In the Project tree, double click on the layout (report) that you wish to use as a starting
point.
•
Click on the + sign to show the main page of the layout, then click on the page to show
the main page region. Click Edit…Copy to copy the page layout to the clipboard.
•
Double click on your new report layout and open the blank page. Click Edit…Paste which
will copy the page layout to your new layout file.
•
Save the invoice layout file and you have successfully created your own layout.
•
From here you can edit or experiment with your layout to come up with a new invoice.
Opening Balances
CashManager Plus users with the General Ledger option activated can enter opening ledger
balances. Users of the special Trust Account Ledger file also have the facility of entering client
opening balances. (CashManager Plus is not available in the UK.)
From the Setup menu, choose Opening Balances. A grid will display, listing all accounts in your
chart.
You only need to enter amounts in the right hand column, headed Last Year Closing.
CashManager will automatically create the Opening Balance amount if the account is a balance
sheet account.
Remember that CashManager is structured as a cashbook, and there is no need therefore to
open ledger accounts for any bank accounts that have been set up under CashManager - they
are automatically added to the ledger. When you first enter the opening balances section, the net
opening balance of all bank accounts is already shown at the foot of the grid.
Import from other CashManager file
Users can also have CashManager open and recalculate the opening balances from the prior
year file. This is ideal when you need to roll the year but can't finalise the prior year totals.
Select Import Prior Year Totals from the Setup menu. Click the Search button to navigate to
the CashManager file containing last year's data. You also need to record the suspense account 18
Setting Up
this will be used to balance the opening balances should a problem occur, like an account no
longer in the chart, or the opening bank reconciliation being different from the closing bank
reconciliation in the prior year file.
Passwords
CashManager offers two types of passwords – one that controls total access to the file, and two
others that simply limit or prohibit access to the specific parts.
To set passwords for your CashManager data file, select Passwords from the Setup menu.
There are three different types of passwords:
File password: If a file password is set,
users will be required to enter the password
whenever they attempt to open the company.
Report password: If a reports password is
set, users will be asked to enter the
password to gain access to CashManager's
reports.
Invoicing password: This password works
in conjunction with the file level password.
When this password is set (and a File
password must also be set), users will be
asked to enter a password when opening the
company's CashManager files. If they enter
the Invoicing password, they will only be
given access to the Invoicing parts of
CashManager. If they enter the File
password, they will have access to all parts
of CashManager.
As a security measure, as you type your passwords, the screen will display only asterisks. To
make sure that you typed in your right passwords, you are asked to re-type them as a
confirmation. Your new passwords will only be accepted if the original passwords and the
confirmation passwords are identical.
19
CashManager
Setting and changing passwords
If your file already has a password, you will be asked to enter the existing password before being
allowed to change it. This limits the ability of unauthorised users to change the passwords.
When the password screen opens, if there are any existing passwords, the appropriate boxes will
contain asterisks. A blank box means that there is no password for the particular level.
Passwords are not case sensitive - you can set a password in upper case, but the same word in
lower case will be accepted.
If you forget you password, your local Support Centre may be able to help you resurrect your
data, although they won’t help you to do this unless you can prove that you are entitled to have
access to the files.
Report Categories
You can change the way that the Report Categories are presented in reports by selecting Report
Categories on the Setup menu. For each category, you can
•
select a heading name (eg. Expenses), indicate whether a first level sub-total is required
afterwards (eg. to print Total Expenses), whether a second level sub-total is required
afterwards, and whether a cumulative total is required (eg. to print Net Profit);
•
nominate a sub-total heading for the second and cumulative totals;
•
indicate whether or not you want the page to be ejected at the end of the category,
•
indicate whether or not the category is an income/expense category - this determines
whether the account is used when CashManager has to calculate a profit figure
You can also change the printing order of the categories, by highlighting the relevant category
and clicking on the Change Report Sequence arrows.
CashManager Plus users who want to use the Financial Statements feature can also nominate to
which of the standard financial statements categories this report category belongs.
See also Financial Statements.
System Setup
CashManager has many powerful features which can be activated if the need arises. Any of
these features that are not activated remain invisible to the user, so that screens and reports are
not cluttered unnecessarily.
The Options section is located on the Setup menu and consists of a number of segments, which
are separated by tabs. These are:Features
GST Setup
Cashbook Column Headings
Cheque Printing
CashManager PLUS options
Invoicing - Customers and Suppliers
20
Setting Up
Email set-up
Preferences
Other
Setup - Cashbook Column Headings
The Detailed Cashbook Report prints your transactions in a multi-column format, similar to
traditional manual cashbooks. There are six columns (five for GST users), which are userdefined, and these headings are set up under the Cashbook Column Headings tab under
Setup - Options.
Select the accounts from your chart that
you want to feature as column headings,
using, if necessary, Accounts
Easysearch. When you select a code
from your chart, the account name is
offered as a default heading, broken up
into two lines. You can edit the heading at
any time.
Alternatively, you can use “wild cards” for
column headings, using the asterisk in
conjunction with the account code. For
example, to have a column contain all
accounts starting with 21, enter 21* in the
Account Code box. The asterisk can be
at the beginning or end of the code, for
example *21 or */2.
There are two sub-tabs here - one for the Detailed Cash Payments Book and one for the
Detailed Cash Receipts Book.
Setup - Cheque Printing
Cheque printing can be activated from the Cheque Printing tab under the Setup | Options
section.
Once you check the box to activate this feature, you need to complete the cheque layout
parameters. Record the cheque height (from perforation to perforation), date format, top margin
21
CashManager
adjustment, number of cheque forms per page, and the top and left co-ordinates and field width
for the four data fields that appear on the cheque form.
Email Setup
In order to email your data files to your accountant or to the Accomplish Support Team, or send
emails within CashManager Customer Invoicing, you need to record various settings.
These are entered under System Setup, which is accessed from the Setup | Options menu.
Select the Email tab.
You can use either MAPI or SMTP. Selecting MAPI will utilise your default email client (i.e.
Outlook, Outlook Express), and emails sent this way will end up in your Sent folder. By selecting
SMTP, you will use CashManager's in-built email system, and emails won't be copied to your
Sent folder.
If you select MAPI, no
further setting up is
required in order to use
email in CashManager.
Alternatively, if you select
the SMTP option, you may
need to enter your ISP's
logon details. These
settings can be obtained
from your network
administrator or your
Internet Service Provider.
Alternatively, if you use
Outlook Express, they can
be found on the Tools |
Accounts menu, on the
Mail tab, Properties
button, Servers tab. The
Username and Password
required by CashManager
will be the same as the Account Name and Password on the Outlook Express screen
(remembering that the password will be showing as a row of asterisks), the SMTP Mail Server
required by CashManager is the same as the Outgoing Mail Server in Outlook Express, and the
email address that CashManager requires is simply the Sender and Reply To address you want
to be used for the emails that CashManager generates.
The name and email address of your accountant are offered as a default in the Email window
when you elect to send Transfer Files or reports to them.
Multi-company users should remember that these settings are held in file separate from the
company data files, and as such, impact on all existing and future companies under your
CashManager program folder, not just the currently open company.
Setup - Features
Under the Features tab in Setup (accessed via the Setup | Options menu), the following
features can be found. In order to keep the interface as uncluttered as possible, none of these
features are apparent in the main part of CashManager until activated.
22
Setting Up
Recurring Transactions
Recurring transactions are deposits or payments that happen automatically at a fixed time
interval, for a fixed amount. Loan and lease payments are good examples of recurring payments.
When you activate this option, you can also elect to have CashManager scan the file of
transactions whenever the program is launched, and process any transactions that have become
due. Once activated, extra menu options appear on the Transactions menu.
The Recurring Transactions options are located on the Transactions menu. See Transactions Recurring Transactions for more details.
Sub-account feature
(Not available in CashManager Lite)
The sub-account feature enhances reporting flexibility by letting users filter transactions by their
sub-account. A sub-account is a suffix appended to an account code in your chart, usually
indicating a division or department. For example Account 388-1 would be a sub-account of
Account 388, with a sub-account separator being a dash.
The sub-account separator is a symbol that separates the main account from the sub-account,
and can be a forward-slash (/) a dash (-) a decimal point (.) or just a space. You need to tell
CashManager what sub-account separator you are using.
Note that you have the ability name sub-account groups if you are usuing the sub-account feature
for separate departments within your business. You will simply need to edit the Defaults.ini file in
the company data folder to add the following:
23
CashManager
[Sub-account Headings]
01=DEPARTMENT 1 NAME HERE
02=DEPARTMENT 2 NAME HERE
etc
Deposit slip printing
By activating the Deposit Slip Printing feature, you can print a deposit slip showing the full drawer
details for lodging with your banking. This saves having to write out the slip by hand. All you need
to do is fill in the pre-coded summary slip provided by your bank.
Easysearch on Details
Activating this option converts the Details line in the Transaction Entry screen in a searchable
field like the name field. This means that descriptions you enter here are added to a look-up file,
and the lookup file can be accessed by clicking the ellipsis next to the field, or by pressing the F2
or F3 keys.
Quantities tracking option
The quantities tracking feature allows you to record a quantity for each transaction allocated to
selected accounts in your chart. This quantity also appears in reports where appropriate. It is
useful for primary producers who wish to track livestock movements. Once activated, you can
nominate that any account in your chart is to hold quantities as well as dollar amount, and when
transactions are coded to such an account, a Quantity box appears.
Contact Management
(Available in CashManager Plus and CashManager Standard, and in CashManager Lite if
Invoicing is activated.)
CashManager’s Contact Management system allows you to log notes and follow-ups against
contacts, and also to create an export file of selected contacts for mail merging.
If you are using CashManager’s Invoicing, your customer and supplier files are automatically
linked to Contact Management, so that all existing customers and suppliers will become contacts.
You can also elect to have CashManager alert you to any due tasks whenever the program is
launched.
Setup - GST / VAT
See also CashManager and GST.
CashManager’s GST / VAT features are activated from the GST Setup tab under Setup |
Options.
To activate GST or VAT, tick the Activate GST or Activate VAT check box, and complete the
details as described below.
24
Setting Up
Australian Users
The default rate should be set to 10%.
Enter your ABN number, the return period (quarterly or monthly) and the return basis (cash or
accrual).
Also enter your company’s name, address and phone number, and nominate the month of the
last finalised return. This provides the correct period as the default when printing the next BAS
Worksheet.
If you are reporting on the accruals basis, you will also need to complete the closing balances for
customers (debtors) and suppliers (creditors) that were used in your last finalised BAS. These
will be reversed in your next BAS.
New Zealand Users
The default rate should be set at 12.5%.
If you are going to use CashManager to print your GST return, you will also need to complete the
GST Return details: GST Number, Name, Address, Period (Monthly, Bi-monthly or Half-yearly),
Return Basis (Payments, Invoice or Hybrid), and Last Return Date.
If you are using a basis other than Payments, you will also need to complete the closing balances
for customers (debtors) and suppliers (creditors) that were used in your last finalised GST Return.
These will be reversed in your next GST Return.
United Kingdom Users
The default rate should be set at 17.5%, though the concessional rate of 5% can be applied to
selected accounts in your chart.
You also need to complete the VAT Return details: VAT Number, Name, Address, Period
(Monthly, 3-monthly or Yearly), Return Basis (Cash or Accruals), and Last Return Date.
If you are using a basis other than Payments, you will also need to complete the closing balances
for customers (debtors) and suppliers (creditors) that were used in your last finalised VAT Return.
These will be reversed in your next VAT Return.
Setup - Invoicing
CashManager’s Customer and Supplier Invoicing features are activated under the Customers and
Suppliers tabs under Setup | Options.
For each of customers (debtors) and suppliers (creditors), you can choose to manage them by
either Logs or Full Invoicing. Note that Logs and Full Invoicing are mutually exclusive – in other
words you can’t have both Customer Logs and Full Customer Invoicing activated. However, you
can have Customer Logs and Full Suppliers Invoicing, and vice versa.
25
CashManager
Invoice logs
The invoice log feature
allows you to track
invoices received from
suppliers and invoices
issued to customers.
Once either of the logs
are activated (on the
Customer and Supplier
tabs under Setup,
Options), extra menu
options appear on the
Transactions menu:
Customer Invoice Log
and/or Supplier Invoice
Log. Further, an extra
button appears on the
main transaction entry
form: Invoice Log.
To activate one or
other of the logs, check
the Activate customer
invoice logs and/or Activate supplier invoice logs check boxes. Set the default terms: Fixed
Number of days or Set day next month, and record the number of days or the day of the month as
appropriate.
Customer and supplier invoice logs are accessed via the Transaction menu, and can also be
opened in an Easysearch style window during transaction entry by clicking the Invoice Log
button.
Full Invoicing - Customers and Suppliers
CashManager’s Invoicing add-on allows you to easily invoice your customers, enter invoices from
suppliers and generally manage your accounts payable and receivable. You can print customer
statements, and automatically record payments received from customers against their account. A
range of reports show you sales history, aged analysis of the outstanding amount and transaction
listings. You can also print labels for a range of customers or suppliers.
Invoices, statements and remittance advice layouts are user-definable, though CashManager
Invoicing ships with standard layout files.
The customer and supplier ledgers are based on the open item system. This means that
accounts are managed down to the unpaid invoice level, no matter how old the unpaid invoices
might be.
After activating Customer Invoicing or Supplier Invoicing, additional buttons "Customers" and
"Suppliers" will appear on CashManager's main toolbar for quick access to the customer and
supplier invoicing screens. Customers and Suppliers menus also appear, giving you access to
invoicing as well as all the other functions relating to the invoicing aspects of CashManager like
reports and customer and supplier set-up.
A Stationery Layouts option will appear on the Setup menu. This is where you can modify the
layouts of invoices, statements and remittance advices if the standard ones that ship with
CashManager don't suit.
26
Setting Up
To activate Customer
and/or Supplier Invoicing,
tick Activate full
invoicing and customer
ledger and/or Full
Supplier ledger check
boxes.
If you've activated full
customer ledgers you may
also need to:
•
Choose names for
your five price lists
(if different from
the standard
descriptions
offered).
•
Nominate a default
sales account –
this is used as the
default sales
account when adding new products, and also as the default adjustment account when
adding new customers.
•
Nominate the account for automatic Settlement Discounts – this is used when entering
receipts from customers and where the customer has taken a settlement discount.
•
Activate Customer and Product groups, if required – if groups are activated, you set up
groups for Products and Customers, and this allows for more flexibility in reporting.
•
Activate the option to record stock movements - this will allow you to record stock
received, and will maintain stock ledgers and stock on hand records.
•
Activate the option of tracking product costs – if activated, a unit cost can be attached to
each product in your products file, and this is carried through to invoice lines, and allows
the reporting of gross profit over a range of invoices.
•
Activate the weekly ageing option if desired – weekly ageing affects the way in which the
Aged Customer Balances report presents non-current accounts, and also affects the
printing of customer statements. If this check box is not ticked, ageing is monthly.
•
Activate the option to record that prices in your product file are GST-inclusive. If this
option is not ticked, product prices are assumed to be exclusive of GST.
•
Activate Streamlined Invoicing if desired - this is a quick method of creating simple
invoices. See Streamlined Invoicing.
•
Activate CashManager's Club Membership feature.
•
Activate CashManager's Parent/Child option for customers.
•
Record the number of decimals you want in quantity reporting.
•
You might also consider activating Deposit Slip Printing (under Setup | Options |
Features), as this allows you to include receipts from multiple customers to be bulked up
into one bank deposit amount for reconciliation purposes.
27
CashManager
If you choose full Supplier Invoicing ledgers, you need to:•
Record the default trading terms offered when adding new suppliers (terms can still be
altered for individual suppliers).
•
Nominate a default purchases account offered when adding new suppliers.
•
Decide if you want a pop-up reminder when you have accounts that are due.
Once you have done this, follow these steps:
•
Make sure you have entered your company name, address and GST/ABN number (if
applicable) in the Company Details section (Setup | Options, on the Other tab). These
details appear on your invoices, statements and other documents.
•
Enter your customers (Customers | Add/Edit Customers) and/or suppliers (Suppliers |
Add/Edit Suppliers). You can also enter the customers and suppliers "on-the-fly" from
the invoice entry screens.
•
If you are using Customer Invoicing, you will also need to enter your products. This area
is accessed via Customers | Add/Edit Products. You can also enter the products "onthe-fly" from the invoice entry screen.
•
Enter the opening outstanding invoices for each customer and/or supplier. This is done
from the normal Invoice screen. Note that if you are using CashManager PLUS with the
general ledger option activated, you should ensure that the opening balance of your
customer or supplier control account (i.e. Debtors or Creditors account) in the chart
agrees with this total.
•
Print the Customer Aged Analysis and /or Supplier Aged Analysis from the Customer or
Supplier Reports menus to check that you have correctly entered your data.
(Full Invoicing is an optional add-on. Invoice Logs are not available in CashManager Lite unless
used in conjunction with the full Invoicing module.)
Setup - Other
This section is divided into three areas:
Company Name and Address
Under Company Details, you can edit your company name and address details. You can also
select a User Name to print at the foot of every page. If you leave this blank, the report footer is
simply “Printed on 99/99/99 at 9.99am”. However, if you record a user name here, the footer
becomes “Printed by XXXXXXXXX on 99/99/99 at 9.99am”.
Accountant’s Close-Off
The Accountant’s Close-Off Details section records the date of the last accountants transfer disk.
New transactions cannot be dated on or before this date, and transactions dated on or before the
Accountant's Close-off Date cannot be edited. (This is not relevant in the UK version.)
Bank Reconciliation Sound
28
Setting Up
Under this option, you can choose a sound to be played when your bank reconciliation balances.
There are four sounds offered, but if you have your own WAV file, name it SOUND5.WAV and
place it in the CashManager program folder.
System Preferences
There are some options that enhance the functionality of CashManager. These used to be only
accessible by editing the Cashwin.ini file, but are now available under Setup | Options, on the
Preferences tab.
These settings are different from other setup options because they affect all company files,
present and future, in contrast to other setup options which only affect the files of the currently
opened company.
The options are:Automatically load Window calculator at start-up: when ticked, this automatically loads the
Windows Calculator when you run CashManager. It sits on the Windows task bar and can be
used for calculations while entering transactions.
Bypass back-up question on exit: when ticked, the option to back up the data files that
normally appears every time the user exits the program is bypassed.
Make the Enter key act like the Tab key: when ticked, the Enter key functions as the Tab key
during, and only during, transaction data entry and invoice entry - this allows users to move
between data fields by pressing either the Tab key or the Enter key.
Validate data files on exit: when ticked, this will force a data file validation to be run every time
CashManager is closed.
Remember CashManager printers: Users who want to use a separate printer for invoicing
should check this box. CashManager will then offer to remember a different printer to be used for
customer invoice printing.
29
CashManager
Validate data files before backing-up: when ticked, this will force a data files validation to be
run before any back-ups are made.
Print report borders: when ticked, reports will print with a border and with headings shaded.
Users with slower ink jet printers may elect to suppress borders and shading in order to improve
printing speed.
Start CashManager with no company loaded: when ticked, multi-company CashManager will
start with the Company Selection window open, and with no companies loaded; when not ticked,
the most recently-accessed company is loaded.
Remember sort order of grids and look-ups: when this option is ticked, CashManager
remembers what the last “Sort by” sequence was for each grid and look-up, and sets the sort
order to that same sequence next time the grid or look-up is loaded.
Remember size and position of windows: with this activated, CashManager will open
resizeable windows in the same size and position as when they were last closed.
Allow forward-dated transactions: when ticked, this allows transactions to be entered that are
dated beyond the end of the financial year. They will not appear in any reports until the year is
rolled.
CashManager Plus Options
CashManager PLUS is an add-on to CashManager that converts the cashbook into a full general
ledger system. (CashManager Plus is not available in the United Kingdom.)
General ledger option
To activate the General Ledger option, certain control accounts need to be recorded. These
should added to your chart before you start.
External report-writer
You can also activate CashManager's DOS-based report-writer. This adds an additional menu
option under the Reports menu, which, when selected, generates a file of account balances,
before shelling out to the DOS report writer. There is separate documentation on this report writer
available from Accomplish.
Most CashManager users find that the in-built Financial Statements Generator fulfills all of their
needs for financial statements.
30
Setting Up
Club Membership Tracking
This feature allows clubs to track membership details, and to generate subscription renewals. It is
only available as part of the Customer Invoicing module, and requires the Customer groups
option to be activated.
Each membership category has its own group. With Club Membership activated, the Customer
group Add/Edit form offers provision for additional details
.
If the group category is a membership one, tick the checkbox and nominate the renewal fee and
an optional wording to appear on the renewal notices.
Generating Renewal Notices
On the reporting menu, an option will appear for Membership Renewals. This allows you to
generate renewal notices, which can be printed or emailed. Complete the expiring date - this will
easily allow you to exclude non-financial members, and also to exclude paid-up members when
running the process a second or subsequent time.
31
CashManager
Uninstalling CashManager
To remove CashManager from your computer, simply remove the program directory and its
contents using Windows Explorer or similar. If you are certain that no other application uses the
BDE, you can also remove that directory.
For more details, contact the Accomplish Support Team.
32
Transaction Entry
Bank Account Transactions
Bank account transactions are divided into five types:
•
Deposits;
•
Cheques;
•
Direct Deposits;
•
Direct Payments; and
•
EFT transactions (not available in UK version).
Direct Deposits and Direct Payments are transactions initiated by your bank (like bank fees, loan
repayments) or by third parties (like a customer making a direct deposit to your account).
The bank account transaction section is accessed by pressing the Transactions toolbar button or
by selecting Bank Transactions from Transactions menu.
If you have opened more than one bank account, you should first select the appropriate bank
account from the Bank Account dropdown list at the top of the window.
You will be presented with the Transaction Entry grid, listing the most recent transactions, and
through which you can scroll using the scroll bars. You can sort this transaction list in Date order,
Reference Number order, Amount, Name, or in the order As Entered with the “Sort transactions
by” dropdown list.
This window offers four buttons for entering New Transactions - one for each of Deposit, Direct
Deposit, Cheque or Direct Payment. If you have activated the EFT Payments feature (see EFT
Setup), there will be an additional button which is used to enter an EFT payment batch.
There are also Edit and Delete buttons that allow you to edit or delete the currently highlighted
transaction.
There are three styles of transaction entry windows:•
Deposit slip
•
EFT payments, and
•
All other transactions
Transaction Entry
The transaction entry screen consists of two parts: the main details and the dissection details.
Main details
First, enter the main details, which consists of the Date, Reference Number, Payee or Drawer
Name and Transaction Amount.
33
CashManager
There are various tips and tricks that make data entry more efficient.
There is also a button captioned Calc that loads the Windows calculator.
Dissection
The second part of the transaction is the dissection. A transaction can be split into as many
dissections as necessary, and CashManager will continue to accept dissections until the
cumulative total of the dissections is equal to the original transaction amount. As you add
dissections, they are displayed on the dissection grid at the foot of the transaction dissection
panel.
For each dissection, you need to record the Account Code, the gross and GST amounts of the
dissection and an optional description. Users who have activated the quantity tracking feature
may also be able to record a quantity.
If you have activated the Invoice Logs feature for either customers or suppliers, you can access
that file by clicking Invoice Logs. See Using Invoice Logs for more details.
If you have activated CashManager’s Full Invoicing feature for either customers or suppliers, you
will need to open the ledger files by clicking Invoices. See Receipting and Paying Invoices for
more details.
When the total of all dissections equals the transaction amount, you can click Accept. The
transaction will be saved to the file, and the transaction entry window is ready for the next
transaction.
34
Transaction Entry
Editing bank transactions
Any part of any transaction in the file can be edited, except for transactions that have been
exported to your accountant. When editing bank transactions, you need to be particularly careful
not to edit amounts that form part of a finalised GST period. A warning will appear if you attempt
to do this.
Further, once an amount has been ticked off in the bank reconciliation, the amount becomes
fixed, but other parts of that transaction can still be changed.
Highlight the transaction in the Transactions grid and click Edit, or double-click the transaction
itself. This will open the Transaction Entry window with the transaction displayed, ready for
editing.
Bulk-moving transactions
Individual transactions can be moved from one account category to another simply by editing the
particular transaction and changing the account code.
If, however, you need to move all transactions from one account to another, you can achieve
this in one step. Simply select Setup | Chart of Accounts, call up the account that presently
contains the transactions, and edit its code from the old code to the new code (see Chart of
Accounts Add/Edit).
When CashManager looks at the new code, and sees that it already exists in the chart, you will
be asked to confirm that all transactions are to be moved from the old code to the new code.
This will also have the effect of deleting the old code from your chart.
Deleting bank transactions
Any transaction that has not yet been ticked off in a bank reconciliation can be deleted, with the
exception of transactions that have been exported to your accountant. You will need to be
particularly careful not to delete transactions that form part of a finalised GST Return. A warning
will appear if you attempt to do this.
Highlight the transaction in the Transactions grid, and click Delete. After you have confirmed that
this transaction is to be deleted, it will be removed from the file, and the bank balance updated
accordingly.
Data Entry Tips
Features that make data entry in CashManager easier and more efficient include:Quick entry of dates by using cursor keys: Wherever you need to enter a date, CashManager
offers a default, which is usually today's date or the last day of the financial year. If you need to
change this default, you can
•
over-type it as normal,
35
CashManager
•
use the Up-Arrow and Down-Arrow keys to change the day component, (eg. the UpArrow key changes 25/06/08 to 26/06/08) or
•
use the Page-Up and Page-Down keys to change the month component, (eg. the PageUp key changes 25/06/08 to 25/07/08).
Using the Enter key to move between fields: This is an alternative to using the tab key or
mouse (see Setup Preferences).
Names Easysearch for previously used names and details: CashManager keeps a log of all
previously used Names (and optionally Details), and this log is available as a look-up list when
entering further names or details. The list is activated by clicking the ellipsis next to the field, or by
pressing F2 or F3. See Names and Details Easysearch for more details.
Popup list of recently-used names and descriptions: When entering names or descriptions
during transaction entry, you can right-click the particular fields to reveal a pop-up list containing
the last five names or descriptions used. Simply click or highlight the one you want to bring back
to the transaction entry screen. Pressing the F8 function key at the appropriate field has the same
effect.
The "hot" Accept button: During all aspects of transaction entry, the Accept button is "hot" this means that pressing the Enter key at any time is the same as clicking the Accept button.
Therefore, once you have entered enough detail for a transaction to be valid, you can save the
transaction and prepare for the next one by pressing Enter, instead of having to tab past
irrelevant fields or using the mouse to click Accept. This won’t work, of course, if you have elected
to use the Enter key to move between fields.
Cheque Printing
Once you have activated Cheque Printing under the Setup | Options section, a new item appears
on the Transaction menu: Print Cheques.
Selection of this menu option opens the Print Cheques window, displaying in a grid any unprinted
cheques.
To add a cheque to be printed, click New. To edit an existing unprinted cheque, highlight it and
click Edit, and to delete one, highlight it and click Delete.
Adding or editing cheque details in this section is identical to normal transaction entry, except that
the cheque number isn't recorded at this time.
To print one or more unprinted cheques, tick each one in the Unprinted Cheques grid and click
Print. To untick a cheque, click Tick again.
Next, click Print, and enter the next cheque number and the number of cheques remaining on the
first sheet, then click Print. The cheques will be displayed in the Print Preview window, and can
be sent to the printer in the normal way.
Once printing is complete, you will be asked whether or not printing was successful. If so, the
cheques will be cleared from the Unprinted Cheques file, otherwise, they will remain in the
Unprinted Cheques file for re-printing.
Note that unprinted cheques are not deducted from the bank account until they have been
printed, and nor will they appear in any of the reports.
36
Transaction Entry
Deposit Slip
If you have activated the Deposit List feature (see Setup | Options), the procedure for entering
deposits is different from normal transaction entry, as there is an additional step in grouping the
individual deposits into one bank transaction.
One of the major uses/advantages of Deposit Slip Entry is when Invoicing is activated and
multiple payments are received from Customers each day, it allows for a separate entry for each
Customer and retains a single deposit total for reconciliation purposes.
To enter a new deposit slip transaction, click the Deposit button in the Transaction Entry window.
This will bring up the Deposit List window.
To add a new cheque to the banking, click New. To edit one, highlight it and click Edit, and to
delete one, highlight it and click Delete.
Each depositor's cheque that makes up the deposit is then added like a normal transaction (see
Transaction entry). It can be dissected into as many income/expense accounts as necessary.
If you are depositing cash, simply enter the word Cash for the depositor's name, and leave the
Bank and Branch blank. When the deposit slip prints, all the cash entries will be combined into
one line.
Note that previously used bank names and branch names will be remembered for future use, and
can be recalled using the dropdowns.
Once you have entered all depositors cheques, click Print. This will display the deposit slip in the
Report Preview. You can then use the normal Previewer options to send it to a printer.
See also Receipt Printing.
Chart of Accounts Easysearch
Chart of Accounts Easysearch is activated by clicking the ellipsis (the
three small dots) next to any field requiring the entry of an account code.
To locate the desired account code, move through the list using the scroll bars.
You can sort the chart in account code sequence, name sequence or reporting group sequence
with the “sort by” list box. You can also speed your search by typing the beginning characters of
the code (if the list is sorted by
account code) or name (if the
list is sorted by name).
When you have located the
account you want, click Select,
or press Enter. To close the
Easysearch window without
selecting an account code, click
Cancel or press Escape.
To add a new account to your
chart, click Add. This will load
the Chart of Accounts Setup
37
CashManager
form, where you can add the account.
You can also edit an existing account in your chart by clicking Edit from the Easysearch window.
This will load the Chart of Accounts Setup form, where you can edit any of the details of the
account. (See also Adding/Editing your chart of accounts.)
The keyboard function keys also open Accounts Easysearch - F2 opens the Easysearch window
in Account Code order and F3 opens it in Account Name order.
Easysearch with names and details
Names Easysearch lets you search through a list of previously used payee and payer names.
Similarly, Details Easysearch, if activated under System Setup, lets you search through
previously used details/descriptions.
Names or Details Easysearch is activated by clicking the ellipsis next to any field requiring the
entry of a name or
details (eg. payee of a
cheque).
To locate an entry from
your Names or Details
file, move through the
list using the scroll bars.
You can also speed
your search by typing
the beginning
characters of the name
or words.
When you have located
the name you want,
click Select, or press
Enter. To close the
Easysearch window without selecting a name, click Cancel or press Escape.
You can also bring up a popup menu showing the previous five names or descriptions by clicking
the name or details box with the right mouse button.
The keyboard F3 function key also opens Names Easysearch and the F8 key will launch the
previous names popup.
The Names file is built automatically as you add new transactions. It is optionally purged during
year end, so that any names or details that haven't been used in the previous financial year are
removed.
You can also add and edit the contents of the Names or Details file from Names Setup, located
under the Setup menu.
38
Transaction Entry
EFT Payments
If you have activated the EFT Payments feature (see EFT Setup), the procedure for entering
payments by EFT is different from normal transaction entry, as the individual payments that make
up the EFT batch need to be consolidated into one bank statement transaction.
To create a new EFT payments batch, click the EFT button in the Payments section of the
Transaction Entry window. This will bring up the EFT Transaction window.
To add a new payment to the batch, click New. To edit one, highlight it and click Edit, and to
delete one, highlight it and click Delete.
Each suppliers' payment that makes up the batch is then added like a normal transaction (see
Transaction entry). It can be dissected into as many income/expense accounts as necessary.
Once you have entered all suppliers' payments, click File. This will open the Create EFT
Transaction File window, where you can record the file name (including full path) and the date
that the bank is to process the payments. You can choose whatever file name and path you wish,
but you will need to remember these details, as the Direct Entry software provided by your bank
will ask you for the location of the EFT file.
You can also print a report of the EFT Batch, showing all details of suppliers being paid, amounts
etc.
New Zealand users will also need to select their bank from the list provided, as each bank in New
Zealand expects a different file format.
Importing Transactions
CashManager has the ability to import transactions from other packages. The option to do this is
titled Transaction Import, and is located on the File menu under Import Data.
Select the format of the file you wish to import and enter the location and name of the import file,
using the Browse button to search for it if necessary.
On the right hand side of the window, select the bank account which the imported transactions
are to go to.
Depending on the import file format you have selected, you may also have to indicate whether
you want to consolidate into one bank entry, mark transactions as cleared in bank reconciliation,
the transaction type to use for unspecified transactions and to nominate a suspense account. If
you have activated the GST feature, you may also have to indicate if GST is included in the
transactions.
Once you have entered the requested information, click OK, and the file will be imported.
Interbank Transfers
If you have opened two or more bank accounts, you can use CashManager's Interbank Transfer
feature to record transfers between accounts. This process automatically creates deposit and
payment transactions in the respective accounts.
39
CashManager
To process an
interbank transfer,
select Interbank
Transfers from the
Transactions
menu.
There are three
sections to
complete.
Transaction
Details: Firstly,
enter the date of
the transfer, and
the account in your
chart that each side
of the transfer is to
be processed
through. (Most
users add a special
account to their
chart called Interbank Transfer Account, but you can use a Suspense account if you want.)
Sending Account : Secondly, select the bank account that the funds are coming out of, and
indicate whether the transfer is happening by way of a cheque or a direct payment. A default
reference number will be offered, which you may change if necessary. Enter the amount, and if
there will be a difference between what the paying bank pays and the receiving bank receives
(eg. bank fees on the transfer), choose an account for the difference.
Receiving Account: Finally, select the bank account that the funds are being transferred into,
and record the amount you expect to be credited. A default reference number will be offered,
which you may change if necessary.
Once you have completed the three sections, click OK. CashManager will generate both sides of
the transfer.
If you have no further transfers to process, click Close.
Move, Find and Copy Transactions
When you right click on the bank account transaction grid, a menu pops up. This allows you to
add, edit or delete transactions (instead of clicking the button).
It also allows you to do the following:-
40
•
Move transaction to another bank account: If you have
more than one bank account established, you can move the
highlighted transaction from one bank account to another. This
is useful if you accidentally enter a transaction into the wrong
bank account. Note that this is different from processing a
transfer of funds between bank accounts - this can be achieved
via CashManager's Interbank Transfer process.
•
Find transaction: This allows you to enter a reference number
you wish to search for in the bank transaction grid.
Transaction Entry
•
Copy transaction: This allows you to copy the highlighted transaction. This will save
time if you have similar transactions that occur in your bank account (i.e. a weekly wages
EFT transaction where only the amounts change each time). See also Recurring
transactions.
•
Change to…: If you have entered a transaction as the wrong type, rather than deleting
and re-entering it, you can simply change it to a different type. If you change its sign (e.g.
a deposit to a cheque), the bank balance is automatically recalculated. Note that this
process will not alter any other part of the transaction, including its reference number.
Recurring Transactions
With CashManager, you can set up recurring transactions which can be processed either
automatically whenever you launch CashManager, or periodically, at your discretion.
The Recurring Transactions options are located on the Transactions menu.
Adding and editing recurring transactions
To add a new recurring
transaction, from the
Recurring Transaction
window, click either Deposit or
Payment.
Enter the drawer / payee name
(using Names Easysearch if
desired), the amount of the
transaction and the date it is
next due.
If you have Customer or
Supplier invoicing activated,
you can elect to attach the
transactions to a customer or
supplier each time they are
generated. They will remain as
"unmatched" transactions in that customer/supplier account.
To edit an existing recurring transaction, highlight it in the grid and click Edit.
The lower part of the window is divided into two sections: Financial and Schedule, which are
activated by clicking on the appropriate tab.
Financial
This is where you record how you want the transaction to be dissected whenever it is processed.
A recurring transaction can be broken up into as many dissections as necessary (just like
ordinary bank transactions), and as the dissections are entered, they appear in the dissection grid
at the foot of the window. For each component of the dissection, enter the account code (using
the Accounts Easysearch if desired), amount, and an optional description. GST users will also
need to record the amount of GST included in the amount.
To add further dissections, click Add. To delete a dissection line, highlight the line and click
Delete.
41
CashManager
Schedule
This is where you record information about the term and frequency of the recurring transaction.
For Duration, you can:•
set the transaction to occur a fixed number of times and enter the number of times;
•
record a finishing date and enter that date; or
•
set the transaction to continue until further notice.
For Frequency, record the number days or months between each occurrence of the transaction.
For example, a monthly payment might be set for Every 1 Month, and a weekly payment might be
Every 7 Days.
Deleting a recurring transaction
From the grid on the Recurring Transaction window, highlight the recurring transaction you wish
to delete and click Delete.
Processing Recurring Transactions
See also Editing recurring transactions
If you have asked CashManager to scan the file of recurring transactions every time it is launched
(see Setup options), you will be alerted whenever there are any transactions that are due to be
processed. You can also manually ask that the file be scanned at any time by selecting Process
Recurring Transactions from
the Transactions menu.
When you run this process,
each transaction that is due
will be displayed, and you
have the choice of Editing,
Processing or Skipping.
Once the transaction has
been processed or otherwise
dealt with, the next
transaction that is due will be
displayed, and the process
starts again.
When all due recurring
transactions have been
processed, the window will close.
Budgets
(This feature is not available in CashManager Lite.)
42
Transaction Entry
CashManager gives you the power to enter monthly budget amounts, for the current year and
next year, for every account code in your chart of accounts. This is done under Budgets located
on the Transactions menu.
First, choose whether you want to work on this year's budget or next year's budget.
A list of your chart of accounts appears on the left side of the Budget window. Once you have
selected the appropriate account, you are able to record the monthly budget values in one of four
ways:
•
Annual amount - enter an amount, choose a rounding basis and click Update (this will
divide the amount by 12, round it as specified and update the twelve monthly values);
•
Percentage increase – enter a percentage that you want to increase the existing budget
amounts by. Existing budget amounts can be decreased by entering a negative
percentage.
•
Monthly amount - enter an amount, and click Update (update the twelve monthly
values); or
•
Enter/edit amounts directly - enter the appropriate values in to the 12 monthly boxes.
Note that once you have used either of the first three methods to update the budgets, you can still
use the fourth method to edit it.
Remember that outflows (i.e. expenses) should be entered as negatives (precede the
amount with a minus sign).
There is also provision for a brief description to be entered for each account. This can be used for
rough notes about how the amounts were arrived at, and when you print the Budget Report from
this section, you can elect to have this description print as well.
All amounts should be entered exclusive of GST/VAT.
At any time, you can click View to display or print the entire budget.
Calculating GST
The GST payable/refundable to/by the Tax Office or IRD is recorded in a separate GST
Payments/Refunds account in your chart. There are two ways to do this.
•
You can manually calculate and enter the budgeted GST payments or refunds as you
would any other account, and manually enter these amounts into your GST
Payments/Refunds account in your chart. To determine the amount of GST payable or
refund for a GST period, click the View button. This will show the budget as it stands,
including a net GST in/out line. Simply add the amounts as necessary, based on your
GST cycle (e.g. combining the monthly amounts into 4 lots of three months each of you're
on a quarterly cycle) and enter them into the appropriate box against the GST
Payments/Refunds account.
•
Alternatively, you can have CashManager calculate the GST Payments/Refunds for you,
based on the rest of the budget values entered. To do this, simply click the Calc GST
button, and enter the code for your GST Payments/Refunds account. CashManager will
then calculate the payment/refund amount for each period in your GST cycle. You can
then edit these amounts if necessary.
Importing Budgets
43
CashManager
This option is located on the Transactions | Import Budget menu..
There are two methods of importing budget data:Import from another CashManager file: Simply select the CashManager file that has the
budgets you want to import, choose whether you wish to import this year or next years budget
values from that file, and click Import.
Import from a CSV file: This will be ideal if you have used Excel or a similar spreadsheet
program to create your budget. The CSV file must contain column headings in row 1, called
Code, Bud1, Bud2, Bud3 etc etc up to Bud24. These columns can be in any order, and not all the
Bud... columns need be present. Also, any additional columns will be ignored by this process.
Transaction Browse-and-Edit
Transaction Browse-and-Edit is a way that users of CashManager PLUS can review their
transactions on the screen, and make selected edits as part of the review.
From the Transactions menu, select Browse-and-Edit. A grid will appear, displaying the year’s
transactions, sorted in account code order. As you move through the list, you can edit the account
code itself by right-clicking the transaction, and choosing Edit Transaction or Reallocate To…
The Edit Transaction menu option, and the Edit button, both load the highlighted transaction in
the Transaction Edit window, allowing you to edit any part of it. The Reallocate To… option
provides a quick way to assign that transaction to a different account in your chart, by selecting
the account from the menus and sub-menus.
You can size the columns by clicking the mouse pointer on the heading divider and moving it to
the desired width, and you can also change the relative positions of columns by dragging them to
their new location.
44
Transaction Entry
Invoice Logs
Invoice Logs are accessed from the Transactions menu, under Customer Invoice Logs or
Supplier Invoice Logs.
To add an invoice to the log, click New, and enter the date (using Quickdate if desired), the
invoice number, due date, purchase order number (if applicable), customer or supplier name
(using Names Easysearch if desired) and amount. GST users will also need to record the amount
of GST included in that amount.
The due date will be automatically calculated as soon as you enter the invoice date. This is based
on the payment terms you have established when activating the Invoice Logs feature.
If you want to abandon the invoice, click Re-do.
Click Accept to save the invoice, and click Close when you have added all invoices.
To edit an invoice in the log, locate and highlight it in the grid, click Edit, make any necessary
changes, and click Accept. If you want to abandon the changes and re-instate the original data,
simply click Discard.
To delete an invoice in the log, locate and highlight it in the grid, click Delete. This will remove all
record of this invoice from the invoice log.
Receipt Printing
Receipts can be printed from
any deposits created using
the Deposit Slip option.
Simply click the Receipts
button on the Deposit Slip
form.
The receipt layout is a
standard receipt layout, but
can be modified with the
assistance of the Accomplish
Support Team.
Using Invoice Logs
If you have activated the Invoices Logs feature, clicking the Invoice Logs button in the
Transaction Entry window will open an Easysearch window to your file of unpaid invoices. If you
are entering deposits, the Easysearch window will display unpaid customer invoices, and if you
are entering payments, the Easysearch window will display unpaid supplier invoices.
Once the Unpaid Invoices window has opened, you can move through the list using the scroll
bars, and you can sort the list by Date, Due Date, Reference or As Entered by using the Sort
order dropdown list.
45
CashManager
Mark off the invoice or invoices being paid by “ticking” the appropriate line or lines. A tick will
appear alongside the item, and the cumulative value of ticked items at the top of the grid will be
updated.
When you have ticked all desired invoices, click OK. This will close the Unpaid Invoices window,
returning you to the transaction entry screen. The sum total of ticked items will be offered as the
default amount, and the payee name and details lines will also offer appropriate defaults. You can
over-type these defaults if necessary.
Invoice logs are not available in CashManager Lite.
Journal Entries
If CashManager PLUS users activate the General Ledger option, a Journals option appears on
the Transactions menu.
A grid displaying all existing journal entries appears. To create a new journal entry, click New. To
edit an existing journal, highlight it and click Edit, and to delete one, highlight it and click Delete.
On the main journal entry screen, enter the date, a reference number, and a journal description.
Then, on the Journal Lines panel, enter the account code, amount, GST amount if applicable, and
a dissection description.
To add further lines, click Add, to edit a line, double-click that line, and to delete a line, highlight
the line and click Delete.
The same data entry tips that are available in the main transaction entry section are also
available here.
When you have finished adding all journal lines, click Accept.
46
Invoicing
Customer Setup
Enter the Customer Add/Edit screen through Customers | Add/Edit Customers.
Adding and editing
To add a new customer, click New. To edit a customer, highlight the customer in the grid, and
click Edit.
47
CashManager
The customer details appear in two tabbed pages - Contact and Other
Most of the information requested is self explanatory. However, an explanation of some of the
items appears below.
Code: All customers have codes. The code is a unique identifier for each customer, and is alphanumeric. Enter the desired code, up to ten characters in length. Codes must be unique - if the
code you choose is already in use, you will be advised accordingly.
Default prices: Items in the product file may have up to five prices each, and each customer
needs to belong to a price list group (e.g. a retail, trade or wholesale customer) and you can
chose the group here. Price 1 is the default offered during invoicing, however, prices can be overwritten during invoicing if necessary.
Default discount %: This discount rate will be used as the default whenever this customer is
invoiced. However, it can be edited at the time of invoicing.
Default payer: In some cases, the name on your customer's cheque might be different from the
customer's name so this provides a default that is used when entering receipts from the
customer. When a receipt for an outstanding invoice is entered through the transaction entry
screen, this name will appear in the payees field.
Default account: In Customer Invoicing, this account is used as the default code when you're
entering an adjustment to the customer's account. It is also used in the default dissection of a
customer deposit when CashManager has insufficient information to determine specifically what
48
Invoicing
elements of an invoice are being receipted or paid. This typically happens with part payments.
Finally, the default account is also used to "consolidate" transactions if you elect to purge old
customer or supplier transactions from the files.
Bank and branch (for deposit slip): This information will appear when entering deposits if you
have elected to use CashManager's deposit slip feature.
Payment terms: Customer invoices will have a default due date based on the setting here. You
can make it a fixed number of days from the invoice date, or a set day next month.
Customer group: Select a Customer Group if this feature is activated.
Referral: Select or enter the referral source for this customer.
Credit limit: By entering a non-zero credit limit, a pop-up alert will appear if an invoice will cause
the limit to be exceeded. if you want the customer to have no credit (as opposed to no credit limit)
set the limit to 1.
Notes: This is a free form text area that is virtually unlimited in size.
Deleting a customer
To delete a customer, highlight the customer in the grid, and click Delete.
Note that a customer cannot be deleted if they still have current year transactions. A message will
display in this instance.
Product Setup
Enter the Products screen through the Customers | Add/Edit Products.
Adding and editing
To add a new product, click New. To edit a product, highlight it in the grid, and click Edit.
49
CashManager
Code: All products have codes. The code is a unique identifier for each product, and is alphanumeric. Enter the desired code, up to 15 characters in length. If the code is already in use, you
will be advised accordingly.
Short Description: This is the description that is used in reporting.
Description: This is the actual wording that will appear on the invoice. If it is the same as the
Short Description, leave it blank, and the Short Description will be automatically copied to the
Description.
Default prices: Items in the product file may have up to five prices each, and each customer
needs to belong to a price list group (e.g. a retail, trade or wholesale customer) and you can
choose the group here. Price 1 is the default offered during invoicing, however, prices can be
over-written if necessary. Prices can be entered as GST exclusive or inclusive, depending on
your setup options under Invoicing Setup.
Default unit: Enter the unit to which the prices relate (e.g. kg, box, dozen, each, hour etc).
Show as freight: If you tick this box, the product will not appear as a normal invoice item, but will
be shown in a special Freight area on the printed invoice. If you use this option, make sure you
use an invoice layout that shows freight separately.
Default account: This is the code from your chart of accounts that you want to use for sales of
this product. If you are using CashManager as a standard cashbook, this code is used when
processing the customer's receipt. In the general ledger version of CashManager, it is used in
building the sales journal entry. The account code cannot be blank.
GST Rate: This is the GST percentage for this product.
Cost: If you have activated Cost Tracking under Invoicing Setup, you can record the unit cost
here. This is carried through into the invoice when the product is sold, where the cost for that
invoice can be edited.
Re-order Level: If you have activated the option to track stock movements under Invoicing
Setup, you can record the minimum stock level allowed before re-ordering is necessary.
Re-Order Quantity: If you have activated the option to track stock movements under Invoicing
Setup, you can record the quantity to order when stock level slips below the Re-order Level.
Deleting a product
To delete a product, highlight it in the grid, and click Delete. Note that a product cannot be
deleted if it has been used in any invoice. A message will display in this instance.
Customer Invoicing
The Customer Invoicing screen is the focal point for managing your customer invoices. From this
screen, you can create new invoices, print a range of invoices, enter adjustments, and edit and
delete invoices.
Note that there is no “posting” process in CashManager’s Customer Invoicing. As soon as an
invoice has been entered, it will appear on the customer ledger as outstanding.
To access CashManager Invoicing select the Customers menu, then Invoicing. Alternatively,
you can click the Customers toolbar button.
50
Invoicing
This displays the Customer Invoicing screen. Initially the screen shows the total outstanding in
respect of all customers. However, by entering the code for an individual customer (or selecting
the customer by clicking the Easysearch ellipsis), the display is filtered to show just that
customer’s invoices as well as any unmatched adjustments and receipts.
Further, you can elect to show either just the unpaid transactions, all transactions or all
transactions this year.
This list can be sorted by Date, Details, Reference Number, Amount, Customer Code or Name,
from the Sort By dropdown list.
By right-clicking on the invoicing grid a pop-up menu appears. Options allow you to quickly tick all
invoices entered today for printing, copy an invoice, and find a transaction.
See also Creating and Editing Customer Invoices.
Streamlined Invoicing
Streamlined invoice is a quick way of creating very simple invoices.
When this feature is activated under Invoicing Setup (Setup | Options on the Customers tab),
the normal multi-line invoice is reduced to a simple invoice with the usual header details, but with
one large text area for the details and just one place for you to record the invoice amount
including GST.
Complete the details as requested, and then click Print. The normal Print Invoice dialog will
appear, but you will need to select the layout titled Simplified Invoice.
51
CashManager
Creating and Editing Customer Invoices
To create a new customer invoice, simply click Invoice on the main Customer Invoicing screen.
The Invoice screen consists of two sections:
•
Invoice Header, which contains the customer’s name, date, invoice number, address and
reference, and
•
Invoice Body, which contains details of the products being invoiced.
Most of the data fields are self-explanatory, but some explanation is offered below.
52
Invoicing
Invoice header
Customer Code: Enter the customer code using, if necessary, Easysearch, by pressing F2 or
clicking the ellipses (…). Once you have chosen the customer, their name will appear on the
screen and the address will show in the address boxes. Remember that new customers can be
added from the Easysearch window by clicking Add, or their details edited by clicking Edit.
Invoice Number: The next invoice number will appear as a default. This can be overridden if
necessary.
Invoice Date: The date defaults to the current date but can be edited to any date required. Any
date can be entered, but a warning will appear if you attempt to enter a date outside the current
financial year.
Due Date: This is based on the terms set up under the Customer Add/Edit menu.
Customer Reference: The reference may be an order number, the name of the person who
placed the order or a general comment to appear on the invoice and optionally on the customer
statement.
Alternate Reference: This may be used as an alterative customer reference field, and may be
formatted onto the invoice layout.
Postal and Delivery Address: These details are extracted from the customer file, but can be
edited. Any changes you make here will only affect this invoice – the details on the customer file
remain unchanged.
Invoice body
The invoice body is displayed in a grid format, and individual lines are added by clicking the Add
Line button, which loads a new window, where the following items are entered:Product Code: Enter a product item code. You can enter a code directly, or open the Products
Easysearch window by pressing F2 or click the ellipses (…). Remember that new products can
be added from the Easysearch window.
Price List: This dropdown allows you to select an alternative price at the time of invoicing. When
the product is selected, the Price List dropdown will initially show the appropriate price for this
customer, based on the Price List they belong to. However, you can elect to invoice this product
to them at a price from an alternative Price List, or to use a special price.
Quantity: This is the number of units sold. If you are producing “service-style invoices” when the
quantity doesn't appear on the invoice, enter a quantity of 1 and record the total charge as the
unit price.
Unit: The unit is extracted from the product file, but can be edited if necessary. Example of units
are “boxes”, “hours”, “each” etc.
Unit Price: The default price will have been extracted from the product file, based on the price
group that the customer belongs to. It can be edited if necessary, but the altered price will only
apply for this invoice – the file price of the product will not be altered.
GST “Gross-Down”: Customer invoice entry requires that the unit price is entered as a GSTexclusive amount. If you only know the GST inclusive price however, you can enter it in the Unit
Price box, then click the “Gross-Down” button (the small button next to the unit price box). This
will calculate the GST-exclusive amount based on the GST rate in your file, and insert both that
amount and the GST amount into the appropriate boxes.
53
CashManager
Discount: Enter the percentage discount (if any) to apply to this invoice line. If the customer has
a discount under Customer Setup, this rate will be displayed on each new line, but can be
overwritten if necessary.
Sub-Total, Total: These fields are automatically calculated and cannot be altered.
Cost: If you have elected to have CashManager track invoice costs (see Invoicing Setup), you
can edit the unit cost that is attached to this invoice line.
GST Amount: The GST amount is calculated by applying the GST rate for that product to the
extended price. It can be edited to accommodate roundings, but it is recommended that it be left
as it is.
Description: A detailed description can be entered in the Description box. A line break can be
inserted into this field by pressing Control-Enter.
Once these details have been completed, click Accept to save the line, and you will be returned
to the main invoice screen.
Additional invoice lines are added by clicking Add Line, an existing line edited by highlighting it
and clicking Edit Line, and a line can be deleted by highlighting it and clicking Delete Line.
You can alter the sequence of the invoice lines by right-clicking a line and selecting the option to
Move Up or Move Down.
When you have finished entering the invoice, you can print it by clicking Print. You don’t need to
print the invoice immediately – if you are entering a number of invoices, you may choose to leave
them unprinted, then print them all in one batch when you return to the main Invoice screen.
To create another invoice, you can simply click New. To return to the main invoicing screen, click
Finish.
Editing customer invoices
Any invoice can be edited from the main Customer Invoicing screen. Simply highlight the invoice
and click Edit.
Deleting customer invoices
You are only permitted to delete invoices that are completely unpaid. If a partly or fully paid
invoice needs to be deleted, the payment or payments must be “detached” from it first. This is
done via the Matching screen.
Note also that even though receipts appear in the main Invoicing screen, they cannot be deleted
from here. Receipts can only be deleted from within the Bank Transactions screen, which is
where they were originally entered.
Customer credit notes
If you wish to enter a credit for a customer, simply enter an invoice in the normal way, but with
negative quantities. This will extend into a negative invoice total, and show as a credit in the
customer ledger, and as such, can be matched against the original invoice. Do not enter both the
quantity and unit price as negatives - in mathematical terms, two negatives extend into a positive.
CashManager provides two standard Credit Note layouts - they differ from the invoice layout in
that the words "Tax Invoice" are replaced with "Tax Adjustment (Credit Note)" and the negative
54
Invoicing
signs are suppressed. Alternatively, you can print the credit note as a normal invoice, and
quantities and amounts will appear as negatives.
Customer refunds
You can enter refunds
paid to customers in the
same way as normal
transactions. From the
transaction entry screen,
click the Invoices button,
but select the appropriate
option from the drop down
list at the top of the form.
For example when entering a cheque or direct debit, when you click Invoices, the default option is
"Payment to a supplier". However, if the payment was a refund to an account customer, you
would select "Refund to a customer" from the drop down list.
Of course, if you hadn't activated CashManager's customer Invoicing, this option wouldn't appear,
because a refund to a customer wouldn't affect the ledger at all.
See also Printing customer invoices.
Customer Adjustments
A customer adjustment is an entry to a customer's account that does not produce a paper
document. An example is a bad debt write-off.
Customer adjustments are entered in a similar way to bank account transactions, where they are
dissected to one or more account codes from your chart of accounts. This is in contrast to an
invoice entry, where the account code or codes are determined from the codes that are attached
to the particular products being invoiced.
55
CashManager
Customer Quotes
The Quotes feature in CashManager is very similar to Invoicing. The process for building a quote
is identical to that for an invoice. See Creating and editing Customer Invoices for further details.
To create a Quote, select Quotes from the Customer menu. This displays a screen almost
identical to the normal invoice entry screen, and just like normal invoices. Quotes are created by
clicking Add, edited by clicking Edit and deleted by clicking Delete.
Like Invoice layouts, Quote layouts are user-editable (see Invoice Layouts), and standard layouts
for Quotes are shipped with CashManager.
Quotes can be converted to invoices by clicking the Convert button on the main Quotes screen.
You will be asked for an invoice number and invoice date (the next number in sequence, and
today’s date are the defaults). Once converted, a Quote can remain in the file, or can be deleted.
It is recommended that converted quotes be deleted, so that any quotes remaining in the Quotes
file at any time are “pending” quotes.
Printing Customer Invoices
Invoices can be printed individually when originally created, or by calling up the invoice for
editing. This is done by clicking Print from the main Customer Invoicing Screen or an individual
invoice Edit screen.
Individual invoices and batches of invoices can be printed from the main Invoicing screen. Simply
tick the invoices you wish to print by clicking in the “Tick” column of the grid.
After ticking the required
invoices, click Print.
You can also elect to tick all
invoices dated today, or
dated in any other period, by
right-clicking the list.
Alternatively, if you’re only
printing one invoice, there’s
no need to tick it- simply
highlight it in the grid, and
click Print.
You will then be presented
with a list of all the invoice
layouts in your invoice layout
files.
CashManager’s Customer Invoicing offers a number of standard layouts, including invoice and
credit note layouts for each of a “product” type invoice (where the quantity and unit price for each
item are shown) and a “professional” type invoice (where just the description and GST-exclusive
price for each item are shown), as well as a generic GST-at-end-of-invoice layout and a detailed
landscape style invoice. The credit note layouts are identical to the corresponding invoice layout,
with the exception that signs are reversed and the words “Tax Adjustment (Credit Note)”. These
layouts are user-editable - see Invoice Layouts.
56
Invoicing
You can also add an invoice message. Previously used messages are remembered, and are
available from the dropdown list. Otherwise, enter a one-off message or leave it blank. Standard
invoice messages are managed under Customer | Add/Edit Invoice Messages.
Select the layout applicable to the invoice or invoices being printed, and click OK.
Customer invoices can be emailed to customers, individually or in bulk, from the Report
Previewer form. To assist with bulk-emailing of customer invoices, there is an option under the
right-click pop-up menu to only list customers with email addresses. This assists you with
batching up all the invoices that can be emailed into one group.
Locking Invoices
After printing an invoice, you will be given the choice of "locking" it. Once locked, an invoice
cannot be edited (though can be unlocked easily and then edited). As well as being a safety
control, this also provides a way of tracking which invoices have been printed.
Invoice Messages
When printing invoices, you can have a one-off invoice message by typing it into the Invoice
Message box, or
you can choose
one of a standard
list.
The standard list is
managed under
Customers |
Invoice
Messages.
Recurring Invoices
The Recurring Invoices feature in CashManager consists of a file of invoices that are identical in
structure and design to normal invoices, except they don’t appear as outstanding amounts on the
customers’ accounts. Instead, they are used as templates for invoices.
To create a Recurring Invoice, select Recurring Invoices from the Customers menu. This
displays a screen almost identical to the normal invoice entry screen, and just like normal
invoices. Recurring Invoices are created by clicking Add, edited by clicking Edit and deleted by
57
CashManager
clicking Delete. Once the invoice has been loaded, the process is identical to normal invoice
entry.
See Creating and editing Customer Invoices for further details.
The billing cycle isn’t recorded in CashManager. When you want to generate one, some or all
your recurring invoices, simply tick them in this screen, and click Generate. After confirming the
invoice date and invoice numbering starting point, click OK. Normal invoices will then be created
from the selected Recurring Invoices. You have the option of all generated invoices having a
static Customer Reference. This would be useful for raising invoices for standard monthly
charges - you could for example use "Hire - Nov 2009" .
Supplier Setup
Enter the Supplier screen through the Suppliers | Add/Edit Suppliers.
Adding and editing
To add a new customer, click New. To edit a customer, highlight the customer in the grid, and
click Edit.
58
Invoicing
Most of the information requested is self explanatory. However, an explanation of some of the
items appears below.
Code: All suppliers have codes. The code is a unique identifier for each supplier, and is alphanumeric. Enter the desired code, up to ten characters in length. Codes must be unique - if the
code you choose is already in use, you will be advised accordingly.
Default account: In Supplier Invoicing, this is the code that if offered as the default when
entering invoices from this supplier. It is also used for the default dissection of a payment when
CashManager has insufficient information to determine specifically what elements of an invoice
are being paid. This typically happens with part payments. Finally, the default account is also
used to "consolidate" transactions if you elect to purge old supplier transactions from the files.
Bank account numbers (for EFT payments): This feature is used if CashManager's EFT
function is activated. The format is country-specific, and should be 999-999-999999999 (3-3-9)
for Australian users and 99-9999-99999999-999 (2-4-8-3) for New Zealand users.
Deleting a supplier
To delete a supplier, highlight the supplier in the grid, and click Delete.
Note that a supplier cannot be deleted if they still have current year transactions. A message will
display in this instance.
Supplier Invoicing
The Supplier Invoices screen is the focal point for managing your supplier invoices.
CashManager Supplier Invoicing is accessed by selecting the Suppliers menu, and selecting
Invoicing.
59
CashManager
Initially, the Supplier Invoicing screen shows the total outstanding in respect of all suppliers.
However, by entering an individual supplier code, or selecting a supplier using Easysearch, the
display is filtered to show just that supplier's invoices.
Further, you elect to show either just the unpaid transactions, all transactions or all transactions
this financial year. This list can be sorted by Date, Due Date, Details, Reference Number, Invoice
Number, Amount, Supplier Name or Code, from the Sort By dropdown list.
Right-click on the invoicing grid and a pop-up menu appears. Options on this menu allow you to
quickly tick all invoices that are due for payment by a nominated date, reverse an invoice, copy
an invoice, and quickly find an invoice.
From this screen, you can enter new invoices and credit notes for suppliers, edit and delete
invoices that have already been entered, and pay a selection of invoices.
See also Creating and Editing Supplier Invoices.
Creating and editing Supplier Invoices
Supplier invoices and credit notes need to be allocated to one or more account codes in your
chart of accounts, in the same way as bank account transactions are entered. This is how
CashManager determines the default dissection when you pay that invoice. If you are using
CashManager's general ledger feature, the coding of each invoice forms the basis for the
purchase journal that is generated.
To enter a supplier invoice, click Invoice from the main Supplier Invoice screen.
Most of the fields on the invoice screen are self explanatory, but an explanation of some of them
appears below.
Supplier Code: Enter the customer code at the top of the screen using, if necessary,
Easysearch, by pressing F2 or pressing the ellipses (...). The name of the supplier you select will
appear on the screen. Remember that you can add new suppliers by clicking Add in the
Easysearch window, or edit their details by clicking Edit.
60
Invoicing
Date: This is the invoice date. The date defaults to the current date but can be adjusted to any
date required. Any date can be entered, but a warning will appear if you attempt to enter a date
outside the current financial year.
Ref No: This is an internal number, and is set by the system and cannot be overwritten.
Due Date: Record the due date for payment. This is particularly relevant if you are going to use
Payments Wizard to pay invoices as they fall due. The default payment terms for each supplier
are recorded in the suppliers file, and the appropriate due date is offered, but this can be altered if
necessary.
Invoice No: This is the supplier's invoice number. If supplier's invoice doesn't show an invoice
number, enter something meaningful, like "June account" so that where you're making payments
or reviewing reports, there is something to tell you what the invoice was for.
Held: if you want the invoice to be held out of any payment runs, click the Held check box.
Transaction Dissection: This is identical to the process you use when entering a bank
transaction to CashManager.
Credit Notes
If you wish to enter a credit against a supplier account, simply click Credit Note. The screen is
identical to the supplier invoice screen.
Editing supplier invoices
Any invoice can be edited via the main Supplier Invoicing screen. Simply highlight the invoice and
click Edit.
Deleting supplier invoices
You are only permitted to delete invoices that are completely unpaid. If a partly or fully paid
invoice needs to be deleted, the payment or payments must be "detached" from it first. This is
done via the Matching screen.
Note also that even though payments appear in the main Suppliers Invoicing screen, they cannot
be edited or deleted from here. Payments can only be deleted from within the Bank Transactions
screen.
Supplier debit notes
If you wish to enter a debit for a supplier (e.g. for goods returned to the supplier), simply enter an
invoice in the normal way, but with a negative amount. This will show as a debit in the supplier
ledger (supplier invoices are normally credits), and as such, can be matched against the original
invoice.
Supplier refunds
You can enter cash refunds received from suppliers in the same way as normal transactions.
From the transaction entry screen, click the Invoices button, but select the appropriate option
from the drop down list at the top of the form.
61
CashManager
For example when entering a deposit, when you click Invoices, the default option is "Payment
from a customer". However, if the deposit was a refund from a supplier, you would select "Refund
from a supplier" from the drop down list.
Paying and Receipting Invoices
Receipts against customer
invoices and payments towards
supplier invoices are entered in
the normal Transaction Entry
screens. (The exception is where
you are using the Payments
Wizard to automatically pay
suppliers' invoices - this is done
via the Suppliers Invoicing
screen.)
When Customer and/ or Supplier Invoicing is activated, an Invoices button appears on the
Transaction Entry screen. When recording a payment to a supplier or receipt from a customer,
click this button.
It is best to do this before entering any other details apart from the date, because
CashManager will automatically provide defaults for the name, amount and dissection, based on
the invoice you marked off as being paid.
In the screen that follows, select the customer or supplier and click OK. Note that you gave the
option to just display customers who have amounts outstanding. This option will be remembered
for next times you search for invoices to be paid.
You can also use the Locate button on this form to search for the customer who has a particular
invoice - this will be useful where you know the invoice number but not the customer.
This will load the Matching screen, showing all that customer's or supplier's unpaid invoices or
otherwise unmatched transactions. Simply tick each invoice that's being paid by clicking in the
Tick column, or double clicking anywhere else on the line. To un-tick an invoice, simply click in
the tick column again.
62
Invoicing
If all unpaid invoices are being paid, you can select them all quickly by right-clicking the grid, and
choosing Tick All from the pop-up menu.
Note on the top right corner of the screen, the Total Selected appears, and this increases as you
tick the invoices. If you entered the original cheque or deposit amount in the Transaction Entry
screen before clicking the Invoices button, this also appears alongside Total as entered.
If you need to record a part-payment of a particular invoice, highlight the relevant invoice and
click Part-Pay, or chose Part-Pay from the right-click pop-up menu. You will then be asked to
enter how much of the current invoice you wish to mark as paid.
If the customer has deducted a settlement discount from their payment, this needs to be entered
as a customer adjustment. However, you can achieve this very simply from this matching screen
by clicking Discount. Enter the amount of discount the customer has deducted, and click OK.
This will automatically generate a Customer Adjustment and will appear in the Unmatched
Transactions list as a ticked item. (Note that for the Discount button to be enabled, you need to
enter the Settlement Discount account from your chart under Customer Invoicing Setup.)
When you've selected all the invoices being paid, click OK. This will take you back to the
Transaction Entry screen, with the transaction completely loaded. All you need to do to save the
transaction is click Accept. As well as saving the deposit or cheque itself, this will also update
your customer or supplier ledger to record the fact that the invoices are paid.
The transaction offered back in the Transaction Entry screen is completely editable - you may
elect to alter the way CashManager dissected the amount, or to embellish the description.
However, users of CashManager Plus with the general ledger feature activated should not edit
the dissection, as customer receipts and supplier payments must be posted to the nominated
customer or supplier control account. CashManager will offer this account as a default, and
changing it will result in your invoicing ledger being out of balance with your general ledger. A
warning will appear if you attempt to do this.
Note that if you abandon the transaction at this point, it will be abandoned completely. Even
though you clicked OK on the Invoice Selection screen, this matching will be "wound back" if the
bank transaction is abandoned.
If you wish to enter a deposit from a customer or a payment to a supplier which does not
relate to any particular invoices, or you wish to allocate the deposit or payment to the appropriate
invoices later, click the Invoices button, locate the customer or supplier, and click OK without
ticking any invoices. You will then need to dissect the transaction manually, as CashManager has
no way of knowing what the dissection should be.
Paying Supplier Invoices
There are two methods of paying your suppliers.
The first method is to manually enter cheques or direct payments into CashManager's bank
transactions area as you would enter non-creditor payments, and click Invoices in order to select
the invoices being paid. This will update the supplier ledger account, but will not provide a
remittance advice. You would use this method if you do not want to use CashManager to print
cheques or remittance advices. This process is described under Paying and Receipting Invoices.
The second method of paying supplier invoices is to process the payments from the Supplier
Invoicing screen, using CashManager's Payment Wizard. This allows you to print cheques and/or
remittances, or to create an EFT payment.
63
CashManager
Payment Wizard steps
First, from the main Supplier
Invoice screen, tick the
invoices you wish to pay. You
can manually tick each
invoice, or right-click the grid,
choose "Select By Due Date"
and enter a date.
If you have a mixture of
suppliers who you pay by
cheque and by EFT, you
should elect to filter the list by
payment method. This allows
you to process the two groups
separately.
Next, click Pay. This launches the Payments Wizard.
The first screen of the Wizard allows you to review the invoices being paid, and to part-pay some
of them. To part pay an invoice, highlight it, click Part Pay, and enter the amount to pay. To
remove an invoice from this batch, click Remove.
The second part of the Payments Wizard allows you to print the proposed payment listing, so you
can check the actual payments you are about to make. When you're happy with the payment to
be made, click Next.
On the next page of the Wizard, select the payment method (Cheques, Direct Debits or EFT) and
if you have more than one bank account opened, select the bank account that the payments are
to come from.
The next step is the actual printing of the cheques and/or remittance advices. Choose the layout
you want from the list. Remember
that you can customise these
layouts (see Invoice Layouts), and
even create new layouts, using the
RAVE report writer.
The final step is to update the
payments. Note that you cannot
move to the final step until you have
printed the remittance advices or
cheques in the previous step. This
final step generates the cheque or
direct debit entries, and updates
your bank account balance.
If you have chosen to pay suppliers
via an EFT transaction, a Create EFT Transaction File window will then display, allowing you to
create the file of this payment. If you do not create the file, you may do so from the bank
transaction screen later.
64
Invoicing
Matching Invoicing Transactions
Matching is the process that allows you to match payments to invoices. Most matching occurs at
the time of entering payments and deposits, but occasionally the need may arise to manually
control transaction matching in the customer or supplier ledger. An example would be the
offsetting of an invoice and credit note on a customer's account.
Manual matching is done by selecting Matching Transactions from the Customers or
Suppliers menu.
Enter the customer or supplier code, using, if necessary, the Easysearch feature.
The grid displays all unmatched transactions for that customer or supplier. An unmatched
transaction is defined as a transaction that has an "unallocated" portion, and includes invoices
that are partly or fully unpaid, as well as any unmatched adjustments, receipts or payments.
By definition, the matching process cannot change the net amount owing to or by a customer or
supplier. Consequently, the net total of all matches must be zero before it can be applied.
Move to the first transaction to be matched, and enter the amount to be matched in the Amount
column. If the whole transaction is to be "absorbed", enter the amount as it appears in the
Unmatched column, complete with the same sign. A quick way of doing this is to double-click the
row. The Result column will show what portion of the transaction will remain unmatched once the
matching is confirmed.
Keep entering the matches for this customer or supplier. The running total of all matches is
displayed at the top right of the screen. This needs to be zero before the matching can be
confirmed.
For complicated matching and unmatching, you may find it easier to enter the desired result you
want in the Result column, and CashManager will work out the Match amount based on this. For
example, if you wanted to return a payment or invoice back to being completely unmatched,
make the Result column the same as the Amount column, including the same sign.
Remember, that it is the net total of all amounts in the Match column that need to equal zero.
65
CashManager
When you have finished entering the matches, check that the running total is zero, then click OK.
After confirming that you wish to accept the proposed matches, the matching process will be
performed, and the Matching screen will be cleared.
Q: I have applied a deposit to a customer invoice, but now realise that it was for a job that wasn’t
invoiced.
A: In this case, you need to remove it from the customer ledger side of CashManager, and then
change the account code to the correct one.
If you didn’t actually apply the receipt to any of the customer’s other outstanding invoices, then all
you need to do is bring the deposit for editing in the normal way, click on the Invoices button, and
from the dropdown at the top of the screen, choose ‘Not related to Customers or Suppliers.’ This
unhitches the receipt from the Invoicing ledger completely, and you can then allocate it to
whatever account is appropriate. CashManager Plus users should note that it should not be
posted to the customers control account, as it is no longer anything to do with customer invoicing.
However, if you accidentally applied the receipt to some of the customer’s unpaid invoices, it
needs to be unmatched from them first. You need to un-apply the transactions, so that the
receipt’s unmatched amount is identical to the original receipt amount. This is done in the
matching screen (Customers | Matching Transactions menu), by locating the receipt, and entering
the original amount of the receipt into the Result column (being careful to match the sign as well
as the amount). Next, you need to reinstate the invoices that you accidentally paid so that they
are fully unpaid. This is done in the same way. After you have done this, the net total of the
matched amounts should be zero, and you can click OK to apply the changes. Once you have
done that, the receipt can be called up in the Edit Transaction window, and you simply follow the
procedure described in the paragraph above.
Invoice Matching FAQs
Q: I have applied a customer receipt to the wrong customer, and accidentally applied it against
some invoices.
A: Before it can be removed from this customer, you need to un-apply the transactions, so that
the receipts unmatched amount is identical to the original receipt amount . This can be done in
the matching screen, by locating the receipt, and entering the original amount of the receipt into
the Result column (being careful to match the sign as well as the amount). Next, you need to
reinstate the invoices that you accidentally paid so that they are fully unpaid. This is done in the
same way. Hopefully, after you have done this, the net total of the matched amounts will be zero,
and you can click OK to apply the changes.
If it is getting too complicated because of pre-existing part matches or similar, as a last result you
can right-click the matching grid, and choose Un-match All. This will force all invoices and
receipts/payments to their original unmatched state, and then you can re-do the matching in an
orderly manner, periodically clicking OK when you’ve reached a temporary in-balance situation.
Once you have returned the receipt to its fully un-matched state, you can call it up for editing in
the normal transaction entry screen, click the Invoice button, re-select the customer, and apply it
to that customer’s outstanding invoices.
Invoicing Easysearch
When you need to enter a code for a Customer, Supplier or
Product, click the ellipsis (...) that appears next to the code box.
This will open Easysearch, allowing you to search for the desired
item.
66
Invoicing
To locate the desired code, move through the list using the scroll bars.
You can sort the list in
code sequence or name
sequence with the “sort
by” list box. You can
also speed your search
by typing the beginning
characters of the code
(if the list is sorted in
account code
sequence) or name (if
the list is sorted in name
sequence).
When you have located
the account you want,
click Select, or press
Enter. To close the
Easysearch window without selecting an account code, click Cancel or press Escape.
To add a new item, click Add. This will load the appropriate Setup form, where you can add the
details.
You can also edit an existing item by clicking Edit from the Easysearch window.
The keyboard function keys also open Easysearch - F2 opens the Easysearch window in Code
order and F3 opens it in Name order.
CashManager will remember the sort order when you last used it, and will offer that next time you
open the Easysearch windows.
Parent-Child Customers
CashManager's Parent-Child feature allows you to create customers that are subsidiaries of other
customers. A typical example is where you need to set up several customer accounts for
divisions of a customer, but want all statements to be sent straight to one "parent" customer.
With this option activated under Invoicing Setup, the Parent/Child option appears on the
Customer Add/Edit form.
A customer can either be:•
a parent (i.e. can have "child accounts" attached to it);
•
a child (in which cas you need to nominate the parent code) ;
•
or neither (i.e. just a normal customer).
67
CashManager
With the Parent/Child feature activated, all invoices raised to "child" customers will be allocated to
the nominated parent code, and will appear on their monthly statement.
This option also allows the sales reports to be run with either the parent code or the child code as
the posting code.
Customer Statements
Customer Statements can be printed for one customer or for a range of customers.
To print statements, from the Customers menu, choose Statements. Select the customers for
whom you want to print statements and click Print. You can select all customers by clicking Tick
All.
Next, choose the "ageing"
month. The ageing month
determines the calculation of
the amounts that appear in the
Current, 30 Days, 60 Days etc
boxes on the statement. For
example, if you choose March
2006 as your ageing month, all
transaction dated March 2006
are aged into "Current",
February 2006 transactions as
"30 days" and so on.
Weekly ageing can also be
used, by selecting this option
under Setup | Options on the
Invoicing tab.
When you print statements, there is a check box that allows you to include statements for
customers who have a nil balance on their account.
You can also nominate a Statement Message to appear on all statements. The standard
message can be set under Invoicing Setup, but the message can be overwritten when running
the statements.
Finally, select a statement layout. There are four standard layouts that ship with CashManager
Invoicing:
•
a plain paper layout in the more popular “open item” style;
•
a letterhead layout in the more popular “open item” style; and
•
a plain paper “brought-forward” style layout
•
a plain paper statement with weekly ageing.
The letterhead layout doesn't show your company name or address, but leaves a gap at the top
in expectation of your letterhead showing all necessary details.
68
Invoicing
Standard statement layouts can be edited, and new statement layouts created, using the RAVE
Designer report writer that ships with CashManager Invoicing. See Invoice Layouts.
Statements can be emailed to customers, individually or in bulk, from the Report Previewer form.
Customer Reports
The Customer Reports area can be accessed by the Reports menu option under the Customers
menu.
CashManager Invoicing provides a range of reports to help manage your customers and
suppliers. The reports are:
Customer Aged Analysis Report
The Customer Aged Analysis report provides you with aged balances owing, with ageing relative
to the nominated month. Note that this is a "real-time" report - all outstanding invoices, regardless
of their date, are included in this report, even if they are dated subsequent to the ageing month
nominated. Balances are aged across monthly time bands, but weekly ageing can also be used,
by selecting this option under Invoicing Setup.
You can sort the report by customer code or by amount owing (highest to lowest).
If you have activated Customer and Product Groups (under Invoicing Setup), and have assigned
your customers to different Customer Groups, the Customer Aged Analysis Report can divide this
report into the different Customer Groups.
69
CashManager
There is also the option to show the specific invoices that make up the outstanding amount, as
well the individual invoice lines on those invoices.
Customer Ledger Report
The Customer Ledger Report shows all the transactions on file for the nominated range of
customers, for the nominated period. This report shows the original amount of each transaction
regardless of whether or not it has been partly or fully paid or applied.
Summary Sales and Product Reports
The Summary Sales Report and Summary Product Report show the analysis of customer or
product sales, for a twelve month period, for a nominated range of customers or products.
You can elect to show either dollar values or quantities in the Product reports. You can sort the
reports by code or amount.
If you have activated Customer and Product Groups (under Invoicing Setup), and have assigned
your customers to different Customer Groups, the Summary Sales Report can divide this report
into the different Customer Groups.
Transaction List
The Customer Transaction List details the transactions for a user-nominated period. It is a good
working report for checking on your data entry. When run in Reference Number order, this report
will highlight any missing invoice numbers.
Customer Labels
You can print address labels for customers. Simply specify the dimensions of the labels and
nominate a range of customers. The labels print name, contact and address.
Once you have set your label dimensions, they will be remembered by CashManager for next
time.
If you have activated Customer and Product Groups (under Invoicing Setup), and have assigned
your customers to different Customer Groups, customer labels can be sorted into the different
Customer Groups.
Customer and Product Lists
The Customer List and Product Lists present the particular data for a user-nominated range. The
Customer List also gives you the option of including addresses in the report.
The Product List shows the three prices of each item, as well as the GST rate and the account
code from your chart that each product is linked to.
If you have activated Customer and Product Groups (under Invoicing Setup), and have assigned
your customers to different Customer Groups, the Customer List and Price List can be divided
into the different Customer Groups.
Detailed Sales Report
The Detailed Customer Sales Report displays your sales for a nominated customer or product for
a twelve month period.
70
Invoicing
If you choose to report on a customer, it will show a sales summary of each product item
purchased for the nominated customer. Conversely, if you choose to report on a product, it will
show a sales summary of each customer who purchased the nominated product.
You can elect to show either dollar values or quantities in the Product reports.
Group Sales Reports
These reports are only available if you have activated Customer and Product Groups (under
Invoicing Setup).
The Group Sales Reports present product group and customer group totals only – no individual
products or customers are shown.
You have the choice of running the report by Product by Customer (each customer group is
listed, with the individual product group totals shown beneath each customer group) or Customer
by Product (each product group is listed, with the individual customer group totals shown
beneath each product group).
Gross Profit Report
The Gross Profit Report covers all sales over a nominated date range, and shows the invoice
amount, the cost, and the gross profit. It is only available if you have activated the Track Product
Costs feature under Invoicing Setup.
There is an option to print this report in summary form Customer-by-Product or Product-byCustomer, and to also list the individual invoices.
Search Invoices Report
This is like the Search by Name report from the main CashManager Reports form. It scans all
invoice data for the nominated word/s.
Customer Reconciliation Report
This shows your customer control's opening balance, invoices, adjustments and receipts, and
closing balance.
Product Reports
These report are only available if you have activated Product Ledger (under Invoicing Setup).
The Summary Product Report shows opening balance, total movements and closing balance
on a one-line-per-product basis. If you run the report as the present date, it will be a stock on
hand listing
The Detailed Product Report is like a ledger, showing opening balance, all movements in and
out and a closing balance for each product.
The Product Re-order Report lists all products whose stock level has fallen below its re-order
level, and also lists the order quantity for each of those products.
71
CashManager
Supplier Reports
The Supplier Reports area can be accessed by the Reports menu option under the Suppliers
menu.
CashManager Invoicing provides a range of reports to help manage your suppliers. The reports
are:
Supplier Aged Analysis Report
The Supplier Aged Analysis report provides you with aged balances owing, with ageing relative to
the nominated month. Note that this is a "real-time" report - all invoices, regardless of their date,
are included in this report, even if they are dated subsequent to the ageing month nominated.
Balances are aged across monthly time bands.
You can sort the report by supplier code or by amount owing (highest to lowest).
Supplier Ledger Report
The Supplier Ledger Report has two views - it can show:•
all transactions for the nominated range of suppliers, for the nominated period, grouped
by supplier.
•
all transactions for the nominated range of expenses, for the nominated period, grouped
by expense.
This report shows the original amount of each transaction regardless of whether or not it has
been partly or fully paid or applied.
Summary Purchases Reports
72
Invoicing
The Summary Purchases Report shows the analysis of supplier purchases, for a twelve month
period, for a nominated range of customers or products.
Transaction List
The Supplier Transaction List details the transactions for a user-nominated period. It is a good
working report for checking on your data entry.
Supplier Labels
You can print address labels for suppliers. Simply specify the dimensions of the labels and
nominate a range of suppliers. The labels print name, contact and address.
Once you have set your label dimensions, they will be remembered by CashManager for next
time.
Supplier List
The Supplier List presents the particular data for a user-nominated range. It also gives you the
option of including addresses in the report.
Supplier Expense Analysis Report
The Supplier Expense Analysis Report can be run in two different ways:
•
By selecting Supplier Analysis from the report parameters, the report presents a list of
supplier invoices in the nominated date range, showing the expense etc codes they were
dissected to. When running this report, you can present it Supplier by Expense (listing all
the expenses individually, and showing the relevant suppliers beneath each expense) or
Expense by Supplier (listing all the suppliers individually, and showing the relevant
expense beneath each supplier).
•
By selecting Period-end Analysis from the report parameters, the report presents an
analysis of the expenses that all unpaid invoices relate to. If any outstanding invoices are
partly paid, they will be listed separately at the end of the report, because CashManager
is unable to determine with certainty which expense or expenses the part-payment
related to. This report will be ideal for accountants seeking to determine period-end
closing creditors journal
entries.
Bulk Emailing
Customer invoice and statements, and
supplier remittances, can be "bulkemailed". This means that a number of
documents for different
customers/suppliers can be selected,
and as long as each selected
customer/supplier has an email
address set up, CashManager can
73
CashManager
email each one to the appropriate recipient.
This is done by clicking Bulk Email on the screen where you select the layout you want to run.
Once this option is selected, the Email Invoices form will show, listing the documents that are
about to be emailed. If any documents can't be emailed (e.g. because the email address isn't
complete), a message will appear in the Result column.
Review the list carefully. If you need to remove a document from this batch, right click it, and
choose Delete from the pop-up menu.
When ready, click Send All to send all emails in the batch, or Send to send the highlighted one
only.
When the email/s have been sent, the result will show up in the Result column of the grid.
Price Update
Apart from manually editing prices for your products under Product Add/Edit, you can have
CashManager automatically apply an increase or decrease across all products. You can limit this
to just one, some or all of your three price lists, and if you have activated the Customer and
Product Group feature, you can also limit this process to selected Product Groups.
74
Invoicing
To increase or decrease prices,
select Update Product Prices
from the Customers menu.
Select whether you want prices
to change by a percentage or a
fixed amount, and record that
percent or amount. Precede the
amount or percentage with a
minus sign to process a price
decrease. Choose a rounding
policy, and if you have activated
Groups, choose the Product
Groups to be updated. When
done, click Update.
Stock Received
If you have activated the option to track stock movements, a menu option Product Received /
Adjustments appears on the Customers menu. This allows you to record goods received and
stock level adjustments.
Stock Received
Stock received and adjustment entries are entered in a batch basis, where each batch might be
one supplier's shipment.
To record stock received, from the Product Received Batches screen, click Goods In. Record
the date, an optional reference number, and a comment that will apply to this whole batch. If you
are batching up stock receipts by supplier, you can record the Supplier Name and perhaps an
invoice number in the Comments field.
75
CashManager
In the lower half of the screen, record the individual products that were received as part of this
shipment. Enter the Product Code (using the products Easysearch if necessary), the quantity and
optional details.
When you have entered all the products that were received for this batch, click Accept, and a
new batch will be loaded.
Click Close when done.
Stock Adjustments
A typical Stock Adjustment entry might be an adjustment to stock levels after a stocktake reveals
missing stock.
Stock Adjustments are entered in exactly the same way as entering goods received described
above.
Merge Customers and Products
You can merge two customers or
products together. This is useful if
you:•
find that a customer or
product has been entered
twice in error
•
you want to delete
customers or products
you are no longer dealing
with, but want to retain
the transaction on file.
To achieve the latter, enter a new
customer (or product) called, for
example, Old Customers with a code of ZZZZZ. Move redundant customers to this account and
delete the redundant one.
Purging Old Invoicing Transactions
CashManager allows you to delete old transactions from the customer and supplier ledgers. It
does this by consolidating all the transactions on a customer-by-customer or supplier-by supplier
basis up to the nominated purge date into one consolidated adjustment per supplier or customer.
To purge old transactions, select Purge Old Transactions from the Customers or Suppliers
menu, enter the nominated date and click OK.
The nominated date must be before the start of the current financial year.
76
Invoicing
As this process deletes transactions from your file, it is strongly recommended that you make
a backup of your CashManager files before
purging.
Contact Management
CashManager’s Contact Management system is available as part of the Invoicing module, and
also to users of CashManager Standard and Plus. It allows you to log notes and follow-ups
against contacts, and also to create an export file of selected contacts for mail merging.
Contact management is activated under the Setup | Options menu. Simply click the tick box on
the Features tab.
If you are using CashManager Invoicing, your customer and supplier files are automatically linked
to Contact Management, so that all existing customer and suppliers will become contacts.
Contact add/edit
Contacts are added and edited by clicking the Contacts toolbar button, or by clicking the
Contacts menu and choosing Contacts.
To add a new contact, click the Add button. To edit a Contact, highlight the name in the grid, and
click Edit. This will display the Contacts form, where you can enter / edit the various details.
Users of CashManager’s invoicing feature will note that all existing customers and suppliers are
part of the Contact system. You can add or edit customers or suppliers in this section, or from
within the Customer or Supplier Invoicing side of CashManager – there is no difference.
Contact notes
Notes can be attached to contacts to record conversations, reminders and other memos.
To add a Note, from the main Contact screen, highlight the Contact and click Notes. This will load
the Note form, showing at the top all current notes for this contact. To add a Note, click Add
Note, complete the details, and click Accept. To edit a Note, highlight it in the list at the top,
make any edits in the fields below, and click Accept.
To discard a note you are adding or editing, click Discard, and to delete a note already in the file,
highlight it and click Delete.
Date: This is the date of the Note entry, and defaults to today’s date.
77
CashManager
Person: This field can be used for either the person you spoke to or the person from your
company who is making the Note.
Follow-up: This is the follow-up date, if required. Click the check box if follow up is required, and
enter the follow-up date. Leave the check box unticked if no follow-up is necessary.
Details: This is where the actual note is recorded. There is no limit to the amount of data you can
enter here.
To Do List
The To Do List is a list of all Notes that have a follow-up date. It is accessed by clicking To Do
List from the Contacts menu.
You can elect to show All Events, or just those that are due today or earlier. You can also sort this
list by Due date, Contact Name or Person. Sorting by Person may be useful if you use the Person
field to record the name of the person in your organisation who made the Note.
To look at a particular Note in the To Do List, highlight it and click Show, or double-click the row.
This will load the Note screen.
You can also elect to have CashManager remind you when you have due tasks whenever you
load the program. This is activated under Setup | Options, on the Features tab.
Exporting Contacts
Contacts name and address details can be exported to a CSV file. This sort of file can be opened
in MS-Excel and other spreadsheet programs, and can also be used as a mail merge data source
with MS-Word and similar programs.
To export contacts, select the main Contacts form by clicking on the Contacts toolbar button, or
by choosing Contacts from the Contacts menu.
Select the contacts you want to export, using the Tick All button to select them all if necessary,
and click the Export button. On the next form, choose the name for the export file. You can elect
to automatically add a Note to all exported contacts, and if you wish to do this, click the checkbox,
and complete the details.
When done, click OK. The export file will then be created.
Importing Contacts
Contacts can be imported from a CSV file, via the menu option Contacts | Import Contacts.
There are two formats:
CashManager CSV format: this file must be formatted in the same way as the Contacts export
file
Microsoft Outlook CSV file: this file can be flexible in layout, but CashManager expects that the
column headings are in row one, and will look for the following columns to import (columns can
be in any order, and the only compulsory one is COMPANY):
COMPANY
BUSINESS STREET
BUSINESS STREET 2
BUSINESS STREET 3
78
Invoicing
BUSINESS CITY
BUSINESS STATE
BUSINESS POSTAL CODE
E-MAIL ADDRESS
BUSINESS FAX
BUSINESS PHONE
TITLE
FIRST NAME
MIDDLE NAME
LAST NAME
These column headings are among the default headings that Microsoft Outlook's Export option
uses.
Customer and Supplier Import/Export
CashManager allows you to import and export
Customer, Supplier and Product details. Exporting
these details creates ASCII files, which can be
opened in Excel, Notepad or similar programs. The
Import process expects ASCII files. To determine
the format required, simply create an export file,
and review the result.
You can also export and import Invoicing
transactions.
Exporting creates an ASCII file of invoices, with
either one line per Invoice (Invoices) or one line per
Invoice Line (Sales History).
The invoice import option simply imports one line
per invoice.
When importing invoices, you have the choice of
processing duplicated invoice numbers as follows:
* append a new invoice (default);
* overwrite the existing invoice; or
* do not import that invoice at all.
Note also that when importing Products, you have the option of auto-creating stock received
entries for items that show a current quantity in the import file.
79
Bank Reconciliation
Bank Reconciliation
The bank reconciliation is the process whereby the transactions on your bank statement are
compared with transactions entered into CashManager. By identifying which transactions have
been presented and which ones have not, CashManager can relate the balance showing on the
bank statement with what we know to be our true bank balance. In other words, we are
reconciling the balance showing on the bank statement with what CashManager believes is in the
bank.
CashMan
ager
offers two
methods
of
performin
g your
bank
reconcilia
tion – the
Standard
method
which
involves ticking off transactions on your paper bank statement, and the Import Bank Statement
method, whereby CashManager imports and processes a file of bank statement transactions that
you have downloaded from your bank’s Internet banking web site or proprietary software
package.
See also Bank Reconciliation Wizard.
Bank Reconciliation Wizard
Click the Reconciliation toolbar button, or select Bank Reconciliation from the Transactions
menu. This will launch the Bank
Reconciliation Wizard.
Step 1
On the first page of the wizard,
select the bank account you want to
reconcile from the list box, and
enter the final balance and closing
date from the bank statement. You
can confirm that your last bank
reconciliation is in order by verifying
the opening balance on the bank
statement with the opening balance
showing on the screen. Then click Next.
81
CashManager
Step 2
Next comes the Ticking Off page, which lists all currently uncleared transactions.
Because this screen holds a lot of information, you may find it easier to maximise the window by
clicking in the small square at the top right corner of the form, or widening it by dragging the right
edge. You can also re-size individual column widths and move columns around the grid by
dragging the column headings.
To perform the reconciliation, work your way down the actual bank statement from top to bottom,
locate each item on the screen, highlight it, and tick it off by pressing Enter, or by clicking once in
the Tick column.
You can sort the ticking-off list in a number of ways: Date, Reference, Amount, As ticked, As
entered, Details.
If you accidentally tick an item as being presented when it is not on the bank statement, you can
un-tick it by clicking it again.
Don't just look at the Reference Number when checking off items. Ensure that the amount on
the bank statement is the same as the amount on the screen.
Throughout the ticking-off process, you should check the bank statement details panel on the
lower left side of the form, which shows the running bank statement balance. This balance is
updated after every tick, and if you are ticking off in the same sequence as the bank statement,
this balance should be the same as the running balance on the statement.
If you come across an amount on the screen that has been incorrectly entered, right click on that
transaction. This will pop up a menu, giving you the opportunity of editing the transactions. You
can also add new transactions this way. See also Editing Transactions.
During ticking-off, you may find it easier to re-sort the transactions on the screen. The default
sequence is date order, but the list box at the top of the grid lets you re-sort the transactions into
alternative sequences.
If you are certain that all transactions have been cleared, right-click and select Tick All
Transactions.
When you have completed ticking off, click Next.
Step 3
The final page of the Bank Reconciliation Wizard is the result, telling you whether or not you have
balanced. If you have balanced, you can view and/or print a copy of the bank reconciliation by
clicking View or Print, and then click Finish to leave the Bank Reconciliation Wizard.
If you want the printed bank reconciliation to show the outstanding deposits and unpresented
cheques other than in date order, simply ensure that the grid in Step 2 is sorted in the desired
sequence. This is the sequence that the report uses.
If you forget to print the balanced bank reconciliation, you can load the Bank Reconciliation
Wizard at any time, step through each page by clicking Next, then clicking View on the final page.
If the reconciliation is out of balance, there are some steps you can take to find the cause and
rectify it.
82
Bank Reconciliation
Bank Reconciliation Out of Balance
The most likely causes for the reconciliation not balancing are either:
•
recording an incorrect amount when entering a transaction; or
•
incorrectly ticking off an item as being presented when it is not.
Both of these problems can be quickly and easily resolved.
Click Proforma on the Results page of the Bank Reconciliation Wizard. The Proforma Bank
Statement is what CashManager believes the current bank statement looks like, based on the
closing bank statement balance you entered, what transactions you ticked off, and the sequence
in which you ticked them.
Once the Proforma Bank Statement has been printed, it is a simple matter to compare it to the
statement you received from the bank. The discrepancy will be obvious, and can be rectified by
clicking Back and either editing the offending transactions or ticking or unticking as necessary.
What if the bank statement is wrong...
In the unlikely event that the bank has made an error, you will need to add a transaction equal to
the transaction in dispute. Allocate the amount to a suspense account. If and when the bank
corrects the error, the correcting transaction on the bank statement is again entered as a normal
transaction through Transaction Entry, and this item should also be allocated to the same
suspense account. The two items in the suspense account will be equal and opposite, and will
cancel each other out in your next bank reconciliation.
Bank Statement Import
(Not available yet in the UK version.)
The Bank Statement Import process consists of the following steps:
1. You download your bank statement transactions as a CSV or other file from your bank’s
Internet Banking web site
2. CashManager will perform an auto-match where possible by checking the amounts and
cheque numbers against transactions you have entered under the normal Transaction
Entry area
3. If you so elect, CashManager can also “auto-generate” transactions, where it recognises
a payee or payer name as one you have previously used
4. You will then need to work your way through the remaining transactions contained in the
bank statement file, allocating them to an account or accounts from your chart, using one
of three methods: Simple Allocation, Detailed Allocation or Memorise and Process.
5. Once all the bank statement transactions have been dealt with, the bank reconciliation is
finalised.
CashManager supports the download format for all major Australian and New Zealand banks, as
well as bank statement files exported from some of the banks’ own proprietary software
packages. Additional formats for other banks will be added where demand warrants.
83
CashManager
Both bank reconciliation methods end up with the same result, so it doesn't matter which one you
use. This means that you can alternate between the two methods from one month to the next,
and even use different methods for different bank accounts.
See also Bank Statement Import Wizard Steps
Bank Statement Import Wizard Steps
Before you start, you will have needed to record the bank and file format for the account for which
you are importing. This is done under Bank Account Setup.
The first thing to do is download your bank statement from your bank’s Internet banking site.
Save this file to a convenient location on your hard disk. If you have recorded the bank’s web
address under Bank Account Setup, there will be a clickable link on for first screen of the Bank
Statement Import Wizard, and this can be done as part of Step 1 below. If you haven't recorded
the address, you will need to launch your Internet browser externally before you start the wizard,
and download the file.
Be careful when entering the date range – be sure that the beginning date is the day after
your last bank statement date or download date range, and that the ending date is within the
desired GST period and/or financial year.
You can determine the correct beginning date to use by checking the first screen in the Import
Bank Statement wizard (see below), where the closing date of the last import is displayed.
Make a note also of the closing bank statement balance as at the end of the period.
CashManager will check this against the last closing balance and the total of the transactions to
ensure that you haven’t accidentally overlapped periods.
Step 1
Once you have downloaded this file,
click the Transactions | Bank
Statement Import menu option.
This will show the first screen of the
wizard. Select the bank account,
enter the closing date and bank
statement balance (if required – this
latter option may be greyed out for
some formats and is therefore not
necessary), and enter or browse for
the downloaded bank statement file.
The file name will be remembered
by CashManager and offered as a
default next time you import a bank
statement for this account. Click
Next.
Step 2
If the closing balance you entered doesn't equal the sum of the transactions plus the last bank
reconciliation’s closing bank statement balance, a warning will display, and you will need to
correct this before moving on. Otherwise, the next page of the wizard will display, showing a
summary of contents of the download file.
84
Bank Reconciliation
Before moving to Step 3, you need to decide whether you want CashManager to auto-generate
transactions in cases where it recognises the payee or payer name. This will be a time saver,
particularly in second and subsequent downloads, but it may also result in CashManager making
assumptions that are incorrect. This is because it will assume that transactions are be allocated
to the same account code that the previous transaction to the particular payee/payer was, and
this may not always be the case.
Once you’ve checked the summary and made your decision about auto-generating transactions,
click Next.
Step 3
CashManager now presents you with two grids, side by side. The left grid displays all
transactions in the bank statement file, and the right grid displays all unreconciled transactions in
CashManager. (This right hand screen is in fact the same screen that appears in the standard
Bank Reconciliation Wizard.)
Because this screen holds a lot of information, you may find it easier to maximise the window by
clicking in the small square at the top right corner of the form. This will enlarge the form to
maximum size. You can also re-size the column widths and move columns around the grid by
dragging the column headings.
Transactions that have been auto-matched, or that have been auto-generated, are ticked on both
sides. There is a column on the right hand grid that shows the account to which each transaction
has been allocated, and you should scan this for any auto-generated transactions to make sure
that the account code used is correct. If it isn’t, you can edit the transaction by right-clicking the
row and choosing Edit.
You now need to work your way through all transactions on the left hand grid (the Bank
Statement side) . Once all these transactions have been ticked, the reconciliation will have been
completed.
If the transaction already exists in the right hand grid (the CashManager side), but wasn't automatched, you can simply tick the transaction on both sides by clicking the Tick column, or rightclicking and choosing Tick from the pop-up menu.
85
CashManager
If a transaction appears on the right side, but the amount is incorrect, you can right-click the
transaction on the right hand grid (the CashManager side) and choose Edit. This will allow you to
edit the transaction in the normal Transaction Entry screen.
Otherwise, the bank statement transaction will need to be added to CashManager. This is done
by right-clicking the transaction, and choosing one of the four methods:• Simple Allocation – this presents you with your complete chart of
accounts as part of the pop-up menu, grouped by the reporting
categories (e.g. Income, Expenses, Other). All you need to do is select
the desired account code, and a transaction will be added to
CashManager with the Date, Amount, Reference number and
Description per the bank statement file, with the account code you
chose and GST amount as per the default for that account code. Both
sides will then be ticked. This allocation is the quickest and easiest of
all, and is ideal for single dissection transactions that have a standard
GST component.
• Detailed Allocation – this takes you straight to CashManager’s normal Transaction Entry
window, where you can enter a full transaction. The appropriate details will be loaded into the
various fields, and all you need to do is complete the allocation. This method is ideal for bank
statement transactions that need to be multi-dissected; that have non-standard GST portions; that
you need to enter additional information into the details line; or if you have activated
CashManager’s Invoicing module and the transaction is in respect of a customer or supplier
invoice. When you have entered the transaction, you will be returned to the Bank Reconciliation
Wizard, and the transaction will have been added to the CashManager side and both sides will
have been ticked.
• Memorise and Process – this has the effect of attaching a default account code to the
highlighted name that will be applied for future bank statement imports. However, it also lets you
apply a "mask" to the name so that future imported transaction that match that "mask" will be
coded to this default account. For example, if your EFTPOS transactions at the local Shell petrol
station appeared on your Visa card statement as "Shell Anytown 999999999" where 9999999 is
an ever-changing series of numbers, by setting the default payee name to "Shell Anytown*" (the
asterisk at the end is a wild card symbol saying "anything following", all transactions in the current
bank future bank statements that conform to that mask will be automatically coded.
• Names Easysearch – this loads the Names Easysearch window, allowing you to scroll through
and select the payee/payer name from those that appear in the Names file. Selecting a name will
generate a CashManager transaction using that name as the payee/payer, and with the chart of
accounts code that was attached to that name. This method will be ideal for processing bank
statement transactions where the payee/payer names don't appear in the bank statement file but
you would like to have that information in your CashManager file. Typically you would work
through this process with your cheque book in one hand.
You can perform a Simple Allocation or Names Easysearch on several transactions at the same
time, by holding down the Control key and selecting the various rows. Once you have selected
the rows to be processed, right-click one of them, choose Simple Allocation or Names
Easysearch, and then select the desired account or name.
Note that the right-click pop-up menu can be also displayed at any time by pressing F9.
Once you have dealt with all the transactions on the bank statement, a message appears at the
foot of that grid saying "All transactions ticked”. When this appears, click Next.
If, during the ticking process, you need to un-tick a transaction on either side, simply tick it again.
86
Bank Reconciliation
During this process, you may find it easier to re-sort the transactions on either of the grids. The
list box at the top of the each of the grids lets you re-sort the transactions by alternative
sequences.
Step 4
This is the final step, and the balanced bank reconciliation appears. You have the option of
viewing or printing it. When done, click Finish.
87
Reports
Reports and Graphs
CashManager offers a variety of reports, providing you with information as detailed or as “topdown” as you want. These reports are:
Bookkeeping Reports
These reports are working reports, and will be very useful to your accountant when preparing
your financial statements and tax returns. They will also be of use to you if you need some
detailed information about your transactions.
Summary Cashbook
Detailed Cashbook
Accounts Detailed Report
Search by Name Report
Cash Profit Report (becomes Trial Balance when general ledger is activated)
Invoice Log Report (if Invoice Logs activated)
GST Return (New Zealand) / BAS Worksheet (Australia) / VAT Worksheet (UK)
Budget and Management Reports
These reports are useful when you need a “top-down” view of your business. They are normally
one or two pages in length, and give you a global view of the actual and expected performance.
These reports have one thing in common - they all utilise the report categories that your chart of
accounts is divided into. These categories are set under Report Categories section and each
account is allocated to a report category in Chart of Accounts Setup. These reports are not
available in CashManager Lite.
Monthly Analysis
Budget Actual Comparison Report
Actual Last Year Comparison Report
Budget Report
Cashflow Forecast Report
Lists
As the name suggests, these reports are lists of various items. They are not needed in the day to
day usage of CashManager, but may be useful from time to time.
Transaction List
Bank Account List
Chart of Accounts List
All reports can be viewed on the screen using the Report Previewer, or printed straight to the
printer. Even if you view the reports first, you can still print them from within the Report Previewer.
89
CashManager
Graphs
CashManager offers some useful graphs to help you visualise the way your cashflow and bank
balance move throughout the year. They can be broken into two categories:Bank balance graphs
Account category graphs
Category Graphs
Summary Cashbook Report
This report shows a complete and concise summary of the cashbook, reconciling with the closing
bank reconciliation, for any nominated period in the current financial year. This is the report that
your accountant will find most helpful.
If you have opened more than one bank account, you can run the report for each bank account
individually (your accountant will prefer this), or for some or all the bank accounts combined.
You can elect that amounts be shown as either inclusive or exclusive of GST. If you choose
exclusive, the GST applicable to the deposits and payments is shown on a separate line.
90
Reports
Detailed Cashbook Report
This report prints the bank transactions in detail, for any nominated period, in conventional
cashbook format, with five user-specified columns (or six if GST is not activated), and a sundries
column which is summarised at the end.
For information on how to select cashbook columns, see Cashbook Column Headings.
The Payments Cashbook and Receipts Cashbook are kept separate. Direct Payments are
included in the Payments Cashbook, and Direct Deposits are included in the Receipts Cashbook.
Any period during the year may be nominated, and transactions may be listed in Date order or
Reference Number order.
Account Details Report
This report prints all transactions for a specified range of accounts from your chart of accounts.
All transactions, whether deposits, cheques, direct deposits or direct payments, are listed, with
the deposit amounts shown as negatives to show that they are credits.
When specifying accounts to print, you can either enter a From Account and To Account in the
boxes provide, or you can enter a codes ion the Account Range box Here, you can enter a single
code (e.g. 460), a range of codes separated by 2 dots (e.g. 300..499), specific codes separated
by a comma (e.g. 300,301,302) and/or account codes with wild-card symbol (e.g. 460* to print all
accounts starting with 460).
You can nominate a date range as well, in which case, the opening balance at the start of that
period is calculated and shown.
If you are working with more than one bank account, you can also select which account or
accounts are to be included in the report. In all cases, the Bank Account Number appears before
the cheque or deposit reference, indicating the bank account from which the transaction came.
If you are operating a special Trust Account Ledger file, this report can be run in standard format,
or as client statements. The latter option presents all transactions in the period on a statementlike page, complete with the client address and matter, in a format ideal for issuing to the client.
CashManager PLUS users with the General Ledger option activated can also elect to include or
exclude journal entries from this report.
91
CashManager
Search By Name Report
This option generates a report of all transactions for a nominated payee/payer, regardless of the
account in your chart that they were allocated to. You can ask CashManager to scan the Name
line, the Details line, or both, and you can select whether the transactions need to start with, end
with, be exactly the same as, or simply contain, the letters or words you nominate.
This report is useful for reporting on payments to a particular person, where those payments are
spread over a number of expense categories. Another useful application is to isolate payments to
a particular supplier where the relevant expense category includes transactions to a number of
different suppliers.
Cash Profit Report
This report prints a report for any specified period, listing the balance of each account in your
chart, in a Profit & Loss Statement format. It groups accounts by their Report Category.
When using this report, it is important to remember that there may be non-cash items that affect
profit, such as sales and purchases on credit, or an increase or decrease in stock levels, and you
should be aware that the “Cashflow Profit” that the report shows may not be your true accounting
profit.
92
Reports
However, if you have activated CashManager's Customer and/or Supplier Invoicing feature, a
separate page will print at the end of the report, listing the opening and closing balances of
customers and suppliers, which will then add through to a more accurate profit or loss amount.
If you have CashManager PLUS, and have activated the general ledger option, the Cash Profit
Report is replaced by the Trial Balance. If you have set up a Trust Account file instead of a
cashbook, this report becomes the Client Balances Report.
Invoice Log Report
This report will only be available if you have activated either of the Unpaid Invoice Logs.
This report shows unpaid customer invoices, unpaid supplier invoices, or both. You can set a
starting date for the week-by-week forward projection, and elect to sort the invoices alphabetically
by name, by invoice number, or by date.
The resulting report will list all unpaid invoices (showing the GST content if applicable), and
dissect the invoices across an eight week time band (seven weeks if GST applies) based on the
scheduled due date for payment. This will assist you with your forward cashflow planning.
93
CashManager
GST Return / BAS Worksheet / VAT Worksheet
See also
Preparing a non-payments based GST Return
GST Audit Trail
Cash-based GST Return with CashManager Plus
This report only appears on the Reports Menu if the GST/VAT feature is activated (not available
in all versions).
You will be asked to nominate the period the report is to cover, and whether you want the Audit
Trail to print as well.
New
Zealand
You will need to record any
adjustments to appear at Item
9 (adjustments to output tax)
or Item 13 (adjustments to
input tax) on the return.
Examples of such
adjustments are GST on the
private portion of expenses
(adjustment to output tax) or
GST paid to customs
authorities on imports
(adjustment to input tax).
A GST Return (GST101), in
the same layout as the one
provided by the Inland
Revenue, will then be printed.
Australia
The BAS Worksheet prints the
calculation sheet in a format
similar to the worksheet form
supplied by the Australian Tax
Office. There is also a
summary in the same form as
the short form BAS. After you
have checked the report and
GST Audit Trail, you can
simply copy the totals onto the
form supplied by the ATO.
United
Kingdom
The vat Worksheet prints the
calculation sheet in a format
similar to the worksheet form
supplied by HM Customs and
Excise. After you have checked
the report and Audit Trail, you
can simply copy the totals onto
the form supplied.
You can record any sales
adjustments (G7) or purchases
adjustments (G18) for inclusion
in the calculation.
After running the report, you will be asked if you wish to finalise that GST/VAT period. Finalising
the period means that the amounts of all transactions in that period cannot be altered, and no
more transactions can be entered for that period. This is an important control in maintaining the
accuracy of future GST / VAT Returns.
NZ users can use the link to the IRD website (under the Reporting menu) if they want to
complete their GST Return on-line.
94
Reports
95
CashManager
96
Reports
GST Audit Trail
The GST / VAT Audit Trail is part of the GST Return / BAS / VAT Worksheet, and lists all
transactions during the period that make up each of the totals on the return, showing the date,
details, gross amount and GST amount. The report is broken up into the various categories that
appear in the report. Any amount that has a non-standard GST component (i.e. where the GST
component is not equal to the standard rate nominated) is highlighted with a hash symbol (#).
The Audit Trail should be printed when you print the final copy of your GST Return / BAS
Worksheet / VAT Worksheet, and should be kept on file. It is this report that tax auditors will be
most interested in.
97
CashManager
Cash-based GST in general ledger system
See also Preparing a non-payments based GST Return.
CashManager Plus with the general ledger feature activated is able to prepare a cash-based GST
Return or BAS as long as there are no subsequent transactions entered that have been applied
to invoices in the GST period being reported. It does this by preparing the return as a normal
accrual based return, but then deducting the closing debtors and creditors, and adding the
opening debtors and creditors, from/to the appropriate areas.
When you select the GST Return / BAS Worksheet option, there are boxes for you to enter the
various debtor and creditor balances. If you are tracking your unpaid customer and supplier
invoices independently of CashManager, you will need to enter the gross GST amounts in the
appropriate boxes.
However, if you have activated either Invoice Logs, or Full Invoicing, CashManager can extract
the totals for you. All you have to do is click Calculate. There are, however, some important
provisos with this, described as follows.
If you are using Invoice Logs, any invoices dated after the GST close-off date will be ignored, but
if you have started to process the new month’s receipts and payments, and have paid off any
invoices from before the GST close-off date, these will be ignored. Therefore, if you will be
working on the new month’s transactions before printing your GST Return, you should print the
appropriate list of unpaid invoices (Invoice Log Report) as at the end of the GST period before
starting the new month’s transactions. Then when you come to complete your GST Return,
simply enter these values from the reports into the appropriate boxes.
If you are using Full Customer / Supplier Ledgers to manage your customer and/or supplier
invoices, clicking Calculate will provide the correct balance retrospectively. However, it will
disregard any payments or deposits that have been posted to the customer or supplier ledger, but
not applied against actual invoices, as it is unable to determine the GST nature of such
payments/receipts.
Non-Payments-Based GST Return
If you have elected to prepare your GST Return or BAS Worksheet on other than the cash basis,
(i.e. invoice basis or hybrid basis in New Zealand, accruals basis in Australia) (see GST Setup),
you will also need to record the total amount and GST content of your unpaid customer and/or
supplier invoices as at the date of your GST Return / BAS.
If you are tracking your unpaid customer and supplier invoices independently of CashManager,
enter the gross GST amounts in the appropriate boxes.
However, if you have activated either Invoice Logs, or Full Invoicing, CashManager can extract
the totals for you. All you have to do is click Calculate. There are, however, some important
provisos with this, described as follows.
CashManager will offer, as defaults, the current totals from the invoice logs or ledgers.
If you are using Invoice Logs, any invoices dated after the GST close-off date will be ignored, but
if you have started to process the new month’s receipts and payments, and have paid off any
invoices from before the GST close-off date, these will be ignored. Therefore, if you will be
working on the new month’s transactions before printing your GST Return, you should print the
appropriate list of unpaid invoices (Invoice Log Report) as at the end of the GST period before
starting the new month’s transactions. Then when you come to complete your GST Return,
simply enter these values from the reports into the appropriate boxes.
98
Reports
If you are using Full Ledgers to manage your customer and/or supplier invoices, clicking
Calculate will provide the correct balance retrospectively.
CashManager automatically adjusts for BAS or GST Return for the outstanding amounts at the
start of the GST period. You will see these adjustments if you print out the GST Audit Trail. If you
need to edit these starting values, you can do so from the GST Setup section under Setup Options. However, extreme caution must be exercised so that current and future GST Returns
and BAS Worksheets are correct.
Monthly Analysis Report
This report is a month by month summary of the balance of each income, expense and other
account from your chart, with the months across the top of the page, and the accounts appearing
down the page. It also brings forward the opening bank balance each month, and calculates the
end-of-month balance.
This report will be invaluable when you or your accountants prepare cashflow projections, as it
illustrates your actual cashflow pattern over the year.
This report is not available in CashManager Lite.
Budget Report
This report prints the budget as you have entered it. It lists the months across the top of the page,
and the income and expense accounts down the page.
The Budget Report can be run for any twelve month period spanning the current or next financial
year.
Budget values for each account are entered in Budget Setup.
This report is not available in CashManager Lite.
Budget Actual Comparison Report
This report shows the budget, actual and variance for a nominated period, and shows alongside
this the same data for the year-to-date. A final column shows how much, if any, of the annual
budget remains.
The Budget Actual Comparison Report can be run for any period in the current financial year.
Budget values for each account are entered in Budget Setup.
This report is not available in CashManager Lite
Actual Last Year Comparison Report
This report shows the actual for this year, the actual for last year, and the variance for a
nominated period, and shows alongside this the same data for the year-to-date.
The Actual last Year Comparison Report can be run for any period in the current financial year.
99
CashManager
Last Year's actual values are automatically held through the end of year process. They can also
be manually entetred or edited under Setup - see Opening Balances..
This report is not available in CashManager Lite.
Cashflow Forecast Report
This report is a combination of the Monthly Analysis and the Budget Report. In the traditional
format, it shows the actual cash inflows and outflows up to the nominated date, and then projects
to the end of the twelve month period using the budget values.
The Cashflow Forecast Report can be run for any twelve month period spanning the current or
next financial year.
Budget values for each account are entered in Budget Setup.
This report is not available in CashManager Lite.
External Report Writer
CashManager Plus integrates with the report-writer from CashManager for DOS.
In order to use these reports, you need to create an export file. To do this, select Report Writer
from the Reporting menu.
After re-calculating account totals, the DOS-based Report-Writer will be launched. Refer to the
separate documentation on this feature.
A simplified financial statements generator is available within CashManager.
Financial Statements Generator
CashManager Plus users who have activated the general ledger option can also utilise a basic
“financial statements generator”. This is launched
via the Reports | Financial Statements menu.
The financial statements generator prints out a
standard profit and loss statement and balance
sheet in a structured way, based on report
categories.
To explain how this works, each account in your
chart belongs to a reporting category, like
income, expenses or current assets. This is
managed via Setup | Chart of Accounts.
Further, each of the Report Categories belongs
to one of nine financial statement groups:
• Income
• Direct costs
• Other income
• Expenses
100
Reports
• Profit & Loss Appropriation
• Capital
• Current Assets
• Non-current assets
• Current liabilities
• Non-current liabilities
These are managed via Setup| Report Categories. The financial statements generator will print
financial statements in a fixed layout, based on these categories.
When running the financial statements, you also have an option of reporting by sub-account in
much the same way as with the Monthly Reports.
Report Preview Window
When you choose to view a report, the report preview builds the report and displays it on the
screen. You can then scroll through the report using the scroll bars, or by using the Up-Arrow and
Down-Arrow keys. To move to the next or previous page, you can click the buttons at the top of
the Previewer window (Next Page or Previous Page), or press Page-Up (to display the next
page) or Page-Down (to display the previous page).
You can zoom in or out by clicking the Zoom In and Zoom Out buttons (magnifying glass + or -),
by left click (zoom in) and right click (zoom out) with the mouse, or by entering a zoom
percentage, where 100% is actual size, anything over 100% is larger than actual and anything
under 100% is less than actual.
You can also display the page so that its width covers as much of the screen as possible (Zoom
Page Width) or so that the whole page is displayed (Zoom Whole Page).
You can save any report as PDF (for viewing with Adobe Acrobat Reader), RTF (for opening with
MS Word and similar applications), XLS (for opening in Microsoft Excel and similar), TXT (for
opening with Notepad and similar applications), or HTM (for viewing with a web browser). This is
done by clicking Save As, choosing the desired format, entering a file name and clicking Save.
You can also email any report straight from the Report Preview window. Click Email, and select
the desired name from the dropdown list or choose Other and manually enter the email
address,complete the other email message details and click Send. Your accountant’s name and
email address will appear in this list if you have completed their details on the Email tab under
Setup | Options.
Users of CashManager's Invoicing feature can utilise this Email option to bulk-email customer
invoices and statements, and supplier remittances. See Bulk Emailing.
You can also print the report from the Previewer window (click Print).
101
CashManager
Chart of Accounts List
This report prints a complete listing of the Chart of Accounts.
It can be printed in account number sequence, alphabetically by description, or by reporting
categories. It shows the account code, account name, report category, and if GST has been
activated, it also shows the GST Category and default GST rate.
Bank Accounts List
This report prints a list of all the Bank Accounts you have set up, and shows their current balance
and the date they were last reconciled.
Transaction List
The Transaction List is an “audit trail” style listing of all transactions entered for any specified
period, and for a specified bank account or bank account range.
You can elect to include all transaction types, or to isolate one particular type (Deposits,
Payments, Direct Deposits, Direct Payments or EFT Payments). CashManager PLUS users with
the General Ledger option activated may also print a list of journal entries, which may include
manually entered journals, system-generated journals (e.g. sales/purchase journals created by
the invoicing module) or both.
Reports for your Accountant
If your accountants use one of the client accounting software programs for which CashManager
provides a disk format (and they probably do), you can provide them with your transactions on
diskette, CD or other media (under the File | Export Data | Accountants File Export menu
option).
More likely, though, your accountant may also have CashManager. If so, they may prefer that you
send them a CashManager Transfer File (using CashManager Transfer File under the File |
Export Data menu option). This way, they can review your files, and can make any necessary
corrections before sending the files back to you.
If your accountants are unable to accept your data on disk, they can still obtain the information
they need from the Summary Cashbook Report and Bank Reconciliation Report, along with the
Account Details Report covering the whole financial year, for all accounts in the chart. You should
print each of these reports separately for each bank account you have opened.
Your accountants might then review the reports, and suggest some account code modifications.
After you have made the modifications, re-print these reports, so that your accountants can enter
accurate totals straight into their computer.
As well as this, if your accountants assist you with future cashflow projections, the Monthly
Analysis Report will provide an invaluable starting point.
If you are managing your customer and /or supplier accounts using Unpaid Invoice Logs or Full
Invoicing, your accountants will also need a copy of the Unpaid Invoice Log Reports or Aged
Customer/Supplier Balances Report as at the end of the period.
102
Reports
Periodic reporting with your accountant
CashManager does not have any period close-offs as such, apart from the end of the financial
year itself. Consequently, if you print, for example, the Summary Cashbook Report for one month,
go back and change the amount of one of the transactions, then re-run the report, the closing
bank balance will naturally differ from that shown on the first report. This will mean that the
opening balance for the next month will also differ.
If you send your figures to your accountant more often than once a year, you need to keep this in
mind. The figures they receive for the second period will not include anything from the first period,
so if you need to change a transaction in the first period, let them know the details of that change
so they can make the appropriate correction in their books for the first period.
For more information, contact your local Support Centre.
Account Totals Export
If you want to export your data to a spreadsheet like Microsoft Excel, you can create a special
export file by selecting Account Totals Export from the File | Export menu.
This process creates a file
in one of three formats Comma Separated Values,
Excel Spreadsheet, of
dBase (dbf) format,
containing monthly actual
and budget totals for every
account in your chart and
your bank accounts. This
file can then be read by
Excel or any other
reporting or data crunching
program, with the columns
containing monthly totals,
and rows containing chart
and bank account details.
You can then use the full
power of other programs to report on and analyse the data.
CashManager reports can also be saved as PDF, XLS, RTF, TXT or HTM files, or sent as an
email attachment, straight from the Report Preview window.
Bank Balance Graphs
The Bank Balance graph, as the name suggests, plots your bank account balance over the entire
financial year. You can elect to included one, several or all your bank accounts. You can also
nominate a heading for the graph, but if you leave it blank, CashManager will choose an
appropriate heading for you.
Once the graph has displayed, you have the option of printing it - simply click Print.
You also have the option of displaying in table format the actual values used by CashManager to
build the graph (click Values).
103
CashManager
Category Graphs
Category graphs show in bar graph format the monthly or cumulative totals for either a single
category or range of categories from your chart. You can chart Actuals, Budgets or both.
You have a number of options:Heading: This is the wording to appear at the top of the graph
From / To Category: Select the category or category range you want to graph. The categories
relate to the Report Categories you have set up under Setup | Report Categories.
104
Reports
Invert the graph: As income and profits appear as credits (i.e. negatives), you may wish to invert
the graph when plotting this sort of data.
Include journal entries: Users of CashManager Plus who have activated the General ledger
feature can also elect to include or exclude journal entries
Monthly Values: Here, you select what data you want to plot - actuals, budgets, both, monthly,
cumulative, etc.
Filter by sub-account: If you have activated CashManager's sub-account feature, you can filter
the graph for a specific sub-account. This would be useful if you used sub-accounts to separate
divisions within your business.
Once the graph has displayed, you have the option of printing it - simply click Print.
You also have the option of displaying in table format the actual values used by CashManager to
build the graph (click Values).
Saving Graphs
Once you have set up a graph, you can save the "parameters" under a particular name. This
means that the same graph can be called up in the future, but of course, any newly added data
will also appear.
CashManager ships with some standard graphs, based on the standard chart of accounts. These
can be loaded by clicking Load Default. They may not suit your Chart of Accounts if you have not
adopted the standard chart and/or report categories, so will need to be tweaked as necessary.
Account Graphs
105
CashManager
The Account Category graph shows in bar graph format, the monthly total for either a single
account, or a range of accounts from your chart. Budget bars are also drawn for each month,
allowing a ready comparison of actual cashflow with the budget.
You have a number of options:Heading: This is the wording to appear at the top of the graph
Account Range: Select the account or account range from your chart of accounts.
Invert the graph: As income and profits appear as credits (i.e. negatives), you may wish to invert
the graph when plotting this sort of data.
Include journal entries: Users of CashManager Plus who have activated the General ledger
feature can also elect to include or exclude journal entries
Monthly Values: Here, you select what data you want to plot - actuals, budgets, both, monthly,
cumulative, etc.
Filter by sub-account: If you have activated CashManager's sub-account feature, you can filter
the graph for a specific sub-account. This would be useful if you used sub-accounts to separate
divisions within your business.
Once the graph has displayed, you have the option of printing it - simply click Print.
You also have the option of displaying in table format the actual values used by CashManager to
build the graph (click Values).
106
Reports
Saving Graphs
Once you have set up a graph, you can save the "parameters" under a particular name. This
means that the same graph can be called up in the future, but of course, any newly added data
will also appear.
CashManager ships with some standard graphs, based on the standard chart of accounts. These
can be loaded by clicking Load Default. They may not suit your Chart of Accounts if you have not
adopted the standard chart and/or report categories, so will need to be tweaked as necessary.
Pie Charts
The Pie Chart allows you to depict a breakdown of any one category. Categories are defined in
Report category under Setup menu, and each account in your chart belongs to a category.
107
CashManager
You have a number of options:Heading: This is the wording to appear at the top of the graph
Category: Select the category you wish to display.
Reverse the signs: As income will appear as credits (i.e. negatives), you may wish to invert the
signs when plotting income type account categories.
Include journal entries: Users of CashManager Plus who have activated the General ledger
feature can also elect to include or exclude journal entries
Date range: Here, you select what date range you wish to plot.
Filter by sub-account: If you have activated CashManager's sub-account feature, you can filter
the graph for a specific sub-account. This would be useful if you used sub-accounts to separate
divisions within your business.
Once the graph has displayed, you have the option of printing it - simply click Print.
You also have the option of displaying in table format the actual values used by CashManager to
build the graph (click Values).
108
Reports
Saving Graphs
Once you have set up a graph, you can save the "parameters" under a particular name. This
means that the same graph can be called up in the future, but of course, any newly added data
will also appear.
CashManager ships with some standard graphs, based on the standard chart of accounts. These
can be loaded by clicking Load Default. They may not suit your Chart of Accounts if you have not
adopted the standard chart and/or report categories, so will need to be tweaked as necessary.
109
Other Functions
Creating Accountant's Export File
(Not available un United Kingdom version.)
From the File menu, select Export Data, then Accountants File Export, and the Accountant's
Export File form will be
displayed.
Select the software package
your accountant is using from
the list.
Then enter the name you
want the file to be called,
complete with drive and path.
In some cases, depending on
the format you have chosen,
a specific file name may be
required, and in other cases,
a default name might be
offered.
If you want the file to be
stored on a floppy disk,
ensure that you precede the name with A:\.
From the Accountants Export Options panel on the right hand side of the screen, select the
date range and bank account you want to export.
Some accountant software systems allow you to export all bank accounts and journals in one go,
whereas others need you to export bank accounts one by one. This will be apparent when you
select the appropriate software from the list.
For single bank account exports, you will need to run this process once for each bank account,
remembering to give each file a different name. Also nominate the account code that your
accountant uses in their client accounting file for the selected bank account.
CashManager PLUS users will also have the option to export journal entries.
Some export formats also require additional details. Unless your accountant advises otherwise,
you should accept the defaults in all cases.
Closing off an exported period
Once you have created an accountant’s export file, CashManager will ask if you want to finalise
that period. If you answer “Yes”, you will not be permitted to change any part of any transaction in
that period, and nor will you be able to add new transactions with dates in that period.
This is an important control, because once data for a particular period has been provided to your
accountant, it is not normally re-submitted, and any alterations or additions to that period would
be lost as far as your accountant’s files were concerned.
111
CashManager
If you discover an error after you have given the export file to your accountant, make a correction
dated the day after that period. For example, if a deposit was missed out, add it to the
subsequent period, and make an appropriate note in the details section of the transaction. Or if a
cheque was found out to be for the wrong amount, enter a negative cheque for the original
amount, and a new cheque for the correct amount, with both transactions dated in the new
period. Use the details line of the transaction to explain the adjustment.
If your accountant wants you to correct the original transaction, the close-off date can be edited
under Company Details on the Other tab in the Setup - Options section.
Transferring data to your accountant
You can send your CashManager data to your accountant as a file of transactions on a diskette,
CD or other media, which they can then import electronically into their computer system.
If your accountant has indicated that they would like to receive your information in this way, they
will need to tell you what software package they are using. Some packages also need other
information as well, and your accountant will advise you of this.
This process uses alternative account codes referred to as "Map To" codes, which are entered in
Chart of Accounts Setup section. This is useful if you are using account codes in CashManager
that differ from those your accountant uses.
This process is done via the Accountant's Export File.
Altenmatively, if your accountant has their own copy of CashManager (and they most likely will),
they will probably prefer that you send them a CashManager Transfer File. This will allow them to
open your data in CashManager, review your files, make any necessary corrections, and send
the data back to you.
CashManager Transfer Files
The CashManager Transfer File is a standard CashManager file format that lets you transfer data
files between different computers. It is better than the standard back-up in that (a) only one file is
produced and (b) it is version independent. This is useful for sharing files with your accountant,
particularly if they are on a different version from you.
You can also transfer data between CashManager for DOS and CashManager for Windows using
this file format.
From the File menu, select Export Data then CashManager Transfer File. Choose any location
and name for the file but leave the extension as .TFR. If you accept the default location, the
transfer file will be stored in the same location as the data files for this company. A default name
equivalent to the company name plus today's date is offered.
112
Other Functions
Click OK to commence
the creation of the
transfer file.
You can also email the
transfer file to your
accountant or to
Accomplish support as
part of this process. To
do this, you need to
have set up the
parameters under
System Setup on the
Email tab under Setup
| Options.
To email a transfer file,
simply check “Also
send file by email” box,
and select the recipient
from the dropdown list,
before pressing OK.
Once the transfer file has been created, the Send Email dialog will show, where you can edit the
details or add comments before clicking Send.
You can also elect to copy the invoicing layout files (*.RAV) to the same location. This is not
applicable if you’re creating the transfer file in the same folder as the data files, as the layout files
will already be there. But it may be useful if you are using this method as an alternative to a
conventional back-up, or are moving the files to a new workstation.
Converting from CashManager for DOS
CashManager for Windows is able to convert data files from the DOS version of CashManager.
To do this, you must first create a special Windows transfer file using the latest version of
CashManager for DOS. This file will be called CASHDATA.TFR.
When you create a new company using CashManager for Windows, you are given the option of
starting with an existing CashManager transfer file. Simply enter the location of the file, and the
data will automatically be converted to CashManager for Windows format.
Making the transition
CashManager for Windows has combined the best of DOS with the best of Windows.
Users familiar with the DOS version will find the same structure, the same functions and the same
efficiency in data entry. But the benefits of the Windows environment have made the program
better - common Windows interface and conventions, great looking reports, multi-tasking to name
but a few.
Data entry is Windows style, where movement across the screen is achieved by using the Tab
key or the mouse. However, you are able to have the Enter key act like the Tab key (i.e. move
between fields, simulating data entry in DOS style) by setting this option under Setup | Options,
on the Preferences tab.
113
CashManager
Similar, Easysearch windows are opened by clicking the ellipsis, but these windows can also be
opened in the same manner as with the DOS version, by pressing the F2 or F3 functions keys.
Further, the pop-up menus accessing recently used names and descriptions are normally
activated with the right mouse button, but these are also available through the DOS F8 repeat
key.
There is a seamless conversion from CashManager for DOS, which converts all existing data,
including transactions, bank accounts, chart of accounts and setup options from any file created
under CashManager for DOS.
Converting back to DOS
To maintain two-way compatibility, there is a facility to re-convert your data files so they can be
loaded back into CashManager for DOS. Your accountant may ask you to do this.
From the File menu, select Export Data then CashManager Transfer File. The export file must
be called CASHDATA.TFR, but you can choose any drive and path name. If you accept the
default location, the transfer file will be stored in the same location as the data files for this
company.
Click OK to commence the creation of the transfer file.
To import this file into CashManager for DOS, you will need to activate the Data Import feature
via System Setup, Advanced Options, and then choose the menu option located on the
Transactions Menu.
CashManager for Windows employs a different file structure from CashManager for DOS, and
also offers features not available in CashManager for DOS. This means that if you convert a file
from Windows to DOS and back to Windows, you may not end up with exactly the same file as
you started with. The data will be accurate and complete of course, but some of the setup options
may need to be re-established. Further, the way that EFT and deposit slip transactions are held
under Windows is different under DOS.
End of Year
When you have finished entering the transactions for the year, and completed the end-of-year
bank reconciliations, you will need to close off the financial year.
To close the year, select End of Year from the File menu.
During this process, the following
steps occur:–
•
114
a copy of the data files
can be created - multicompany users can
choose the company
code for these files
whereas for single
company users, they are
held in the "Prior Year
Other Functions
2999" (where 2999 is the year) folder;
•
a transfer file will automatically be created in the company folder as a safety precaution;
•
the transaction files are totally erased, except for transactions that make up the end-ofyear bank reconciliations;
•
the names file (and details file if activated) can be cleared of any names that have not
been used in the last year;
•
any budgets you have set up can be erased, replaced with next years budgets, replaced
with the current year actuals, or left intact, and with any of these options, can be
increased/decreased by a fixed percentage.
If you are using Customer and/or Supplier Invoicing, this process has no effect on them. If you
want to purge the invoice files, this is done separately – see Purging Old Invoice Transactions.
The end of year close-off is a one-way process. That is why you should take a back-up of
your data files before proceeding, and mark that CD or floppy disk: END OF FINANCIAL YEAR
20XX - NEVER TO BE ERASED.
Links to other Accomplish packages
CashManager can receive data from AccountManager (Accomplish’s DOS-based invoicing and
debtors package) and CreditManager (Accomplish’s DOS-based creditors package).
To establish a link, you will need to be using AccountManager or CreditManager Version 6.22 or
later, and have set them up to link specifically with CashManager for Windows.
Whenever data is transferred from one of these packages, a special transaction file called
CMTFR.DBF is created in the CashManager data directory. Then, the next time the
CashManager files are launched, you will be given the option of importing the transaction file
data.
When transferring data from AccountManager or CreditManager to the transaction file, any as yet
“unimported” data in the transfer file will be retained, and the new data will be simply appended to
it. When CashManager for Windows eventually performs the import, the transaction file will be
erased.
Backing Up
It is very important that you back up your data files regularly. Without an adequate back-up
system, computer failure, theft or destruction can cost you hours and hours of extra work, and
that is assuming that your original documents are still available.
To back up your files, click the Backup speed button or select Backup Data Files from the File
menu. Choose the back-up drive and click OK.
If backing up to floppy disks, and the back-up requires more than one disk, you will be prompted
to insert subsequent disks.
It is important to remember that before a back-up commences, CashManager erases any files on
the back-up disk, so if it contains any other data, even another CashManager back-up, it will be
115
CashManager
lost. Because of this, multi-company users must remember to store each company on a separate
disk, or adopt an alternative back-up policy
external to CashManager.
If you are backing up to a high capacity drive, like
a USB memory stick, you can elect to back-up to a
new folder on the drive. This will create a folder
called "CashManager backup dd-mmm-yy" where
dd-mmm-yy is the current date, and copy the files
into that folder. This way you an keep multiple
backup sets on the one drive.
Alternatively, you might choose to back-up your
data files to zip disk or a networked drive on
another workstation. Simply click the ellipsis, and
browse to the desired folder. Future backups will
offer this as the default backup and restore
location.
An alternative to the usual back-up process is to
create CashManager Transfer Files.
Backing up to a CD burner under Windows XP
1. Insert a blank CD-RW in the CD drive
2. Bring up the CashManager Backup or Transfer File screen as you normally would
3. Click the Ellipsis (Square button with 3 dots on it) and make sure the path name is:
C:\Documents and Settings\[Username]\Local Settings\Application Data\Microsoft\CD Burning.
CashManager will remember this name and path for every backup and transfer file from here on
in.
4. Once the backup or transfer file is saved to the above folder, a balloon appears at the bottom
right of the screen – coming from the WINDOWS menu bar. The balloon says – “You have files
waiting to be written to CD” .
5. Click the balloon to then view the files to be written to CD, and open the File dropdown menu
and select “Write Files to CD”
Windows XP then takes you through the 3-step wizard – Name of CD, Next and Next. It takes
less than 30 seconds.
Important: Each consecutive backup to CD will overwrite any existing files that match those you
are trying to backup eg: consecutive backups. If you have a transfer file on the CD and then you
backup to the same CD, the backup files will be added to the CD and the Transfer file will not be
overwritten. CD-RW can be used like floppy disks for backups and the User should have at least
3 CD’s and use them in a cycle, just as we recommend with floppy disks. The CD can be taken to
any other PC and used to restore from
See also Restoring from a backup.
Good back-up practices
The importance of backing up cannot be over-emphasised. A good rule of thumb is to assume
that at some point in the life of your computer, it will crash. The data loss you sustain can either
be minor or severe, depending on your back-up practices.
116
Other Functions
You can back up to any removable media: diskettes, CD-RW, USB memory stick for example.
You should use at least three sets of back-up media. Start with Set 1, then for your next
back-up, use Set 2, and then use Set 3 for the third back-up. Then for your fourth back-up, go
back to Set 1. This way, if something goes wrong with a back-up, you have two earlier copies.
Back-up media should be stored in a safe, away from magnetic influence. You should store
copies off-site - if there is a fire or other catastrophe, computer disks and CDs are just as likely to
be destroyed as the computer itself.
Restoring from a Backup
To restore your data files from a back-up disk, select Restore from Backup from the File menu,
choose the drive that contains the back-up media, and click OK.
It is important to remember that existing data files will be replaced with the files on the backup
disk. Because of this, it is advisable to make a quick back-up of the current files onto a spare
floppy disk, CD or other media, just in case the back-up you are restoring from is incomplete or
damaged.
See also Backing up.
Dashboard
There is a toolbar item called Dashboard. This calculates key company-wide information and
presents in on a one-page display.
Once displayed, you have the option of recalculating the presented data as of an alternate date.
117
CashManager
Data File Validation
Users can run a data file validation to ensure that the files balance and that all information is
complete. It is advisable to run this process if you have had computer hardware problems, or if
the computer was accidentally turned off with the program still running.
To run a validation, click File then Validate Data Files.
If the validation encounters any errors, an alert will display, and you will be invited to print a report
detailing these errors. Once the report has been printed, you should contact you local Support
Office.
118
Appendix
You and your accountant
Your accountant is one of your most valuable business resources. At Accomplish, we realise that
no computer package can replace your accountant, so we have ensured that the information that
CashManager holds can be presented to your accountant in a form that they can readily use. This
way, they can analyse your financial data, and help you to run your business better.
One way we have done this is to make the bank reconciliation the centrepiece of the program.
Your accountant can confirm the importance of the bank reconciliation, and the Bank
Reconciliation Wizard makes this otherwise complicated task a breeze, ensuring that your data is
as complete and as accurate as possible.
To make your accountant's job easier, CashManager offers export facilities to all the major
software packages that accountants use throughout Australia and New Zealand. This is done
under Accountants File Export.
As well, many of the reports have been designed with your accountants needs in mind too. See
Reports for your Accountant for more details.
Remember that your accountant is not just a tax return preparer. He or she has skills in many
other facets of small business management, covering areas like:•
Business advice
•
Raising finance
•
Budgeting
•
Tax planning
•
Financial and retirement planning
•
Computer software assistance
•
Insolvency
•
Auditing
•
Reconstruction
•
and much more...
Accomplish Contact Details
In Australia
Phone
Fax
Email
Sales
1800 811 899
1800 811 878
[email protected]
Support
1800 634 440
1800 811 878
[email protected]
119
CashManager
Web site: www.accomplish.com.au
In New Zealand
Phone
Fax
Email
Sales
0800 707 111
0800 707 123
[email protected]
Support
0800 707 111
0800 707 123
[email protected]
Web site: www.accomplish.co.nz
There is also a link to the Accomplish web site under the Help menu.
120