1
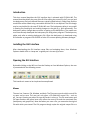
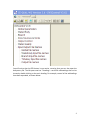
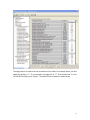
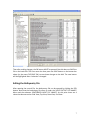
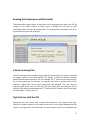
GUI Interface CE‐QUAL‐W2 V3.6 User Manual Scott A. Wells Portland State University Department of Civil and Environmental Engineering September 2009 Table of Contents Table of Contents ................................................................................................................ 1 Introduction ......................................................................................................................... 2 Installing the GUI Interface ................................................................................................ 2 Opening the GUI Interface.................................................................................................. 2 Menus .............................................................................................................................. 2 Button Bar ....................................................................................................................... 3 Editing the Control File ...................................................................................................... 3 Editing the Bathymetry File ................................................................................................ 7 Merging or Splitting Segments or Layers ....................................................................... 9 Running the Preprocessor within the GUI ........................................................................ 11 A Note on Saving Files ..................................................................................................... 11 Typical Errors with the GUI ............................................................................................. 11 Command Line Processing ............................................................................................... 12 1
Introduction This short manual describes the GUI interface that is released with CE‐QUAL‐W2. The manual describes briefly the uses of the GUI for editing the control file (w2_con.npt) and the bathymetry file (user‐defined filename, typically called bth.npt). Please note that the model files can be edited using a text editor and the GUI is not required. The GUI though may be very helpful for the new CE‐QUAL‐W2 user. The bathymetry editor is very useful in viewing the model grid and making changes to the grid (e.g., grid refinement). The bathymetry editor though does not assist in setting up the bathymetry. The model user must have already developed the bathymetry file using other programs. The bathymetry editor only edits an existing bathymetry file. Often the bathymetry is developed using GIS software or programs like SURFER or other 3‐D contour plotting software packages. Installing the GUI Interface After downloading the GUI interface setup files and unzipping them, from Windows Explorer double‐click on ‘setup.exe’ to guide you in the set‐up process. Opening the GUI Interface By double‐clicking on the W2 icon from the Desktop or from Windows Explorer, the user is presented with the following screen: This interface is meant to be simple and uncomplicated. Menus The user has 3 menus: File, Window, and Help. The File menu controls which control file to open and to save. The user can only open a CE‐QUAL‐W2 control file – such as w2_con.npt. Opening any other file type will result in an error. The File save button and file open buttons and menu items only affect the control file and the associated files (bathymetry and graph files). Note that when you save a file, you overwrite the original file with which you started. The GUI program though copies the original output file to a 2
similar name but with a number designator. This allows the user always to go back and track changes made over time to the control file or bathymetry files. Button Bar The buttons become active as the user opens the files that affect the buttons. For example, once the bathymetry file is opened, the 4 grid viewing options are then displayed (see more information below). The open file button opens the w2_con.npt file or another file that is in the format of the control file. The save button becomes active once a file is opened and changes are made. The print button prints the current screen (I would not use this since it is not a very useful print out. It is much more convenient to just print the text file directly from Notepad or other text editor.) The next buttons are described below. Editing the Control File Once you have chosen a control file to open (w2_con.npt), open it and adjust the window so that the window options are visible. If the file does not open there may be serious formatting errors in the file or you may have not chosen a CE‐QUAL‐W2 control file. Check the file for errors using the CE‐QUAL‐W2 preprocessor (a separate program released with W2). 3
You will notice that the BTH button is now active, meaning that you can also open the bathymetry file. The left pane now has 7 headings – each with subheadings that can be shown by double‐clicking on the main heading. For example, several of the subheadings have been expanded, as shown below. 4
By double‐clicking on a subheading, the user can edit the information in a cell. Information about each model parameter is shown in Appendix C in the User Manual. Once you have edited the cells (either by changing a number or changing a menu parameter), there are 2 buttons at the bottom of the page as shown below.
5
The Apply button is used to set the parameters of the table. For example above, the # of epiphyton groups is ‘1”. If one wanted to change this to “2”. One would enter 2 in the cell for NEP and then press “Apply”. The table will be re‐drawn as shown below. 6
Then after making changes, the OK button MUST be pressed. But this does not SAVE the file to the hard disk. The User must also then press the SAVE button on the button bar above (or the menu FILE/SAVE file) to save these changes to the disk. The save button will be highlighted after a selection is changed. Editing the Bathymetry File After opening the control file, the bathymetry file can be opened by clicking the BTH button. Note that the bathymetry file name is under the ‘INPUT‐OUTPUT FILE NAMES’ Menu and the submenu ‘WATERBODY INPUT FILE NAMES’. At this point there are 4 views that become active: Side View, Top View, Data View, End View. 7
The buttons on the top allow one to toggle between the different bathymetric views. By expanding the Top View, one can enlarge the view by holding down the left mouse button and scrolling from right to left (see example below). To decrease the image size, hold down the left mouse button and scroll from right to left. To change the active segment and layer, you must place the mouse cursor in the Data View at a segment and layer of interest and click the ‘Refresh View’ button. This affects which segment is shown in the End View and which segment is highlighted in the Side View. To edit the bathymetry, click on the variable and change its value. Then the user must click the ‘OK’ button to accept these changes. Using the SAVE button saves all the user files. 8
Merging or Splitting Segments or Layers In order to perform this operation, open the Data View and select the range of layers and/or segments to merge or split by highlighting them with the mouse. You will notice in the left hand corner a box shows what segments and layers have been selected. In the example below I have selected layers 5‐14 and segments 2 and 3. You will also now notice that the layer and segment merge/split buttons are now active. To merge or split segments, click on the Merge/Split segment button. A small dialog box will come up with options for merging or splitting the segments (see below). You then have the option to merge the 2 segments or split them into many more segments. The control file (w2_con.npt) will automatically adjust segment numbers when using this option. But keep in mind that the following files will need to be edited to adjust them for changes in the number of model segments: the wind sheltering coefficient file (wsc.npt) and the shading file (shade.npt). A similar process is followed for merging or splitting layers. 9
Note that in the bottom left corner of the above screen shot, the layers and segments that were selected is shown. 10
Running the Preprocessor within the GUI The preprocessor which checks all input files can be executed from within the GUI by clicking on the CHECK button. At which point a dialogue box will pop up with information about running the preprocessor. The preprocessor executable must be in the root directory with the input files. A Note on Saving Files The GUI interface makes a backup copy of each file opened during a session. It will add an integer number to the files opened. This integer is based on whether previous backup files have been created or not. For example, the 1st time the GUI opens the files, w2_con.npt, graph.npt, and bth.npt; the program will write as backup copies of the unaltered original files: w2_con.npt2, graph.npt2, and bth.npt2. The next time the program opens these files, the files w2_con.npt3, graph.npt3, and bth.npt3 will be created (if you have already deleted the *.*2 files from your hard disk, the GUI will again use the integer ‘2’ rather than ‘3’). Typical Errors with the GUI Sometimes the GUI cannot read a control file because of the format of the text. UNIX/Linux systems often use a line‐feed at the end of a line, while Windows text files include a carriage‐return and a line‐feed. You must convert the file to a Windows text 11
file for the GUI to work properly. In a text editor you can view all the characters and verify you have the proper Windows format if the GUI is having problems reading the file. Many text editors automatically convert files from one type to the other (such as the text editor ‘Notepad ++’). It is recommended that you use the W2 preprocessor to catch errors in the set‐up files first before using the GUI. The W2 preprocessor though will not catch the line‐feed error noted above and will read the files correctly whether in UNIX/Linux or Windows format. Command Line Processing The GUI also can be controlled by command line passing of the working directory and file. In a batch program or from the command line in a DOS box you can execute the GUI as follows: "C:\scott\research\corps of engineers\tomcole\w2code\GUI36\w2control\w2control36.exe" C:\scott\w2workshop\2009 workshop\waterqual\problem1\w2_con.npt The first string in quotes executes the GUI (this shows the path to the GUI – your path to the GUI will be different). The command line argument is NOT in quotes. This program was developed in VB6 and does not take quotes around the command line. Note that this is different than the FORTRAN command line argument. So the above command will open the GUI and load the control file automatically from the directory “C:\scott\w2workshop\2009 workshop\waterqual\problem1”. 12