1
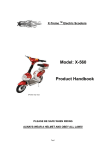
CM Series 3 and Series 4 User’s Manual TABLE OF CONTENTS Safety guide………………………………………………………………………………………….. Specifications……………………………………………………………………………........... Diagram…………………………………………………………………………………………………. Battery maintenance/charging………………………………….....………………….. Assembly & setup……………………………………………………………………..…………. Scooter operation………………………………………………………………………………… Environmental conditions………………………………………………………………….. Maintenance…………………………………………………………………………………………. Limited Warranty………………………………………………………………………………….. Troubleshooting…………………………………………………………………………………… 2 3-6 7 8 9-11 12-13 14-16 17-18 19-21 22 23 IMPORTANT PLEASE READ THIS BEF ORE USING THIS PROD UCT READ THIS FIRST! WARNING This product does not conform to Federal Motor Vehicle Standards and is not intended for operation on public streets, roads or highways. Serious injury can result from the unsafe operations of this product. Operator can minimize these risks by using certain safety equipment such as: safety helmet, goggles, gloves, elbow and kneepads and appropriate footwear. DO NOT operate this product in traffic, on wet, frozen, oily or unpaved surfaces or under the influence of drugs and/or alcohol. Avoid uneven surfaces, potholes, surface cracks and obstacles. DO NOT use a water hose to clean this product. See Product Handbook for more information. Riders must be 16 YEARS OF AGE or older. SAFETY • Person without excellent vision, balance, coordination, reflex, muscle and bone strength and good decision-making capabilities should not use this product. • Minors without adult supervision should not use this product. • Persons unwilling or unable to take responsibility for their own actions should not use this product. • The user of this product assumes ALL risks associated with its use. To minimize these RISKS, the user must wear safety helmet, goggles, gloves, elbow and kneepads and appropriate footwear. • This product is ELECTRIC! DO NOT ride this product in wet conditions, puddles or rainy weather. 3 QUICK REFERENCE SAFETY GUIDE • Maintain your scooter as recommended in this Product Handbook. • The minimum age for riding this scooter is 16 years old. • To avoid damage to the motor and footplate, do not overload the scooter. • Inspect your scooter thoroughly before each use for loose or missing parts. Replace any part that is cracked, chipped or damaged before use. Do not operate your vehicle if it is not functioning properly. • Avoid unintentional starts by turning the scooter off while not in use. • To avoid the risk of a short circuit in the electrical parts, do not use your Electric scooter in the rain and never spray or wash off your scooter with water. • Do not place the battery near fire or heat. • To avoid damage to the battery, do not use the charger if it has been damaged in any way. • Keep hands, face, feet and hair away from all moving parts. • Do not touch the motor or wheels while they are rotating. • Brakes are designed to control speed as well as stop the scooter. Practice braking for proper slowing down and smooth stops. • Do not store your scooter in direct sunlight for an extended time. • Store your scooter in a dry place. Exposing your scooter to rain, snow, or other precipitation may result in damage. • Do not attempt to lift or move a power scooter by any of its removable parts. Personal injury and damage to the power chair may result. • Do not connect any electrical or mechanical devices to the scooter. • Failure to obey this instruction may result in injury and will void the warranty. • Never use electronic radio transmitters such as CB, walkie talkies, portable computers or cellular phones while using the vehicle without first turning off the scooter. 4 • • • • • • • • • • • • • • • Riding Safety Guidelines Always use a seatbelt, and keep your feet on the scooter all the time. Never ride with more than one person. Ride predictably and in a straight line. Never ride against traffic. Use the signal lights to indicate turning or stopping. Ride defensively. To other road users, you may be hard to see. Concentrate on the path ahead. Avoid potholes, gravel and dirt, wet road, oil, curbs, speed bumps, drain grates and other obstacles. Be alert for unexpected events, such as opening car doors or cars backing out of concealed driveways. Be extra careful at intersections and when preparing to pass other vehicles. Familiarize yourself with all the bike's features. Practice signal lights, braking and use of the horn. Don't carry packages that will interfere with your visibility or control of the scooter. Don't use items that may restrict your hearing. Maintain a comfortable stopping distance from all other riders, vehicles and objects. Safe braking distance and forces are subject to the prevailing weather and road conditions. Your scooter works best on level ground. Use caution while going down an incline, such as a hill or a ramp. The scooter has an electrical brake cutoff system. When you engage either brake, the throttle becomes inoperative. Release the throttle before braking. Do not "ride" the brakes. The CM SERIES 3 AND 4 has a speed control dial to regulate the speed output. The rider can turn it from low to high and set it anywhere in between. On the first ride, set the knob to its slowest position until the rider feels comfortable and safe. This a fast and powerful scooter that is capable of bringing the front wheel up and off the ground if not careful. Having the seat slid completely back as well as the speed control dial at its highest adjustment, increases its ability to "Pop a Wheelie " when the throttle is engaged. Use caution! 5 Like any sport, cycling carries the risk of injury and damage. By choosing to ride the CM SERIES 3 AND 4 you assume all responsibility for these risks. Thus, follow all rules and regulations in your area for operating a motorized bicycle. Obey the same road law as all other road vehicles, including yielding the right-of-way to pedestrians, and stopping at red lights and stop signs. This product is NOT INTENDED for extreme or off-road use! Please take care of your scooter! DO NOT JUMP or ABUSE THIS PRODUCT! DO NOT RIDE IN WET/ICY CONDITIONS! Failure to follow these instructions will VOID YOUR WARRANTY YOUR INSURANCE POLICIES MAY NOT PROVIDE COVERAGE FOR ACCIDENTS INVOLVING THE USE OF THIS CYCLE. TO DETERMINE IF COVERAGE IS PROVIDED YOU SHOULD CONTACT YOUR INSURANCE COMPANY OR AGENT. Use While Under the Influence of Medication or Alcohol Check with your physician if you are taking any medication that may affect your ability to operate your powered scooter safely. Do not operate your scooter while you are under the influence of alcohol as this may impair your ability to operate your power scooter in a safe manner. 6 Specifications CM SERIES 3 AND 4 CM-401 CM-402 COLOR Red, Silver, Blue, Orange Red and Silver Green, Red, Orange POWER Electric Electric Electric WATTS 500 Watts 700 Watts 700 Watts MOTOR TYPE Transaxle differential brushless motor Transaxle differential brushless motor Transaxle differential brushless motor AMPS 20A 20A 20A VOLTS 48 Volts 48 Volts 60 Volts DIMENSIONS 61” x 29” x 41" 61” x 29” x 41" 61” x 29” x 41" BATTERIES 48 volt lead acid maintenance-free battery 48 volt lead acid maintenance-free battery 48 volt lead acid maintenance-free battery TIRE SIZE (3) 16”/2.5” (4) 14”/2.25” (front), 16”/2.5” (rear) (4) tubeless tires CHARGER Smart charger included Smart charger included Smart charger included SPEED Up to 18 mph Up to 15 mph Up to 15 mph DISTANCE Up to 45 miles/charge * Up to 43 miles/charge* Up to 40 miles/charge* THROTTLE TYPE Speed control- Twist Throttle Speed control- Twist Throttle Speed control- Twist Throttle KEY START YES YES YES BRAKING SYSTEM Front and rear braking system Front and rear braking system Front and rear braking system DRIVE SYSTEM Brushless motor Brushless motor Brushless motor HEAD LIGHT Yes Yes Yes SHIPPING WEIGHT 280 lbs 300 lbs 320 lbs NET WEIGHT 200 lbs 220 lbs 240 lbs ELECTRIC LIGHT Yes Yes Yes BATTERY INDICATOR Yes Yes Yes STORAGE BASKET Yes Yes Yes SHOCK ABSORBER Two rear shock absorber on the frame Two rear shock absorber on the frame Two rear shock absorber on the frame ALARM Anti-theft alarm Anti-theft alarm Anti-theft alarm * Note: distance varies by rider’s weight, terrain, road surfaces, etc. 7 Diagram 1. Battery Storage Access 6. Throttle 2. Seat Recline Adjuster 7. Brake Levers 3. Drop down armrest 8. Ignition Switch 4. Forward/reverse switch 9. Basket 5. Instrument Panel 10. Variable Speed Control 1. Brake Levers 6. Throttle 2. High/Low beam Selector 7. Ignition Switch 3. Rearview mirrors 8. Forward/Reverse switch 4. Instrument panel 9. Turn signal 8 BATTERY MAINTENANCE and CHARGING INSTRUCTIONS 1. While charging the Battery, keep the key switch OFF. 2. You MUST FULLY CHARGE the battery prior to initial use. (Follow charging instructions in your Product Handbook) 3. Charge immediately after each use. 4. Charge before storage. You must charge the battery no less than every 30 days. Even a healthy battery will discharge itself slowly. 5. Charge the unit for 6 to 8 hours or until the light on the charger turns red & green. 6. DO NOT deep discharge the battery. 7. For safety purposes, DO NOT charge for over 8 hours. 8. Turn the unit OFF when not in use. Other Considerations • Read the charger label to learn about the charger indicator lights, and their meanings. • Verify that you are using the correct charger for your vehicle, and that the charger input power is compatible the "house current" in your area. • Keep the charger and battery away from water to prevent electrical shock and shorting. The charger is intended for use in a covered dry area only. • Plug the end of the charger's cord into the socket of the 9 adaptor first. Next connect the adaptor to the CM SERIES 3 AND 4 (the charger port in located below the front of the seat). Then plug the chargers' AC cords into the wall outlet. • Generally, a short drive will require a short time to re-charge, and a long ride will require a longer time. A complete (90%) discharge may require 6 hours to recharge. To prevent electrolysis (battery fluid loss by hydrogen generation,) do not charge for longer than eighteen hours. Battery Care and Maintenance What to Expect from Your Batteries (Ideally) • The battery is a sealed lead-acid type, with a gel electrolyte. With normal use, it can last for well over 300 charge/discharge cycles. • Know that normal use should mean partial, and not complete discharging. If you employ "shallow" discharge cycles, using less than 30% of battery's capacity, the battery can achieve up to 1,200 charge/discharge cycles. • Thus, it is good to charge the battery after each ride. A partial discharge will require less time on the chargers. What to Expect (Realistically) • The battery can keep its performance for about 200 charge/discharge cycles, with high current and deep (80%) discharging. The storage capacity of the battery will decline after 200 times recharging. If you re-charge the battery before it is depleted, you will dramatically extend the battery's cycle life. In Summary Always try to recharge the Battery Pack within 24 hours 10 after use to maximize battery cycle life and prevent damage. Battery Trouble Should a battery ever leak, do not touch the battery liquid. If you are exposed to the solution, flush the affected area with water. If you must handle the battery, wear disposable gloves. Replace the battery if there are leaks, visible breaks or cracks. Dispose of used batteries by taking them to a recycling center, or according to state and local laws. Battery Temperature Sensitivity Ambient temperature will affect almost every kind of battery. Usually, the battery shows good discharging capability at higher air temperature. When the air temperature is under 0 °F, the battery power will decline more than one third. So it is natural that the CM SERIES 3 AND 4 will not reach its normal mileage in winter or in cold weather. When the air temperature is up to 68 °F, the CM SERIES 3 AND 4 will achieve its normal range capability. When the ambient temperature is over 110 °F (as when exposed to summer sunshine for a long period), batteries and other electric components usually run in an abnormal fashion. 11 ASSEMBLY AND SETUP 1. Remove your CM SERIES 3 AND 4 from its shipping carton. CM SERIES 3 AND 4 weighs about 200+ lbs., so get help, and use care. Cut away any residual packing materials with a knife or scissors. 2. Attach the Rear View Mirrors to the mounting holes. A wrench can be used to tighten the lock nuts at the base of each mirror. 3. Check if the brakes are properly adjusted. The brake handles should stop short of touching the handgrip, when fully engaged. The rear brake cable can be adjusted in two places: • At the cable end bracket, just before the lever, with 8 and 10 mm wrench adjustments, and • At the end of the lever, with a 10 mm nut fastener. The front brake is adjusted at the end of the cable, at the saddle nut. 4. Circuit Breaker. Using the ignition key, open the rear storage compartment located under the seat. Locate the circuit breaker and switch it from off to on. a. Your CM SERIES 3 AND 4 has been in transit and storage. You must charge the batteries before riding it. 12 Charge the battery by plugging the charger into the CM SERIES 3 AND 4 Charger Ports. Seat Adjustment 1. Locate and adjust forward/reverse seat handle located under the seat. 2. Locate and adjust the reclining seat lever located on side of seat. Seat armrest can be in an upright position or a down position. Key Fob Scooter Operation 13 Locate the below listed materials in rear basket: • Set of mirrors • Electric charger • Scooter Key • Owner’s manual Caution! § To prevent injury to yourself or others, always ensure that the power is switched off when getting on or off the scooter. § Always check that the variable speed control is set to the desired speed setting. § Always check you have selected the correct forward or reverse button when about to drive. § Always reduce your speed when making sharp turns. § Do not switch off the power when the scooter is still moving forward Pre-Ride Check 1. Be sure the tires have sufficient air. Low tire pressure risks rim pinching (tube failure) and lowers your range (distance per charge). 2. Be sure the battery is fully charged. Riding on a low state-ofcharge will reduce range, and can damage the battery. a. Be very careful not to twist the throttle and engage the hand brake at the same time. If this occurs excessive power will occur and this will cause the scooter to leap forward. 3. Verify the proper adjustment and function of the brakes. 4. Make sure the CM SERIES 3 AND 4 is in good mechanical 14 order. Visually inspect and hand-check the vehicle, and snug any loose bolts, screws, or other fasteners. 5. With the CM SERIES 3 AND 4 visually inspected, turn the key switch and apply the throttle, to verify the motor's smooth operation. Apply the brake to stop the motor. Verify that the throttle is inoperative when either brake is applied. Steps to Startup 1. Adjust the Rear View Mirrors so that you can see clearly behind you. 2. ADJUST THE SPEED CONTROL KNOB! Adjust to slow for the initial ride until you feel comfortable. 3. Insert the key into the key switch and turn the key from OFF to ON. 4. The CM SERIES 3 AND 4 has an onboard Voltmeter, indicating the Battery's approximate state-of-charge. It is normal for this reading to "sag" somewhat during acceleration. Excessive Voltage "sag" is a sign of a depleted or damaged battery. When a battery is exhausted, if you force it to supply energy, it will dramatically damage the battery. At this time, the low voltage protector will shut off the power automatically, protecting the battery from further damage. 5. Hold onto the handlebars with both hands. Assume a wellbalanced position. Your right hand will control the accelerator. Twist the accelerator slowly to avoid a sudden rush of speed forward. The speed of the bike will increase as you twist the accelerator more. Release the accelerator and apply the brakes to stop your bike. You will control the speed of the bike by using both the accelerator and the brakes. When the brake 15 handle is squeezed it cuts power to the accelerator. 6. Give the CM SERIES 3 AND 4 some acceleration and speed by first applying the throttle gently. Try not to brake and accelerate needlessly. 7. Return the key to the OFF position and take out the key after riding, to secure your property and to save battery power. 16 Environmental Conditions Rain, Sleet and Snow If exposed to water, your power scooter is susceptible to damage to electronic or mechanical components. Water can cause electronic malfunction or promote premature corrosion of electrical components and frame. Ramps and Curbs Check that ramp surface is toughened to prevent slipping. Never drive across a slope or turn sharply on a slope. When driving up curbs, always check the height of the curb to ensure that it does not exceed 4” in height. Wet Weather Riding Wet weather impairs traction, braking and visibility, both for the rider and for other vehicles sharing the road. The risk of accident is dramatically increased in wet conditions. In wet weather you need to take extra care. In wet conditions, the stopping power of your brakes (as well as the brakes of other vehicles sharing the road) is dramatically reduced. This makes it harder to control speed and easier to lose control. To make sure that you can slow down and stop safely in wet conditions, apply your brakes earlier and more gradually than you would under normal, dry conditions. Decrease your riding speed, avoid sudden braking, and take corners with additional caution. Keep in mind that there is a direct, but inverse, relationship between speed and controllability. Be more visible on the road. Wear reflective clothing and use 17 safety lights. Potholes and slippery surfaces such as lane markings and train tracks all become more hazardous when wet. Night Riding A rider is very difficult for motorists to see at dusk, at night, or at other times of poor visibility. If you must ride under these conditions, check and be sure you comply with all local laws about night riding; follow the Rules of the Road, and take the following precautions: Make sure that your CM SERIES 3 AND 4 is equipped with correctly positioned and securely mounted reflectors. Make sure your clothing or cargo does not obstruct a reflector or light. Ensure that the front lights are on. Wear light colored, reflective clothing and accessories, any reflective device or light source that moves will help you get the attention of approaching motorists, pedestrians and other traffic. Ride slowly. Avoid hazards, such as potholes and curbs. Avoid areas of heavy traffic, dark areas, and roads with speed limit over 35 mph. If possible, ride on routes already familiar to you. Ride at night only if necessary- Slow down and use familiar roads with street lighting, if possible. 18 What Does "Maximum Range" mean? To determine the CM SERIES 3 AND 4 maximum per-charge distance, the testing environment was: • Rider weight: 180 lbs. • Air temperature: 77 °F • No headwind, smooth, level road, infrequent braking and steady speed. Under these conditions, the CM SERIES 3 AND 4 maximum range is up to 43 miles. Frequent braking and acceleration, driving into headwinds, up hills or with cargo will all consume a lot of battery energy. In these conditions, the CM SERIES 3 AND 4 will not reach its normal range. MAINTENANCE Your CM SERIES 3 AND 4 should be checked once a year for a thorough inspection and adjustment. This can guarantee the comfort, safety and the normal operating life of the CM SERIES 3 AND 4 Front and Rear Brakes The adjustment of the front brake is the same as in a common motorcycle. It is very important to brake effectively and to be sure that the battery shut-off device is in good condition. When the brake lever is released, the wheel should spin without resistance. If it drags, it will waste a lot of electric power. You should change the brake's shoes when they are worn to one-third of their original thickness. The rear drum brake is very similar to the brakes on electric scooter products. When this brake is exhausted, a squealing 19 sound will be heard upon brake application. Front and Rear Tires The changing method of the front tire is the same as common bicycle. It is more complex to change the rear tire because of the motor and brake assemblies, and associated wiring and cabling. If you are not comfortable with undertaking this operation, you can ask your servicing dealer or mechanic to change it. Fuse The CM SERIES 3 AND 4 comes with one 25A Glass Fuse. The fuse is located under the headlight fairing. Lubrication You should inspect and maintain your CM SERIES 3 AND 4 and lubricate the mechanical power transmission components. The brake cables may also need lubrication Lubricate the brake cables with silicone or graphite lubricant. Maintenance period: one month. Lubricate the fork Shock Absorber tube, axle rim, and the axle ball bearing with SH/T0386 lubricant, bicycle or lithium grease. Maintenance period: one year. Cleaning 1) Never wash the bike using high-pressure water, as it will cause damage to the electric scooter. 2) Never use lubricant to clean the metal parts of the bike and never apply lubricant to the drum brake and the tire. 20 Scheduled Maintenance The CM SERIES 3 AND 4 should be checked from time to time. Refer to the maintenance schedule in the following chart: If you find problems that you cannot solve during your inspection and maintenance, please send your bike to an authorized service repair store. Never take apart or repair the bike yourself, as this will void the warranty. 21 Warranty For valid warranty claims, Charged Mobility LLC will, at its discretion, replace/repair/refund items mutually agreed to be defective. Charged Mobility LLC’s warranty is as follows: 1. Frame: (2) Year limited warranty 2. Electronic components and charger: (3) Year limited warranty 3. Controllers: (3) Year limited warranty 4. Batteries: Not warranted 5. Consumables: Wheel Tires, arm pads and seat cushions: Not warranted 6. Labor costs are NOT covered by warranty Any damage or defect of any nature occurring from the misuse of the product is not to be covered. The warranty is to start from the date of arrival of our products. 22 TROUBLESHOOTING GUIDE NOTE: If other problems occur, do not attempt to disassemble the electric bike on your own, please contact your retailer or Charged Mobility LLC at www.chargedmobility.com. 23