1
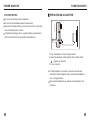
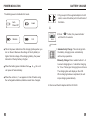
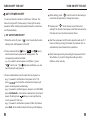
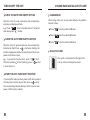
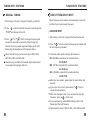
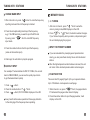
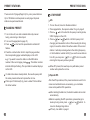
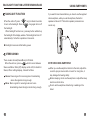
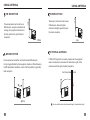
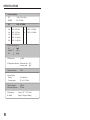
INDEX
POWER SOURCES.......... ........................................ ........... 1
OPERATING ON BATTERY ............................... ..... ...... ....1
OPERATING ON AC ADAPTOR. ......................................3
POWER INDICATION......... ...................................................4
BATTERY CHARGE......................... ................. ......... ........ 5
CLOCK FUNCTION...... ..................... ................................. .7
TEMPERATURE INDICATION............... ........... . .................... 8
SET CLOCK MODE..................................... ....................... ...8
AM(MW) STEP SELECTION................................. .............. ...9
TURN ON/OFF THE UNIT......................... ........................ ....10
POWER ON/OFF..............................................................10
SLEEP OFF......................................................................10
AUTO POWER ON/OFF.....................................................12
CHANGE BAND.................................................................. 15
ADJUST VOLUME...............................................................15
METER BAND................................................................. .. 16
TUNING INTO STATIONS...................................................17
AUTO TUNING................................................................17
MANUAL TUNING............................................................18
DIRECT FREQUENCY INPUT..........................................19
MEMORY SCAN..............................................................21
PRESET STATIONS.............................................................22
RANDOM PRESET...........................................................22
ATS PRESET...................................................................23
POWER SOURCES
INDEX
EDIT FUNCTION IN PAGE 0.......................... ................ 24
OPERATING ON BATTERY
DELETE STATIONS. ..................................................... 25
ALARM FUNCTION..... ...................................................26
AUTO RESET ................................................................27
LOCK FUNCTION ..........................................................27
BACK LIGHT FUNCTION................................................28
STEREO/MONO......................................................... ...28
USING EARPHONES.....................................................29
USING ANTENNA..........................................................30
BATTERY INSTALLATION
1. Slide the lid of the battery
compartment.
2. Insert two AA batteries with
correct polarity as shown in
the compartment.
3. Close the lid of the battery
compartment.
FM RECEPTION ........................................................30
MW RECEPTION........................................................30
SW RECEPTION........................................................31
EXTERNAL ANTENNA................................................31
SPECIFICATIONS..........................................................32
BATTERY REPLACEMENT
1. When the sound becomes weak and distorted, and battery
power indicates
otherwise
, replace batteries immediately,
will turn to
, then the unit will power off
automatically.
2. All the memories(stations preset) are permanently stored.
However, when the batteries are removed, the clock reverts
to the default setting of 12:00, and the last alarm setting
is cancelled. They need to be reset.
1
POWER SOURCES
Right side
Do not try to recharge the dry batteries.
Do not mix the old batteries with the new ones.
Remove the batteries if they are not to be used for a long time
to avoid leaking and corrosion.
If the battery leakage occurs, wipe the battery compartment
with a soft cloth before inserting the new batteries.
OPERATING ON AC ADAPTOR
DC JACK
5V
BATTERY NOTES
POWER SOURCES
1. Plug the adaptor into an AC power outlet.
2. Insert the small port of the adaptor into the DC JACK,
appears on the LCD.
3. Turn on the unit.
If the AC adaptor is connected, the unit automatically
switches to the AC adaptor power, and installed batteries
are no longer be used.
Remove the batteries if you want to use AC adaptor for a
long time.
2
3
BATTERY CHARGE
POWER INDICATION
5-6V
FAST
SLOW
VOL
TUNE
The battery power is divided into 4 levels.
Auto
Power Off
Lower
1. Plug one port of the supplied adaptor into AC
outlet, connect the other port to the AC Jack of
the Radio.
2. Press
button, the power indicator
will flash for 5 seconds.
PAGE
Medium
Full
PAGE
In 5 seconds
This is the power indication of the charging battery when you
turn on the unit. Because the voltage of the dry battery is
higher than the voltage of the charging battery, the power
indication of the dry battery is higher.
When the battery power indicates from
will power off automatically.
to
,the unit
When the unit is on, if
appears on the LCD when using
the rechargeable batteries, batteries need to be changed.
3. Automatically Charge: The unit will get into
the battery charging mode automatically
without any operations.
Manually Charge: Press number buttons 1~ 9
to select charging hours. 1 stands for charging
for 1 hour. The longest charging time is 9 hours.
The charging time will display on the LCD.
When charging has been completed , the unit
stops charging automatically.
4. Disconnect the AC adaptor with the DC JACK.
4
5
BATTERY CHARGE
CLOCK FUNCTION
NOTES
The unit has two clock modes(12H/24H)for user to select.
1. If the charge time is not set, the radio will get into battery
charging mode automatically according to current battery
capacity,
DISPLAY THE CLOCK
Hour
Minute Second
1. If the unit is turned off, the time displays on
the LCD.
06 20
2. Battery charging will not be terminated if the radio is turned
on. But the charging is slowed down. If you want to charge
the battery solely, turn off the radio to charge.
3. When the capacity indicator shows
shows the batteries are fully charged.
2
4
6
8
10
2. When the unit is turned on, hold down
button to
display from the frequency to the time,
flashes, returns
to the frequency displaying automatically after 5 seconds.
EXIT
with 10 dots, it
2
4
6
8
2
10
EXIT
STEP
MHz
06 20
4. When charging, if the unit is in the colok displaying mode,
press EXIT short to terminate the charging.
5. Do not charge the fully charged batteries.
6. If you don't want to charge, just un-plug the adaptor, it will
not affect the batteries.
7. It is recommended to use N I-MH rechargeable batteries.
4
6
8
10
06 20
35
83 F
SET THE CLOCK
The default time of the unit is 12:00. When the unit is turned off,
set the clock to the current time
1. Press
short twice to enter the clock
setting mode, clock indicator
displays
and flashes for 6 seconds on the LCD.
ENTER
ENTER
In 6 seconds
02
28 5
2. Press the number buttons when
is
flashing to set the current time(e.g.: Press
in turn to set 15:03).
3. After setting,
disappears. The clock works and second
times from 0 and the unit enters alarm setting mode. If you
don't set, the unit returns to clock displaying automatically
after 6 seconds. Press
to returns to the clock mode.
EXIT
6
7
TEMPERATURE INDICATION & SET CLOCK MODE
TEMPERATURE INDICATION
When the unit is on, the temperature indicator will display.
06 20
35
83
F
AM(MW) STEP SELECTION
To meet your listening requirement in different countries,
AM(MW) step can be selected.
North and South America: 10KHz
Other Countries(e.g. China): 9KHz
Temperature indicator
The temperature sample lies in the inside of the unit, if you
just listen to the radio, the compartments of the unit will be
heated, so the temperature of the unit is higher than the one
of outside. You have to wait for 30 minutes after turning off
the unit or stopping charging.
When charging, the temperature stands for the one of unit.
When the voltage is low, there is some deflection of the
temperature.
1. Take out the batteries and unplug the external adaptor till
nothing appears on the LCD.
2. About 40 seconds later, connect the AC
adaptor or insert batteries, the unit enters
waiting mode, SET and 9~0 appears on the LCD.
3. Press
button, 9-10 KHz appears on the
LCD for 3 seconds, 9 indicates the medium
wave channel spacing is 9KHz, and 10 means
it is 10KHz.
ENTER
ENTER
SET CLOCK MODE
1. Take out the batteries and unplug the adaptor, nothing
displays on the LCD.
2. About I minute later, connect the AC adaptor
or insert batteries, the unit enters waiting
mode, SET and 9~0 appears on the LCD.
3. Quickly press
twice, enters the clock
mode setting, 12-24 appears on theLCD for
3 seconds.
ENTER
ENTER
4. Press number button
or 24H time mode.
or
2
4. Press number button
press number button
KHz
2
to select 9K step,
to select 10K step.
Press
button can exit from the current mode.
If there is not any operation in 6 seconds, the unit will exit
from the current mode automatically.
The default AM(MW) step is 10K.
EXIT
to select 12H
If there is not any operation in 6 seconds, the unit will exit
from the current mode.
8
9
TURN ON/OFF THE UNIT
TURN ON/OFF THE UNIT
POWER ON/OFF
1. Press
short once to turn on the unit.
2. After turning on the unit, press
short once to turn
off the unit.
The unit will receive the last channel you have ever heard.
SLEEP OFF
If there is not any setting after turning on the unit, the default
sleep time is 99 minutes, the unit will turn off 99 minutes later.
After setting sleep time,
and the sleep time will display.
When receivig SW band, the sleep time will not display.
TURN OFF THE SLEEP OFF MODE
1.Press
short to turn on the unit,
time 99 will flashes for 2 seconds.
When starting the sleep off function,
displays on the LCD,
The unit will power off automatically when reaches the time
you set. User can set the sleep time from 1 to 99 minutes. The
default time is 99 minutes.
and the default
2. When flashing, press
to turn off the sleep off mode,
and the sleep time will disappears.
EXIT
SET SLEEP TIME
1. Method 1: When power off, press
to turn on the unit,
and the default time 99 will flashes for 2 seconds.
Method 2: When power on, press
long for about one
second to enter the clock displaying mode and
flashes.
EXIT
to enter the sleep time setting
2. When flashing, press
mode, the sleep time will change from 99 to -- .
ENTER
3. Press number buttons(1~99) short to set the desired sleep
time from 1 to 99 minutes.
10
11
TURN ON/OFF THE UNIT
TURN ON/OFF THE UNIT
AUTO POWER ON/OFF
When setting, press
short to exit from the setting or
cancel the last operation to change the number.
EXIT
You can set 3 kinds of auto turn on/off time in 24 hours. The
time of turning on/off, the frequency of turning off all can be
presetted. When reaching the presetted time, the unit will turn
on/off automatically.
Please press
short directly to confirm the last
setting.If the 3 kinds of auto power on/off time are same, the
first time will cover the other two kinds of time.
ENTER
SET AUTO POWRE ON/OFF
1. When the unit is off, press
short to enter the function
setting mode, SET appears on the LCD.
ENTER
2. Press one time button(
time 1,
time 2,
time 3)
short to enter the auto power on/off setting mode. The
corresponding indicator will flash.
e.g.: If you want to set auto power on/off(time 1), press
short to set. 1 and
displays and flashes, you can
input the time of auto power on.
ST
Start the auto power on/off function when the radio is off. If
there is nothing occuring to the radio, the radio will turn on
automatically when it reaches the preset time.
METER
When listening normally, the setting of auto power on/off is
still effective. If you don't change the setting, it will be
effective on the next day.
ST
3. Press number buttons short to input the time of power on.
e.g.: If you want to set the time of auto power on to 7:30,
press
in turn and the unit enters the frequency of
power on setting mode automatically.
e.g.: If you want to set the frequency of power on to 95.80MHz,
press
in turn and the unit enters the time of auto
power off setting mode.
flashes, you can input the time
of auto power off(1~99 min).
e.g.: If you want to set the time of power off after 30 minutes,
press
short and the indicator of turning on/off displays.
12
13
CHANGE BAND AND ADJUST VOLUME
TURN ON/OFF THE UNIT
CHECK THE AUTO TURN ON/OFF SETTING
When the unit is off, press one time key, the corresponding
indicatior will display and flash.
e.g.: Press
short to check the time 2. The last set
time displays and 2 flashes.
CHANGE BAND
After turning on the unit, you can press the button to select the
band as follows:
Press
ST
short to enter the FM band.
FM
Press
short to enter the MW band.
MW
CLOSE THE AUTO TURN ON/OFF FUNCTION
When the unit is off, press one time key, the corresponding
indicatior will flash. Press
short when flashing, the
indicator disappears and the correspnding function of auto
power on/off will be closed.
e.g. : I f you want to close the time 3, press
short .
When the indicator 3 of time 3 flashing, press
short
to close the time 3.
Press
METER
short to enter the SW band.
SW
EXIT
EXIT
VOL
METER
ADJUST VOLUME
Dial VOL knob which is at the right of the
unit up or down to change the volume.
START THE AUTO TURN ON/OFF FUNCTION
If you accept the settings of auto power on/off what you set at
last time, press one time key and then press
short,
the corresponding indicator displays, that's to say, the auto
power on/off function is started.
ENTER
14
15
TUNING INTO STATIONS
METER BAND
METER BAND CONVERSION
When tuning into stations, the indicator of strong or weak signal
will display on the LCD. When the bar increases longer,
the signal is getting stronger.
2
When it is in SW band, press
to select your desired meter band.
METER
49M
41M
31M
button short repeatly
25M
22M
6
8
10
AUTO TUNING
1. After turning on the unit, change to the band you desired.
Meter Band Circulation
16M
4
19M
2. Press
short to enter the frequency searching mode.
STEP will display on the LCD.
SCAN
METER BAND INDICATOR
The unit will indicate the meter band automatically in the meter
band range. The corresponding meter band of SW will display
on the right of the LCD.
SW
9.635
METER
MHz
3. Press and hold
or
for 1 second, when the
frequency starts changing, release the button. The unit will
start searching automatically with the corresponding step
from the current frequency. The indicator of strong or weak
signal will display on the LCD. The unit will stop searching
automatically when meeting the strong signal.
Meter Band Indicator
When auto tuning, the frequency step is 100K for FM,
9K/10K for MW, and 5K for SW.
Auto tuning is suitable for strong signal stations.
I f tuning become slowly in a frequency range, try manual
tuning to see if there are some weak stations.
16
17
TUNING INTO STATIONS
MANUAL TUNING
1. After turning on the unit, change to the band you desired.
2. Press
short to enter the frequency searching mode.
STEP will display on the LCD.
TUNING INTO STATIONS
DIRECT FREQUENCY INPUT
Direct frequency entry makes it extremely easy to tune into
a station if you know its exact frequency.
SCAN
3. Press
or
short, the step of frequency will
increase or decrease correspondly. When tuning, the
indicator of strong or weak signal will display on the LCD.
Please stop tuning when tuning the proper station.
When manual tuning, the frequency step is 50K for FM,
9K/10K for MW, and 5K for SW.
Manual tuning is suitable for the weak signal stations and
the crowded strong signal stations.
RANDOM INPUT
1. After turning on the unit, change to the band you desired.
2. Press
short to enter the frequency input mode and
the old frequency is deleted.
ENTER
3. Press the number buttons to enter the frequency:
FM: 95.80MHz, press short the number buttons:
MW: 1287KHz, press short the number buttons:
SW: 6.255MHz, press short the number buttons:
After input one number, please input the next number in 8
seconds.
If your input is incorrect, please press
short to
cancel the last operation.
After enter the input mode, if you don't want to input the
frequency, press
short to exit.
If you input a wrong number,ERR displays on the LCD.
Please input the right freqency.
The frequency step is 10KHz for FM 1K for MW and SW.
EXIT
EXIT
18
19
TUNING INTO STATIONS
CHANGE BAND INPUT
TUNING INTO STATIONS
MEMORY SCAN
1. When the unit is on, press
short to enter the frequency
inputting mode and the old frequency is deleted.
ENTER
+/- TUNING
1. After turn on the unit, press
short to enter the
memory tuning mode, MEM displays on the LCD.
2. Press
or
short, the station number changes.
If you find the frequency what you desire, stop scanning and
the unit starts playing the program.
SCAN
2. Press the corresphonding band key of the frequency.
e.g.: If it is FM band and you want to input the SW band
frquency, press
short to enter SW frequency
SW
input mode.
METER
3. Press the number buttons short to input the frequency
(same as the random input).
4. After input, the unit starts to play the program.
QUICKLY INPUT
For example: The desired band is FM 107.10 MHz, the current
band is FM 80.00 MHZ, you can use the quickly input mode
to get the desired band quickly.
1. Press
short.
2. Press the number button 1
short .
short, FM 100.00MHz displays on the LCD.
3. Press
INPUT THE PRESET NUMBER
If you can remember the preset page and preset number
clearly, you can press them directly to tune into the desired
station.
After the highest preset number has been scanned, the unit
will return to the smallest preset number and scan again.
PAGE FUNCTION
There are total 10 pages(Page 0-9) for you to preset stations.
Up to 100 stations can be preset on each page.
ENTER
ENTER
Every band has the same operations. Please pay attention
to the changing of the frequency when operating.
20
1. When the unit is on, press
short, the page indicator
PAGE
P flashes and the page number doesn't display.
2. Press the number button to input the page number, it will
display on the LCD.
21
PRESET STATIONS
There are total 10 pages(Page 0-9) for you to preset stations.
Up to 100 stations can be preset on each page. All preset
stations are permanent stored.
RANDOM PRESET
PRESET STATIONS
ATS PRESET
ATS
1. Turn on the unit, tune into the desired band.
2. Press page button, then press number 0 to go to page 0.
3. Press
short to enter the frequency scanning mode,
STEP displays on the LCD.
4. Press
or
short until the frquency start
changing and release the button. When meeting the strong
signal, it saves the station follow the number of the current
station. It will stop scanning when is the starting frequency
or the the station numbetr is 99.(If you want to save stations
from 00, you can press
or
short once after
entering the frequency scanning mode.
SCAN
1. Turn on the unit, tune into a desired station by manual
tuning, auto tuning or direct input.
2. Turn over the page(refer to page 21).
3. Press
short and the preset station indicator M
flashes.
4. Press the number button short to input the page number,
the corresponding page number displays on the LCD.
e.g.: If you want to save the station on the 99th staion
number of the current page, press
. The station number
indicator M stops flashing. The input station number displays
on the LCD.
MEMORY
If a station has been already stored, the new frequency with
the same preset number will replace the old one.
When input 10 stations(0~9), press number 0 first and then
the other number.
When ATS preset, the new frequency with same preset
number will replace the old one.
Repeat ATS
After the ATS operations, if the preset numbers are not full or
some scanned stations are unnecessary, you can delete
some and repeat the ATS operations.
After deleting the stations, the station number will reorder
automatically.
Before repeating the ATS operations, please change to
memory tuning mode, press
or
short to
tune into the beginning station.
ATS only has effect on page 0.
22
23
DELETE STATIONS
EDIT FUNCTION IN PAGE 0
DELETE SINGLE STATION
DELETE STATIONS IN PAGE 0
Deleting stations in page 0 is different from the other pages.
In page 0, the preset numbers will reorder automatically when
a preset station is deleted.
COPY FUNCTION IN PAGE 0
All stored stations in page 0 can be copied tothe other page.
1. Press
short in page 0, the page indicator
PAGE
flash and no page number displays.
2. When P flashing, press
will flash.
short, the page number
P
3. When the page number 0 flashing, press the number
buttons short to input the page number which you want to
copy the page 0 to.
e.g.: If you want to copy the page 0 to page 5, please press
the number button
. The stations which are in page 5 will
be same as the ones which are in page 0.
24
2. Press
short, DEL
the station number flashes.
displays on the LCD and
3. When the station number flashing, press
short,
the selected station will be deleted and the station number
will not display.
will
0
New stations copies from page 0 will cover the old ones
which preset on that page before.
1.Turn on the unit, select the station what you want to delete.
In page 0, the preset number will reorder automatically
when a preset station is deleted.
In page 1~9, the station number will not display after being
deleted. You can use the station number at the next time.
DELETE WHOLE PAGE
1. Turn on the unit, select the page what you want to delete.
2. Press
long, DEL
the page number flashes.
displays on the LCD and
3. When the page number flashing, press
short,
all the stations what are in the selected page will be deleted.
25
ALARM FUNCTION
AUTO RESET & LOCK FUNCTION
AUTO RESET
SET ALARM
1. When the unit is turned off, press
short three times
to enter the alarm setting mode, the alarm indicator
flashes and the time what you set at last time displays. If it is
your first time of setting, --:-- dispalys on the LCD.
2. When flashing press the number buttons to input the time
you desired. e.g.: Press
to input 22:30.
will
displays on the LCD and the unit will returns to standby mode.
3. When the setting time reaches, the unit will beep for about
30 seconds unless you press any button to stop it. You can
adjust the volume with the volume knob.
ENTER
I f the preset time is not changed or cancelled, the unit will
beep at the preset time on the next day.
I f you set the alarm time when the unit is on, the beep sound
will cover the broadcast. The unit will play the program after
stopping beeping.
I f the power source is disconnected, the preset alarm time
will be cancelled.
If the unit operates erratically, just remove the batteries or
disconnect the AC adaptor for about 10 minutes, then insert
the batteries or connect the AC adaptor, the unit will resume
to normal operation.
Reset function will not erase from the memory except the
clock time and alarm time setting.
LOCK FUNCTION
The lock function can be used to avoid any accidental
operation when the unit is being carried or used.
1. Press
short for about one second until
displays on the LCD. All buttons except LOCK button
become inoperative.
2. Press
short for about one second until
diappears to cancel the lock function.
CANCEL ALARM
1. When the unit is off, press
short three times to enter
the alarm time setting mode.
will flash and the alarm time
that you set at last time will display on the LCD. If it is your
first time of setting, --:-- dispalys on the LCD.
2. When flashing press
short,
disappears.
ENTER
EXIT
26
27
BACKLIGHT FUNCTION & STEREO/MONO/BASS
BACKLIGHT FUNCTION
When the unit is off, press
long for about 2 seconds
to turn on the backlight. Press
long again to turn off
the backlight.
When backlight function is on, press any button will start up
the backlight of the display window. The backlight will turn off
automatically if no further operation in 8 seconds.
USING EARPHONES
If you want to hear stereo stations, you have to use the supplied
stereo earphone, when you use the earphone,the built-in
speaker will be cut off. The built-in speaker produces mono
sound only.
Earphone
Jack
5V
Backlight consumes a little battery power.
STEREO/MONO
There are two choices(Stereo/Mono) in FM band.
When the unit is on, press
short to select between
FM
Stereo and Mono. When [ST] displays on the LCD, it stands for
Stereo; When nothing displays, it stands for Mono.
ST
Stereo: Stereo is good for receiving music broadcasting
where the signal is strong enough.
Mono: Mono is good for receiving music and voice
broadcasting where the signal is not strong enough.
28
NOTES ON USING EARPHONE
When you use the earphone to listen to the radio, adjust the
sound to a proper level and do not use it for a long time, it
may damage the hearing ability.
Before sleeping, do not use the earphone or adjust the sleep
mode to a shorter time.
Do not use the earphone while driving or walking on the
street.
29
USING ANTENNA
USING ANTENNA
SW RECEPTION
FM RECEPTION
Telescopic antenna functions as
SW antenna. Extending the
antenna straight upward to gain
the best reception.
Telescopic antenna functions as
FM antenna, keep it extended and
change Its length and direction to
find the position to gain the best
reception.
FM
(SW)
EXTERNAL ANTENNA
MW RECEPTION
Ferrite antenna inside the unit functions as MW antenna,
it is strongly effected by the reception direction. When listening
to MW broadcast, rotate the unit to find the position to gain the
best reception.
If FM or SW signal is too weak, please use the supplied
external antenna to increase the effective length of the
antenna and then gain the best reception.
Out of window
Inside
MW
Do not use the external antenna during a thunderstorm day!
30
31
SPECIFICATIONS
1. Frequency Range
FM
70.00 - 108.00 MHz
AM(MW)
520 -1710 KHz
SW
5.800 - 26.100MHz
49m
5.800 - 6.400 MHz
19m
15.000 - 15.700 MHz
41m
6.900 - 7.400 MHz
16m
17.260 - 18.100 MHz
31m
9.100 - 9.990 Mhz
25m
11.500 - 12.200 MHz
22m
13.510 - 13.900 MHz
2. Noise Limit Sensitivity
FM
<
10 V
AM(MW) <
1mv/m
SW
<
20 V
3. FM Selection:
> 40dB
4. Temperature Indicator:
difference ratio
accuracy ratio
5. Memory Stations:
1000
6. Power Supply:
Battery:
External power:
2 AA batteries
DC in 6V 350mA
7. Built in Speaker:
8. External Earphone:
D50mm
D3.5mm
9. Dimensions:
10. Weight:
32
1 F
4 F
Approx. 118 * 75 * 23.5mm
Approx. 165g(excl. Battery)