1
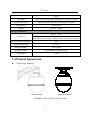
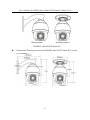
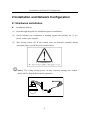
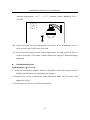
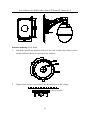
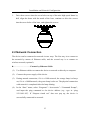
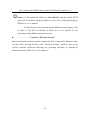
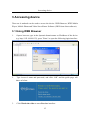
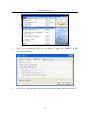
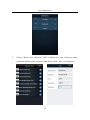
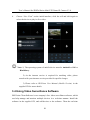
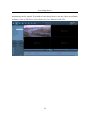
User’s Manual for ZKSD4 Series Mini PTZ Dome IP Camera Document Version: 1.0 Date: 2012.12 Introduction This document mainly introduces the functional features, installation process and access methods of mini PTZ dome IPC. Important Notices Thanks for selecting our company’s IPC. Before use, please read through the user’s guide to avoid any unnecessary damage! All functions depend on the actual product. Since the product is subject to updating, our company is not responsible for any difference from this guide and not liable for any dispute over different technical parameters from this guide. The project is subject to any change without notice. To learn more, please visit our company’s website www.zkivision.com or local office. Table of Contents Table of Contents 1 Overview................................................................................................................ 1 1.1 Product Description ..................................................................................... 1 1.2 Product Features .......................................................................................... 1 1.3 Technical Parameters ................................................................................... 3 1.4 Product Appearance ..................................................................................... 5 1.5 Connecting Terminal.................................................................................... 7 1.6 Basic Procedure ........................................................................................... 8 2 Installation and Network Configuration ............................................................ 9 2.1 Hardware Installation................................................................................... 9 2.2 Network Connection .................................................................................. 13 3 Accessing device .................................................................................................. 15 3.1 Using WEB Browser ................................................................................. 15 3.2 Using RTSP Media Player ......................................................................... 16 3.3 Using Mobile Phone .................................................................................. 18 3.4 Using Video Surveillance Software ........................................................... 20 4 Extended Functions ............................................................................................ 22 I Overview 1 Overview 1.1 Product Description The mini intelligent high-speed dome IP camera is developed using state-of-the-art technologies and features high-performance digital signal processing (DSP). It is a high-tech monitoring product integrated with a zoom lens, a universal variable-speed Pan Tilt Zoom (PTZ), and a digital decoder. This series camera features all-digital control and simple design, which minimizes inter-component connections, improves system reliability, and facilitates installation and maintenance. The Web server embedded in the camera enables users to perform video monitoring on their PCs through various TCP/IP-based networks. This series camera can be used in indoor and outdoor locations with monitoring requirements, such as jails, schools, factories, and residential areas. It is especially applicable to the monitoring of moving targets and open places such as squares, roads, and spacious halls. 1.2 Product Features Is powered by a precise stepping motor, making the system stable, responsive, and accurate Implements fast locating, continuous tracking and scanning, and all-direction monitoring Adapts to changes in ambient lightness and target distance automatically 1 User’s Manual for ZKSD4 Series Mini PTZ Dome IP Camera V1.0 Provides the power-off memory function, which enables the camera to restore to the original working status after it is powered off and then restarted, thereby improving system security and reliability All-digital design and power-off data protection (in which the system resumes the original action after a power failure and restart) Integrated design, compact structure, and high reliability Power supply through a precise stepping motor, making the system stable, responsive, and accurate Ingenious mechanical drive device, which supports 360° continuous horizontal rotation, 0º–90° vertical rotation, and 180° auto flip Slow horizontal rotation at 0.5° every second while maintaining image stability Storage space for 255 presets Six auto cruise tracks, with each one storing up to 16 presets Integrated camera of high sensitivity and resolution Auto focusing, auto Iris, auto lightness control, and auto white balance Stepless speed change, human centered zoom, and auto speed matching technology Auto conversion between colored images and black and white images, auto backlight compensation, and auto slow shutter Camera that has 10x zoom and can automatically identify SONY and Samsung brands Double web indicator lamps for easy judgment of web status 2 Overview Support of the proportional zoom function and auto adjustment of the rotational speed according to the lens zoom multiple Wire coming out from within, to better protect the wire Double web indicator lamps for easy judgment of web status Numerous additional functions, e.g. TF card and reset No data loss in case of power-fail Power-fail status memory; once the power is recovered, the system will automatically be back to the previous status of the platform and lens Hi3512 high-performance multimedia processor, supporting H.264 Main Profile video coding The highest resolution of images is to D1 (704 * 576) resolution Dual code stream, suitable for various networks Support the browsing by 20 users simultaneously, 10 in primary code stream and 10 in secondary code stream 1.3 Technical Parameters Product Name Mini PTZ IPC with 10x zoom Mini IR PTZ dome IPC Product Model ZKSD420 ZKSD422 Cam Properties Image Sensor 1/3"Super HAD CCD Zoom Range 10-multiple optical zoom, 10-multiple electronic zoom Optical lens F1.8(W)~3.1(T);f=5.5~55mm Minimum illuminance Normal mode: 1 Lux; Night mode: 0.1Lux(IR OFF ),0Lux( IR On ) Signal-to-noise ratio ≥48db(AGC OFF,Weight On) 3 User’s Manual for ZKSD4 Series Mini PTZ Dome IP Camera V1.0 Aperture Automatic aperture; the electronic mode is preferential Focus Automatic focusing; the electronic mode is preferential Infrared projection 25 m~30 m NO Video Coding Primary Processor Hi3512 Operating System Embedded Linux Video Compression Algorithm H.264 main profile level 3 Audio Compression Algorithm G.726/G.711 Primary Code Stream: 32~512 Kbits/s adjustable Video Compression Code Rate Secondary Code Stream: 32~256 Kbits/s adjustable Primary Code Stream: 704x576, 352x288, 176x144 optional Video Resolution Secondary Code Stream: 352x288, 176x144 optional Video Frame Rate NTSC: 1~30 frames optional ; PAL: 1~25 frames optional Functional Interfaces Motion Detection Allow 4 independent detection areas Support TF card for video storage and image capture, 32G maximum Memory (optimal) 10Base-T/100Base-TX Ethernet interface Network Interface WiFi 802.11b/g wireless (optional) TCP/IP, HTTP, TCP, ICMP, UDP, ARP, IGMP, SMTP, FTP, DHCP, Supported Network Protocols DNS, DDNS, NTP, UPNP and RTSP, etc. PTZ Horizontal Speed 0.5º~180º/s Vertical Speed 0.5º~180º/s Default Speed of Preset Position 150º/s Horizontal Rotation 360º continuous rotation Vertical Rotation 0º~90º, with auto flip Preset Position 255 preset positions and precision of preset positions is less than 0.1 4 Overview degree Scan Mode Three scan modes: automatic /random/preset position cruise path Preset Position Cruise 6 preset positions, with each one storing up to 16 presets Track Memory 2-track memory RS-485 Pelco-D、Pelco-P Working Environment DC12V,1.5A Input Power POE Ethernet power supply: comply with 802.3af regulation (optional) Maximum Power Consumption 10W Working Temperature -10~+50 °C Working Humidity 10%~85%RH Installation Mode Wall-mounted / Pending mounted net weight 1.5KG 1.4 Product Appearance Stereoscopic Drawing Wall-mounted Pending mounted ZKSD420: Mini PTZ IPC with 10x zoom 5 User’s Manual for ZKSD4 Series Mini PTZ Dome IP Camera V1.0 Wall-mounted Pending mounted ZKSD422: Mini IR PTZ dome IPC Dimensional Drawing (in mm) (the ZKSD422 mini IR PTZ dome IPC is used as an example ) 6 Overview 1.5 Connecting Terminal 1 2 3 (1) Power Interface: used for connecting the power adapter. The voltage of series products is DC12V AC and the current is not lower than 1.5A. Other power is not allowed, in order to avoid damage of the cameras. (2) Network Interface: 10/100M self-adapting Ethernet interface is used to connect the camera with various network equipments, such as, switch, router and hub. When it is connected to 10M network, the orange lamp is also on. When it is connected to 100M network, the green lamp is always on. (3) Reset Button: When the camera fails to function during incorrect operation or accidental failure (e.g. forget IP address or password), or it is used in different scenes, press down the button for above 5s after a delay of 30s from powering on to restore the camera to its factory default. The default user’s name is “admin”, the default password is “admin” and the default IP address is “192.168.1.88”. 7 User’s Manual for ZKSD4 Series Mini PTZ Dome IP Camera V1.0 1.6 Basic Procedure (1) Unpack and check whether any component is missing; (2) Connect the camera to computer by means of patch cable; (3) If your computer IP is in a network section different from camera IP, please set it to the same network section as camera IP, such as, 192.168.1.87. (4) Log in the camera through client software or browser to check whether the video functions normally; (5) Adjust the code stream and other video parameters; (6) Modify the network parameters of camera and reboot the device; (7) Repeat Step 3; (8) Revisit the camera through client software or browser to check till the video functions normally; (9) Install the camera and adjust the camera angle to the appropriate area; (10) Visit the camera through client software or browse for video monitoring. 8 Installation and Network Configuration 2 Installation and Network Configuration 2.1 Hardware Installation Installation Notices: (1) Read through the guide for installation prior to installation. (2) Check whether any component is missing against the packing list, if yes, please contact your supplier. (3) Wire during power off. If the camera does not function normally during operation, please cut off the power before check. Notice: The wiring during power on may seriously damage the camera, which will be disqualified from the guarantee. 9 User’s Manual for ZKSD4 Series Mini PTZ Dome IP Camera V1.0 (4) Please use the power (voltage 24V AC and rating current no lower than 1.5A) provided by the factory for the cameras. Much higher or lower voltage and direct current power may cause the camera failure. (5) Use the standard power cord when the power supply is too far away from the camera, and consider the voltage drop caused by long distance. (6) Read through the instructions for connecting terminal and wire strictly according to interfaces. Any damage to the camera due to improper operation will be disqualified from the guarantee. (7) Mount the relay equipment in the middle to avoid signal attenuation when the straight communication distance from the camera to the incoming equipment exceeds 80m. (8) Pay attention to provide lightning protection if the camera is mounted outdoor. Do not touch the camera during lightning. (9) Use the camera in the working conditions: 10 Installation and Network Configuration Ambient temperature: -10 ℃ ~ +55 ℃; ambient relative humidity: 10% ~ 85%RH. (10) Please keep the lens and transparent cover clean. If the transparent cover is dirty, please wipe it with clean soft cloth. (11) Do not let the cameras aim at intense light source for long period of time, in order to avoid the CCD failure, which results in no images or distorted images displayed. Installation Diagram Wall mounting (Unit: mm): 1. Attach the installation template sticker to the wall on which the camera will be installed and drill holes as required by the template. 2. Hammer two screws, suspend the mini high-speed dome on the screws, and tighten the screws. 3. Use the other two screws to fix the camera body. 11 User’s Manual for ZKSD4 Series Mini PTZ Dome IP Camera V1.0 ① ② Installation Template ③ Pendant mounting (Unit: mm): 1. Attach the installation template sticker to the wall on which the camera will be installed and drill holes as required by the template. 2. Tighten three anchor screws and fix the hoisting base on the ceiling. Installation Template 12 Installation and Network Configuration 3. Drive three screws into the screw holes on top of the mini high-speed dome by half, align the dome with the notch of the base, continue to drive the screws into the screw holes of the base, and tighten the screws. 2.2 Network Connection The device can be connected to network in two ways. The first way is to connect to the network by means of Ethernet cable, and the second way is to connect to wireless network (optional). .............................. Connect by Ethernet Cable (1) Use Ethernet cables to connect the device to network or directly to computer. (2) Connect the power supply of the device. (3) During normal connection, if it is a 10M network, the orange lamp is always on; if it is a 100M network, the green lamp is also on. The physical connection with network is completed after the lamp shining. (4) In the “Start” menu, select “Programs”--“Accessories”--“Command Prompt”, and input the ping command to the device address (e.g.: type in “ping 192.168.1.88”). If “Request timed out” does not pop up, the device is successfully connected to network. 13 User’s Manual for ZKSD4 Series Mini PTZ Dome IP Camera V1.0 Notice: 1) The default IP address is “192.168.1.88” and the default HTTP port is 80. If needed to change IP address or port, refer to Network Setting in WEB Server User Manual. 2) If the device is in a network section different from computer, refer to How to Visit IPC on Internet in WEB Server User Manual for the connection during different network sections. .............................. Connect to Wireless Network Before starting the wireless network, connect the IPC to network by Ethernet cable, visit the device through browser, enter “Network Settings” interface, and set the wireless network connection following the operating procedure, as detailed in Network Setting in WEB Server User Manual. 14 Accessing device 3 Accessing device There are 4 methods can be used to access the device: WEB Browser, RTSP Media Player, Mobile Phone and Video Surveillance Software (ZKiVision client software). 3.1 Using WEB Browser 1. Open a browser, type in the dynamic domain name or IP address of the device (e.g. http://192.168.80.123), press "Enter" to open the following login interface: 2. Type in user’s name and password, and click “OK” and the guide page will show as below: 3. Click Watch the video to enter Preview interface: 15 User’s Manual for ZKSD4 Series Mini PTZ Dome IP Camera V1.0 Note: When accessing the device via browser for the first time, it is necessary to download the ActiveX. More details about how to use browser for video surveillance, please refer to WEB Server User Manual in the supplied CD. 3.2 Using RTSP Media Player 1. Download and install a media player supporting RTSP protocol, e.g. VLC media player. 2. Open the media player, select the menu “Media”—“Open Network Stream”, pop up the input interface of URL. 16 Accessing device 3. Type in the network URL in the form of rtsp://<IP address>:<RTSP port>/<stream code>. 4. Click “Play” and the media player will play the real-time video of the device. 17 User’s Manual for ZKSD4 Series Mini PTZ Dome IP Camera V1.0 Note: 1) The default RTSP port of device is 554. If it must be modified, please contact the network administrator or professional. 2) If it is necessary to learn about how to use RTSP media player for video surveillance, please refer to WEB Server User Manual in the supplied CD. 3.3 Using Mobile Phone If it is necessary to use mobile phone for video surveillance, please firstly ensure the device can be accessed on Internet. Please refer to ZKiVision User Manual (Mobile Version). 1. Install the surveillance software into your mobile phone. 2. Click the icon “ZKiVision” to enter the software. 18 Accessing device 3. Choose “Device List” and click “Add” to add devices, type in the user name, password, domain name and port of the device, click “Save” to complete it. 19 User’s Manual for ZKSD4 Series Mini PTZ Dome IP Camera V1.0 4. Choose “Live View” on the initial interface, click the cell and click again to select the device to play its live video. Note: 1) The operating system of mobile device must be Android or iOS or BlackBerry. 2) As the internet service is required for watching video, please consult with your internet service provider for specific charges. 3) Please refer to ZKiVision User Manual (Mobile Version) in the supplied CD for more details. 3.4 Using Video Surveillance Software ZKiVision Client Software is our company's free video surveillance software, which can help manage and monitor multiple devices in a real-time manner. Install the software in the supplied CD, and add devices to the software. Then the real-time 20 Accessing device monitoring can be started. If needed to learn about how to use the video surveillance software, refer to ZKiVision Client Software User Manual in the CD. 21 User’s Manual for ZKSD4 Series Mini PTZ Dome IP Camera V1.0 4 Extended Functions The mini PTZ dome IP camera supports a maximum of 255 presets, among which presets 90 to 130 and preset 255 are used for special functions. 95 (invoke preset 95): Enter the high speed dome menu 91 (invoke preset 91): Enter the camera menu (if camera supports this feature) 128 (invoke preset 98): Invoke limit scanning 125 (configure preset 125): The auto horizontal scanning mode 126 (configure preset 126): Enter the limit scanning settings 127 (configure preset 126): Left limit setting 128 (configure preset 126): Right limit setting 22