1
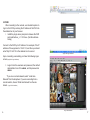
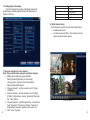
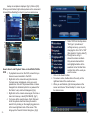
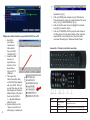
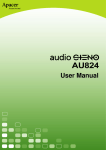
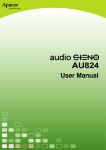
quick start guide
USER MANUAL
60x/70x/90x Digital Video Recorder
Table of Contents
Part 1: Basic Operation
Initial Setup ------------------------------------------- p. 4
Login --------------------------------------------------- p. 5
Monitoring -------------------------------------------- p. 6
Video Playback -------------------------------------- p. 8
Network Setup --------------------------------------- p. 10
Alarm Setup ------------------------------------------ p. 11
Part 2: Remote Viewing
Network Connection ------------------------------- p. 14
Client Software (CMS) ----------------------------- p. 15
Web Monitoring ------------------------------------- p. 16
Part One
– Basic Operation –
Congratulations on purchasing an outstanding digital
surveillance product known for its reliability and
performance. The 60x/70x/90x series of DVRs is built
on an embedded LINUX operating system and takes
advantage of H.264mp video compression and G.711A
audio compression ensuring a high-quality image and a
low error rate. Solid network services provide enhanced
data throughput and remote viewing capabilities.
Part 3: Special Functions
Configuring the Encoding ------------------------- p. 20
Multi-channel Remote Monitoring -------------- p. 22
Mobile Device Monitoring ------------------------- p. 23
Exporting a Video Event -------------------------- p. 24
Search and Playback Video ---------------------- p. 26
Playback on a PC ---------------------------------- p. 28
Appendices
Remote Control Operation ----------------------- p. 29
Mouse Operation ----------------------------------- p. 30
2
3
1. Initial Setup
1.1 Install a hard disk
Your device may come with a hard disk preinstalled. If it
does not, please install a hard disk before using your DVR.
The DVR supports SATA 1or SATA 2 hard disks.
Note: The DVR can monitor without a hard disk but it will
not be able to record and playback events.
3. Powering off your DVR
There are two methods to turn off the DVR: 1) Entering
[Main menu] and choosing [Logout] in the [turn off the
system] menu is called soft shutdown. 2) Pressing the
power switch is called hard shutdown.
Note: Settings information must be saved before
replacing the onboard battery or the information will be lost.
1.2 Connect a Mouse
The DVR has two built-in USB ports on the back panel
designed to be used with a mouse and a flash drive.
(USB1/2)
2. Powering on your DVR
Connect the power supply to the back of the DVR and
plug in the power cord. Turn on the power switch on the front
of the DVR. An indicator light is provided to indicate that there
is power and you will hear a beep. The system boots up to
the default multi-camera view.
Note: If the power is interrupted, the DVR will start up
to the previous state it was in before the interruption.
4
img.1: Login
4. Login
When the DVR boots up, the user is presented with a
login screen as seen in (img.1):
There are two pre-defined users, admin and guest; by
default there is no password set. “Admin” is the superuser
log in; “Guest” is a restricted user log in.
Password protection: If the password is entered
incorrectly three times, an alarm will be set off. If the
password is entered incorrectly five times, the account
will be locked. (At this point the DVR must be rebooted or
you must wait for 30 minutes for the user account to be
unlocked automatically.)
For your security, please change your password
after first login.
5
5. Monitoring
Login and view the default multi-camera view.
The system date, time, and channel name are shown in
each camera window along with the status outlined in (Table.1).
1
Recording
3
Video lost
2
Motion detected
4
Camera locked
Table.1: preview icons
6. Recording Configuration
To configure recording, right-click on the monitoring
screen and select [Main Menu]> [Record]> [Record
Config]. The system’s default schedule setting is 24 hours
continuous recording. The system is configured to 24 hour
motion detect recording.
Note: There must be at least one read/write hard
disk for the DVR to record.
[Channel] To set options, select the channel number for the
setting you would like to adjust. Select “all” to apply
these settings to all the channels.
[Redundancy] Select this to record to one hard drive and
have the second drive as a redundant backup.
[Length] Set the duration of each video clip. 60 minutes is the
default length.
[Prerecord] The number of seconds to add to the video file
from the buffer before an event.
[Record Mode] Set the record mode to Schedule, Manual, or
Stopped
Schedule: Record based on the video method (regular,
detect, and alarm) and schedule settings.
Manual: Ignore schedule, record mode and record
continuously.
Stop: Ignore schedule, record mode and do not record.
[Period (n)] Set the recording schedule. Recording will only
happen in this range (unless overridden by the options
above).
6
Img.2: Record Configuration
[RecordingType] Set recording method: regular, detect, or alarm.
regular: Record constantly during the given period. The
video file type is “R” (regular).
detect: Trigger recording using “motion detect,” “camera
mask” or “video loss” signals. When this option is set,
video is recorded when triggered. The video file type
is “M.”
alarm: Trigger recording by an external alarm signal.
When an alarm is signaled, “detection recording”
begins. The video file type is “A.”
7
7. Video Playback
From the desktop, right-click and select Playback. (img.4:
Video Playback)
Note: Files are saved on the hard disk
Note: The storage must be large enough to hold the backup.
[Playback controls] Refer to the following sheet for more
information.
Button
1
Function
Button
Function
Play / Pause
Backward
Stop
Slow Play
Previous Frame
Fast Play
Next Frame
Previous File
Repeat Playback
Next File
2
6
5
4
3
Full Screen
img.4: Video Playback
Table.2: Playback control legend
1. File list
3. Search
2. File information 4. File Backup
5. Tool Tip
6. Playback Controls
[File list] Choose the file to playback/backup.
[File information] Start time, end time, and size
[File searching] Search the file searching parameters.
[File backup] Backup files from hard disk.
8
Note: Frame by frame playback is only available when
paused.
Special functions:
Playback a specific time frame: Input time (h/m/s) in the
time column and then click [PLAY].
Playback zoom: When the system is in single-window fullscreen playback mode, you can drag your mouse on the screen
to select a region, left-click to zoom to that region. Right-click
and select the Up Window to exit.
9
9. Alarm Setup
8. Network Setup
Picture5 Network Setup
On the desktop, right-click and select Main Menu > System >
Network
[IP address] Set the IP address. Default: 192.168.1.10
[Subnet Mask] Set the subnet mask. Default: 255.255.255.0
[Gateway]
Set the default gateway. Default: 192.168.1.1
Ensure that the DVR’s IP address and router are on the same
network. For example, the router IP address is 192.168.1.1,
and the subnet mask is 255.255.255.0. Often the default
gateway is the router IP address.
View the DVR over the local network by entering the IP
address 192.168.1.10 (or the one you assigned) into Internet
Explorer. For more details, refer to “Remote Viewing”.
10
Picture 6 Motion Detection
Motion detection setup: The DVR can be set to
activate an alarm, begin recording, and make a PTZ (if
connected) turn to a preset position when motion is detected
within an assigned region.
1. Choose [Main Menu]>[Alarm]>[Motion Detect], click
“Enable”
2. Choose one channel and adjust the motion detection
sensitivity level, then set the time period to monitor.
Set the monitor region (click the “set” button, choose
the areas you want by clicking on the squares in the
grid, all areas are included by default. To exit, rightclick and select "up window."
3. When the alarm is triggered, the DVR can be set to
take multiple actions: alarm output, video recording,
channel tour, activate a PTZ camera, snapshot, display
a message, send email, and trigger an onboard alarm.
11
4. Set the other channels’ alarm parameters by repeating
steps 2 and 3.
Note: Video block, video loss, and alarm input are set up the
same way as motion detection.
Part 2
- Remote Viewing –
10. PTZ Control
Follow these steps to set up your PTZ camera:
1. Set basic parameters such as channel and protocol.
[Main Menu]>[System]>[PTZ Config]
2. Enter the PTZ operation menu.
3. Right-click on the desktop and choose “PTZ control”
to find the PTZ general operation settings. Another
method is to right-click, choose “High Speed PTZ.”
Using the left mouse button it is possible to control the
PTZ directly. Use the mouse wheel to zoom in/out on
the controlled camera.
4. Please read your PTZ user manual for more instructions
12
13
1. Network Connection
Before you can view your DVR over the Web, you need
to connect the equipment to the internet.
1. Connect the equipment to the local network.
2. Set the LAN settings by following “9. Network Setup” in
the first part of this manual.
3. Once the LAN is connected, you will need to access
your router to map the necessary ports to the device
which will enable you to connect to the DVR over the
internet. Ports that will need to be opened are: Port 80,
Port 34567, and Port 34599 for mobile viewing.
4. If you do not have a static IP address assigned to you
by your internet service provider, you can sign up for a
Dynamic DNS at several sites on the internet, such as
dyndns.org.
5. DDNS Setup. Enter the correct settings provided
by your DDNS provider at Main Menu-> System->
NetService-> DDNS.
2.1 Client software
The CMS software is used on a computer and can monitor
several DVRs at the same time.
1. Please take the CD out of the accessories box, then
install the CMS installation software found at: [CD/DVD
drive]:\English\Software\General_CMS_ChnEng….exe
2. After installing this software on your computer, open
the program. (Img.7: CMS Interface) shows the
interface. Add a DVR by going to [System]>[Device
Manager]>[Add area/device], and enter your DVR
information following the prompts. The web browser
uses the same method to add a device.
3. You can monitor multiple DVRs by repeating this step
for each DVR.
Note: Test your IP settings with a computer on the same
network to make sure it is properly configured before
proceeding to the router-side configuration.
2. Remote Monitoring
Once your DVR is connected to the network, there are
two methods for remote monitoring. The first is through your
Internet Explorer browser. The second method is Client
Managment Software, or CMS. This method is recommended
since it has more features and control than using a browser.
The CMS is stable, professional-grade software that can be
used to view multiple devices at the same time.
img.7: CMS Interface
14
15
2.2 WEB
After connecting to the network, use Internet Explorer to
log in to the DVR by entering the IP address of the DVR into
the address bar of your browser.
1. Install the plugin when prompted or browse the DVR
and install activex_v1.1.0.32.exe. (Net Surveillance
Setup)
Connect to the DVR by its IP address. For example, if the IP
address of the equipment is 10.6.0.114, and then you should
enter http://10.6.0.114 in the address bar to connect.
img.8: Web Login Interface
Upon connecting successfully you’ll see the following logon
screen (img.8:Web Login Interface).
2. Login. Enter the username and password, the default
administrator User ID is admin, and the password is
admin.
*If you are on a local network, select “Local Area
Network” from the dropdown. If you are connecting from a
remote location, choose “Wide Area Network” as the substream. (img.9: Web Interface)
16
img.9: Web Interface
17
3. Basic Web Operation
To do the following on the web interface:
1) Screen Split
Choose image preview mode;
2) Playback
Enter playback mode
3) Log
Display log information:
4) Local Config
Alarm and System settings
5) Channel position
Part 3
- Special Functions –
This series of DVRs allows you to personalize a number of
features. DVR keys, zoom to an area in preview, timed start
up and shut down, FTP uploads, 3G & WIFI and more.
Here are the settings for encode, multi channels playback,
and mobile monitor setup.
Left click and choose a window on the left, double-click on
a camera from the device list on the right. Do the same for
each camera. Alternately, you can right-click on the device
and select “connect all cameras [stream].” You can adjust the
image settings once you are connected to the channel.
To close a channel, right-click on the channel and select
“Close window” or choose “Close all windows” to close all
opened video channels.
18
19
1 Configuring the Encoding
The DVR adjusts the quality of playback and remote
monitoring by modifying the settings in the Main Menu->
System->Encode.
Resolution
Kb/S
D1
512~2560
HD1
384~2048kbps
CIF
64~1024kbps
QCIF
64~512kbps
1.2 Extra Stream Setup
Extra stream is used for remote and mobile clients.
1. Enable extra stream
2. Set frame rate and bitrate. The settings work the
same way as the main stream.
img.10: Encode setup
20
1.1 Encode settings for every channel
Note: Only certain modes support resolution changes.
1. Modify these settings by going to [Main
Menu]>[System]>[Encode] on the remote).
Using a mouse, right-click and choose [Main
Menu]>[System]>[Encode]).
2. Choose channel 1, set the resolution as D1 (25fps,
1536Kb/s).
3. Choose channel 2, set the resolution as CIF (25fps,
512Kb/s). Right-click or choose “Advanced” then click
the “Copy” button.
4. Choose channel 3, click the right button or choose the
local “Advanced,” then choose “Paste.” Channel 2’s
settings have now been pasted to Channel 3, etc.
5. Click “save,” then exit.
img.11: Video Playback
21
3. Mobile Monitoring - Use the extra stream to monitor
from a mobile device (eg. iPhone)
2. Multi-channel Real-time Monitor remotely
Use the extra stream settings remotely to compensate
for slow networks.
1. Enable extra streams (MainMenu->System->Encode)
2. Setup mobile monitor: go to MainMenu->System->
3. NetService->Mobile Monitor, change to "Enable"
Note: Be sure to route the mobile monitor port in the
router (34599).
4. Install the corresponding mobile monitoring software
MEYE through the appropriate marketplace (Apple
App store, Android Market Place).
5. The following example shows how to correctly set up
the iPhone app but the steps are the same from step 7
onwards on Android.
Connect to the Apple App store or Android Market Place
img.12 CMS Interface
1. Enable extra streams (MainMenu->System->Encode)
2. Open the CMS, and login.
3. After adding devices, right-click device name to select
"Connect all video (Extra stream)."
22
6. Search for “MEye.”
7. Click on MEye in the search results.
8. Click on “Free” to install.
9. Enter your iTunes logon/password if prompted
10.MEye is downloaded and installed. You can see the
progress of the install on the app icon. Wait for it to
complete.
11. Tap on the MEye icon to open the application.
12.Click on the settings icon.
13.Enter the server’s IP address. (Note: if you are
connected on the same network as your DVR user
your internal ip address [e.g.:192.168.1.x, 10.10.x.x] if
you are connecting remotely from a different network
use your external IP address: [e.g.: 69.x.x.x] be sure
to find out your external IP address and configure your
router before attempting to connect externally)
14.Enter the port#. By default this is 34599.
15.Enter your UserID.
16.Enter your Password.
17.Tap on the [Back] button at the top of the screen.
18.You should now see your cameras displayed.
23
fig.2
fig.1
1. To export an event on the DVR, ensure that you have
a mouse connected to the DVR. Also ensure that you
have a USB storage device, such as a flash drive,
connected to the USB port in the back.
2. Right-click on the screen showing the cameras. If a
login screen is displayed, enter your user’s password
or click ok if the password has not been changed from
its default (which is no password for the “admin” user)
and it will disappear. (fig.1)
3. Right-click on the camera screen again, this time a
menu list comes up, select [PLAYBACK]. (fig.2)
FIG. 3
Exporting a Video Event from your 60x/70x/90x DVR
24
4. You’re now at the search screen. (fig.3) We need to tell
the system what time frame you want to search for by
clicking on the magnifying glass icon in the lower righthand side of the screen. This brings up the “Search
Criteria“ dialog box. (fig.3)
5. Select “All” from the drop-down “File Type:” (sometimes,
if nothing comes up, you can try changing this from “All”
to “MD” [this stands for “motion detect”])
6. The green arrow on the illustration shows the camera
numbers. Only camera channels that are highlighted
white will be searched. Enter the Start time and End
time of the event you want to review.
7. Click on the Search button.
8. To review a video, double-click on the entry on the righthand side of the results screen.
9. To export the video, click on the event in the upper
right-hand side of the screen and then on the hard disk
icon. (fig.3 circled)
10.You should see your USB device listed as in (fig.4).
11. Click on [BACKUP] and the screen will change. Click
on [START]. When complete, a confirmation that the
25
26
How to Search and Playback Video on the AP-60x/70x/90x
DVR
1. To playback an event on the DVR, ensure that you
have a mouse connected to the DVR.
2. Right-click on the screen showing the cameras.
If a login screen is displayed, enter your user’s
password or click ok if the password has not been
changed from its default (which is no password for
the “admin” user) and it will disappear. (fig.6)
3. Right-click on the camera screen again, this time a
menu list comes up, select [PLAYBACK]. (fig.7)
4. You’re now at the search screen. (fig.8) We need
to tell the system what time frame you want to
search for by clicking on the magnifying glass icon
in the lower right-hand side of the screen. This
brings up the “Search Criteria“ dialog box. (fig.9)
fig.6
5. Select “All” from the drop-down
“File Type:” (sometimes, if
nothing comes up, you can try
changing this from “All” to “MD”
[this stands for “motion detect”])
6. The light arrow in fig. 9
shows the camera numbers.
Only camera channels that
are highlighted white will be
searched. Enter the Start time
and End time of the event you
want to review.
7. Click on the Search button.
8. To review a video, double-click on the entry on the
right-hand side of the results screen.
9. When you are finished, right-click anywhere on the
screen and choose “Show Desktop” to return to your
live camera view.
fig.8
fig.7
FIG. 5
FIG. 4
backup is complete is displayed. (fig.5) Click on [OK].
When you are finished, right-click anywhere on the screen and
choose [Show Desktop] to return to your live camera view.
27
fig.3
fig.9
illustrated in (fig.1).
5. Click on [OPEN] and navigate to your USB device.
This will show the video you exported with a file name
like: [1_02_M_082010095024]. (fig.2)
6. Click on the file name once to highlight it and make
sure [AVI] is selected. (fig.3)
7. Click on [CONVERT] and the program will create an
AVI file and put it in the same folder as the originally
exported file on the USB device. Now, the newly
converted file will play in Windows Media Player.
fig.1
Playback a Video Event from your 60x/70x DVR on a PC
1. Export the
event (See
“Exporting a
Video Event
from your 60x/
70x/90x DVR”).
2. Insert the USB
device you
exported your
video to in the
steps above
into your PC’s
USB slot.
3. Then open the
Video Converter utility
on the DVD that shipped
with your DVR. This will
convert the video to a file
that will play in Windows
Media Player. (This file is
found on the DVD at:
\▫▫▫▫\English\Software\
VideoConvert)
4. Double clicking on the
“Video Converter” icon
will bring up a window as
28
fig.2
Appendix 1. Remote controller operation
button
Name
Function
1
Multi-channels
button
Multi-channels preview
2
Number button
Password input/number input/ channel switch
3
[Esc]
Back to up window
29
4
Direction button
Direction and OK button
5
Playback operate
Playback Basic operation
6
Record control
Enter into record menu
7
Remote controller
Input the number of DVR to control it
8
FN
Assistant function
Appendix 2.Mouse operation
Operation
Function
Double left click
Left click
Double click one item in the file list to playback the video
Double click the playback video to zoom in or out the screen
Double click the channel to make it full screen display in preview
double click again to resume the multi-channel display
Choose according option in the menu
Pop desktop shortcut menu in preview state
Right click
Current shortcut menu in the menu
Add or subtract number value in the number setting
Wheel button
Switch the items in the combo box
Page up or down in the list
Move mouse
Drag mouse
Choose the widget or move the item in the widget
Set the motion detect area
Set the cover area
PRODUCT WARRANTY
All the products sold are covered by 12-month warranty
from the date of purchase.
Alphabetical Index
Alarm setup ------------------------------------------ p. 11
CMS channel position ----------------------------- p. 18
CMS client software -------------------------------- p. 15
CMS local config ------------------------------------ p. 18
CMS log ----------------------------------------------- p. 18
CMS playback --------------------------------------- p. 18
CMS screen split ------------------------------------ p. 18
Encode settings ------------------------------------- p. 20
Encoding configuration ---------------------------- p. 20
Exporting a video event --------------------------- p. 24
Extra stream setup --------------------------------- p. 21
Hard disk installation ------------------------------- p. 4
Initial setup ------------------------------------------- p. 4
Login through browser ----------------------------- p. 16
Login to DVR ---------------------------------------- p. 5
Mobile monitoring ---------------------------------- p. 23
Monitoring your DVR ------------------------------- p. 6
Mouse operation ------------------------------------ p. 30
Multi-channel remote monitoring --------------- p. 22
Network connection -------------------------------- p. 14
Network setup --------------------------------------- p. 10
Playback a video event on PC ------------------ p. 28
Powering on/off ------------------------------------- p. 4
PTZ control ------------------------------------------- p.12
Recording configuration --------------------------- p. 6
Remote controller operation --------------------- p. 29
Remote monitoring --------------------------------- p. 14
Search & playback video on DVR -------------- p. 26
Video playback -------------------------------------- p. 8
Web operation --------------------------------------- p.18
31
32
33
34