1
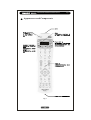
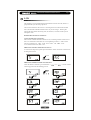
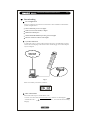
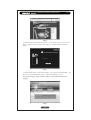
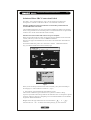
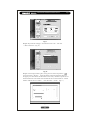
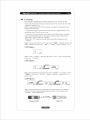
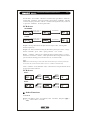
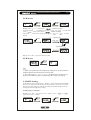
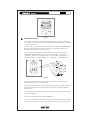
THE INTERNET POWERED UNIVERSAL REMOTE
User Manual
THE INTERNET POWERED UNIVERSAL REMOTE
Table of Contents
Introduction of the Universal Remote Control
Main Functio ns
App earance and components
Before using
Components
Battery Installment
LCD
How to Set
Quick Start Guide
Download
Learning
Other Functions
How to Use
Cautions on Use
FAQS
Descriptions
Customer Service
English
THE INTERNET POWERED UNIVERSAL REMOTE
English
This product can control any devices only after you finish the steps of initial setting.
For specific operati ons, please se e corresponding pages and chapters.
Important Hints
Please keep the manual book in a proper storage after readi ng it in case of a later use.
Introduction
A nycon trol N RC- 701L Universal R emo te Co ntrol ( URC ) are n ew co ncep t prod ucts
in acco rdance with the p ursui t of m odern and easy l ife, w hich are research ed an d
developed in depen dently by BREM AX Techn ology Co., Ltd. (Hang zhou). Users
ca n firstly set the U RCflexibly thro ugh d ownloadin g or learning; th e dow nload ing
process is pa rticul arly u nique and magical: th rough the attached US B con nection,
the use rs can dow nload desired Rccode from the in ternet.
A fter th e setting p rocess, UR C can contr ol 8 d ifferent kin ds of audio /visu al dev ices
an d 1 k ind of air-condit ioner, applicable for any bra nds a nd mo del d omes tically or
ab road .
Main functions
The URC contro ls 8 different kinds of audio/visual devi ces and 1 kind of
air-conditioner simultaneous ly, including TV、CBL、S AT、DVD or VCD、
VC R、CD、AM P、AUX and A/C.
Internet: Users have access to the BREMA X website an d download the code
or upgrading the URC
Lea rning: URC can identify v arious RC co des; the learning process i s guided
by LCD with eas iness.
LC D: Showing p resent condition, includin g: present de vices, sending codes,
learning, downloading and cl ock timing.
Blue backlight: Easy operatio n in the dark ness.
Clo ck and button pressing wit h sound.
About AUX
AU X means that users set home devices by themselves, w hich is a hum anization de sign for
use rs' conveniences. Users can set any devi ces by AUX e xcept air conditioner, for e xample,
the second TV or fan with Infrared Remote Control.
THE INTERNET POWERED UNIVERSAL REMOTE
Appearance and Components
Fig 1
English
THE INTERNET POWERED UNIVERSAL REMOTE
English
Before Using
Read follow ing carefu lly before using URC for th e first time:
Components
Ensure that y ou have received the following items:
1 NRC-701L Universal R emote Control
Manual book
Quick Start Guide
Manufacturer/ Warranty card
1 U SB Cable
4 AAA b atteries(batteries may be different in different sales areas)
No te: diff erent packag es may includ e different ac cessories.
Battery Installment
Push the tab and lift off the battery lid on the b ack and insert 4 new AAA b atteries
(No. seven) into th e batt ery compartment in accordance with positiv e (+) and
negative (-) marks indicated on the botto m of the battery compartme nt
(as is sh own in Fig 2). Be sure to do so in the proper direction.
Fig 2
Note:
1. Do no t mix fresh an d used batteries or b atterie s with different mod el.
2. If the electro lyte inside the batter y shou ld leak , take out the batteries imm ediately.
Re place new ones after wiping the fl uid off the ins ide of t he battery compartment by
soft and d ry clot h or co tton pa per. Don't use water or oth er kind s of liq uid directly.
3. Remove the batterie s from the un iversal remot e control whe n you p lan no t to
use this p roduct for a long period of time.
THE INTERNET POWERED UNIVERSAL REMOTE
English
LCD
T his ch apter gives a brief introduction o f diff erent sectio ns on LCD , whic h is a
p repar ation for yo ur next step oper ation .
There a re two functions for section s: 1.showin g the devic e name und er no rmal
st ate, w hich means what kind of ho me devices you a re using; 2 . showing t he
se tting functions u nder the se tting state, for in stance, “ CL OCK ” means yo u are
se tting the clock.
Detailed instructions areas follows:
1.Sectio ns un der the no rmal state.
URC controls 9 different k inds o f hom e dev ices, inclu ding 8 audio/visual devices
and 1 air-conditioner. Thus there are 9 corr espon ding sectio ns: 1. audio /visu al
secti ons, i nclud ing T V、C BL、 VCR、 SAT 、DV D、C D、A MP、 AUX .
2. ai r-cond ition er section, that is A/C.
Shift between audio/visual and A /C devices
As is shown in th e pict ure, p lease press the b utton “ Aud io-Visual/A ir-Co nditioner ”
to cha nge th e section
Shift between di fferent audio/visual devices.
Under the a udio/visual state, press the button “
follo wing pictur es for the s hiftin g process.
” or“
” . Please se e the
THE INTERNET POWERED UNIVERSAL REMOTE
English
2. Sections under the setting state.
Fu nctio nal section unde r the setting state
Enter th e setting st ate: p ress t he bu tton“ SET”for 5 seco nds.
A s is sh own i n the picture, there are four funct ional sectio ns, p lease press the
bu tton “
” 、or“
” fo r shifting.
No te: you have fo ur different setting operati ons un der the audio/ visual state: L EARN、
CL OCK、 LIGHT 、SOUND. A nd you have th ree un der the A/C st ate: CL OCK、 LIGHT、
SO UND.
How to Set
Th ere are sev eral setting meth ods for UR C, do wnloading, learn ing, etc. yo u can
se lect any one of th em at your convenien ces.
Quick Start Guide
If you h ave a PC w hich has a ccess to th e inte rnet, we re commend you t o use:
Downloading from Internet
(page 6)
If y our o riginal RC was dama ged o r lost, plea se use:
Downloading from Internet
(page 6)
If y ou do n't ha ve an y PC s, ple ase u se:
LEARN
(page 11)
If y ou w ant to set l ight, clock or so und, please use:
Other Functions
(page 12)
THE INTERNET POWERED UNIVERSAL REMOTE
English
Downloading
PC Configuration
Prep are a comp uter and co nnect it to the In ternet . The minim um recommend ed
system co nfigu ration is:
Inter Pentium III processor or higher
USB 1.1 (Un iversa l Seria l Bus) or high er
20M free ha rd dis k space
Wind ows98 SE/M e/2000 /XP op erating system or higher
Mon itor resolutio n of 10 24×76 8 or hi gher
System Connection
As i ndicated in Fig 3 , conn ect URC with on e online PC via USB cable provided.
Con nect the smaller plug o f the cable to UR C and the b igger one to the USB port
on y our compu ter.
Fig 3
W hen successfully conn ected , lcd shows:
How to D ownload
Pl ease follow the steps to dow nload RC c ode:
1. Please visit o ur website at ww w.bremax.com, click Service and Support
“Download Code”
“D ownl oad RC Code”, then enter the do wnloading
web page.
THE INTERNET POWERED UNIVERSAL REMOTE
English
Fig 4
2. Wh en it shows “Su ccess ful Connection”, please click “Enter”(in Fig 5); if it
shows “Failed”(in Fig 7), please refer to page 8 “Solutions When Connection
Failed ”
Fig 5
3. Wh en website shows “Enter C lassic Mode” and “Enter customized Mode”, for
first users, we recommend you to click “Enter Classic Mode ”(Fig 6)
Note: for the setting of “Enter Customized Mode”, please follow the steps on the
webpage.
Fig 6
THE INTERNET POWERED UNIVERSAL REMOTE
English
Solutions When URC Connection Failed
If it show s “R C co nnection failed” (Fig 7), please o perate acco rding to th e
descriptions in solu tion A or B until it sho ws “ successful RC co nnection” .
Sol ution A : Ma ke sure that you m ake t he correct b attery insta llment and
nor mal U SB ca ble co nnect ion
Ch eck w hethe r the batteries are corr ectly instal led; w heth er the batteries are run ning
dow n; if any p roblems were to be found, p lease re-in stall t he batteries or replace them
wit h new ones. Check if t he US B cab le wo rks n ormally.
Sol ution B : Ple ase in stall OCX c ontrol into y our c omputer.
Wh en yo u use URC for th e first time, OCX control m ay be mask ed. Please install the
con trol, otherwise y ou have no access to B REM AX d ataba se.
There are two types of installation fo r OC X con trol: auto i nstallation and m anua l in
stallatio n.
For manu al in stallation, p lease see i t as fo llows: click the “Ma nual D ownload”
(Fig 7); a nd th en ins tall a nd run OCX control(F ig 8)
Fig 7
Fig 8
Wh en yo u successfully in stall the O CX co ntrol manu ally, the sy stem would skip to
the webp age o f “S uccessful R C Co nnect ion” (Fig 5)
4. Select the RC co de an d finish the down load ing process.
UR C con trols 9 different types of ho me devices; you have to make a s etting
respectiv ely w ith th e sam e sett ing m ethod s. We take the T V RC as a sample for specific
ope ratio n. Sup pose you h ave a Chan ghong TV set with mo del nu mber 2112 FA an d the
original RC m odel n umber K6F.
Step 1: C hoose the type o f hom e dev ice. P ress the bu tton“
” or “
”
and mov e the icon “ TV” to the des ired central plac e(Fig 9), click an d enter.
THE INTERNET POWERED UNIVERSAL REMOTE
English
Fig 9
Step 2: Skip from the webpag e “D ownlo ad TV RC Code” and click
“ Model Selection ”(Fig 10)
Fig 10
”,
Step 3: In the displayed dialog box, firstl y please click th e drop butto n“
cho ose the bra nd “ Philip s” among the b rand listin g(Eng lish b rand names in
the upper plac e and Chinese brand n ames in the lower ); And then inpu t the devic e
mo del nu mber RC7 812 and RC mod el num ber R c781 2 into the b lank of “M odel
Nu mber of Ho me D evice and R C”; click the bu tton “search” (Fig 11)
Fig 11
THE INTERNET POWERED UNIVERSAL REMOTE
English
Step 4: All th e RC numb ers are liste d matching the search ing conditions (note: o ne
RC usually co ntrols different types of hom e dev ices of the same brand), click an y one
of them (Fig 1 2);
Fig 12
Step 5: Go back to the w ebpag e of “ Dow nload TV RC Co de” , click the b utton
“O K”(Fig 1 3), th en it g oes b ack to the s tartin g web page in ste p 1(F ig 9). Now the
setting for TV RC is finis hed.
Fig 13
Step 6: Adop t the same m etho ds for setti ng oth er ho me devices .
Step 7: After the se tting process, click th e butt on “ finish ed”; later a dialogue box
com es ou t, ple ase click “ yes” , then all t he set tings are finished.
THE INTERNET POWERED UNIVERSAL REMOTE
English
If LCD shows “SU CCE ED” and after 2 seco nds' d elay it goes back to “ KEY IN”,
it mean s that “PO WER” learns su ccessfully; if LC D shows “ ERR OR” and after
2 s econ ds' delay it goes b ack t o“IR IN” , it m eans learning fai led. N ow y ou hav e to
re-press the “ POW ER” on the original TV R C.
LCD shows:
SUCCEED:
press the “ power” on
the original TV RC
2 secon ds' delay
press the “ power” on
the original TV RC
2 secon ds' delay
Failed:
St ep 5: Lear ning o ther button s. Re peat the ab ove steps 3 and 4 , learn ing o ther
bu ttons respectively.
Step 6: Exit: after you fi nish l earnin g all the bu ttons, please pre ss“S ET” and go
back to “ LEA RN” ; press “S ET” again , go b ack to “T V” section .
Step 7: “LEA RN” other dev ices. Imitate the above-men tione d step 1, re -select
one device, for instance, “DV D”; Then repeat all th e abo ve steps fro m 2 to 6 un til
you succeed, f or learning process of other devices, so on and so forth.
Note :
After you en tered l earning sectio n of th e above -menti oned step 3 w ith no o peration for
20 se conds, the sys tem wi ll come back t o sectio n “ LEARN” automatically.
Und er “ LEAR N” state, the b utton“SET ” fu nctio ns as exit to pare nt me nu. Th ere
are two exit models as fol lows.
LCD shows:
Exit 1:
Exit 2:
Other Functions
1. CLOCK
Step 1: press button “SET” for 5 minutes, en ter “ LEAR N”,then press“
or“
” u ntil it show s “C LOCK ”
”
English
THE INTERNET POWERED UNIVERSAL REMOTE
LCD shows:
” , clock sho ws “
”, and th e hou r digits
Step 2: press“
” or“
” to s et the hour;
(fir st two figu res) starts to sparkle, p lease press“
” again, clock show s “
”, the minute d igits
press“
”or“
” t o set the
(th e last two figures)starts to sparkl e, ple ase press“
min ute.
adjust the time
adjust the time
Step 3: press“SET” and exit t o the device name.
LCD shows:
No te:
1. If there is no operation for 20 seconds du ring setting p rocess, the sy stem will exit
au tomatic ally an d com e back to the p resent device name.
2. Every time yo u press “
”or “
”, the figure incre ases or decrea ses 1;
If y ou pre ss it wi thout s top, process o f incre asing or decreasing is spee ding u p.
2. LIGHT Setting
In the darknes s, you press the b utton “LIGHT” and switch on the bl ue backligh t.
The re are two choic es for the lasting perio d of t he lig ht, 6 s econ ds or 1 2 seconds.
The purp ose o f this settin g is either for sw itchin g on/off th e back light or for the
last ing p eriod of the light (dela y sett ing).
Setting steps are as fol lows:
Step 1: press “SET” for 5 seconds, enter “CODE”, press “
again until it shows “LIGHT”.
”or“
”
English
THE INTERNET POWERED UNIVERSAL REMOTE
” , first enter def ault s tate“L_6S ”,w hich mean s backlight
S tep 2: pres s“
is on an d for 6 seconds' delay. Totally th ere are 3 states: “ L_O FF” (lig ht off) 、
“ L_6 S” (6 seconds' delay )、“ L_1 2S”(12 se conds' delay); press“
”or
“
”fo r selection . For examp le, sw itch o ff the light.
LCD shows:
S tep 3: pres s “
”, and come ba ck to “LIG HT” ; press “S ET” again ,
c ome b ack to the n ame of present d evice.
LCD shows:
3. SOUND Setting
Step 1: pres s“SE T” for 5 s econd s, enter “ COD E”, p ress“
until it show s “SO UND ”.
”or “
”
Step 2: pres s “
”, firstly e nter default state“S_ ON” , it m eans sound is on ;
you can swit ch it o ff, th at is “ S_O FF”; for selection, p lease press“
”o r
“
”. F or example , we s witch the s ound off.
LCD shows:
Step 3: pres s“
” an d com e back to “ SOU ND” ; press “S ET” again , and
co me b ack to present device n ame.
LCD shows:
Note:
1 .If th ere is n o operation f or 20 seconds during the se tting p rocess , the sy stem will
e xit aut omatic ally an d come back to the p resent device name.
2. If the re is no opera tion fo r 30 se conds o n the U RC, L CD will close autom aticall y.
THE INTERNET POWERED UNIVERSAL REMOTE
English
How to Use
After initial setting, you c an us e Any control NR C-70 1L UR C.
A/C controlling
Press “audio- visual/ air-condi tioner”, enter th e section A /C(F ig 14).
F ig 14
Und er the A/C mode , ther e are 9 butt ons fo r you r oper ation , which are mode, win d
direction and speed, timin g, confirm , delete, temperature+, temp eratu re-, and po wer
(Fig 15).
power: power for A/C
mode: mode selection
wind direction: adjustment for
wind direction
wind speed: wind speed control
Timing: time setting
confirm: timing confirm
delete: delete timing
temperature-: the temperature decreasing
temperature+: the temperature increasing
F ig 15
Audio/visual control(DVD for example)
P ress “ aud io-vis ual/ air-conditio ner” , ente r the sectio n, then pres s “
” or
“
” a nd select “ DVD “(Fi g 16) ; now you can use the b utton s on t he UR C to
contro l your DVD (Fig 15).
F ig 16
THE INTERNET POWERED UNIVERSAL REMOTE
English
Fig 17
Cautions on Use:
1 . Our URC canno t add any additianal fu nctio ns beyond your devices' fun ction s.
F or exa mple , if yo ur TV set d oesn' t have soun d fun ction, then the bu tton “SOUND”
o n UR C does not work .
2. Because there is no unified marketing criterio n on RC bu ttons, BREMAX adop ts
the most widel y used buttons. Howev er, there is still a possibility that they are
different from your button s on origin al device.
3. On our U RC t he same bu ttons may h ave d ifferent names, becau se they hav e
different functions fo r diff erent devices. Fo r exa mple, in Fig 18, the bu tton
“SO UND ”, w hen y ou are cont rollin g a TV, it is “SO UND ”; bu t when you are
controllin g AMP, it is “DS P ON /OFF ”; it is “R EPE AT” under the D VD s tate.
Fig 18
4. Op erate your home device in t he rig ht sections on URC. F or example , pres s
butto ns in the D VD se ction to co ntrol DVD .
5. Make su re tha t the distan ce between URC and d esired dev ice is within 8 m eters
and angle w ithin 30 d egree s. Ensure th at the re is n o obstacle betw een U RC an d
desir ed device.
6. Do not ex pose this p roduct to th e hum id en viron ment, to th e place with too high
or too low t empe rature .
7. Do not us e US B cab le not provided b y BR EMA X.
8. Do n ot disassem ble U RC w ithou t prio r endo rsem ent by BRE MAX . Do not ap ply
pressure to it or dr op it. Do no t use organ ic detergen ts lik e acet one to wipe dirt off.
THE INTERNET POWERED UNIVERSAL REMOTE
English
Frequently Asked Questions (FAQs)
Problems
Solutions
1.Check if the connection between URC and the computer via
USB cable is correct.
It displays No RC is found!
Please check the USB cable
connection! When running
software
2.Make sure that the battery installment is correct.
3.Remove USB extension cable or USB hub. Use USB cable
directly for connection.Replace the batteries with new ones.
During learning, it displays
Failed to learn.
1. During learning, be sure to place your original RC and
WEB01 head-to-head and keep their distance within 5-15cm.
2. Make sure that the original RC can be used properly to
control the device.
3.Ensure that the batteries in the original RC work normally.
Webpage shows URC
connection failed
1. Check if the connection between URC and the computer
via USB cable is correct.
2. Download the OCX control manually and run it.
3. Select IE domain to default state.
4. Replace the batteries with new ones.
After learning, URC can not
control home devices.
1.Make sure the devices are on standby mode.
2.Make certain that the distance between URC and desired
device is within 8 meters and try to aim it at the device.
3.Ensure that there is no obstacle between URC and desired
device.
4.Restart learning for those buttons failed to operate properly.
Replace the batteries with new ones.
De scrip tions
Interf ace
USB
Powe r
4 AAA Batteries
Batte ry life-time
3 months under standard usage conditions
Distance and Ang le
Approximately within 8 meters (26 feet), angles within 30 degrees.
Dimension
For illustrations purpose only.
Mass
For illustrations purpose only.
Usage Environme nt
Temperature: -25℃ to +55℃ Relative humidity: 0% to 93%
Note:
Param eters o f URC may va ry from each other d ue to s pecifie d mod els, for illustr ations
purpo se only.
THE INTERNET POWERED UNIVERSAL REMOTE
English
Customer Ser vice
After-sale service
If you have problems in using URC or it doesn't work temporarily, please
contact us as soon as possible. We will spare no efforts to provide our most
qualified service. We assume no responsibility if you d isassemble and repair
the URC personally.
Service Center
For any help please contact our service center via:
Hot line: 4008- 878585
0086-0571-88872183 88872187
Service Time: 8:00-21:00 Monday to Friday
10:00-18:0 0 Saturday and Sunday
FAX: 008 6-0571-88216187
Website: http://www.bremax.com/services/message.asp
Email: [email protected]
THE INTERNET POWERED UNIVERSAL REMOTE
Statement
All the items an d attached figures above are only
used for the description of usag e of this product.
Any law respon sibili ty will not be undertaken by
BREMX Techno logy C o., Ltd. (Hangzh ou).
BREMX Techno logy C o., Ltd. (Hangzh ou) reserves
the right o f fina l expl anatio n and all other rights to
this user manu al.
English
BREMAX Te chnology Co., Ltd.(HangZhou)
Ad dress: To wer 1, 4 H uanggu sh an Rd. , Xihu D ist.,
Hangzhou, Zhejian g,310 012 P.R. C hina
Tel:0086-571-88218628
Fax:0086-571-88216187
E-mail: [email protected]
Website: w ww.b remax.com