1
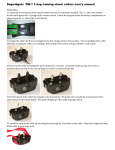
Dogwidgets DW-3 1 dog training shock collar user's manual Preparation: 1) Check the 9-volt battery of the remote control and see if it's properly installed. The +/- side of the battery should touch against the 2 springs of the remote control. Follow the diagram inside the battery compartment on where to put the +/- side of the 9-volt battery. 2) Charge the collar for 8 hours straight for the first charge and 4 to 6 hours after. The red led light of the collar will flash, meaning the collars are charging. Red led light of the collars will go solid after a full charge. 3) Power on the collar by holding the power button for 3 seconds. Install the rubber prongs if you have a small/medium size dog or the metal prongs if you have a medium/large dog. 4) Test the shock of the collar by using the wire shock tester. Wrap the wires around the 2 metal posts of the collar then press the shock button. The bulb will light up if the collar is giving a shock. 5) Install the strap to the collar by inserting them through the 2 brackets on the collar. Adjust the length and snug fit the collar to your dog's neck. Shock durations: Number 4 button has the shortest shock, Number 1, 2 and 3 has longer shocks while number 5 and 6 will give a double and a triple shocks. Training tips: 1) Familiarize the collar and the remote control and check the collar if they are working properly and safely before putting the collar on your dog. 2) Start with the vibration correction before using the shock correction. Most dogs will respond to the vibration correction. 3) Always praise your dog after a punishment. Troubleshooting the collars: 1) The collar has a built-in Lithium-Ion battery that can be charge by the wall charger or on the USB port of the computer. If the collar won't hold a charge by the wall charger, try charging the collar on the USB port of the computer, if the collar charges on the USB port then the wall charger needs to be replaced. 2) If the collar has power but won't respond to the remote control or would only work half the time, then the collar needs to reset. Follow these steps on how to reset the collar: 1) Power on the collar then push the power button three consecutive times and the red light will start flashing. 2) Press and hold the "V" button of the remote for the corresponding collar right after the red led light of the collar starts to flash and keep holding the "V" button until the collar vibrate 6 months warranty: The collar comes with a 6 months warranty, contact us at our email address [email protected] for technical support, replacement parts and replacement warranty. IMPORTANT SAFETY INFORMATION WARNING This collar is not for use with aggressive dogs. Do not use this product if your dog is aggressive, or if your dog is prone to aggressive behavior. Aggressive dogs can cause severe injury and even death to their owners and others. If you are unsure whether this product is appropriate for your dog, please consult with your veterinarian or certified trainer. CAUTION Risk of skin damage. Please read and follow the instructions in this manual. Proper fit of the collar is important. A collar worn for too long or made too tight on the pet's neck may cause skin damage. Ranging from redness to pressure ulcers; this condition is commonly known as bed sores. Avoid leaving the collar on the dog for more than 12 hours a day. When possible reposition the collar on the dog's neck every 1 to 2 hours. Check the fit to prevent excessive pressure. Never connect a lead to the receiver; it will cause excessive pressure on the prongs. When using a separate collar for a lead, don't put pressure on the receiver. Wash the dog's neck area and the prongs of the receiver weekly with a damp cloth. Examine the contact area daily for signs of a rash or a sore. If the condition persists beyond 48 hours, see your veterinarian. These steps will help your dog safe and comfortable. Some pets are sensitive to contact pressure. You may find after some time that your dog is very tolerant of the collar. If so, you may relax some of these precautions. It is important to continue daily checks of the contact area. If redness or sores are found, discontinue use until the skin has fully healed. CAUTION Safety during on-leash training. It is vitally important that you and your dog remain safe while learning during on-leash training. Your dog should be on a strong leash, long enough for him to attempt to chase an object, but short enough for him not to reach a road or other unsafe area. You must also be physically strong enough to restrain your dog when he tries to chase. Terms of Use and Limitation of Liability 1. Terms of Use. This product is offered to you conditioned upon your acceptance without modification of the terms, conditions and notices contained herein. Usage of this product implies acceptance of all such terms, conditions, and notices. 2. Proper Use. This product is designed for use with pets where training is desired. The specific temperament of your pet many not work with this product. We recommend that you not use this product if your pet is aggressive. If you are unsure whether this is appropriate for your pet, please consult your veterinarian, certified trainer or contact our customer care. 3) No Unlawful or Prohibited Use. This product is designed for use with pets only. The pet training device is not intended to harm, injure, or provoke. Using this product in a way that is not intended could result in violation of Federal, State or local laws. 4) Limitation of Liability. In no event shall Dog Widgets For Less, Inc. be liable for any direct, indirect, punitive, incidental, special or consequential damages, or any damages whatsoever arising out of or connected with the use or misuse of this product. Buyer assumes all risks and liability from the use of the product. 5) Modification of Terms and Conditions. Dog Widgets For Less, Inc. reserves the right to change the terms, conditions and notices under which the product is offered.