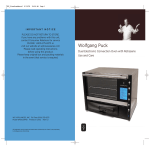
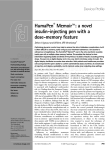
1
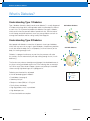
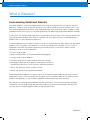
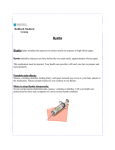
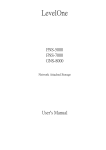
Diabetes: An Owner’s Manual
Your guide to successfully navigating
your diabetes and living your best life.
Northshore University HealthSystem (NorthShore) Diabetes Education Centers wish
to express their gratitude to The Myra Rubenstein Weis Health Resource Center for
its generous support of diabetes education initiatives.
Diabetes: An Owner’s Manual, was generously underwritten by The Myra Rubenstein
Weis Health Resource Center to help support diabetes patients and their families.
Dear Patient:
Welcome to NorthShore University HealthSystem (NorthShore), where excellence is all around you.
Our outpatient programs in diabetes care are recognized by the American Diabetes Association
(ADA), and our inpatient program at NorthShore Evanston Hospital achieved Advanced Certification in Inpatient Diabetes through The Joint Commission. At NorthShore, we are committed to
helping you manage your diabetes through our comprehensive education and support programs.
This booklet is designed to get you started with your diabetes care by providing important basic
information while you’re hospitalized or in the outpatient setting. It also introduces you to our team
of inpatient nurses and dietitians as well as our outpatient certified diabetes educators. These
team members are specially trained experts in the field of diabetes and are available to provide
an individualized treatment plan for you.
Our educators also can assist you in planning for your diabetes care in the areas of diet, exercise,
blood glucose monitoring and medication. If your doctor has requested that you test your blood
sugar levels, our certified diabetes educators can provide you with a free blood glucose monitor
and demonstrate how to use it.
Use the following phone number for our outpatient Diabetes Education Centers if you have any
questions or need to schedule appointments at any of our NorthShore Hospital locations:
(847) 926-5032
•Evanston Hospital
•Glenbrook Hospital
•Highland Park Hospital
•Skokie Hospital
You may also access our program in Adult Endocrinology and Metabolic Diseases with a referral
from your primary care physician. We are located at 9977 Woods Drive in Skokie, and can be
reached by calling (847) 663-8540.
We invite you to visit us online at northshore.org/diabetes for additional information and
resources to help you take charge of your diabetes care.
Inpatients can work with their healthcare team to assist with their diabetes education.
Again, thank you for choosing NorthShore. You are an important member of the NorthShore
Diabetes Care Team, and we’re here to assist you in managing your care so you can live a
healthy, productive life.
A Teaching Affiliate of
the University of Chicago
Pritzker School of Medicine
Hospitals:
i
Evanston • Glenbrook • Highland Park • Skokie
Helpful Information
NorthShore Pharmacies
Outpatient Diabetes Education
Diabetes supplies are available at the following
locations:
Diabetes Education at (847) 926-5032
NorthShore Evanston Hospital
2650 N. Ridge Avenue
Evanston, IL
NorthShore Evanston Hospital (847) 570-2210
Outpatient Pharmacy
2650 N. Ridge Avenue
Evanston, IL
Diabetes Education at (847) 926-5032
NorthShore Glenbrook Hospital
2500 Pfingsten Road
Glenview, IL NorthShore Glenbrook Hospital (847) 657-1785
Outpatient Pharmacy
2050 Pfingsten Avenue
Glenview, IL NorthShore Highland Park Hospital Outpatient Pharmacy
777 Park Avenue West
Highland Park, IL
NorthShore Skokie Hospital Outpatient Pharmacy
9600 Gross Point Road
Skokie, IL
Diabetes Education at NorthShore Highland Park
Hospital
777 Park Avenue West
Highland Park, IL
(847) 433-2508
(847) 926-5032
Diabetes Education at
NorthShore Skokie Hospital
(847) 926-5032
9600 Gross Point Road
Skokie, IL
(847) 933-6890
NorthShore Medical Group/
Endocrinology
9977 Woods Drive
Skokie, IL
(847) 663-8540
Here are other helpful diabetes websites:
NorthShore University HealthSystem
northshore.org/diabetes
Academy of Nutrition and Dietetics
eatright.org
American Diabetes Association
diabetes.org
Juvenile Diabetes Research Foundation
jdrf.org
ii
Diabetes: An Owner’s Manual
Table of Contents
Chapter 1
What Is Diabetes?...................................2
Chapter 6
Taking Insulin..........................................24
Causes and Symptoms..................................2
Insulin Pumps...............................................28
Type 1 Diabetes..............................................3
Chapter 7
Treating Hypoglycemia
and Hyperglycemia...............................29
Type 2 Diabetes..............................................3
Pre-Diabetes..................................................4
Gestational Diabetes.......................................5
Chapter 8
Following Sick-Day Guidelines.........33
Chapter 2
Planning Healthy Meals.........................7
Chapter 9
Reducing Your Risk
of Chronic Complications...................35
Food Groups..................................................7
Nutrition Labels..............................................9
Serving Sizes................................................10
Foot Care.....................................................35
Chapter 3
Getting Exercise and
Physical Activity.....................................17
Eye Care......................................................36
Oral Health...................................................36
Chapter 10
Coping With Stress..............................37
Chapter 4
Monitoring Your
Blood Glucose.......................................19
Chapter 11
Your Diabetes Care Checklist...........38
Chapter 5
Learning About Medications
to Manage Diabetes.............................21
Chapter 12
Resources................................................39
Oral Medications..........................................22
Important Phone Numbers ..........................39
Injectable Medications..................................23
Safe Needle Disposal....................................40
Combination Medications.............................23
New “Apps” to Manage Diabetes.................42
1
Diabetes: An Owner’s Manual
Chapter 1
What Is Diabetes?
Diabetes mellitus, or diabetes, is a group of diseases characterized by high blood
glucose levels. These high levels are the result of the body’s inability either to produce
or to use insulin properly. “Insulin deficiency” means the body no longer makes
insulin; “insulin resistance” means the body makes insulin but doesn’t use it properly.
Here’s what happens:
Every time you eat, your food is broken down into a variety of nutrients, including glucose (or sugar), which
is used as fuel (or energy) in your cells for normal daily living. Glucose needs the help of the hormone insulin,
which is made in the pancreas, in order to move from your bloodstream into your cells so it can be used as
energy. The pancreas is a small organ located near the stomach.
When you eat, your brain signals the pancreas to make insulin.
Insulin acts like a key to unlock your cells so glucose can pass
from your bloodstream into your cells. Insulin is important because
it lowers your blood sugar and helps keep it within normal levels.
Without insulin, glucose (or sugar) stays in your bloodstream
and cannot get into your cells. This is what leads to high blood
sugar readings. You may experience several signs or symptoms
of diabetes, or you may not have any symptoms.
Stomach
Following are the classic symptoms:
Liver
•Frequent urination
Pancreas
•Thirst
•Fatigue
•Unusual weight loss
•Frequent infections, such as urinary tract
infections; yeast infections; or gum, skin
and bladder infections
Sugar
Bloodstream
• Blurred vision
Sometimes, long-standing, undiagnosed diabetes
can result in other symptoms such as:
•Erectile dysfunction/impotence
•Slow healing of cuts and sores
•Numbness, tingling and burning of hands and feet
Diabetes also may lead to a serious health condition called diabetic ketoacidosis, or DKA (see page 32). Without insulin, the cells of the body can’t get the energy that glucose provides. As a result, the cells use stored fat
for energy instead. As fat is broken down, ketones are released into the bloodstream and eventually appear in
the urine.
2
Diabetes: An Owner’s Manual
What is Diabetes?
Understanding Type 1 Diabetes
Type 1 diabetes (formerly called “juvenile onset diabetes”) is usually diagnosed
in children and young adults, although older adults may develop this disease
as well. Only 5 to 10 percent of people with diabetes have type 1 diabetes,
which occurs when the pancreas doesn’t produce insulin. With the help of
insulin therapy and other treatments, even very young children can learn to
manage their condition and live a long, healthy and happy life.
Cell without diabetes
Understanding Type 2 Diabetes
Most people with diabetes—more than 90 percent—have type 2 diabetes,
which also may occur at any age. In type 2 diabetes, the pancreas produces
insulin, but either the body can’t use it properly (“insulin resistance”) or the
body isn’t making enough insulin.
Cell with diabetes
Diabetes is a progressive disease, so over time, the pancreas will make
less and less insulin and eventually will stop making enough insulin (“insulin
deficiency”).
The liver also may release stored glucose (glycogen) into the bloodstream at
any time, causing your blood sugar to rise in the morning after an overnight
fast. When any of these factors happen, glucose can build up in the bloodstream causing high blood sugar, or “hyperglycemia.”
Following are characteristics of people
at risk for developing type 2 diabetes:
Glucose
Receptor
•Pre-diabetes (see page 4)
Insulin
•Sedentary lifestyle
•Body mass index (BMI) of > 25 kg/m2
•Family history of diabetes
•High triglycerides, or fat, in your blood
•High blood pressure
•Excessive alcohol consumption
continued >>
3
Diabetes: An Owner’s Manual
What is Diabetes?
continued >>
In addition, certain groups of people are at higher risk for type 2 diabetes, including:
•African-Americans, Hispanic/Latino Americans, Asian Americans, Pacific Islanders, Native Americans
and Native Alaskans
•Women who have had gestational diabetes
•Women who have given birth to a baby weighing more than nine pounds
•Women with polycystic ovarian syndrome (PCOS)
•Individuals with acanthosis nigricans, a darkening of skin that appears around the neck, elbows,
underarms and knuckles
If type 2 diabetes is not well controlled through a healthy diet, regular exercise and medications, it can
lead to serious complications.
Understanding Pre-Diabetes
“Pre-diabetes” is a condition that occurs when blood glucose levels are higher than normal—but not
yet high enough to be diagnosed as diabetes. Pre-diabetes also is called “impaired fasting glucose” or
“impaired glucose tolerance.” People with pre-diabetes are at higher risk of developing type 2 diabetes
than people with normal glucose levels.
Research shows that some long-term damage to the body, especially the heart and circulatory system,
may occur in people with pre-diabetes. Studies also show that the best way to control pre-diabetes is
to control your weight by losing 7 to 10 percent of your total body weight and exercising regularly.
Three blood tests can determine whether you have pre-diabetes, type 1 or type 2 diabetes.
Blood Test
What It Measures
Without Diabetes
With Pre-Diabetes
With Diabetes
(Type 1 or 2)
Fasting plasma glucose > 126 mg/dL
Blood sugar levels
fasting > 8 hours
< 100 mg/dL
100–125 mg/dL
Oral glucose Blood sugar levels 2 hours
< 140 mg/dL
140–199 mg/dL
tolerance test
after eating (often used to
diagnose gestational
diabetes)
> 200 mg/dL
A1C
> 6.5 (estimated
glucose number
= 140 mg/dL)
Average blood glucose over 2–3 months
< 5.7 (average blood glucose range < 100 mg/dL)
4
5.7–6.4 (average
blood glucose range = 117–137 mg/dL)
Diabetes: An Owner’s Manual
What is Diabetes?
Understanding Gestational Diabetes
Gestational diabetes is a common medical problem that usually occurs between the sixth and ninth month of
pregnancy. During this time, the placental hormones in the mother’s blood increase her need for insulin. Insulin,
the hormone produced by the pancreas, helps keep blood sugar within normal levels. When the body is unable
to produce enough extra insulin or it’s not working effectively, high blood sugar, or gestational diabetes, develops.
In most cases, the mother’s blood sugar returns to normal levels after the baby is born. However, women who
have had gestational diabetes are at high risk—between a 35 to 60 percent chance—of developing type 2
diabetes within 10 years following the pregnancy.
Gestational diabetes occurs in about 7 percent (7 out of 100) of all pregnancies. Most women with gestational
diabetes have no symptoms, so a blood test is the only way to diagnose the condition. The test usually is
performed at the end of the second or beginning of the third trimester (24–28 weeks). Women with the
following risk factors may be tested earlier:
•25 years of age or older
•Being overweight (BMI > 25 kg/m2) before becoming pregnant
•Having a family history of diabetes
•Previously giving birth to a baby weighing more than 9 pounds
•Belonging to a particular ethnic group, including African-Americans,
Hispanic/Latino Americans, Asian Americans and Native Americans
•Women with polycystic ovarian syndrome (PCOS)
•Women with a prior history of gestational diabetes
Untreated gestational diabetes can increase the risk of macrosomia (a baby weighing more than 9 pounds
before birth), the most common complication for women with this condition. Babies of this weight may have
problems during delivery, as well as breathing problems and low blood sugar levels after birth.
Most women can control gestational diabetes with diet and exercise. Those who cannot keep their blood
sugar within a normal range through diet and exercise alone may need to take medication. Your physician
may refer you to an endocrinologist for follow up after the baby is born.
continued >>
5
Diabetes: An Owner’s Manual
What is Diabetes?
continued >>
Here are some tips to manage gestational diabetes:
•Eat healthy and make appropriate food
choices to provide good nutrition for you
and your baby. Meet with a registered
dietitian or certified diabetes educator to
develop a meal plan during pregnancy
and after delivery.
•Monitor blood sugar levels as directed to
make sure they’re within a normal range.
A registered dietitian or certified diabetes
educator can show you how to test
blood sugar levels daily.
•Get regular physical exercise, but check
with your doctor first to learn the guidelines for safe exercise.
•Check urine ketones each morning before breakfast to monitor adequate carbohydrate intake.
Ketones are the result of the body using stored fat, instead of glucose, for energy. They’re
released into the bloodstream and eventually appear in the urine. A registered dietitian or
certified diabetes educator can show you how to test for ketones using a small plastic cup
and Ketostix® strips, purchased at your local pharmacy.
A1C Test
The A1C test (glycated hemoglobin) measures a person’s average blood
glucose level over the last two to three months. The A1C also can be
reported as an estimated average glucose value (eAG). People with
diabetes should get their A1C tested every 3-6 months. The table to the
right shows the relationship between A1C and eAG:
Average Amount of Glucose in Cells
Non-diabetes A1C
range: 4 – 6%
Goal A1C:
less than 7%
High A1C:
7% or greater
6
A1C % eAG mg/dL
5
97
5.5
111
6
126
6.5
140
7
154
7.5
169
8
183
8.5
197
9
212
9.5
226
10
240
10.5
255
11
269
Diabetes: An Owner’s Manual
Chapter 2
Planning Healthy Meals
Planning for a healthy diet and choosing healthy foods that best meet your needs
and eating habits are important steps in managing your diabetes. A balanced diet also
helps you feel better.
You can make a difference in controlling your blood sugar levels and reducing your risk for the complications of
diabetes by eating the right kinds of foods at the right time in the right amount. Drinking alcohol also
can affect your blood sugar levels, so be sure to talk with your doctor or certified diabetes educator to learn
the risks of drinking alcohol when you have diabetes.
Eat at the right time.
Eat three meals a day spaced four to five hours apart at about the same time each day.
This is especially important if you’re taking certain diabetes medications.
Eat the right kinds of foods.
There are three major nutrients in food:
•Carbohydrates: Carbohydrates (or “carbs”) raise blood sugar. Choose whole grains, fruit, low-fat milk and
vegetables every day.
•Protein: Protein does not have a major effect on blood glucose. Choose lean beef, pork, chicken, fish,
eggs/egg whites, reduced fat cheese and tofu.
•Fat: Very little dietary fat turns to glucose, but certain types of fat can increase the risk of heart disease.
Choose from at least three of the food groups, ideally incorporating a fruit and/or vegetable, at each meal.
Healthy fats can be added in moderation.
Fruit
Milk/yogurt
(1 serving)
(1 serving)
Starches
(1/4 of a 9” plate)
Vegetables
(1/2 of a 9” plate)
Meat/protein
(1/4 of a 9” plate)
9” plate
7
continued >>
Diabetes: An Owner’s Manual
Planning Healthy Meals
continued >>
Eat the right amount of each nutrient type
Carbohydrates provide energy, fiber, vitamins, minerals and antioxidants, so it’s important to eat reasonable
amounts of carbohydrates at each meal. Here are some examples of one carbohydrate serving, which
equals 15 grams of carbohydrate:
1 slice bread
1 small apple
1 cup milk
2 small cookies
Carbohydrate foods include:
•Starches (grains, cereal, starchy vegetables such as corn, peas and potatoes)
•Fruits and fruit juices •Milk and yogurt •Desserts and sweets Nonstarchy vegetables have little effect on blood sugar and provide few calories. They can help lower
blood pressure and cholesterol, and they have other health benefits—so incorporate more vegetables into
your diet. Some examples of nonstarchy vegetables include green beans, broccoli, spinach and tomatoes.
Talk to your certified diabetes educator about how many grams of carbohydrate per meal or snack (or
how many servings of carbohydrate) you need to manage your diabetes. You also can learn about “carb”
counting to keep track of how many carbohydrates you eat at each meal.
8
Diabetes: An Owner’s Manual
Planning Healthy Meals
Understanding Nutrition Facts Label
1. Start with Serving Size and Servings Per Container
because the rest of the label is based on this information. Measure foods to determine how many servings
you’re consuming.
2. If you’re watching your weight, look at Calories first.
If you’re trying to maintain or lose weight, your meals
should be between 500 and 700 calories (depending
on your height, weight, physical activity and gender).
Snacks should be no more than 200–300 calories.
3. When counting carbohydrates, use the Total Carbohydrate grams (not Sugars) and the Serving Size to
determine how many grams of carbohydrate you’re
eating.
4. Look for foods that are Low in Total Fat, Saturated
Fat, Trans Fat, Cholesterol and Sodium.
5. Look for foods that are High in Fiber, Vitamin A,
Vitamin C, Calcium and Iron. Breads should
contain 3 grams of fiber or more per serving, and
cereals should contain 5 grams of fiber or more
per serving.
6. Sugar alcohols have carbohydrates and may
cause gas and bloating when eaten in excess.
continued >>
9
Diabetes: An Owner’s Manual
Planning Healthy Meals
continued >>
Starches
Cereals and Grains Serving Size
Each serving of starch contains about
15 grams of carbohydrate
Cereals, cooked (oats, oatmeal, grits), ½ cup
Cereals, unsweetened, ready to eat, ¾ cup
Couscous, 1/3 cup
Granola, low-fat, ¼ cup
Kasha, cooked, ½ cup
Millett, cooked, 1/3 cup
Quinoa cooked, 1/3 cup
Pasta, cooked, 1/3 cup
Rice, white or brown, cooked, 1/3 cup
Rice vermicelli, ½ cup
Bread Serving Size
Bagel, large (about 4 oz), ¼ (1 oz)
Biscuit, 2½”, 1
Bread (whole wheat, white or rye), 1 slice (1 oz)
Chapati, 6” across, 1
Cornbread, 1¾” cube (1½ oz)
Dosa (plain), 1
English muffin, ½
Hot dog or hamburger bun, ½ (1 oz)
Idli plain, 3” round
Naan, ¼
Pancake, 4” across, ¼” thick, 1
Pita pocket bread, 6” across, ½
Roll, plain, small, 1 (1 oz)
Roti, 6” across, ½
Tortilla, corn or flour, 6” across, 1
Waffle, 4” square or 4” across, 1
Starchy Vegetables Serving Size
Breadfruit, ¼ cup small cubes
Corn, cooked, ½ cup
Corn on cob, large, ½ cob (5 oz)
Dhal (mung or toor), cooked, ½ cup
Hominy, canned, ¾ cup
Peas, green, cooked, ½ cup
Plantain, ripe, 1/3 cup
Potato
• Baked with skin, ¼ large (3 oz)
• Boiled, all kinds, ½ cup or ½ medium (3 oz)
• Mashed with milk and fat, ½ cup
• French fried (oven-baked), 1 cup (2 oz)
Spaghetti/pasta sauce, ½ cup
Squash, winter (acorn, butternut), 1 cup
Yam, sweet potato, plain, ½ cup
Yucca, 1/3 cup
10
Diabetes: An Owner’s Manual
Planning Healthy Meals
Crackers and Snacks Serving Size
Fruit Serving Size
Crackers
• Round, butter-type, 6
• Saltines, 6
Graham cracker, 2½” square, 3
Matzoh, ¾ oz (½ square or ½ sheet)
Popcorn
•With butter, 3 cups
•Lower fat or no fat added, 3 cups
Pretzels, ¾ oz
Snack chips (tortilla chips, potato chips)
•Fat-free or baked, 15–20 (¾ oz)
•Regular, 9–13 (¾ oz)
Each serving of fruit contains about 15 grams
of carbohydrate
Apple, unpeeled, small, 1 (4 oz)
Applesauce, unsweetened, ½ cup
Banana, extra small, 1 (4 oz)
Berries
• Blackberries, ¾ cup
• Blueberries, ¾ cup
• Raspberries, 1 cup
• Strawberries, 1¼ cup whole berries
Cantaloupe, small, 1/3 melon or 1 cup cubed (11 oz)
Cherries, sweet fresh, 12 (3 oz)
Dried fruits (blueberries, cherries,
cranberries, mixed fruit, raisins), 2 Tbsp
Grapefruit, large, ½ (11 oz)
Grapes, small, 17 (3 oz)
Guava, ½ cup
Kiwi, 1 (3½ oz)
Mandarin oranges, canned, ¾ cup
Mango, small, ½ fruit (5½ oz) or ½ cup
Orange, small, 1 (6½ oz)
Papaya, ½ fruit or 1 cup cubed (8 oz)
Passion fruit, ¼ cup
Peaches (fresh, medium), 1 (6 oz)
Pears (fresh, large), ½ (4 oz)
Pineapple (fresh), ¾ cup
Plums
• Dried (prunes), 3
• Small, 2 (5 oz)
Tamarind, ¼ cup whole or 1 oz dried
Beans, Peas and Lentils
(Count as 1 Starch/15 grams of carbohydrate
+ 1 Lean Meat/7 grams of protein) Serving Size
Baked beans, 1/3 cup
Beans, cooked (black, garbanzo, kidney, lima,
navy, pinto, white), ½ cup
Dhal (mung or toor), cooked, ½ cup
Lentils, cooked (brown, green, yellow), ½ cup
Peas, cooked (black-eyed, split), ½ cup
Milk
Each serving of milk/yogurt contains about
12 grams of carbohydrate
Milk, buttermilk, goats milk, 1 cup
Evaporated milk, ½ cup
Yogurt (plain 8 oz), 1 cup
Yogurt, Greek (carbohydrate varies)
Soy milk, regular or light,
15 grams carbohydrate/2-5 grams fat
Watermelon, 1 slice or 1¼ cups cubes (13½ oz)
Fruit Juice Serving Size
Apple, grapefruit, orange, pineapple, ½ cup
Fruit juice blends, 100% juice, grape juice,
prune juice, 1/3 cup
continued >>
11
Diabetes: An Owner’s Manual
Planning Healthy Meals
continued >>
Sweets, Desserts and
Other Carbohydrates
Each food from this list contains 15 grams of
carbohydrate. The amount of protein, fat and
calories varies.
You can substitute food choices from this list for
other carbohydrate-containing foods (such as those
found on the Starch, Fruit or Milk lists) in your meal
plan, even though these foods have added sugars
or fat. The foods on this list do not have as many
vitamins, minerals and fiber. Choose foods from this
list less often if you’re trying to lose weight.
Many sugar-free, fat-free and reduced-fat products
are made with ingredients that contain carbohydrate, so check the Total Carbohydrate information
on the Nutrition Facts food label.
Food Serving Size
Brownie, small, unfrosted, 1¼” square,
7
/8” high (about 1 oz)
(Count as 15 grams carbohydrate + 1 fat/5 grams
of fat)
Cake
• Frosted 2” square (about 1 oz)
(Count as 30 grams carbohydrate + 1 fat)
• Unfrosted 2” square (about 1 oz)
(Count as 15 grams carbohydrate + 1 fat)
Candy bar, chocolate/peanut, 2 “fun size” bars (1 oz)
(Count as 22 grams carbohydrate + 1½ fats)
Candy, hard, 3 pieces
Cookies
• Chocolate chip, 2 cookies (2¼” across)
(Count as 15 grams carbohydrate + 2 fats)
• Vanilla wafer, 5 cookies
(Count as 15 grams carbohydrate + 1 fat)
Doughnut, cake, plain, 1 medium (1½ oz)
(Count as 22 grams carbohydrate + 2 fats)
Flan (caramel custard), ½ cup
(Count as 30 grams carbohydrate)
Fruit juice bars, frozen, 100% juice, 1 bar (3 oz)
Gelatin, regular, ½ cup
Granola or snack bar, regular or low-fat, 1 bar (1 oz)
(Count as 22 grams carbohydrate)
Jam or jelly, regular, 1 Tbsp
Ice cream
•Light and no sugar added, ½ cup
•Regular, ½ cup
Muffin (4 oz), ¼ muffin (1 oz)
(Count as 15 grams carbohydrate + ½ fat)
Pie, commercially prepared fruit, 2 crusts, 1/6 of 8” pie
(Count as 45 grams carbohydrate + 2 fats)
Pudding
•Regular (made with reduced-fat milk), ½ cup
(Count as 30 grams carbohydrate)
•Sugar-free or sugar- and fat-free, ½ cup
(made with fat-free milk)
Sports drink, 1 cup (8 oz)
Sugar, 1 Tbsp
Syrup
•Light (pancake type), 2 Tbsp
•Regular (pancake type), 1 Tbsp
Yogurt
•Frozen, fat-free, 1/3 cup
(Count as 15 grams carbohydrate + 1 fat)
•Regular, ½ cup
(Count as 15 grams carbohydrate + 2 fats)
12
Diabetes: An Owner’s Manual
Planning Healthy Meals
Combination Foods
Nonstarchy Vegetables
Combination foods contain foods from more than
one food list. With the help of a registered dietitian
and certified diabetes educator, you can fit these
foods into your meal plan.
One cup of raw vegetables, a 1/2 cup cooked
vegetables, or a 1/2 cup tomato or vegetable
juice has about 5 grams of carbohydrate.
Amaranth or Chinese spinach
Bean sprouts
Beans (green, wax, Italian)
Broccoli
Cabbage (green, bok choy, Chinese)
Carrots
Cauliflower
Celery
Cucumber
Eggplant
Greens (collard, kale, mustard, turnip)
Jicama
Mushrooms, all kinds, fresh
Okra
Onions
Pea pods
Peppers (all varieties)
Radishes
Sauerkraut
Spinach
Squash (summer, crookneck, zucchini)
Tomatoes, fresh and canned
Tomato sauce
Tomato/vegetable juice
Water chestnuts
Entrees Serving Size
Casserole type (tuna noodle, lasagna, macaroni
and cheese), 1 cup (8 oz)
(Count as 30 grams carbohydrate
+ 2 medium-fat meats)
Frozen Meals/Entrees Serving Size
Burrito (beef and bean), 1 (5 oz)
(Count as 45 grams carbohydrate
+ 1 lean meat + 2 fats)
Enchilada, 1 (11 oz)
(Count as 45 grams carbohydrate)
Pizza, cheese/vegetarian, thin crust, ¼ of a
12” (4½–5 oz)
(Count as 30 grams carbohydrate + 2 medium-fat
meats)
Taco, 1 (5–6 oz)
(Count as 30 grams carbohydrate)
Soups Serving Size
Bean, lentil or split pea, 1 cup
(Count as 15 grams carbohydrate + 1 lean meat)
Tomato (made with water), 1 cup
continued >>
13
Diabetes: An Owner’s Manual
Planning Healthy Meals
continued >>
Meat and Meat Substitutes
Medium-Fat Meat and Meat Substitutes
Each food from this list contains 0 grams
carbohydrate, 7 grams protein, 4–7 grams fat
and 75 calories.
Meat and meat substitutes are rich in protein.
Whenever possible, choose lean meats. Portion
sizes on this list are based on cooked weight, after
bone and fat have been removed. The carbohydrate
content varies among plant-based proteins, so read
food labels carefully.
Beef: corned beef, ground beef, meatloaf, prime
grades trimmed of fat (prime rib), 1 oz
Cheeses with 4–7 grams of fat per oz:
feta, mozzarella, pasteurized processed cheese
spread, reduced-fat cheeses, string cheese, 1 oz
Egg, 1
Fish, any fried product, 1 oz
Pork, cutlet, shoulder roast, 1 oz
Poultry, with skin or fried, 1 oz
Ricotta cheese, 2 oz or ¼ cup
Sausage with 4–7 grams of fat per 1 oz
Tempeh, ¾ cup
Lean Meats and Meat Substitutes
Each serving from this list contains 0 grams
carbohydrate, 7 grams protein, 0–3 grams fat
and 45 calories.
Beef—Select or choice grades:
•Ground round, roast (chuck, rib, rump)
•Round, sirloin, steak (cubed, flank, porterhouse,
T-bone), tenderloin, 1 oz
Canadian bacon, 1 oz
Cheeses with 3 grams of fat or less per 1 oz
Cottage cheese, ¼ cup
Egg whites, 2
Fish, fresh or frozen, plain: catfish, cod, flounder,
haddock, halibut, orange roughy, salmon, tilapia,
trout, tuna, 1 oz
Hot dog with 3 grams of fat or less per 1 oz
Pork, lean, 1 oz
Rib or loin chop/roast, ham, tenderloin, 1 oz
Poultry, without skin, 1 oz
Processed sandwich meats with
3 grams of fat or less per 1 oz
Tuna, canned in water or oil, drained, 1 oz
High-Fat Meat and Meat Substitutes
Each food from this list contains 0 grams
carbohydrate, 7 grams protein, 8+ grams fat
and 100 calories.
Bacon:
• Pork, 2 slices
• Turkey, 3 slices
Cheese, regular: American, bleu, brie, cheddar, hard
goat, Monterey jack, queso and Swiss, 1 oz
Hot dog: beef, pork or combination, 1
Pork sparerib, 1 oz
Processed sandwich meats with 8 grams of fat or
more per 1 oz: bologna, pastrami, hard salami, 1 oz
14
Diabetes: An Owner’s Manual
Planning Healthy Meals
Fats
Saturated Fats, Serving Size
Bacon, cooked, regular or turkey, 1 slice
Butter, stick, 1 tsp
Cream, half and half, 2 Tbsp
Cream cheese
•Reduced-fat, 1½ Tbsp (¾ oz)
•Regular, 1 Tbsp (½ oz)
Sour cream
•Reduced-fat or light, 3 Tbsp
•Regular, 2 Tbsp
Palm oil, palm kernel oil, 1 tsp
Coconut oil, 1 tsp
Each food from this list contains 0 grams
carbohydrate, 0 grams protein, 5 grams fat
and 45 calories.
Choose heart-healthy fats from the monounsaturated and polyunsaturated groups more often.
In general, a single serving of fat is:
•1 teaspoon of regular margarine,
vegetable oil or butter
•1 tablespoon of regular salad dressing
Unsaturated Fats
Monounsaturated Fats, Serving Size
Avocado, medium, 2 Tbsp (1 oz)
Nut butters (trans-fat free), 1½ tsp
Nuts
•Almonds, cashews, 6 nuts
•Macadamia, 3 nuts
•Peanuts, 10 nuts
•Pecans, 4 halves
Oil: canola, olive, peanut, 1 tsp
Olives, black (ripe), 8 large
Olives, green (stuffed), 10 large
Free Foods
Each food from this list has 5 grams or less
of carbohydrate and less than 20 calories
per serving.
Eat up to three servings per day of the free foods
with a serving size noted without counting any
carbohydrate. Choices listed without a serving size
noted can be eaten whenever you like.
For better blood glucose control, spread your
servings of these foods throughout the day.
Polyunsaturated Fats, Serving Size
Margarine
•Lower-fat spread, 1 Tbsp
•Stick, tub or squeeze, 1 tsp
Mayonnaise
•Reduced-fat, 1 Tbsp
•Regular, 1 tsp
Oil: corn, cottonseed, flaxseed, grape seed,
safflower, soybean, sunflower, 1 tsp
Salad dressing
•Reduced-fat, 2 Tbsp
•Regular, 1 Tbsp
Low Carbohydrate Foods, Serving Size
Cabbage, raw, ½ cup
Gelatin, sugar-free or unflavored
Gum
Jam or jelly, light or no sugar added, 2 tsp
Salad greens
Sugar substitutes (low-calorie sweeteners)
Modified Fat Foods with Carbohydrate,
Serving Size
Cream cheese, fat-free, 1 Tbsp (½ oz)
Creamers
•Nondairy, liquid, 1 Tbsp
•Nondairy, powdered, 2 tsp
Salad dressing
•Fat-free or low-fat, 1 Tbsp
•Fat-free Italian, 2 Tbsp
continued >>
15
Diabetes: An Owner’s Manual
Planning Healthy Meals
continued >>
Free Foods (continued)
Seasonings
Flavoring extracts
Garlic
Herbs, fresh or dried
Nonstick cooking spray
Spices
Worcestershire sauce
Condiments, Serving Size
Barbecue sauce, 2 tsp
Catsup (ketchup), 1 Tbsp
Mustard
Pickles, dill, 1½ medium
Salsa, ¼ cup
Taco sauce, 1 Tbsp
Vinegar
Meal Planning information has been adapted from the following sources:
Choose Your Foods: Exchange Lists for Diabetes
Drinks/Mixes
Bouillon, broth, consommé
Carbonated or mineral water, club soda
Coffee or tea
Diet soft drinks or sugar-free drink mixes
American Diabetes Association and Academy of Nutrition
and Dietetics, 2008
Beyond Rice and Beans by Lorena Drago
(American Diabetes Association, 2006)
AAPI Guide to Indian Foods
Eating Out at Restaurants
•Give specific instructions to the waiter or waitress
when you place your order.
When you have diabetes, ordering food from
a menu takes careful planning. Here are some
important guidelines to remember so you can
enjoy eating out while keeping your blood sugar
levels under control:
•Send your food back if it’s not what you ordered.
•Order a la carte or appetizers instead of large
meal portions.
•Keep your meal plan in mind when you eat out.
•Order dressings, sauces, gravy, butter and sour
cream on the side.
•Be sure to bring medications and/or insulin with
you and take as prescribed.
•If a meal serving is large, eat half of the portion
and take the rest home.
•Do not drink alcohol on an empty stomach.
•Limit foods with these descriptors:
—Buttery
—Sautéed
— Fried or crispy
— Creamed or cream sauce
— Gravy
— Au gratin or escalloped
— A la mode
—Hollandaise
— Alfredo, Béarnaise, Prime
•If you want your favorite dessert, omit or reduce
your portions of starches.
•Eat a small portion of dessert, or split dessert with
a companion.
16
Diabetes: An Owner’s Manual
Chapter 3
Getting Exercise and Physical Activity Regular physical activity is an important part of managing your diabetes because it
helps improve your body’s ability to use insulin and reduces your risk of complications.
It also helps you:
Strength training
•Lower your blood sugar, blood pressure and
cholesterol levels
Strength training builds and maintains muscle and
bone mass, and gives you the strength you need for
daily activities. Strength training also improves blood
sugar levels by helping your body’s cells use insulin
more effectively.
•Strengthen your heart and lungs
•Relieve stress and tension
•Lose or maintain weight
You can do strength training by using small weights
or weight machines, or by using your own body
weight with exercises such as push-ups.
•Feel better mentally and physically
The American Diabetes Association recommends
150 minutes of exercise each week, which is about
20 to 30 minutes of physical activity most days of
the week.
Stretching and flexibility
Stretching and flexibility exercises, including yoga
and Pilates, keep your joints and muscles flexible
and help prevent soreness from other activities.
Here are some types of exercise that can help
you stay healthy:
Aerobic exercise
If you have certain diabetes complications,
talk to your doctor about physical activities
you should not include in your exercise routine,
such as high-impact activities, heavy lifting or
strenuous exercises.
Aerobic exercise increases your heart rate, works
the large muscles in your arms and legs, and makes
you breathe harder. It also can improve or lower
blood sugar levels by helping your body’s cells use
insulin more effectively.
Some types of aerobic exercise include:
•Walking
•Swimming
•Running
•Cycling
•Dancing
•Water aerobics
•Chair aerobics
continued >>
17
Diabetes: An Owner’s Manual
Getting Exercise and Physical Activity continued >>
Safety Guidelines
Guidelines for blood sugar
range before exercise
It’s important to have a medical exam before you
begin any exercise program and to exercise safely.
If your doctor encourages you to exercise, start by
being active for only 5 to 10 minutes a day, and
work up to longer exercise sessions over time.
You can begin with simple activities that include:
•Parking in the far corner of a parking lot and
walking to your destination
•Taking the stairs instead of the elevator
•Walking a hallway several times
•Exercising to a video
Blood sugar levels also can increase after you’ve
been physically active because your muscles
need more glucose during exercise. Be sure to
talk with your doctor about ways to reduce the
risk of your blood sugar level rising after exercising. In addition:
1. Make sure you get a stress test, if recommended.
2. Check your blood sugar before and after
exercise.
Your doctor may recommend a stress test or an
electrocardiogram test (EKG) if you:
•Have heart disease
•Are over the age of 35
•Have high blood pressure or elevated cholesterol
•Use tobacco
•Have a family history of heart disease
•< 100 mg/dL: Your blood sugar may be
too low to exercise safely; consume a
snack (15 grams of carbohydrate) before
beginning your workout.
•100–250 mg/dL: This is a
safe pre-exercise blood
glucose range; proceed
with your workout.
Physical activity may cause your blood sugar to
drop more quickly than usual, so be sure to ask
your doctor how to avoid the risk of low blood sugar.
In addition:
•Always wear your diabetes identification which you
can obtain with the help of your certified diabetes
educator.
•Carry a cell phone with you.
•Check your blood sugar before and after exercise.
•Always carry sugar-containing food or glucose
tablets to treat low blood sugar.
•Warm up before and cool down after you exercise.
•Drink plenty of water.
•Stop if you have any pain or discomfort and call
your doctor.
•Do not exercise when insulin is peaking.
•Do not inject insulin into an area that you plan
to exercise.
•Always have your blood glucose meter with you.
•Wear comfortable and supportive shoes and
cotton socks.
•250–300 mg/dL: Check
for ketones in your urine:
–Do not exercise with
ketones; they can
cause ketoacidosis.
–If no ketones are present,
begin your workout and
test blood glucose after
5–10 minutes of
activity. Only continue
to exercise if your blood glucose level
begins to drop.
•> 300 mg/dL: Do not exercise until your
blood glucose level returns to a normal range
(100–250 mg/dL).
Exercise one to one-and-a-half hours after
eating.
18
Diabetes: An Owner’s Manual
Chapter 4
Monitoring Your Blood Glucose The only way to know how well your diabetes treatment plan is working is to check
your blood sugar at different times during the day—every day.
Monitoring your blood glucose level can help you
understand how your meal planning, exercise and
medications are working to control your diabetes.
Information on how often and when you should
check your blood sugar with your blood glucose
monitor, or meter, will be part of your diabetes
treatment plan. You can choose from a variety of
different types of blood glucose monitors. Work
with your diabetes care team to make the best
choice for you.
It’s also important to keep a logbook of your daily
sugar levels so you can track your progress. Your
doctor will need to see the logbook to treat you
effectively.
In addition, be sure to record other information
that could affect your blood sugars levels. These
include being sick, getting more exercise than usual,
forgetting to take your medication or celebrating a
special holiday.
•Wash and dry your hands and the area on your
skin where you’ll use your lancing device.
Keeping track of your blood glucose readings
helps you manage your blood sugar in two ways:
•These helpful hints will make it easier to obtain
an adequate drop of blood:
—Hold your hands under warm water if they
feel cold.
—Hang your hands down at your sides for
30 seconds and gently “milk” the finger from
the palm of your hand to your fingertip before
lancing.
—After lancing, hold hand on table or below
waist to get a drop of blood.
—Deliver the blood drop to the test strip.
•Use the lancing device to prick your skin surface
and obtain a small drop, or sample, of blood for
the testing strip to run your blood glucose test.
•It can identify patterns that tell you how your
activities affect your blood sugar.
•It can tell you if you need to make changes to your
diet, activity level or other areas of your life.
Here are the basic steps for blood sugar monitoring:
•Gather all of your supplies. These include your
blood glucose monitor or meter, test strips, a
lancing device, a lancet (a tiny needle), a “sharps”
container (a heavy plastic bottle for used needles
and lancets) and your blood sugar logbook. Be
sure to check the expiration date on your test
strips, and do not use them if they’ve expired.
•Write down the results in your blood sugar logbook.
•Always bring your meter with you to
appointments.
continued >>
19
Diabetes: An Owner’s Manual
Monitoring Your Blood Glucose continued >>
Recommended Glucose
Target Ranges
Leading organizations that help people manage
their diabetes prefer slightly different glucose
target ranges, or the healthy level of your blood
sugar. The measurement “mg/dL” means how
many milligrams (mg) of sugar for 100 milliliters
(dL) of blood. For example:
The American Diabetes Association (ADA)
recommends glucose levels:
•Before meals 70 – 130 mg/dL
•After meals (less than) < 180 mg/dL
The American Association of Clinical
Endocrinologists (AACE) recommends
glucose levels:
•Before meals(less than) < 110 mg/dL
•2 hours after meals (less than) < 140 mg/dL
Be sure to talk with your diabetes care team
about your glucose target range and record it
here for future reference:
My glucose target:
•Before meals_______________________________
•After meals ________________________________
20
Diabetes: An Owner’s Manual
Chapter 5
Learning About Medications to Manage Diabetes:
Oral Medications, Combination Medications and Insulin Pumps
Most people with diabetes need to take medication to keep their blood glucose
within a target range.
How Diabetes
Medications Work
For instance, people with type 1 diabetes take
insulin injections or use an insulin pump because
their bodies no longer produce insulin.
Medications that treat diabetes affect different parts
of your body, including the pancreas, liver, intestines
and muscles. It’s important to talk with your doctor,
certified diabetes educator or pharmacist about the
particular medication you’re taking, and make sure
all your questions are answered. Be sure to ask
about any side effects of the medications.
Most people with type 2 diabetes take diabetic
pills, insulin or both. Some can keep their blood
sugar in control with careful meal planning and
regular activity. If you take medicine and need to
take either more of your medicine or a different
type of medicine or insulin, this does not mean your
diabetes is getting worse. Over time, diabetes can
change, and your medications and treatment plan
will change, too.
Some medications increase insulin sensitivity, or how
insulin works, in the cells while other medications
prevent the liver from making and releasing too much
glucose. Some medications cause carbohydrates to
break down more slowly, while others work on the
hormones your body secretes.
Remember, the key to managing your diabetes is
to control your blood sugar levels, and you can do
this in different ways.
continued >>
21
Diabetes: An Owner’s Manual
Learning About Medications to Manage Diabetes:
Oral Medications, Injectables and Combination Medications
continued >>
The following chart shows how different medications work in your body
and will help you discuss your medication with your healthcare team.
Oral Medications
Sulfonylureas
1
Lowers blood sugar by stimulating
the pancreas to produce more insulin
Side effects may include low blood glucose or hypoglycemia
Glimepiride (Amaryl®)
2
Glipizide (Glucotrol )
®
6
Glipizide Extended Release 7
5
1
4
Glyburide (Micronase®)
Meglitinides
3
1
Stimulates the pancreas to release insulin to lower
blood sugar after meals
Side effects may include low blood glucose or hypoglycemia
Repaglinide (Prandin®)
Nateglinide (Starlix®)
Biguanides
2
Keeps the liver from releasing too much stored glucose
Side effects may include GI disturbances such as gas, bloating,
diarrhea, or upset stomach
1 Pancreas
2 Liver
3 Body fat and muscles
4 Intestine, liver and pancreas
5 Liver and pancreas
6 Kidney
7 Intestine and liver
Metformin (Glucophage®)
Metformin Liquid (Riomet®)
Metformin Extended Release
(Glucophage XR®, Fortamet®, Glumetza®)
Thiazolidinediones
3
Increases insulin sensitivity, or how insulin works, in the muscle cells and fat cells
Pioglitazone (Actos®)
Take once a day.
May cause weight gain and fluid retention (swelling) and increase potential
for heart problems. Check with your doctor before using if you have any
heart condition.
22
Diabetes: An Owner’s Manual
Oral Medications (continued)
DPP-4 Inhibitors 5
Improves insulin level after a meal and lowers the amount of glucose or sugar made by your body
Take once a day.
Sitagliptin (Januvia®)
May cause stomach discomfort, diarrhea, stuffy nose
and upper respiratory infections.
Saxagliptin (Onglyza®)
Take once a day.
Same as above.
Linagliptin
(Tradjenta®) (Nesina®)
Take once a day.
Same as above.
SGLT2 Class
6
Inhibits reabsorption by reducing renal glucose reabsorption and increasing urinary glucose excretion
Invokana™ (canaglifozin tablets) works with your kidneys and the natural process of urination to help remove
excess sugar from the body; is a sodium-glucose transport inhibitor.
Injectible Medications
GLP-1 Receptor Agonists (Injectables)
4
After you eat, your intestines release “incretins,” which work as messengers to signal insulin-producing cells to
make more insulin. These medicines also help you feel full longer so you may eat less.
Exenatide (Byetta®)
Liraglutide (Victoza®)
Exenatide XR (Bydureon )
®
Take 2 times a day (at least 6 hours
apart), 60 minutes or less before
breakfast and dinner.
May cause nausea, which may lead to weight loss,
and increase potential for low blood glucose, especially
when taken with other diabetes medications.
Take once a day.
Same as above.
Take once a week.
Same as above.
Combination Medications
Kazano® (alogliptin/metformin)
Ozenc® (alogliptin and pioglitazone)
Kombiglyze™ XR (metformin/saxagliptin)
PrandiMet® (repaglinide and metformin)
Juvisync™ (sitagliptin and simvastatin)
Jenadueto® (linagliptin and metformin)
Alpha-Glucosidase inhibitors
7
Delays the absorption and breakdown of carbohydrates from the intestines
Miglitol (Glyset®)
Acarbose (Precose®)
Bile-acid sequestrants
Works with other diabetes medications to lower blood glucose; lowers low-density lipoprotein (LDL), or “bad” cholesterol)
Take once or twice Cholesevelam (Welchol®)
a day with a meal
and liquid.
May cause constipation, diarrhea, nausea, gas and
headache. May interact with glyburide, thyroid medication (levothyroxine) and contraceptives.
Dopamine—2 agonists
Lowers blood glucose
Bromocriptine
Take with food within 2 hours of waking.
May cause hypoglycemia, abdominal pain, constipation,
diarrhea, nausea and loss of appetite.
23
continued >>
Diabetes: An Owner’s Manual
Chapter 6
Taking Insulin
Insulin is divided into five different groups, depending on its onset of action
(when it starts working), peak action (when it’s working the hardest) and effective
duration (when it stops working).
Aspart, lispro, glulisine
Insulin helps move glucose into your cells for your
body to use as energy. Learning how to prepare
and administer insulin is an important part of your
diabetes care plan.
Regular
Plasma Insulin Levels
NPH
Detemir/Glargine
0
2
4
5
6
10
12
Hours
Insulin Types
Insulin Name
(Generic Name)
Onset
Peak
Duration
Rapid Acting/Bolus Apidra® (Glulisine)
5–15 minutes
1–2 hours
®
Humalog (Lispro)
5–15 minutes
1–2 hours
®
NovoLog (Aspart)
5–15 minutes
1–2 hours
3–4 hours
3–4 hours
3–4 hours
Short Acting Regular
30–60 minutes
2–3 hours
5–8 hours
Intermediate
NPH (Neutral
Protamine Hagedorn)
2–4 hours
4–10 hours 10–16 hours
Long Acting/Basal
Levemir® (Detemir)
2–4 hours
None
Lantus® (Glargine)
2–4 hours
None
Up to 24 hours
Up to 24 hours
Premixed insulin provides some coverage for both your background (basal) and
mealtime (bolus) needs. For many patients, mixed insulin does not adequately
control blood sugars. Usually you take this before your breakfast and evening meal.
Rapid/intermediate-acting insulin:
Short/intermediate-acting insulin:
•Humalog mix: 75/25
•Humulin 70/30
•Humalog mix 50/50
•Humulin 50/50
•Novolog mix 70/30
•Novolin 70/30
24
14
16
18
20
22
24
Diabetes: An Owner’s Manual
Taking Insulin
Using Insulin Pens
and Injectables
Before you begin taking any medication, such as
insulin, be sure to talk with your certified diabetes
educator about any side effects. For instance,
some side effects may include the following:
An insulin pen and pen needle, which may be more
expensive, can be used instead of a syringe to inject
insulin. Several types of insulin pens are available for
purchase. Be sure to read the instructions carefully if
you decide to use one of these devices, and always
check the label on the insulin to make sure you’re
using the correct insulin type.
•Low blood sugar
•Weight gain
•Low blood potassium
•Changes in fat tissue at the site of injection
•Allergic reactions
Below are some general instructions for using
insulin pens:
Injecting Insulin
The first time you do something new, you may feel
uncertain about how to do it correctly. This is true
for taking insulin to treat your diabetes. But once
you learn how to inject insulin, you’ll feel more
confident in your ability to take this medication.
The injection technique is the same for those who
use a needle or insulin pen.
•Attach a new needle before
each injection. Never leave
a needle on the insulin pen.
•Always prime your insulin
pen before injecting by
removing the needle cap
and shooting two drops of
insulin into the air. If you
don’t see at least two drops
after repeated priming,
don’t use the pen because
it may not administer the
correct amount of insulin
you need.
Some general instructions for taking injections are
to choose an area of your body where you’ll inject
the insulin, and change the site for each injection.
Use fatty tissue such as your belly, the top of your
thigh, your hips or buttocks. Arms should be used
as a last site choice due to access and arm variability. Be sure to wash your hands before you begin.
Then clean the injection site with soap and water, or
use an alcohol wipe.
•Be sure the dose window
shows “0” after the safety
test. Then select your
required dose.
•Insert the needle into your
skin and inject your dose by
pressing the injection button
all the way in. Hold the
button in that position and
count to 10 (the window
should be back to “0”), then
withdraw the needle.
25
continued >>
Diabetes: An Owner’s Manual
Taking Insulin
continued >>
For a single dose:
Be sure to store your unopened vials or pens
in the refrigerator. Don’t freeze or allow insulin to
become warmer than 86 degrees, and be sure to
use it before the expiration date. Open vials may
be refrigerated or kept at room temperature for one
month. Avoid heat and direct light.
•Take off the cap and
pull the plunger down
to the units of insulin
you need.
Pens, cartridges and vials are good for a limited
time after their first use. Record the date you use
them and store them at room temperature. Store
unopened vials, pens and cartridges in the refrigerator, and be sure to check their expiration dates.
•Put the needle into
the vial and push
the plunger down,
pushing air into
the vial.
Drawing Up Insulin—
Single and Mixed Doses
Some patients take a single dose of insulin; others
take a “mixed dose,” which involves combining two
different types of insulin medication in one injection.
It’s important to talk with your certified diabetes
educator about the steps you must follow to “draw
up,” or prepare, either a single or mixed dose.
Be sure to wash your hands thoroughly before you
prepare your insulin doses. If your insulin is “cloudy”
in appearance, roll it between the palms of your
hands and mix it well. Never shake a bottle of insulin.
Wipe the top of the insulin bottle with an alcohol
swab.
•Turn the vial and
syringe upside down
and pull the plunger
down to draw the
units of insulin you
need into the syringe.
•Check for air bubbles and push insulin back into
the bottle if you see any sign of bubbles.
•Push the needle through the skin and push down
the plunger.
•Count to 10 and pull the needle out of your skin.
26
Diabetes: An Owner’s Manual
Taking Insulin
For a mixed dose:
•Push the needle through the skin and push down
the plunger.
It is more difficult to attain adequate blood sugar
control using a mixed insulin regimen. Discuss
this with your doctor to determine the best insulin
regimen for you.
•Count to 10 and pull the needle out of your skin.
Warning: Never mix Lantus™ (Glargine) or
Levemir™ (Detemir) with other insulins.
•Take off the cap and pull the syringe plunger down
to the units of cloudy insulin you need.
•Pull the needle out of the cloudy insulin bottle—
you should not draw out any cloudy insulin yet.
Below is a chart that provides information
on different types of insulin, their administration and the number of days they’re
good for after their first use or unopened
if left at room temperature:
•Pull the plunger down to the prescribed units of
clear insulin you’ll need (these will be air units).
You need air in the syringe equal to the amount
of clear insulin you’ll take.
Apidra® (glulisine)
Cartridge/vial
28 days
Humalog (lispro)
Cartridge/ disposable pen/vial
28 days
Humalog® Mix 50/50
Disposable pen
10 days
Humalog®
Mix 50/50
Vial
28 days
Humalog ® Mix 75/25
Disposable pen
10 days
Humalog ® Mix 75/25
Vial
28 days
Humulin® 70/30
Disposable pen
10 days
Humulin 70/30
Vial
28 days
Humulin N
Disposable pen
14 days
•Put the needle into the cloudy vial and push the
plunger down, pushing air into the vial.
Type of Insulin
Administration
®
•Push the needle into the clear vial and push the
plunger down, pushing air into the vial.
•Without taking the needle out of the clear vial, turn
the clear vial and syringe upside down and pull the
plunger down to draw the units of clear insulin you
need into the syringe.
•Check for air bubbles and push insulin back into
the bottle if you see any sign of bubbles.
•Pull the needle out of the vial of clear insulin and
carefully push the needle containing the clear
insulin into the cloudy insulin vial.
®
®
Number of days good
for after first use
(or unopened at
room temperature)
•Without taking the needle out of the cloudy vial,
turn the cloudy vial and syringe upside down and
pull the plunger down to draw the units of cloudy
insulin you need into the syringe. Make sure you
draw the correct units of insulin because you can’t
push any insulin back into the cloudy vial.
Humulin N
Vial
28 days
Lantus (glargine)
Cartridge/ disposable pen/vial
28 days
Levemir® (detemir)
Disposable pen/vial
42 days
Novolin 70/30
Cartridge/InnoLet™
10 days
•Now you should have:
Novolin 70/30
Vial
28 days
________ units of clear
Novolin® N
Cartridge/InnoLet™
14 days
Novolin® R
Cartridge/InnoLet™
28 days
NovoLog® (aspart)
Cartridge/
disposable pen
28 days
Novolog® Mix 70/30
Disposable pen
14 days
®
®
®
®
+ ________ units of cloudy
= ________ total units
•Pull the syringe out of the bottle. You’re now ready
for your injection.
27
continued >>
Diabetes: An Owner’s Manual
Taking Insulin
continued >>
Insulin Pump Therapy
or before deciding to use a pump) The pump is a
small, battery-operated device that’s filled with
fast-acting insulin. It’s connected to a narrow plastic
tube that’s inserted just under the skin and taped in
place. There are also pumps available without
tubing.
Insulin pumps can sometimes be used instead
of giving multiple daily injections of insulin by an
insulin syringe or pen. (You still need to learn how
to inject insulin with a syringe or pen, however,
you still need to learn how to inject insulin with a
syringe or pen in the event the pump malfunctions,
The pump site is changed every two to three days.
Small amounts of insulin, called “basal,” are delivered to the body 24 hours a day. Larger amounts
of insulin, called “bolus,” can be administered by
the pump before meals or snacks.
An insulin pump also can provide intensive insulin
therapy. This alternative to daily injections may be
right for you if you have type 1 or type 2 diabetes,
take insulin, test your blood sugar at least four to
six times a day, and count carbohydrates. Your
doctor can help you decide if an insulin pump is
appropriate for you, and provide a prescription if
insulin pump therapy is right for you.
28
Diabetes: An Owner’s Manual
Chapter 7
Treating Hypoglycemia and Hyperglycemia
Hypoglycemia
(Low Blood Sugar)
A blood sugar reading below 70 mg/dL is
considered a lower-than-normal level of sugar in
the bloodstream. (In gestational diabetes, a blood
sugar reading below 60 mg/dL is considered below
normal.) Some people may have no symptoms, but
typical signs and symptoms of low blood sugar
include the following:
•Sweating •Shakiness
•Anxiety •Nervousness •Rapid heartbeat •Dizziness/light-headedness •Headache •Sudden hunger •Weakness •Impaired vision •Confusion •Numbness or tingling around the mouth or lips
If you’re having any symptoms of low blood sugar,
you must test your blood sugar immediately.
Always carry your blood glucose meter with you.
Low blood sugar is caused by several factors.
Below are some of the most common causes:
If your blood sugar is less than 70 mg/dL
(or 60 mg/dL if you’re pregnant), you need to treat
it immediately by eating or drinking 15 grams of
fast-acting carbohydrate.
•Missing or delaying a meal
•Eating a meal that’s smaller than usual
•Taking an insulin dose that’s mismatched with
the amount of carbohydrate you eat at a meal
If your blood sugar is less than 50 mg/dL, you
need to double the portion size listed below and
eat or drink 30 grams of fast-acting carbohydrate.
•Taking too much insulin or other diabetes
medication
•Taking rapid-acting insulin too early before the
start of a meal
•Drinking alcohol without eating
•Being more physically active than usual
continued >>
29
Diabetes: An Owner’s Manual
Treating Hypoglycemia and Hyperglycemia
continued >>
How to Treat Low Blood Sugar
Preventing Low Blood Sugar
Use the “The Rule of 15”
Here are some tips to help prevent hypoglycemia
and manage it if it happens to you:
1. The following examples contain approximately
15 grams of fast-acting carbohydrate.
•3–4 glucose tablets
•½ cup of apple juice
•4–6 ounces of regular (not diet) soda
•1 tablespoon of sugar, honey or syrup
•5–7 Lifesavers® hard candy
•8 ounces of skim milk
•Eat meals and snacks at consistent times,
such as breakfast at 8 a.m., lunch at 12 noon,
an afternoon snack at 4 p.m. and dinner at 6 p.m.
—Be sure not to skip meals.
•Follow directions carefully as to when to
take insulin in relationship to eating meals.
The timing of insulin injections is very important.
Understand how carbohydrate-containing foods
and your insulin/medication doses are connected.
The more you know about the foods you eat, the
more you can control your blood sugar by taking
the correct amount of medication.
2. Check your blood sugar 15 minutes after eating
or drinking the fast-acting carbohydrate food
source. Once your blood sugar is above
70 mg/dL, you can have a snack if your next
meal is longer than one hour away. In your
snack or meal, be sure to include foods with
carbohydrate, protein and fat. An example of
a snack may be half a sandwich with a piece
of fruit.
•Carefully measure your medication. If you
think your dose needs to be adjusted, contact
your doctor for help.
—Do not adjust your medication yourself without
talking to your physician.
—If you exercise or are going to be physically
active, you may need to either eat additional
snacks or have a plan to adjust your medication.
3. If your blood sugar is still below 70 mg/dL after
15 minutes, eat or drink another 15 grams of
fast-acting glucose, wait 15 minutes and test
your blood sugar again.
•Talk to your diabetes care team for instructions about the best way to use insulin when
you exercise.
—Always remember to check your blood sugar
before, during and after any physical activity.
— If you use insulin or take oral medication that
can cause low blood sugar, you should carry
the following items with you:
° Your glucose monitor or meter
° Fast-acting glucose tablets
° A snack that contains carbohydrate, protein
and fat
° Always carry a Medical Identification, or “ID,”
card, or medical ID tag (such as a necklace
or bracelet) with your diabetes information
listed. This is especially important if you use
insulin.
4. Document all of your low blood sugar episodes
on your log sheet and discuss them with your
diabetes care team. By recognizing the patterns
that cause low blood sugar, you can take steps
to prevent them in the future.
5. Untreated low blood sugar or low blood sugar
that does not improve with the above treatment
can become an emergency involving loss of
consciousness or a seizure. You also may faint.
Contact your doctor or 911 if your symptoms
do not improve and your blood glucose remains
below normal despite multiple attempts to treat it.
30
Diabetes: An Owner’s Manual
Treating Hypoglycemia and Hyperglycemia
•Carry a cell phone with you, if possible.
•Always check your blood sugar before
driving or operating heavy machinery,
especially if you use insulin.
—Low blood sugar can limit your ability to
drive and make decisions.
•Test your blood sugar as directed by your
diabetes care team.
—Vary the time of day at which you test your
blood sugar so you can recognize patterns.
—The most common times to check are when
you’re fasting, before meals, two hours after
meals and at bedtime.
—Bring your records and meter to each office
visit so that you can review this information
with your diabetes care team.
Increased thirst can be a sign of high blood sugar
Hyperglycemia
•If you have a history of severe hypoglycemia,
it’s very important that family, friends and
co-workers know how to recognize and
treat your low blood sugar in case you need
assistance.
(High Blood Sugar)
Hyperglycemia means there’s too much glucose, or
sugar, in the bloodstream. Some people may have
no symptoms of hyperglycemia, but typical signs
and symptoms include the following:
•Increased thirst or hunger
•Frequent urination
•Feeling more tired than usual
•Confusion
•Cuts or infections that are slow to heal
•Stomach pain
•Nausea
•Blurred vision
•Dehydration
•Tingling or numbness of the hands or feet
•Hair loss
What to Do in the Case of
Severe Low Blood Sugar
If symptoms of low blood sugar become serious
and you’re unable to swallow, call 911 or have
someone take you to the nearest emergency room
for treatment. Some people with diabetes have a
family member or friend who has been trained to
give a glucagon injection, which is a medication
that rapidly raises blood sugar. For more information
on how to receive this training, please contact your
doctor or certified diabetes educator.
These symptoms can vary from person to person,
so it’s important to work with your diabetes care
team and develop a plan to help you recognize and
treat high blood sugar when it happens to you.
continued >>
31
Diabetes: An Owner’s Manual
Treating Hypoglycemia and Hyperglycemia
continued >>
Diabetic Ketoacidosis
Here are some helpful tips if you experience
hyperglycemia:
In type 1 diabetes, hyperglycemia (high blood
sugar) may lead to a serious health condition called
diabetic ketoacidosis, or DKA. Without insulin, the
cells of the body cannot get the energy that glucose
provides. As a result, the cells use stored fat for
energy instead. As fat is broken down, ketones are
released into the bloodstream and eventually appear
in the urine.
•Review your food choices. You may be eating
too much food or too many foods that are high in
carbohydrates.
•Review your exercise habits. If you’re not as
active as usual, your body may not be using
carbohydrates in the same way.
•Review your medications. Make sure you’re not
skipping any medications and are taking them as
prescribed. Sometimes if your medications have
been changed recently, you also may experience
hyperglycemia. Additionally, some over-thecounter non-diabetes medications can affect
your blood sugar.
Here are some common signs and symptoms of
diabetic ketoacidosis:
•Stomach pain
•Increased urination, leading to dehydration
•Stress also can impact your blood sugar
levels, so try to identify the sources of stress in
your life and take steps to manage them as best
as you can.
•Heavy breathing or trouble breathing
Some ways to prevent hyperglycemia are to follow
your treatment plan and keep your regular visits with
your diabetes care team.
•Vomiting or diarrhea
•A dry mouth or fruity breath
•Confusion
•Coma
If you experience any of these symptoms of diabetic
ketoacidosis, have a blood glucose reading that’s
greater than 240 mg/dL, have ketones present in
your urine, or have a fever of 101 degrees or above,
call your doctor. It’s important to continue to take
your insulin, check your blood sugar levels and your
urine for ketones, and drink eight ounces of water
every hour.
Call your doctor or diabetes care team if your blood
sugar is higher than 240 mg/dL or if there are
ketones in your urine. Ketones are the result of the
body using stored fat instead of glucose for energy.
You can test for ketones by using a small plastic
cup and Ketostix® strips, which you can purchase
at your local pharmacy.
Ketone—read at exactly 15 seconds
NEGATIVE
TRACE
SMALLMODERATE
LARGE
md/dL
5 104080160
Ketone testing strips change color to correspond with the amount of ketones present your
urine. The guide above shows the various readings you may see after you test for ketones.
32
Diabetes: An Owner’s Manual
Chapter 8
Following Sick-Day Guidelines
When you’re sick or have an infection or injury, and your body is under stress,
it responds by releasing hormones. These hormones can cause high blood sugar
levels and make it harder for you to get well.
•Continue to take your medication and insulin.
If you have nausea or diarrhea, check with your
doctor or certified diabetes educator to find out
how to adjust your medication doses.
Here are some important tips to remember:
•Be prepared before you get sick. Talk with your
diabetes care team about getting a flu shot every
year. Ask about a sick-day menu, liquid carbohydrates that you should have on hand if you have
nausea or are vomiting, and any extra diabetes
supplies you should be sure to have. Find out
how frequently you should check your blood
sugar levels. Keep a list of telephone numbers
that include your doctor, your certified diabetes
educator and your pharmacy. Always have a list
of your current medications available.
•Check your temperature. A fever may
dehydrate you, so be sure to increase the amount
of water you drink. Call your doctor when you
have a fever to get further instructions on how to
reduce it.
•Let a family member or friend know that
you’re ill and keep in regular contact with
them. Ask them to check on you during your
illness.
•Drink plenty of liquids. Drink 8 ounces of water
or other calorie-free beverages every hour. You
also can have ice chips, sugar-free popsicles,
sugar-free soda, sugar-free jello and clear broth.
•Keep track of your illness and record
your blood sugar levels, temperature and
symptoms.
•If you’re unable to eat, you’ll need to drink
liquids that contain sugar. Choices include fruit
juice, regular soda and sports drinks.
•Check your blood sugar frequently, on
average at least every four hours. Check your
urine for ketones if your blood glucose is greater
than 240 mg/dL.
continued >>
33
Diabetes: An Owner’s Manual
Following Sick-Day Guidelines
continued >>
Here are symptoms to watch for when you’re sick.
If you experience any of them, you need to call
your doctor for immediate medical attention:
Below is a list of the carbohydrate content of liquids
and soft foods for sick days:
Food
Amount
Grams of
Carbohydrate
•You can’t keep liquids down for more than
four hours.
Regular soda
½ cup
15
Orange juice
½ cup
15
Apple juice
½ cup
15
Milk
1 cup
12
•You have difficulty breathing or have fast
breathing.
Ice cream, vanilla
½ cup
15
Cereal, cooked
½ cup
15
•Your blood glucose is over 300 mg/dL on two
consecutive measurements that do not respond
to increased fluids or food. Also call your doctor
if your blood sugar levels are too low.
Gelatin, regular
½ cup
30
Sherbet, sorbet
½ cup
30
Popsicle
1 serving
7
Sugar, honey
1 teaspoon
4
Coffee, tea
1 cup
0
Soup, creamy
1 cup
15
•You’re confused or are unable to stay awake or
think clearly.
Pudding, regular
½ cup
30
Pudding, sugar-free
½ cup
15
•Your breath smells fruity or smells like fingernail
polish remover.
Yogurt, fruit regular
1 cup
40
Yogurt, lite
1 cup
15
•You’re vomiting or dehydrated.
•You have diarrhea or abdominal pain.
•You have ketones in your urine.
•You have a temperature of 100.4 (38C) or above.
34
Diabetes: An Owner’s Manual
Chapter 9
Reducing Your Risk of Chronic Complications
Diabetes can lead to serious health complications, so it’s important to keep your blood
sugar levels within your target range—and to have regular checkups with your doctor.
Your physician will test your A1C blood test results
and help you learn how to keep your blood pressure
and cholesterol at healthy levels.
Here are some tips to keep your feet, eyes and
gums healthy.
•Foot care—Be sure to check your feet every day,
including the tops and bottoms, and between the
toes. Look for changes in skin color, swelling,
open sores, ingrown or fungal toenails, corns or
calluses, and cracks in the skin and talk with your
certified diabetes educator to treat them promptly.
These are the “ABCs” of diabetes. It’s important to
know your A1C levels, blood pressure readings and
cholesterol results so you can discuss your goals
with your doctor or certified diabetes educator.
People with diabetes are at risk for heart disease,
stroke, nerve damage and kidney disease, as well
as complications with their feet, eyes, teeth and
gums. Wound healing can also be delayed or
impaired. This is because high blood sugar can
eventually affect the nervous system and blood
vessels throughout your body.
Be sure to wear comfortable-fitting footwear and
never walk barefoot. Talk with your doctor or
certified diabetes educator for a complete checklist of proper foot care.
Do not walk barefoot.
Always wear comfortable fitting footwear.
Cut toe nails straight across and use emery board to
gently shape sides of toe nails. Do not use pocket knives
or razors.
Clean and inspect your feet daily.
continued >>
35
Diabetes: An Owner’s Manual
Reducing Your Risk of Chronic Complications
continued >>
•Eye care—High blood sugar affects the blood
vessels and retina in the eyes and may cause
blindness over time. Make regular appointments
with an ophthalmologist or optometrist to have
a thorough, dilated eye exam at least once
a year.
Some people may not experience pain or early
warning signs of trouble with their vision at the
early stages. Others may notice dark spots,
difficulty seeing in the dark or a feeling of
pressure in their eyes. Let your doctor know
if you have any of these symptoms.
•Oral health—Diabetes can lead to periodontal, or
gum, disease, which impacts the bones and gum
that hold your teeth in place. Periodontal disease
is an infection that also can damage the heart.
Be sure to brush and floss your teeth daily and
have regular checkups with your dentist. Call your
dentist if you have signs or symptoms of gum
disease, such as gums that bleed, are red or
swollen, or have receded from your teeth.
36
Diabetes: An Owner’s Manual
Chapter 10
Coping With Stress
An important part of managing your diabetes is caring for your emotional health
and learning how to cope with stressful situations.
Everybody has to manage stress in their lives, and
they handle it in different ways. But when you have
diabetes, coping with stress is important because it
helps keep your blood sugars in your target range.
Stress can increase blood glucose levels by activating the “fight-or-flight” hormones in the body. These
regulatory, or “stress,” hormones signal the liver and
muscles to release sugar into the bloodstream,
which raises blood sugar levels.
Things that affect your blood sugar level:
Variable
Effect on Blood Sugar
aIncrease
aIncrease
Illness
aIncrease
Stress
eDecrease
Exercise
Diabetic Medication eDecrease
eDecrease
Skipping Meals
ae Increase OR Decrease
Alcohol
Food
Here are some helpful tips to manage stress in
your life:
•Be sure to get regular exercise or be physically
active, which are both natural stress relievers and
can lower your blood sugar.
•Take time to enjoy life by spending relaxing time
with your family/friends or starting a hobby.
•Talk to a counselor or close friend, or join a
support group to get the emotional support
you need.
•Talk with your doctor if you’re in a stressful
situation and are having trouble coping with it.
37
Diabetes: An Owner’s Manual
Chapter 11
Your Diabetes Care Checklist
Diabetes Care Checklist
YOU can control your diabetes. Take this checklist when you see your doctor. Know your numbers
and discuss your goals at each visit. Enter information below each time you visit your doctor.
How Often l A1C measures blood sugar control
Lowering your A1C reduces Every 3 – 6 months
diabetes complicatons
l Blood pressure control
Lowering your blood pressure reduces the risk of strokes
Every visit
l Cholesterol (LDL) level
Lowering your LDL level reduces the risk of heart attacks
l Depression screen
Monitors your emotional health
Every year
Target Level *
Discuss with your
physician
Less than
130/80 mm Hg
Less than
100 mg/dl
Every year
l Diabetes kidney function tests
Urinalysis and microalbumin ratio
Treating early kidney damage Every year
may prevent dialysis
l Eye Exam
Treating diabetic eye disease early may prevent blindness
Every year
l Foot exam
•
•
•
•
Observe the feet
Every year
Check the pulses
Test sensation
Helps prevent serious foot infections and amputations
l Immunizations
• Influenza (flu vaccine)
• Pneumonia (Pneumovax)
l Just ask for a referral to:
• Diabetes education classes
• Nutritional counseling
Every year
At least once
Discuss with your physician
Call (847) 926-5032
*Levels are based on recommendations from the American Diabetes Association
(see “Living With Diabetes” at www.diabetes.org) but may vary by patient
38
Less than
30 mg/gm
Your Result
Diabetes: An Owner’s Manual
Chapter 12
Resources
Important Phone Numbers
Keep this information in a safe place so it’s available when you need it:
NamePhone
Primary Care Physician
Endocrinologist
Registered Dietitian
Certified Diabetes Educator
Pharmacist
In addition, the above information also is important to carry with you in case of an emergency.
Medic Alert ID bracelets are available for purchase and are recommended for people with
diabetes. This allows others (including medical staff) to provide appropriate treatment in case
of an emergency.
If you need diabetes supplies, please call the following numbers:
NorthShore Evanston Hospital
Outpatient Pharmacy
2650 N. Ridge Avenue
Evanston, IL
(847) 570-2210
NorthShore Glenbrook Hospital Outpatient Pharmacy
2050 Pfingsten Avenue
Glenview, IL (847) 657-1785
NorthShore Highland Park Hospital Outpatient Pharmacy
777 Park Avenue West
Highland Park, IL
NorthShore Skokie Hospital Outpatient Pharmacy
9600 Gross Point Road
Skokie, IL
(847) 433-2508
(847) 933-6890
continued >>
39
Diabetes: An Owner’s Manual
Resources
continued >>
Outpatient Diabetes Education
Safe Needle Disposal
Diabetes Education at (847) 926-5032
NorthShore Evanston Hospital
2650 N. Ridge Ave.
Evanston, IL
Disposing of medical waste, such as used insulin
needles/pen needles and lancets (known as
“sharps”), in a safe and appropriate way is crucial
to avoid injuring other people and keep the environment safe. In the state of Illinois, needle disposal
programs are available outside of Chicago in
northern Cook County and LaSalle County.
Residents in other areas of the
state should follow state guidelines for safe needle disposal,
which allow individuals to place
used needles/pen needles and
lancets in household containers.
Diabetes Education at (847) 926-5032
NorthShore Glenbrook Hospital
2500 Pfingsten Road
Glenview, IL Diabetes Education at NorthShore Highland Park
Hospital
777 Park Ave. West
Highland Park, IL
(847) 926-5032
Acceptable containers include
laundry bottles, bleach bottles
or other opaque plastic containers with screw-top lids. When
the container is full, it’s placed
in the regular garbage, not the
recycling bin, for pickup.
Diabetes Education at
NorthShore Skokie Hospital
(847) 926-5032
9600 Gross Point Road
Skokie, IL
NorthShore Medical Group/
Endocrinology*
9977 Woods Drive
Skokie, IL
(847) 663-8540
do not
recycle
Here are some helpful tips to remember when
you’re disposing of used needles and lancets:
•Label the container “Do Not Recycle.”
•Do not store sharps in glass bottles, soda bottles,
milk jugs, aluminum cans or coffee cans.
* A referral from your primary care physician is required.
Here are other helpful diabetes websites:
•Always keep storage containers out of reach of
children and pets.
NorthShore University HealthSystem
northshore.org/diabetes
•Always place needles in the container with the
sharp end first.
Academy of Nutrition and Dietetics
eatright.org
•Screw the cap on tightly.
•Never place loose sharps in the garbage.
American Diabetes Association
diabetes.org
For a complete list of disposal sites, check the
program information about sharps on the Solid
Waste Agency of Northern Cook County (SWANCC)
website at: swancc.org/or call (847) 724-9205.
Juvenile Diabetes Research Foundation
jdrf.org
40
Diabetes: An Owner’s Manual
Resources
Other Disposal Options Available to
Illinois Residents
Sharps Disposal Resources
in the Northwest Suburbs
Below are some additional options to dispose of
your used insulin needles/pen needles and lancets:
The Solid Waste Agency of Northern Cook County
(SWANCC) provides a complete list of disposal sites
on its website at swancc.org. In addition, below is a
list of suburbs that accept used sharps. Sharps
must be in a heavy plastic container, such as a
laundry detergent bottle, bleach bottle or fabric
softener bottle. The container can be dropped off at
the village hall Monday through Friday from 9 a.m. to
4 p.m. You must show identification to verify that you
live in the suburb. Check to see if they also have a
used or old prescription drugs drop–off service.
Mail-Back Programs
Mail-back disposal programs allow you to mail
used sharps to a licensed disposal facility. These
programs charge a fee for their service. Be sure to
ask your healthcare provider or pharmacist for more
information, or search the yellow pages or Internet
using the search term “sharps mail-back.”
You also can find additional information at:
Arlington Heights
Mount Prospect
Barrington
Niles
Sharps Needle Destruction Devices
Buffalo Grove
Palatine
These devices are designed to bend, break, melt
or shear needles. Once the needle is destroyed, it
may be safely disposed of in the garbage (not the
recycling bin). Sharps needle destruction devices
can be purchased from medical supply companies
or found on the Internet using the search term
“sharps destruction devices.”
Elk Grove Village
Park Ridge
Evanston
Prospect Heights
Glencoe
Rolling Meadows
Glenview
Skokie
Hoffman Estates
South Barrington
Inverness
Wheeling
You also can find additional information at:
Kenilworth
Wilmette
•Safe Needle Disposal Solutions by State
safeneedledisposal.org
Lincolnwood
Winnetka
BD ecoFinity® Life Cycle Solution bd.com/ecofinity
Morton Grove
•Solid Waste Agency of Lake County
swalco.org
continued >>
41
Diabetes: An Owner’s Manual
Resources
continued >>
New “Apps” to Manage Diabetes
New technology, such as tablets and smartphones,
can help you manage your diabetes care with special
applications, or “apps.” Some of these are free of
charge, while others include a small fee.
Diabetes apps include the following features:
•“Carb” counting
•Meal entry
•Glucose log
•Medication log
•Exercise log
•Weight log
•Graphs and charts
•Alarms to remind you to
check your blood glucose
For more information about these helpful tools, be sure
to talk with your certified diabetes educator or visit your
app marketplace for more information.
42
We hope that this owner’s manual has provided
information to help you successfully navigate your
diabetes care and live your best life. Please feel free to
reach out to your care team at NorthShore University
HealthSystem with any questions that you may have.