1
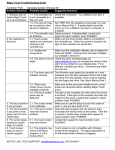
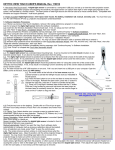
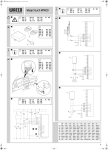
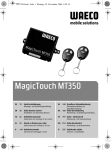
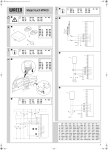
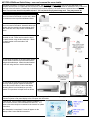
KEYTEC ACEeBoard Quick Setup – see user's manual for more details.
ACEeBoard consists of 2 receivers, connected by a cable. The left receiver has two cables (one is for the USB cable to the
computer and the other is a cable that connects the left receiver to the right receiver). Right receiver should have only 1 cable that
connects to the left receiver. Please keep in mind that it will not work properly if the receivers are positioned incorrectly.
Note: The receivers should be mounted at least 1” (2.5 cm) above the projected image area. They may need to be
mounted higher when using on flat panel displays
For whiteboard or projection screen with thick
frame mounted on the Stand or on the wall - Attach
the receivers on the top of the whiteboard frame
For whiteboard or projection screen with a thin
frame mounted on the stand - Assemble the acrylic
holders with the receivers as shown below, place
each receivers on the top corners of whiteboard
frame.
For whiteboard or projection screen with thin frame
mounted on wall - Place receiver onto the top of
the steel bracket using double-sided tape. Attach
the steel bracket to the back side of the
whiteboard.
For mounting Receivers on the flat surface directly
- Place receiver onto the top of the steel bracket
using double-sided tape. Attach the steel bracket
to the wall using screws or double-sided tape.
For mounting the receivers on flat panel displays You may use any proper method to raise and
mount the receivers about 5” above the display.
Mounting fixture is not included, but you may
contact us to purchase a simple fixture as shown.
Connect USB cable from left receiver to a USB port on the computer. If cable is not long enough, use active USB extension cable.
Connect Projector or flat panel display to the Computer with VGA cable.
Insert the CD, click on Install to start software installation. If
auto run does not work, Run POPStarter.exe from CD. It is
better to have the computer connected to the Internet for update
information.
After installation is completed, 2 icons will appear on the
desktop: Mint Control and Mint Interactive.
Double click Mint control to open the control panel. For the first-time calibration after the hardware setup, click “initial setup”. For
recalibration in the future, click “screen calibration”.
In the next screen, click “Next” to continue. You will need to select “Quick setup” or “Fine setup”. Quick setup is normally
recommended. If you experience difficulty of achieving the accuracy of touch, you may run “Fine setup”.
Follow and touch the center of circles appeared on the screen to complete the calibration process. Check the accuracy of touch.
Recalibrate if necessary. If “Fine setup” is selected, you will need to touch each X appeared on the top of the screen to complete
calibration process.
The digital pen works like a mouse pen.
Digital Pen:
Pen tip: same as left mouse click.
Lower button: same as right mouse click.
Upper button:
1. In Mint Interactive mode – toggle between writing and eraser
functions.
2. In Windows mode – press and hold will exit Windows mode
and back to Mint Interactive mode.
The digital pen can be charged from computer's USB port.
Mint Interactive is an interactive whiteboard software. Double
click the Mint Interactive icon to run the program. There are two
Bar type
ways to display the tool bars – Bar type or Floating type.
Toggle between Mint Interactive mode and Window mode.
Pencil, highlighter, brush.
Erasers.
Color, size, shapes/lines/diagrams.
Text input, edit.
Screen capture, recording.
Previous page, next page.
Insert new page, delete selected page.
Redo, undo.
Floating type
Shift window, tool & utility.
Shift & zoom, setup options.
Contact Information:
KEYTEC, INC. 520 Shepherd Drive, Garland, Texas, USA 75042 Tel: 972-272-7555 or 800-624-4289 Fax: 972-272-7501
Office Hours: 8:30AM – 5:00PM CST Monday – Friday.
Homepage: www.magictouch.com ACEeBoard page: http://www.magictouch.com/board.html
Email: for information: [email protected] for sales inquiry: [email protected] for tech support: [email protected].
Join KEYTEC facebook for special discounts and free prizes: http://www.facebook.com/Keytec.
Rev. 110715 copyright – all rights reserved.