1
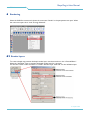
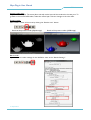
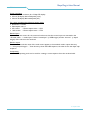
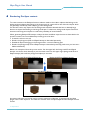
Maya 7 / 8 / 8.5 / 2008 plug-in
User Manual
Philips 3D Solutions
Document Information
Info
Content
Title
Plug-in for Maya 7 / 8 / 8.5 / 2008 User manual
Date
01 April 2009
Security
The attached material and the information contained herein are
proprietary to Philips 3D Solutions. Copying, reproduction,
adaptation, modification or dissemination in whole or part is not
permitted without written permission from Philips 3D Solutions.
Contact
www.philips.com/3dsolutions
Maya Plug-in User Manual
3D Solutions
Table of Contents
1
Introduction ............................................................................................................................................................................5
2
Installation ...............................................................................................................................................................................6
3
4
5
2.1
Requirements.................................................................................................................................................................6
2.2
Plug-in activation ...........................................................................................................................................................6
3D content formats...............................................................................................................................................................7
3.1
2D-plus-Depth...............................................................................................................................................................7
3.2
Declipse...........................................................................................................................................................................8
Working with the Maya plug-in..........................................................................................................................................9
4.1
Creating a WOWvx camera......................................................................................................................................9
4.2
Adjusting the WOWvx settings................................................................................................................................9
Rendering...............................................................................................................................................................................12
5.1
Render layers ...............................................................................................................................................................12
6
Rendering Declipse content..............................................................................................................................................15
7
How To’s for the Maya plug-in.........................................................................................................................................16
8
Known limitations................................................................................................................................................................17
01 April 2009
©2009 Philips Electronics Nederland B.V.
3 of 17
Maya Plug-in User Manual
3D Solutions
01 April 2009
4 of 17
©2009 Philips Electronics Nederland B.V.
Maya Plug-in User Manual
3D Solutions
1 Introduction
Welcome and thank you for purchasing the Maya plug-in. The Maya plug-in gives Maya users the
opportunity to produce 3D content for all Philips 3D LCD display types.
The Maya plug-in completely integrates within the Maya workflow making it very easy to use. This
user-friendly interface offers possibilities to adjust parameters and manipulate these over time.
The Maya plug-in has a unique new feature: converting existing Maya scenes into 2D-plus-Depth scenes
with only a few mouse clicks. This will helps you producing high quality 3D content, quickly and easily.
The Maya plug-in from Philips 3D Solutions allows artists to save next to their rendered frames the
depth information to bitmap files. The individual image and depth bitmaps can easily be converted to a
video sequence. The resulting video sequence can be played back with the 3D Solutions Media Player.
With the use of the Maya plug-in also the advanced new content format called Declipse is supported
by using an extra render pass. The basics and workflow required to create Declipse content is
described in sections 3.2 and 6 of this document. The document “3D Interface Specification – White
paper” available from http://www.philips.com/3dsolutions → Documents shows the detailed
specifications of the 3D content formats.
Special note:
This manual is intended for users with basic Maya knowledge. Certain basic understandings will
therefore not be explained or mentioned.
01 April 2009
©2009 Philips Electronics Nederland B.V.
5 of 17
Maya Plug-in User Manual
3D Solutions
2 Installation
2.1 Requirements
The Maya plug-in requires an original Maya, installed on the target system. Plug-ins are available for the
following Maya versions:
• Maya 7.0
• Maya 8.0
• Maya 8.5
• Maya 2008
Maya Personal Learning Editions are not supported by the plug-ins.
Current Maya plug-ins are for 32-bit Maya versions.
Operating system compatibility
• Windows XP
• Windows Vista
There is an installer for each above mentioned Maya version that enables you to install the plug-in. Just
click on the executable of the version needed and follow the instructions on screen. Make sure that on
selection of the destination directory you select the plug-ins directory of Maya.
2.2 Plug-in activation
Open the Maya “Plug-in Manager” and check the box with “WOWvx-plugin.mll”. Be sure to check the
box with “auto load” as well, this will cause the WOWvx plug-in to automatically start up when Maya
is opened.
Select: “Window → Settings/preferences → Plug-in Manager”
01 April 2009
6 of 17
©2009 Philips Electronics Nederland B.V.
Maya Plug-in User Manual
3D Solutions
3 3D content formats
3.1 2D-plus-Depth
The 3D content format basically comprises so-called 2D-plus-Depth; i.e. a separate depth image next
to the color (RGB) image. The Philips 3D screens display objects in a virtual 3D space in front and
behind the actual 3D LCD screen.
In the demo image below you can see an image in the 2D-plus-Depth output format. According to the
image below the red teapot should appear in front of the 3D screen. The blue teapot should appear
near the glass of the screen and the green teapot should appear behind the 3D screen.
Objects that appear in front of the screen have a grayscale value from 129 up to 255 in the depth
image. Objects that appear behind the screen have a grayscale value from 0 to 128 in the depth image.
01 April 2009
©2009 Philips Electronics Nederland B.V.
7 of 17
Maya Plug-in User Manual
3D Solutions
The Maya plug-in creates a special adjustable view frustum (view angle bounding box) with a near and
far clipping plane. Objects that are close to the far clipping plain appear black and object close to the
near clipping plain appear white.
3.2 Declipse
The Declipse content format enhances the 3D viewing experience by enabling a true look-around
effect; i.e. looking behind objects. It therefore gives a higher visual quality to the content by enabling
the 3D display to render background information for occluded areas.
Below examples of the 2D-plus-Depth (top) and Declipse (bottom) formats are depicted.
Note that removal of the redundant data in the 2D and Depth background sub-images may be applied.
It is also feasible to only have the background information only for the occluded parts in the picture.
The former is especially useful for uncompressed data (e.g. applications that generate content). In the
case of content that is being stored or transmitted in compressed form it is more favorable to remove
the redundant data in order to improve the coding efficiency
01 April 2009
8 of 17
©2009 Philips Electronics Nederland B.V.
Maya Plug-in User Manual
3D Solutions
4 Working with the Maya plug-in
When the Maya plug-in is activated, an extra menu item named “WOWvx Tools” appears in the menu
bar.
4.1 Creating a WOWvx camera
Create a new camera or use a camera from an existing scene. To convert the relevant camera to a
WOWvx camera, select the camera and click the “WOWvx Tools” menu item. When the menu
opens, click “Convert Camera To WOWvx” which will convert the selected camera into a WOWvx
camera.
4.2 Adjusting the WOWvx settings
The camera has now been converted to a WOWvx camera consisting of a WOWvx view frustum.
The center panel in the frustum presents the glass of a Philips 3D LCD screen. The front- and backpanel reveal the maximum depth range in the scene.
01 April 2009
©2009 Philips Electronics Nederland B.V.
9 of 17
Maya Plug-in User Manual
3D Solutions
The “WOWvx Screen Position” is the distance between the glass of the Philips 3D screen and the
WOWvx camera.
The “WOWvx Screen Offset” is the depth to the front and back of the imaginary glass (WOWvx
Screen Position).
The image below illustrates the side view of the WOWvx view frustum with the corresponding grey
scale values projected on the top.
Adjusting the WOWvx settings can be done in the “Attribute Editor”.
01 April 2009
10 of 17
©2009 Philips Electronics Nederland B.V.
Maya Plug-in User Manual
3D Solutions
Select: “Window → Attribute Editor”
Click the tab titled “WOWvxSettings” to show the WOWvx camera settings (see “Extra Attributes”).
These settings can be adjusted using a keyable slider. The Maya view port shows the results right away
as the OpenGL view frustum of the WOWvx camera adjusts itself real time to the 3D view port.
The “WOWvx Front” and “WOWvx Back” are the distances of respectively the Near and Far clipping
plane from the camera.
When “Hardware Texturing” is activated, it is possible to see the object’s grey value in the OpenGL
instantaneously.
Animating WOWvx attributes
The WOWvx Screen Position and Depth Offset are also keyable and can be animated over time.
Keying these attributes is the same as keying any other attributes of Maya. Select using the right mouse
button and click “Key Selected” coloring the attribute red. This demonstrates that the value of this
attribute has been keyed over time.
Note:
This manual suggests a Maya “Camera”, but the “Camera and Aim” or “Camera, Aim, and Up” are also
possible options. Any previously animated camera can be converted into a WOWvx camera.
01 April 2009
©2009 Philips Electronics Nederland B.V.
11 of 17
Maya Plug-in User Manual
3D Solutions
5 Rendering
Select the WOWvx camera and choose the menu item “Panels” in the perspective view port. When
the menu item opens click “Look Through Selected”.
5.1 Render layers
To create a depth map preview the depth render layer must be turned on in the “Channel Editor”.
Select the “WOWvx” layer to activate the depth render layer for a preview.
For the best render results we advice to create a “Render Layer Override” for the WOWvx layer.
01 April 2009
12 of 17
©2009 Philips Electronics Nederland B.V.
Maya Plug-in User Manual
3D Solutions
Activate render layer
Maya uses render layers. The active (blue colored) render layer will be rendered in the view port. To
go back to the normal RGB render, select the master layer so that it changes to the color blue.
Preview render
Now create a render of the scene by clicking the “Render view” button.
Result of the preview render (Depth image)
Result of the preview render (RGB image)
Batch render
Input the correct render settings for the WOWvx scene in the “Render Settings”.
01 April 2009
©2009 Philips Electronics Nederland B.V.
13 of 17
Maya Plug-in User Manual
3D Solutions
Screen resolution
Select the correct resolution for a Philips 3D display.
• 42 inch 3D display 960 x 540 pixels (16:9)
• 20 inch 3D display 800 x 600 pixels (4:3)
For a given resolution the following settings apply:
• Resolution = 72 DPI
• Pixel aspect ratio = 1
• 4:3 screens → Device aspect ratio = 1.333
• 16:9 screens → Device aspect ratio = 1.778
Render layers
Select the correct camera for the scene and make sure that the correct layers are activated in the
“Channel editor → render layers” Select “masterlayer” (= RGB images) and the “wowvx1” (= depth
images) of the camera to be rendered.
Render output
Two directories with the name of the used camera appear in the standard render output directory
“......\Yourproject\Images\.....” One directory shows the RGB sequence, the other shows the depth map
sequence.
Compositing
All kind of compositing tools can be used for creating a movie sequence from the rendered stills.
01 April 2009
14 of 17
©2009 Philips Electronics Nederland B.V.
Maya Plug-in User Manual
3D Solutions
6 Rendering Declipse content
To create content in the Declipse format a selection needs to be made in objects that belong to the
background and objects that belong to the foreground. As a general first rule of thumb, objects which
are (partially) occluded by other objects go in the background.
For the best result, only objects for the background should be selected that have a relatively large
distance to objects that belong in the foreground layer. Furthermore, background objects should not
intersect with foreground objects to reduce the possibility of visual artefacts.
When generating Declipse 3D bitmaps in Maya, the basic workflow stays the same as described in the
previous sections, but some additional processing has to be done:
• Create the scene as normal.
• Render the (foreground) 2D and Depth bitmaps as described previously.
• Disable all objects belonging to the foreground for a second rendering pass.
• Render the (background) 2D and Depth bitmaps as described previously (make sure you have set a
different filename!).
Below is an example of how this process works. On the upper left, the foreground 2D and Depth
bitmaps are shown, which basically, is just the whole scene. On the upper right (background 2D and
Depth bitmaps) the small box (foreground object) is removed.
Foreground 2D and Depth3D bitmaps
Background 2D and Depth bitmaps
+
Declipse 3D bitmap
Any post-production tool can be used to convert sequences of bitmaps, as generated by the Maya
plug-in, into a video sequence. This holds for both the ‘basic’ 2D-plus-Depth and the Declipse content
format.
01 April 2009
©2009 Philips Electronics Nederland B.V.
15 of 17
Maya Plug-in User Manual
3D Solutions
7 How To’s for the Maya plug-in
How to render the depth map of Maya Fluids ®
Maya fluids can only be rendered when they are converted to polygons.
How to render the depth map of Maya Paint effects ®
Maya Paint effects ® can only be rendered when they are converted to polygons, Nurbs or Subdivision
surface objects.
How to render the depth map of Maya Fur ® and Maya Hair ®
Maya Fur ® and Maya Hair ® are momentarily not supported by the Maya plug-in.
How to render the depth map of Maya hardware particles
Particles can only be rendered when they are instanced to polygons, Nurbs or Subdivision surface
objects.
How to render a depth map with Mental Ray ®
To optimize performance the depth map will be rendered in the Maya render engine. Mental Ray ®
rendering is therefore not supported as renderer for a depth map. By creating a layer override for the
WOWvx layer, all other layers can use a render engine of choice.
01 April 2009
16 of 17
©2009 Philips Electronics Nederland B.V.
Maya Plug-in User Manual
3D Solutions
8 Known limitations
Scene compatibility
A scene including a WOWvx camera can only be opened, modified and saved on a computer with the
Maya plug-in installed.
Transparent materials
Transparencies are not included in the depth map, because they appear solid. It is advised to use the
least amount of transparencies possible. This is not a limitation of the Maya plug-in but is inhered to
the 3D technology currently available.
Network rendering
A workstation can only render the depth map when the Maya plug-in is installed locally. In the near
future a render node license will be available to render on multiple systems simultaneously (e.g. render
farm).
-0–0–0–0–0-
01 April 2009
©2009 Philips Electronics Nederland B.V.
17 of 17