1
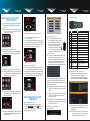
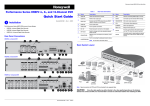
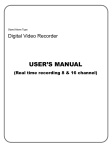
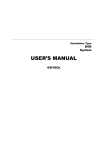
STEP3
SETUP LOCAL VIEWING ON
YOUR COMPUTER
STEP 3 SETUP LOCAL VIEWING
ON YOUR COMPUTER
1. Retrieve the network parameters.
1a. Go to Main menu->System->Network to get
the IP address, TCP port and HTTP port.
Note: The IP address of the DVR should be in the
same field as your computer. And a static
(fixed) IP address is recommended. E.g. if
your router is set for the 192.168.1.x network,
and you computer is 192.168.1.8, then the IP
address of your DVR can be 192.168.1.10.
Default IP address is 192.168.1.10, TCP
port: 5000, HTTP port: 80.
2. Accessing your DVR locally
(ON YOUR LOCAL COMPUTER).
Open Internet Explorer and enter http://192.
168.1.10:80 in the address bar to access it.
Note: You may want to use a different port than the
default HTTP port 80. If so, you need to
configure your DVR to use the port you want.
When configured, remember that you have to
specify its port number in the URL (e.g. if you
select port 88, you access it using 192.168.
1.10:88).
STEP4
INTERNET REMOTE
MONITORING
Note: Port forwarding guides for various routers on
www.portforward.com
2. DDNS (Dynamic Domain Name System)
register on the third party website.
(no-ip for example).
STEP4
INTERNET REMOTE
MONITORING
In order to add a host to your account, select
the "Add" link from the "Hosts/Redirects"
menu. This will bring up the Add a Host page.
And now you're ready to fill in the details of
your new hostname.
Open the web browser (Internet Explorer by
default) and enter http://www.no-ip.com in
the address bar.
2a. Create an account.
Fill in the required fields on the new
account form. Once you've filled in the
required information and agreed to our
Terms of Service, click the "Sign Up
Now!" button at the bottom of the page.
2b. Confirm your account
Once you have submitted your account
information into the new user form, it will
send a confirmation email to the address
you provided. You will need to check that
account and look for the email from NoIP.com. The email contains a link you
must click in order to confirm your
account.
2c. Login to your account
Note: For more detailed guide of No-ip service,
please visit http://support.no-ip.com/
3. Enable DDNS on the DVR.
Go to Main menu->Setup->Network->Other
Setttings to type in the host info.e.g.
Under DDNS: tick off;
Under DDNS type: choose www.no-ip.com;
Under User Name: the account you created
at no-ip.com;
Under Password: the password of your
account at no-ip.com.
Under Host Domain: enter the host name
you created at no-ip.com;
DDNS Update: Choose the DDNS update period.
Note: Please allow 10~15 minutes for the DDNS
service to update with your new DDNS
address. This is normal for the DDNS system.
4. Accessing your DVR remotely.
Open Internet Explorer and enter the host
name (e.g. Http://MyDVR.no-ip.org ) in the
address bar to access it.
STEP4 INTERNET REMOTE
MONITORING
1. Port forward.
1a. Accessing your router by entering the gate
way address, e.g. http://192.168.1.1
1b. Find the option called port mapping or
port forwarding.
1c. Specify the HTTP port (default is 80) and
TCP port (default is 5000) to be forwarded
from the internal/local IP address of your
DVR(e.g. 192.168.1.10) to the Internet.
2d. Add a host or domain to your account
For other detailed operation like mobile phone
remote view,please refer to the user manual.
Quick Guide Manual
Of DVR
STEP1
BASIC SETUP AND
INSTALLATION
STEP2
NAVIGATION AND
CONTROLS
STEP2
STEP2
NAVIGATION AND
CONTROLS
NAVIGATION AND
CONTROLS
3b. Remote control
STEP1 BASIC SETUP AND
INSTALLATION
1. Connecting BNC cameras (not included)
t o BNC ports (VIDEO INPUT) on the rear
p anel.
Note: Test the cameras prior to selecting a permanent
location by temporarily connecting the cameras
and cables to your DVR.
(For reference only)
Note: HDMI port is optional for some model.
4. Connecting the Ethernet cable.
(not included).
Connect one end of the Ethernet cable to an
available LAN port of your router (not included)
and the other end to the DVR’s network port
(LAN) on the rear panel of the DVR.
2. Connecting the USB mouse.
Connect a USB mouse to one of the USB ports
on the front panel or rear panel of the DVR.
(For reference only)
(For reference only)
3. Connecting a monitor (not included).
3a. Connect a BNC cable (not included) from
your TV or monitor to the video output port
on the rear panel of the DVR.
Serial
Number
(For reference only)
5. Powering on the DVR.
Connect the power cable to the DC 12V port
on the rear panel and the power cord into an
electrical outlet, and then turn on the switch.
At start up, the system runs an initial logo, after
a few moment, it will load a live display view.
2. Using a mouse.
2a. In live:Double-click left button
on one camera to be full screen
display. Double-click again to
return to the previous screen
display.Click right button to
show the control menu. Here
are all control and setup. Click
right mouse again to hide the
control menu.
2b. In setup: Click left button to enter. Click
right button to cancel setup, or return to
the previous.If want to input the value,
move cursor to the blank and click. An
input window will appear as Fig2.1. It
supports digits, letters and symbols input.
Fig 2.1 Virtual Keyboard It supports mouse
drag. I.e. Set motion detection area: click
customized, hold left button and drag to set
motion detection area.
(For reference only)
3b. Connect a VGA cable (not included) from
your monitor to the VGA port on the rear
panel of the DVR.
(For reference only)
3c. Connect a HDMI cable (not included) from
your monitor to the HDMI port on the rear
panel of the DVR.
(For reference only)
STEP 2 NAVIGATION AND
CONTROLS
1. Using the main menu.
Right click anywhere on the screen and
choose ,
or press the
button on
the front panel of the DVR. Click the icons
below to open sub-menus.
Name
REC Button
ADD Button
POWER Button
Digital Button
EXIT Button
BACKUP Button
SEARCH Button
SEQ Button
Function
To start the manual recording.
Input the number of DVR to control it.
To turn on/off the device.
Code input/number input/channel switch.
Return to the previous interface.
To enter the backup mode.
To enter the video playback interface.
To enter the auto dwell mode.
11
12
E-ZOOM Button
MENU Button
Multi Screen Button
Single Screen Button
To electronic amplify the single channel.
To enter the sub menu.
To choose multi-screen display mode.
To choose single -screen display mode.
13
Direction and
Enter Button
Direction Button: move cursor to select
items.Enter Button: confirm the selection.
14
15
16
AUDIO Button
Fn Button
SNAP Button
17
Playback Control
Button
18
PTZ Button
To enter the audio adjustment interface.
Reserved function keys.
To snap the live pictures.
To control playback, pause/play,
single-frame play, rewind, stop,
fast forward.
To enter the PTZ control interface.
1
2
3
4
5
6
7
8
9
10
4. Setting the basic parameters.
4a. There is a setup wizard when power on
the DVR, you can setup the basic
parameters like time, date, IP address,
record resolution, manage the HDD and etc.
2c. In playback:Click left button to choose the
options. Click right button to return to live
mode.
2d. In backup:Click left button to choose the
options. Click right button to return to
previous picture.
2e. In PTZ control: Click left button to choose
the buttons to control the PTZ. Click right
button to return to live.
3. Other control options
3a. Front panel.
(For reference only)
4b. Or you can enter into Main menu>Setup
to setup the time, record and network
parameters.
Note: By default, ID is admin, no password. With
password enabled, you need to enter your
ID and password to access the system.