1
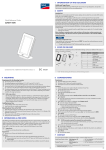
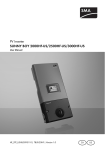
VIEW-10
SUNNY VIEW
User-friendly
Innovative
Simple
Safe
• Large, easy-to-read color
touchscreen
• Freely configurable user
interface
• Slideshow with automatically
changing information
• WLAN interface for the display
of online data
• Intuitive operation via touch screen
• Easy-to-understand display of
all key plant data
• Audio and visual alarm
• Data archiving and backup
via microSD
SUNNY VIEW
Stylish visualization for the home
Now your plant data is live and in color: The Sunny View offers you more than just a reliable visualization of the solar power
yield. Plant operators can use the large, easy-to-read five-inch color touchscreen to display all key PV data, as well as to
receive news, meteorological data, and posts from social networks via WLAN. All relevant information will be presented in an
individually configurable slideshow. Including fully-automatic monitoring – the device uses Bluetooth® to communicate with
up to 12 inverters and can send a visual and acoustic warning signal in the event of a failure.
Large, easy-to-read
color touchscreen
Wireless communication with inverters
via Bluetooth
Visual and acoustic
alarms
microSD card slot
for data archiving,
storage, and export
WLAN interface for
news and weather
Technical data
Sunny View
Communication
Inverter communication
PC communication
Number of SMA devices
Bluetooth
Max. communication range
Bluetooth in free-field conditions
Bluetooth
SDHC card (micro SD)
Max. 12
Up to 100 m (can be extended with
an SMA Bluetooth Repeater)
Dimensions (W / H / D) without tabletop stand
Weight with tabletop stand
Weight without tabletop stand
Mounting location
Mounting type
Software languages
Languages of the manual
Features
Display
○ Optional feature
0 °C … +40 °C (+32 °F …+104 °F)
5 % … 95 %
IP20
16 MB as ring buffer
SDHC carte (microSD), max. 8 GB
109 / 165 / 75 mm
(4.3 / 6.5 / 3.0 inch)
109 / 152 / 23.5 mm
(4.3 / 6.0 / 0.9 inch)
0.293 kg (0.6 lb)
0.245 kg (0.5 lb)
Indoor
Wall mounting, tabletop device
German, English, Italian, French,
Dutch, Greek, Japanese
German, English, Italian, French,
Dutch, Greek, Japanese
5 inch (12.75 cm), 16 million colors,
resolution 480 x 800 pixels
Touch screen
2 years
www.SMA-Solar.com
Operation
Warranty
Certificates and approvals
Accessories
USB plug-in power supply
SMA Bluetooth® Repeater
● Standard feature
Type designation
External plug-in power supply
90 V – 240 V, 50 / 60 Hz
Type. 3,75 W, max. 8 W
●
For extending the maximum
Bluetooth- Communication range
– Not available
www.SMA-Solar.com
View-10
SMA Solar Technology
SUNNYVIEW-DEN131221 SMA and Sunny View are registered trademarks of SMA Solar Technology AG. Bluetooth ® is a registered trademark of Bluetooth SIG, Inc.. No liability for typographical errors. Printed on chlorine-free paper..
Voltage supply
Voltage supply
Input voltage
Power consumption
Ambient conditions in operation
Ambient temperature
Max. permissible value for relative humidity (non-condensing)
Degree of protection (according to IEC 60529)
Memory
Internal
External
General data
Dimensions (W / H / D) with tabletop stand
Safety Precautions
To reduce the risk of personal injury and to ensure the safe installation and
operation of the product, you must carefully read and follow all instructions,
cautions and warnings in the CD‑ROM manual attached to the product before
installing or using the product.
Danger to life due to electric shock
Lethal voltages are present in the conductive parts of the plug-in power supply.
• Only use the Sunny View indoors and in a dry environment; keep it away
from liquids.
• Do not open the plug-in power supply.
Device for Plant Monitoring
SUNNY VIEW
Quick Reference Guide for Commissioning
Preventing unauthorized access
PV plants are delivered with "0000" as default password. In other words,
unauthorized users can gain access to the data of your PV plant.
• Change the default plant password (see user manual).
Sharp or pointed objects can damage the display.
• Use your finger or the touch-screen stylus pen to control the Sunny View.
Damage to the Sunny View due to moisture penetration
The Sunny View is not splash-proof.
• Only use the Sunny View in a dry, indoor environment.
SunnyView-SE-US-en-11 | A30851-X3151-A103-1-X143 | Version 1.1
EN
CA
US
INFORMATION ON THIS MANUAL
Validity
This manual is valid for the Sunny View type VIEW-10.GR1.
The type designation can be found on the type label on the back of the Sunny View.
Scope of Delivery
Check the delivery for completeness and any visible external damage. Contact
your specialty retailer if the delivery is incomplete or you find any damage.
Target Group
This manual is intended for end users and skilled persons.
Nomenclature
Complete designation
SMA Solar Technology America, LLC
SMA Solar Technology Canada Inc.
SMA Solar Technology AG
Designation in this manual
SMA
SMA
SMA
Security
Intended Use
The Sunny View is a communication product that receives, displays and stores data
from SMA inverters.
The Sunny View is only suitable for indoor use.
The Sunny View may only be used with original accessories that are produced or
recommended by SMA.
For safety reasons, it is forbidden to modify the product or install component parts
that are not explicitly recommended or distributed by SMA.
The data collected by Sunny View regarding the power generated by your PV
plant may deviate from the electricity meter data.
• The Sunny View data must not be used for billing purposes.
Only use the Sunny View in accordance with the information provided in the
enclosed documentation. Any other use can result in personal injury or material
damage.
The enclosed documentation is a part of this product. Read and follow the
documentation for the proper and optimum use of the Sunny View. Keep all
enclosed documentation in a convenient place for future reference.
Item
A
B
C
D
E
F
G
H
Quantity
1
1
1
1
1
2
2
1
Description
Sunny View
Tabletop stand
Plug-in power supply with adapter
User manual CD
Stylus pen
Screws
Screw anchors
Quick Reference Guide for Commissioning
Mounting
Installation Location Requirements
☐☐ The installation location must be indoors.
☐☐ The ambient temperature must be between 0°C (+32°F) and +40°C
(+104°F).
☐☐ The installation location must be protected against dust, moisture, and
corrosive substances.
☐☐ Devices that use the 2.4 GHz radio spectrum (e.g. microwave ovens) must
be kept at a minimum distance of 1 m (3 ft. 4 in.). This will prevent reduced
connection quality and decreased data transmission speed.
☐☐ The distance between the Sunny View and the devices that use SMA
Bluetooth® Wireless Technology must not be too great. In free-field conditions,
the maximum range is 100 m (328 ft.). Depending on the ambient conditions,
this range may decrease.
☐☐ There must be no sources of interference (e.g. steel walls) between the
Sunny View and devices with Bluetooth.
Installing the Sunny View
1. Push the tabletop stand onto the back of the Sunny View.
2. Install the Sunny View at a suitable location.
Mounting the Sunny View on the Wall
1. Select the mounting location taking into consideration the requirements for the
installation location.
2. Mark the drill holes and drill them: (distance between the drill holes: 56 mm
(2 13 ⁄64 in.), diameter of the drill holes: 6 mm (15 ⁄64 in.)).
3. Insert screw anchors into the drill holes.
4. Screw the screws into the screw anchors.
5. Hang the Sunny View onto the screws.
Determining a Free NetID
The NetID serves to distinguish PV plants with Bluetooth in close proximity of each
other. All devices in a PV system must have the same NetID.
The NetID can be a number from 1 to 9 or a letter from A to F. NetID 0
deactivates the Bluetooth module. NetID 1 enables a Bluetooth connection with
one device.
A free NetID is a NetID that is used by no other PV plant with SMA Bluetooth in
your vicinity.
Target Group
This task must be performed by a skilled person.
Requirement:
☐☐ The Bluetooth devices of your PV plant must be turned off.
1. Commission the Sunny View at the various locations of each Bluetooth
enabled device (see Section "Commissioning").
☑☑ During commissioning, Sunny View will search for all PV plants and display
the assigned NetIDs.
2. Select a free NetID and configure all Bluetooth enabled devices
(see installation manual of the device).
Commissioning
Requirements:
☐☐ The same free NetID is set for all devices.
☐☐ All devices of the PV plant are ready for operation.
☐☐ The PV plant consists of fewer than 12 inverters.
1. Connect the plug-in power supply to the
power supply line of the Sunny View.
5. Select [Next].
☑☑ The following message appears: "Would you like to search for a new plant?"
6. Select [Search].
☑☑ The Sunny View searches for all PV plants in its environment.
☑☑ All the NetIDs that were found will be displayed after the search.
7. If the NetID of your PV plant does not appear, select [Repeat search].
☑☑ The Sunny View displays the selected NetID.
✖✖ Is the Sunny View not displaying the selected NetID?
• Reduce the distance between the Sunny View and the device.
• Check the NetID setting of the devices.
8. Select the NetID of your PV plant.
9. Select [Next].
☑☑ The Sunny View establishes a connection to the PV plant.
☑☑ The password prompt appears.
10. Enter the password for the user group "User". Tip: The default password is
"0000".
11. Select [Next].
☑☑ Sunny View connects to the PV plant.
12. If you want to use the 24-hour format for the time display, select the
[24-hour format] checkbox.
13. If you want to automatically synchronize the time over the Internet, select the
[Automatic] checkbox. After commissioning, a WLAN connection must be
established (for information on how to establish the WLAN connection after
commissioning, refer to the user manual).
14. Set the time zone, date format and time.
15. Select [Next].
☑☑ A list of slides is displayed.
16. Select the checkboxes of the slides you want to display. Tip: Select the Info
symbol to view additional information on the slide.
17. Select [Next].
☑☑ The home slides appear.
Contact
If you have technical problems concerning our products, please contact the
SMA Service Line. We require the following information in order to provide you with
the necessary assistance:
• Hardware version of the Sunny View
• Firmware version of the Sunny View
• Firmware version of the SMA Bluetooth Piggy-Back in the inverter
(if available)
• Type and serial number of the inverter
North America
SMA Solar Technology America, LLC
6020 West Oaks Blvd, Ste 300
Rocklin, CA 95765
Tel. +1 916 625 0870
Tel. +1 877-MY SMA TECH
Tel. +1 877 697 6283 (Toll free, available
for USA, Canada and Puerto Rico)
Fax +1 916 625 0871
[email protected]
www.SMA-America.com Europa
Europe
SMA Solar Technology AG
Sonnenallee 1
34266 Niestetal, Germany
www.SMA.de
2. Connect the plug-in power supply to the socket-outlet.
☑☑ The SMA logo appears.
3. Select the desired language.
4. Select a country.
SMA Service Line
Inverters +49 561 9522 1499
Communication: +49 561 9522 2499
Fax: +49 561 9522 4699
E‑Mail: [email protected]
SMA Solar Technology Canada Inc.
2425 Matheson Blvd E , 8th Floor
Mississauga, ON L4W 5K5, Canada
Tel. +1 877 506 1756 (Toll free,
available for Canada)
[email protected]
www.SMA-Canada.ca