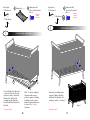
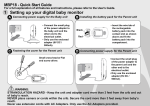
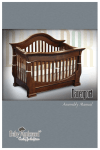
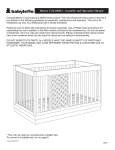
1
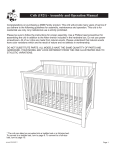
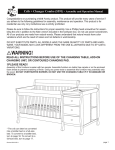
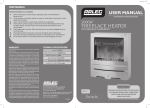
Sleigh
Crib
Assembly Instructions
Adult assembly required due to the presence of small parts, sharp points & sharp edges.
Before assembly, read these instructions. Make sure all pre-assembled parts are tight. Store this instruction
manual for future reference.
If a part is missing or you have questions, contact us.
1-800-886-9555
Email: [email protected]
©2009 BSF BABY INC. 02000_021309_
Made in China
Crib Warnings
!
WARNING -
Disassembling Crib For Storage
Failure to follow these warnings and assembly instructions
could result in serious injury or death.
• Read all instructions before assembling crib. KEEP INSTRUCTIONS FOR FUTURE USE. DO NOT
use this crib if the instructions can not be strictly followed.
!
WARNING -
To disassemble crib for storage, follow steps in reverse.
Store all parts and hardware together in a safe place. Store the instruction manual in the supplied
envelope attached to the mattress support assembly for future reference for reassembly.
Infants can suffocate on soft bedding. Never add a pillow,
comforter or padding.
• To reduce the risk of SIDS, pediatricians recommend healthy infants be placed on their backs to
sleep, unless otherwise advised by your physician.
Cleaning and Maintenance
Strangulation Hazard:
To clean bed frame and bed rails, use only mild household soap and warm water. Do not use bleach
• Strings can cause strangulation! DO NOT place items with a string around a child’s neck, such as
DO NOT suspend strings over a crib or attach strings to toys.
may be treated with a light application of a good grade non toxic furniture polish.
• To help prevent strangulation tighten all fasteners. A child can trap parts of the body or clothing
on loose fasteners.
• DO NOT place crib near window where cords from blinds or drapes may strangle a child.
Fall Hazard:
• When child is able to pull to a standing position, set mattress to lowest position and remove
bumper pads, large toys and other objects that could serve as steps for climbing out.
• After raising side, make sure latches are secure.
• DO NOT leave child in crib with side lowered. Be sure side is in raised and locked position
whenever child is in crib.
• When child is able to climb out or reaches the height of 35 in. (90 cm), the crib shall no longer be
used and can be converted to a transitional bed.
• Ensure the safety of your child by tightly securing and routinely maintaining all bolts and fastener.
• Check this product for damaged hardware, loose joints, missing parts or sharp edges before and
after assembly and frequently during use. DO NOT use crib if any parts are missing, damaged or
broken. Contact BSF BABY INC. at 1-800-886-9555 orrw ite to 80 Richards Street, Brooklyn, NY
11231 for replacement parts and instructional literature, if needed. DO NOT substitute parts.
• DO NOT use a water mattress with this crib.
as
suffocation.
• Infants can suffocate in gaps between crib sides and a mattress that is too small.
• CAUTION: Any mattress used in this crib must be at least 27 1⁄4 inches (69 cm) by 51 5⁄8 inches
(131 cm) with a thickness not exceeding 6 inches (15 cm).
2
19
Transitional Bed Warnings
Notes
! WARNING ENTRAPMENT/STRANGULATION HAZARD
• Failure to follow these warnings and assembly instructions
could result in serious injury or death.
• Infants have died in toddler beds from entrapment and strangulation
• The mattress intended for use on the bed shall be a full-size crib mattress having minimum
dimensions of 27 1/4 in. (690 mm) in width and 51 5⁄8 in. (1310 mm) in length and 4 in. (100 mm) in
thickness. Not exceeding 6 in. (150 mm) in thickness.
• The minimum age for a child using this transitional bed shall not be less than 15 months and the
maximum weight shall not be greater than 50 lbs. (22.7 kg).
• DO NOT use with less than 12 inches of space between the transitional bed and solid objects such
as a wall or dresser. Child could slide into smaller spaces and suffocate.
• DO NOT place bed near window where cords from blinds or drapes may strangle a child. Child may
fall out of window.
• Strings can cause strangulation! DO NOT place items with a string around a child’s neck, such as
hood strings or pacifier cords. DO NOT suspend strings over a crib or attach strings to toys.
• DO NOT use a water mattress.
• DO NOT use casters on transitional bed.
• If guardrails are provided as the mattress containment means, guardrail(s) provided must be used to
avoid the formation of a gap between the mattress and the bed that could cause an entrapment. If
mattress retention clips are provided they must be used to restrict mattress movement.
18
3
Parts
A
Left End
Parts Needed:
B
(x1)
Right End
(x1)
12
Storing Instruction Manual
1.
2.
Fold Line
C
Stationary Side
D
(x2)
Mattress Base
(x1)
3.
E
Toddler Bottom Rail
F
(x1)
Toddler Rail
(x2)
After unit is assembled, use the
following instructions to keep
instruction manual for future use.
G
Adapter Plate
“L” Allen
Wrench
(x2)
“S” Allen
Wrench
1. Pick up instruction manual.
2. Fold instruction manual in half.
3. Slide instruction manual into
warning envelope attached to mattress
base assembly.
4
17
Parts Needed:
“L” Allen Wrench
OR
G
Adapter Plate
(x2)
dd Adapter Bolt
Hardware
(x2)
HARDWARE
“S” Allen Wrench
11
HARDWARE
SHOWN AT
ACTUAL SIZE
aa Crib Bolt
SHOWN AT ACTUAL SIZE
bb Mattress Base Bolt with
Loctite Threadlocker Blue
(x8)
Full Size Headboard - continued
cc
Toddler Rail Bolt
dd Adapter Bolt
(x6)
G
dd
Attach two (2) Adapter Plates (G)
to Full Size Headboard using two
(2) Adapter Bolts (dd). Full Size
Headboard complete.
Continue to Step 12...
16
5
(x2)
(x4)
Parts Needed:
A
Left End
Stationary Side
C
(x1)
(x1)
Parts Needed:
“L” Allen Wrench
“L” Allen Wrench
OR
“S” Allen Wrench
OR
“S” Allen Wrench
aa Crib Bolt
1
(x2)
HARDWARE
SHOWN AT
ACTUAL SIZE
10
Full Size Headboard Assembly
Crib Assembly
aa
A
C
Attach one (1) Left End (A) to one (1)
Stationary Side (C) using two (2) Crib
Bolts (aa).
To assemble the Full Size
Headboard: remove two (2)
Mattress Base Bolts with Locktite
Threadlocker Blue and four (4) Bolts
from the back of the Crib Assembly
as shown.
Continue to Step 2...
Continue to Step 11...
6
NOTE: Steel bed frames (full
size) can be purchased from
any mattress store.
15
Parts Needed:
F
Toddler Rail
(x2)
cc
Toddler Rail Bolt
“L” Allen Wrench
OR
Parts Needed:
C
Stationary Side
(x1)
aa Crib Bolt
(x2)
“L” Allen Wrench
“S” Allen Wrench
9
(x6)
HARDWARE
SHOWN AT
ACTUAL SIZE
HARDWARE
SHOWN AT
ACTUAL SIZE
OR
“S” Allen Wrench
Toddler Bed Assembly
2
Crib Assembly - continued
aa
F
cc
C
Attach one (1) Stationary Side (C)
to Crib Assembly using two (2) Crib
Bolts (aa).
Attach one (1) Toddler Rail (F) to
Transitional Bed Assembly using
three (3) Toddler Rail Bolts (cc).
Repeat for other side ( see Figure 1).
Toddler Bed complete.
Continue to Step 10...
Figure 1
14
Continue to Step 3...
7
Parts Needed:
“L” Allen Wrench
OR
B
Right End
(x1)
aa Crib Bolt
HARDWARE
SHOWN AT
ACTUAL SIZE
“S” Allen Wrench
3
Parts Needed:
“L” Allen Wrench
(x4)
OR
Toddler Bottom Rail
“S” Allen Wrench
8
Crib Assembly - continued
E
Transitional Bed - continued
aa
B
E
IMPORTANT: If converting crib
to Transitional/Toddler Bed, make
sure that the Mattress Support is in
the LOWEST position.
Attach one (1) Right End (B) to
Crib Assembly using four (4) Crib
Bolts (aa).
Attach one (1) Toddler Bottom Rail
(E) to Crib Assembly using two (2)
Crib Bolts (aa). Transitional Bed
complete.
Continue to Step 4...
Continue to Step 9...
8
13
(x1)
Parts Needed:
“L” Allen Wrench
OR
7
Parts Needed:
D
Mattress Base (x1)
“S” Allen Wrench
Transitional Bed Assembly
4
Crib Assembly - continued
Figure 1
Warning
Envelope
Figure 2
Remove plastic ties from plastic
bag. Pull ties through holes in
the Warning Envelope and
secure it onto the Mattress
Base. Pull tightly see above.
Turn out four mattress brackets (one
on each end) on one (1) Mattress
Base (D) as shown (see Figure 1)
before attaching to Crib Assembly.
Then attach Instruction Envelope
(see Figure 2).
Remove four (4) Crib Bolts and
the front Stationary Side from Crib
Assembly as shown.
Continue to Step 8...
Continue to Step 5...
12
9
Parts Needed:
“L” Allen Wrench
D
Mattress Base
(x1)
bb Mattress Base Bolt
with Loctite Threadlocker
Blue (x2)
Parts Needed:
“L” Allen Wrench
HARDWARE
SHOWN AT
ACTUAL SIZE
OR
bb Mattress Base Bolt
with Loctite Threadlocker
Blue (x2)
OR
HARDWARE
SHOWN AT
ACTUAL SIZE
“S” Allen Wrench
“S” Allen Wrench
6
5
Crib Assembly - continued
Crib Assembly - continued
bb
bb
D
Lift one (1) Mattress Base (D) up and
over the Side of the crib. Place the
right end on the floor. Then attach
Mattress Base Left End on Crib
Assembly using two (2) Mattress
Base Bolt with Loctite Threadlocker
Blue (bb).
NOTE: For infants, set Mattress
Support Assembly in upper
position for greater accessibility.
As child grows and can stand,
Mattress Support Assembly must
be lowered. See Warning
Statements.
Continue to Step 6...
10
Attach other end of Mattress Base
using two (2) Mattress Base Bolts
with Threadlocker Blue (bb). Crib
Assembly is complete (see Figure 1).
Figure 1
Continue to Step 7...
11