1
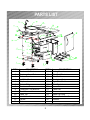
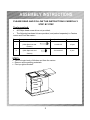
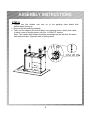
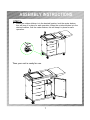
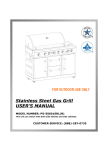
STAINLESS STEEL KITCHEN CART USER’S MANUAL MODEL NUMBER: PS-OK002 CUSTOMER SERVICE:(888)-287-0735 FOR OUTDOOR USE ONLY TM MESSAGE TO OUR USERS Thank you for your purchase of our Stainless Steel Kitchen Cart. We sincerely wish you will enjoy using our fine products. Please read this User’s Manual in its entirety before using the product. Please contact our customer service if you have any questions. Please read this User’s Manual carefully. Some parts of this unit may have sharp edges. Please wear suitable protective gloves. NOTE TO INSTALLER: Leave this User’s Manual with the customer after delivery and/or installation. NOTE TO CONSUMER: Leave this User’s Manual in a convenient place for future reference. OPERATE & MAINTENANCE For your safety: Keep the cart area clear and free from any flammable material. NEVER let children play near the cart, especially if the folding shelf is folded-up, they may bump their head on it and cause bodily injury. Do not place this cart on or under wood balconies. Make sure there is a bucket available to hold the waste water. STAINLESS STEEL CLEANING The outdoor kitchen is made of stainless steel. There are many different stainless steel cleaners available. Always use the mildest cleaners first, scrubbing in the direction of the grain. To touch up noticeable scratches, sand very lightly with dry 100 grit emery papers in the direction of the grain. Specks of grease water can gather on the surfaces of the stainless steel and bake by the hot sun onto the surface and give the appearance of rust. Use an abrasive pad in conjunction with a stainless steel cleaner to remove, scrubbing in the direction of the grain. 1 PARTS LIST REF# 1 2 3 4 5 6 7 8 9 10 11 12 13 DESCRIPTION REF# Casters with Brakes Casters without Brakes Bottom Panel Left Side Panel Clapboard Drawer Slide Condiment Tray Condiment Tray Bracket Push Bar Table Top Inlet Water Hose Faucet Sink 14 15 16 17 18 19 20 21 22 23 24 25 2 DESCRIPTION Cutting Board Side Shelf Bracket Side Shelf Standpipe, Cart Right Side Shelf Door Bracket Name Plate Trash Can Door Trash Can Seat Sliders, Trash Can Seat Drawers ASSEMBLY INSTRUCTIONS PLEASE READ AND FOLLOW THE INSTRUCTIONS CAREFULLY STEP BY STEP Tools required: #2 Philips head screw driver not provided; The following hardware kits are provided, and packed separately in Casters carton and Push bar carton. Item Description Specification Quantity 1 Truss head screw (With Split lock And Gasket) 1/4-20X1/2” 16 pcs 2 Truss head screw (With Split lock And Gasket) 3/16-24X3/8” 4 pcs STEP I: Take out main body of kitchen cart from the carton. Remove all the packing materials. Fold up right side shelf. 3 ASSEMBLY INSTRUCTIONS STEP II: Slowly turn the kitchen cart over on to the packing foam board with bottom panel facing up. Remove all the packing materials. Take out four casters (two with brakes) from packing carton, attach one caster to each corner of bottom panel, with four 1/4-20X1/2” screws. Note: The casters with brakes should be assembled on the left side, the same side with push bar. (Opposite side of folding shelf) 4 ASSEMBLY INSTRUCTIONS STEP III: Unscrew the four setscrews of sink, and remove the sink. Use 4 pieces of Truss head 3/16–24X3/8” screws to attach the push bar on left side panel from the inside of outdoor kitchen cart. 5 ASSEMBLY INSTRUCTIONS STEP IV : Unpack the faucet and inlet water hose from carton. Insert the faucet through faucet sink hole and attach with plastic nut see figure (a). Attach the inlet water hose to treaded end of faucet under sink by screwing it in counterclockwise see figure (b). Place sink onto counter top and attach with 4 screws see figure (c). Place the inlet and outlet hoses through the holes on back panel, see figure (d). (a) (b) Inlet hose Outlet hose (c) (d) 6 ASSEMBLY INSTRUCTIONS STEP V : When the outdoor kitchen is in the desired location, lock the caster brakes, this will keep it in place for safe operation. When the outdoor kitchen is in the desired location, lock the caster brakes, this will keep it in place for safe operation. Then your cart is ready for use. 7