1
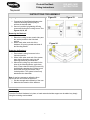
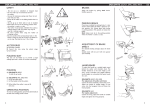
Flo-tech Evo Back
Fitting Instructions
USE AND CARE
INSTRUCTIONS
NOTE: Please read the following instructions carefully prior to assembly.
This item should be fitted by an experienced clinician or technician. This document
contains important information that must be passed on to the user at delivery.
Before assessing for the appropriate positioning of the backrest, ensure that the user is
sitting in the wheelchair in an optimum position with their bottom as far back in the seat as
possible.
LIMITATIONS OF USE
The Invacare Evo Backrests are designed to provide the important benefits of a posterior
back support for a wide variety of users. They are also designed to provide simple,
comfortable and effective lateral support to help maximise function and increase sitting
tolerance, providing they do not reduce or limit the function of the wheelchair.
The backrest is suitable for use on most wheelchairs, tube sizes 19/20mm, 22mm and
25mm.
MAINTENANCE
Before each use: Undertake a visual check for missing/loose screws or worn screws and
fittings.
Periodically: Ensure the product is inspected for loose/worn fastenings and that the torque
settings are checked by a suitably qualified and competent person. Should you notice any
fault in the product, notify your dealer. For heavier and high impact users, the period
between inspections should be reduced accordingly.
The expected product life-cycle for this product is 5 years.
TRANSPORTATION
The Invacare Flo-tech Evo Backrests are in transport when fitted to a wheelchair which is
suitable for transportation. Invacare recommend that the Evo headrest and shoulder
support are used during transportation. When travelling in a motor vehicle, it is general
practice for wheelchair users to where feasible, transfer to a vehicle seat. Please follow the
wheelchair manufacturer’s guidelines on transportation. Invacare recommends that an
individual risk assessment is carried out, taking into account the full combination of
wheelchair, seat, user and tie-down system.
TRAINING
Should you require additional training regarding the assembly of this hardware, please
contact Invacare at the number listed below, for free advice and support.
COMPATIBILITY
This device is compatible with a wide range of wheelchair systems and offers tube sizes of
19/20mm, 22mm and 25mm. Please consult the wheelchair manufacturer’s user guide or
contact Invacare who will be happy to advise on appropriate usage.
1
Flo-tech Evo Back
Fitting Instructions
USE AND CARE
INSTRUCTIONS
QUALITY
In keeping with Invacare’s policy of continuous improvement, we reserve the right to modify
designs without prior notice. All rights reserved.
CLEANING AND CARE
The cover must be cleaned with a neutral detergent and hot water and / or a single use
wipe. Alternatively, it may be laundered to a maximum of 80oC.
Cleaning agents including Alcohols and Phenols should not be used.
The cover should be drip-dried before re-fitting to the back cushion/mesh back. Do NOT
tumble dry. Please follow the instructions on the washing label.
The Flo-tech Evo Backrest hardware may be cleaned with common household cleaners
and a soft cloth.
Should the cover become contaminated, please ask your Infection Control Officer for
advice. Alternatively, contact Invacare for their information on decontamination protocol.
Store in a dry environment.
CAUTION
• Installing a back support on a wheelchair may affect the centre of gravity of the
wheelchair and may cause the wheelchair to tip backwards, potentially resulting in
injury.
• Always assess for the potential need for wheelchair anti-tippers.
• Use of this Backrest in conjunction with a reclining or semi-reclining back will
exaggerate the centre of gravity shift rearward.
• Please ensure that you have confirmed that the back system you are fitting is
compatible to the wheelchair it is being fitted to.
2
Flo-tech Evo Back
Fitting Instructions
USE AND CARE
INSTRUCTIONS
INSTRUCTIONS FOR ASSEMBLY
STEP 1— Remove the backrest from its
packaging and ensure all components are
present and correct. (See figure 1, 2 & 3).
Figure 1 – Evo Backrest
STEP 2—Should this product reach you in an
unsatisfactory condition, please contact the
supplier.
STEP 3— Select the appropriate position for
the mounting blocks. The optimum** balance
point is to fit the mounting block centrally on
the backrest tubes (see figure A below).
However if this is not possible installation in
configuration as shown in B or C may be
required. In this situation additional mounting
hardware may be required if excessive forces
are likely. If a headrest is fitted then
configuration B is recommended. If a backrest
extension and/or headrest are fitted the pivot
point should be raised to reflect the change in
backrest loading – see Figure C.
Figure 2 - Mounting System Components
It is recommended that all screws be
tightened to 8.5Nm.
Figure 3 – Mounting Blocks
Figure A, B & C
** The optimum position is that which best
balances the rotational forces generated in use.
3
Flo-tech Evo Back
Fitting Instructions
USE AND CARE
INSTRUCTIONS
INSTRUCTIONS FOR ASSEMBLY
Note: The Mounting blocks are frequently installed
to the rear of the canes at an angle of
approximately 45 degrees – Figure 4 - but any
position around the backrest tube can be viable
and the final position will depend on the
positioning requirements of the user. In all
cases, ensure that the securing screws are
accessible for final tightening and/or adjustment
1.
2.
3.
4.
5.
6.
7.
8.
Remove the wheelchair canvas according
to the manufacturer’s recommended
procedures.
Remove the Mounting Blocks from their
packing and dismantle. (see page 8 for
further information on spacer selection –
depending on cane tube width).
Place one Clamp Band around a wheelchair
cane – Figure 5.
Insert the Pin Block and hold in place
Insert the Plain Tightening Wedge in line
with the screw slots and the Threaded
Tightening Wedge on the opposite side –
Figure 6.
Insert the screws and tighten loosely
Position this Mounting Block at the optimum
height for the backrest
Tighten the fixing screws enough to hold the
block in place
Figure 4
Figure 5
Figure 6
Figure 7
Do not over tighten at this stage. Allow the
Mounting Block to rotate under moderate pressure
9.
10.
11.
12.
13.
14.
Install the second Mounting Block
approximately 50mm (2”) below the first –
Figure 7.
Take the Central Hardware Assembly and
loosen the 2 Arm Locking Screws to allow
the Adjustment Arms to slide in the Centre
Housing
Insert one Locking Pin in the first Mounting
Block
Adjust the Centre Housing and Adjustment
arms so that the second Locking Pin is
aligned with the receiving hole in the
second Mounting Block – Figure 8.
Close the first Locking Lever and tighten the
Arm Locking Screws. The installation
should now be horizontal
Move the second (lower) Mounting Block
upwards until the second Locking Pin is fully
engaged; then close the Locking Lever and
tighten all screws – Figure 9 & 10.
4
Figure 8
Figure 9
Flo-tech Evo Back
Fitting Instructions
USE AND CARE
INSTRUCTIONS
INSTRUCTIONS FOR ASSEMBLY
Check that the mechanism can be removed and
replaced easily when both Locking Levers are
opened. If it cannot, the Mounting Blocks may not
be level or the Locking Pins may not be correctly
aligned. Continue adjustments until removal and
replacement is smooth and easy.
Figure 10
Figure 11
Note: if necessary, the above installation
procedure can also be achieved by lowering the
first Pin Block and the hardware assembly to meet
the second Mounting Block
Universal Mounting Blocks include a selection of
Spacers and Clamp Bands to suit different cane
diameters. Observe the correct position for any
Spacers which must not be in contact with the
Tightening Wedges ( )– Figure 11.
If in doubt please refer to fitting instructions that
come with the Mounting Blocks.
Figure 12
Figure 13
Installing the Backrest:
1.
2.
3.
4.
5.
6.
7.
Remove the mounting system from the
mounting blocks.
Remove the protective End Cap from one
end of the Mounting Track – Figure 12.
Slacken the Centre Clamp Fixing Screws to
allow the Track Slider to mount onto the
backrest track
Insert the Track Slider into the track and
move the assembly to the desired position –
Figure 13. Ensure its orientation before
clamping (Locking Pins should be facing
down).
Secure in place with the Centre Clamp
Fixing Screws.
Install the completed backrest in the
wheelchair and secure by closing the
Locking Levers.
Replace the protective End Cap.
Figure 14
Adjustments:
Backrest Height:
For fine adjustment of the backrest height, slacken
the two Centre Clamp Fixing Screws – Figure 14.
Move the backrest up or down to the desired
position – Figure 15 - and re-tighten the Fixing
Screws. If this adjustment significantly alters the
pivot position, it may be necessary to adjust the
height by repositioning the mounting blocks on the
wheelchair canes
5
Figure 15
Flo-tech Evo Back
Fitting Instructions
USE AND CARE
INSTRUCTIONS
INSTRUCTIONS FOR ASSEMBLY
Backrest Angle (pitch):
Figure 16
Slacken the two Centre Clamp Fixing Screws –
Figure 14. Angle the backrest forwards or
backwards to the desired position – Figure 16 and
re-tighten both Fixing Screws.
Seat Depth:
1. Raise both Locking Levers to the open
position
2. Slacken both Arm Locking Screws
3. Slacken the Mounting Block screws
sufficiently to allow the Mounting Blocks to
rotate – Figure 17.
4. Rotate the Mounting Blocks until the desired
position is reached – Figure 18.
5. Tighten the Arm Locking Screws and close
the Locking Levers
6. Tighten the Mounting Block Screws
7. Check for easy removal/replacement of the
backrest and adjust if necessary.
Figure 17
Backrest Rotation & Offset:
1. Proceed as for seat depth adjustment but
rotate Mounting Blocks differently to
achieve the angle required – Figure 20.
2. To change or reinstate the central position,
slacken the Centre Clamp and slide
sideways to the required position – Figure
21. Secure in position by tightening all fixing
screws and closing the Locking Levers.
Figure 19
Note: The Central Clamp is designed to grip firmly
to resist movement and may do so even when
fixing screws have been slackened. Further
movement of the hardware may be needed to
disengage the clamp before adjustments can be
made.
Figure 20
Figure 21
6
Figure 18
Flo-tech Evo Back
Fitting Instructions
USE AND CARE
INSTRUCTIONS
INSTRUCTIONS FOR ASSEMBLY
Adjusting for different wheelchair widths:
Figure 22
Figure 23
1. Proceed as for Seat Depth adjustment but
rotate the Mounting Blocks equally to
achieve the desired width.
2. Secure in position by tightening all fixing
screws and closing the Locking Levers. See
Figures 22, 23, 24.
Removing the Backrest:
1. Raise the Locking Levers at each side, past
the vertical position to the Unlocked
position.
2. With a hand under each side of the
hardware, lift evenly upwards and clear of
the Mounting Blocks.
Figure 24
Replacing the Backrest:
1. Ensure both Locking Levers are in the
Unlocked position.
2. With a hand under each end of the system,
lower the Locking pins evenly into the
Mounting Blocks on the wheelchair.
3. When both Locking Pins are located in the
holes in the Mounting Blocks, push down
firmly. Ensure that the Locking Pins are fully
located before pressing the Locking Levers
downwards until fully horizontal, in the
Locked position. The system is now firmly
attached to the wheelchair.
Note: It may be necessary to adjust the force
required to lock and unlock the system to:
1. Suit the strength and/or dexterity of the user
2. Maximise the retention of the backrest.
Accessories:
Once the Evo Back Hardware is in place, a head rest and shoulder support can be added very simply
using the mounting track available.
7
Flo-tech Evo Back
Fitting Instructions
INSTRUCTIONS FOR ASSEMBLY – MOUNTING BLOCKS
Installing the Mounting Blocks:
Figure 25
1. Dismantle the assembled blocks and
remove the Shell Spacers.
2. Assemble and install. In most cases the
pre-assembled mounting block will be
suitable without the spacers.
Occasionally it may be necessary to use
the additional spacers to suit different
cane diameters, as shown in Figures
25
Please note: Mounting Blocks are normally
installed to the rear of the canes and angled
inwards to align with the wheelchair arms.
They can also be mounted in front of the canes
but if so ensure the Clamping Screws remain
accessible for the final adjustment and
tightening.
20mm (3/4”)
TUBES USE
CLAMP BANDS
WITH THICK
SPACERS
22mm (5/8”)
TUBES USE
CLAMP BANDS
WITH THIN
SPACERS
25mm (1”) TUBES
USE CLAMP
BANDS
NO SPACERS
9 8
Figure 26
WARRANTY
The Flo-tech Evo Backs are covered by a warranty period of 24 months.
Manufactured for Invacare Ltd by Performance Health Products Limited.
Invacare Ltd
Pencoed Technology Park
Pencoed, Bridgend CF35 5HZ, UK
Tel: +44 (0) 1656 776222 Fax: +44 (0) 1656 776220
E-mail: [email protected] Web: www.invacare.com
Part Number - 1539017
This product is
manufactured to comply
with the Medical Device
Directive
8
V1.4 - 10th September 2010