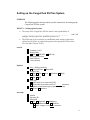
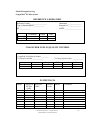
1
Policies and Procedures Manual This is a CLIA-waived system. Approval date ____________ Approved by_______________________________ Reviewed/Revised: Date By whom Roche Diagnostics 9115 Hague Road Indianapolis, IN 46256 www.poc.roche.com COAGUCHEK is a trademark of Roche. Dispatch is a registered trademark of Caltech Industries, Inc. Vacutainer is a registered trademark of Becton, Dickinson and Company. All other product names and trademarks are property of their respective owners. 2007-2013 Roche Diagnostics. All rights reserved. 05021499001(04) Title Table of Contents POLICIES AND PROCEDURES................................................................................................... 1 Overview ..................................................................................................................................... 1 Principle of Operation ................................................................................................................. 2 Roche Diagnostics Technical Service Center ............................................................................. 2 Test Strip Storage and Handling ................................................................................................. 3 PURPOSE ............................................................................................................................... 3 POLICY—Test Strip Storage and Handling ........................................................................... 3 Coding the Meter with the Test Strip Code Chip ....................................................................... 4 PURPOSE ............................................................................................................................... 4 POLICY—Coding the Meter with the Test Strip Code Chip ................................................. 4 PROCEDURE—Matching Code Chip to Test Strip .............................................................. 4 PROCEDURE—Inserting the Test Strip Code Chip .............................................................. 5 Setting up the CoaguChek XS Plus System ................................................................................ 6 PURPOSE ............................................................................................................................... 6 POLICY—Setting up the System ........................................................................................... 6 PROCEDURE—Setting up the System .................................................................................. 7 Patient Preparation ...................................................................................................................... 8 PURPOSE ............................................................................................................................... 8 POLICY—Patient Preparation ................................................................................................ 8 PROCEDURE—Patient Preparation ...................................................................................... 8 Specimen Collection and Handling ............................................................................................ 9 PURPOSE ............................................................................................................................... 9 POLICY—Specimen Collection and Handling ...................................................................... 9 POLICY—Rejecting Specimens ............................................................................................. 9 POLICY—Blood Application............................................................................................... 10 PROCEDURE—Direct fingerstick and capillary tube sample collection ............................ 10 Testing a Patient Sample ........................................................................................................... 12 PURPOSE ............................................................................................................................. 12 PROCEDURE—Testing a Patient Sample ........................................................................... 13 Interpreting Test Results ........................................................................................................... 16 PURPOSE ............................................................................................................................. 16 POLICY—Interpreting Test Results ..................................................................................... 16 PROCEDURE—Interpreting Test Result ............................................................................. 17 Documenting Test Results ........................................................................................................ 18 PURPOSE ............................................................................................................................. 18 POLICY—Documenting Test Results .................................................................................. 18 PROCEDURE—Documenting Test Results ........................................................................ 18 Quality Control Testing ............................................................................................................ 19 PURPOSE ............................................................................................................................. 19 POLICY—Liquid Quality Control Testing........................................................................... 19 POLICY— Liquid Control Storage and Handling................................................................ 21 POLICY—Documenting Liquid Quality Control Testing Results ....................................... 21 PROCEDURE—Preparing a Liquid Quality Control ........................................................... 22 i PROCEDURE—Liquid Quality Control Testing ................................................................. 22 Calibration and Calibration Verification .................................................................................. 25 PURPOSE ............................................................................................................................. 25 POLICY—Calibration and Calibration Verification ............................................................ 25 Evaluation Protocol ................................................................................................................... 26 PURPOSE ............................................................................................................................. 26 POLICY—Evaluation Protocol ............................................................................................ 26 POLICY—Testing Precision Using Liquid Controls ........................................................... 26 PROCEDURE—Testing Precision Using Liquid Controls .................................................. 27 PROCEDURE—Steps to Calculate QC Precision ............................................................... 28 POLICY—Method Comparison ........................................................................................... 29 PROCEDURE--Method Comparison Using Direct Fingerstick or Capillary Tube Samples 32 PROCEDURE--Performing the Method Comparison Using Venous Blood........................ 33 POLICY—Proficiency Testing ............................................................................................. 35 Limitations of the Method ........................................................................................................ 36 PURPOSE ............................................................................................................................. 36 LIMITATIONS ..................................................................................................................... 36 Cleaning the Meter .................................................................................................................... 37 PURPOSE ............................................................................................................................. 37 POLICY—Cleaning and Disinfecting the Meter .................................................................. 37 PROCEDURE - Cleaning/disinfecting the meter housing (the exterior of the meter) ......... 38 PROCEDURE - Cleaning/disinfecting the meter test strip guide......................................... 39 Recommendations for Operator Certification/Recertification .................................................. 40 PURPOSE ............................................................................................................................. 40 POLICY—Recommendations for Operator Certification and Recertification ..................... 40 Additional Facility policy ..................................................................................................... 40 References ................................................................................................................................. 41 OPERATOR IN-SERVICE CURRICULUM ............................................................................... 42 Introduction ............................................................................................................................... 42 Training Materials ..................................................................................................................... 43 Supplies ..................................................................................................................................... 44 Class Orientation....................................................................................................................... 46 Training DVD ........................................................................................................................... 47 Understanding the System ........................................................................................................ 48 Reviewing Operating and Storage Conditions .......................................................................... 51 Setting Up the System ............................................................................................................... 52 Test Strip Code Chip................................................................................................................. 53 Set-up Options .......................................................................................................................... 54 Preparing for the Test ................................................................................................................ 55 Testing a Patient Sample ........................................................................................................... 57 Patient Test Results stored in memory...................................................................................... 60 Responding to Results............................................................................................................... 61 Practicing and Confirming ........................................................................................................ 62 Optional Quality Control Testing ............................................................................................. 63 Control Test Results stored in memory..................................................................................... 67 ii Cleaning the System.................................................................................................................. 68 POLICY—Cleaning and Disinfecting the Meter .................................................................. 68 Review the following policy for cleaning and disinfecting the meter. ................................. 68 Troubleshooting ........................................................................................................................ 70 Concluding the Session ............................................................................................................. 71 Knowledge Test ........................................................................................................................ 71 Certificate of Completion ......................................................................................................... 71 Log Sheets ................................................................................................................................. 72 Operator Certification Log .................................................................................................... 73 Instrument Log ...................................................................................................................... 74 Reagent Log .......................................................................................................................... 75 Patient Test Log .................................................................................................................... 76 Quality Control Log .............................................................................................................. 77 Quality Control Chart............................................................................................................ 78 Quality Control Chart............................................................................................................ 79 Preventive Maintenance Log................................................................................................. 80 Temperature Log ................................................................................................................... 81 Skills Checklist ..................................................................................................................... 82 Performance Evaluation ........................................................................................................ 83 Knowledge Test .................................................................................................................... 84 Precision Data Log for Liquid QC ........................................................................................ 86 Method Comparison Log ...................................................................................................... 87 iii POLICIES AND PROCEDURES For use with the CoaguChek XS Plus System. Overview Introduction The CoaguChek XS Plus System measures blood-clotting time (prothrombin time, or PT) for people who are taking anticoagulation medications, such as Coumadin® or warfarin. The CoaguChek XS Plus System measures bloodclotting time using blood from the fingertip or whole blood from a vein (nonanticoagulated venous whole blood). The CoaguChek XS Plus System quantitatively measures prothrombin (blood-clotting) time (PT/Quick value/INR). INR is a measure of the rate at which blood clots. A low INR can increase the risk of blood clots, while a high INR can increase the risk for internal bleeding. The patient’s physician will determine the best INR range for that patient, depending on why the patient is taking anticoagulants and how the patient reacts to them. The doctor will also determine how often the patient needs blood testing. The system includes the CoaguChek XS Plus meter, CoaguChek XS PT test strips and optional liquid CoaguChek XS Pro PT Controls. The meter guides you through the test step by step using the symbols and instructions in the display. Each box of test strips has its own code chip that you insert into the meter. The code chip contains lot-specific information about its test strips, such as the expiration date and calibration data. Controls are made available to assist with regulatory compliance requirements as applicable to this facility. Clinical Laboratory Improvement Amendments 1988 (CLIA ’88) Requirements As of September 2012, the CoaguChek XS Plus System is CLIA waived. Intended use Roche Diagnostics is pleased to present CoaguChek XS Plus System Policies and Procedures to assist you in developing policies and procedures to ensure quality care with prothrombin testing and in implementing regulations of CLIA ’88 in your own facility. 1 Principle of Operation Use The CoaguChek XS PT Test strip, used as directed with the CoaguChek XS Plus meter, provides accurate blood PT values. Test principle The CoaguChek XS PT Test, used as directed with the CoaguChek XS Plus meter, will provide an electrochemical measurement of prothrombin time following activation of blood coagulation with human recombinant thromboplastin. In simple terms, blood works with the chemicals in the test strip to make a small electric current in the test strip that measures blood clotting time. WHO reference In 1983, the World Health Organization (WHO) adopted this calibration system and made recommendations for its implementation to allow all thromboplastins of varying sensitivity in any laboratory for oral anticoagulant control to be calibrated against a reference thromboplastin of human brain with an ISI of 1.0. 1 Roche Diagnostics Technical Service Center If you have questions, please contact your account manager, or call Roche Diagnostics Technical Service Center at 1-800-428-4674, available 24 hours a day, 365 days a year. We offer assistance in Spanish and many other languages. 2 Test Strip Storage and Handling PURPOSE The following policy is intended to help operators with correct strip handling and storage. If you are new to the CoaguChek XS Plus System, watch the CoaguChek XS Plus System DVD and read the CoaguChek XS Plus System Getting Started Guide before testing. Ingredients Each CoaguChek XS PT test strip contains reagent (human recombinant thromboplastin 1.5 U), stabilizers, preservatives, and additives. POLICY—Test Strip Storage and Handling • Strips are intended for in vitro diagnostic use only. • Exercise normal precautions when handling laboratory reagents. Follow your facility’s infection control guidelines. • Store the test strips in their container with the cap closed. • You can store the test strips at room temperature or in the refrigerator (36°F to 86°F or 2°C to 30°C). • When stored properly, the test strips can be used until the expiration date printed on the test strip container. • When you are ready to test, open the test strip container and remove one strip from the container. Immediately close the container. Make sure it seals tightly. • Dispose of the test strips if they are past their “Use By” date. • Use the test strip within 10 minutes after removing it from the container. • Do not open a vial of test strips or touch a test strip with wet hands or gloves. This may damage the test strips. • Close the container tightly. 3 Coding the Meter with the Test Strip Code Chip PURPOSE The following procedures provide instructions for matching the code chip to the test strip lot and changing the test strip code chip. The test strip code chip provides the meter with important information that it needs to perform the coagulation test. The chip contains information about the test method, the lot number and the expiration date. POLICY—Coding the Meter with the Test Strip Code Chip • The test strip code chip is required when a new test strip container is opened to store the lot information about the test strips in the meter. • The CoaguChek XS Plus meter stores the data from up to 60 code chips. • Use the test strip code chip that was supplied with each new test strip container before you perform the first test. • Leave the code chip in the meter to protect the electrical contacts in the meter from becoming dirty. • Each code chip belongs to a particular lot of test strips. Only remove the code chip when you are testing with test strips taken from a new pack (with a new code chip). • Protect the code chip from moisture and equipment that produces magnetic fields. PROCEDURE—Matching Code Chip to Test Strip 1. Before each test, make sure the correct code chip is in the meter. 2. The 3-number code on the test strip container must match the 3-number code on the code chip. 3. To install the code chip, follow the instructions below. Have the code chip ready. 4 PROCEDURE—Inserting the Test Strip Code Chip 1. Be certain the meter is OFF. 2. Remove the old code chip if there is one inserted in the meter. Store the code chip with appropriate strip lot. 3. Insert the code chip into the code chip slot in the meter with the printed side facing UP until it snaps into place. • Always compare the code number you see on the display with the number that is printed on the test strip container you are using. If the two code numbers do not match, insert the correct code chip in the slot in the meter. • If the code chip is missing or incorrectly inserted, error messages appear in the display. (Please refer to the chapter Error Messages in the CoaguChek XS Plus System User Manual.) 5 Setting up the CoaguChek XS Plus System PURPOSE The following policy and procedure provides instructions for setting up the CoaguChek XS Plus system. POLICY—Setting up the System • The setup of the CoaguChek XS Plus meter is the responsibility of ___________________________________________________ manager, nursing supervisor, qualified operator, etc.) • (who? lab The following set up selections are established when setting up the meter: (Select box(es) below by right clicking, then select properties. Then select Checked under Default Value.) Screen Contrast (0-10) Result Units INR INR/SEC Language Selection Date (format) Time (format) INR/%Q Options Sort—display results by Date and Time Patient ID Beeper Tone Off On Low Medium High Key Click On Off Auto Off Off (meter never turns itself off.) Time until meter turns itself off (minutes) Computer (connection requires optional software) Active Inactive ID Setup Admin. Operator ID Patient ID No Optional Mandatory Alphanumeric Numeric Max Length (1-20) Characters 6 Lockouts Operator Lockout (only available with optional software) New Code Yes No No Weekly Monthly Every three months Every six months Annually Quality Control No Daily One level Weekly Monthly Two levels PROCEDURE—Setting up the System The procedures for setting up the meter can be found in the CoaguChek XS Plus System User Manual. Note: If you have not set the date (after turning the meter on for the first time or because the batteries were removed from the meter for more than 10 minutes), you cannot perform a test. In that case, turning on the meter takes you immediately to the SETUP mode, where you must set the date and time. Once the date and time are set, the meter automatically moves to the main menu, where you can start a test or enter more settings. The next time you turn the meter on, the date and time will remain and you will automatically go to the main menu. 7 Patient Preparation PURPOSE The following policy and procedure provides instruction for preparing a patient for testing on the CoaguChek XS Plus System. POLICY—Patient Preparation • Before performing the test, the operator explains to the patient the purpose and steps of the procedure. • Observe universal precautions based on the compliance program of this facility. • Exercise precautions required for handling all blood specimens and laboratory reagents. • Operators must wash hands before and after testing. • Operators must wear disposable gloves when collecting blood samples or performing tests. • If possible, have patients wash hands prior to testing. • Dispose of used test strips, lancets, and venipuncture supplies in the appropriate designated biohazard or sharps containers. PROCEDURE—Patient Preparation 1. Explain the purpose and steps of the testing procedure to reassure the patient. 2. Wash your hands and put on disposable gloves prior to testing. 3. Collect blood sample following the procedure in the Specimen Collection and Handling section below. 8 Specimen Collection and Handling PURPOSE The following policies and procedures provide instructions for collecting, handling, and rejecting patient test specimens. POLICY—Specimen Collection and Handling • The CoaguChek XS Plus System test may be performed with fresh capillary whole blood from a fingerstick or fresh venous whole blood drawn in an anticoagulant-free plastic syringe. • The results are unaffected by heparin concentrations up to 0.8 U/mL. • The CoaguChek XS PT Test is insensitive to low molecular weight heparins (LMWH) up to 2 IU anti-factor Xa activity/mL. • The test strip must be used within 10 minutes of removing from it from the container. • The meter should display the flashing test strip and blood drop symbols prior to sample collection. • Capillary sample must be applied to the strip within 15 seconds of the fingerstick. • Minimum sample size is 8 µL of blood. • Use of single-use CoaguChek Lancets (REF 04348150001), available from Roche Diagnostics, is recommended. POLICY—Rejecting Specimens • Plasma or serum CANNOT be used as a testing sample. • Sample size CANNOT be less than 8 µL. • Venous sample CANNOT be collected in a syringe containing anticoagulant. • Sample must be USED IMMEDIATELY after collection. • Glass tubes or glass syringes CANNOT be used (only use plastic). • Additional blood sample CANNOT be added to the test strip once testing has begun. • When a patient is on intravenous infusion therapy, sample CANNOT be collected from arm receiving the infusion line. • See the package insert for additional limitations to the procedure. 9 POLICY—Blood Application • Apply directly from the finger to the test strip or use the CoaguChek Capillary Tubes/Bulbs (REF 11621173001), or apply directly from the needle of a plastic syringe filled with blood sample. • Read the testing instructions in the CoaguChek XS Plus System User Manual and the CoaguChek XS Plus PT Test Insert before collecting the sample. PROCEDURE—Direct fingerstick and capillary tube sample collection 1. Gather the following: • CoaguChek XS Plus meter • CoaguChek XS PT Test strips and matching code chip • CoaguChek Lancet or other lancet device • Alcohol wipe or soap and water • Gauze or cotton ball • Bandages 2. Prepare lancet device according to manufacturer’s instructions. Set it aside until fingerstick is needed. 3. If using the CoaguChek Capillary Tubes/Bulbs (REF 11621173001), prepare capillary collection device by firmly inserting the capillary tube into the capillary bulb. Set aside until needed 4. Warm the hand. Have the patient hold it under his or her arm, use a hand warmer, or wash with warm water. 5. Have the patient let that arm hang down by his or her side before lancing a finger. 6. Massage the finger from its base DO NOT MILK THE FINGER. 7. Clean the selected finger with alcohol wipe or use soap and warm water. Allow to air dry completely. 8. When the meter displays the flashing test strip and blood drop symbols, with the hand still down, stick the side of finger with a lancet. • DO NOT WIPE AWAY THE FIRST DROP OF BLOOD. • DO NOT puncture the finger until the flashing test strip and blood drop symbols appear on the meter screen. 9. Immediately after lancing, massage gently along the side of the finger to obtain a good blood drop without pressing or squeezing too hard. 10. While the flashing test strip and blood drop symbols appear on the display, apply the first drop of blood (within 15 seconds) as outlined in Testing a Patient Sample. 10 • Hold the blood drop to the strip until the meter beeps (providing beeper is set to ON). • DO NOT apply a second drop or disturb the strip while testing. 11. If using the CoaguChek Capillary Tubes/Bulbs, touch the capillary tube to the blood drop. Keep tube level and allow it to fill halfway by capillary action. Put finger over hole in the capillary bulb. Hold capillary tube directly over sample target area. While the test strip and blood drop symbols are flashing on the display, apply the sample within 15 seconds of the puncture as outlined in Testing a Patient Sample. Note: Avoid getting air bubbles into the sample. Do not touch the bulb during sample collection. If blood gets into the capillary bulb during sample collection, discard the bulb. PROCEDURE—Venous Sample Collection 1. Prepare a plastic syringe that is free of anticoagulants. Syringe needle should be 23 gauge or larger. A 21-gauge or larger needle is recommended. 2. When the meter displays the flashing test strip and blood drop symbols, perform the venipuncture. 3. Draw venous sample into the plastic syringe. 4. While the meter displays the flashing test strip and blood drop symbols, apply sample as outlined in Testing a Patient Sample. 11 Testing a Patient Sample Note: Medical staff and other persons using the CoaguChek XS Plus meter to perform tests on more than one patient must be aware that any object coming into contact with human blood is a potential source of infection (See: Clinical and Laboratory Standards Institute: Protection of Laboratory Workers from Occupationally Acquired Infections; Approved Guideline -Third Edition; CLSI document M29-A3, 2005). Refer to the user manual for guidance on the cleaning and disinfection of the meter system. PURPOSE The following policy and procedure provides instructions for testing a patient sample. POLICY—Testing a Patient Sample • Only a certified operator may perform a test with the CoaguChek XS Plus System. • Tests are performed with the CoaguChek XS Plus System only in response to written or electronic requests from an authorized person. • Oral requests are permitted only if the facility obtains written authorization for testing within 30 days. • Because of the hazards of handling blood products, wear disposable gloves when collecting specimens and performing test procedures. • Observe and use universal precautions for all blood specimens. Handle at Biosafety Level 2 as recommended for any potentially infectious material in the Centers for Disease Control/National Institutes of Health manual, Biosafety in Microbiological and Biomedical Laboratories, 1999. • Refer to this facility’s infection control procedures for proper disposal of bloodcontaminated items in compliance with OSHA and CDC regulations for universal precautions. 12 PROCEDURE—Testing a Patient Sample 1. Prepare the lancet device or venipuncture supplies according to the manufacturer’s instructions. 2. Place meter on a flat surface, free of vibrations. Or hold it in your hand horizontally until you see the test result. Do not move the meter around during testing. 3. Take a test strip out of the container. Close the container tightly. 4. Hold the test strip so the lettering “CoaguChek XS PT” is facing upward. 5. Slide the test strip into the test strip guide in the direction indicated by the arrows. 6. Slide the test strip in as far as it will go. This turns the meter ON. A beep tone indicates that the meter has detected the test strip (provided the beeper is turned on in the settings). • For alternative ways of turning on the meter, please refer to the CoaguChek XS Plus System User Manual. 7. Check the battery level. If there are no bars left in the battery symbol, you cannot perform any more tests. 8. Check that the date and time are correct. Correct any wrong entries as described in the CoaguChek XS Plus System User Manual. • If a lockout (OP. or QC Lockout) is displayed instead of PATIENT TEST, you must run a quality control before you can perform a test. (Refer to Quality control in the User Manual.) When the meter is in lockout status, a test cannot be performed. 9. Enter your operator ID (if required). See CoaguChek XS Plus System User Manual. 10. Touch [OK] to log on and move to the main menu. 11. Touch PATIENT TEST. 12. Select or enter Patient ID (if required). See CoaguChek XS Plus System User Manual for information on Operator lists. 13. Touch [OK]. An hourglass symbol indicates the test is warming up. 14. Confirm that the code number displayed on the meter matches the number on the test strip container. • The meter automatically checks to see if you have the right test strip code chip. The 3 digit code on the test strip vial must match the number on the test strip code chip before a test can be run. 13 15. The blood drop symbol flashes to indicate that the meter is ready to perform the test and is waiting for blood to be applied. The 180-second count down begins. • DO NOT “perform fingerstick” until the flashing drop of blood appears on the display. Strip must be used within ten minutes of removing it from the container. 16. Identify the sample target area on the test strip. 17. Collect the fingerstick or venous blood sample as outlined below. • Fingerstick sample – DO NOT wipe away the first drop of blood. Apply the first drop of blood to the top or side of the target area within 15 seconds of puncture. Hold the blood drop to the test strip until you hear a beep (provided the beeper is set to ON ). • Using the Capillary Tube – Touch the CoaguChek Capillary tube to the blood drop. Keep tube level and allow it to fill halfway by capillary action. Put finger over hole in the capillary bulb. Hold capillary tube directly over sample target area and expel sample within 15 seconds. Note: Use the first drop of capillary blood. Avoid getting air bubbles into the sample. • Venous Sample – Expel the first four drops of blood from the syringe or syringe needle. Then, immediately place one drop of blood (at least 8 μl) directly onto the target area of the test strip, being sure not to introduce air bubbles into the sample. Note: Expel the first four drops of venous blood. 18. Apply the blood directly to the semicircular, transparent sample application area of the test strip. 19. You hear a beep tone when you have applied enough blood (provided the beeper is turned on). The blood drop symbol disappears and the test starts. Note: DO NOT add more sample. DO NOT touch the test strip or move the meter until the result is displayed. 20. The meter automatically performs a two-level, on-board quality control test on the test strip before it displays the test result. “QC” appears in the display. 21. Following a successful outcome of the quality control test, a check mark appears after “QC.” 22. You must WAIT for results—this takes about one minute 23. The result is displayed in the unit of measure you chose when setting up the meter. It is automatically saved to memory. 14 24. Read and record results. 25. After the test results are displayed, a strip and arrow symbols appear on the screen, prompting you to remove the strip. If you would like to add a comment to the result, you must do so BEFORE you remove the test strip from the meter. 26. Remove the test strip from the measurement chamber. 27. Turn meter OFF. 28. Dispose of all biohazardous material in the appropriate designated biohazard or sharps container. Note: Use a new fingerstick from the opposite hand and a new test strip if you must retest. DO NOT add more blood to the first test strip. 15 Interpreting Test Results PURPOSE The following policies and procedures assist you with interpreting test results. Before interpreting the result, please also read the test strip package insert carefully. POLICY—Interpreting Test Results Any unexpected results should always be followed up with an immediate call to the attending physician. A Panic Value is a PT INR result that is above or below the Immediate Follow-up Values set by the physician. Panic Values should always be followed up with an immediate call to the physician. Expected Results: • The CoaguChek XS Plus meter displays test results in units equivalent to laboratory plasma measurements. • Results may be displayed in three ways: • International Normalized Ratio (INR=(PT/Mean Normal PT)) • INR/SEC (Seconds) • INR/% Quick (a unit used mainly by healthcare professionals in Europe). • Each lot of test strips is calibrated to a reference lot that is traceable to the WHO International Reference Preparations. Normal INR levels vary from person to person. • For the purpose of providing universal INR results, the Mean Normal Prothrombin Time (MNPT) has been established as 12 seconds and the ISI for the system has been established as 1.0. • The physician must determine the best INR level depending on the reason for anticoagulant treatment and how each individual responds to treatment (based on Prothrombin Time). • Each physician should establish expected values for his or her patient population or individual patients. • Differences in reagents, instruments, and pre-analytical variables can affect prothrombin time results. These factors should be considered when comparing different prothrombin time test methods.1 Experience comparing results obtained using the CoaguChek XS Plus System to those obtained using common clinical 16 laboratory reagents shows that the CoaguChek XS Plus System correlates well with the following clinical laboratory reagents: Dade Innovin, Ortho Recomboplastin, and Dade Thromboplastin C+. Note: It’s possible other clinical laboratory reagents may not consistently correlate with the CoaguChek XS Plus System as well as the recommended list above. Unusual Results: • Certain drugs may affect results by interfering with warfarin pharmacology. The potential effect of a drug interaction with warfarin or the effect of underlying diseases (e.g. liver disease, congestive heart failure) must be considered when interpreting a result. • Changes in the patient’s diet can cause unusually low or high results. • Any unusual result can be followed up with inquiries to define the cause of the unusual result. If the result does not match the clinical symptoms, repeat the patient test to rule out procedural error. PROCEDURE—Interpreting Test Result 1. If the meter displays a message other than a result, refer to the Error Messages section of the CoaguChek XS Plus System User Manual. 2. If a < 0.8 INR or > 8.0 INR is displayed, the test result could not be measured or the result may be outside the measuring range for the particular lot of test strips. Repeat the test with a new strip and a new fingerstick. Refer to this facility’s policy on Unusual Results. Note: In rare cases, an error message can occur in patients with long coagulation times (> 8 INR). If this error message appears again when the test is repeated, the result must be checked using another method. 3. If the meter displays an unusual test result (other than an error message), check the following items: • Check that the correct code chip is in the meter. The 3-number code on the test strip container must match the 3-number code on the code chip. • Check that the meter is set up with the correct date and time. The expiration date of the strips is programmed into the code chip, and is compared to the date on the meter. Therefore, it is important that the date and time be programmed correctly on the meter. 4. Debris on the test strip guide can cause problems with results. Clean the meter as recommended in the CoaguChek XS Plus System User Manual. • Do not use a spray to clean the guide or any part of the meter. • Do not let liquid enter the meter 5. See the test strip package insert for the measurement range of the system and Limitations of Procedure. 17 Documenting Test Results PURPOSE The following policy and procedure provides instructions for documenting test results. The test result is displayed in the unit of measure you chose when setting up the meter. It is automatically saved to memory. If the memory is full when you perform a test, the oldest result is automatically deleted. The most recent result is always saved. In the memory display, you can scroll through additional results or return to the main menu. POLICY—Documenting Test Results • The date, time, initials of the operator, patient name, patient ID (if required) and result are examples of data that can be recorded on the patient chart or the appropriate log for your facility. The appropriate log and data to record for this facility is ____________________________________________ . • Test requisitions, test authorizations, and test results are retained for a minimum of __________________________________________________ years. • Linking the patient test with the appropriate CoaguChek XS Plus meter and test strip lot number creates an audit trail. A Patient Test Log is available at the back of this manual. PROCEDURE—Documenting Test Results 1. Record data per this facility’s policy on the patient chart or other appropriate log. 2. Any unusual result can be followed up with inquiries to define the cause of the unusual result. If the result does not match the clinical symptoms, repeat the patient test to rule out procedural error. 18 Quality Control Testing Your CoaguChek XS Plus system performs many types of quality control tests independently: • A check of the electronic components and functions every time the meter is turned on. • A check of the expiration date and lot information on the test strip. • A quality control function is incorporated into the test strip. • A two-level, on-board quality control test and patient result determination within a single test chamber. PURPOSE The following policies and procedures provide instructions for performing and documenting optional liquid quality control testing. Roche Diagnostics has made available optional liquid quality controls for the CoaguChek XS Plus System. These controls are made available to assist with regulatory compliance requirements as applicable to this facility. These instructions should be read thoroughly before using the liquid controls. Ingredients Each control bottle contains nonhuman plasma with varied levels of coagulation factors, stabilizers, and preservatives. Each diluentfilled dropper contains a calcium chloride solution with preservatives. POLICY—Liquid Quality Control Testing • Read control instructions thoroughly before using the controls. • If you are using test strips from a new unopened container, you will need to change the test strip code chip. (The meter recognizes only those test strips that match the test strip code chip.) NOTE: The meter automatically checks to see if you have the right test strip code chip. The 3 digit code on the test strip container must match the number on the test strip code chip before a test can be run. To install the test strip code chip, follow the instructions in the CoaguChek XS Plus System User Manual. • Refer to the CoaguChek XS Plus System User Manual for more details about the components and procedures of the CoaguChek XS Plus System • The CoaguChek XS Plus meter displays the control range and the result. The reading is automatically saved in the memory of the CoaguChek XS Plus meter. • Acceptable CoaguChek XS Pro PT Controls ranges are displayed on the meter when each Quality Control test is run. • The system is working properly and all handling has been done correctly when the test results obtained are within the acceptable control range. 19 • If a quality control test result is within the acceptable control range, it is appropriate to proceed with patient testing. Unacceptable Control Results: • An outofrange result is indicated by an arrow. An arrow pointing up means the result is too high. An arrow pointing down means the result is too low. To resolve outofrange results or error messages, check for the following: • Controls may be expired or stored improperly. • The control may not have been used within 30 minutes of reconstitution. • You may not be doing the test correctly. Repeat the control test, using a new test strip. Carefully follow the instructions in the User Manual. • Make sure you run the test within 10 minutes of removing the test strip from its container. • If you follow all these guidelines and your results are still unacceptable, call Roche Diagnostics Technical Service at 18004284674. • The appropriate quality control frequency for this facility is (be sure to meet all standards of your regulatory agencies) ____________________ . Additional Facility policy (You may insert your facility’s guidelines here and on the following pages.) 20 POLICY— Liquid Control Storage and Handling • For in vitro diagnostic use. Do not take internally. • Exercise the normal precautions required for handling all laboratory reagents. • Store controls in refrigerator at 36°F to 46°F (2° to 8°C). DO NOT FREEZE. • Unopened, lyophilized controls that are stored in the refrigerator are good until the expiration date. • Discard any outdated controls. • Controls are stable for 30 minutes after adding the diluent. • Additional requirements by the appropriate licensing or accrediting body should be incorporated into the quality control program. In this facility additional requirements are ______________________________________ . POLICY—Documenting Liquid Quality Control Testing Results • Liquid quality control records are retained __________________ years, according to this facility’s policy. • All quality control results, along with any corrective action to restore that result to the acceptable range, are recorded on a quality control log. This log includes the test strip lot number and expiration dates, control solution lot number and expiration dates, meter serial number, control ranges, operator identification, and date the test was performed. • An appropriate authority or an appointed individual reviews the liquid quality control log for completeness, and notes any trends that indicate potential problems. Such trends include: gradual drifting of values, sudden shifts in control values while using the same lot of strips, and differences in operator performance. • The liquid quality control log is reviewed __________________ (When? Weekly, monthly, quarterly). • An audit trail links the liquid control test with the appropriate CoaguChek XS Plus meter, test strip lot, and control solution lot used for quality control testing. Quality control testing information is also traceable to patient test results. Additional Facility policy: (You may insert your facility’s guidelines here and on the following pages.) 21 PROCEDURE—Preparing a Liquid Quality Control 1. Gather Supplies • CoaguChek XS Plus meter • CoaguChek XS PT Test strip(s) with matching test strip code chip • CoaguChek XS Pro PT Controls: Level 1 and/or 2 with matching quality control code chip • Diluent dropper(s): one for each control to be run • Scissors 2. Insert the quality control code chip into the meter. This tells the meter the acceptable ranges for this box of controls. 3. Remove the screwcap and rubber stopper from the quality control bottle. Label the bottle with the date and time that you reconstitute it. 4. Using scissors, cut off the tip of the dropper at the end of the stem. Hold the dropper a safe distance from your face. CAUTION: To avoid loss of diluent, hold the dropper by the stem; do not squeeze the bulb of the dropper while cutting the tip. 5. Invert the dropper and place the tip into the bottle. 6. Gently squeeze the bulb to dispense all of the contents of the dropper over the dried material. Do not allow the dropper to touch the dried material. IMPORTANT: Make sure you dispense ALL the diluent. 7. Remove the dropper from the bottle. DO NOT discard the dropper. Replace the cap first and gently swirl the bottle to dissolve the quality control. Do not shake or invert the quality control. Make sure that all control material is completely dissolved before you test it. 8. Use the reconstituted quality control within 30 minutes from the time the diluent is added. PROCEDURE—Liquid Quality Control Testing 1. Place the meter on a flat surface, free of vibrations. Or hold it in your hand so it is roughly horizontal. Do not move the meter during testing. 2. When you are ready to test, remove one test strip from the container and immediately close the container. Make sure it seals tightly. IMPORTANT: Do not open a container of test strips or touch a test strip with wet hands or gloves. This may damage the test strips. 22 3. Use the test strip within 10 minutes of removing it from the container. Otherwise, you may get an error message and you will have to repeat the test. 4. Hold the test strip so the lettering is facing upward. 5. Slide the test strip into the test strip guide in the direction indicated by the arrows. 6. Slide the test strip as far as you can into the meter. This turns the meter ON. A beep tone indicates that the meter has detected a test strip (provided the beeper is turned on in the settings). • For alternative ways of turning on the meter, please refer to the CoaguChek XS Plus System User Manual. 7. Check the battery level. If there are no bars left in the battery symbol, you cannot perform any more tests. 8. Check that the date and time are correct. Correct any wrong entries as described in Meter setup/Setting the date of the CoaguChek XS Plus System User Manual. 9. Touch CONTROL TEST. 10. The meter automatically checks to see if you have the right test strip code chip. The threedigit code on the test strip container must match the number on the test strip code chip before the test can be run. 11. If you are using a new test strip lot and have not inserted the test strip code chip yet, you must do so now. 12. Select the code already stored for your current control solution, or touch NEW CODE to use a new control solution. Note: When you first run your control, the QC TEST screen will not display. This screen will display the next time you use the control. 13. If you are using a new control solution, remove the code chip from the meter and insert the code chip that came with the control solution instead. 14. Select level for this control test measurement. (L1 or L2) 15. The hourglass symbol shows that the test strip is warming up. 16. The dropper symbol flashes to indicate that the meter is ready to perform the test and is waiting for the control solution to be applied. A 180second countdown begins. • You must apply the control sample within this time. Otherwise, you will receive an error message. 17. When the meter is ready for the sample, gently swirl the control bottle once or twice to mix the control solution. DO NOT mix the solution with the dropper. 18. Draw control solution into the dropper and put one drop of the liquid on the top of the target area (clear area of the test strip). DO NOT add 23 more control. DO NOT touch or remove the test strip while the test is in progress. 19. The flashing dropper symbol changes to an hourglass symbol when the meter detects a sufficient sample. You hear a beep tone when you have applied enough control solution (provided the beeper is turned on). The dropper symbol disappears and the test starts. 20. You must WAIT for results—this takes about one minute. 21. The result of the quality control is displayed. It is automatically saved to memory. 22. The acceptable range of results for the liquid control is displayed below the current result. 23. If any control remains in the dropper after you dose the test strip, return the remaining control material to the control bottle. Save extra control until after the test result is obtained, in case the control test needs to be repeated. 24. Record the result. After you verify the validity of the control result, discard the test strip, dropper and the reconstituted bottle of quality control. 25. If the quality control test fails, an up arrow (too high) or down arrow (too low) flashes on the display. 26. If you need to repeat a test, use a new test strip. 27. Remove the quality control code chip and store it with the opened box of controls. Reinsert the test strip code chip if necessary. 28. Turn the meter OFF. 24 Calibration and Calibration Verification PURPOSE The following policy provides information on calibration for the CoaguChek XS Plus System. Definitions: Calibration is the process of “setting” the instrument to provide correct answers. This is usually done by analyzing known standards supplied by the manufacturer. Linearity testing defines the limits of accuracy, which is known as the reportable range. This is usually tested with another series of known standards with a wide range of values. Calibration verification was introduced by CLIA ’88 and is defined as, “The assaying of calibration materials in the same manner as patient sample to confirm that the calibration of the instrument, kit, or test system has remained stable throughout the reportable range for patient test.” (CFR 42 Section 493.1217). This calibration verification process determines the reportable range so it replaces the concept of linearity testing. POLICY—Calibration and Calibration Verification CoaguChek XS Plus System users are already in compliance with CLIA ’88 calibration requirements because the code chip supplied with each box of test strips automatically calibrates the meter for that particular lot of strips. The code chip provides specific performance characteristics information to the meter so it is calibrated for use with its corresponding specific lot of test strips and controls. • The manufacturer establishes the performance characteristics based on testing of specimens from donors on warfarin therapy. Each code chip is verified to show that it will produce expected results. In addition, every time the meter is turned on, it goes through a series of self-diagnostic checks. • Roche Diagnostics tests extensively to be sure calibration data provides analytical values that correspond to established reference methods. The CoaguChek XS Plus System calibration is traceable to the WHO International Reference Preparations. • The CoaguChek XS Plus System cannot be adjusted externally to fit a certain linearity curve. Additional facility policy: (You may add any additional policies and procedures for this facility here.) 25 Evaluation Protocol (Optional) PURPOSE The following policies and procedures provide information on this facility’s evaluation protocol for accuracy and precision using method comparison and liquid controls. POLICY—Evaluation Protocol • If desired, or if required by an accreditation agency, verify the performance specifications of the CoaguChek XS Plus system • If an evaluation is performed, results must meet the standards of the facility. In this facility: Acceptable precision (%CV) is ____________ . Acceptable mean bias in INR for method comparison is ______ . POLICY—Testing Precision Using Liquid Controls • A within-run precision study can be performed using 20 control samples (ten of Level 1 and ten of Level 2, tested on the CoaguChek XS Plus meter with test strips from the same lot). • Before testing, set the meter to report the results in both INR and Seconds. • Because the meter does not report liquid control results in seconds, it is necessary to run the precision study as patient samples in order to report in seconds. You have the option of storing them with a unique ID that distinguishes them from actual patient results in the meter’s memory (e.g. 123ABC). In addition, the letter “C” will appear after the number to distinguish it as a control. • All results obtained from each QC run must be within the specified acceptable QC range. Refer to the QC range for the specific lot of controls that are being tested. • Any QC out of range should be repeated to confirm the result. • Use a new vial of control solution for each precision test unless you are dosing multiple meters at the same time. • Acceptance Criteria: %CV is less than or equal to the total CV published in the package insert for the control level (1 or 2) you are using. Each QC result must be within the assigned range. (See instructions below for Steps to Calculate QC Precision.) 26 PROCEDURE—Testing Precision Using Liquid Controls 1. Set the meter to report the results in INR and SEC (seconds). 2. Prepare the controls according to Preparing the Control procedure in the Quality Control Testing section. 3. Slide the test strip as far as you can into the meter. This turns the meter ON. A beep tone indicates that meter has detected a test strip (provided the beeper is turned on in the settings). 4. Prepare the CoaguChek XS Plus meter and log on according to Testing a Patient Sample procedure. 5. Touch PATIENT TEST. 6. The meter automatically checks to see if you have the right test strip code chip. The 3-digit code on the test strip container must match the number on the test strip code chip before the test can be run. 7. The hourglass symbol shows that the test strip is warming up. 8. The test strip and blood drop symbol flashes to indicate that the meter is ready to perform the test and is waiting for the control solution to be applied. A 180second countdown begins. • You must apply the control sample within this time. Otherwise, you will receive an error message. 9. When the meter is ready for the sample, gently swirl the control bottle once or twice to mix the control solution. DO NOT mix the solution with the dropper. 10. Draw control solution into the dropper and put one drop of the liquid on the top of the target area (clear area of the test strip). DO NOT add more control. DO NOT touch or remove the test strip while the test is in progress. 11. The flashing test strip and blood drop symbols change to an hourglass symbol when the meter detects sufficient sample. You hear a beep tone when you have applied enough control solution (provided the beeper is turned on). The dropper symbol disappears and the test starts. 12. You must WAIT for results—this takes about one minute. 13. The result of the quality control test followed by a “C” is displayed. It is automatically saved to PATIENT RESULT memory. 14. Record the control value in seconds on the Precision Data Log for Liquid Quality Control, which is found in the log sheet section of this manual. 15. Properly discard the used test strip according to this facility’s infection control policy. 16. Run control tests using a new bottle of control solution for each of the remaining Level 1 and Level 2 controls for a total of 10 tests for each level. Record results. 27 17. Properly discard control vials according to this facility’s infection control policy. 18. Calculate the mean, standard deviation, and coefficient of variation (%CV) in seconds. You may use standard calculators or spreadsheet programs for this calculation, or you many use the Steps to Calculate QC Precision section of this manual. PROCEDURE—Steps to Calculate QC Precision 1. Repeat any tests where the QC result was outside the acceptable range. 2. On the Precision Data Log for Liquid QC, calculate and record the mean for Level 1 in Column B. 3. Subtract the mean (Column B) from each value in Column A and record this difference in Column C. 4. Square each difference and record in Column D. 5. Sum the squared differences and record. 6. Divide the sum of the squared differences by the total number of observations. 7. Find the square root of the sum of step 6. Note: This is a pooled standard deviation (SD) that should represent the amount of variability that you would expect between replicates done on the same patient. 8. Divide the SD from step 7 by the mean from step 2. This is the %CV that should represent the amount of variability that you would expect between replicates done on the same patient, expressed as a percentage. Record this value. 9. Repeat steps 1-8 for Level 2 CoaguChek XS Pro PT Controls. 28 POLICY—Method Comparison • Method comparison is not a CLIA requirement for waived test systems, but may be performed in order to compare test results from a new method to a previous method. • Controls must be within acceptable range before running patient samples. Reference method controls must also be within the range specified by the manufacturer or laboratory. • Specimens consist of 40 samples total—30 from patients on warfarin therapy evenly distributed with as broad a PT as possible, and 10 from healthy patients who fit the following criteria: • not on warfarin • nonsmokers • not on aspirin or any other medication that affects clotting time Note: For method comparison, we recommend that no patients whom are on heparin therapy be enrolled in the study. • A minimum of 40 data points is necessary for a correlation study. • CoaguChek XS Plus System results will be compared to a laboratory reference method. Differences in reagents, instruments, and pre-analytical variables can affect PT results. These factors should be considered when comparing different prothrombin time test methods.1 Experience comparing results obtained using the CoaguChek XS Plus System to those obtained using common clinical laboratory reagents shows that the CoaguChek XS Plus System correlates well with the following clinical laboratory reagents: Dade Innovin, Ortho Recomboplastin, and Dade Thromboplastin C+. NOTE: It’s possible other clinical laboratory reagents may not consistently correlate with the CoaguChek XS Plus System as well as the recommended list above. • When performing method comparison testing, it is important to ensure proper technique is followed in testing with both methods. • When the study is complete, please fax results to the attention of Roche Diagnostics Technical Service at 1-800-858-8075. The results will be calculated and returned within three business days. • A reference lab should be certain to follow appropriate PT testing guidelines. Some common sources of error include: Specimen collection: • Incorrect volume, type, or concentration of anticoagulant in the collection tube. The anticoagulant used should be 106 to 109 mmol/L, 3.13% to 3.2% of the dihydrate form of trisodium citrate, buffered or nonbuffered. Other anticoagulants are unacceptable. 29 • Overfill or under fill of collection tubes. Improper filling may interfere with the correct ratio of blood to the sodium citrate dehydrate anticoagulant. • Failure to correct the citrate volume for persons with high (>.55) Hematocrit. 30 Transport, processing, and sample storage: • Specimen storage at incorrect temperature. Specimens should be kept at 15°C to 24°C. • Excessive time between collection and testing. The specimen should be tested within 4 hours of the time of specimen collection. • PT results from both the CoaguChek XS Plus System and the laboratory reference should be reported in the International Normalized Ratio (INR). • The Mean Normal PT (MNPT) for the CoaguChek XS Plus System has been predetermined through the calibration process for all strip lots. The meter automatically gives results in INR based on that calibration. • The reference laboratory will need to establish MNPT for their system before method comparison may begin. The MNPT should NOT be taken directly from the package insert. • Fill out the top portion of the Method Comparison Log before collecting any blood samples. The information for the CoaguChek XS Plus meter and the laboratory instrument is important to assess the correlation, and can help solve problems. • Blood may be applied to the test strip in the following way: • Directly from the finger to the test strip • Dosing the test strip with the CoaguChek Capillary Tubes/Bulbs (REF 11621173001) • Directly from the plastic syringe The following definitions are provided for reference: INR = The patient PT value divided by the MNPT of the lab raised to the power of the ISI. INR = Prothrombin time (PT) in seconds MNPT ISI ISI = The International Sensitivity Index (ISI) is the sensitivity of a prothrombin time system (instrument and thromboplastin). Thromboplastins manufactured today usually list the ISI of each lot for use with optical and electromechanical instruments. Sensitivities of thromboplastins in the U.S. vary from 1.0 - 2.8 ISI.1 Not all optical instruments are identical. There may be some error in assuming an ISI is that of the package insert. Ratio = The ratio of the patient PT value in seconds divided by the mean normal PT. Mean Normal PT (MNPT) = The mean value is derived by testing a minimum of 30 healthy, non-warfarinized patients over a period of several days on a given prothrombin time system. 31 WHO Reference = In 1983, the World Health Organization (WHO) adopted this calibration system and made recommendations for its implementation to allow all thromboplastins of varying sensitivity in any laboratory for oral anticoagulant control to be calibrated against a reference thromboplastin of human brain with an ISI of 1.0.1 PROCEDURE--Method Comparison Using Direct Fingerstick or Capillary Tube Samples 1. Prepare the lancet device according to the manufacturer’s instructions. 2. Perform PT test according to steps outlined in Testing a Patient Sample/ Fingerstick Sample or Using the Capillary Tube. 3. Dispose of all biohazardous material in the appropriate designated biohazard or sharps container. 4. Record the result on the Method Comparison Log along with the initials of the operator. 5. Collect venipuncture supplies. Set aside until needed. 6. Clean the venipuncture site with an alcohol swab and allow it to dry thoroughly. 7. Draw the venous sample using a butterfly collection set (Vacutainer Blood Collection Set 21g #6251) with a 3.2% citrate blue top Vacutainer tube installed (make sure you have the correct adapter on the end of the butterfly tubing.) Fill to the appropriate fill line. Any under filling or overfilling can affect test results. If a tube is not filled correctly, discard and redraw. 8. After filling the Vacutainer tube, remove the tube from the adapter, gently mix the contents and set aside. 9. Send the venous tubes to the lab for testing. Roche Diagnostics recommends testing within four hours. 10. If the venous tubes cannot be tested within four hours, spin the samples according Clinical and Laboratory Standards Institute (CLSI) guidelines. Pipette off the plasma without disturbing the cell layer into an appropriately labeled tube. Your lab may also require the original blue top to accompany the plasma. 11. Record the results from the lab on the Method Comparison Log. Note: For the purpose of this study, it is recommended that any CoaguChek XS Plus System result greater than 4.0 INR be confirmed immediately with another fingerstick from the opposite hand. Record the second result in the comment sections of the Method Comparison Log. 32 PROCEDURE--Performing the Method Comparison Using Venous Blood Note: The venous blood for the CoaguChek XS Plus System must be from the same venipuncture as the blood collected in the 3.2% sodium citrate blue top Vacutainer tube (below) for the laboratory PT reference. Use a butterfly collection set. 1. Prepare venipuncture supplies. Use a butterfly collection set (Vacutainer Blood Collection Set 21g #6251) with a 3.2% citrate blue top Vacutainer tube installed (make sure you have the correct adapter on the end of the butterfly tubing). Set aside until needed. Note: The butterfly collection set should be fitted with the adapter for collection of the venous sample into the Vacutainer tube first. A 3cc plastic syringe should be available for collecting the blood sample for dosing the meter immediately afterward. 2. Clean the venipuncture site with an alcohol swab and allow it to dry thoroughly. 3. Prepare the CoaguChek XS Plus meter and log on according to steps outlined in Testing a Patient Sample. Note: DO NOT obtain sample until the flashing test strip and drop of blood appears on the display. Strip must be used within ten minutes of removing it from the container. 4. Draw the venous sample using a butterfly collection set into the 3.2% citrate blue top Vacutainer tube. Fill to the appropriate fill line. Any under filling or overfilling can affect test results. If a tube is not filled correctly, discard and redraw. 5. After filling the Vacutainer tube, remove the tube from the adapter, gently mix the contents and set aside. 6. While carefully pinching the tubing, remove the adapter and attach the 3 cc syringe and continue to draw the desired quantity of blood. 7. Collect about 1 cc of blood into the syringe. Pinch off the tubing or close the luer lock and remove the syringe. 8. Expel the first four drops of blood from the syringe. Then place one good drop of blood (at least 8 µl) from the syringe directly on the sample target area. 9. Record result on Method Comparison Log along with the initials of the operator. 10. Send the venous tubes to the lab for testing. We recommend testing within four hours. 11. If the venous tubes cannot be tested within four hours, spin the samples according to Clinical and Laboratory Standards Institute 33 (CLSI) guidelines. Pipette off the plasma without disturbing the cell layer into an appropriately labeled tube. Your lab may also require the original blue top to accompany the plasma. 12. Record the results from the lab on the Method Comparison Log. Expected Results The CoaguChek XS Plus System was compared against the Sysmex Analyzer. The following accuracy data was obtained. Accuracy: 811 venous samples were collected from 412 outpatients at three external sites. The INR of each sample was compared to the INR of a venous plasma sample measured on a Sysmex Analyzer using Dade Innovin (ISI = 1.02). The patient clinical conditions included (number of patients): not on warfarin (61), atrial fibrillation (163), valve repair/replacement (44), stroke/TIA (5), DVT (75), pulmonary embolism (22), cardio vascular accident (15), other heart-related disorders (9), other clotting disorders (13), other (5). The results are as follows: Venous Data: Site 1 Site 2 Site 3 N 287 286 238 Slope 1.071 1.091 1.111 Intercept -0.2 -0.1 -0.1 Correlation 0.969 0.975 0.983 All 811 1.090 -0.2 0.974 Accuracy: 822 capillary samples were collected from 413 outpatients at three external sites. Capillary blood samples were assayed on the CoaguChek XS Plus meter with the CoaguChek XS PT Test and venous samples were measured on a Sysmex Analyzer with Dade Innovin (ISI = 1.02). The results are as follows: Capillary Data: Site 1 Site 2 Site 3 N 287 297 238 Slope 1.048 1.071 1.111 Intercept -0.1 -0.1 -0.1 Correlation 0.959 0.974 0.988 All 822 1.075 -0.1 0.972 Recommended therapeutic range There are two recommended therapeutic ranges: a less intense range of 2.0-3.0 INR and a more intense range of 2.5-3.5 INR for patients with mechanical heart valves. 2 The physician determines the appropriate therapeutic range 34 POLICY—Proficiency Testing For a list of current proficiency testing programs, contact your Account Manager or Roche Diagnostics Technical Service at 1-800-428-4674. 35 Limitations of the Method PURPOSE The following are limitations of the CoaguChek XS Plus System. Refer to the CoaguChek XS Plus PT Test Strip Insert for the most current information. LIMITATIONS • The CoaguChek XS Plus System should not be used for patients being treated with any direct thrombin inhibitors –including Hirudin, lepirudin, Bivalirudin and Argatroban. • The CoaguChek XS PT Test uses only fresh capillary or non-anticoagulated venous whole blood. Plasma or serum cannot be used • Use only plastic syringes without anticoagulants or additives. Glass tubes or syringes must not be used. • The blood drop must be a minimum of 8 μL in volume. Low sample volume will cause an error message. • Never add more blood to test strip after test has begun or perform another test using the same fingerstick • When a patient is on intravenous infusion therapy, do not collect sample from arm receiving the infusion line. • Hematocrit ranges between 25-55% do not significantly affect test results. A “c” by patient test result may indicate hematocrit outside range. HCT should be checked. • Testing performed with the following in vitro spiked samples or native blood samples (Triglycerides) indicated no significant effect on test results: • Bilirubin up to 30 mg/dL • Lipemic samples containing up to 500 mg/dL of triglycerides • Hemolysis up to 1000 mg/dL • The results are unaffected by heparin concentrations up to 0.8 U/mL. • The CoaguChek XS PT Test is insensitive to low molecular weight heparins (LMWH) up to 2 IU anti-factor Xa activity/mL. • Clopidogrel up to 20 mg/dL • Fondaparinux up to 5 mg/L • The presence of anti-phospholipid antibodies (APAs) such as Lupus antibodies (LA) can potentially lead to prolonged clotting times, i.e., elevated INR values. A comparison to an APA-insensitive laboratory method is recommended if the presence of APAs is known or suspected.3 • In rare cases, patients with long clotting times (>8 INR) may receive an error message on the meter display. If this error message appears again when the test is repeated, the result must be checked using another method. 36 Cleaning the Meter PURPOSE The following policies and procedures provide instructions for cleaning and disinfecting the CoaguChek XS Plus meter. POLICY—Cleaning and Disinfecting the Meter • It is important to keep the meter clean. Clean the meter whenever it looks dirty, or if you prefer, clean on a regular schedule. • In this facility the meter is cleaned ________________________ . • Check the test strip guide regularly for signs of soiling. If the test strip guide has become soiled with blood or any other material, you must clean this area. • In this facility the test strip guide is cleaned_________________ . • Follow the procedures outlined below to clean and disinfect the meter. Failure to follow these procedures may cause malfunction of the meter. o Do not use sprays of any sort. o Ensure that swab or cloth is only damp, not wet. Wear disposable gloves when cleaning and performing preventive maintenance. • • Follow this facility’s infection control policy when cleaning and performing preventive maintenance. • The CoaguChek XS Plus meter may potentially be infectious. It should therefore be decontaminated before disposal. 37 PROCEDURE - Cleaning/disinfecting the meter housing (the exterior of the meter) • Use only the following items for cleaning/disinfecting the CoaguChek XS or CoaguChek XS Plus meter housing for a contact time of >1 minute: o 70% isopropyl alcohol o 10% Sodium hypochlorite solution (1 part bleach to 9 parts deionized water, made fresh every 24 hours) o NOTE: Do not use any other disinfectants/cleaning solutions on the meter housing. • Ensure that the blue test strip guide cover remains tightly closed while cleaning the housing. 1. With the meter powered off, wipe the meter’s exterior clean. • Apply cleaning agent for a contact time of >1 minute (refer to the corresponding product labeling • Do not let liquid accumulate near any opening. Make sure that no liquid enters the meter. 2. With a lint-free tissue, dry the meter. • Wipe away residual moisture and fluids after cleaning the housing. • Ensure the meter is completely dry before performing a test. 38 PROCEDURE - Cleaning/disinfecting the meter test strip guide • • Use only 70% isopropyl alcohol or 10% bleach to clean and disinfect the CoaguChek XS or CoaguChek XS Plus test strip guide. Do not use any other cleaning/disinfecting solutions on the test strip guide. Use of other cleaning/disinfecting solutions could result in damage to the meter. 1. With the meter powered off, use your thumbnail to open the cover of the test strip guide by pressing its front edge upward. Move the cover safely away from the meter. Then rinse the cover with water or wipe it clean. 2. To clean the test strip guide: • Hold the meter upright with the test strip guide facing down • Clean the easily accessible areas with a cotton swab o Ensure the swab is only damp, not wet. o Apply cleaning agent for a contact time of >1 minute (refer to the corresponding product labeling o Wipe away residual moisture and fluids. Caution: Do not insert any objects into the test strip guide. Doing so could damage the electrical contacts behind the test strip guide. 3. Let the inside of the test strip guide dry for at least 10 minutes. 4. Close the test strip guide cover and make sure it snaps into place. 39 Recommendations for Operator Certification/Recertification PURPOSE The following policy provides recommendations for operator certification and recertification to perform tests using the CoaguChek XS Plus System. POLICY—Recommendations for Operator Certification and Recertification • All operators should be certified to perform tests using the CoaguChek XS Plus System. Additional Facility policy On the following lines, write in or insert your facility’s policy for performance and documentation of operator certification and recertification. 40 References 1 Loeliger EA, van den Besselaar AMHP and Lewis SM., “Reliability and Clinical Impact of the Normalization of the Prothrombin Times in Oral Anticoagulant Control.” Thromb Haemostas, 1985; 53: 148154. 2 Hirsh J MD FCCP Chairman, et al, “Oral Anticoagulants Mechanism of Action, Clinical Effectiveness, and Optimal Therapeutic Range.” Chest.1995; 108(4): 231S-246S. 3 Moll S and Ortel TL. “Metering Warfarin Therapy in Patients with Lupus Anticoagulants.” Annals of Internal Medicine 1997; 127: 177185. 41 OPERATOR IN-SERVICE CURRICULUM Introduction In-service training In-service training with small groups is often the best way to provide initial instruction and practice when teaching staff to perform PT tests. Whenever possible, make in-services mandatory. Curriculum The following curriculum outline is provided to help you develop a CoaguChek XS Plus System in-service program for your facility. Support materials A Knowledge Test, Skills Checklist, and Training Certificate are included in the last section of this manual for documenting proficiency in PT testing. Class guidelines The following guidelines have been developed to help you plan training time and determine class size. Optimal conditions are particularly important for the practice portion of the training. It is critical that there be sufficient space, time, and one-on-one coaching during this part of the training session. Training facilities Training facilities should be free of distractions and should have adequate space for operators to take notes, to practice with the meters, and to see the video screen. If you are planning to use an overhead projector, make sure there is sufficient space for it, too. Scheduling The suggested training time is two hours. This may be a single session or two onehour sessions--an educational session and a practice session. Coordinate the in-service with a staff meeting or provide a weekend session for staff training. It is important to allow plenty of time for operators to practice the testing procedure and to ask questions. Class size In-service classes should be small so that each operator can receive individual attention during the practice session if needed. Instructors The instructor may be a Roche Diagnostics account manager/trainer, a nursing supervisor or quality assurance nurse, or another designated individual who has been trained on the CoaguChek XS Plus System. It may be helpful to have one or more assistants, especially during the practice session. They can answer any questions and help complete the Skills Checklist, allowing the in-service leader to maintain class momentum. 42 Training Materials Introduction Roche Diagnostics has developed several materials specifically for you to use in training operators to test with the CoaguChek XS Plus System. Repeated exposure to a consistent message and hands-on practice are keys to successful training. Available materials You may copy selected training materials for class distribution or to make transparencies to facilitate discussion. Appropriate materials include the class outline and key sections of the CoaguChek XS Plus System User Manual. It is strongly recommended that you utilize the training materials listed below in your in-service session: • CoaguChek XS Plus System Training DVD. This program runs approximately 15 minutes, provides step-by-step instructions for setting up the meter, preparing for and performing a blood test, and cleaning the meter. This DVD is intended to be the basis of the training session. • CoaguChek XS Plus System User Manual. This is a reference guide for CoaguChek XS Plus operators. During training, familiarize the operators with its content and structure. • CoaguChek XS Plus System Getting Started Guide. This is an easy resource for operators. During the in-service, familiarize the operators with its contents and structure. • Package Inserts. The test strips, controls, and lancet devices all have informative package inserts with information about proper storage and use. During the in-service, familiarize the operators with their contents and structure. Customized materials You may wish to develop customized training materials for your facility. You may develop these materials as handouts, flip charts, or transparencies. Ordering training materials To order additional copies of these training materials, or to make comments or suggestions about the training materials, contact Roche Diagnostics Technical Service at 1-800-428-4674. 43 Supplies Introduction Before beginning each training session, make sure that you have all the necessary supplies and that all equipment is operational, including the individual meters. System supplies You should have at least one complete set of CoaguChek XS Plus System supplies for demonstration purposes. • CoaguChek XS Plus meter • 4 AA batteries • CoaguChek XS PT Test, including: CoaguChek XS PT Test strips, code chip, and CoaguChek XS Plus PT Test Strip Insert • CoaguChek XS Pro PT Controls and package insert • CoaguChek Capillary tubes and bulbs for capillary samples (optional) • Anticoagulant-free plastic syringes and needles for venous samples (optional) • Supplies for drawing venous samples (optional) • Approved cleaning supplies as listed in the user manual • CoaguChek XS Plus System User Manual and Getting Started Guide • CoaguChek XS Plus System Policies and Procedures Manual Note: Before the in-service begins, program the meter with the time, date, and result format (INR, INR/ seconds, or INR/% Quick). Medical supplies Have sufficient medical supplies for each operator and for demonstrations. • CoaguChek Lancet or other lancet device • Biohazard waste and sharps containers • Alcohol wipes • Cotton balls or tissue • Disposable gloves 44 Teaching supplies Organize your teaching supplies and test all electronic equipment before the inservice begins. You need: • CoaguChek XS Plus System Training DVD • DVD player • Copies for each operator of: Class outline, Skills Checklist, Knowledge Test, Certificate of Completion, the Error Messages section and other key sections of the CoaguChek XS Plus System User Manual • A pen or pencil for each operator • OPTIONAL: An overhead projector and transparencies of: • Class outline • Customized materials (copies of your facility’s quality control, maintenance, and patient result logs) 45 Class Orientation Introduction Familiarizing class members before training with the CoaguChek XS Plus System can greatly enhance the effectiveness of the in-service session. They will know what to expect and what is expected of them. Providing class members with the opportunity to ask questions before the training begins can alleviate any unnecessary concerns for them. Class outline This outline was developed to provide a clear structure for the class. If training is conducted in two separate sessions, you may wish to amend the outline to reflect the activities for Day One and Day Two. Outline This outline will help your operators know what to expect and help you know how to pace the class. You may wish to distribute it as part of your introduction. Topic Introduction and overview CoaguChek XS Plus System Training DVD Test kit, meter and components Operating guidelines Performing the test • Setting up the system • Preparing for the test • Collecting a sample • Applying the sample • Reading, responding to, and recording results • Practicing and confirming Liquid quality control testing Cleaning the system Troubleshooting Knowledge Test Q&A Conclusion • Follow-up information • Certificate of Completion Time to present 5 min. 15 min. 10 min. 5 min. 35 min. 15 min. 5 min. 5 min. 10 min. 5 min. 5 min. 46 Introduce the class At the onset of any in-service session, it may be helpful if you review what operators will learn, what will be expected of them, and how they will be evaluated. Action plan The action plan contains the key points you should include in your introduction. 1. Ask each operator to sign in as they enter the room. 2. Begin the class by introducing yourself and your assistants, and asking your operators to introduce themselves. 3. Explain the importance of regular PT testing. 4. Review the outline for the training session. 5. Review the criteria for completing the course: • Skills Checklist • Knowledge Test 6. Show operators the Certificate of Completion. 7. Ask for questions. Training DVD Introduction • The CoaguChek XS Plus System Training DVD provides an overview of the system, setting up the meter, running controls, testing procedure, and maintenance. These topics will be covered in depth during the remainder of the training session. • Show the CoaguChek XS Plus System Training DVD. • When the DVD is over, ask for questions. Address any concerns that will not be explicitly covered in class. If operators ask questions about material that will be covered, respond briefly, and assure them that they will get a detailed answer later. 47 Understanding the System Introduction Before learning to perform tests with the CoaguChek XS Plus System, operators should be familiar with the components and operating conditions. CoaguChek XS Plus System Care Kit components This chart supplies a description of each component of the CoaguChek XS Plus System. Review the Care Kit components. Component Description CoaguChek XS Plus meter A portable coagulation meter for prothrombin time testing. Power adapter and 4 AA batteries The meter’s power source options. CoaguChek Lancets with instructions Devices used to obtain fingerstick blood sample for testing. CoaguChek XS Plus Training DVD A DVD that provides an overview of the system. CoaguChek XS Plus System User Manual A detailed resource manual for CoaguChek XS Plus System operators. CoaguChek XS Plus System Getting Started Guide A resource of key information for CoaguChek XS Plus System operators. CoaguChek XS Plus System Policies and Procedures Manual A detailed operational guide for evaluation and use of the CoaguChek XS Plus System. Warranty card Must be filled out and mailed to register the CoaguChek XS Plus System with Roche Diagnostics. 48 CoaguChek XS Plus Meter Elements This chart supplies a description of each element of the CoaguChek XS Plus meter. Show each of the following elements on an actual meter: Top Description Code chip slot Insert code chip here Connection socket for Plug in the power adapter here power supply unit Contacts for optional Charges battery pack when connected to base unit base unit Infrared interface Used for data communication Front Touch screen ON/OFF button Test strip guide Test strip guide cover Back Battery cover Battery cover tab Roche Diagnostics Technical Service Center 1-800-428-4674 Description Shows results, information, symbols and results recalled from memory. To select any of the screen prompts, touch the prompt lightly, holding until the prompt is selected. Press and hold until the meter turns on or off. Insert test strip here. Remove to clean the test strip guide. Description Covers the battery compartment (4 AA batteries or rechargeable battery pack). Press tab to slide cover off. Call for technical service 24 hours a day, 7 days a week. CoaguChek XS PT Test Strip This chart supplies a description of each component of the CoaguChek XS PT Test strips. Show each of the following components: Component Description CoaguChek XS PT Test Provides a platform for the blood and reagents to strip react. Target area of the test Apply blood sample here. strip CoaguChek XS PT Test Calibrates the system for each new box of test strip code chip strips. CoaguChek XS Plus PT Provides important reference material on how to Test Strip Insert use and store the test strips. 49 CoaguChek XS Pro PT Controls (If applicable for your facility) This chart supplies a description of each component of the CoaguChek XS Pro PT Controls. Show each of the following components: Level 1 and Level 2 Made available to assist with regulatory quality control plasma compliance requirements as applicable to this facility. Diluent-filled droppers Used for mixing and applying control solutions. Quality control code Code chip tells the meter the acceptable ranges and chip expiration dates for each box of controls. 50 Reviewing Operating and Storage Conditions Introduction To ensure accurate test results, operators must be aware of the proper operating conditions for the CoaguChek XS Plus System. They must also be careful to store test strips in the appropriate environmental conditions. Note: Stress the importance of this information. Be certain that operators understand that test results may not be accurate if they do not strictly adhere to these conditions. Meter operating conditions The meter should be operated: • At temperatures between 59°F and 90° F (15°C and 32°C). • Within 10% to 85% relative humidity without condensation. • In artificial light or indirect sunlight. (Avoid bright sunlight.) • On a flat, level surface, free of vibrations. • At altitudes no higher than 14,000 feet (4,300 meters). • Away from strong magnetic fields, such as a microwave oven. This may interfere with the meter’s proper operation. Test strip conditions • Store the test strips in their container with the cap tightly closed. • Do not freeze test strips. Store the test strips at room temperature or in the refrigerator (2°C to 30°C or 36°F to 86°F). • When stored properly, the test strips can be used up until the expiration date printed on the test strip container. Dispose of the test strips if they are past their “Use By” date. Liquid control storage and handling • For in vitro diagnostic use. Do not take internally. • Exercise the normal precautions required for handling all laboratory reagents. • Store controls in refrigerator at 36°F to 46°F (2° to 8°C) DO NOT FREEZE. • Unopened, lyophilized controls that are stored in the refrigerator are good until the expiration date. • Discard any outdated controls. • Controls are stable for 30 minutes after adding the diluent. Package literature Show operators where to find this information in the package inserts and User Manual. 51 Setting Up the System Introduction At this point, operators should be familiar with the components. Now it is time for them to learn how to use the system. You should spend most of the class time on this section. Before the CoaguChek XS Plus System can be used. The meter must be set up. It needs to have batteries inserted. It needs to be calibrated by inserting a code chip, and set–up options need to be selected. Power source The CoaguChek XS Plus meter can operate with either the power adapter provided or a special rechargeable battery pack. The CoaguChek XS Plus meter uses four AA batteries. The recommended batteries, alkaline-manganese batteries, should last for approximately 60 tests depending on the type of battery used. When you turn the meter on, the display shows the battery symbol. The battery symbol is divided into four segments. With new, fresh batteries in the meter, the battery symbol shows all four segments. When only one segment appears, replace the batteries. When only one segment appears you can still access results stored in the meter’s memory. If you insert new batteries within 10 minutes of removing the old batteries, the date and time settings will remain in memory. But if you do need to reset the date and time, refer to the Meter Setup section in the CoaguChek XS Plus System User Manual. To save battery power, the CoaguChek XS Plus meter has the option to turn itself off, based on your set up selections, unless a screen prompt has been pressed or a new test strip has been inserted. Even when the batteries are removed, the test results are saved in memory. Battery placement Operators should follow these steps to install the batteries. 1. With the meter OFF, press the battery compartment cover release tab and slide cover off. 2. Insert four (4), AA batteries as indicated by the diagram inside the battery compartment. 3. Slide the battery compartment cover back onto the meter and close it Practice Operators should practice inserting and removing the batteries under supervision. Skills checklist While operators practice, complete the appropriate portion of the Skills Checklist. Package literature Show operators where to find this information in the User Manual. 52 Test Strip Code Chip Definition Each box of test strips comes with its own code chip. The code chip provides the meter with information such as the lot number and expiration date of the test strips. Matching to test strip Have operators follow these steps to match the code chip to the test strip. 1. Before each test, make sure the correct code chip is in the meter. 2. The 3-number code on the test strip container must match the 3-number code on the code chip. 3. To install the code chip, follow the instructions below. Have the code chip ready. Inserting the code chip Have operators follow these steps to insert the test strip code chip. 1. Be certain the meter is OFF. 2. Remove the old code chip if there is one in the meter. Store the code chip with the appropriate strip lot. 3. Insert the code chip into the code chip slot with the printed side facing UP until it snaps into place. 4. Power the meter on. • Always compare the code number you see on the display with the number that is printed on the test strip container you are using. If the two code numbers do not match, insert the correct code chip in the slot in the meter. • If the code chip is missing or incorrectly inserted, error messages appear in the display. (Please refer to Error Messages in the CoaguChek XS Plus System User Manual.) Practice Operators should practice inserting the code chip under supervision. Skills checklist While operators practice, complete the appropriate portion of the Skills Checklist. Package literature Show operators where to find this information in the User Manual. 53 Set-up Options Introduction The CoaguChek XS Plus System has several programming options. The meters are preset with recommended formats. Recommended formats may be altered, and these procedures may be reviewed at this in-service at your discretion, though specific in-service guidelines have not been provided. If necessary, refer to Meter Set up in the CoaguChek XS Plus System User Manual. Result formats The meter has three display options for primary results units: • International Normalized Ratio (INR) • INR and Seconds (SEC) • INR and % Quick INR INR units are calculated from a mathematical formula that is designed to compensate for differences in reagents, thereby standardizing PT results from different systems. The CoaguChek XS Plus meter performs INR calculations automatically. The formula is as follows: INR = (PT result/Mean normal PT)ISI ISI = International Sensitivity Index. This is a numerical value assigned to the reagent used in the test strip. Seconds (SEC) This displays the length of time, in seconds, that a blood sample takes to coagulate (PT time). % Quick (%Q) This unit of measure is used primarily by European health care providers. Package literature Show operators where to find this information in the User Manual. 54 Preparing for the Test Introduction Gather supplies and make the following preparations prior to conducting the test. This section will review the steps required to perform a capillary fingerstick. If your facility will be performing venous draws, you may want to address that information in this section too. Supplies The following supplies are needed to perform the fingerstick test: CoaguChek XS PT Test strip Correct CoaguChek XS PT Test strip code chip CoaguChek Lancet or other lancet device CoaguChek XS Plus Meter Alcohol wipes Cotton balls or tissue Bandages CoaguChek Capillary Tubes/Bulbs (optional, REF 11621173001) Disposable gloves Preparation Review the steps necessary to prepare for the test: 1. Explain the purpose and steps of the testing procedure to reassure the patient. 2. Wash your hands and put on disposable gloves prior to testing. 3. Prepare lancet device according to manufacturer’s instructions. Set it aside until finger puncture is needed. 4. If using the CoaguChek Capillary Tubes/Bulbs, prepare capillary collection device by firmly inserting the capillary tube into the capillary bulb. Set aside until needed. 5. Warm the hand. Have the patient hold it under his or her arm, use a hand warmer, or wash with warm water. 6. Have the patient let that arm hang down by his or her side before lancing a finger. 7. Massage the finger from its base 8. Clean the selected finger with alcohol wipe or use soap and warm water. Allow to air dry completely. 9. When the meter displays the flashing test strip and blood drop symbols, with the hand still down, stick the side of finger with a lancet. • DO NOT WIPE AWAY THE FIRST DROP OF BLOOD. • DO NOT puncture the finger until the flashing test strip and blood drop symbol appears on the meter screen. 55 10. Immediately after lancing, massage gently along the side of the finger to obtain a good blood drop without pressing or squeezing too hard. 11. While the flashing test strip and blood drop symbols are flashing on the display, apply the first drop of blood (within 15 seconds) as outlined in Testing a Patient Sample(below). • Hold the blood drop to the strip until the meter beeps (provided beeper is set to ON). • DO NOT apply a second drop or disturb the strip while testing. 12. If using the CoaguChek Capillary Tubes/Bulbs, touch the capillary tube to the blood drop. Keep tube level and allow it to fill halfway by capillary action. Put finger over hole in the capillary bulb. Hold capillary tube directly over sample target area. Apply the sample within 15 seconds of the puncture. Note: Avoid getting air bubbles into the sample. Do not touch the bulb during sample collection. If blood gets into the capillary bulb during sample collection, discard the bulb. Package literature Show operators where to find this information in the User Manual and Getting Started Guide. 56 Testing a Patient Sample Introduction Getting a clean, sufficient sample is critical to the success of the fingerstick test. The following instructions will help you guide your operators in collecting their samples and running a patient test. Testing a patient sample Review the necessary steps for collecting and testing a fingerstick blood sample. 1. Prepare the lancet device according to the manufacturer’s instructions. 2. Place meter on a flat surface, free of vibrations. Or hold it in your hand horizontally until you see the test result. Do not move the meter around during testing. 3. Take a test strip out of the container. Close the container tightly. 4. Hold the test strip so the lettering is facing upward. 5. Slide the test strip into the test strip guide in the direction indicated by the arrows. 6. Slide the test strip in as far as it will go. This turns the meter ON. A beep tone indicates that the meter has detected the test strip (provided the beeper is turned on in the settings). • For alternative ways of turning on the meter, please refer to the CoaguChek XS Plus System User Manual. 7. Check the battery level. If there are no bars left in the battery symbol, you cannot perform any more tests. 8. Check that the date and time are correct. Correct any wrong entries as described in the CoaguChek XS Plus System User Manual. • If a lockout (OP or QC Lockout) is displayed instead of PATIENT TEST, you must run a quality control before you can perform a test. (Refer to Quality Control Testing.) When the meter is in lockout status, a test cannot be performed. 9. Enter your operator ID (if required). See CoaguChek XS Plus System User Manual for information on Operator lists. 10. Touch [OK] to log on and move to the main menu. 11. Touch PATIENT TEST. 12. Select or enter Patient ID (if required). See CoaguChek XS Plus System User Manual for information on Patient ID and Patient lists. 13. Touch [OK]. An hourglass symbol indicates the test is warming up. 14. Confirm that the code number displayed on the meter matches the number on the test strip container. 57 • If the numbers are different, insert the correct code chip that came with the test strips you are using. 15. The blood drop symbol flashes to indicate that the meter is ready to perform the test and is waiting for blood to be applied. The 180-second count down begins. • DO NOT obtain sample until the flashing drop of blood appears on the display. Strip must be used within ten minutes of removing it from the container. 16. Identify the sample target area on the test strip. 17. Collect the fingerstick blood sample as outlined below. • Fingerstick sample – DO NOT wipe away the first drop of blood. Apply the first drop of blood to the top or side of the target area within 15 seconds of puncture. Hold the blood drop to the test strip until you hear a beep (provided the beeper is set to ON). • Using the Capillary Tube – Touch the CoaguChek Capillary tube to the blood drop. Keep tube level and allow it to fill halfway by capillary action. Put finger over hole in the capillary bulb. Hold capillary tube directly over sample target area and expel sample within 15 seconds. Note: Use the first drop of capillary blood. Avoid getting air bubbles into the sample. 18. Apply the blood directly to the semicircular, transparent sample application area of the test strip. Note: DO NOT add more sample. DO NOT touch the test strip or move the meter until the result is displayed. 19. You hear a beep tone when you have applied enough blood (provided the beeper is turned on). The blood drop symbol disappears and the test starts. 20. The meter performs an automatic quality control test on the test strip before it displays the test result. “QC” appears in the display. 21. Following a successful outcome of the quality control test, a check mark appears after “QC.” 22. You must WAIT for results—this takes about one minute 23. The result is displayed in the unit of measure you chose when setting up the meter. It is automatically saved to memory. 24. Read and record results. 25. After the test results are displayed, a strip and arrow symbols appear on the screen, prompting you to remove the strip. 26. Remove the test strip from the measurement chamber. 27. Turn meter OFF. 58 28. Dispose of all biohazardous material in the appropriate designated biohazard or sharps container. Note: Use a new fingerstick from the opposite hand and a new test strip if you must retest. DO NOT add more blood to the first test strip. Infection control Operators assisting with the testing procedure should wear disposable gloves and wash hands thoroughly to prevent contact with the blood sample. Package literature Show operators where to find this information– including universal precautions – in the CoaguChek XS Plus System User Manual and the Getting Started Guide. Reading Results Results appear on the meter’s display immediately after the test. They are also stored in the meter’s memory. 59 Patient Test Results stored in memory The CoaguChek XS Plus meter has a 2,500-value memory for saving results (i.e., 2,000 patient tests and 500 liquid quality control tests) along with the time and date. If the memory is full when you perform a test, the oldest result is automatically deleted. The most recent result is always saved. In addition, the meter stores up to 60 code chip records (contents of the test strip code chips and control solution control chips). Recalling patient test results stored in memory Review the following steps to recall patient test results that are stored in memory. 1. Place the meter on a level, vibration-free surface or hold it in your hand so it is roughly horizontal. Turn the meter on by pressing the ON/OFF button. 2. Wait until the main menu is displayed. 3. Touch MEMORY. 4. Select PATIENT RESULT. Display patient result memory Review the following steps to display all test results for patients, sorted chronologically or by patient ID. 1. Touch the up arrow or down arrow to display the entry of choice. 2. Touch the entry you want to open. The entry is displayed. When you touch the Individual symbol, results for the selected patient are displayed. Package literature Show operators where to find this information in the User Manual. 60 Responding to Results Target results The physician determines the best PT level for the patient depending on the reason for anticoagulant treatment and how each individual responds to treatment (based on prothrombin time). Each physician should establish expected values for his or her patient population or individual patients. < 0.8 INR or > 8.0 INR message A < 0.8 INR or > 8.0 INR message indicates that the test result is outside the measuring range for that lot of test strips. If the < 0.8 INR or > 8.0 INR message appears and test was performed within the Limitations of Procedure as outline in the CoaguChek XS Plus PT Test Insert, repeat the test. If the result is still out of range, follow your facility policy for unexpected results. Any unexpected results Unusual results should always be followed up with an immediate call to the physician or other health care professional. Package literature Show operators where to find this information in the User Manual and the Getting Started Guide. Error messages Review error messages, their causes, and the appropriate action with operators. Package literature Show operators where to find this information in the User Manual. The Skills Checklist asks them to find this information. Recording results Instruct operators to record the PT result on the appropriate documentation log for your facility. A Patient Log is available for use in the last section of this manual. 61 Practicing and Confirming Introduction You have outlined the procedures essential to PT testing with the CoaguChek XS Plus System. Your operators have followed along as you have demonstrated the proper techniques. Now, they need to practice. Practice Operators should practice the entire testing process. Allow ample time for this portion of the session. Each operator should practice running patient samples, reading and recalling results, responding to results, recording results, preparing controls, running controls and responding to control results. Skills Checklist Observe while operators practice. Complete the appropriate portions of the Skills Checklist for each operator. 62 Optional Quality Control Testing Introduction The following procedures provide instructions for performing and documenting liquid quality control testing. Roche Diagnostics has made available optional liquid quality controls for the CoaguChek XS Plus System. These controls are made available to assist with regulatory compliance requirements as applicable to this facility. Preparing liquid controls Review the following steps to prepare the liquid controls. 1. Gather the following • CoaguChek XS Plus meter • CoaguChek XS PT Test strip(s) with matching Test strip code chip • CoaguChek XS Pro PT Controls: Level 1 and/or 2 with matching quality control code chip • Diluent dropper(s): one for each control to be run • Scissors 2. Insert the quality control code chip into the meter. This tells the meter the acceptable ranges for this box of controls. 3. Remove the screwcap and rubber stopper from the quality control bottle. Label the bottle with the date and time that you reconstitute it. 4. Using scissors, cut off the tip of the dropper at the end of the stem. Hold the dropper a safe distance from your face. CAUTION: To avoid loss of diluent, hold the dropper by the stem; do not squeeze the bulb of the dropper while cutting the tip. 5. Invert the dropper and place the tip into the bottle. 6. Gently squeeze the bulb to dispense all of the contents of the dropper over the dried material. Do not allow the dropper to touch the dried material. IMPORTANT: Make sure you dispense ALL the diluent. 7. Remove the dropper from the bottle. DO NOT discard the dropper. Replace the cap first and gently swirl the bottle to dissolve the quality control. Do not shake or invert the quality control. Make sure that all control material is completely dissolved before you test with it. 8. Use the reconstituted quality control within 30 minutes from the time the diluent is added. 63 Running a liquid quality control test Review the following steps to perform a quality control test with liquid controls. 1. Place the meter on a flat surface, free of vibrations, or hold it in your hand so it is roughly horizontal. Do not move the meter during testing. 2. When you are ready to test, remove one (1) strip from the container and immediately close the container. Make sure it seals tightly. IMPORTANT: Do not open a container of test strips or touch a test strip with wet hands or gloves. This may damage the test strips. 3. Use the test strip within 10 minutes of removing it from the container. Otherwise, you may get an error message and you will have to repeat the test. 4. Hold the test strip so the lettering is facing upward. 5. Slide the test strip into the test strip guide in the direction indicated by the arrows. 6. Slide the test strip as far as you can into the meter. This turns the meter ON. A beep tone indicates that the meter has detected a test strip (provided the beeper is turned on in the settings). • For alternative ways of turning on the meter, please refer to the CoaguChek XS Plus System User Manual. 7. Check the battery level. If there are no bars left in the battery symbol, you cannot perform any more tests. 8. Check that the date and time are correct. Correct any wrong entries as described in Meter setup/Setting the date of the CoaguChek XS Plus System User Manual. 9. Touch CONTROL TEST. 10. The meter automatically checks to see if you have the right Test strip code chip. The 3digit code on the test strip container must match the number on the Test strip code chip before the test can be run. 11. If you are using a new test strip lot and have not inserted the Test strip code chip yet, you must do so now. 12. Select the code already stored for your current control solution, or touch NEW CODE to use a new control solution. Note: When you first run your control, the QC TEST screen will not display. This screen will display the next time you use the control. 13. If you are using a new control solution, remove the code chip from the meter and insert the code chip that came with the control solution instead. 14. Select level for this control test measurement. (L1 or L2) 15. The hourglass symbol shows that the test strip is warming up. 64 16. The dropper symbol flashes to indicate that the meter is ready to perform the test and is waiting for the control solution sample to be applied. A 180second countdown begins. • You must apply the control sample within this time; otherwise, you will receive an error message. 17. When the meter is ready for the sample, gently swirl the control bottle once or twice to mix the control solution. DO NOT mix the solution with the dropper. 18. Draw control solution into the dropper and put one drop of the liquid on the top of the target area (clear area of the test strip). DO NOT add more control. DO NOT touch or remove the test strip while the test is in progress. 19. The flashing dropper symbol changes to an hourglass symbol when the meter detects sufficient sample. You hear a beep tone when you have applied enough control solution (provided the beeper is turned on). The dropper symbol disappears and the test starts. 20. You must WAIT for results—this takes about one minute. 21. The result of the quality control test is displayed. It is automatically saved to memory. 22. The acceptable range of results for the liquid control is displayed below the current result. 23. If any control remains in the dropper after you dose the test strip, return the remaining control material to the control bottle. Save extra control until after the test result is obtained, in case the control test needs to be repeated. 24. Record the result. After you verify the validity of the control result, discard the test strip, dropper and the reconstituted bottle of quality control. 25. If the quality control test fails, an up arrow (too high) or down arrow (too low) flashes on the display. 26. If you need to repeat a test, use a new test strip. 27. Remove the quality control code chip and store it with the opened box of controls. Reinsert the test strip code chip if necessary. 28. Turn the meter OFF. Package literature Show operators where to find this information in the User Manual and Getting Started Guide. Expected control values Acceptable CoaguChek XS Pro PT Controls ranges are displayed on the meter when each quality control test is run Results in range If a quality control test result is within the acceptable control range, it is appropriate to proceed with patient testing. 65 Results out-of-range An outofrange result is indicated by an arrow. An arrow pointing up means the result is too high. An arrow pointing down means the result is too low. To resolve outofrange results or error messages, check for the following: • Controls may be expired or stored improperly. • The control may not have been used within 30 minutes of reconstitution. • You may not be doing the test correctly. Repeat the control test, using a new test strip. Carefully follow the instructions in the User Manual. • Make sure you run the test within 10 minutes of removing the test strip from its container. If you follow all these guidelines and your results are still unacceptable, call Roche Diagnostics Technical Service at 18004284674. 66 Control Test Results stored in memory The CoaguChek XS Plus meter has a 500 liquid quality control test memory, along with the time and date. If the memory is full when you perform a test, the oldest result is automatically deleted. The most recent result is always saved. In addition, the meter stores up to 60 code chip records (contents of the test strip code chips and control solution control chips). Recalling control test results stored in memory Review the following steps to recall control test results that are stored in memory. 1. Place the meter on a level, vibration-free surface or hold it in your hand so it is roughly horizontal. Turn the meter on by pressing the ON/OFF button. 2. Wait until the main menu is displayed. 3. Touch RENEW RESULTS. 4. Select QC RESULT. Display liquid QC (Quality Control) memory Review the following steps to display all the quality controls that were run, sorted chronologically. The most recent results are at the top of the list. 1. Touch the up arrow or down arrow to display the entry of choice. 2. Touch the entry you want to open. The entry is displayed Practice Operators should practice running liquid control tests under supervision. Skills checklist Observe while operators practice. Complete the appropriate portion of the Skills Checklist. 67 Cleaning the System Introduction As with all equipment, the CoaguChek XS Plus System requires routine cleaning and disinfecting to ensure consistent smooth functioning. Reasons to clean the system It is important to keep the meter clean. Clean the meter whenever it looks dirty, or if you prefer, clean on a regular schedule. Check the test strip guide regularly for signs of soiling. If the test strip guide has become soiled with blood or any other material, you must clean this area. Review your facility’s schedule for cleaning the meter and the test strip guide. The CoaguChek XS Plus meter may potentially be infectious. It should therefore be decontaminated before disposal. POLICY—Cleaning and Disinfecting the Meter Review the following policy for cleaning and disinfecting the meter. • It is important to keep the meter clean. Clean the meter whenever it looks dirty, or if you prefer, clean on a regular schedule. • In this facility the meter is cleaned ________________________ . • Check the test strip guide regularly for signs of soiling. If the test strip guide has become soiled with blood or any other material, you must clean this area. • In this facility the test strip guide is cleaned _________________ . • Follow the procedures outlined below to clean and disinfect the meter. Failure to follow these procedures may cause malfunction of the meter. o Do not use sprays of any sort. o Ensure that swab or cloth is only damp, not wet. Wear disposable gloves when cleaning and performing preventive maintenance. • • Follow this facility’s infection control policy when cleaning and performing preventive maintenance. • The CoaguChek XS Plus meter may potentially be infectious. It should therefore be decontaminated before disposal. PROCEDURE - Cleaning/disinfecting the meter housing (the exterior of the meter) • Use only the following items for cleaning/disinfecting the CoaguChek XS Plus meter housing for a contact time of >1 minute: o 70% isopropyl alcohol o 10% sodium hypochlorite solution (1 part bleach to 9 parts de-ionized water, made fresh every 24 hours) o Note: Do not use any other disinfectants/cleaning solutions on the meter housing 68 • Ensure that the blue test strip guide cover remains tightly closed while cleaning the housing. 1. With the meter powered off, wipe the meter’s exterior clean. • Apply cleaning agent for a contact time of >1 minute (refer to the corresponding product labeling • Do not let liquid accumulate near any opening. Make sure that no liquid enters the meter. 2. With a lint-free tissue, dry the meter. • Wipe away residual moisture and fluids after cleaning the housing. • Ensure all surfaces are completely dry before performing a test. PROCEDURE - Cleaning/disinfecting the meter test strip guide • Use only 70% isopropyl alcohol or 10% bleach solution to clean the CoaguChek XS Plus test strip guide. • Do not use any other cleaning/disinfecting solutions on the test strip guide. Use of other cleaning/disinfecting solutions could result in damage to the meter. 1. With the meter powered off, use your thumbnail to open the cover of the test strip guide by pressing its front edge upward. Move the cover safely away from the meter. Then rinse the cover with water or wipe it clean. 2. To clean the test strip guide: • Hold the meter upright with the test strip guide facing down • Clean the easily accessible areas with a cotton swab o Ensure the swab is only damp, not wet. o Apply cleaning agent for a contact time of >1 minute (refer to the corresponding product labeling o Wipe away residual moisture and fluids. Caution: Do not insert any objects into the test strip guide. Doing so could damage the electrical contacts behind the test strip guide. 3. Let the inside of the test strip guide dry for at least 10 minutes. 4. Close the test strip guide cover and make sure it snaps into place. Package literature Show operators where to find this information in the User Manual. Practice Operators should practice cleaning the system under supervision. 69 Skills Checklist Observe while operators practice. Complete the appropriate portion of the Skills Checklist. Troubleshooting Introduction Occasionally your operators may have problems with testing. Some testing problems can be solved through referencing the User Manual, while other more extensive problems require the help of Roche Diagnostics Technical Service. Error message Most problems may be identified through the error messages shown on the display. The Error Messages chapter of the CoaguChek XS Plus System User Manual details potential causes for each message and appropriate action. Phone help Help is available by calling Roche Diagnostics Technical Service at 1-800-428-4674. Package literature Show operators where to find this information in the User Manual. 70 Concluding the Session Having reviewed and practiced all the procedures with the operators, you are ready to conclude the session. Before awarding the Certificates of Completion, however, it is critical to be certain that everyone is clear on every aspect of self-testing and can perform testing on patient samples and obtain acceptable results. Knowledge Test Introduction The Knowledge Test helps to determine whether operators have understood key concepts and uncovers potential areas of confusion. Procedure At the end of the presentation and practice sessions, have each operator complete the Knowledge Test. 1. Review any areas of confusion with the class. 2. Distribute the tests. 3. Ask operators to complete them. 4. Collect the tests. 5. Use the answer key to score the tests. Passing score Individual instructors determine the criteria for a passing score. Develop a remedial lesson plan for any operators who do not perform adequately on either the Skills Checklist or the Knowledge Test. In some cases, it may be necessary to invite an operator to attend a second class. Certificate of Completion Introduction Each operator who successfully completes the class and passes both the Skills Checklist and the Knowledge Test should be given a Certificate of Completion. Procedure At the end of the session, give each operator who has successfully completed the class a Certificate of Completion. 1. Complete the certificate. 2. Make a copy of the completed certificate. 3. Give the original to the operator, and file the copy with the completed Skills Checklist and Knowledge Test in the operator’s record. 71 Log Sheets Introduction Throughout this manual, we have mentioned forms to be used for documentation and training with the CoaguChek XS Plus System. Originals are provided in this chapter, you may copy them as needed. Forms The following forms are included: • Operator Certification Log — for recording the names of trained CoaguChek XS Plus operators • Instrument Log — for recording the serial numbers of CoaguChek XS Plus meters • Reagent Log — for recording the dates of use, lot numbers, and expiration dates of CoaguChek XS PT Test strips • Patient Test Log — for recording patient results • Quality Control Log and Control Charts—for recording quality control information • Preventive Maintenance Log — for recording the dates on which maintenance is performed • Temperature Log — for recording reagent storage temperatures • Skills Checklist and Performance Evaluation — for evaluating operator skills while testing on the CoaguChek XS Plus System • Knowledge Test — for written documentation of operator competency • Precision Data Log Using Liquid Quality Control—for recording and calculating precision data prior to a correlation study • Method Comparison Log — for recording data obtained for a correlation study 72 Operator Certification Log CoaguChek® XS Plus System Instrument/Test System ___________________________ Date of Initial Certification Operator ID No. Competency Checks Observer/ Reviewer Q1 Q2 Q3 Q4 Q1 Q2 Q3 Q4 © 2013 Roche Diagnostics. All rights reserved. COAGUCHEK is a trademark of Roche. 73 Instrument Log CoaguChek® XS Plus System Location Serial No. Inventory No. © 2013 Roche Diagnostics. All rights reserved. COAGUCHEK is a trademark of Roche. Date Put in Use 74 Reagent Log CoaguChek® XS Plus System Test Strips Date No. of Boxes Received Lot No. Manufacturer’s Exp Date Test Strips Date No. of Boxes Received © 2013 Roche Diagnostics. All rights reserved. COAGUCHEK is a trademark of Roche. Lot No. Manufacturer’s Exp. Date 75 Facility: _________________________________ Patient Test Log CoaguChek® XS Plus System CoaguChek XS Plus Meter Serial No.: ________ Reviewed By: ____________________________ Date: ___________________________________ Date/Time Operator ID Test Strip Lot No. Patient ID Physician Result Comments 1 2 3 4 5 6 7 8 9 10 11 12 13 14 15 16 17 18 19 20 21 22 23 24 25 26 27 28 29 30 © 2013 Roche Diagnostics. All rights reserved. COAGUCHEK is a trademark of Roche. 76 Quality Control Log Facility: ___________________________________ CoaguChek® XS Plus System CoaguChek XS Plus Meter Serial No.: ___________ Reviewed By: ______________________________ Date: _____________________________________ Lot Number Exp. Date Test Strip Control 1 Control 2 Date Time Operator ID Control 1 Result Range ------------------ Control 2 Result © 2013 Roche Diagnostics. All rights reserved. COAGUCHEK is a trademark of Roche. Corrective Action if Unacceptable 77 Quality Control Chart Facility: ____________________________________ CoaguChek® XS Plus System CoaguChek XS Plus Meter Serial No.: ____________ Control 1 Reviewed By: _______________________________ Date: ______________________________________ Lot Number Exp. Date Range ------------------ Test Strip Control 1 Date No 1 2 3 4 5 6 7 8 9 10 11 12 13 14 15 Result in seconds Operator Comment Date No 16 17 18 19 20 21 22 23 24 25 26 27 28 29 30 Control Chart Date: 1 2 3 Result in seconds Operator Comment Control 1 4 5 6 7 8 9 10 11 12 13 14 15 16 17 18 19 20 21 22 23 24 25 26 27 28 29 30 31 Upper Limit Mean (X) Lower Limit © 2013 Roche Diagnostics. All rights reserved. COAGUCHEK is a trademark of Roche. 78 Quality Control Chart Facility: ____________________________________ ® CoaguChek XS Plus System CoaguChek XS Plus Meter Serial No.: ____________ Control 2 Reviewed By: _______________________________ Date: ______________________________________ Lot Number Exp. Date Range ------------------ Test Strip Control 2 Date No 1 2 3 4 5 6 7 8 9 10 11 12 13 14 15 Result in seconds Operator Comment Date No 16 17 18 19 20 21 22 23 24 25 26 27 28 29 30 Control Chart Date: 1 2 3 Result in seconds Operator Comment Control 2 4 5 6 7 8 9 10 11 12 13 14 15 16 17 18 19 20 21 22 23 24 25 26 27 28 29 30 31 Upper Limit Mean (X) Lower Limit © 2013 Roche Diagnostics. All rights reserved. COAGUCHEK is a trademark of Roche. 79 Preventive Maintenance Log Facility _____________________________________ CoaguChek XS Plus Meter Serial No. _____________ Reviewed By: _______________________________ Date: ______________________________________ Check the box if you have performed the task. Date and initial the top of the column. CoaguChek® XS Plus System Date and Initials 1. Adequate test strip supply available 2. Test strips within expiration date. 3. Adequate control supply available. 4. Controls within expiration date. 5. Visually inspect the CoaguChek XS Plus meter for cracks and damage. 6. Clean exterior of meter with appropriate product. 7. Clean test strip guide. 8. Replace batteries. 9. Correct code chip in meter. 10. User manual and test strip insert available, if needed. © 2013 Roche Diagnostics. All rights reserved. COAGUCHEK is a trademark of Roche. 80 Temperature Log Location: __________________________________ CoaguChek® XS PT Test Strips Year: _____________________________________ Acceptable Range (ºC): _______________________ Jan Feb Mar Apr May Jun Jul Aug Sep Oct Nov Dec 1 2 3 4 5 6 7 8 9 10 11 12 13 14 15 16 17 18 19 20 21 22 23 24 25 26 27 28 29 30 31 © 2013 Roche Diagnostics. All rights reserved. COAGUCHEK is a trademark of Roche. 81 Skills Checklist Name: ______________________________________ ® CoaguChek XS Plus System Facility: _____________________________________ Date of Review: ______________________________ Trainer should check each activity as it is demonstrated or described. USER ASSEMBLES EQUIPMENT CoaguChek XS Plus Meter CoaguChek XS PT Test Strips Code Chip USER REVIEWS PROCEDURE Reviews Procedure States when coding is needed Turns meter off before inserting or removing code chip Removes old code chip if one is installed Inserts new code chip until it snaps into place Performs Test Procedure Washes hands and puts on disposable facility-approved gloves Properly prepares lancet device or plastic syringe Removes test strip from container and replaces cap tightly Inserts test strip or turns meter on Obtains blood sample correctly Applies blood to test strip correctly Reads result Records result Properly discards used test strip and blooddrawing supplies Recalls Results from Memory Correctly recalls results stored in memory __ Control Solutions Supplies for fingerstick or venous draw Problem Solving Refers to Error Messages in User Manual when a problem occurs Liquid Quality Control Testing (if applicable) __Checks expiration date of liquid control solution __Properly prepares control solution for test (inserts QC chip into meter, removes screw cap and rubber stopper, label bottle with time/date, hold dropper by stem and cut off end, invert dropper and squeeze bulb, swirl mixture, apply drop) __Compares control result with range displayed on the meter Follows proper troubleshooting steps if control is not in the acceptable range Is aware of the 24-hour Roche Diagnostics Technical Service number at 1-800-428-4674 if problem persists Cleaning States minimum cleaning frequency Demonstrates exterior cleaning procedure as stated in the User Manual Properly cleans test strip guide Battery Replacement Demonstrates removal and replacement of batteries © 2013 Roche Diagnostics. All rights reserved. COAGUCHEK is a trademark of Roche. 82 Performance Evaluation CoaguChek® XS Plus System Name: ____________________________________ Facility: ___________________________________ Date of Review: ____________________________ Equipment Used: Test Strips Lot No.: ___________________________ Exp. Date: _________________________ CoaguChek XS Plus meter Serial No.: _________________________ Controls Lot No.: ___________________________ Exp. Date: _________________________ Acceptable Range Control 1: _____________________________ Control 2: _____________________________ Result Control 1: _____________________________ Control 2: _____________________________ Observation _____________________________________ on ___________________________ (name) (date) (Attach completed Skills Checklist) Please complete your Performance Evaluation, record the results above, and return the completed form to ________________________________ by ___________________________ (name) (date) © 2013 Roche Diagnostics. All rights reserved. COAGUCHEK is a trademark of Roche. 83 Name: ______________________________________ Knowledge Test Facility: ____________________________________ Date: _______________________________________ CoaguChek® XS Plus System Mark “T” if the statement is true and “F” is the statement is false. _____ 1. When coding the CoaguChek XS Plus meter, you must use the code chip from the same box of test strips that you are using. _____ 2. After removing the test strip from the container, it is important to close the cap tightly. _____ 3. When performing a blood test, it is important to hold the finger to the test strip until the meter beeps. _____ 4. A venous sample must be collected in a plastic syringe free of anticoagulants. _____ 5. Sample must be applied to the test strip within ten minutes of removing the strip from the container. _____ 6. INR is a reporting format that stands for International Normalized Result. _____ 7. When you change control lots, you must insert a new control code chip into the meter. _____ 8. A control is good for 10 minutes after reconstitution. _____ 9. You will find the most up-to-date information for the CoaguChek XS Plus System in the package inserts. _____ 10. The CoaguChek XS Plus meter stores up to 2000 patient tests and 500 liquid quality control tests with time and date. 11. What is used to clean the exterior of the CoaguChek XS Plus meter? ________________________________________________________________________ © 2013 Roche Diagnostics. All rights reserved. COAGUCHEK is a trademark of Roche. 84 Answer Key 1. T 2. T 3. T 4. T 5. T 6. F - International Normalized Ratio 7. T 8. F- A reconstituted control is good for up to 30 minutes. 9. T 10. T 11. 70% isopropyl alcohol or 10% bleach solution © 2013 Roche Diagnostics. All rights reserved. COAGUCHEK is a trademark of Roche. 85 Precision Data Log for Liquid QC ® Facility: ____________________________________ CoaguChek XS Plus System CoaguChek XS Plus Meter Serial No.: ____________ Run as a patient test to get PT/INR Reviewed By: _______________________________ Performed By: _______________________________ Date: ______________________________________ Exp. Date: __________________________________ Test Strip Lot No.: _______________________ Control 1 Control 2 (check one) Control Lot No.: _________________________ Control Range: __________________________ Refer to Steps to Calculating Precision Using Liquid QC Section Sample A Control result B Mean C A–B (difference) D 2 C 2 (difference ) (In Sec) 1 2 3 4 5 6 7 8 9 10 Sum of squared differences (sum of column D) Sum of squared differences/number of observations ______ SD = square root of number above _______ Mean (Column B) SD x 100 / mean (%CV) © 2013 Roche Diagnostics. All rights reserved. COAGUCHEK is a trademark of Roche. 86 Method Comparison Log CoaguChek® XS Plus System REFERENCE LABORATORY Reference Facility ___________________ Type of thromboplastin ____________ ISI ____________ Lot number Range Instrument ________________ Reagent Lot _______________ MNPT ___________________ INR Control 1 Control 2 COAGUCHEK XS PLUS QUALITY CONTROL CoaguChek XS Plus Serial Number _________ Test Strip Lot Number _____________ Lot number Test Strip Expiration Date ____________ Range INR Initials Date Control 1 Control 2 PATIENT DATA Sample CoaguChek XS Plus (INR) Reference (INR) Warfarin Yes/No Initials Comments 1 2 3 4 5 6 7 8 © 2013 Roche Diagnostics. All rights reserved. COAGUCHEK is a trademark of Roche. 87 9 10 11 12 13 14 15 16 17 18 19 20 21 22 23 24 25 26 27 28 29 30 31 32 33 34 35 36 37 38 39 40 41 42 43 44 45 46 47 48 49 50 © 2013 Roche Diagnostics. All rights reserved. COAGUCHEK is a trademark of Roche. 88