1
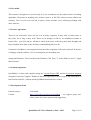
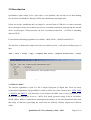
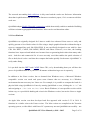
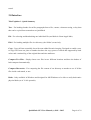
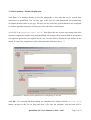
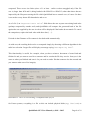
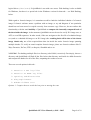
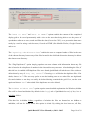
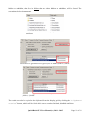
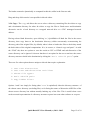
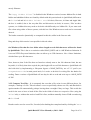
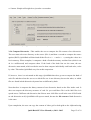
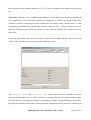
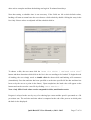
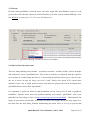
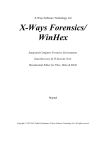
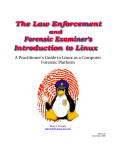
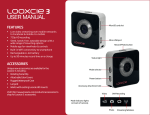
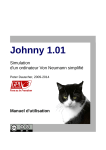
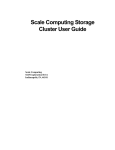
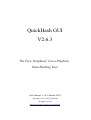
QuickHash GUI
V2.6.3
The Free, Graphical, Cross-Platform,
Data Hashing Tool
User Manual : v1.0.2 (March 2015)
Copyright (c) 2011-2015 Ted Smith
All rights reserved
https://sourceforge.net/projects/quickhash
1.0 Pre-amble
This manual is designed as a user-aid only. It is not an authority on the subject matter of hashing
algorithms, filesystems or anything else, neither in part or in full. The software comes without any
warranty. Use it at your own risk and if unsure, please consider cross referencing findings with
other software.
1.1 License Agreement
There are no restrictions. Users can run it on as many computers as they wish, as many times as
they wish, for as long as they wish. There are no dongles, no DLL's, no installation wizards or
license files – just click and go. All that is asked of the users is that they share their thoughts and
help contribute ideas back to the developer ([email protected]).
Constructive feedback is encouraged and welcomed but complaints will not be tolerated. If the user
is unhappy with the software, s/he is encouraged to use something else.
Supported Platforms: Tested on Microsoft Windows (XP, Vista, 7), Linux Mint 16 and 17, Apple
Mac Yosemite.
1.2 Acknowledgements
QuickHash is written and compiled using the Lazarus Project IDE and the Freepascal language
using the Freepascal Compiler. Thanks are therefore expressed to the developers and contributors of
both Lazarus and FPC, without which QuickHash would not have existed.
1.3 Development Team
Lead Developer:
Ted Smith
Contact:
https://sourceforge.net/projects/quickhash – see support pages and
ticket system for feature requests and suggestions
QuickHash GUI User Manual (c) 2011 - 2015
Page 3 of 18
2.0 Introduction
QuickHash is quite simply a free, open source, cross platform, fast and easy-to-use data hashing
tool for Microsoft Windows, Dekstop GNU/Linux distributions and Apple Mac.
It does not require installation and can simply be executed from a USB drive or other removable
device (though on Linux, the software has to have executable permissions assigned and the external
device would require a filesystem that can store executable permissions – so EXT4 or something
and not FAT32).
Four mainstream hashing algorithms are available – MD5, SHA-1, SHA256 and SHA512.
The interface is deliberately simple and comes as a tabbed system – each tab for a different type of
data.
Text | File | FileS | Copy | Compare Two Files | Compare Directories | Disks
Illustration 1: The tabbed interface of Quickhash
2.1 What is a hash?
The simplest explanation is that it is like a unique fingerprint of digital data. There are many
common hash algorithms, but QuickHash is coded to utilise four of the common ones : MD5, SHA1, SHA256 and SHA512. Very basically, if you compute the MD5 value of your typed name, the
result is theoretically unique to one in 3.4028...E38, which, put more simply is one in 340 billion,
billion, billion, billion (1 undecillion) meaning that the chances of any other digital data other than
that string of characters generating the same hash are infinitely unlikely (engineered collisions
aside).
QuickHash GUI User Manual (c) 2011 - 2015
Page 4 of 18
The research surrounding hash collisions is duly noted and the reader can find more information
about that in publications and articles on the Internet or academic papers, if it is a concern to his\her
work area.
QuickHash adopts Merkle–Damgård constructions which theoretically enables a method of building
collision-resistant cryptographic hash functions. More can be read about that online.
2.2 Cross Platform
QuickHash was originally designed for Linux to enable less advanced Linux users to easily and
quickly generate a list of hash values for files using a simple graphical interface without having to
resort to command line tools like SHA1SUM. It was specifically designed to run with live boot
CD's like DEFT, CAINE, PALLADIN, HELIX and others. However, over time, the hashing
functions have improved and indeed now become faster at generating hash values than many other
tools – both free and commercial. So it is now not only a tool that enables the quick selection of
files to hash, but it is also a tool that does compute the hashes quickly. So the name “QuickHash” is
really rather fitting.
It is pre-built into the DEFT and CAINE Linux CD's, so by downloading them you will have the
power of QuickHash built in to your live CD instance without having to use it separately.
In addition to the Linux version, due to demand from Windows users, a Microsoft Windows
compatible version was made and sports some features that are necessary in a Windows
environment but not necessary in a Linux one. For example, it is possible to compute the hash of a
physical disk using QuickHash in Linux by running QuickHash as root, clicking the “File” tab
and navigating to /dev/sdX or /dev/sdXX. But in Windows, it is not possible to select a disk
in that way, so a special disk hashing tab exists in the Windows version, but not the Linux or Apple
versions.
An Apple Mac version was then developed and first appeared with version 2.5.3 in 2014. It
functions in a similar vein to the Linux version. The Mac version was compiled on the Yosemite
operating system, so older Mac's with Power PC systems may not run QuickHash successfully – not
QuickHash GUI User Manual (c) 2011 - 2015
Page 5 of 18
tested.
3.0 Interface
Tabs Explained – Quick Summary
Text : For hashing chunks of text like paragraphs from a file, a name, a character string, or key data
that can be copied from somewhere to QuickHash
File : For selecting and then hashing one individual file (and disks in Linux\Apple Mac).
FileS : For hashing multiple files in a directory (aka 'folder') recursively.
Copy : Copy & Paste essentially, but with some added forensic integrity. Designed to enable a user
to copy files from one place to another but have the copy process verified and supported by hash
values and a retained log of the original date and time attributes.
Compare Two Files : Simply choose two files in two different locations and have the hashes of
both compared automatically.
Compare Directories : For comparing the file content of one directory to another to see if all the
files inside each match, or not.
Disks : Only available in Windows and designed for MS Windows to be able to easily hash entire
physical disks (as of v2.4.0 upwards).
QuickHash GUI User Manual (c) 2011 - 2015
Page 6 of 18
3.1 Tabs Explained – Detailed Explanation
3.1.1 Text : For hashing chunks of text like paragraphs or key data that can be copied from
somewhere to QuickHash. You can also type in the text box and QuickHash will dynamically
recompute the hash value as you type. The user can also switch the generated hash to one computed
by another algorithm simply by clicking one of the other three radio buttons.
As of v2.6.2, an “Expected Hash Value” field allows the user to paste an existing hash value
(perhaps computed by another tool) and QuickHash will compare the generated hash of the inputted
text segment against the one supplied by the user. An alert will be displayed if the hashes do not
match. To cancel the comparison, replace the hash value with three dots ('…').
Illustration 2: Hashes values dynamically recomputing in Text tab
3.2.2 File : For selecting and then hashing one individual file. Simply click the 'Select File'
button, navigate to the file (or drag and drop a file onto the program), and the hash will be
QuickHash GUI User Manual (c) 2011 - 2015
Page 7 of 18
computed. There are no size limits (since v2.1 at least – earlier versions struggled only if the file
was a) larger than 4Gb and b) being hashed with SHA256 or SHA512) other than those that are
imposed by the filesystem storing the file which QuickHash has no control over, of course. So there
is no need to worry about 4Gb boundaries and so on.
As of v2.6.2, an “Expected Hash Value” field allows the user to paste an existing hash value
(perhaps computed by another tool) and QuickHash will compare the generated hash of the file
against the one supplied by the user. An alert will be displayed if the hashes do not match. To cancel
the comparison, replace the hash value with three dots ('…').
Unicode in the filename or file content is also dealt with automatically.
As with text, the resulting hash can be re-computed simply by choosing a different algorithm in the
radio box selection. Larger files will display a message saying “Recomputing hash”.
This functionality is useful, for example, when you have written a document of some kind and
finished it and you want to send it to someone and be certain the file they receive from you is the
same as when you finished and sent it. Or you need to send a file that someone else has created and
you want to make sure of its integrity.
Illustration 3: The 'File' tab showing a computed hash of a file
On Linux systems, everything is a file so this can include physical disks (e.g. /dev/sda) or
QuickHash GUI User Manual (c) 2011 - 2015
Page 8 of 18
logical drives (/dev/sda1) if QuickHash is run with root access. Disk hashing is also available
for Windows, but there is a special tab in the Windows version for that task – see Disk Hashing,
below.
With regard to forensic images; it is sometimes useful to hash the individual chunks of a forensic
image if forensic software states a problem with an image, to try and diagnose if one particular
chunk has not been moved or copied correctly from a master copy. However, do not confuse this
functionality with the total inability of QuickHash to compute the internally computed hash of
the data inside the image. At the moment, QuickHash can not be used to verify E01 image sets, or
AFF, or even DD sequences. In other words, if the user navigates to the first file of a chunked image
set (such as a chunked dd image or an E01 image) the resulting hash will be that of the chosen
image chunk only, not of the acquired data that sits inside the entire forensic image spanning
multiple chunks. To verify an actual complete forensic image, please use forensic software like XWays Forensics, EnCase, FTK, ewfacquire, Sleuthkit and so on.
3.2.3 FileS : For hashing multiple files in a directory (aka 'folder') recursively. Put simply, choose a
directory and QuickHash will find all the files below that directory and inside its child directories
and compute the hashes for all of the files, outputting the results to screen.
There are several options in this tab :
1. Saved to a CSV log file?
2. Saved to an HTML log file?
3. Ignoring sub-directories
4. Flag Duplicates?
5. Hidden folders too?
Options 1 -5 require the user to tick the box prior to starting the scan.
QuickHash GUI User Manual (c) 2011 - 2015
Page 9 of 18
Illustration 4: The various options of the 'FileS' tab
The “Save to CSV?” and “Save to HTML?” options enable the content of the completed
display grid to be saved permanently with a view to the user then being able to use the power of
spreadsheet software to sort, search and filter the data (if saved as CSV), or to present the data more
neatly by e-mail or using a web browser (if saved as HTML) like Mozilla Firefox, Google Chrome
and so on.
The “Ignoring sub-directories?” enables the user to compute hashes of files in the root
of the chosen directory but not any of the files located in the child sub-directories that may be below
that chosen root directory.
The “Flag Duplicates?” option simply populates an extra column with information about any file
that is found to be a duplicate of another in the chosen directory structure. After hashing the files, if
this tick box is enabled AND duplicate files were found, QuickHash will ask the user if he wishes to
delete them by way of “Yes, No, Cancel”. Choosing Yes will delete the duplicate files. If in
doubt, choose “No”! The user may prefer to run the hashing once to see what files are duplicated
first and whether or not they can safely be deleted having examined the grid. If so, run the scan
again and choose “Yes” when asked if the duplicates are to be deleted.
The “Hidden Folders too?” option requires some detailed explanation. On Windows, hidden
files will be found and hashed by default in the 'Copy' tab of Quickhash but only if they live in
unhidden folders.
Files that live in hidden folders, regardless of whether the files are themselves are hidden or
unhidden, will not be found unless this option is ticked. By ticking the box however, all files,
QuickHash GUI User Manual (c) 2011 - 2015
Page 10 of 18
hidden or unhidden, that live in folders that are either hidden or unhidden, will be found. The
screenshots below demonstrate.
Illustration 5: Files with various filesystem
attributes
Illustration 6: Quickhash will ignore files in hidden folders if asked
Illustration 7: Quickhash will examine files in hidden
folders, if asked
The results can also be copied to the clipboard from the display grid by clicking the “ Clipboard
results” button, which will be 'click-able' once a scan has finished; disabled until then.
QuickHash GUI User Manual (c) 2011 - 2015
Page 11 of 18
The hashes cannot be dynamically re-computed in this tab, unlike in the first two tabs.
Drag and drop of directories is not possible in this tab either.
3.2.4 Copy : The Copy tab allows the user to select a directory containing files he wishes to copy
and a destination directory for where he wishes to copy the files to. Both source and destination
directories can be a local directory or a mapped network drive or a UNC unmapped network
address.
Having selected both directories, upon clicking 'Go', QuickHash will hash the files in the source
directory, then copy them to the destination directory (whilst concurrently reconstructing the
directory path of the original files, by default) where it then re-hashes the files to check they match
the hash values of the original computations. It is, in essence, a “forensic copy and paste”. As with
the “FileS” tab, there are options to save the results to CSV or HTML and sub-directories of the
source directory can be ignored. Also note that there is an option for the user to not have the source
directory structure rebuilt in the destination by ticking the “Don't rebuild path?” option.
There are five other options that are unique to this tab that require explanation.
1. Just LIST Directories?
2. Just LIST sub-directories and files?
3. Choose file types?
4. Don't rebuild path?
5. Copy hidden files?
Options 1 and 2 are simply for listing (thus 'LIST' is capitalised) either the directory structure of
the chosen source directory (excluding files) or for listing the names of directories AND files of the
chosen source directory but without actually hashing any of the files. This is useful when a user
needs a textual representation of a directory structure to paste into some other software or a report.
QuickHash GUI User Manual (c) 2011 - 2015
Page 12 of 18
Illustration 8: The default 'Copy' tab showing tree views (new feature as of v2.6.3)
The “Choose file types” box allows the user to specify what file types to find, hash, and
copy. So for example, if the user is only interested in .doc files, by entering just “.doc;”, only
those file types will be found and copied. Multiple extensions can be used if separated with a ';'
ONLY (no spaces). Note that this type identification is conducted by filename only – not the more
accurate file header signature analysis (which is currently not available in QuickHash).
The “Don't rebuild path?” option allows all files found in the source directory and its subdirectories to simply be dumped in the root of the destination directory without rebuilding the
original path in the destination path. Obviously though two files of the same name cannot exist in
the same directory on the same filesystem whereas two files of the same name may exist in one
folder and any of its other subdirectories. To account for this, when this option is enabled (it is off
by default) QuickHash will check for the existence of a file with the same name in the destination
directory for each file it copies. Where found, it will rename the second, third, fourth (and so on)
instance of the file by renaming it to FileName.ext_DuplicatedNameX where X is the
counter of duplicated filenames detected. Note this is not a check of file hash based on content –
QuickHash GUI User Manual (c) 2011 - 2015
Page 13 of 18
merely filename.
The “Copy hidden files?” is disabled in the Windows version, because hidden files in both
hidden and unhidden folders are found by default with this particular tab in QuickHash (different to
the 'FileS' tab and its 'Hidden folders too?' tick box). However, in Linux and Apple Mac,
the box is enabled, due to the way that files and directories are both, in essence, 'files' on those
systems, so a hidden directory needs to be dealt with differently to a hidden file. If you want such
files when using either of those systems, tick this box. But Windows users need not be concerned
about it.
The hashes cannot be dynamically re-computed in this tab, unlike in the first two tabs.
Drag and drop of directories is not possible in this tab either.
On Windows, files that live in a folder whose length exceeds 260 characters will not be found
by QuickHash. This is due to a restriction called 'MAX_PATH' and is a MS Windows limitation. It
is not an NTFS filesystem limitation; that can allow up to 32K characters. Nor a Linux limitation,
which allows up to 4K characters.
Note, however, that if the files that are found are already near to the 260 character limit, but not
beyond it, it is likely that when copied, the path length will exceed 260 characters. QuickHash will
deal with this by implementing a filesystem bypass of MAX_PATH by use of '\\?\' prefix (see
LongPathOverride in main pascal unit). It is easier to do this for writing files but harder for
reading. Future versions of QuickHash will one day be able to read and write up to a MAX_PATH
of 32K.
3.2.5 Compare Two Files : It is commonly the case that a file exists in two different places, for
example, a backup of a file. This tab allows a user to specifically choose one file, and then hash it
against another file automatically perhaps leaving them overnight if they are large. This avoids the
need for the user to have to hash all the files in the folder of these two respective files (using the
'FileS' tab), or without the need to hash FileA first, and then manually choose FileB second using
the 'File' tab.
Results can be saved to a text file, if needed, after hashing has completed and by clicking the 'Save
QuickHash GUI User Manual (c) 2011 - 2015
Page 14 of 18
As' button. Simpler still might be to just take a screenshot.
Illustration 9: Comparing the hashes of two identical files
3.2.6 Compare Directories : This enables the user to compare the file content of two directories.
The user must select one directory as the source (Dir A) and then a second to compare the source
against (Dir B). QuickHash will then hash all the files in Dir A and Dir B, storing the values in a
list in memory. When complete, it computes a hash of both the memory resident lists (which it can
do in a millisecond) and compares them. If the hash of the hash lists are the same, the two
directories must match, which avoids the need to then compare individually each hash value, value
by value. This makes QuickHash very fast at this comparison.
If, however, there is a mis-match at this stage, QuickHash then does go on to compare the hash of
each file and then alerts the user as to which files are in one directory but not the other, or which
files are found in both directories by name but are different by hash.
Note therefore it compares the binary content of two directories based on the files inside each. It
does not compare the directory structure of each. So you could have Dir A with 1000 files in it
spread across 5 different sub-directories but if those same 1000 files are all in the root of Dir B with
no sub-directories at all, QuickHash will report a match, because the file content of both directories
is the same.
Upon completion, the user can copy the content of either grid or both grids to the clipboard using
QuickHash GUI User Manual (c) 2011 - 2015
Page 15 of 18
the two buttons in the summary panel (as of v2.6.1). Prior to completion, the buttons will be greyed
out.
3.2.7 Disks : This tab is only available in the Windows version and the user should run QuickHash
as an administrator. The functionality enables the computation of a hash for the physical disk of the
computer. Useful for comparing the value computed by one forensic tool to “another tools” i.e. that
computed by QuickHash. On modern disks, speeds of between 7Gb – 14Gb per minute have been
observed. Though speeds of 4Gb per minute are quite common and still fast compared to many
other tools.
To use the functionality, the user must click the “Launch Disk Hashing Module” button in the tab
“Disks” and he will then be presented with the following screen:
Illustration 10: The disk hashing module
The “Start At Date” and “Start At Time” fields enable the user to schedule a start date
and time for the hashing process. This is useful for occasions when the user wants to hash the disk,
but at the time he is operating the software, something else might be doing something with the disk.
By using the scheduler, unnecessary strain on the disk components can be reduced by allowing the
QuickHash GUI User Manual (c) 2011 - 2015
Page 16 of 18
other task to complete and then the hashing can begin in X minutes\hours\days.
Note that setting a schedule time is not necessary. If the fields are left at their default values,
hashing will start as normal once the user chooses a disk to hash by double clicking the entry in the
list. Only if these values are adjusted will the scheduler kick in.
Illustration 11: The disk hashing module running
To choose a disk, the user must click the “Scan for Disks \ Refresh Disk List”
button and then determine which disk in the list is the one needing to be hashed. To begin the task
of hashing, the user simply needs to double click the chosen disk and hashing will commence
(immediately if no date and time has been specified or at the time specified if the date and time has
been set by the user to a point in the future). Upon completion, the hash value will appear at the
bottom and can be saved to a text file by clicking “Save Results...”.
Note : Only SHA-1 hash values can be computed for disks, until further notice
Progress is relayed to the user by way of a reducing byte count and the speed is presented as a Gb
per minute rate. The end time and time taken is computed at the end of the process at which point
the hash is also displayed.
QuickHash GUI User Manual (c) 2011 - 2015
Page 17 of 18
3.3 Unicode
Be aware that QuickHash is Unicode aware on Linux, Apple Mac and Windows systems. It will
process files with Unicode characters in their filenames or in their content without difficulty. Note
that Windows versions prior to 2.3 were not Unicode aware.
Illustration 12: Quickhash showing Unicode awareness on Windows
3.4 Other tools of the same name
There are many hashing tools available – too many to mention - and they all have various strengths
and weaknesses, just as QuickHash does. This section is written to try and help with the enquiries
received that are worded along the lines of “I downloaded QuickHash following our chat the other
day but it doesn't do half the things you said it could” which, since about 2012, caused some
enquiries of my own, at which point it became clear that new projects have been developed since
QuickHash that are also called “QuickHash”!
It is important to point out, however, that QuickHash was the first tool of its kind (a graphical,
standalone, Unicode aware and cross platform hashing tool) named “QuickHash” and it was
published on Sourceforge in 2011 at http://sourceforge.net/projects/quickhash . Unfortunately, the
nature of open-source means there will always be others who might choose the same name for a
tool that does the same thing. Without trademarking the name, there is no way to prevent that
QuickHash GUI User Manual (c) 2011 - 2015
Page 18 of 18
happening. So please be advised that any other tools appearing to be called or actually being called
“QuickHash” are not the same as QuickHash GUI as available at Sourceforge at
http://sourceforge.net/projects/quickhash, for which there is only one!
QuickHash GUI User Manual (c) 2011 - 2015
Page 19 of 18