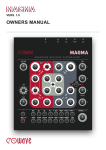
1
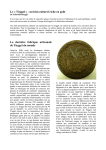
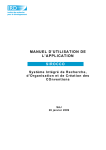
Persephone
MarkII
Analogue Duophonic Fingerboard Synthesizer
User’s Manual
Eowave
Persephone markII user’s manual
1
Table Of Contents
Cautions
Persephone: What is it? Where does it come from? A little bit of history…
General Overview
Connections
Synthesis Architecture
Synthesis Section
Control Section
Routings
Factory Routings
User Routings
MIDI IN/MIDI out/USB
How to update my Persephone?
MDI Implementation
Terms Of Warrant
CE & FCC
Congratulations! You’re now the owner of a Persephone MarkII, a wonderful new instrument
inspired by the first electronic non-keyboard instruments whilst featuring the most advanced
sensor technology. We hope that you will enjoy playing this unique instrument and that it will
bring a new dimension to your creativity. The Persephone MarkII is a handmade instrument
and therefore, individual units can differ from one another. For any questions, please contact
eowave at [email protected]
CAUTION!
Before using the Persephone MarkII, make sure you have read the following instructions
carefully, as well as the instructions for use.
RISK OF ELECTRIC SHOCK, DO NOT OPEN OR MODIFY THE PERSEPHONE
REFER SERVICING TO QUALIFIED SERVICE PERSONNEL.
TO REDUCE THE RISK OF ELECTRIC SHOCK,
DO NOT REMOVE COVER (OR BACK).
NON USER-SERVICEABLE PARTS INSIDE
Do not try to repair the Persephone, its ribbon, its expression key or its components inside.
Please contact Eowave for technical support.
Avoid all sharp object contact on the ribbon.
Do not use the Persephone MarkII or store it under extreme temperature conditions
or expose it to direct sunlight, damp or dusty areas, areas prone to strong vibrations.
Before you plug in the Persephone MarkII, always check the voltage.
Protect the Persephone MarkII against violent shocks.
Before using the Persephone MarkII in a foreign country, check if the voltage is compatible.
When the Persephone MarkII is not used, switch the unit off.
Never place heavy objects on the Persephone MarkII.
Never touch the Persephone MarkII with wet hands when it is plugged in.
Before moving the Persephone MarkII, make sure the unit is disconnected from other
devices.
Before cleaning the Persephone MarkII, make sure the unit is switched off and not plugged
in.
During lightning, unplug the Persephone MarkII.
Persephone markII user’s manual
2
Persephone: What is it? Where does it come from?
A little bit of history…
This is an excerpt from the paper written by Emmanuelle Gallin/ Marc Sirguy: Sensor
Technology and The Remaking of Instruments from the Past, published by NIME09 © 2009
Carnegie Mellon University.
Introduction
Are we the future of the past? Let’s go back to the early twentieth century and the recent invention of
filters and VCA, which has been followed by the invention of many new controls and new electronic
instruments. If among these, many are now parts of our cabinets of curiosities, some are worth a
closer examination… Sensor technology now enables to recreate some of these forgotten controls
with a new accuracy, turning them into innovative tools.
1. HISTORICAL PARALLELISM
octave keyboard and a ribbon controller that
allowed pitch inflections like a voice or stringed
instrument. It allowed for a wide glissando
when the player moved a finger ring attached
to the metal ribbon that controlled frequency.
Hundreds of symphonic works, operas, ballets,
and film scores were composed for this
instrument by Varèse, Honneger and
Maessian.
In Leipzig, Peter Lertes and Bruno Helberger
developed the Hellertion. This fingerboard was
a flat metal resistance strip covered with
leather. Depending on where the strip was
pressed, a different resistance in the circuit
was created altering the voltage sent to the
oscillator and thereby producing different
pitches. The force of the pressure controlled
the volume of the output signal. The
fingerboard was marked to help the performer
find the correct pitch on the strip and had a
range of approximately five octaves. The
original instrument had just one fingerboard
strip which was gradually increased to four and
then on the later models, six aligned in parallel
horizontally at the height of a piano keyboard.
The four and six strip models allowed four and
six voice polyphony.
The Trautonium was the first instrument to ally
position and pressure control. Created in 1931
by Franz Trauntwein, it used filters to modify
the timber of the note and a keyboard. The
Original Trautonium had a fingerboard
consisting of a resistance wire made of a tube
of graphite stretched over a metal rail marked
with a chromatic scale and coupled to a neon
tube oscillator. When the performer was
pressing the wire, it would touch the rail and
complete the circuit. The Trautonium had a
three octaves range that could be transposed
by means of a switch. The Sonar, developed
A quick historical comparison between the
XXth and the XXIst century will lead to the
conclusion that both centuries have known, in
their early years, a certain effervescence in the
design of new controllers. This parallelism can
be explained by recent discoveries that have,
at both times, opened wide fields of new
technical possibilities. May it also find its
origins in a particular political and economical
environment – this won’t be the subject of this
paper.
1.1 1920s effervescence
The creation of the first electronic oscillators,
followed by the invention of filters and VCA
enabling to play tremolos and vibratos and to
recreate
the
musicality
of
classical
instruments, opened the field of the research
for new controls, which would offer more
possibilities than generic keyboards. The
1920s remains the most fertile years for the
evolution of electronic music instruments with
the invention of new controls like dial-operated
non-keyboard electronic instruments or ribboncontrolled instruments. In Russia, Lev
Sergeivitch Termen developed the Theremin
using the body capacitance as a control
mechanism, freeing the performer from the
keyboard and fixed intonation. He also created
the first fingerboard cellos. In France and in
Germany, a whole family of dial-operated non
keyboard
electronic
instruments
was
developed. Among them, René Bertrand and
Edgard Varèse’s Dynaphone or Jörg Mager's
Electrophon and Spharaphon. At the end of
the 1920s, a family of the fingerboard
instruments –or ribbon controllers- appeared.
In France, les Ondes Martenot, designed by
Maurice Martenot, included both a sevenPersephone markII user’s manual
3
by N. Anan'yev in the USSR in the 1930s also
had a fingerboard continuous controller to vary
the pitch of the oscillator.
necessarily to a musical gesture. The analysis
of this intrusion of new control gesture into the
music area is fundamental for all music
industries and controller new designs. The
« learning limit » is another important aspect
for the design of new instruments. Among the
forgotten controllers from the past, many have
disappeared because their play required to be
learnt. The past experiences with controllers
tell us that a controller must be intuitive. The
fact that most of the non-keyboard instruments
using new controllers required a new play
explains why they remained unpopular with
musicians who had little time to practice on
unusual keyboard, the Telharmonium 36-noteper-octave keyboard designed by Cahill for
example.
1.2. The supremacy of keyboards
After the 40s, the general use of keyboards
(and the war) slew down the research of new
types of controls. Ribbon controllers were back
in the 1960s with Moog ribbon controllers
which Keith Emerson was famous for attaching
to a pyrotechnics control. The Theremin-like
sound in the Beach Boys' song "Good
Vibrations," was played by a ribbon-controlled
instrument called the Electro-Theremin, which
the Beach Boys have later replaced by a Moog
ribbon controller with a Moog synthesizer.
Only a few synthesizers from the 1980s had
ribbon controls: Yamaha CS80’s ribbon
controller, Kurzweil synths and the Korg
Prophecy.
3. REMAKING RIBBONS : THE
PERSEPHONE EXPERIENCEi
In 2002, we decided to work on a
contemporary version of a fingerboard
instrument, using sensor controls today’s
technology would offer but preserving the best
of analogue sound generators. Beyond a
vintage look, the Persephone allies sensors
technology and digital controls to a pure
analogue generation of sound. Its analogue
oscillator can generate notes with a range of
10 octaves, which goes from a deep and
ii
resonant cello tone to a nearly human voice .
And on the highest pitches, it can reach very
high frequencies. The oscillator waveform can
be set between triangle and saw tooth for a
more or less brilliant sound. Its ribbon sensor
technology allows all kind of glissando a
Theremin or Les Ondes Martenot would allow,
though the sensor ribbon is much more precise
than the tube full of graphite used as a variable
resistance in the Trautonium.
2. THE XXIST CENTURY AND THE
EMERGENCE OF NEW CONTROLS
The 2000s offered new possibilities with the
development of sensor technology and new
computer controls. Today, new controllers
designed by the gaming and communication
industries are much more innovative than the
controls developed in the music industry. The
general use of these new controls necessarily
has a deep impact on the demand from
musicians for new controllers as well as on the
invention of a new approach for making music.
Will brands like Apple or Nintendo be at the
origin
of
a
new
musical
gesture?
Communication & game new controllers, such
as Apple IPod, IPhones, ITouch, Nintendo
Wiimotes, or DS with Korg D-10 for example,
are commonly used by musicians as new tools
for controlling music -first advantage being the
low prices of these new tools. Though they
offer a choice of innovative controllers, their
low sampling resolution remains a barrier for
making music (the number of values being
insufficient for a musical gesture). On another
hand, new controllers made for musicians are
often limited to a closed non editable
environment. Some artists and circuit bending
specialists modify these new controllers to
have a higher sampling resolution (12 bit
allowing a resolution of 4096 values), but this
approach is rare for a larger public. In general,
the re-appropriation of control tools, which
have not been thought for musicians and are
not designed for musical applications, is limited
in terms of use. Though it is possible to
imagine that these new controllers could be at
the origin of a new intuitive control gesture?
The question of intuitivity in musical gesture
must refer to an acquired gesture, but not
Persephone markII user’s manual
The way the Persephone is played creates the
instrument personality. The Persephone
follows the traditional play of the first nonkeyboard electronic instruments with the right
hand controlling the pitch and the left hand
controlling the velocity. Control gesture is very
intuitive, expressive and accurate enough for
playing scores – not only sci-fi effects.
Like on the Trautonium, the Persephone’s
ribbon is sensitive to pressure and position.
The ribbon is a linear potentiometer that
generates different control voltages depending
4
on where it is touched. These changes in
voltage are applied to the voltage-controlled
oscillator and the filter. A 12 bits converter
samples analogue signal from the ribbon to
send them in MIDI or control the oscillator. In
the 5 octaves mode, the 12 bit sampling
enables a resolution of 68 cents per half tones
–the average human perception range being of
8 cents. This avoids scales effect and it is
possible to switch from mode A to the other
modes without hearing the analogue/digital
switch. An expression key controls the filter.
This kind of key was also found on Les Ondes
Martenot. With the Persephone, it is controlled
by an optical sensor able to reproduce
vibratos.
Four play modes A,B,C,D offer different
hierarchy of control between the pitch, the
velocity, a filter modulation and a LFO. An
Persephone markII user’s manual
expression pedal can be connected to control
the volume (modes A and B) or the LFO speed
(modes C and D).
4. DESIGNING THE PERSEPHONE II
Three years after the first release of the
Persephone, comments from users and
suggestions for new features illustrate how
important is the influence of new controllers
developed by the game and communication
industries (e.g. multi-touch surfaces and
Nintendo Wii games) on the perception of new
musical interfaces. A growing demand called
for a polyphonic ribbon and stronger
integration
into
the
computer
music
environment by adding a USB I/O to the MIDI
and CV I/O.
5
Connections
Connections are located on the rear side of the control panel and protected from dust and
other sources of deterioration by the Persephone suitcase top when closed. For the desktop
version, we recommend to cover the unit with a cloth when not used to avoid dust. To
remove dust from the unit, make sure the unit is turned off and clean it with a damp cloth
only.
AC-12V: The Persephone MarkII use an external AC - 12 V - 1A power supply. Never open
the unit when it is switched on.
on/off: There is no on/off switch. When on, the LED on the front panel is on.
USB: With the USB plug, you will be able to update the Persephone MarkII firmware.
MIDI out: Connect to your MIDI devices to use the Persephone as a MIDI controller. (See
MIDI implementation).
MIDI in: to control the Persephone
Audio out: main audio out. Plug it to your amplifier audio in.
Beware! Plugging the audio out into the Pedal in will shut the Persephone down and may be
a cause of severe damages to the unit.
Pedal 1: You may plug an expression pedal into the Pedal in jack 6,35 input. With this pedal,
you will be able to control the volume, but also the LFO frequency.
Pedal 2: You may plug an expression pedal into the Pedal in jack 6,35 input. With this pedal,
you will be able to control the volume, but also the LFO frequency.
CV ½: Connect the CV out to the CV in of another analogue synthesizer to control it with the
Persephone. For a CV connection, the pitch1 is on the tip and pitch2 on the ring. < pitch
1/pitch2
CV ¾: Affected to filter and VCA (sources can be modified with custom routings)
Plugging your Persephone for the first time
Powering the Persephone
Make sure you are using the right AC 12V 1A power supply. Be aware that using a DC power
supply may cause irreversible damages to the unit. The red light on the front of the
Persephone should light when right plugged.
Plugging your Persephone on guitar amps
You may use all types of guitar amplifier. Connect the audio out of the Persephone to the
audio in of your amp. The Persephone sound generator is 100% analogue, therefore, it can
reach very high frequencies. Always turn down the volume of your amplifier when you first
play the Persephone to avoid any damage to your loud speakers. If you add a little
reverberation to the sound it will sound great.
Plugging your Persephone in MIDI
Note that the MIDI is disactivated per default.
You can activate it via the software editor.
Plugging your Persephone to your computer
Connect your Persephone to your computer via USB. A Persephone icon will appear in the
MIDI devices. Note that you don’t have to activate MIDI to use USB.
Does your computer recognize the new USB interface?
On Windows (here the French version on XP), your Persephone should appear as an audio
device in the audio /video & game device window.
On OSX it's even easier, the Persephone should appear in the audio & midi configuration
panel.
Persephone markII user’s manual
6
Configure your software & start playing
Once the Persephone has been recognized as an audio device by your computer, open your
MIDI software.
Select the input midi port (audio device for XP/VISTA, Persephone for OSX )
By default :
input 1 sends CC1 on channel 1(CC for continuous controller)
input 2 sends CC2 on channel 1
input 3 sends CC3 on channel 1
input 4 sends CC4 on channel 1
input 5 sends CC5 on channel 1
input 6 sends CC6 on channel 1
input 7 sends CC7 on channel 1
input 8 sends CC8 on channel 1
Configure your software to match these parameters.
Synthesis section
Persephone markII user’s manual
7
Synthesis architecture
Oscillators section
Lo wave - Hi wave – space
The sound of the Persephone is generated by two 100% analogue oscillators. Like all
analogue oscillators, its sound can differ depending on temperature conditions.
Hi Wave: waveform from triangle to sawtooth.
Lo wave: waveform from triangle to sawtooth.
Scale: adjusts the frequency difference between the two oscillators lo wave and hi wave.
Volume: adjusts the main volume
Persephone markII user’s manual
8
Listen to the lo wave waveform.
Set the routing 1, so you get only one oscillator. Set the scale. Try a glissado with the triangle
waveform. Turn the lo wave knob to the right to get a sawtooth waveform. Listen to the
difference.
Listen to the hi wave waveform.
Hi wave alone being the same than the lo wave, listen to the low wave.
Using the space knob enables to increase or decrease the frequency difference
between osc1 and osc2.
In routing 1 to 4 with 1 position, press the ribbon and adjust th espace knob to hear the
difference between the 2 osc.
In other modes, space adjusts the osc2.
How do I adjust the volume of osc1 and osc2 ?
The waveforms triangle has less harmonics. Using this waveform on one oscillator will turn
down its volume.
Tune section
Tune tunes the oscillators.
Fine adjusts the finetune of the oscillators.
Scale sets the ambitus of the ribbon from 1, 2, 5 or 10 octaves.
How to scale the ribbon?
You can adjust the scale of the ribbon from 1, 2, 5 or 10 octaves.
If you wish to use another ambitus, it’s possible to set the scale with a trimmer inside the
instrument.
Is it possible to have different scale for each oscillator?
No, it’s not possible.
I don’t hear anything.
Remember that the frequency range of the oscillators goes far beyond the frequency human
ear can hear. With a scale of 1 octave with the tune at its minimum value or its maximum
value, the Persephone will make no auditable sounds. When you don’t hear any sound, first
check the routing selection (ribbon on pitch), set an ambitus of 5 octaves and turn the know
tune while pressing the ribbon. In this medium setting, you will go back to auditable
frequencies.
Filter section
Cutoff - resonance - modulation
Low-pass filter: The Persephone has an analogue resonant 12dB low-pass filter, which
modulates the sound source. You can set the filter frequency with the knobs cutoff and
resonance and its modulation amount with the knob modulation.
Cutoff: The knob cutoff sets the frequency at which the filter opens and closes.
Resonance : With the knob resonance, you may adjust the resonance of the filter.
The filter affects both oscillators.
Note that in the sources, there are two parameters for the filter: filter and filter modulation
(see routing table).
Persephone markII user’s manual
9
Listen to the filter
In routing presets 1 & 2, the filter is affected to the ribbon position with the low wave pitch.
The filter closes in the low tones and opens in the higher tones. In preset 1, the filter
modulation is affected to the pressure of the ribbon. Press the ribbon with different strength
to hear the filter. In preset 2, the filter modulation is affected to the key. Press the key while
playing the ribbon to hear the filter.
Modulating the volume of one oscillator with the filter
The filter can be used to modulate the volume of one oscillator. With one oscillator set on a
triangle wave and the other one on a saw waveform, the volume of oscillator with the triangle
waveform willl sound lower.
Play with the filter with the expression key
In routing presets 2, 4, 5, the filter modulation is affected to the key. Slightly press the key to
hear the filter.
LFO section
Modulation – lfo
The LFO has a triangle waveform.
Modulation: The knob ‘modulation’ sets the modulation amount of the LFO on the selected
source.
Listen « LFO mod to filter »
With routings 1, 2, 3, 4, 5, 6, the LFO (source) modulates the filter via an expression pedal
connected to the Pedal 1 of the Persephone. Connect an expression pedal to the Pedal 1 of
the Persephone and try the LFO mod to filter.
Listen « LFO mod to VCA »
With routing 7, the LFO (source) modulates the VCA via an expression pedal connected to
the Pedal 1 of the Persephone. Connect an expression pedal to the Pedal 1 of the
Persephone and try the LFO mod to VCA.
Listen to LFO mod to hi wave freq
With routing 8, the LFO (source) modulates the hi wave frequency via an expression pedal
connected to the Pedal 1 of the Persephone. Connect an expression pedal to the Pedal 1 of
the Persephone and try the LFO mod to hi wave freq.
Persephone markII user’s manual
10
Control Section and routings
The Persephone controllers are 100% digital. The Persephone has different control tools:
the ribbon which allows pressure and 2 positions control, the expression key and 2 pedals.
All I should know about the ribbon
CAUTION! The ribbon is very fragile. Avoid sharp object contact with the ribbon. Do not try to
remove the ribbon from the panel. To clean the ribbon, use a dry cloth.
The ribbon responds to changes in voltage or resistance caused by changing the finger
position along its surface. The Persephone ribbon controller is also able to record pressure
or velocity. The ribbon is a linear potentiometer that generates different control voltages
depending on where it is touched. These changes in voltage are applied to the voltagecontrolled oscillator and the filter. The voltage fluctuations are also translated into binary data
and used to control digital modulation. The ribbon is linear. The position of your finger will
determine the pitch of the note played.
Changing the ribbon’s scale
Scale: allows scaling the Persephone’s ribbon from 1, 2, 5 to 10 octaves.
The Persephone can generate sounds beyond the frequencies human beings can hear. Your
pets may be very sensitive to some high frequencies… Note that this is possible to set the
scale on another ambitus.
How to mark the ribbon?
The ribbon has no marks, but it’s possible to tape a paper with your own marks on the wood.
First steps with the duophonic ribbon
The Persephone MarkII is the first duophonic ribbon synthesizer on the market. Duophonic
means that the same ribbon can produce two sounds when two positions (highest and
lowest) are pressed on the ribbon. Making the ribbon duophonic extends the instrument
sonorities spectral to play simple chords. With ribbons, the resistance is usually measured
where at the stimulated position (the ribbon is pressed). Here, the resistance is measured at
each extremity of the ribbon. The duophonic ribbon allows modulation capabilities like
frequency modulation of one oscillator by the other one. Each oscillator has a dedicated
12dB low-pass filter to adjust the low and hi sounds separately.
The ribbon is divided is 3 different sources : position ribbon 1, position ribbon2 and ribbon
pressure. The position on the ribbon always determines the pitch.
fig.1. Duophonic ribbon
.
Listen to the two oscillators
Play the lo wave only. With routing 2, the ribbon controls the pitch of the osc 1. The volume is
controlled by the pressure onto the ribbon. Play a glissando on the ribbon. Adjust the
waveform of the osc1 from triangle to saw.
Persephone markII user’s manual
11
Now, select routing 5. With this routing, hi wave controls the pitch of osc 1; lowave controls
the pitch of osc2. Play with the knobs tune & scale to hear the different frequencies of the
oscillators.
Play the 2 oscillators together on ribbon position 1
With routings 3 and 4, both oscillators are affected to the ribbon position 1. Play with the
knobs tune & scale to hear the different frequencies of the oscillators.
Can I play osc 1 and a sample on the other finger?
Connect the Persephone to your computer. Affect the sample to pitch 2.
How to use the pressure sensitivity
The pressure of your finger will control the velocity or the amplitude of the note played.
All I should know about the Expression key
The expression key is controlled with an optical sensor able to reproduce the slightest
movement of the key. This is a great control tool for tremolo effects.
Play the expression key
With routing 1, the key controls the volume. This means that when you press the ribbon
(without pressing the key), no sound is played. When you slowly press the key, the volume of
the note will increase. Les Ondes Martenot had such an expression key.
Expression key destinations
With the preset routings, the expression key is affected to the filter modulation or to the
volume. Only routing 8 differs with the expression key being affected to the FM.
All I should know about the Expression pedal 1
An expression pedal can be connected to the Pedal 1 at the rear side of the Persephone to
control the LFO modulation on the LFO destination (filter, VCA or hi wave freq).
All I should know about the Expression pedal 2
A second expression pedal can be connected to the Pedal 2 at the rear side of the
Persephone to control the FM.
What is FM?
FM is frequency modulation. The carrier oscillator is modulated in frequency by a modulator
oscillator. The output of the modulating oscillator is added to the fundamental carrier
frequancy, causing it to vary up and down. The amplitude of the modulator determines the
amount of modulation or the frequency deviation from the fundamental frequency.
Routings
16 routings enable to select different routing architectures. 8 routings are fixed (factory
routings) and 8 are users routings configurable thru a software. Users routings will be stored
in an internal memory.
Persephone markII user’s manual
12
Persephone markII user’s manual
13
Users routings
The Persephone mkII editor is available on www.eowave.com/members
You may need to install Cycling74 Max5 runtime before lauching the editor. You can
download it on www.cycling74.com with the Max5 free trial. The runtime will remain on your
computer when the 30 days trial are over. With the editor, you will be able to simply modify
the source and destination of the controls.
Source and destinations
Note
You can’t use 2 sources on 1 destination.
It’s possible to use 1 source for 2 destinations.
MIDI Implementation
MIDI option is set by default. Receive channel 1- 16
Pressing the expression key while powering up the unit will disactivate MIDI.
Sending Control Change Message
Key CC-7
Pressure CC-1
Pedal CC-2
Pitch – Pitch bend
Note to be sent
Note on 60/vel 127 while pressing the ribbon,
Note of 60/vel 0 while releasing the finger from the ribbon
Sending MIDI PROGRAM CHANGE
Message will affect different parameters of the Persephone
Changing the MIDI channel
MIDI CHANNEL PC 1 –16 (on current midi channel)
The midi channel is stored in an non volatile flash ram
Use the Persephone as a MIDI controller
To use the Persephone as a MIDI controller or to be able to record and playback the sound
on a sequencer, it should be set to local OFF mode after each powering up.
MIDI LOCAL ON PC 20 (on current midi channel) (default value)
MIDI LOCAL OFF PC 21 (on current midi channel)
MIDI KB half tone mode
The half tone mode enables to trigger only half tone notes from the ribbon and send them
via MIDI. The mode 1 calculates the nearest 1/2 tone from the first pitch played and sends
the pitchbend of that note. It will also affect the internal oscillator by playing only half tone
notes at each first contact onto the ribbon. The mode 2 only sends notes.
MIDI KB 1/2 TONE mode OFF PC 22 (default value)
MIDI KB 1/2 ON mode 1 PC 23
MIDI KB 1/2 ON mode 2 PC 24
Persephone markII user’s manual
14
Terms of Warrant
The Persephone has a one year term warrant after the date of purchase. Shipping the unit
back to Eowave will be at the charge of the owner. Any damage resulting from misuse of the
instrument is not covered by the warrant.
Eowave Team
The Persephone has been designed and developed by Marc Sirguy, MESI/eowave CEO.
Design, manual, marketing and export: Emmanuelle Gallin.
Thank you to all who have shown their interest since the very beginning of this project.
Contact & Support
Eowave
6, rue Marceau - 94200 Ivry-sur-Seine – France
Tel: +33/1 45 15 41 95 - Fax : +33/1 45 15 07 24
CE & FCC Information
1.
Important notice: do not modify this unit. This product, when installed as indicated n
the instructions contained in this manual, is compatible with the CE norm & FCC
requirements.
2.
Important! When connecting this product to accessories or/and to another product,
use only high quality shielded cables. Cables supplied with this product must be used.
Follow all installation instructions. Failure to follow instruction could void your FCC
authorization to use this product in the USA.
3.
Note: this product has been tested and found to comply with the requirements listed
in the FCC Regulations, Part 15 for Class B digital devices & in The European Standart EN
50081-1 on Electromagnetic Compatibility – Generic emission standart on residential,
commercial and light industry. Compliance with these requirements provides a reasonable
level of assurance that the use of this product in a residential environment will not result in
harmful interference with other electronic devices.
Persephone markII user’s manual
15