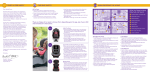
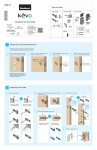
1
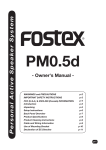
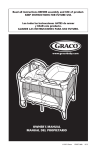
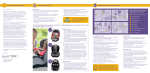
COCONEL User Manual :Thank you very much for purchasing Aprica’s product. This product is a single bed set for use with a baby from newborn until 24 months old (approximately 13kg in weight). *Newborn babies refer to babies who are born after 37 weeks of pregnancy and weigh above 2.5kg at birth. Before use, please read this user manual carefully and use the product accordingly. After reading, please keep this manual in a convenient place for future reference. Please do not use this product in ways other than those specified in this user manual. Otherwise, the product may not perform as indicated, and it may result in serious danger. About SG standards SG is the abbreviation of Safety Goods which is created by the Consumer Product Safety Association. In regard to the structure, material and usage, products which pose danger to life and body will have to pass the assessment based on the relevant stipulated certification criteria mandatory for a safe product as prescribed by the Consumer Product Safety Association, before they are allowed to bear the SG mark. o Cribs that show the SG mark fulfill the following criteria. Applicable range Types Usage range Floorboard height Criteria for structure This crib is suitable for use by a typical family and it is a single baby crib for sleeping and childcare purposes. Baby crib. From newborn (*) to 24 months old (reference weight of 13kg). Upper level: From newborn to when baby is able to stand up with support. Lower level: From when baby is able to stand up with support to 24 months old. Height of top rail (top frame) from the floorboard, >35cm for upper level and >60cm for lower level. The area within 15cm above the floorboard is to be surrounded by a solid structure. *Newborn babies refer to babies who are born after 37 weeks of pregnancy and weigh above 2.5kg at birth. About PSC system PSC is the abbreviation of Product Safety of Consumer Products. Products which pose particularly high risk to the life and body of the consumer are not allowed to be sold in Japan if they do not bear the PSC mark which represents conformity to the technical standards prescribed by the Japanese government. o Cribs that show the PSC mark (special specified products) fulfill the technical standards prescribed by the Japanese government. 1 Markings used in this manual o “Warning”, “Caution” and “Prohibition” marks are classified according to the severity of the resulting danger or damage when they are not adhered to. The contents are very important and please make sure to follow them properly. Mark Warning Caution Advice Meaning Item denoting where misuse may cause fatal or serious injury. Item denoting where misuse may cause bodily injury or damage to the property. Convenient tip for operating and using this product. Prohibition Please do not use the product in a manner which is prohibited in this manual. Cautions Regarding Usage o Please read this user manual thoroughly and use the product accordingly to prevent unforeseeable accidents. Warning- item denoting where misuse may cause fatal or serious injury. Do not use with babies who are over 24 months old or over 13kg in weight. Otherwise, there may be a risk of the baby climbing out, tumbling over or falling off the crib. When the baby is able to stand up with support, shift the floorboard to the lower level so that the top rail (top frame) is at least 60cm above the floorboard. Otherwise, there may be a risk of the baby climbing over the top rail and falling off the crib. Except when placing the baby in or taking the baby out of the crib, leave the sliding front rail at the top rail position. Otherwise, there may be a risk of the baby climbing over the sliding front rail and falling off the crib. Please do not place objects on which the baby can step inside or outside of this product. Otherwise, there may be a risk of the baby climbing out, tumbling over or falling off the crib. Please do not allow two or more babies on the crib at the same time, and do not let the baby hang on the horizontal rail. Otherwise, there may be a risk of the baby climbing over the top rail (sliding front rail) and falling off the crib. Please set the crib indoor on a flat and even surface. Do not use the crib near a fire source or heating device. Otherwise, there may be a risk of the crib tumbling over, thus causing the baby to be scalded or triggering a fire. 2 Please ensure that the baby’s clothes, string or hood do not get caught with the top rail (top frame) or vertical support. There may be a risk of suffocation to the baby. Do not let the baby crawl under the crib. There may be a risk unforeseeable accident or injury to the baby. Please do not attach strings/string-like items (toys etc) to this product, and do not leave wet laundry to dry on this product. There may be a risk of suffocation to the baby. Please do not move the crib when the baby is nearby. There may be a risk unforeseeable accident or injury to the baby. Please check to ensure that the floorboard has been assembled completely and is flatly installed on the main body. Otherwise, there may be a risk unforeseeable accident, injury or suffocation to the baby. Please do not use the crib with the top rail (top frame) unlocked. There may be a risk of suffocation or a risk of the baby climbing over the top rail and falling off the crib. When installing the floorboard, make sure that the hook-and-loop fasteners on the side of the main body are fastened on the floorboard. Otherwise, there may be a risk of the baby getting caught in the gap between the floorboard and main body, thus resulting in unforeseeable accident, injury or suffocation to the baby. Please maintain a balanced and steady posture when operating the open/close lock on the inside of the crib or when installing or removing the floorboard. Otherwise, there may be a risk of falling into the crib, thus resulting in unforeseeable accident. Please use a mattress or mattress pad of suitable firmness and with a mini bed dimension (60x90cm) which does not leave a gap with the crib. Otherwise, there may be a risk of suffocation, injury or other unforeseeable accidents. Please take note of the height of the mattress or mattress pad used. This is to prevent the baby from climbing over the top frame and falling off the crib easily. Please keep the packaging material, carry bag and other items out of the baby’s reach. Otherwise, there may be a risk of suffocation to the baby. Please assemble the crib in accordance with the user manual (this manual). Otherwise, there may be a risk of unforeseeable accident or injury. 3 Please be careful not to pinch your hand, leg or finger when assembling or folding the crib, or when operating the sliding rail. Otherwise, there may be a risk of unforeseeable accident or injury. When shifting the floorboard to the lower level, the hooks in the corners should be kept in the pouches on the inside of the floorboard. Otherwise, there may be a risk of unforeseeable accident or injury to the baby. Please check to ensure that the crib has been assembled completely before use. Otherwise, there may be a risk of the baby or the baby’s clothes getting caught in the crib, thus resulting in injury or suffocation. Before use, please check for damages in the product, broken or loose joints, and splits in fabric parts. Please do not use the crib if there is any damage or fault. Please do not place this product near the curtain or the cord of a window blind. There may be a risk of suffocation to the baby. Please do not use a plastic cushion or plastic cushion cover. There may be a risk of suffocation to the baby. Please do not place items which pose risk of injury or suffocation in the crib. Please do not use a water cushion with this product. There may be a risk of unforeseeable accident. Please do not move the crib with the baby in it. Otherwise, there may be a risk of unforeseeable accident or injury. Please do not let the baby play near the crib. There may be a risk of unforeseeable accident or injury to the baby. Please do not use the crib in a place with strong sunlight for a prolonged period. This may lead to elevated temperature inside the crib. Please do not sit, lean on or shake the top rail (top frame). There may be a risk of the crib toppling over, thus resulting in unforeseeable accident or injury. Do not use a modified product. Please do not use the baby crib for purposes other than sleeping and childcare. 4 Caution -item denoting where misuse may cause bodily injury or damage to the property. o When assembling or moving the crib, please be careful not to damage the floor or wall. o Do not leave the mattress or mattress pad in the crib all the time. There may be a risk of mildew growth due to dampness. When unpacking the product o o o Please check for missing or damaged parts after unpacking the product. For damaged or missing parts, please contact our customer support centre. (Refer to P.17). Before use, please fill in the following items of the Warranty Letter on P.18. ① Model (refer to “Name of parts” on P.6.) ② Date of purchase. ③ Customer name, address and contact. ④ Store of purchase Main body Main body Floorboard Accessories Side wall panels (2pcs) Carry bag Supporting tubes (3pcs) User manual / warranty letter (this manual) 5 Before assembly (things to note) o Please place a piece of cloth or carpet over the floor where the crib is assembled or folded, and pay full attention not to cause damage to the product, floor and existing furniture. o Please take note of all the outer and inner surfaces, left and right sides, and top and bottom sides of the parts and components during installation. Ensure that they are installed correctly with reference to the user manual. o After assembly, please check that the product has been assembled completely in accordance with the user manual before starting to use the product. o The product must be assembled by an adult. o No tool is required for assembly. Warning o Please keep the packaging material, carry bag and other items out of the baby’s reach. There may be a risk of suffocation to the baby. Caution o When assembling or moving the crib, please be careful not to damage the floor or wall. 6 Name of parts <Main body> (floorboard installed at the upper level) Release buttons (4 locations) Floorboard Hook Top rail (top frame) Slide lock (2 locations, left and right) Hook-and-loop fasteners (4 locations for upper level) Sliding front rail Hook-and-loop fasteners (2 locations for lower level) <Inner side of the right leg> Legs Open/close lock Sticker showing product name, model number and lot number Castor 7 <Floorboard> (assembled) Hook-and-loop fasteners (4 locations) Hooks (4 locations) <Inner side of floorboard> Pouch Hook 8 How to use the crib & playard Assembling the main body Warning o Please do not assemble the main body when the baby is nearby. There may be a risk of the baby bumping into the product or parts, or getting pinched in the hand, leg or finger, thus resulting in injury to the baby. o Please be careful not to pinch your hand, leg or finger when assembling or folding the crib. Otherwise, there may be a risk of unforeseeable accident or injury. Caution o When assembling or moving the crib, please be careful not to damage the floor or wall. Advice o This product can be assembled by one person, but it will be safer if the assembly is carried out by two persons. o Please use the centre of the body as the point of support when assembling and folding this product. <Maintain the position of the open/close lock> Hook-and-loop fasteners Open/close lock Open/close lock Floorboard Position of open/close lock 1. Lay the main body flat and unfasten the hook-and-loop fasteners (2 locations). Remove the main body. 2. Pull the open/close lock upward to the locked position (approximate position as shown in the diagram), and keep it at this position. Advice o The top frames cannot be locked if the position of the open/close lock is too low. 9 Open/close lock Top frame Top frame “Click” “Click” Position of open/close lock 3. Maintain the open/close lock at the height of the locked position and lock the top frames (front and back) by pulling them upward until a “click” sound is heard. o Check to ensure that the top frames have been locked and cannot be folded. Advice o If the top frames fail to lock, it could be that the position of the open/close lock is too low. Please pull the open/close lock up, and pull the top frames until a “click” sound is heard. 10 How to use the crib & playard Top frame Open/close lock “Click” “Click” Position of open/close lock Leg 4. Use the same method as in Step 3, lock the top frames (left and right) by pulling them upward until a “click” sound is heard. o Check to ensure that the top frames have been locked and cannot be folded. 5. Lift the main body and spread out the legs. Advice o If the top frames fail to lock, it could be that the position of the open/close lock is too low. Please pull the open/close lock up, and pull the top frames until a “click” sound is heard. Sliding front rail Open/close lock 6. Press the open/close lock down to lock it. 11 Advice o If your hand cannot reach the open/close lock, please lower the sliding front rail before pressing the open/close lock down. (Refer to P.11) Warning o Please maintain a balanced and steady posture when operating the open/close lock on the inside of the crib or when installing or removing the floorboard. Otherwise, there may be a risk of falling into the crib, thus resulting in unforeseeable accident. o Before using this product, please check to ensure that it has been assembled completely. Otherwise, there may be a risk of the baby or the baby’s clothes getting caught in the crib, thus resulting in injury or suffocation to the baby. 12 How to use the crib & playard Assembling the floorboard Warning o Please be careful not to pinch your hand, leg or finger when assembling or folding the crib, or when operating the sliding rail. Otherwise, there may be a risk of unforeseeable accident or injury. Floorboard Side walls Through-hole Hook-and-loop fastener Side wall cover Side wall panel 1. Insert the side wall panels into the side wall covers of the floorboard. (Front and back) 2. Raise the side walls of the floorboard, insert the hook-and-loop fasteners at the corners through the through-holes and then fasten them. (4 locations) Collars Supporting tube Hook-and-loop fastener Hook-and-loop fasteners 13 3. Flip the floorboard over. 4. Unfasten the hook-and-loop fasteners at the collars and insert the supporting tubes (3pcs). Insert the supporting tubes right through the end to prevent the tubes from jutting out. 5. Fasten the hook-and-loop fasteners after the supporting tubes have been inserted. 14 How to use the crib & playard Installing the floorboard Warning o When the baby is able to stand up with support, shift the floorboard to the lower level so that the top rail (top frame) is at least 60cm above the floorboard. Otherwise, there may be a risk of the baby climbing over the top rail and falling off the crib. o When shifting the floorboard to the lower level, the hooks in the corners should be kept in the pouches on the inside of the floorboard. Otherwise, there may be a risk of unforeseeable accident or injury to the baby. <Installing at the upper level>: From newborn to when baby is able to stand up with support. Floorboard Pouch Hook Corner Hook Hook-and-loop fasteners (4 locations) 1. Remove the hooks from the pouches of the floorboard. (4 locations) 2. Flip the floorboard upright and fasten the hooks to the corners of the main body. (4 locations) 3. Push the floorboard down and check that the hooks are not twisted or loosened. 4. Fasten the hook-and-loop fasteners on the side of the main body to the floorboard. (4 locations) <Installing at the lower level>: From when baby is able to stand up with support to 24 months old Pouch Hook-and-loop fasteners (2 locations) 15 1. Keep the hooks in the pouches of the floorboard. (4 locations) 2. Flip the floorboard upright and place it at the base of the main body. 3. Fasten the hook-and-loop fasteners on the side of the main body (left and right) to the floorboard. (2 locations) Advice o If your hand cannot reach the floorboard, please lower the sliding front rail before proceeding. Warning o When installing the floorboard, make sure that the hook-and-loop fasteners on the side of the main body are fastened on the floorboard. Otherwise, there may be a risk of the baby getting caught in the gap between the floorboard and main body, thus resulting in unforeseeable accident, injury or suffocation to the baby. o Please maintain a balanced and steady posture when operating the open/close lock on the inside of the crib or when installing or removing the floorboard. Otherwise, there may be a risk of falling into the crib, thus resulting in unforeseeable accident. 16 How to use the crib & playard Moving the crib & playard Warning o Please do not move the crib when the baby is nearby. There may be a risk unforeseeable accident or injury to the baby. o Please do not move the crib with the baby in it. Otherwise, there may be a risk of unforeseeable accident or injury. Caution o When assembling or moving the crib, please be careful not to damage the floor or wall. Castor About 15cm The crib has four legs, and two of the legs are equipped with castors for the purpose of moving the crib. To move the crib, please tilt the crib by lifting the legs without the castor by about 15cm and leaving the castors in contact with the ground. Using the sliding front rail Please lower the sliding front rail before placing the baby in or taking the baby out of the crib. <Lowering the sliding front rail> Sliding front rail Sliding rail lock (push up) Release the sliding rail locks (left and right) and lower the sliding front rail. 17 <Raising the sliding front rail> “Click” “Click” 1. Release the sliding rail locks (left and right) and raise the sliding front rail. 2. Check that the rail is locked when there is a “click” sound. Warning o Except when placing the baby in or taking the baby out of the crib, leave the sliding front rail at the top rail position. Otherwise, there may be a risk of the baby climbing over the sliding front rail and falling off the crib. o Please be careful not to pinch your hand, leg or finger when assembling or folding the crib, or when operating the sliding rail. Otherwise, there may be a risk of unforeseeable accident or injury. o Please do not sit, lean on or shake the frame. There may be a risk of the crib toppling over, thus resulting in unforeseeable accident or injury. 18 How to use the crib & playard Folding the crib & playard Warning o Please be careful not to pinch your hand, leg or finger when assembling or folding the crib, or when operating the sliding rail. Otherwise, there may be a risk of unforeseeable accident or injury. o Please do not assemble or move the crib, or operate the sliding rail when the baby is nearby. There may be a risk of unforeseeable accident or injury to the baby. o Please maintain a balanced and steady posture when operating the open/close lock on the inside of the crib or when installing or removing the floorboard. Otherwise, there may be a risk of falling into the crib, thus resulting in unforeseeable accident. Advice o This product can be assembled by one person, but it will be safer if the assembly is carried out by two persons. o Please use the centre of the body as the point of support when assembling and folding this product. <Floorboard at the upper level> Hook Hook-and-loop fasteners 1. Unfasten the hook-and-loop fasteners. (4 locations) 2. Disengage the floorboard hooks (4 locations) and remove the floorboard. 19 <Floorboard at the lower level> Sliding front rail Hook-and-loop fasteners Floorboard 1. Unfasten the hook-and-loop fasteners on the side of the main body (left and right). (2 locations) 2. Remove the floorboard. Advice o If your hand cannot reach the floorboard, please lower the sliding front rail before proceeding. Hook-and-loop fastener Pouch Collars Supporting tube 3. Flip the floorboard over after removing it from the crib. 4. Keep the hooks in the pouches of the floorboard. (4 locations) (When removing the floorboard from the upper level) 5. Unfasten the hook-and-loop fasteners at the collars and remove the supporting tubes (3pcs) Side walls Through-hole Hook-and-loop fastener Floorboard Side wall cover Side wall panel 6. Flip the floorboard upright and unfasten the hook-and-loop fasteners at the corners. 20 7. Remove the side wall panels from the side wall covers of the floorboard. (Front and back) 21 How to use the crib & playard Folding the crib & playard Warning o Please be careful not to pinch your hand, leg or finger when assembling or folding the crib, or when operating the sliding rail. Otherwise, there may be a risk of unforeseeable accident or injury. o Please do not assemble or move the crib, or operate the sliding rail when the baby is nearby. There may be a risk of unforeseeable accident or injury to the baby. o Please maintain a balanced and steady posture when operating the open/close lock on the inside of the crib or when installing or removing the floorboard. Otherwise, there may be a risk of falling into the crib, thus resulting in unforeseeable accident. “Click” “Click” Sliding front rail 8. Return the sliding front rail to the highest position. (Refer to P.11) Advice o If your hand cannot reach the open/close lock, please lower the sliding front rail temporarily, and return it to the highest position after completing Step 9. Open/close lock Open/close lock Leg Position of open/close lock 9. Pull the open/close lock upward until the locked position. (Refer to P.7) * The legs will fold inward as the lock is pulled upward. Release button Release button 22 Top frames (front and back) Top frames (left and right) Position of open/close lock 10. Squeeze the release buttons on the top frames (front and back) and push downward. 11. Squeeze the release buttons on the top frames (left and right) and push downward Advice o If the top frames cannot be unlocked, please do not push downward forcefully, but gently pull the open/close lock toward the top frame. o If the top frame cannot be folded, it could be that one of the sides connected to the left or right of the release button has not been fully disengaged. Please squeeze the release button again. 23 Page 14 How to use the crib & playard Floorboard Side wall cover Open/close lock Sliding front rail 12. Pull the open/close lock upward while folding the top frames. 13. Fold and stow the mesh fabric on the sides of the main body inward. 14. Spread the floorboard out face up and fold the side wall covers inward. 15. Place the main body on position 3 of the floorboard with the sliding front rail facing down. Floorboard Hook-and-loop fastener Advice 24 o Roll up the floorboard which has been divided into five equal sections with reference to the diagram below. 16. Roll the floorboard around the main body and fasten it with hook-and-loop fasteners (2 locations). <Using the carry bag> Main body Carry bag Side wall panels (2pcs) Supporting tubes (3pcs) 1. Unzip the carry bag, and put the main body, side wall panels and supporting tubes into the bag. 2. Zip up the carry bag. o Should you encounter any error or omission in this user manual, please contact our customer support centre. o Improvements to this product which will lead to parts differing from what are shown here, may be made without prior notification. 25