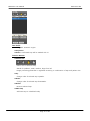
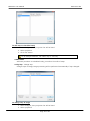
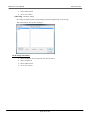
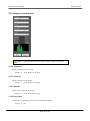
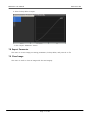
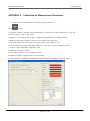
1
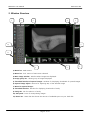
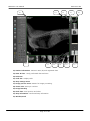
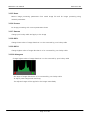
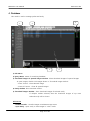
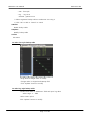
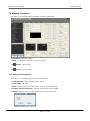
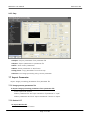
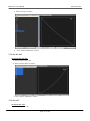
MAXXvue User Manual RA21-093-004 MAXXvue User Manual (For Veterinary use) Version 2.1.1.x 2009/03/30 Manufacturer : vieworks Co., Ltd. #604, Suntechcity 2, 307-2, Sangdaewon-dong Jungwon-gu Seongnam-city Gyeonggi-do, 462-806, South Korea TEL : +82-70-7011-6161 FAX : +82-31-737-4954 www.vieworks.com Page 1 of 84 MAXXvue User Manual RA21-093-004 Contents Revision History .......................................................................................................................................... 6 1. Introduction ............................................................................................................................................ 7 1.1 Start ............................................................................................................................................... 7 2. Window Structure ................................................................................................................................... 9 2.1 Mode bar ..................................................................................................................................... 11 2.2 Tool Panel .................................................................................................................................... 11 2.2.1 Mode ................................................................................................................................. 12 2.2.2 Zoom ................................................................................................................................. 12 2.2.3 Pan ..................................................................................................................................... 13 2.2.4 Window Level .................................................................................................................... 13 2.2.5 Magic Glass ........................................................................................................................ 13 2.2.6 Crop ................................................................................................................................... 14 2.2.7 Invert ................................................................................................................................. 15 2.2.8 1x1 Layout ......................................................................................................................... 15 2.2.9 2x2 Layout ......................................................................................................................... 16 2.2.10 3x3 Layout ....................................................................................................................... 16 2.2.11 User Layout ...................................................................................................................... 17 2.2.12 Clockwise Rotation ........................................................................................................... 17 2.2.13 Counterclockwise Rotation ............................................................................................... 17 2.2.14 Fit ..................................................................................................................................... 18 2.2.15 1:1 .................................................................................................................................... 18 2.2.16 H Mirror ........................................................................................................................... 19 2.2.17 V Mirror ........................................................................................................................... 19 2.2.18 Select all........................................................................................................................... 19 2.2.19 Show / Hide ..................................................................................................................... 20 2.2.20 Rectangle ......................................................................................................................... 20 2.2.21 Distance ........................................................................................................................... 21 2.2.22 Angle ............................................................................................................................... 21 2.2.23 Elliptical ............................................................................................................................ 22 2.2.24 Text .................................................................................................................................. 23 2.2.25 Arrow ............................................................................................................................... 24 2.2.26 Configure ......................................................................................................................... 24 2.2.27 Label ................................................................................................................................ 26 2.3 Menu for opened images ............................................................................................................ 27 2.3.1 W/L adjustment button ...................................................................................................... 27 Page 2 of 84 MAXXvue User Manual RA21-093-004 2.3.2 Menu for opened image .................................................................................................... 27 3. Exposure mode..................................................................................................................................... 28 3.1 How to perform study ................................................................................................................. 29 3.2 Register Study.............................................................................................................................. 29 3.2.1 Patient Register Information .............................................................................................. 30 3.2.2 Worklist .............................................................................................................................. 32 3.2.3 File Work List ..................................................................................................................... 34 3.2.4 Database ............................................................................................................................ 35 3.2.5 Option ................................................................................................................................ 35 3.3 Register Step ............................................................................................................................... 37 3.3.1 Category registration ......................................................................................................... 38 3.3.2 Anatomic region registration ............................................................................................. 39 3.4 Change Step ................................................................................................................................ 40 3.5 DICOM Transfer ........................................................................................................................... 41 3.5.1 Current Transfer Information .............................................................................................. 41 3.5.2 Manager Queue ................................................................................................................. 43 3.6 Add Image to Print mode ........................................................................................................... 44 3.7 Modify / View Information .......................................................................................................... 44 3.7.1 Patient Register Information .............................................................................................. 44 3.7.2 Worklist .............................................................................................................................. 45 3.7.3 Comment ........................................................................................................................... 45 3.8 Delete Image ............................................................................................................................... 45 3.9 Merge Images ............................................................................................................................. 46 3.10 Close All Study .......................................................................................................................... 46 3.11 Close Study ................................................................................................................................ 46 3.12 Step Manage Window ............................................................................................................... 46 3.13 Image processing tool ............................................................................................................... 50 3.13.1 Sharpness ......................................................................................................................... 50 3.13.2 Contrast ........................................................................................................................... 50 3.13.3 Denoise ............................................................................................................................ 50 3.13.4 Freq Layer ........................................................................................................................ 50 3.13.5 Reset ................................................................................................................................ 51 3.13.6 Process ............................................................................................................................. 51 3.13.7 Gamma ............................................................................................................................ 51 3.13.8 ROI L ................................................................................................................................ 51 3.13.9 ROI H ............................................................................................................................... 51 3.13.10 Histogram ...................................................................................................................... 51 4. Database .............................................................................................................................................. 52 Page 3 of 84 MAXXvue User Manual RA21-093-004 4.1 Query Menu ................................................................................................................................ 53 4.1.1 Query Condition ................................................................................................................ 53 4.1.2 Buttons............................................................................................................................... 53 4.2 DICOM Transfer ........................................................................................................................... 54 4.3 Open Study ................................................................................................................................. 54 4.5 Delete Study ................................................................................................................................ 54 4.6 Modify / View Information .......................................................................................................... 54 4.7 Insert Image ................................................................................................................................ 54 4.8 Register Study.............................................................................................................................. 54 4.9 Send Images to Image Process mode ......................................................................................... 54 4.10 Delete Image ............................................................................................................................. 54 4.11 Convert / Export Images ........................................................................................................... 55 4.12 Archive Study ............................................................................................................................. 57 4.12.1 Archive to DVD/CD-ROM ................................................................................................. 57 4.12.2 Archive to Removable hard disk ...................................................................................... 57 4.12.3 Clean archived studies ..................................................................................................... 58 4.13 Add Image to Print mode ......................................................................................................... 58 4.14 Configuration ............................................................................................................................. 59 4.15 Manage Code ............................................................................................................................ 59 4.16 Administration ........................................................................................................................... 60 5. View Mode ........................................................................................................................................... 61 5.1 Change Step ................................................................................................................................ 62 5.2 Image Process ............................................................................................................................. 62 5.3 DICOM Transfer ........................................................................................................................... 62 5.4 Modify / View Information .......................................................................................................... 62 5.5 Convert / Export Images ............................................................................................................. 62 5.6 Merge Images ............................................................................................................................. 62 5.7 Send Images to Image Process mode ......................................................................................... 62 5.8 Delete Image ............................................................................................................................... 62 5.9 Add Images to Print mode .......................................................................................................... 62 5.10 Close All Study .......................................................................................................................... 63 5.12 Close Study ................................................................................................................................ 63 5.13 Stitch.......................................................................................................................................... 63 6. Print ...................................................................................................................................................... 66 6.1 Configuration .............................................................................................................................. 67 6.1.1 Advanced ........................................................................................................................... 67 6.1.2 Print ................................................................................................................................... 68 6.1.3 Test of Connection ............................................................................................................. 68 Page 4 of 84 MAXXvue User Manual RA21-093-004 7. Image Process ...................................................................................................................................... 69 7.1 Open Image ................................................................................................................................ 69 7.2 Create Test-Image ........................................................................................................................ 69 7.3 Convert Raw-Image ..................................................................................................................... 69 7.4 Delete Image ............................................................................................................................... 70 7.5 Manage LUT ................................................................................................................................ 70 7.5.1 Device LUT ......................................................................................................................... 70 7.5.2 Pre Prc LUT ........................................................................................................................ 72 7.5.3 Prc LUT............................................................................................................................... 72 7.6 Manage Procedure ...................................................................................................................... 73 7.6.1 Body part & Projection ...................................................................................................... 73 7.6.2 Procedure ........................................................................................................................... 74 9.6.3 Step .................................................................................................................................... 75 7.7 Import Parameter ........................................................................................................................ 75 7.7.1 Image process parameter list ............................................................................................. 75 7.7.2 Device LUT ......................................................................................................................... 75 7.7.3 Pre Prc LUT ........................................................................................................................ 76 7.7.4 Prc LUT............................................................................................................................... 76 7.8 Export Parameter ......................................................................................................................... 77 7.9 Close Image ................................................................................................................................. 77 APPENDIX A Calibration of Measurement Dimension ............................................................................ 78 APPENDIX B Image Processing .............................................................................................................. 79 Page 5 of 84 MAXXvue User Manual RA21-093-004 Revision History Mar 30, 2009 First release of ver. 2.1.1.122 Page 6 of 84 MAXXvue User Manual RA21-093-004 1. Introduction 1.1 Start To run MAXXvue, “East Asian Language” option in windows should be selected, if not , "Selected collating sequence not supported by the operating system" or “the selected order is not supported by this operating system” message will be displayed. To select this option 1. Start->Control Panel-> Regional and Language… 2. Check “Install files for East Asian languages” option and click “OK” button to install MAXXvue have following login modes. - User mode : Mode for physician who performs study and has not permission of special function. Following functions are not valid in user mode - Archive Study - Merge Image - Delete Study - Configuration of Database - Import Procedure - Manage Procedure - Calibration - Administration in Database mode - Admin mode : Mode for administrator who performs study and has permission of using special function Following functions are not valid in Admin mode - Calibration - Administration in Database mode - Service mode : Mode for service man, all functions are valid in this mode Page 7 of 84 MAXXvue User Manual RA21-093-004 To login select mode and input password. Default password is vieworks Page 8 of 84 MAXXvue User Manual RA21-093-004 2. Window Structure 1 2 3 4 5 10 6 11 9 8 7 1) Mode bar : Main menus 2) Menu bar : Sub- menus of main menu selected 3) Main image window : Window where images are displayed 4) Image group bar : Shows group of images displayed. 5) Thumbnail window of opened images : Window for displaying thumbnails of opened images 6) Opened image adjust : Buttons for adjusting W/L of the selected image 7) Menu for opened images 8) Thumbnail window : Window for displaying thumbnails of study. 9) Study tab : Tab for selection of study. 10) Tool panel : Icons for manipulating images . 11) Status bar : Status bar that shows the amount of available space on your hard disk. Page 9 of 84 MAXXvue User Manual RA21-093-004 13 12 22 21 20 12) Patient information : Patient‟s name, ID, and registered date 13) Date & Time : Study performed date and time 14) Index No 15) Scale bar : Display scale 16) Step manage menu 17) Image process menu : Menus for image processing. 18) Zoom ratio : Ratio per real size 19) Image laterality 20) Pixel data : Pixel position and value 21) Step information : Performed step information 22) Window/Level Page 10 of 84 14 19 15 18 16 17 MAXXvue User Manual RA21-093-004 2.1 Mode bar You can change the mode by selecting a mode button. Though you do not select the mode button, sometimes the mode changes to another mode automatically for efficiency of work. The main function of each mode is as following; 1) Exposure Register and perform study to take images of patient 2) Database Manage databases of study to view, print, send to PACS, etc 3) Viewer Manipulates images of the study 4) Print Print selected images to selected printers 5) Image Process Manages step information and image processing parameters 6) Minimize Minimize MAXXvue 7) Exit Exit MAXXvue. 2.2 Tool Panel The Tool Panel contains various icons of function for manipulating images. Page 11 of 84 MAXXvue User Manual RA21-093-004 2.2.1 Mode This is the default mouse pointer state. To adjust Window/Level Drag mouse with pressing right button of the mouse Brightness + Contrast - Contrast + Brightness - To crop image with pre-determined shutter size Click right button of the mouse and select shutter size 2.2.2 Zoom This function enables interactive zooming by dragging mouse. To zoom in and zoom out 1. Click the “Zoom” icon on the tool panel. 2. Move the mouse pointer to the main image window then the mouse pointer will be changed to magnifying glass. 3. Click left-button and drag the mouse on the image to control zooming. Zoom in – drag mouse upward on the image Zoom out - drag mouse downward on the image 4. Release mouse button to finish zooming. Page 12 of 84 MAXXvue User Manual RA21-093-004 2.2.3 Pan This function is used to do panning image. To do panning 1. Click the “Pan” icon on the tool panel. 2. Move the mouse pointer to the main image window then mouse pointer will be changed to hand shape 3. Press left-button of the mouse and drag the image to the desired position. Pan image up Pan image left Pan image right Pan image down 2.2.4 Window Level This function is used to adjust the window level - brightness and contrast of an image. The current window level values are shown in the left bottom of the image. To adjust the window level of an image 1. Click the “Window/Level” icon on the tool panel. 2. Move the mouse pointer into the image area then mouse pointer will be changed. 3. Press left button of the mouse and drag mouse Brightness + Contrast - Contrast + Brightness - 2.2.5 Magic Glass This function is used to magnify a local region of interest. Page 13 of 84 MAXXvue User Manual RA21-093-004 To magnify a local region of interest 1. Click the “Magic Glass” icon on the tool panel. 2. Move the mouse pointer into the image area then mouse pointer will be changed as following 3. Click on the detail in the image that you want to enlarge. The image around the position of the mouse pointer appears enlarged by a factor of 2 to current image scale. 2.2.6 Crop This function is used to crop image. To apply pre-determined shutter 1. Select an image in main image window 2. Click right button of mouse 3. Select shutter 4. Drag shutter in green with left mouse button to move shutter. To crop manually 1. Click crop icon, then rectangle shutter in green will be displayed Page 14 of 84 MAXXvue User Manual RA21-093-004 2. Locate mouse pointer on the dotted line. 3. Drag dotted line to adjust shutter. 4. Locate mouse pointer inside of the dotted line in green. 5. Drag rectangle to move cropping area. To make shutter size to fit to entire image size, locate mouse pointer inside of the shutter and double-click left button. If image is zoomed in, you may not see the dotted lines. Then click the “Fit” icon and adjust shutter. If cropped image is saved, image will be fitted at display area by doubleclick left button. 2.2.7 Invert This function is used to invert black and white of an image. To invert an image, click the “Invert” icon on the tool panel 2.2.8 1x1 Layout “1x1 Layout” shows one image on main image window. To use the “1x1 Layout”, just click the “1x1” icon on the tool panel. Page 15 of 84 MAXXvue User Manual RA21-093-004 2.2.9 2x2 Layout “2x2 Layout” shows four images on the main image window To use the “2x2 Layout”, just click the “2x2” icon on the tool panel. 2.2.10 3x3 Layout “3x3 Layout” shows nine images on the main image window. To use the “3x3 Layout”, just click the “3x3” icon on the tool panel. Page 16 of 84 MAXXvue User Manual RA21-093-004 2.2.11 User Layout “User Layout” is used to change image format variously. To use the “User Layout” 1. Click the “User Layout” icon on the tool panel and following dialog box will pop-up. 2. Input the number of columns or rows of layout. 3. Click “OK” button. Then the layout will be changed. 2.2.12 Clockwise Rotation This function is used to rotate an image to clockwise by 90˚. To rotate an image to clockwise, click the “CW” icon on the tool panel. 2.2.13 Counterclockwise Rotation This function is used to rotate an image to counterclockwise by 90˚. To rotate an image to counterclockwise, click the “CCW” icon on the tool panel. Page 17 of 84 MAXXvue User Manual RA21-093-004 2.2.14 Fit This function is used to fit an image to the main image window size. If the image is cropped, then cropped area of the image will be fit to the window. To fit an image to main image window size, click the “Fit” icon on the tool panel. 2.2.15 1:1 This function is used to show an image size to the actual size of the object. To use this function the calibration should be done according to clause 3.4.8 To show an image size to the actual size of the object, click the “1:1” icon on the tool panel Page 18 of 84 MAXXvue User Manual RA21-093-004 2.2.16 H Mirror This function is used to convert an image to horizontally mirrored image To use this function, click the “H Mirror” icon on the tool panel. 2.2.17 V Mirror This function is used to convert an image to vertically mirrored image. To use this function, click the “V Mirror” icon on the tool panel. 2.2.18 Select all This function is used to select all opened images to manipulate all opened images at once. To select all the images Click the “Select all” icon on the tool panel. Then the color of the icon is changed gray to yellow and you can apply a function to the all images at once. To deactivate the “Select all” function Click the “Select all” one more. Then the color of the icon is changed yellow to gray. Page 19 of 84 MAXXvue User Manual RA21-093-004 2.2.19 Show / Hide This function is used to show or hide the information and the annotations of an image. In default state, the information is shown. To hide the image information, click the “Show / Hide” icon on the tool panel. To show the image information again, click the “Show / Hide” icon on the tool panel one more. 2.2.20 Rectangle This function is used to draw a rectangle over an image to indicate a region of interest. To draw a rectangle 1. Click the “Rect” icon on the tool panel. 2. Move the mouse pointer to the main image window and the mouse pointer will be changed to rectangle shape. 3. Press left-button of the mouse and drag. To move rectangle Click Mode icon and locate mouse pointer on the line of the rectangle and drag. To resize the rectangle Click Mode icon and click rectangle and locate mouse pointer on the corner of the rectangle and drag. To delete rectangle Click Mode icon and click rectangle and press “del” key. Page 20 of 84 MAXXvue User Manual RA21-093-004 2.2.21 Distance This function is used to measure distances between two points in the image. To draw a line and measure distance 1. Click the “Distance” icon on the tool panel. 2. Move the mouse pointer to the main image window, then the mouse pointer will be changed scale shape. 3. Press the mouse left-button at one point and drag to the other point you want to draw a line between them. 4. The distance between two points is presented automatically. You can draw a vertical line with pressing Shift key and a horizontal line with pressing Ctrl key on the keyboard To modify measuring distance 1. Click Mode icon 2. Click measured line and drag or click end of line and drag. To delete a line 1. Click Mode icon 2. Click measured line and press “del” key. 2.2.22 Angle This function is used to measure the angle among three points over an image. When you complete drawing an angle, the value of the angle is computed and presented automatically. To draw an angle 1. Click the “Angle” icon on the tool panel Page 21 of 84 MAXXvue User Manual 2. RA21-093-004 Move the mouse pointer to the main image window then the mouse pointer will be changed. 3. Click left-button of the mouse and drag, then the measured angle will be displayed. 4. Move the mouse pointer to the end point of angle, and drag the point to another location. The value of the angle is presented automatically. To delete an angle 1. Click Mode icon 2. Click angle. 3. Press “del” key. 2.2.23 Elliptical This function is used to draw an ellipse (including circle) over an image to indicate a region of interest. To draw an ellipse 1. Click the “Elliptical” icon on the tool panel. 2. Move the mouse pointer to the main image window then the mouse pointer will be changed. 3. Click left-button of the mouse and drag. To move ellipse Click Mode icon and locate mouse pointer on the line of the ellipse and drag. To resize the ellipse Page 22 of 84 MAXXvue User Manual RA21-093-004 Click Mode icon and click ellipse and locate mouse pointer on the corner of the ellipse and drag. To delete ellipse Click Mode icon and click ellipse and press “del” key. 2.2.24 Text This function is used to insert text over an image. To insert text 1. Click the “Text” icon on the tool panel. 2. Move the mouse pointer to the main image window then the mouse pointer will be changed. 3. Drag the mouse over a rectangle area where you want to insert text. 4. Type text in the rectangle. To end typing, Press “Enter” key or click the mouse left-button outer region of the rectangle. Then the background changes from white color to transparent. To move text Click Mode icon and locate mouse pointer on the text and drag. To resize the text window Click Mode icon and click text and locate mouse pointer on the corner of the text window and drag. To delete text Click Mode icon and click text and press “del” key. To modify text Click Mode icon and click text with Ctrl key pressed. Page 23 of 84 MAXXvue User Manual RA21-093-004 2.2.25 Arrow This function is used to draw an arrow on the image. To draw an arrow 1. Click the “Arrow” icon on the tool panel. 2. Move the mouse pointer to the main image window then the mouse pointer will be changed as shape of arrow. 3. Click a point and drag mouse to draw an arrow. To move arrow Click Mode icon and locate mouse pointer on the arrow and drag. To resize the arrow Click Mode icon and click arrow and locate mouse pointer on the one end of the arrow and drag. To delete arrow Click Mode icon and click arrow and press “del” key. 2.2.26 Configure This function is used to modify the configuration of annotation and calibrate measuring unit and configure pre-determined shutter. Page 24 of 84 MAXXvue User Manual RA21-093-004 To input calibration coefficient refer to Appendix A. Configuration of annotation font 1. Indication font size : Modify size of distance and angle indicator. 2. Description font size : Modify the input text size. 3. L./R Label font size : Modify L/R label font size 4. Font : Modify font Configuration of pre-determined shutter size To register pre-determined shutter size 1. Click Add button to add new size, input new shutter size and click OK button 2. Select Shutter size on left list and click “>” button to register 3. To delete, select shutter size on right side and click “<” button Page 25 of 84 MAXXvue User Manual RA21-093-004 2.2.27 Label This function is used to put label on the image and input patient orientation and laterality To put label on the image 1. Click the “Label” icon on the tool panel and the following dialog box will pop up. 2. Select insert position and click L/R button to put label To remove the label Select the label and press “del” key To input patient orientation 1. Click the “Label” icon on the tool panel and the following dialog box will pop up. 2. Input patient orientation (defined by DICOM) by clicking button of orientation. 3. Click OK button to confirm. To input image laterality 1. Click the “Label” icon on the tool panel and the following dialog box will pop up. Page 26 of 84 MAXXvue User Manual RA21-093-004 2. Select image laterality (defined by DICOM) by clicking button. 3. Click OK button to confirm. 2.3 Menu for opened images 2.3.1 W/L adjustment button Adjust window/level of selected image Window/level will vary while triangle button is pressed. The button in center is to restore window/level, double click this button to restore window/level as saved ones. 2.3.2 Menu for opened image Menu to save and close opened image - Save : Save selected image - Save All : Save all opened images - S & C : Save and close selected image - S &C All : Save and close all opened images - Close : Close selected image - Close All : Close all opened images Page 27 of 84 MAXXvue User Manual RA21-093-004 3. Exposure mode This mode is used to register study and perform study 2 1 5 4 3 1) Step : Step information of study ready to perform. 2) Step manage window : Manage scheduled step 3) Image processing tool : Adjust image processing 4) Thumbnail window : Thumbnail image of the performed study 5) Study tab : Tab for selection of study. Sub-menus - Register Study : Register study - Register Step :Configure step selection menu - Change Step : Change step of study and do image processing with different parameters - DICOM Transfer : Transfer images to DICOM storage server. - Add Image to Print Mode : Send images to “Print” mode for printing. - Modify/View Information : Modify patient information of current study. - Delete Image : Delete image in the performed study. Page 28 of 84 MAXXvue User Manual RA21-093-004 - Merge Image : Merge image from selected study to other study. - Close All Study : Close all opened study - Close Study : Close selected study 3.1 How to perform study Step 1 : Register patient using Register study menu Step 2 : Register step To register step, use “Register Step” menu or “ADD PROC” button or “ADD STEP” button. Step 3 : Select step to perform Step 4 : Shot X-ray then image will be displayed after processing. 3.2 Register Study 1. Patient Register Information : Used to register a new patient. 2. Worklist : Register study from worklist server. 3. File Worklist : Register study from text file. 4. Database : Retrieve patient information from local database. Page 29 of 84 MAXXvue User Manual RA21-093-004 3.2.1 Patient Register Information This menu is used to input patient information manually. To register a new patient 1. Input patient information 2. Click “Registration” button. Items Fields *ID : Identification number of the patient *Name : Name of the patient *Sex : Sex of the patient (M: male / F: female / O: others) *Age : Age of the patient, default unit is Y and other unit can be inputted - Y: year(s) - M: month(s) - W: Week(s) - D: Day(s) Accession Number Birthday : Birthday and height and weight of patient If birthday inputted, then age will be automatically calculated and applied Page 30 of 84 MAXXvue User Manual RA21-093-004 Body Part to Examine referring Physician Performing Physician : Performing physician can be selected in “Performing Physician” combo box menu Physician list is managed in option menu Comment Telephone : Phone number of the patient Address : Home address of the patient Height : Height of the patient Weight: Weight of the patient. Species Description Species Code Sequence Breed Description Breed Code Sequence Breed Registration Number Breed Registration Code Sequence Responsible Person Page 31 of 84 MAXXvue User Manual RA21-093-004 Responsible Person Role Responsible Organization The “*” marked item values are essentially required. “Performing Physician” is not cleared by “Clear all”. Function Buttons Registration Register patient Registered patient will be saved to local database and will be shown in study tab Add Database : Save patient information to local database to use later. Urgent Patient If you do not have time to enter the personal data of the patient in an emergency or if you do not know the data, you can skip inputting patient information and later you can modify Clear all : Clear all patient information. Close : Exit “Register study” menu 3.2.2 Worklist This menu is used to get scheduled study from worklist server Page 32 of 84 MAXXvue User Manual RA21-093-004 Worklist server should be registered before using it Function Buttons Registration : Register selected study Edit : Modify patient information of selected study. If clicked, the menu will be changed to “Patient Register Information” Worklist Query : Query scheduled study from worklist server with query condition Today : Query scheduled study on today Today & Yesterday : Query scheduled study on today and yesterday Urgent Patient This is all the same with the “Urgent Patient” in “Patient Register Information” tab. Configuration : Register worklist server. To register worklist server 1. Click the “Insert Worklist-SCP item” button and the dialog box as following will pop up. Page 33 of 84 MAXXvue User Manual RA21-093-004 2. Input information of worklist server 3. Click the “OK” button to confirm. To delete registered worklist server 1. 2. Select registered worklist server Click “Delete Worklist SCP Item” button To test registered worklist server 1. 2. Select registered worklist server Click “Test” button, then test result will be displayed Close : Exit configuration menu 3.2.3 File Work List This menu is used to get scheduled study from text file. The file format is set in “MAXXvueConfigure” program Function Buttons Registration Edit Get Retrieve scheduled study from worklist file Urgent Patient Configuration This is used to set folder where worklist file located. Close Page 34 of 84 MAXXvue User Manual RA21-093-004 3.2.4 Database This menu is used to register patient using local database. If patient is registered once, then information of patient will be stored in local database to make it easy to input patient information. Function Buttons Registration Edit Database Query Delete Item This is used to delete a patient data. Urgent Patient Close 3.2.5 Option This menu is for helping inputting performing physician name in study registration. Performing Physicians listed here is used to “Patient Register Information” tab. Page 35 of 84 MAXXvue User Manual RA21-093-004 Using performing physician name from worklist Used to get “Performing Physician Name” from worklist Page 36 of 84 MAXXvue User Manual RA21-093-004 3.3 Register Step This menu is used to register step. Step means combination of anatomic region and projection 1 2 3 1) Projection list : Projection list of the selected anatomic region. 2) Anatomic region : Anatomic region list 3) Category registration : Register category 4) Anatomic region registration : Register anatomic region 5) Patient size : Patient size button - Pediatric - Small - Medium - Large Page 37 of 84 4 5 MAXXvue User Manual RA21-093-004 To register Step 1. Select category 2. Select anatomic region 3. Click projection 4. Click patient size 3.3.1 Category registration Register category of animal like dog and cat etc. Function Buttons Insert Add new category Delete Delete registered category Page 38 of 84 MAXXvue User Manual RA21-093-004 3.3.2 Anatomic region registration Function Buttons Insert Add new anatomic region Anatomic region list and projection list are managed in “Image Process” mode. Projection list of added anatomic region will be listed in projection list Delete Delete anatomic region Modify Modify location of anatomic region button Page 39 of 84 MAXXvue User Manual RA21-093-004 3.4 Change Step This menu is used to change step of performed study and change image processing. Function Buttons Change step Change step of performed study Enhance image Change image processing To change step 1. Select category 2. Select anatomic region and projection and patient size 3. Click “Change step” button, then step will be changed and image processing will be done To change image processing 1. Select category 2. Select anatomic region and projection and patient size 3. Click “Enhance image” button, then image processing will be done with the parameters of selected step. Page 40 of 84 MAXXvue User Manual RA21-093-004 3.5 DICOM Transfer This menu is used to transfer images to DICOM storage server. To transfer images to DICOM storage server 1. Select image 2. Click “DICOM Transfer” button 3. Select option to transfer 3.5.1 Current Transfer Information Function Buttons Transfer Start transferring images to DICOM storage server - All Images : transfer all image of the study - Selected Images : transfer selected images only Page 41 of 84 MAXXvue User Manual RA21-093-004 Configuration - Option Compression : compress image data or not. Transfer Syntax : Implicit VR Little Endian or Explicit VR Little Endian Software Collimation Cut : image inside of the crop area will be transferred, so the transferring image size will be reduced. Fill : image outside of crop area will be filled black when transferred Burned in Information Selected information and annotation will be burned in on image when transferred. To select option, click “Advanced” button Auto send when close study at exposure mode All images in study will be transferred to DICOM server automatically when study is closed. Advanced Set burn-in information option Page 42 of 84 MAXXvue User Manual RA21-093-004 Enable MAX PDU Size(byte) Set ”MAX PDU Size” used in DICOM transfer, if not checked, default value will be used - Hospital Information : used in making DICOM tag - Test: checks the status of the selected SCP-item. - Insert Storage-SCP item : Register DICOM storage server - Delete Storage-SCP item : Delete registered DICOM storage server 3.5.2 Manager Queue Manager Queue shows the list of items waiting for the DICOM transformation. Using the item bar between the tab and the list, you can sort the list by requested time, ID, name, sex and age, and so on. Page 43 of 84 MAXXvue User Manual RA21-093-004 Function Buttons Retry Configure This is all the same with the “Configure” in “Current Transfer Information” tab. Delete Item This is used to cancel the transformation of an image. 3.6 Add Image to Print mode This menu is used to send images to “print” menu to print. To print images 1. Select images 2. Click “Add Image to Print mode” button. 3.7 Modify / View Information Modify / View Information is used to modify information of a patient and manage report of a patient. 3.7.1 Patient Register Information To modify information, click Modify button after modifying information Page 44 of 84 MAXXvue User Manual RA21-093-004 3.7.2 Worklist This is used to replace current patient information with new patient information that is acquired from worklist server. The usage is same with that of “Exposure->Register Study->Worklist” 3.7.3 Comment You can put comment about study and image. To input comment, click “Modify” button after writing comment. 3.8 Delete Image This menu is used to delete a selected image. To delete an image, select images in thumbnail image window and click “Delete Image” button. If you want to delete several images at once, hold on pressing [Ctrl] key while you are selecting images. Page 45 of 84 MAXXvue User Manual RA21-093-004 3.9 Merge Images This menu is used to merge an image(s) from the study of a current patient to the study of another study. To merge images 1. Select an image(s) in selected study. 2. Click the “Merge Images” menu and then select the target study. 3. Click the “Move button, and select option - All Images : Move the all images in the study. - Selected Images : Move the only selected image(s). 4. Click “OK” button to confirm. 3.10 Close All Study This menu is used to save and close all study. 3.11 Close Study This menu is to save and close selected study. 3.12 Step Manage Window This menu is to manage scheduled and register steps. Page 46 of 84 MAXXvue User Manual RA21-093-004 Item Fields Bodypart : Anatomic region. Projection Status : Performed step will be marked with „O‟ Function Buttons Patient Size Patient size of selected step. Stands for pediatric, small, medium, large from left Image processing parameter is registered according to combination of step and patient size. Up Change order of selected step upwards. Down Change order of selected step downwards. Delete Remove selected step ADD Step Add new step to scheduled study Page 47 of 84 MAXXvue User Manual RA21-093-004 To add step to scheduled study 1. Select bodypart, then projection list will be listed 2. Select projection 3. Click “OK” button To do multiple selection, use “Shift” key or “Ctrl” key ADD PROC Add new procedure to scheduled study, procedure is bundle of steps. Chg Step : Change step Change steps of image, image processing will be performed automatically if step changed. To change step of image 1. Select bodypart, then projection list will be listed 2. Select projection Page 48 of 84 MAXXvue User Manual RA21-093-004 3. Select Patient Size 4. Click “OK” button Ehn Img : Enhance image Do image processing with using image processing parameter of other step . Step information will not be changed. To do image processing 1. Select bodypart, then projection list will be listed 2. Select projection 3. Select Patient Size 4. Click “OK” button Page 49 of 84 MAXXvue User Manual RA21-093-004 3.13 Image processing tool Refer to Appendix B for more information about image processing 3.13.1 Sharpness Adjust sharpness of the image . Range : 1 – 10 (1: weak, 10 :strong) 3.13.2 Contrast Adjust contrast of the image . Range : 1 – 10 (1: weak, 10 :strong) 3.13.3 Denoise Adjust noise reduction intensity . Range : 1 – 10 (1: weak, 10 :strong) 3.13.4 Freq Layer The number of frequency layer used for image processing . Range : 1 – 10 Page 50 of 84 MAXXvue User Manual RA21-093-004 3.13.5 Reset Restore image processing parameters from saved image file and do image processing using restored parameters. 3.13.6 Process Do image processing with current parameters shown 3.13.7 Gamma Change post lookup table and apply to the image 3.13.8 ROI L Change lowest value of image data that is to be converted by post lookup table 3.13.9 ROI H Change highest value of image data that is to be converted by post lookup table 3.13.10 Histogram Change highest value of image data that is to be converted by post lookup table Set range of image data that is to be converted by post lookup table. To adjust press triangle mark and drag. The adjusted range will be applied to the image immediately Page 51 of 84 MAXXvue User Manual RA21-093-004 4. Database This mode is used to manage performed study 1 3 2 5 4 1) Sub-Menu 2) Query Menu : Menu for searching database 3) Thumbnail images of opened images window : Show thumbnail images of opened images. To open images, double click images shown in “Thumbnail image window”. - “Close” button : Close selected image. - “Close All” button : Close all opened images. 4) Study window: Show searched studies.. 5) Thumbnail images window : Show thumbnail images of selected study. If multiple studies selected, then the thumbnail images of top most selected study will be shown. Sub-menus - DICOM Transfer : Transfer images to DICOM storage server. - Open Study : Open study to view images in “View” mode Page 52 of 84 MAXXvue User Manual RA21-093-004 - Delete Study : Delete selected study - Modify/View Information : modify patient information of current study. - Insert Image : Add images in this study by registering this study for x-ray exposure. - Send Images to image Process Mode : Send images to image “Processing” mode to adjust image processing parameters. - Delete Image : Delete selected image from study. - Convert/Export Image : Export images to CD or user directory with various image format.. - Archive Study : Make backup copy of the study. - Add Image to Print Mode : Send images to “Print” mode for printing. - Configuration : set warning level of occupied storage volume and set period of making backup copy of database. - Manage Vet. Code : Manage breed and species code of veterinary. - Administration : Manage password, language and screen look-up table. The position of item fields in study windows can be changed by dragging item fields with pressing “Shift” key. The studies displayed in “Study window” can be sorted by clicking title of item field in order of clicked item field. To select multiple studies, press “Shift” key and select studies 4.1 Query Menu 4.1.1 Query Condition The “Query condition” menu is used to query studies with condition selected. To search studies, input query condition and click “Search” button. 4.1.2 Buttons Today : Used to search studies performed today. Today and Yesterday : Used to search studies performed today and yesterday. One Week : Used to search studies performed within a week. Two Week : Used to search studies performed within two week. One Month : Used to search studies performed within a month. Page 53 of 84 MAXXvue User Manual RA21-093-004 4.2 DICOM Transfer This is all the same with the “DICOM Transfer” in the Exposure mode. The images of selected studies or selected images in “Thumb image window” will be transferred. 4.3 Open Study Open studies to view images in “View” mode. The mode will be changed to “View” mode automatically. 4.5 Delete Study The “Delete Patient” menu is used to delete all the data of selected studies. The password is needed to delete studies 4.6 Modify / View Information This is all the same with the “Modify / View Information” in the Exposure mode. 4.7 Insert Image This menu is used to insert new image(s) in the study of a patient. Selected studies will be registered to “Exposure” mode for examination. The mode will be changed to “Exposure” mode automatically. 4.8 Register Study This menu is to register study using patient information of selected study. The mode will be changed to “Exposure” mode automatically. 4.9 Send Images to Image Process mode This menu is used to send images to image “Processing” mode to adjust image processing parameters. The mode will be changed to “Image Process” mode automatically and selected images will be displayed. The image will be displayed with no image processing. 4.10 Delete Image This menu is used to delete images. Selected images in “thumbnail image window” will be deleted by clicking this menu. Page 54 of 84 MAXXvue User Manual RA21-093-004 4.11 Convert / Export Images The Convert / Export Images is used to export images to CD/DVD or designated folder in various formats. To export images 1. Select designation as CD/DVD or user folder 2. Select options in Item fields 3. Configure “Burned-in Option” 4. Click “Prepare” button 5. Click “Copy/Burn” button Reset/Format : Select media of exporting mages. Image Format : Select image format to be exported - You can export DICOM with a viewer by checking „Include viewer‟. - Compression option is supported if JPEG format is selected Compression : Select Compression method Compression Ratio : Set compression ratio Burned Information : Select option to burn-in various information on image. Page 55 of 84 MAXXvue User Manual RA21-093-004 Software Collimation: You can select software collimation on or off. Page 56 of 84 MAXXvue User Manual RA21-093-004 4.12 Archive Study This menu is to make backup copy of studies to DVD / CD-ROM or Removable hard disk. The meaning of the icons in study list: : Normal state – Data file is in the local drive : Archived state - Study was archived and not erased. : Archived and cleaned state – Data file is archived and erased 4.12.1 Archive to DVD/CD-ROM This menu is to make backup copy of studies to DVD / CD-ROM To Archive images to DVD/CD-ROM 1. Insert CD/DVD 2. Select CD drive. 3. Click “Prepare” button, then studies not archived will be listed. 4. Select studied to archive 5. Click “Archive” button to archive 4.12.2 Archive to Removable hard disk This menu is to make backup copy of studies to removable hard disk. To archive studies to DVD/CD-ROM 1. Plug in removable hard disk. 2. Select disk drive. 3. Click “Prepare” button, then studies not archived will be listed. 4. Select studied to archive 5. Click “Archive” button to archive Page 57 of 84 MAXXvue User Manual RA21-093-004 4.12.3 Clean archived studies This menu is used to remove archived studies in the local hard disk. To clean archived studies, do the following procedure 1. Select backup media volume where the archived studies saved.. 2. Select studies to remove 3. Click “Clean” button, then selected studies will be removed from local hard disk. To clean all listed studies, use “Clean All” button. 4.13 Add Image to Print mode This menu is used to send images to “print” menu to print. To print images 3. Select images 4. Click “Add Image to Print mode” button. Page 58 of 84 MAXXvue User Manual RA21-093-004 4.14 Configuration This menu is used to set warning level of hard disk capacity and set period of making backup of database. The system automatically make backup copy of *.mdb, *.ini files into backup folder at intervals of the input number of days. Backup folder : D:\MAXXvueData\BackupFiles\ The status of the hard disk capacity is displayed as led level indicator on the left bottom side of the screen. 4.15 Manage Code This menu is to manage breed and species code of veterinary. Page 59 of 84 MAXXvue User Manual RA21-093-004 Species, breed and breed registration institute can be added. Designator : Name of institute where these code made. Code Meaning : Description. Deleted : Show the status of code. Show all : Display all list of data if selected, if not selected then display only undeleted list. 4.16 Administration This menu is only available for service and used to change screen LUT, change passwords, change language. Change Screen LUT Screen LUT is used to display images with applying look-up table to compensate difference between monitors, the look-up table is managed in “Image Process” mode. Change Language Change language for menu. Selected language will be applied when restart MAXXvue. If you change language, you need language files. Page 60 of 84 MAXXvue User Manual RA21-093-004 5. View Mode This mode is used to apply various images processing to images. - General Menu - Processing Menu Sub-menus - Change Step : change step of study and do image processing with different parameters. - Image Process : do image processing with adjusting parameters. - DICOM Transfer : transfer images to DICOM storage server. - Modify/View Information : modify patient information of current study. Page 61 of 84 MAXXvue User Manual RA21-093-004 - Convert/Export Image : Export images to CD or user directory with various image format.. - Merge Image : Merge image from selected study to other study. - Delete Image : Delete selected image from study. - Send Images to image Process Mode : Send images to image “Processing” mode to adjust image processing parameters. - Add Image to Print Mode : Send images to “Print” mode for printing. - Close All Study : Close all registered study - Close Study : Close selected study - Stitch Image : Stitch images in same study. 5.1 Change Step This menu is all the same with “Change Step” menu in Exposure mode. 5.2 Image Process This menu is all the same “Image Process tools” menu in Exposure mode. 5.3 DICOM Transfer This menu is all the same with “DICOM Transfer” menu in Exposure mode. 5.4 Modify / View Information This menu is all the same with “Modify / View Information” menu in Exposure mode. 5.5 Convert / Export Images This menu is all the same with “Convert / Export Images” menu in Database mode. 5.6 Merge Images This menu is all the same with “Merge Images” menu in Exposure mode. 5.7 Send Images to Image Process mode This menu is all the same with “Send Images to Image Process mode” menu in Database mode. 5.8 Delete Image This menu is all the same with “Delete Image” menu in Exposure mode. 5.9 Add Images to Print mode This menu is all the same with “Add Images to Print mode” menu in Database mode. Page 62 of 84 MAXXvue User Manual RA21-093-004 5.10 Close All Study Close all opened studied 5.12 Close Study Close selected study 5.13 Stitch Stitch selected images in selected study To stitch images 1. Select images 2. Click “Stitch” button, then image stitching dialog will pop up. 3. Adjust border Page 63 of 84 MAXXvue User Manual RA21-093-004 4. Align images by moving images 5. Adjust brightness of image and click “Blend” button to blend if needed 6. Click „OK” button 7. Assign step, then new study will be created with stitched image in database. Adjust Border menu Adjust border is used to cut out unneeded area of the image. After adjusting, click “Border Confirm” button to apply adjusted border. To adjust border 1. Click “Border Adjust” button 2. Click image and drag green line to cut. 3. Click “Border Confirm” button Sort Image menu Set position of the images To sort images 1. Click image 2. Click “∧” to move image upward or click “∨” to move image downward Auto Stitch menu Align images automatically. Position menu Align images by moving images manually To align images 1. Click image 2. Set speed of moving image 3. Put image to top or back 4. Click “∧” to move image upward Click “∨” to move image downward Click “>” to move image right Click “<” to move image left. Brightness menu Adjust offset of brightness of image to match brightness of images Page 64 of 84 MAXXvue User Manual RA21-093-004 To adjust brightness images 1. Click image 2. Set speed of brightness adjustment 3. Click “+” or “-“ button to adjust + : increase brightness offset - : decrease brightness offset Blend Kill difference in brightness of the border area. Reset Reset all to the state of initial state. Page 65 of 84 MAXXvue User Manual RA21-093-004 6. Print This mode is used to print images using DICOM printer or paper printer. Sub-menus - Print : execute printing to printer - Reset : Clear all images - Delete : Delete selected image. - Swap : Change the position of the two images each other To swap images, select two images and click “Swap” menu - Configuration : Configure printer related parameters . To print images 1. Select images and click “Add image to Print mode‟ menu 2. Do configuration 3. Adjust image if needed 4. Click “Print” menu to print Page 66 of 84 MAXXvue User Manual RA21-093-004 6.1 Configuration Select printer and configure basic parameters. 6.1.1 Advanced Register DICOM printer, and modify parameters To modify, just click parameters and modify. Insert Printer Item Insert new DICOM printer Delete Printer Item Delete registered DICOM printer Burn-in option Select information to be burned-in on image Page 67 of 84 MAXXvue User Manual RA21-093-004 6.1.2 Print This menu is to execute printing. 6.1.3 Test of Connection This button is used to check the connection of the printer. Page 68 of 84 MAXXvue User Manual RA21-093-004 7. Image Process This mode is to manages step information and image processing parameters Sub-menus - Print : execute printing to printer - Reset : Clear all images - Delete : Delete selected image. - Swap : Change the position of the two images each other To swap images, select two images and click “Swap” menu - Configuration : Configure printer related parameters . 7.1 Open Image Open raw images to do image processing MAXXvue only supports the IMG image format. 7.2 Create Test-Image This menu is to make a copy of selected image 7.3 Convert Raw-Image This menu is to restore images to raw image. Page 69 of 84 MAXXvue User Manual RA21-093-004 7.4 Delete Image This menu is used to delete an image in the study of images. 7.5 Manage LUT Manage lookup table 7.5.1 Device LUT Add, delete and modify lookup table that is used in DICOM transfer, print, display. Add To add lookup table 1. Click “Add Item” button 2. Input name of lookup table in “LUT Name” field 3. Input description in “Description” field 4. Select type of lookup table in “Type” field Page 70 of 84 MAXXvue User Manual RA21-093-004 - User : free style - Log : log curve - Gamma : gamma curve 5. Select registered lookup table to make new one using it 6. Click “OK” to add or “Cancel” to cancel Delete Delete lookup table Update Modify lookup table Close Exit menu To make free style lookup table . Drag white rectangle mark to modify . Change value in Original and Remap field . Click “Update” button to modify To make log style lookup table . Double click value in “Parameter” field and input log value Value range : 1 - 1000 . Select invert option . Click “Update” button to modify Page 71 of 84 MAXXvue User Manual RA21-093-004 To make log style lookup table . Double click value in “Parameter” field and input gamma value Value range : 0 - 1 . Select invert option . Click “Update” button to modify 7.5.2 Pre Prc LUT This lookup table is used for image processing and add/delete/modify not possible. 7.5.3 Prc LUT This lookup table is used for image processing and add/delete/modify not possible. Page 72 of 84 MAXXvue User Manual RA21-093-004 7.6 Manage Procedure This menu is to manage step and image processing parameters Procedure : Bundle of steps Step : Combination of body part and projection button : Move dialog button : Exit this menu 7.6.1 Body part & Projection This menu is to manage body part and projection list Code Meaning : Body part/Projection name Code Value : ID code Alias : Simple name, this name will be used in GUI of MAXXvue Coding Scheme Designator : Institute where these code created Import : Import body part and projection list from file(*.qxcd) Selected item will be imported. Page 73 of 84 MAXXvue User Manual RA21-093-004 Export : Save body part and projection list to file (*.qxcd) 7.6.2 Procedure Manage procedures To insert new procedure 1. Click “Insert” button in left side. 2. Fill in fields 3. Insert steps “Up” button : Move step upward in list “Down” button : Move step downward in list Page 74 of 84 MAXXvue User Manual RA21-093-004 9.6.3 Step Import : Import parameters from parameter file Export : Export parameters to parameter file Save : Save current parameters Reset : Reset parameters to saved ones Copy From : Copy parameters from other step Process : Do image processing using current parameter 7.7 Import Parameter Import image processing parameters from parameter file 7.7.1 Image process parameter list To import image processing parameters from parameter file 1. Click “Open File” button 2. Select parameter file and open. Extension of parameter is “.npar”. 3. Select parameters and click “Import Parameter” button to import. 7.7.2 Device LUT To import Device LUT 1. Click “Device LUT” button Page 75 of 84 MAXXvue User Manual RA21-093-004 2. Select lookup to import. 3. Click “import Parameter” button 7.7.3 Pre Prc LUT To import Pre Prc LUT 1. Select “Pre Prc LUT” tab 2. Select lookup table to import. 3. Click “Import Parameter” button 7.7.4 Prc LUT To import Prc LUT 1. Select “Prc LUT” tab Page 76 of 84 MAXXvue User Manual RA21-093-004 2. Select lookup table to import. 3. Click “Import Parameter” button 7.8 Export Parameter This menu is to save image processing parameters, lookup tables, and protocol to file 7.9 Close Image This menu is used to close an image with the test image(s). Page 77 of 84 MAXXvue User Manual RA21-093-004 APPENDIX A Calibration of Measurement Dimension To calibrate the measurement unit, follow following procedure Click button 1. Uncheck “Enable to indicate calibrated dimension” check box to select dimension as pixel unit 2. Attach 200mm scale on the screen 3. Make an x-ray expose, then image of scale will be displayed on the image window 4. Measure the length of scale in pixel unit, and regard the length as A 5. Calculate 200/A with the accuracy of 4 digit below 0, and regard it as B 6. Check “Enable to indicate calibrated dimension” check box to select dimension as mm 7. Input B in the “Calibration coefficient” field 8. Measure the length of scale 9. The length of scale should be 200mm ∩ 1mm 10. Measure length of diagonal line of the rectangle 11. Input length to “Measure a diagonal line below and put the length in mm unit” field Page 78 of 84 MAXXvue User Manual RA21-093-004 APPENDIX B Image Processing B.1 Image Acquisition Flow Image Capturing Defect Compensation Receive image from Detector Receives captured image from detector Compensate for defected line Compensates defectedpixels pixelsand and lines Dark Offset Compensation Compensate offset ofofblack Compensates for offset black Gain Correction Corrects gain of pixels to compensate for difference in brightness Correct gain of pixels to compensate difference of brightness between center the edgeby caused by lens anditself CCD of each the pixels thatand is caused lens and CCD Save Raw Image Savesimage image as raw Save rawimage image Image Processing Do imageimage processing Performs processing Save Processed Image Save and display Savesprocessed and displaysimage processed image Page 79 of 84 MAXXvue User Manual RA21-093-004 B.2 Image Processing Parameter B.2.1 Basic Set basic parameters of image processing. B.2.1.1 Sharpness - This parameter is used to enhance the edge of the image. - The bigger the value is, the more enhanced the edge is. B.2.1.2 Contrast - This parameter is used to enhance the contrast of the image. - The bigger the value is, the more enhanced the contrast is. B.2.1.3 Denoise - This parameter is used to reduce noise of the image. - The bigger the value is, the stronger the noise reduction is. - Image will become soft if this value is set high. B.2.1.4 Freq Layer - Image is divided into multi-layers by frequency levels for image Processing. This parameter is used to determine on the number of frequency layers to be used for image processing. Page 80 of 84 MAXXvue User Manual RA21-093-004 - The bigger the value is, the wider the image processing is performed, even to the extent of low frequency level. B.2.1.5 Lookup - This parameter is used to select lookup table that is used to invert black and white and to expand histogram of the image. B.2.2 Boost B.2.2.1 Sharpness Boost - The sharpness value set in basic parameter will be applied to all frequency layers equally. These parameters are to adjust sharpness of each frequency layer additionally. - L1 – L10 This stands for each frequency layer of the image. The number followed by „L‟ is frequency layer index. High frequency layer index means low frequency layer of the image. - Default value is 100. The range of value is 0 to 1000. 100 mean no additional sharpness adjustment. At the value lower than 100, sharpness enhancement is stronger. At the value higher than 100, sharpness enhancement is weaker. B.2.2.2 Sharpness Slope - This parameter is used to adjust the sharpness enhancement strength of all frequency layers to the sharpness value set in basic parameter. - Default value is 100. The range of value is 0 to 1000. 100 mean no additional sharpness adjustment. At the value lower than 100, sharpness enhancement on high frequency layer of the image is stronger than that on low frequency layer of the image. At the value higher than 100, sharpness enhancement on low frequency layer of the image is stronger than that on high frequency layer of the image. B.2.2.3 Contrast Boost - The contrast value set in basic parameter will be applied to all frequency layers equally. These parameters are to adjust contrast of each frequency layer additionally. - L1 – L10 This stands for each frequency layer of the image. The number followed by „L‟ is frequency layer index. High frequency layer index means low frequency layer of the image. Page 81 of 84 MAXXvue User Manual RA21-093-004 - Default value is 100. The range of value is 0 to 1000. 100 mean no additional contrast adjustment. At the value lower than 100, contrast enhancement is weaker. At the value higher than 100, contrast enhancement is stronger. B.2.2.4 Contrast Slope -This parameter is used to adjust contrast of all frequency layers to the contrast value set in basic parameter. - Default value is 0. The range of value is 0 to 1000. 0 means no additional contrast adjustment. At the value higher than 0, contrast enhancement on low frequency layer of the image is stronger than that on high frequency layer of the image. B.2.3 Pre Filter Apply filter before doing MLDC. B.2.3.1 None No filtering B.2.3.2 High Pass Apply high pass filtering to make image sharp. The range of value is 0 to 1000. Higher value makes image sharper. B.2.3.3 Low Pass Apply low pass filtering to make image smooth. The range of value is 0 to 1000. Value 0 : no filtering 1 – 9 : value x value average filter. 10 – 1000 : higher value makes image smoother. B.2.4 Post Filter Apply filter after doing MLDC. B.2.4.1 None No filtering Page 82 of 84 MAXXvue User Manual RA21-093-004 B.2.4.2High Pass Apply high pass filtering to make image sharp. The range of value is 0 to 1000. Higher value makes image sharper. B.2.4.3Low Pass Apply low pass filtering to make image smooth. The range of value is 0 to 1000. Value 0 : no filtering 1 – 9 : value x value average filter 10 – 1000 : higher value makes image more smooth. B.2.5 MLDC Range Convert data range of the image for MLDC. B.2.5.1 In Input range of Image data The range of image data is 0 to 4095. B.2.5.2 Out Output range of Image data The range of image data is 0 to 4095. B.2.6 Pre Lookup B.2.7 Post Lookup B.2.8 Apply Range The data range set in this field will be used for post-lookup conversion B.2.8.1 Manual Set range manually. B.2.8.2 Default Set range automatically using default algorithm. The offset adjustment will be applied. B.2.8.3 Auto Page 83 of 84 MAXXvue User Manual RA21-093-004 Set range automatically using auto algorithm. The offset adjustment will be applied. B.2.8.4 Low Offset Adjust lowest value of the range B.2.8.5 High Offset Adjust highest value of the range. B.2.9 Display ROI Set data range of image that is to be displayed on the monitor by default. B.2.9.1 Manual Set range manually B.2.9.2 Default Set range automatically using default algorithm. The offset adjustment will be applied. B.2.9.3 Auto Set range automatically using auto algorithm. The offset adjustment will be applied. B.2.9.4 Low Offset Adjust lowest value of the range. B.2.9.5 High Offset Adjust highest value of the range. Page 84 of 84