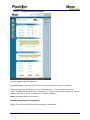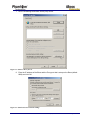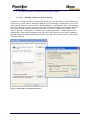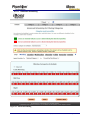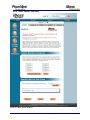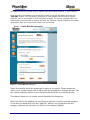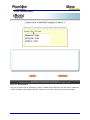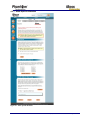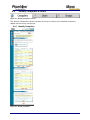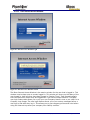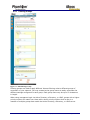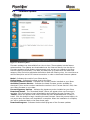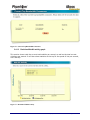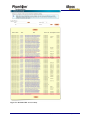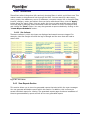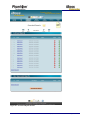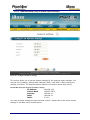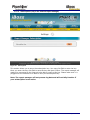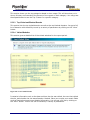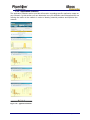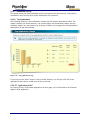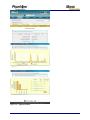
1
Note: Please refer to the User Manual online for the latest updates at www.ibosswebfilters.com. Copyright © by Phantom Technologies Inc. All rights reserved. No part of this publication may be reproduced, transmitted, transcribed, stored in a retrieval system, or translated into any language or computer language, in chemical, manual or otherwise, without the prior written permission of Phantom Technologies Inc. Phantom Technologies Inc makes no representations or warranties, either expressed or implied, with respect to the contents hereof and specifically disclaims any warranties, merchantability or fitness for any particular purpose. Any software described in this manual is sold or licensed "as is". Should the programs prove defective following their purchase, the buyer (and not this company, its distributor, or its dealer) assumes the entire cost of all necessary servicing, repair, and any incidental or consequential damages resulting from any defects. Further, this company reserves the right to revise this publication and make changes from time to time in the contents hereof without obligation to notify any person of such revision of changes. All brand and product names mentioned in this manual are trademarks and/or registered trademarks of their respective holders. www.iBossWebFilters.com Open Source Code This product may include software code subject to the GNU General Public License (“GPL”), GNU Lesser General Public License (“LGPL”), or other open-source software licenses. Copies of the GPL and LGPL licenses are available upon request. You may also visit www.gnu.org to view more information regarding open-source licensing. The GPL, LGPL and other open-source code used in Phantom Technologies Inc products are distributed without any warranty and are subject to the copyrights of their authors. Upon request, open-source software source code is available from Phantom Technologies Inc via electronic download or shipment on a physical storage medium at cost. For further details and information please visit www.iphantom.com/opensource. Rev 5.0.27.215: May 26, 2010 Page 2 of 191 Table of Contents TABLE OF FIGURES ................................................................................................................................................ 6 1 IBOSS ENTERPRISE WEB FILTER ........................................................................................................... 10 1.1 1.2 1.3 1.4 2 OVERVIEW ..................................................................................................................................................... 10 KEY FEATURES .............................................................................................................................................. 10 MANUAL STRUCTURE .................................................................................................................................... 10 SYSTEM REQUIREMENTS ................................................................................................................................ 11 SPECIFICATIONS .......................................................................................................................................... 11 2.1 IBOSS ENTERPRISE MODEL SPECIFICATIONS .................................................................................................. 11 2.2 FRONT PANEL & BACK PANELS ..................................................................................................................... 11 2.2.1 Ethernet Ports ................................................................................................................................... 11 2.2.2 Console Port ...................................................................................................................................... 12 2.2.2.1 3 Console Port Settings .................................................................................................................................... 12 GETTING STARTED ..................................................................................................................................... 13 3.1 OPERATION MODE OVERVIEW ....................................................................................................................... 13 3.2 IBOSS NETWORK SETTINGS CONFIGURATION ................................................................................................ 13 3.2.1 Configuring Network Settings via Serial Console ............................................................................. 14 3.2.2 Configuring Network Settings via the Network .................................................................................14 3.2.2.1 3.2.3 3.2.3.1 3.2.3.2 3.2.3.3 3.2.3.4 3.2.3.5 3.2.3.6 Configuring Network Settings via iBoss User Interface ............................................................................... 14 Setup Network Connection ................................................................................................................ 16 Configure Internet Connection ...................................................................................................................... 18 LDAP Settings .............................................................................................................................................. 20 Active Directory & Proxy Settings ............................................................................................................... 23 Active Directory Plugin ................................................................................................................................ 33 eDirectory Settings........................................................................................................................................ 38 iBoss eDirectory Transparent Integration ..................................................................................................... 39 GETTING STARTED ........................................................................................................................................... 39 OVERVIEW .............................................................................................................................................................. 39 IBOSS EDIRECTORY CONFIGURATION ................................................................................................................. 39 Global Settings ............................................................................................................................................. 39 Enable User Polling .................................................................................................................................................. 40 Initial User Full Sync ............................................................................................................................................... 40 User Login Polling Interval .................................................................................................................................... 40 User Polling In Progress ......................................................................................................................................... 40 Last Users Found Count ......................................................................................................................................... 40 eDirectory Info - Server Registration Settings................................................................................. 40 Name............................................................................................................................................................................. 41 Ip Address/Host ........................................................................................................................................................ 41 Port ................................................................................................................................................................................ 41 Admin Username (DN) ........................................................................................................................................... 41 Admin Password........................................................................................................................................................ 41 Common Name Search Attribute........................................................................................................................ 41 Username Search Attribute .................................................................................................................................. 41 Group Search Attribute .......................................................................................................................................... 41 Group Attribute Value Key .................................................................................................................................... 41 Location Attribute ..................................................................................................................................................... 42 Ignore DN Pattern .................................................................................................................................................... 42 Default Filtering Policy ............................................................................................................................................ 42 Connect Timeout....................................................................................................................................................... 42 Monitor Events........................................................................................................................................................... 42 Poll User Logins ......................................................................................................................................................... 42 Allow Full Sync .......................................................................................................................................................... 42 Rev 5.0.27.215: May 26, 2010 Page 3 of 191 User Polling Search Base ....................................................................................................................................... 42 User SSL/SSL Certificate ....................................................................................................................................... 43 Add The Server ............................................................................................................................................ 43 CONCLUSION ....................................................................................................................................................... 43 3.2.3.7 3.2.3.8 3.2.3.9 3.2.3.10 3.2.3.11 3.2.3.12 Clustering ...................................................................................................................................................... 44 Add Additional Routes.................................................................................................................................. 46 Bypass IP Ranges .......................................................................................................................................... 48 Add Additional Local Subnets ...................................................................................................................... 49 Register Internal Gateways ........................................................................................................................... 52 Edit Advanced Network Settings .................................................................................................................. 54 3.3 INSTALLING THE IBOSS ON THE NETWORK ..................................................................................................... 55 3.3.1 Additional Setup Steps and Notes ...................................................................................................... 55 4 INTERFACE .................................................................................................................................................... 56 4.1 HOME PAGE ................................................................................................................................................... 56 4.1.1 Filtering Status .................................................................................................................................. 57 4.1.2 Main Menu ........................................................................................................................................ 57 4.1.3 Shortcut Bar ...................................................................................................................................... 58 4.2 CONFIGURE INTERNET CONTROLS ................................................................................................................. 59 4.2.1 Block Specific Website Categories .................................................................................................... 61 4.2.1.1 4.2.1.2 Advanced Scheduling ................................................................................................................................... 64 Identify Theft (Phishing)/ IP Address Blocking Page ................................................................................... 66 4.2.2 4.2.3 4.2.4 Programs, Protocols & DLSP (Data Leakage Protection) ............................................................... 67 Bandwidth Throttling/QoS................................................................................................................. 70 Block Specific Websites ..................................................................................................................... 73 4.2.1 Allow Specific Websites ..................................................................................................................... 76 4.2.2 Block Specific Keywords ................................................................................................................... 80 4.2.3 4.2.4 4.2.5 4.2.6 Block Specific Ports........................................................................................................................... 83 Block Specific File Extensions........................................................................................................... 84 Restrict Domain Extensions .............................................................................................................. 85 Configure Sleep Schedule .................................................................................................................. 87 4.2.4.1 4.2.4.2 4.2.1.1 4.2.1.2 4.2.2.1 4.2.6.1 Custom Blocklist Categories ......................................................................................................................... 74 Blocklist Import ............................................................................................................................................ 75 Custom Allowlist Categories ........................................................................................................................ 78 Allowlist Import ............................................................................................................................................ 79 Keyword Import ............................................................................................................................................ 82 Sleep Mode Page........................................................................................................................................... 89 4.2.7 Real-Time Monitoring/Recording...................................................................................................... 90 4.3 EDIT MY PREFERENCES ................................................................................................................................. 92 4.3.1 Set or Change Password ................................................................................................................... 93 4.3.2 Configure Report Settings ................................................................................................................. 94 4.3.2.1 4.3.2.2 4.3.3 4.3.3.1 Edit General Report Settings ......................................................................................................................... 95 URL Logging Ignore List.............................................................................................................................. 97 Customize Block Pages ..................................................................................................................... 98 Blocked Page .............................................................................................................................................. 100 4.3.4 Change Time Zone........................................................................................................................... 101 4.3.5 Edit System Settings......................................................................................................................... 102 4.3.6 Setup Remote Management ............................................................................................................. 103 4.4 IDENTIFY COMPUTERS & USERS .................................................................................................................. 105 4.4.1 Identify Computers .......................................................................................................................... 105 4.4.1.1 4.4.1.2 4.4.2 4.4.2.1 4.4.2.2 4.4.2.3 4.4.2.4 Import Computers ....................................................................................................................................... 107 Identifying a Computer ............................................................................................................................... 109 Identify Users .................................................................................................................................. 111 Adding a User ............................................................................................................................................. 112 Delegated Admins ....................................................................................................................................... 113 Importing Users .......................................................................................................................................... 114 Advanced User Settings .............................................................................................................................. 116 Rev 5.0.27.215: May 26, 2010 Page 4 of 191 4.4.2.5 4.4.3 4.4.3.1 User Internet Access Window ..................................................................................................................... 118 Filtering Groups .............................................................................................................................. 119 Filtering Group Tabs ................................................................................................................................... 120 4.5 FIRMWARE UPDATES ................................................................................................................................... 121 5 ENTERPRISE REPORT MANAGER......................................................................................................... 122 5.1 EXTERNAL ENTERPRISE REPORTER .............................................................................................................. 122 5.1.1 Installing the External iBoss Enterprise Reporter on the network. ................................................. 122 5.1.2 Setup Steps to Register iBoss to External Enterprise Reporter ....................................................... 122 5.2 ACCESSING THE REPORT MANAGER ............................................................................................................ 123 5.3 LOGGING INTO THE REPORT MANAGER ....................................................................................................... 123 5.4 REPORT GENERATION AND MANAGEMENT .................................................................................................. 124 5.4.1 Current Activity ............................................................................................................................... 126 5.4.1.1 5.4.1.2 5.4.1.3 5.4.1.4 Real-time Web Hit Activity Graph ............................................................................................................. 126 Current Top Bandwidth Consumers ............................................................................................................ 126 Real-time Web Hit activity graph ............................................................................................................... 127 Real-time website activity ........................................................................................................................... 128 5.4.2 URL Log Section ............................................................................................................................. 130 5.4.3 View Reports Section ....................................................................................................................... 131 5.4.4 Report Schedules ............................................................................................................................. 137 5.4.5 Automatic Desktop Recording/Monitor/Control (DRMC) .............................................................. 146 5.4.6 Report Manager Settings ................................................................................................................. 149 5.4.7 External Report Manager (Enterprise Reporter) Settings ............................................................... 151 5.4.2.1 5.4.2.2 5.4.3.1 5.4.3.2 5.4.3.3 5.4.3.4 5.4.4.1 5.4.4.2 5.4.4.3 5.4.4.4 5.4.4.5 5.4.4.6 5.4.5.1 5.4.5.2 5.4.5.3 5.4.5.4 5.4.5.5 5.4.6.1 5.4.6.2 5.4.7.1 5.4.7.2 5.4.7.3 5.4.7.4 5.4.7.5 5.4.7.6 Search Filters .............................................................................................................................................. 131 Site Callouts ................................................................................................................................................ 131 Report Types ............................................................................................................................................... 133 Deleting Reports ......................................................................................................................................... 133 Exporting PDF Reports ............................................................................................................................... 133 Generating a Report .................................................................................................................................... 133 Deleting Report Schedules .......................................................................................................................... 139 Editing Report Schedules ............................................................................................................................ 139 Report Schedule Processing ........................................................................................................................ 139 Report Schedule Types ............................................................................................................................... 139 Creating a Report Schedule......................................................................................................................... 139 Report Schedule Space Usage Section ........................................................................................................ 144 Installing VNC ............................................................................................................................................ 146 Registering a Computer to DRMC .............................................................................................................. 146 Video Desktop ............................................................................................................................................ 147 Video Desktop Recordings ......................................................................................................................... 148 Recording Thresholds ................................................................................................................................. 148 Email Server Settings .................................................................................................................................. 150 Report Maintenance Settings ...................................................................................................................... 150 Report Manager Database Settings (only in external report manager) ........................................................ 151 Report Users (only in external report manager) .......................................................................................... 152 Register iBoss Devices (only in external report manager) .......................................................................... 154 Configure Time (only in external report manager) ..................................................................................... 156 Network Settings (only in external report manager) ................................................................................... 157 Subscription (only in the external report manager) ..................................................................................... 158 5.4.8 Report Manager System Information .............................................................................................. 159 5.5 VIEWING REPORTS ....................................................................................................................................... 159 5.5.1 Report Information Section ............................................................................................................. 159 5.5.1.1 5.5.1.2 Showing Report Information for Particular Users ....................................................................................... 160 Quickly switching between reports ............................................................................................................. 160 5.5.2 Web Usage Statistics ....................................................................................................................... 160 5.5.3 Port Statistics .................................................................................................................................. 168 5.5.2.1 5.5.2.2 5.5.2.3 5.5.2.4 5.5.3.1 Web Category Usage .................................................................................................................................. 163 Category Time Usage.................................................................................................................................. 165 Top Visited and Blocked Domain ............................................................................................................... 167 Visited Websites ......................................................................................................................................... 167 Bandwidth Activity ..................................................................................................................................... 170 Rev 5.0.27.215: May 26, 2010 Page 5 of 191 5.5.3.2 IP Statistics ...................................................................................................................................... 172 5.5.5 Bandwidth Statistics ........................................................................................................................ 176 5.5.6 Application Statistics ....................................................................................................................... 181 5.5.4.1 5.5.4.2 5.5.5.1 5.5.5.2 5.5.6.1 5.5.6.2 6 Top Ports Used............................................................................................................................................ 170 5.5.4 Bandwidth Activity ..................................................................................................................................... 174 Top IP Address Utilization.......................................................................................................................... 174 Bandwidth Activity ..................................................................................................................................... 178 Overview of Total Bandwidth Usage .......................................................................................................... 178 Bandwidth Activity ..................................................................................................................................... 182 Top Applications ......................................................................................................................................... 182 REMOTE MANAGEMENT ......................................................................................................................... 185 6.1 6.2 6.3 6.4 6.5 6.6 6.7 7 SET UP ACCOUNT ........................................................................................................................................ 186 ADDING UNITS TO YOUR ACCOUNT ............................................................................................................. 186 GROUPS........................................................................................................................................................ 186 MANAGEMENT ............................................................................................................................................. 186 SETTINGS ..................................................................................................................................................... 186 LOGS ............................................................................................................................................................ 186 FIRMWARE ................................................................................................................................................... 186 SUBSCRIPTION MANAGEMENT ............................................................................................................. 187 7.1 ADDING A SUBSCRIPTION KEY ..................................................................................................................... 187 8 TROUBLESHOOTING ................................................................................................................................ 188 8.1 PASSWORD RECOVERY ................................................................................................................................ 188 8.2 RESETTING TO FACTORY DEFAULTS ............................................................................................................ 188 8.2.1 Through the iBoss User Interface.................................................................................................... 188 8.2.2 Using the iBoss Console Port .......................................................................................................... 188 8.3 TECHNICAL SUPPORT ................................................................................................................................... 188 9 APPENDIX ..................................................................................................................................................... 189 9.1 WARRANTY INFORMATION .......................................................................................................................... 189 10 GLOSSARY.................................................................................................................................................... 190 11 REGULATORY STATEMENT ................................................................................................................... 191 Table of Figures Figure 1 - COM Properties ........................................................................................................... 12 Figure 2 - iBoss User Interface ..................................................................................................... 15 Figure 3 - Setup Network Connection .......................................................................................... 16 Figure 4 - Configure Internet Connection ..................................................................................... 18 Figure 5 - LDAP Settings ............................................................................................................. 20 Figure 6 – Active Directory & Proxy Settings.............................................................................. 23 Figure 7 - Proxy Cache System Information ................................................................................ 27 Figure 8 - GPO Default Domain Policy ........................................................................................ 28 Figure 9 - GPO Connection Settings ............................................................................................ 29 Figure 10 - GPO Import the Connection Settings ......................................................................... 29 Figure 11 - GPO Use Proxy Server............................................................................................... 30 Figure 12 - GPO Local Area Network Settings ............................................................................ 30 Figure 13 - Manual Proxy with Internet Explorer ........................................................................ 31 Figure 14 - Manual Proxy with Mozilla Firefox ........................................................................... 32 Figure 15 - Automatic Identify of Unknown Computers.............................................................. 32 Rev 5.0.27.215: May 26, 2010 Page 6 of 191 Figure 16 - Active Directory Plugin ............................................................................................. 33 Figure 17 - iBoss Active Directory Plugin Configuration ............................................................ 35 Figure 18 - Domain Security Policy ............................................................................................. 36 Figure 19 - Audit Account Logon Events ..................................................................................... 36 Figure 20 - Audit Logon Events ................................................................................................... 37 Figure 21 - eDirectory Settings ..................................................................................................... 38 Figure 22 – Clustering .................................................................................................................. 44 Figure 23 - Add Additional Routes............................................................................................... 46 Figure 24 - Bypass IP Range ........................................................................................................ 48 Figure 25 - Add Additional Local Subnets ................................................................................... 49 Figure 26 - Register Internal Gateways ........................................................................................ 52 Figure 27 - Edit Advanced Network Settings ............................................................................... 54 Figure 28 - iBoss Hardware Installation ....................................................................................... 55 Figure 29 - Home Page ................................................................................................................. 56 Figure 30 - Configure Internet Controls ....................................................................................... 59 Figure 31 - Block Specific Website Categories ............................................................................ 61 Figure 32 - Advanced Scheduling................................................................................................. 64 Figure 33 - Identity Theft Detection Page .................................................................................... 66 Figure 34 - Block Specific Web Programs ................................................................................... 67 Figure 35 - Bandwidth Throttling / QoS ....................................................................................... 70 Figure 36 - Block Specific Websites ............................................................................................ 73 Figure 37 - Custom Blocklist Categories ...................................................................................... 74 Figure 38 - Blocklist Import ......................................................................................................... 75 Figure 39 - Allow Specific Websites ............................................................................................ 76 Figure 40 - Custom Allowlist Categories ..................................................................................... 78 Figure 41 - Allowlist Import ......................................................................................................... 79 Figure 42 - Block Specific Keywords ........................................................................................... 80 Figure 43 - Keyword Import ......................................................................................................... 82 Figure 44 - Port Blocking ............................................................................................................. 83 Figure 45 - Block Specific File Extensions .................................................................................. 84 Figure 46 - Restrict Domain Extensions ....................................................................................... 85 Figure 47 - Configure Sleep Schedule .......................................................................................... 87 Figure 48 - Internet Sleep Mode Page .......................................................................................... 89 Figure 49 - Real-time Monitoring/Recording ............................................................................... 90 Figure 50 - Edit My Preferences ................................................................................................... 92 Figure 51 - Set or Change My Password ...................................................................................... 93 Figure 52 - Configure Report Settings .......................................................................................... 94 Figure 53 - Edit General Report Settings ...................................................................................... 95 Figure 54 - External Report Manager Settings ............................................................................. 96 Figure 55 - URL Logging Ignore List........................................................................................... 97 Figure 56 - Customize Block Pages .............................................................................................. 98 Figure 57 - iBoss Blocked Page .................................................................................................. 100 Figure 58 - Set Time Zone .......................................................................................................... 101 Figure 59 - Edit System Settings ................................................................................................ 102 Figure 60 - Setup Remote Management ..................................................................................... 103 Figure 61 - Identify Computers & Users .................................................................................... 105 Rev 5.0.27.215: May 26, 2010 Page 7 of 191 Figure 62 - Identify Computers................................................................................................... 105 Figure 63 - Importing Computers ............................................................................................... 107 Figure 64 - Identifying a Computer ............................................................................................ 109 Figure 65 - Identify Users ........................................................................................................... 111 Figure 66 - Adding a User .......................................................................................................... 113 Figure 67 - Importing Users ........................................................................................................ 114 Figure 68 – Advanced User Settings .......................................................................................... 116 Figure 69 - Internet Access Window Login ................................................................................ 118 Figure 70 - Internet Access Window Session ............................................................................. 118 Figure 71 - Edit Filtering Groups................................................................................................ 119 Figure 72 - Filtering Group Tabs ................................................................................................ 120 Figure 73 - Firmware Updates .................................................................................................... 121 Figure 74 – Current Activity ....................................................................................................... 125 Figure 75 - Real-time MRTG Bandwidth Graph ........................................................................ 126 Figure 76 - Current Top Bandwidth Consumers......................................................................... 127 Figure 77 - Real-time Webhit Activity ....................................................................................... 127 Figure 78 - Real-time URL Access Activity............................................................................... 129 Figure 79 - URL Log .................................................................................................................. 130 Figure 80 - Site Callouts ............................................................................................................. 131 Figure 81 - Generated Reports Section ....................................................................................... 132 Figure 82 - Generate Report ....................................................................................................... 134 Figure 83 - Report Statistics ....................................................................................................... 135 Figure 85 - Report Schedules ...................................................................................................... 138 Figure 86 - Create a Report Schedule ......................................................................................... 141 Figure 87 - Report Schedule Space Usage .................................................................................. 145 Figure 88 - UVNC Properties ..................................................................................................... 146 Figure 89 - Video Desktop Monitoring ...................................................................................... 147 Figure 90 - Live Desktop MultiView.......................................................................................... 148 Figure 91 - Report Manager Settings .......................................................................................... 149 Figure 92 - External Report Manager Settings ........................................................................... 151 Figure 93 - Report Manager Database Settings .......................................................................... 151 Figure 94 - Report Users ............................................................................................................. 152 Figure 95 - Add Report Manager User ....................................................................................... 153 Figure 96 - Register iBoss Devices ............................................................................................. 154 Figure 97 – Register an iBoss Device ......................................................................................... 155 Figure 98 - Configure Time ........................................................................................................ 156 Figure 99 - Configure IP Address Settings ................................................................................. 157 Figure 100 – Subscription ........................................................................................................... 158 Figure 101 - Report Information Section .................................................................................... 160 Figure 102 - Web Usage Statistics .............................................................................................. 161 Figure 103 - Web Category Usage.............................................................................................. 162 Figure 104 - Web Category Detail .............................................................................................. 164 Figure 105 - Category Time Usage ............................................................................................. 166 Figure 106 - Last Visited Websites............................................................................................. 167 Figure 107 – Port Statistics ......................................................................................................... 169 Figure 108 - Top Used Ports ....................................................................................................... 170 Rev 5.0.27.215: May 26, 2010 Page 8 of 191 Figure 109 - Port Detail .............................................................................................................. 171 Figure 110 - IP Address Statistics ............................................................................................... 173 Figure 111 - Top IP Address Utilization..................................................................................... 174 Figure 112 - Top IP Address Detail ............................................................................................ 175 Figure 113 - Bandwidth Statistics ............................................................................................... 177 Figure 114 – Overview of Total Bandwidth Usage .................................................................... 178 Figure 115 – Bandwidth Usage Detail ........................................................................................ 179 Figure 116 - Application Statistics ............................................................................................. 181 Figure 117 - Top Applications Usage ......................................................................................... 182 Figure 118 - Application Detail .................................................................................................. 183 Figure 119 - Remote Management ............................................................................................. 185 Figure 120 - Manage Subscription.............................................................................................. 187 Figure 121 - Enter Subscription Key .......................................................................................... 187 Rev 5.0.27.215: May 26, 2010 Page 9 of 191 1 iBoss Enterprise Web Filter 1.1 Overview The iBoss Enterprise is a line of web filters for medium to large networks. Powerful patentpending filtering technology puts you in control of Internet usage on your network. Flexible Internet controls allow you to easily restrict access to specific categories of Internet destinations and manage time spent using online programs (online chat and messenger programs, file sharing, gaming and more). It utilizes an industry first advanced real-time graphical user interface, robust Internet traffic controls, total network traffic analyzer, up to the second network activity feed MRTG, and a live real-time URL database feed ensuring the most accurate filtering possible. 1.2 1.3 Key Features Comprehensive Web Filtering IM/Application Policies and Blocking Policy Scheduling Robust Reports Real-Time MRTG Remote Management Individual User Login with LDAP/Active Directory Integration Policies Users/Groups Real-Time URL Updates Simple & User-Friendly Interface Plug & Play with No Software to Install Compatible with any Operating System Manual Structure This manual includes detailed information and instructions for installing and configuring the iBoss. The “Getting Started” section of this manual will guide you through the initial hardware installation and setup process. The “Configuration” section of the manual contains detailed instructions for configuring specific settings and customizing preferences. Note: For quick installation instructions, you may also reference the iBoss Quick Installation Guide included with the product. Rev 5.0.27.215: May 26, 2010 Page 10 of 191 1.4 System Requirements Broadband (Cable, DSL, T1, FiOS, etc.) Internet service Network Adapter for each computer Existing Firewall and Switch Any Major Operating System running a TCP/IP network (i.e. Mac, Windows, Linux, etc.) Standard Web Browser Active iBoss Subscription 2 Specifications 2.1 iBoss Enterprise Model Specifications The iBoss Enterprise has the following specifications: Model 1550 1750 2150 2550 3550 4550 5550 6550 7550 Recommended Concurrent Users 50-100 101-200 201-300 301-400 401-600 601-1000 1001-1500 1501-2000 2001-3000 2.2 Identifiable Computers Identifiable Users Filtering Groups 120 240 360 480 720 1200 1800 2400 3600 120 240 360 480 720 1200 1800 2400 3600 25 50 60 75 100 125 200 300 100 Reports Database Size 10 GB 20 GB 20 GB 25 GB 35 GB 45 GB 55 GB 65 GB 75 GB Generated Reports Report Schedules 50 75 75 100 100 125 250 300 300 5 10 10 15 20 25 30 35 35 Front Panel & Back Panels 2.2.1 Ethernet Ports The back panel contains two Fast Ethernet 10/100 Mbps ports. The following provides a description for each port: LAN - The port labeled “LAN” should be connected to your local area network. Typically, this port is connected to the switch on your LAN that is connected to all of the filtered computers on the network. WAN – The port labeled “WAN” should be connected to an Internet accessible connection. Typically, this port is connected to your firewall/router. Bypass (Fail-Safe) Ports (not in all versions) – These ports are fail-safe ports which will be used instead of using the default ports. It is used for fail-safe features. Rev 5.0.27.215: May 26, 2010 Page 11 of 191 2.2.2 Console Port The Console port provides a serial RS-232 interface to the iBoss. This port provides such functions such as configuring the network settings for the iBoss, displaying the IP Address settings for the iBoss, and restoring factory defaults. When using directly to a computer you must use a NULL MODEM DB9 serial cable. This port can be accessed via any console (COM) program. On windows, you can use the built-in program HyperTerminal. Other console programs that are available include PuTTY. 2.2.2.1 Console Port Settings The settings for the console port are as follows: Table 1 - Serial Console Port Settings Bits Per Second Data Bits Parity Stop Bits Flow Control 19200 8 None 1 None Figure 1 - COM Properties Rev 5.0.27.215: May 26, 2010 Page 12 of 191 3 Getting Started This section describes initial setup and configuration of the iBoss appliance. This section contains information that will help you install the iBoss onto your network. 3.1 Operation Mode Overview The iBoss provides its filtering functionality in a completely transparent fashion on the network. It does not segment a network, nor does it provide firewall or NAT capability. The iBoss filters traffic passing between the LAN and WAN port. The iBoss will actively scan traffic applying filtering rules and intercepting traffic when necessary. This allows the iBoss to achieve very high filtering performance without affecting network topology. In order for the iBoss to perform filtering, it must be configured to have its own IP Address on the local network. The IP Address must be a static IP Address that is available on the network. Before connecting the iBoss to the network, the IP Address settings must be configured to match the network it is being installed on. Once the address is configured, you will be able to access the iBoss while on the local network by either entering www.myiboss.com in your Web Browser, or entering the IP Address that was configured into the iBoss into your Web Browser. 3.2 iBoss Network Settings Configuration Before the iBoss can be connected to the network, the IP Address settings that the iBoss will use must be configured. The iBoss must be configured with a static IP Address and will not obtain an IP Address through DHCP. The iBoss ships with the following default IP Address settings. If these settings are sufficient for the network where it is being installed, you may not need to adjust the IP Address settings and skip this process. Table 2 - Default iBoss IP Address Settings IP Address Subnet Mask Gateway DNS 1 DNS 2 192.168.1.10 255.255.255.0 192.168.1.1 192.168.1.1 0.0.0.0 There are two methods for configuring the IP Address settings of the iBoss. The first method involves using the serial console port. The second method involves connecting a single computer to the iBoss LAN port and configuring via the network using your Web Browser. If you have the external Report Manager, the default IP address is 192.168.1.20 for the external Enterprise Reporter. Rev 5.0.27.215: May 26, 2010 Page 13 of 191 3.2.1 Configuring Network Settings via Serial Console To configure the network settings via the console terminal, connect the provided serial cable to the console port on the iBoss. After the iBoss has been powered on (typically full boot-up takes between 3-4 minutes), open a serial console program. On windows, you can use the built-in HyperTerminal program to access the console port. The settings for the serial console COM connection are shown in the hardware specifications and are re-listed below: Bits Per Second Data Bits Parity Stop Bits Flow Control 19200 8 None 1 None Once you have connected the serial cable from your computer to the console port and configured the console program, press the <Enter> key repeatedly until the configuration menu is displayed. Follow the options presented to configure the static IP Address settings for the iBoss. 3.2.2 Configuring Network Settings via the Network You can also configure the iBoss network settings by connecting to the iBoss via a Web Browser. The following instructions apply when initially configuring the iBoss IP Address settings. If you have already configured the IP Address settings and wish to change them, you need to log into the iBoss using its current IP Address settings. In order to do this, you must configure your computer to have a static IP address within the subnet of the iBoss default network settings. Configure your computer to have the following static IP Address: Table 3 - Computer IP Address settings used to initially configure iBoss through the network IP Address Subnet Mask 192.168.1.15 255.255.255.0 You can leave the Gateway and DNS IP Address blank on your computer as they will not be needed. With these settings in place, open a web browser and enter 192.168.1.10 into your Web Browser’s address bar. This will bring up the iBoss home page. From the homepage, follow the Setup Internet Connection link to configure the iBoss IP Address Settings. 3.2.2.1 Configuring Network Settings via iBoss User Interface The iBoss does not require any software installation. Instead, its user interface can be accessed directly using a standard Internet web browser. The web-based user interface allows you to configure your iBoss. Rev 5.0.27.215: May 26, 2010 Page 14 of 191 1. Verify that your computer has an IP address that is on the same subnet as the iBoss IP address, as stated above. 2. Open a standard Internet web browser application (Internet Explorer®, Firefox®, etc.). 3. In the URL address bar, enter the domain http://myiBoss.com and press <enter>. This will take you to the iBoss interface. If the iBoss interface does not load, enter the configured IP address of the iBoss (default: http://192.168.1.10) and press <enter>. Note: The http://myiBoss.com webpage is built into the iBoss, so it is always accessible even though the Internet may not be. http://myiBoss.com is the configuration portal for the iBoss. You may access the user interface from any computer connected behind the iBoss. Figure 2 - iBoss User Interface Rev 5.0.27.215: May 26, 2010 Page 15 of 191 3.2.3 Setup Network Connection Figure 3 - Setup Network Connection The "Setup Network Connection" menu lets you choose options for configuring the current iBoss connection settings. There are elevent options to choose from: Configure Internet Connection, LDAP Settings, Active Directory & Proxy Settings, Active Directory Plugin, eDirectory Settings, Clustering, Add Additional Routes, Bypass IP Ranges, Add Local Subnets, Register Internal Gateways and Edit Advanced Settings. Rev 5.0.27.215: May 26, 2010 Page 16 of 191 Configure Internet Connection - This option allows you to configure the Internet WAN connection. LDAP Settings - This option allows you to setup your LDAP/Active Directory server so the iBoss can authenticate users from it. Active Directory & Proxy Settings - This option allows you to setup the iBoss in a Proxy mode. This will allow automatic Active Directory authentication using NTLM. Active Directory Plugin - This option allows you to setup the iBoss to work with your Active Directory Server using the iBoss Active Directory Plugin. This will allow automatic Active Directory authentication using the plugin on the server. eDirectory Settings - This option allows you to setup the iBoss with your eDirectory servers for transparent authentication. Clustering - This option allows you to setup multiple iBoss devices in a clustered environment to have settings synced automatically. Add Additional Routes - This option allows you to add additional network routes for the iBoss. Bypass IP Ranges – This option allows you to bypass IP ranges which you would like to completely bypass the iBoss filtering engine. Add Additional Local Subnets - This option allows you to add additional local subnets. Register Internal Gateways - This option allows you to register gateways that are internal to your network (on the LAN side of the iBoss). Edit Advanced Settings - This option allows you to configure the advanced network settings. Rev 5.0.27.215: May 26, 2010 Page 17 of 191 3.2.3.1 Configure Internet Connection Figure 4 - Configure Internet Connection Connection Type – The iBoss will need to be configured to have a static IP address. Manually enter network settings for your WAN connection. These settings should be a unique IP address and match your local network. If you are using Active Directory or have a domain controller, use this IP address for the DNS 1 address. Note: Secondary DNS is not required. Remote Authentication Integration (PAUL) This feature allows Remote Authentication Integration Rev 5.0.27.215: May 26, 2010 Page 18 of 191 Internal Report Manager Listen Port This section allows you to change the port number that the iBoss reports are served from. Click "Save" when you have finished the configuration above. You have completed the WAN configuration for the Static IP Address connection type. Note: Once the iBoss has been configured, you may return your computer’s network settings back to their original settings. Also, if the iBoss has already been configured to have a different IP Address, you must log into the iBoss using these settings. If you do not know what the settings were, you will have to log into the iBoss via the serial console port using the instructions described above. Important Note: You will also need to bypass your DNS or Domain Controller MAC or IP address within the iBoss. Please refer to Identifying Computers and Bypass IP Ranges section for further information. Rev 5.0.27.215: May 26, 2010 Page 19 of 191 3.2.3.2 LDAP Settings Figure 5 - LDAP Settings Rev 5.0.27.215: May 26, 2010 Page 20 of 191 Global Settings – This section allows you to set global LDAP settings. Number of Ldap Processors – This is how many ldap processors are used within the iBoss for authentication. 25 is the default. Max Ldap Retries – This is the number of retries before the authentication is no longer tried. 12 is default. Ldap Retry Interval – This is the interval between retries if authentication is not successful. 10 Seconds is the default. Max Retry Queue Size – This is the max number of queue spots for Ldap authentication retries. LDAP Server Info – This section allows you to individually enter each LDAP server’s information. You may add multiple LDAP servers here. Name - This is the name of the server to assist in identification. Description – This option allows you to set a description for the server that is being added. Server Authentication Method - This option allows you to configure the server authentication method required by your LDAP server. Simple is recommended. Server Host/Ip - This is the domain or IP address of the LDAP server. Example: iphantom.com or 10.0.0.1 Port - This allows you to change the port number that is used to communicate to your LDAP server. Port 389 is most common and is recommended. Admin User - This is the Username of an administrative or root user which has administrative rights to your LDAP server. The user must be able to perform searches on your LDAP server. This user is used to look up user logins. Example: [email protected]. Admin Password – This is the password to your LDAP administrator user above. Some special characters are not accepted. Search Base - This is the base by which searches for users will be made. If you have a large directory you may choose a base other than the top as long as all users that need to be authenticated are under this base. It is recommended that you set this to the top of your LDAP directory. Example: If your LDAP domain is iphantom.com, you would use the following settings: Active Directory sample: dc=iphantom,dc=com Match Group Attribute - This option allows you to set the attribute within the user record found to search for groups. The group names are matched to the iBoss filtering groups. The group names must match exactly. For example, if you have a LDAP group named administrators, the user record found during login would be searched for this attribute. The values found would be compared to your iBoss filtering group. If there is a match, it would use that filtering group for that user. Rev 5.0.27.215: May 26, 2010 Page 21 of 191 If a user belongs to multiple groups, they will be filtered using the highest priority group based on lowest number. (ex: filtering group 1 has the highest priority). Example: Active Directory sample: memberOf Match Group Key - If a filtering group attribute is found and contains many key value pairs, you can limit the group match to a particular key. For example, if a group value contains 'CN=managers,OU=support' you may choose to match groups to the 'CN' key which would match the word 'managers' to the iBoss filtering group. If you leave this field blank, the entire group attribute will be used. Example: Active Directory sample: CN Location Attribute - This option allows you to put the location field on where the LDAP server is located. User Search Filter - This is the filter that is used to search for a username in the LDAP server. This filter must result in a single user record. The filter must also contain %s which will be replaced by the username. There must not be any other percent signs in the search filter. Example: Active Directory sample: (sAMAccountName=%s) Default Filtering Group - This option allows you to use a default filtering group if no LDAP group can be matched with an active iBoss Filtering Group. You can choose to Deny Access if no group match or choose between the different filtering groups. Use SSL – This option allows you to turn on SSL encryption with your LDAP server SSL Certificate – This section allows you to paste the Certificate for the SSL Encryption used by your LDAP server. Once you have finished entering information, click the Add button. Once it has been added, click the Test button next to the entry in the box. If you would like to edit the server information, click the Edit button and the fields will be able to edit. Once updated, click the Edit or Save button. 3.2.3.2.1.1 Match Active Directory Groups with iBoss Filtering Groups Once you have the LDAP/Active Directory Settings configured, you will need to match your Active Directory groups with the iBoss filtering groups. You can simply rename the filtering group names to match the Active Directory group names. To do this, from the main menu click on Identify Computers & Users, then click the ‘Groups’ tab. You can import groups by clicking the ‘Import From LDAP/AD’ button. This will ask you to save or open the list of groups from Active Directory. Open it in a text editor and copy the group names. Then click on the ‘Import’ button and paste the groups. The first line corresponds to filtering group 1. If a user belongs to multiple groups, the user will fall under the highest priority filtering group number. Please refer to Filtering Groups section for more details. Rev 5.0.27.215: May 26, 2010 Page 22 of 191 3.2.3.3 Active Directory & Proxy Settings Figure 6 – Active Directory & Proxy Settings Rev 5.0.27.215: May 26, 2010 Page 23 of 191 By default, the iBoss works as an inline filter that actively scans Internet streams to and from the Internet. This allows the iBoss to scan web requests and Web 2.0 application streams. In this mode, each computer is typically named after the primary user of the computer. In the reports, the username will represent the computer. Alternatively, the iBoss can be configured to work as a proxy. This mode is typical of most other filters. In this mode, computers make requests to the iBoss at which point the request is made by the iBoss on their behalf with filtering applied. This requires that proxy settings be placed in the browser through an Active Directory Group Policy Object or manually. In this mode, the proxy will analyze web requests. For applications to be analyzed, the iBoss must be placed inline on the network so that the iBoss can see the streams. For Web 2.0 streams, the policy for that computer will be applied instead of the proxy user. If using the iBoss in an Active Directory environment, NTLM can be used to transparently log the user onto the proxy using the Active Directory credentials. This will apply to all web requests. The iBoss can still be used in proxy mode in environments that do not use Active Directory. In this case, users will need to be created within the iBoss and the user will be prompted the first time they open a browser for their credentials. To use the iBoss as a proxy filter, you will need to configure the settings for it. You may configure the settings by going to Configure Proxy Settings under the Setup Network Connections section. You will first need to enable this feature. You may change the port number that it uses (by default it uses port 8008). You may then select which User Authentication Method to use. If you have an Active Directory server, you may select Active Directory (NTLM). If you do not have an Active Directory server, you may still use the iBoss in Proxy mode and authenticate using the iBoss users. Enter all the information for the remaining fields like username and password for your active directory, etc. Please see the examples and help link for further details. Enable Active Directory & Proxy Support - This option allows you to enable or disable Active Directory & Proxy Support. To use the iBoss as a proxy filter or NTLM transparent authentication with Active Directory, you will need to enable this option. NTLM Authentication Port – This option allows you to configure the NTLM Port that the iBoss uses to authenticate users. Proxy Port - This option allows you to configure the port number to use as a proxy port for the users’ browser settings. Filtering Method – The iBoss can be configured in Proxy Mode or Transparent Auto-Login Filtering Mode. In Proxy Mode, the clients' browsers must be configured to use the iBoss as a Proxy. This mode is useful if you do not intend to use the iBoss inline on your network. In Transparent Auto-Login Filtering Mode, the iBoss performs filtering transparently. This is the default operation of the iBoss. However, when this mode is enabled and coupled with NTLM, the iBoss will automatically authenticate users via Active Directory. See Help for the differences between 'Ip Mode' and 'Dns Mode'.his option allows you to change the filtering method. The options are Proxy Mode, Transparent Auto-Login (Dns Mode), Transparent AutoLogin (Ip Mode), Proxy Only (No Filtering). Rev 5.0.27.215: May 26, 2010 Page 24 of 191 User Authentication Method - This option allows you to configure whether to authenticate using Active Directory or iBoss user logins. Note: When NTLM is selected, the DNS IP Address settings of the iBoss must be set to your Active Directory IP Address. Unidentified User Group Action - This option allows you to change the action used when an unidentified user is found. You can either choose to block access or use a filtering group. Default Filtering Group - This option allows you to choose the filtering group that is used when an unidentified user is found. Default Landing URL - This option allows you to specify where the page is redirected after a successful authentication. This is only the case where NTLM was done without an original destination page was first requested. Admin Username (Only in Active Directory (NTLM) Authentication Method) – This is the username of the LDAP administrator. Ex: Administrator. Admin Password (Only in Active Directory (NTLM) Authentication Method) - This is the password of the administrator user above for your LDAP/Active Directory server. Domain Name (Only in Active Directory (NTLM) Authentication Method) – This is your Active Directory domain. Ex: phantomtech.local Domain IP (Only in Active Directory (NTLM) Authentication Method) – This is the Domain IP address of your Domain Controller (Active Directory server) Domain Netbios Name (Only in Active Directory (NTLM) Authentication Method) – This is the name of your workgroup or Domain Netbios name. This is the what shows up in the drop down menu when users log in. Ex: phantomtech Active Directory Search Base (Only in Active Directory (NTLM) Authentication Method) – This is the search base of your Active Directory server. Ex: dc=phantomtech,dc=local Location Attribute (Only in Active Directory (NTLM) Authentication Method) – This is the location Attribute within Active Directory if you have multiple locations. WINS Server IP Address (Only in Active Directory (NTLM) Authentication Method) – This is the WINS Server IP Address which is commonly the IP address of your Active Directory server. Password Server IP Address (Only in Active Directory (NTLM) Authentication Method) – This is the Password Server IP Address which is commonly the IP address of your Active Directory server. Number of Authenticators – This is the number of NTLM authenticators that try to do authentication. Authentication Retry Seconds – This option allows you to configure how long to retry authentication in seconds. 0 = disabled. Rev 5.0.27.215: May 26, 2010 Page 25 of 191 Active Directory Logon/Logoff Scripts – When NTLM is selected, use the following logon/logoff scripts to add to the Group Policy Object (GPO) on your Active Directory server where your users log in. There are two logon scripts and one logoff script. Place the two logon scripts into the logon scripts folder on your Active Directory GPO. Place the logoff script on the logoff scripts folder on your Active Directory GPO. When registering the logon scripts, only register the primary logon script below. The secondary logon script only needs to be placed in the logon scripts folder on the GPO and should not be registered as a logon script as it only needs to be accessible by users on the network. You can then download the Primary Logon Script, Secondary Logon Script, and Logoff Script. These scripts can be added to your Active Directory Group Policy to transparently authenticate when users log in. After entering the information, click ‘Save’ and then ‘Test’. Proxy Cache Size – This option allows you to set the Proxy Cache Size. The default is 1000 MB. Max Cache Object Size – This option allows you to set the Max Cache Object Size. The default is 4096 KB. Max Cache Object Size Held In Memory – This option allows you to configure the Max Cache object size held in memory. The default is 8 KB. Reserved Cache Memory – This option allows you to set the Reserved Cache Memory. The default is 256 MB Cache Memory Pooling Size – This option allows you to set the Pooling Size. The default is 16 MB. Cache Max File Descriptors – This option allows you to set the Cache Max File Descriptors. 1024 is the default. Cache Info – This shows the size of the Cache. You can choose to Purge Cache or More information about the proxy. See screenshot below for proxy information. Purge URL From Cache – This option allows you to purge individual URLs from the Proxy cache. Bypass Cache URL List - This option allows you to bypass URLs in the proxy. Rev 5.0.27.215: May 26, 2010 Page 26 of 191 Figure 7 - Proxy Cache System Information Rev 5.0.27.215: May 26, 2010 Page 27 of 191 3.2.3.3.1.1 Automatic GPO Setup for NTLM with Login/Logoff Scripts Add the Logon and Logoff scripts to the Active Directory as a group policy when users log in and log off for NTLM Authentication. To do this, follow these steps: 1. From within your Active Directory server, go to Start->Programs->Administrative Tools and click on ‘Active Directory Users and Computers’ 2. Right-click on the domain and select Properties, then select the Group Policy tab. 3. Select the ‘Default Domain Policy’ and click Edit. 4. Navigate to User Configuration -> Windows Settings -> Scripts (Logon/Logoff) 5. Double click Logon and click Show Files, move the login files here. 6. Next click add and select the primary logon script 7. Do the same for the Logoff script. 3.2.3.3.1.2 Automatic GPO Setup for NTLM with Internet Explorer The automatic GPO Setup for NTLM will allow your Active Directory server to setup and distribute the Proxy Settings within the domain clients’ Internet Explorer browser for you. To do this, follow these steps: 1. From within your Active Directory server, go to Start->Programs->Administrative Tools and click on ‘Active Directory Users and Computers’ 2. Right-click on the domain and select Properties, then select the Group Policy tab. 3. Select the ‘Default Domain Policy’ and click Edit. Figure 8 - GPO Default Domain Policy Rev 5.0.27.215: May 26, 2010 Page 28 of 191 4. Navigate to User Configuration->Windows Settings->Internet Explorer Maintenance>Connection 5. Double-click on Connection Settings in the right window panel. Figure 9 - GPO Connection Settings 6. Select the option ‘Import the Connection Settings’ and click Modify Settings. Figure 10 - GPO Import the Connection Settings Rev 5.0.27.215: May 26, 2010 Page 29 of 191 7. Click ‘LAN Settings’ and check ‘Use a proxy server’. Figure 11 - GPO Use Proxy Server 8. Enter the IP address of the iBoss and the Proxy port that is setup on the iBoss (default 8008) and click OK. Figure 12 - GPO Local Area Network Settings Rev 5.0.27.215: May 26, 2010 Page 30 of 191 9. This setting will now be enforced and the next policy update. 3.2.3.3.1.3 Manually Setup Proxy Browser Settings If you are not using the Active Directory/NTLM features, but still want to use the iBoss as a proxy filter, you will need to manually setup the Proxy Settings for the browser. To do this with Internet Explorer, click on Tools->Internet Options-> Connections Tab->LAN Settings and then check Use a proxy server for your LAN. Enter the IP address of the iBoss and the proxy port number (default 8008) and click OK. To do this in Firefox web browser, click Tools-> Options -> Advanced -> Network Tab -> Settings Button -> Select Manual proxy configuration. Enter the IP address under the HTTP Proxy setting for the iBoss IP address and the proxy port (default 8008) and click OK. This will now prompt a user to login before using the Internet. Figure 13 - Manual Proxy with Internet Explorer Rev 5.0.27.215: May 26, 2010 Page 31 of 191 Figure 14 - Manual Proxy with Mozilla Firefox 3.2.3.3.1.4 Automatic Identify of Unknown Computers The automatic Identify of Unknown Computers can be found under Identify Computers & Users. You can auto-identify unknown computers based on the last known proxy user for that computer. Only computers that have had users access the iBoss through the proxy can be identified using this technique. You can re-attempt this periodically as more users will be identified as soon as they access the iBoss through the proxy. To attempt to auto-identify unknown computers, click the Auto-Identify button. This will identify the computers which proxy users have logged in to and place the identified computer under the Identified Computers table. The Computer Nick Name will show up with the last known user with a star in front of it. Figure 15 - Automatic Identify of Unknown Computers Rev 5.0.27.215: May 26, 2010 Page 32 of 191 3.2.3.4 Active Directory Plugin Figure 16 - Active Directory Plugin Rev 5.0.27.215: May 26, 2010 Page 33 of 191 This feature allows you to configure the iBoss to work with the iBoss Active Directory plugin. The iBoss Active Directory plugin is a service you install on your Active Directory server which communicates user login information with the iBoss. The Active Directory plugin is one of two methods to integrate the iBoss with your Active Directory domain. You can alternatively use the settings in the "Active Directory & Proxy Settings" page to use logon and logoff scripts to perform Active Directory user authentication. When using the alternative technique, install of the Active Directory plugin is not required. You may download the latest iBoss Active Directory Plugin at: www.ibosswebfilters.com/adplugin/adplugin.zip Using the Active Directory plugin has advantages to using logon and logoff scripts as it allows multiple distinct Active Directory domains to report user logon activity to the iBoss. When using logon and logoff scripts, the iBoss can only be joined to one domain. In addition, the plugin offloads authentication information from the iBoss and is more efficient in larger environments. Register any Active Directory domain which will be communicating to the iBoss via the plugin. To remove a cluster member from the list, select the Domain to remove and click the "Remove" button located at the bottom of the page. Click the "Done" button when you are finished. Note: In order for your Active Directory domain to communicate with the iBoss, they must first be registered below with the correct Ip Address. In addition, the security key used in the main settings must match the security key configured in the Active Directory plugin installed on each domain controller. Global Settings Enable AD Plugin - Enable this option if you are going to be using the Active Directory Plugin Security Key - This is the security key used to communicate with the domain controller and iBoss. They must match exactly. Note: Changing the port, request wait time, request fail time, or request backlog size will not take effect until the iBoss is restarted. Port - This is the port number used for the active directory plugin. Default is 8015. Request Wait Time - This is the Request Wait time for how long the Plugin will wait to respond to the iBoss. Request Fail Time - This is the Request Fail time for how long until the request fails to the iBoss. Request Backlog Size - This is the backlog size for requests that are waiting to process. Request Count - Current Request Count Successful Request Count - Current Successful Request Count Unsuccessful Request Count - Current Unsuccessful Request Count Active Directory Info Name – This is for reference of which Active Directory server you are adding. Description – A description can be added for reference. IP Address – This is the IP address of the Active Directory server. Default Filtering Group – This is the default filtering group for this active directory domain. Once finished, click “Add” to add the Active Directory server. Rev 5.0.27.215: May 26, 2010 Page 34 of 191 3.2.3.4.1.1 iBoss Active Directory Plugin Configuration Figure 17 - iBoss Active Directory Plugin Configuration This is the configuration of the iBoss Active Directory Plugin. Enter in the information for your iBoss. These settings work in conjunction with the Active Directory Plugin configuration within the iBoss interface. iBoss IP Address – The IP address of the iBoss iBoss Port – This is the port used for communication. Default is 8015. Security Key – This is the key that matches in the iBoss Active Directory Plugin page. Domain Name – This is the domain of the Active Directory Domain that the plugin is on. Seconds Between Logins – This is the seconds between waiting on duplicate login requests. Group Search Attribute – This attribute is for looking up group names. Default is memberOf. Group Search Key – This is the field within Active Directory where group names are saved. Friendly Name Search Attribute – This is the field that shows the friendly name of the users. NTLM Login Detection – This will detect NTLM authentication when users log in. Log Level – This is the amount of login information will be logged on the Domain Controller. Login Ignore Patterns – These are ignore patterns that shouldn’t log users in with. IP Ignore Patterns – These are IP addresses that should be ignored. Com Timeout Millis – This is the communication timeout in milliseconds. Send User FQDN – This is the user Fully Qualified Domain Name. ex [email protected]. Once finished, click Save and close the window. Follow the next steps to audit logon events. Rev 5.0.27.215: May 26, 2010 Page 35 of 191 3.2.3.4.1.2 Active Directory Audit Logon Events Figure 18 - Domain Security Policy To ensure the Active Directory Plugin is working correctly, you will need to audit logon events. To do this, click on Domain Security Policy within your Administrative Tools as shown in the figure above. Figure 19 - Audit Account Logon Events Rev 5.0.27.215: May 26, 2010 Page 36 of 191 Expand under Security Settings Local Policies Audit Policy. Double click the first option Audit account logon events and make sure the checkbox for Define these policy settings and Success is checked and click OK. Figure 20 - Audit Logon Events Next, double-click on Audit logon events (4th option down) and make sure the checkbox for Define these policy settings and Success is checked and click OK. Rev 5.0.27.215: May 26, 2010 Page 37 of 191 3.2.3.5 eDirectory Settings Figure 21 - eDirectory Settings Rev 5.0.27.215: May 26, 2010 Page 38 of 191 3.2.3.6 iBoss eDirectory Transparent Integration Overview The iBoss Enterprise integrates natively with Novell eDirectory servers to provide seamless transparent authentication of users on the network. Integration with eDirectory allows administrators to manage policies based on a user’s eDirectory group membership. In addition, integration unifies web filtering administration with an existing Novell eDirectory infrastructure. Key Features - Live Real-Time eDirectory event monitoring eDirectory user polling support Multiple simultaneous eDirectory monitoring support Compatible with Suse and Netware based eDirectory platforms Web policy enforcement based on eDirectory group membership Getting Started This section describes how to configure the iBoss to work within an eDirectory network infrastructure. Overview The iBoss can integrate with eDirectory with two different modes. Only one of the two modes are required and the end result is the same. The eDirectory version must be noted as not all modes are supported on older eDirectory firmware releases. Listed below are the two modes and their description: Mode 1: eDirectory login/logout event monitoring In this mode, the iBoss monitors login and logout events sent by the eDirectory server in real-time. As users login and logout of their workstations, eDirectory sends these events and iBoss uses them to associate the user with the workstation and apply dynamic filtering policy depending on which user is logged into the station. To use this mode, eDirectory 8.7 and above is required. Mode 2: eDirectory user polling In this mode, the iBoss polls the eDirectory server at the configured interval (usually every 2 minutes) for any users that have logged in within the last interval time. For example, if the polling interval is set to 2 minutes, the iBoss will query eDirectory for any users that have logged in within the last 2 minutes (repeating this every 2 minutes). Because this mode is not receiving events in real-time, user association to iBoss filtering group can take as long as the configured interval. This mode is supported across all eDirectory versions. iBoss eDirectory Configuration eDirectory configuration is performed via the menu option Home->Setup Network Connection->eDirectory Settings. Global Settings The global settings section contains configuration settings that apply across all registered eDirectory servers. The iBoss supports the registration of multiple eDirectory servers with Rev 5.0.27.215: May 26, 2010 Page 39 of 191 independent settings and allows simultaneous monitoring of all registered servers. The global settings are general settings that apply to all servers. Enable User Polling This option specifies whether user polling should be used to process user logins from eDirectory. With polling, the iBoss will check for logins within a specified polling interval. If using eDirectory events, this option is not required and can be set to No. Initial User Full Sync This option specifies whether the iBoss should fully synchronize users from eDirectory with the iBoss after an iBoss reboot. This option is only available if user polling is enabled. When the iBoss is restarted, all users are disassociated and fall within the default filtering policy. With this option, iBoss will pull all users from the eDirectory tree after a reboot. User Login Polling Interval This is the interval at which iBoss will check for any new logon events from eDirectory. At this interval, iBoss will query the eDirectory tree for any new logon events that have occurred and associate the user with the eDirectory filtering policy. This option only applies when using eDirectory polling. When using eDirectory events, this option is not used. User Polling In Progress Indicates whether the iBoss is polling the eDirectory server for logged in users. Last Users Found Count Used to indicate how many new users the iBoss found during the last sync with eDirectory. Below the global settings, there is a “Force Sync” button which will cause the iBoss to immediately start pulling users from eDirectory and associating them with iBoss filtering policy. You can use this status count to determine how many users the iBoss found in eDirectory. You should click the “Refresh” button while performing a full synch to get updated status on this value. eDirectory Info - Server Registration Settings This section allows you to add and edit settings for individual eDirectory servers. Typically, you can add the top level master eDirectory replicas. However, if possible, it is recommended that all eDirectory servers to which users authenticate are registered in this section. The following describes the settings within the eDirectory Info section used to register the eDirectory server. Rev 5.0.27.215: May 26, 2010 Page 40 of 191 Name Use this setting to specify the server name. You can also use a friendly name for the server. This setting does not affect connection to the eDirectory server and is only used for your reference. Ip Address/Host The IP Address or host name of the eDirectory server. Port The port to which the iBoss will connect to the eDirectory server. Typically this is port 389 when ssl is not being used and 636 when SSL is being used. Admin Username (DN) The username that the iBoss will use to search the eDirectory server tree. This user must have search privileges. In addition, if event monitoring is being used, the user must have monitor event privileges set in eDirectory. Typically, a user with administrative privileges is used. Admin Password The password for the admin user specified above. Common Name Search Attribute The eDirectory LDAP attribute used to extract the full name of the user (First and Last Name). Default: sn Username Search Attribute The eDirectory LDAP attribute used to extract the username for the logged in user. Default: cn Group Search Attribute The LDAP attribute that the iBoss will use to match group membership. When the user is found in eDirectory, the iBoss will compare all groups specified in this attribute to the iBoss group names. When the iBoss finds a match, the iBoss will associate the user with that iBoss filtering group policy. If a user is part of more than 1 group that matches an iBoss group name, the iBoss will use the group with a lower group number (Group 1 match will override Group 3 match). Filtering group names can be found in Home->Identify Computers & Users->Groups Tab. Make sure to name the iBoss group exactly like the eDirectory group name that you would like to match. Default: groupMembership Group Attribute Value Key When the group search attribute above is found (for example groupMembership), this value specifies the tokens that separate the group names. For example, using the default value of cn, the groupMembership LDAP attribute looks like cn=Staff,cn=Wireless User. With cn in this option, the groups that the iBoss would extract are Staff and Wireless User. It would then compare those to the iBoss groups. Rev 5.0.27.215: May 26, 2010 Page 41 of 191 Default: cn Location Attribute An optional LDAP attribute that can be used to specify the users location for generating reports. Typically this is left blank. Ignore DN Pattern The iBoss will ignore any user logins/logoffs that contain the patterns specified in this option. Any automated service accounts should be specified here. If they are not, whenever the service account (such as an antivirus account) logs into a computer that contains a logged in user, that username will override the logged in user. Eventually, it will appear as if the service account is the only user logged into the network. Enter these automated user accounts here so that whenever the iBoss receives a logon or logoff event from these users, it ignores them and preserves the currently logged in user. Values should be specified separated with a comma. Default Filtering Policy If the iBoss cannot find a matching iBoss group name to eDirectory group name, this specifies the default policy the iBoss should apply to the user. Connect Timeout This is the timeout (specified in seconds) that the iBoss should use when connecting to an eDirectory server. If an eDirectory server is down, this will prevent the iBoss from waiting too long before trying to connect again. Default: 20 Monitor Events Specifies whether eDirectory event polling should be used for this server. This is recommended as login and logout events will be sent in real-time to the iBoss. Poll User Logins Specifies whether the iBoss should use the polling method to poll the eDirectory server for login events. The settings specified in the global settings apply to this mode. This is typically set to No when Monitor Events is set to Yes as the iBoss will receive login/logout events in real-time. Allow Full Sync Specifies whether this server will participate in the full user synchronization triggered when “Force Full Sync” above is clicked. Typically, set this to “Yes” only for the master eDirectory replica as not all servers need to be queried during a full sync. User Polling Search Base This is the level in the eDirectory tree the iBoss should use to search for logged in users. When using “Force Full Sync” or enabling the option for “Poll User Logins”, this value is required. Typically this is set to the top of the tree (for example, o=iboss). Rev 5.0.27.215: May 26, 2010 Page 42 of 191 User SSL/SSL Certificate This option specifies whether the iBoss should use SSL to connect to the eDirectory server. Typically SSL for eDirectory communicates via port 636 and this should be configured in Port Settings. When using SSL, paste your SSL certificate by extracting the contents of the certificate in PEM format. SSL is not required and involves more maintenance as you must monitor your certificates expiration dates to confirm that your certificates do not expire. If your certificate expires, the iBoss will no longer be able to communicate with the eDirectory server and the certificate will have to be updated. The default setting for use SSL is usually set to “No” Add The Server Once you have configured all of your settings, click the Add button to add the server to the registered eDirectory list. You should refresh the page using the “Refresh” button after adding the server. This will update the “Status” field for the server that was just added to the list. You will want to confirm that the status is “Running…” for eDirectory servers registered to receive eDirectory events and no error is specified. Conclusion Once all of your eDirectory servers are registered, you can seamless manage policies within the iBoss and manage group membership in your eDirectory server. The iBoss will dynamically apply the appropriate policy whenever the user logs in using their eDirectory login credentials. Rev 5.0.27.215: May 26, 2010 Page 43 of 191 3.2.3.7 Clustering Figure 22 – Clustering This feature allows you to configure clustering between a group of iBoss filters. By clustering iBoss filters, you can have settings from an iBoss master automatically replicate across all members of the cluster. This allows a central management point for a group of iBoss web filters. Enter information about cluster members in the required fields and click the "Add" button. To remove a cluster member from the list, select the iBoss to remove and click the "Remove" button located at the bottom of the page. Click the "Done" button when you are finished. Rev 5.0.27.215: May 26, 2010 Page 44 of 191 Note - When creating the cluster, designate a single iBoss in the cluster as the master. This will be the iBoss which you want to use as the central point for configuring settings. Only the master needs to have cluster members added below. You can also select which settings you will want to replicate from the master to the slaves. Local Settings – These are local settings for the iBoss you are configuring. Enable Clustering – This option turns on clustering globally. Node Type – This field specifies the device node type whether it is a slave or master iBoss device. Retry Sync Interval in Seconds – This field is the interval which the settings are synced. Clustering Port – This field specifies the port used for syncing settings. Note: The security key must be 32 hex characters. Valid characters are 0-9 and AF. Security Key – This field specifies the security key used when communicating with other clustered iBoss devices. Master Ip Address – This field specifies the master iBoss IP address of the cluster. Status – This is the status of the clustering with this device. Sync Count – This is the number of the sync count. Once you have entered all required information click the “Apply” button. The sync count should increase as the intervals are reached and settings are synced. To check current status, refresh the page to check the sync count by clicking the “Refresh” button. You can manually sync settings by clicking the “Full Sync” button. Cluster Member Info – These are settings which you may add for each iBoss device you are adding to the cluster. Name – This field is to put the name of the iBoss you are adding for reference. Description – This is the description for the iBoss device you are adding. Node Type – This field indicates whether this device is the master or slave. IP Address/Host – This is the field for the IP of the iBoss you are adding. Port – This is the port number that is used to communicate. Connect Timeout – This is the timeout if the response is taking too long. Sync Filter Settings – This is option to sync the filtering settings. Sync Group Settings – This is option to sync the groups. Sync Preferences - This is option to sync the preference settings. Sync Security Settings - This is option to sync the security settings. Sync Nodes - This is option to sync the computer nodes. Once finished, click the “Add” button to add the iBoss cluster device. Rev 5.0.27.215: May 26, 2010 Page 45 of 191 3.2.3.8 Add Additional Routes Figure 23 - Add Additional Routes This page allows you to register gateways that are internal to your network (on the LAN side of the iBoss). Typically the iBoss is placed between a Layer 2 switch and the outter network Gateway/Firewall. If your network has any additional internal (non-NAT) gateways that are used to route internal local subnets, you can register those gateways here. The iBoss will automatically integrate with the internal gateways so that you may identify and apply filtering rules to computers behind the gateway. Rev 5.0.27.215: May 26, 2010 Page 46 of 191 The global settings apply to all internal gateways added. You must enable internal gateway integration in the global settings below for any of the settings on this page to take affect. Enter the internal gateway below and click the "Add" button. To remove a gateway from the list, select the gateway to remove and click the "Remove" button located at the bottom of the page. You can add up to 1000 internal gateways. Click the "Done" button when you are finished. Note - Do not add any gateways if your network is configured with a single outter gateway. Place the iBoss between the outter gateway/router and the internal switch to which all of the computers are connected. If you register internal gateways on this page, you must add the subnet which is routed by this gateway on the "Additional Local Subnets" page. When adding the additional local subnet, make sure the option "Routed Through Gateway" is set to yes. Rev 5.0.27.215: May 26, 2010 Page 47 of 191 3.2.3.9 Bypass IP Ranges Figure 24 - Bypass IP Range This page allows you to add IP Addresses which you would like to completely bypass the iBoss filtering engine. IP Addresses listed here will not appear in your Unidentified Computers list and will completely bypass filtering. This is useful for bypassing IP Address ranges that include servers, VOIP based phones, and other devices which do not require filtering. Enter the IP Address ranges below and click the "Add" button. To remove an IP Address range from the list, select the range to remove and click the "Remove" button located at the bottom of the page. You can add up to 50 IP Address ranges to bypass. Click the "Done" button when you are finished. Rev 5.0.27.215: May 26, 2010 Page 48 of 191 3.2.3.10 Add Additional Local Subnets Figure 25 - Add Additional Local Subnets Rev 5.0.27.215: May 26, 2010 Page 49 of 191 This feature allows you to add and define local subnets. Traffic between local subnets are not filtered by the iBoss. In addition, the iBoss will only filter Internet traffic from subnets that are defined below. Be sure to include all the subnets on the local network. You can add a top level subnet (such as 10.0.0.0/255.0.0.0) if your network includes many smaller subnets and you would like to have the entire subnet on the same default policy. In addition, you can select to add IP Ranges if you would like to assign a default policy to a specific IP Range. When the default policy for a subnet is determined, the iBoss will start from the subnet at the top of the list and work its way down. The iBoss will always traverse all subnets from top to bottom. Any subnet (or IP Range) toward the bottom of the list will override subnets toward the top of the list and the default policy for subnets lower in the list will override the default for subnets at the top of the list for matching IPs. It is recommended that IP Subnets are used instead of IP ranges. If there is a range of IPs that must have a separate default policy from the top level subnet, add the subnet first that contains the IP range, then add the IP range within that subnet lower in the list. The "Bandwidth Accounting" option specifies whether the iBoss should track bandwidth statistics for the subnet or IP range. If there are overlapping subnets or IP ranges in the list, disable the "Bandwidth Accounting" option for the duplicate subnet so that bandwidth is not accounted for twice which will inflate bandwidth statistics. Enter the local subnets and click the "Add" button. To remove a subnet from the list, select the subnet to remove and click the "Remove" button located at the bottom of the page. Click the "Done" button when you are finished. Filtering Method Option - The iBoss has the ability to filter a subnet based on a variety of methods. Ip Address - This option indicates that Ip Addresses should be used to apply a filtering policies to traffic originating on this subnet. With this option, you can apply policies to individual Ip Addresses, but not directly to a computer based on its MAC address within the subnet. In addition, if using Active Directory NTLM/Single Signon, you will still have the ability to determine the user that was generating the network traffic, but you will not be able determine which computer (based on its MAC address) the user was operating when generating the traffic. MAC Address - Filtering policies on this subnet are based on the Mac Address (MAC) of the computer's network adapters. This allows you to identify computers on your network uniquely and assign computers to different filtering groups. If using Active Directory NTLM/Single Signon, this method also allows you to identify which computer a user was accessing when network activity occurs. This feature gives you more visibility on the network, especially in a NTLM/Active Directory environment, as it allows you to not only identify the user but associate the station that was used to generate the network traffic. This option indicates that traffic originating from this subnet does not traverse any internal routers or gateways. MAC Address Through Gateway - This option has the same effect as the "MAC Address" option above, except it should be chosen if traffic originating from this subnet traverses an Rev 5.0.27.215: May 26, 2010 Page 50 of 191 internal gateway or router before reaching the iBoss. You must register the internal gateway or router with the iBoss through the "Register Internal Gateways" menu option (under Main Menu->Setup Network Connection). Enter Local Subnet – This is the section to add local subnet information. Type – This is the option to choose whether it is a Range or Subnet. IP Start (Range option) – This is the start IP address of the IP range you are adding. IP End (Range option) – This is the end IP address of the IP range you are adding. IP Address (Subnet option) – This is an IP address of the IP subnet you are adding; typically you enter the broadcast address. Subnet Mask (Subnet option) – This is the subnet mask for the IP subnet you are adding. Authentication Method – This is the option whether to authenticate with fixed filtering or NTLM with Active Directory. Filtering Method – This is the option to choose whether this IP range or subnet are filtered and identified by IP address, Mac Address, or Mac Address through an internal gateway. Default Policy – This is the default filtering policy for the IP range or subnet you are adding. Login Page Group – This is the Login group page for user login used for the IP range or subnet you are adding. Bandwidth Accounting – This option is to choose whether to account for bandwidth for the IP range or subnet you are adding. Rev 5.0.27.215: May 26, 2010 Page 51 of 191 3.2.3.11 Register Internal Gateways Figure 26 - Register Internal Gateways Rev 5.0.27.215: May 26, 2010 Page 52 of 191 This page allows you to register gateways that are internal to your network (on the LAN side of the iBoss). Typically the iBoss is placed between a Layer 2 switch and the outter network Gateway/Firewall. If your network has any additional internal (non-NAT) gateways that are used to route internal local subnets, you can register those gateways here. The iBoss will automatically integrate with the internal gateways so that you may identify and apply filtering rules to computers behind the gateway. The global settings apply to all internal gateways added. You must enable internal gateway integration in the global settings below for any of the settings on this page to take effect. Enter the internal gateway below and click the "Add" button. To remove a gateway from the list, select the gateway to remove and click the "Remove" button located at the bottom of the page. You can add up to 1000 internal gateways. Click the "Done" button when you are finished. Note - Do not add any gateways if your network is configured with a single outter gateway. Place the iBoss between the outter gateway/router and the internal switch to which all of the computers are connected. If you register internal gateways on this page, you must add the subnet which is routed by this gateway on the"Additional Local Subnets" page. When adding the additional local subnet, make sure the option "Routed Through Gateway" is set to yes. Global Settings – These are the global settings for adding an Internal Gateway. Enable – This is the option to globally turn on this feature. Gateway Sync Interval – This is the sync interval with the gateways that are adding in seconds. Once you have changed any of these options, click the “Apply” button. Enter Internal Gateway – These are the individual gateway settings. Name – This is the name for reference for the gateway you are adding. Description – This is the field to add a description for the gateway you are adding. Gateway Type – This is the gateway type. Options are Cisco, HP Switch, Linux, Cisco FWSM, Dlink Switch. IP Address – This is the IP address for the internal gateway you are adding. Port – This is the port used for communication, typically it is port 23 for telnet communication or port 22 for SSH communication. Protocol – This is the option to choose whether communication is through telnet or SSH. Username – This is the username to log into the internal gateway. Password - This is the password to log into the internal gateway. Connect Timeout – This is the connection timeout if no response is received specified in seconds. Once you have finished adding these settings click the “Add” button. It will add it to the Internal Gateways list. To test these settings click the “Edit” button next to the entry and it will populate the fields again that you have entered. Next, click the “Test” button to test this entry. To remove an entry click the “Remove” button next to the gateway entry. Once you are finished, click the “Done” button. Rev 5.0.27.215: May 26, 2010 Page 53 of 191 3.2.3.12 Edit Advanced Network Settings Figure 27 - Edit Advanced Network Settings The iBoss connects to the Phantom servers via UDP. You may select which ports it connects through. The default destination port is 8000 and default source port is 8001. Always On Connection - This option allows you to still have Internet access even if it loses connection with our servers. This function will work after the first time that it has established a connection. Rev 5.0.27.215: May 26, 2010 Page 54 of 191 3.3 Installing the iBoss on the Network Once the network settings have been configured, the iBoss is ready to be installed on the network. The two ports you will be using are the “LAN” port and the “WAN” port located on the iBoss. Place the iBoss between an existing switch on the network and an existing firewall. For example, if the network has a switch to which computers are connected to, and that switch is connected to the network firewall, the iBoss will be placed between the switch and the firewall. Disconnect the switch from the firewall and connect the switch to the “LAN” port on the iBoss. Connect the firewall to the “WAN” port on the iBoss. Figure 28 - iBoss Hardware Installation This completes the physical installation of the iBoss on your network. You can access the iBoss interface from any computer on the local network by opening a Web Browser and typing the IP address of the iBoss into your Web Browser’s address bar. 3.3.1 Additional Setup Steps and Notes After setting up the iBoss, there are some steps you will need to do. We recommend adding IP addresses to the bypass range for any servers or IP addresses that you do not want filtered. For example, any DNS servers or VoIP phones. Rev 5.0.27.215: May 26, 2010 Page 55 of 191 4 INTERFACE 4.1 Home Page Figure 29 - Home Page Rev 5.0.27.215: May 26, 2010 Page 56 of 191 4.1.1 Filtering Status This indicates the filtering status of your iBoss. The following values may be displayed: Enabled - Indicates that your iBoss is Enabled and Active. Disabled - Indicates that your iBoss is not enabled. Connecting - When the iBoss is enabled, it must first establish a connection to the gateway. This indicates that the iBoss is attempting to establish a connection. Must Activate or Subscription Expired - If you have a new iBoss and need to activate your subscription, or if your iBoss subscription has expired, the “Activate” button will appear next to the filtering status field. Click the “Activate” button to proceed with your iBoss activation. Current Date & Time - Indicates the current date and time. The date and time are synchronized when the iBoss establishes a connection to the gateway, and are important for performing Internet scheduling and report logging. The local time zone settings may be set from the “Edit My Time Zone” page under “My Preferences”. Note: The date & time will only be displayed when the iBoss status is “Enabled”. Enable/Disable Button - The “Enable/Disable” button is located next to the Filtering Status field. It is useful for quickly enabling and disabling your iBoss filtering. If your status reads “Not Enabled”, clicking the “Enable” button will enabled the iBoss filtering. You may also choose to Disable for time periods such as 15 Min, 30 Min, 1 Hour, 2 Hours, 12 Hours, 24 Hours or Until Re-enabled. 4.1.2 Main Menu The “Home” menu allows you to choose options for configuring the current iBoss settings. There are eight options to choose from: View Log Reports, Configure Internet Controls, Edit My Preferences, Identify Computers & Users, Tools & Utilities, Setup Network Connection, Update Firmware and Manage Subscription. View Log Reports - This option allows you to view your iBoss report logs. Configure Internet Controls - This option allows you to configure different iBoss filtering controls. Edit My Preferences - This option allows you to edit preferences including E-mail options, password, time zone and custom block messages. Identify Computers & Users - This option allows you to identify computers and individual user login on your network for computer specific management control. Tools & Utilities - This option allows you to configure use utilities for quick lookups or backup & restore options. Setup Network Connection - This option allows you to configure your iBoss network settings. Update Firmware - This option allows you to update the firmware for your iBoss whenever updates are available. Rev 5.0.27.215: May 26, 2010 Page 57 of 191 Manage Subscription - This option allows you to update the subscription for your iBoss. 4.1.3 Shortcut Bar Use this shortcut bar to quickly navigate through the iBoss interface. The shortcut bar has 4 options to choose: Home, Reports, Internet Controls, and My Preferences. Once you set a password for the iBoss, a Logout button will also appear. Rev 5.0.27.215: May 26, 2010 Page 58 of 191 4.2 Configure Internet Controls Figure 30 - Configure Internet Controls The "Configure Internet Controls" menu lets you choose options for configuring the current iBoss Internet controls. These are the options to choose from: Block Specific Website Categories, Programs, Protocols & DLP, Bandwidth Throttling/QoS, Block Specific Websites, Allows Specific Websites, Block Keywords, Block Specific Ports, Block File Extensions, Restrict Domain Extensions, Configure Sleep Schedule, and Real-time Monitoring /Recording. Rev 5.0.27.215: May 26, 2010 Page 59 of 191 Block Specific Website Categories - This option allows you to block or allow website content based on categories. Programs, Protocols & DLP - This option allows you to configure access to web applications that the iBoss can manage. You may choose to block Chat (Instant messenger) programs, File Sharing programs, FTP & other protocols for Data Leakage Protection (DLP). Bandwidth Throttling/QoS - This option allows you to set bandwidth throttles on users, groups, domains, or web categories. Block Specific Websites - This option allows you to block access to specific websites by adding them to the Block List. Allow Specific Websites - This option allows you to permit access to specific websites by adding them to the Allow List. Block Specific Keywords - This option allows you to block specific keywords from searches or full URL's by adding them to the Keyword list. Block Specific Ports - This option allows you to block specific ports or port ranges with Protocol and Direction. Block File Extensions - This option allows you to block specific file extensions from being downloaded on your network. Restrict Domain Extensions - This option allows you to block or allow specific domain extensions from being accessed. Configure Sleep Schedule - This option allows you to schedule access to the Internet on a schedule. Real-time Monitoring/Recording - This option allows you to set notification alerts for real-time monitoring and recording thresholds. Rev 5.0.27.215: May 26, 2010 Page 60 of 191 4.2.1 Block Specific Website Categories Figure 31 - Block Specific Website Categories Rev 5.0.27.215: May 26, 2010 Page 61 of 191 The "Internet Category Blocking" page allows you to configure the current iBoss Internet website category blocking settings, log settings, Stealth Mode, and Identity Theft Detection options. Categories - These are categories from which Internet websites are grouped. You may choose categories from this list that you wish to block on your network. In addition to blocking access to these website categories, the iBoss will also log attempted access violations if logging is enabled. Examples of website categories are: Ads Adult Content Alcohol/Tobacco Art Auctions Audio & Video Bikini/Swimsuit Business Dating & Personals Dictionary Drugs Education Entertainment File Sharing Finance & Investment Forums Friendship Gambling Games Government Guns & Weapons Health Image/Video Search Jobs Mobile Phones News Organizations Political Porn/Nudity Private Websites Real Estate Religion Restaurants/Food Search Engines Services Sex Ed Shopping Sports Technology Toolbars Transportation Travel Violence & Hate Virus & Malware Web-Based E-mail Web Hosting Web Proxies Category Scheduling - Allows you to choose whether you want the categories above that are selected to be always blocked or blocked based on a custom Advanced Day/Time Schedule. Note: The Advanced Category Scheduling feature will only take effect on categories that are currently selected to be blocked in the category block list above. Logging - Allows you to enable and disable logging of violation attempts for the current set of blocked website categories. Log reports may be viewed on the iBoss Reports page. The report information includes date, time, user, website address, and category of the violation. Stealth Mode - Allows you to stealthily monitor Internet activity without blocking access to forbidden sites. With both Logging and Stealth Mode enabled, you can monitor Internet web surfing activity by viewing the log reports on the iBoss Reports page while remaining unnoticed to Internet users on the network. Note: Websites and online applications will not be blocked while the iBoss is in "Stealth Mode". Strict SafeSearch Enforcement - Allows you to enforce strict safe search on the Google and Yahoo search engines. This includes image searching. If this option is enabled and the user does not have search engine preferences set to strict safe searching, the search will be blocked. This allows an extra layer of enforcement to prevent unwanted adult and explicit content from being search on these search engines. Rev 5.0.27.215: May 26, 2010 Page 62 of 191 This setting only applies to Yahoo and Google search engines. For Yahoo, the search preference for "SafeSearch" Filter must be set to "Filter out adult Web, video, and image search results" if this option is enabled. For Google, the SafeSearch filtering preference must be set to "Use strict filtering (Filter both explicit text and explicit images)" when this option is enabled. Scan HTTP On Non-Standard Ports - If this feature is enabled, the iBoss will scan for HTTP web requests on non-standard ports. Allow Legacy HTTP 1.0 Requests - If this feature is enabled, the iBoss will allow HTTP 1.0 requests that are missing the "HOST" header. Disabling this feature provides a higher level of filtering security and makes bypassing the filter more difficult. If this feature is enabled, it may provide more compatibility with older non HTTP 1.1 compliant software. Identity Theft (Phishing)/ IP Address URL Blocking - Protects against potential identity theft attempts by notifying you when someone is trying to steal your personal information through Internet Phishing. Enabling this feature will also block users from navigating to websites using IP address URL's. Rev 5.0.27.215: May 26, 2010 Page 63 of 191 4.2.1.1 Advanced Scheduling Figure 32 - Advanced Scheduling Rev 5.0.27.215: May 26, 2010 Page 64 of 191 You may use advanced scheduling to create custom allow and block times for Filtering Categories, Web Programs, and the Sleep Schedule. You may use different schedules for the different days of the week, simply select the day and set the schedule. For Filtering Categories you will have to select a Category to Schedule: Green (or checked) indicates access is allowed during the time block specified. Red (or unchecked) indicates access is blocked during the time block specified. Note: For the Advanced Category Scheduling to function, the category to be scheduled must be currently blocked on the "Internet Category Blocking" setup page. Rev 5.0.27.215: May 26, 2010 Page 65 of 191 4.2.1.2 Identify Theft (Phishing)/ IP Address Blocking Page Figure 33 - Identity Theft Detection Page When a page is blocked from of the iBoss due to detection of Identity Theft (Phishing)/IP Address URL Blocking, this page will show up in the web browser to the user. You may manually login and add the blocked Identity theft page (IP address) to the allowlist if you feel that you have received the Identity Theft Detection in error by typing in the password and pressing Login. Rev 5.0.27.215: May 26, 2010 Page 66 of 191 4.2.2 Programs, Protocols & DLSP (Data Leakage Protection) Figure 34 - Block Specific Web Programs Rev 5.0.27.215: May 26, 2010 Page 67 of 191 The "Internet Program Blocking" section allows you to configure the current iBoss program blocking settings. Chat - This category contains applications used for online messaging and chat. The iBoss can block the selected program(s) and log attempted violations. Examples of applications in this category are: AIM (AOL Instant Messenger) Yahoo Messenger ICQ MSN Messenger IRC (Internet Relay Chat) Jabber Chat Schedule - Allows you to schedule daily access for selected chat programs. This option will bypass blocking for chat and instant messenger programs during the specified time. Gaming This category contains online gaming applications. The iBoss can block the selected program(s) and log attempted access violations. Examples of applications in this category are: World of Warcraft StarCraft Everquest/Everquest II XBox Gaming Schedule - Allows you to schedule daily access for selected online gaming programs. This option will bypass blocking for online gaming programs during the specified time. File Sharing Programs - This category contains online file sharing applications. The iBoss can block the selected program(s) and log attempted access violations. Examples of applications in this category are: Limewire XoloX ZP2P BearShare Acquisition BitTorrent Edonkey Manolito Ares Direct Connect File Sharing Schedule - Allows you to schedule daily access for selected file sharing programs. This option will bypass blocking for file sharing programs during the specified time. FTP (File Sharing Protocol) - You may choose to enable blocking for incoming and outgoing FTP Traffic. Enabling this feature will allow you to block incoming, outgoing, or all FTP Traffic. Block Ping (ICMP) - You may choose to enable blocking for outgoing Ping (ICMP) Traffic. Block SSL on Non-Standard Ports - You may choose to enable blocking SSL on NonStandard Ports. This feature is useful for blocking File Sharing programs which use encryption over non-standard ports. Block Rogue Encrypted Connections – You may choose to enable blocking for Rogue Encrypted Connections. This option blocks invalid SSL certificates and blocks programs that use Rogue Encryptions such as UltraSurf. Rev 5.0.27.215: May 26, 2010 Page 68 of 191 SSL Domain Enforcement – This option validates domains with the SSL certificate. Reverse DNS Lookup Support – This option allows for Reverse DNS lookup support. Block Newsgroups - You may choose to enable blocking newsgroup traffic. Block Internal Servers - You may choose to enable blocking for internal Servers. This option helps block programs like BitTorrent which upload as well. Logging - Allows you to enable or disable logging of attempted program access violations. This log is found on the Reports page. The logging includes date, time, and category. Logging can be enabled while in stealth mode. This is useful for monitoring your Internet usage while remaining unnoticed on the network. Without logging, the iBoss program blocking will still work however violations will not be logged. Rev 5.0.27.215: May 26, 2010 Page 69 of 191 4.2.3 Bandwidth Throttling/QoS Figure 35 - Bandwidth Throttling / QoS Rev 5.0.27.215: May 26, 2010 Page 70 of 191 This feature allows you to configure quality of service rules for bandwidth throttling and packet shaping. The iBoss allows you to create dynamic rules based on a variety of criteria including users, groups, Ip Addresses, and ports. Creating rules based on users and groups allows the iBoss to track the user dynamically and apply the QoS rules regardless of the user's Ip Address. Create your rules and click the "Add" button to apply the rule. You can disable individual rules which will cause the rule to have no effect. Rules are prioritized from top to bottom starting with rule one below which has the highest priority. The iBoss will apply the first rule that matches each traffic stream. If no rule applies, the iBoss will use default QoS packet TOS bits to determine priority. For each rule, you can specify the minimum amount of bandwidth to reserve for traffic that matches your criteria. This will guarantee that at least this much bandwidth is available for critical applications when your Internet connection is completely saturated. If you would like to simply throttle traffic, set the minimum bandwidth to 12 kbps and set the maximum to that which you would like to throttle the traffic to. The maximum bandwidth specified how much bandwidth matching traffic can use at any time. If the maximum is set to your maximum Internet speed, then the matching application can use any spare bandwidth when it is available. For proper operation, set the Total Downstream Bandwidth and Total Upstream Bandwidth in the Global Settings to match your bandwidth connection speed to the Internet for your network. You must enable the global settings for any of the rules on this page to have effect. You can add up to 250 rules. Click the "Done" button when you are finished. Global Settings - These are global settings for the bandwidth throttling. Enable – This is a global option to turn this feature on or off. Logging Enabled – This option logs the bandwidth throttles in the reports. Total Downstream Bandwidth – This sets the total amount of Downstream bandwidth on your network in kbit/sec. Total Upstream Bandwidth - This sets the total amount of Upstream bandwidth on your network in kbit/sec. Once you have finished with changes any of these settings, click “Apply”. Rule Detail – These are the individual settings for the bandwidth throttles you set. Enabled – This option is to turn this throttle on or off. Traffic Direction – This is the direction in which the throttle takes place, either upstream or downstream. Apply To – This field allows you to specify if this rule is for a group or user. Rev 5.0.27.215: May 26, 2010 Page 71 of 191 Group (only if applied to Groups) – This allows you to choose the group in which this rule is set for. Group (only if applied to User) – This allows you to choose the username in which this rule is set for. Match – This is the rule in which this rule is set for. You may choose Web Category, Domain, IP Addresses, or TCP/UDP ports. Apply To Category – This allows you to choose which web category to apply this rule to. Minimum Reserved Bandwidth – This is the minimum reserved bandwidth for this rule in kbit/sec. Min: 12 kbit/sec Maximum Bandwidth – This is the Maximum cap of this rule in kbit/sec. Run On Schedule – This option allows you to set a schedule time for this rule. Schedule Start Hour – Start time for this rule in hours on 24 hour format (0-23) Schedule Start Minute – Start minute for this rule (0-59) Schedule End Hour – End hour for this rule (0-23) Schedule End Minute – End minute for this rule (0-59) Rev 5.0.27.215: May 26, 2010 Page 72 of 191 4.2.4 Block Specific Websites Figure 36 - Block Specific Websites Rev 5.0.27.215: May 26, 2010 Page 73 of 191 This page allows you to block specific website URLs from being accessed on your network. Enter the URL of the website you would like to block in the text box below and click the "Add URL" button. You may enter a maximum of 1000 website URLs across all profiles. Each URL may be a maximum of 255 characters in length. To remove a website URL from the Blocklist, select the URL to remove and click the "Remove" button located at the bottom of the page. Click the "Done" button when you are finished. 4.2.4.1 Custom Blocklist Categories Figure 37 - Custom Blocklist Categories Select the custom block list categories to apply to this group. These categories allow you to create custom lists of URLs that can be applied to multiple groups. Use the custom category feature to avoid adding the same URL to multiple groups. This feature allows you to create custom Blocklist list categories. Enter the URL of the website you would like to add the currently selected category in the text box below and click the "Add URL" button. Any group that has this category checked will also have the URLs in this category applied. Rev 5.0.27.215: May 26, 2010 Page 74 of 191 4.2.4.2 Blocklist Import Figure 38 - Blocklist Import You may import a list of domains to import. Please paste URLs one per line with a maximum of 255 characters per domain/IP/URL. Once you are done, click the Import Now button. Rev 5.0.27.215: May 26, 2010 Page 75 of 191 4.2.1 Allow Specific Websites Figure 39 - Allow Specific Websites Rev 5.0.27.215: May 26, 2010 Page 76 of 191 This page allows you to add specific websites to your Allowlist. The Allowlist is a list of specific Internet URLs that you want to allow on your network. Website URLs added to this list will be allowed even if they are currently blocked in the Internet Category Blocking settings. Alert! If the "Allow ONLY access to sites on the Allowlist" option is selected, only the websites in the Allowlist below will be allowed. All other websites will be blocked. If you want to only allow access to the Allowlist URLs on your network, select the "ONLY Allow access to sites on the Allowlist" checkbox. You may select the "Enable Allowlist Navigation webpage" if you wish to allow access to a built-in iBoss website that will display links to all sites on the Allowlist. To apply changes, click the "Apply" button. Note: The Allowlist Navigation webpage will only display when the "Allow ONLY" feature is enabled. Allow ONLY access to sites on the Allowlist – Checking this option will only allow sites in list. Enable Allowlist Navigation webpage - This will give you a page that has a list of the allowed sites to be able to give to your users. Once you have changed any of these settings, click the “Apply” button. Enter the URL of the website you would like to allow in the text box below and click the "Add URL" button. You may enter a maximum of 1000 website URLs across all profiles. Each URL may be a maximum of 255 characters in length. To remove a website URL from the Allowlist, select the URL and click the "Remove" button located at the bottom of the page. When you are finished, click the "Done" button. Select "Apply Keyword/Safe Search" if you would still like to have keyword and safe search enforcement applied to the domain being bypassed. Enter URL (ex: domain.com) – field to enter the domain or URL to allow. Global – Option to allow across all filtering groups Apply Keyword/Safe Search – Allows the domain or URL if it contains this keyword added. This is not recommended as it may allow false positives. Once you have entered in a URL or domain, click the “Add URL” button. Rev 5.0.27.215: May 26, 2010 Page 77 of 191 4.2.1.1 Custom Allowlist Categories Figure 40 - Custom Allowlist Categories Select the custom allow list categories to apply to this group. These categories allow you to create custom lists of URLs that can be applied to multiple groups. Use the custom category feature to avoid adding the same URL to multiple groups. This feature allows you to create custom Allowlist list categories. Enter the URL of the website you would like to add the currently selected category in the text box below and click the "Add URL" button. Any group that has this category checked will also have the URLs in this category applied. Youtube Video Category – This option allows you to allow specific YouTube videos while blocking having the Audio/Video category still block the YouTube site. Apply Keyword/Safe Search - Allows the domain or URL if it contains this keyword added. This is not recommended as it may allow false positives. Rev 5.0.27.215: May 26, 2010 Page 78 of 191 4.2.1.2 Allowlist Import Figure 41 - Allowlist Import You may import a list of domains to import. Please paste URLs one per line with a maximum of 255 characters per domain/IP/URL. Once you are done, click the Import Now button. Rev 5.0.27.215: May 26, 2010 Page 79 of 191 4.2.2 Block Specific Keywords Figure 42 - Block Specific Keywords Rev 5.0.27.215: May 26, 2010 Page 80 of 191 This feature allows you to create keyword Blocklists. The iBoss will block Internet sites that contain these specific keywords in the URL. In addition, web searches using the keywords in the list(s) will also be blocked. Pre-Defined Lists You may select from pre-defined keyword category lists. Each category contains its own keyword list. To enable a keyword list, select the checkbox next to the category. You may view and edit the list by clicking on the category link. When you are finished, click the "Apply" button. To see the pre-defined list, you may click on the category name to see the pre-defined list and uncheck words if you wish. Custom List Enter the custom keyword that you would like to block in the text box below and click the "Add Keyword" button. You may enter a maximum of 2000 website URL keywords across all profiles. Each keyword may be a maximum of 19 characters in length (letters and digits only). To remove a keyword from the list, select the keyword and click the "Remove" button located at the bottom of the page. When you are finished, click the "Done" button. Note: If you want a keyword to be blocked globally across all filtering groups, select the "Apply this entry to all filtering groups" option before clicking the "Add Keyword" button. The letter "G" will appear next to the entry which indicates that it is a global entry and applies to all filtering groups. When removing a global" entry, it will remove the entry from all filtering groups. Select the "Wild Card" checkbox if you would like to use wild card matching on the keyword. When wild card matching is used, the entire URL is searched for the keyword pattern. If wild card matching is not used, the iBoss will analyze the URL for queries containing the keywords entered. Select "High Risk" if the keyword represents a high risk word. Selecting this option allows the keyword to be used in other aspects of the filter such as sending alerts when the keyword term is searched for. When you are finished, click the "Done" button. Enter Keyword (example: adult) – This is the field to add the keyword you would like blocked. Once finished, click the “Add Keyword” button. Wild Card – This is the wild card for any part of the URL to block the keyword. High Risk – This option alerts the administrator when this keyword is searched for. Apply this entry to all filtering groups – This option applies this block to all filtering groups. You can import a list of keywords to block by clicking “Import”. You may remove keywords by checking the keyword and clicking the “Remove” button. Once finished, click the “Done” button. Rev 5.0.27.215: May 26, 2010 Page 81 of 191 4.2.2.1 Keyword Import Figure 43 - Keyword Import You may import a list of keywords to import. Please paste keywords one per line with a maximum of 19 characters per keyword. You may select Apply to all filtering groups. Once you are done, click the Import Now button. Rev 5.0.27.215: May 26, 2010 Page 82 of 191 4.2.3 Block Specific Ports Figure 44 - Port Blocking Port blocking allows Internet traffic on specified ports or ranges of ports to be blocked from accessing the Internet. Traffic using the specified ports will be blocked completely. This allows you to enter the name, port start, port end, protocol, and direction. Once you enter in the information click Enable and save. Port Blocking Schedule – You may choose to block these ports all the time or Block on an Advanced Schedule. Rev 5.0.27.215: May 26, 2010 Page 83 of 191 4.2.4 Block Specific File Extensions Figure 45 - Block Specific File Extensions This page allows you to block specific file extensions from being downloaded on your network. Enter the file extension of files you would like to block in the text box below and click the "Add" button. You may enter a maximum of 2000 file extensions across all profiles. Each extension may be a maximum of 15 characters in length. To remove an extension from the Blocklist, select the extension to remove and click the "Remove" button located at the bottom of the page. Click the "Done" button when you are finished. Rev 5.0.27.215: May 26, 2010 Page 84 of 191 4.2.5 Restrict Domain Extensions Figure 46 - Restrict Domain Extensions This page allows you to block or allow specific domain extensions from being accessed. You may choose to only allow the domain extensions in the list or to block the extensions in the Rev 5.0.27.215: May 26, 2010 Page 85 of 191 list. If you choose to only allow the domain extensions in the list, then any domain access who's base is not in the list will not be allowed. Alternatively, if you choose the block the extensions in the list, then accesses to domains with the listed domain bases will be blocked. For example, you may choose to allow only domains that end in ".com" and ".net". Any domain that does not end with those extensions will be blocked. Enter the domain extensions in the text box below and click the "Add" button. You may enter a maximum of 2000 domain extensions across all profiles. Each extension may be a maximum of 15 characters in length. To remove an extension from the list, select the extension to remove and click the "Remove" button located at the bottom of the page. Click the "Done" button when you are finished. Note: Changing the option to Only allow below will only allow the domains in the list. These settings do not apply to web access to direct IP addresses. You can block direct IP address access by going to Internet Controls> Block Specific Web Categories> IP Address blocking. Rev 5.0.27.215: May 26, 2010 Page 86 of 191 4.2.6 Configure Sleep Schedule Figure 47 - Configure Sleep Schedule Internet Sleep Mode allows you to put your Internet connection to sleep (disabling all Internet traffic to and from your network). This is beneficial for when the Internet doesn't need to be on or accessed. Rev 5.0.27.215: May 26, 2010 Page 87 of 191 You may manually force the Internet to sleep by selecting a time period under the “Force Internet To Sleep For:” section and pressing the "Sleep Now" button. You may also bypass the sleep schedule by selecting a time period under the “Bypass Internet Sleep Schedule For:” section and pressing the “Bypass Now” button. When manually forcing the Internet to sleep or bypassing the sleep schedule, a countdown timer will show that will allow you to cancel the forced sleep or cancel the bypass. You may setup a daily schedule or an Advanced Schedule by which to put the Internet to sleep under the “Sleep Schedule” section. When the Internet is in Sleep Mode, the "Internet Sleep Mode" page will be displayed in the web browser if Internet access is attempted. To customize the message that appears on the "Internet Sleep Mode" page, go the custom block page messages under preferences. You may override Internet Sleep Mode and wake up your Internet connection by entering the iBoss login password into the "Internet Sleep Mode" page if it is displayed. Rev 5.0.27.215: May 26, 2010 Page 88 of 191 4.2.6.1 Sleep Mode Page Figure 48 - Internet Sleep Mode Page When a page is blocked from violation of the iBoss sleep mode schedule, this page will show up in the web browser to the user. You may manually login and turn off Internet Sleep Mode by typing in the password and pressing Login. The Sleep Mode will continue at the next scheduled time. If a custom message is set, this will show up above the sleeping computer. Rev 5.0.27.215: May 26, 2010 Page 89 of 191 4.2.7 Real-Time Monitoring/Recording Figure 49 - Real-time Monitoring/Recording Rev 5.0.27.215: May 26, 2010 Page 90 of 191 * The VNC recording feature is not included by default. It is a feature add-on upgrade. This feature allows you to adjust the settings for the real-time user activity monitoring feature. The iBoss can monitor user activity in real-time and send email alerts or perform desktop video recordings when a predefined level of activity is reached. This allows you to have 24/7 awareness of network activity. User activity monitoring must be enabled for the group in order for the settings to take effect. If real-time user activity monitoring is disabled, monitoring by trigger thresholds is disabled for all computers in the group. Video desktop recording feature is an add-on feature and may not be available on all models. Real-time User Activity Monitoring – This setting enables trigger based real-time monitoring for the group. If this setting is disabled for the group, any additional options for this group have no effect. Trigger Level And Interval - Trigger when specified number of events occur within a chosen time period. Real-time Email Alerts - This setting will cause the iBoss to send and email alert when the above threshold criteria is reached. The alert will occur when the trigger is reached to allow you to respond when certain activity is occurring. Note: The email address that these alerts are going to be sent to can be configured below for this group or in the Settings section of the Reports interface. Group Email Contact - This is the email where real-time alerts will be sent for activity related to the currently selected group. If left blank, the email address specified in the reporter under settings will be used for alerts related to this group. Use a semicolon between email addresses to specify more than one email address. Send Alert When User Enters Group - This setting will cause the iBoss to send an email alert whenever a user enters into this filtering group. Alerts will only be sent when a user logs in manually with override and will not be sent when a user is authenticated transparently Send Alert When User Leaves Group - This setting will cause the iBoss to send an email alert whenever a user exits from this filtering group. Alerts will only be sent when a user logs in manually with override and will not be sent when a user is authenticated transparently Video Desktop Recording - This setting enables a desktop recording to occur when the above threshold criteria is reached. In addition, you can specify the duration of the desktop recording. The computer must be registered with the iBoss and have VNC enabled for this settings to have effect. In addition, the computer must have a compatible VNC application installed and running. This is where you set the option on how long to record the video for. Include The Following Categories – This is the categories you choose to include in the trigger thresholds. Rev 5.0.27.215: May 26, 2010 Page 91 of 191 4.3 Edit My Preferences Figure 50 - Edit My Preferences The " Preferences" menu allows you to choose options for configuring the current preferences of the iBoss. These are the options to choose from: Set or Change Password, Configure Report Settings, Customize Block Pages, Change My Time Zone, Edit System Settings, and Setup Remote Management. Set or Change Password - This option allows you to set or change the admin password used for logging into your iBoss device. Setup Report Settings - This option allows you to setup report settings for report manager. Customize Block Pages - This option allows you to customize the blocked pages. Change Time Zone - This option allows you to change your current time zone. This option is important for your logs and schedules to work accurately. Edit System Settings - This option allows you to change system settings. Setup Remote Management - This option allows you to setup Remote Management. Rev 5.0.27.215: May 26, 2010 Page 92 of 191 4.3.1 Set or Change Password Figure 51 - Set or Change My Password You may set or change the password used for managing the iBoss. The password may be a maximum of 24 characters in length. The password recovery option is if your password becomes lost, you will be able to recover it through e-mail if this option is selected. Note: Be very careful with this password. It is used for configuration for your iBoss and for override functions. Rev 5.0.27.215: May 26, 2010 Page 93 of 191 4.3.2 Configure Report Settings Figure 52 - Configure Report Settings The "Report Settings" menu allows you to choose options for configuring the report manager of the iBoss. There are *three options to choose from: Edit General Report Settings, URL Logging Ignore List, *and Video Recording Settings (Feature Addition Upgrade). Edit General Report Settings - This option allows you to enable or disable logging for specified statistics in the Reports. URL Logging Ignore List - This option allows you to add domains which you do not wish to log to the iBoss Reports database. Rev 5.0.27.215: May 26, 2010 Page 94 of 191 4.3.2.1 Edit General Report Settings Figure 53 - Edit General Report Settings Rev 5.0.27.215: May 26, 2010 Page 95 of 191 These report settings are for the Report Manager. Performance Settings – You may choose between More Logging, More Performance, and External Report Manager. This will set the logging settings for you. Some of the settings may disappear depending on which setting you select. It is recommended to use More Performance if you do not have an External Report Manager. If you have an External Report Manager, please choose External Report manager and refer to the following: Figure 54 - External Report Manager Settings * This feature is only available with the Enterprise Reporter Appliance. External Report Manager Settings (only when External Report Manager is selected; must have an external report manager for this to work) – This option will show if you select External Report Manager selected as your performance settings. This setting should only be selected if you have the External Enterprise Reporter. This allows you to set the IP address for the External Report Manager, the Report Manager Database Password, and the Security Key. Please refer to the External Report Manager section for information on where to get these settings from. Log Web Statistics (only when More logging is selected) – This allows you to enable or disable logging for web statistics. You may choose from the different categories to log. Log Port Statistics (only when More logging is selected) – This allows you to enable or disable port statistics. Log IP Address Access Statistics (only when More logging is selected) – This allows you to enable or disable IP Address statistics. Log Bandwidth Category Statistics (only when More logging is selected) – This allows you to enable or disable bandwidth category statistics. Log Application Statistics (only when More logging is selected) – This allows you to enable or disable application statistics. Current Activity Monitory (only when More logging is selected) – This allows you to enable or disable the current activity monitor. IP Address Name Resolution (only when More logging is selected) – This allows you to enable or disable the IP Address Name Resolution. Bandwidth Logging - This allows you to enable or disable bandwidth logging. Rev 5.0.27.215: May 26, 2010 Page 96 of 191 4.3.2.2 URL Logging Ignore List Figure 55 - URL Logging Ignore List This page allows you to add domains which you do not wish to log to the iBoss Reports database. Domains in the list will be ignored from logging, however all filtering policies will still apply. This is useful for preventing the logging of sites like antivirus updates, operating system updates, etc. Enter the domain or sub-domain of the website you would like to exclude from being logged to the iBoss Reports database. Enter the domain in the text box below and click the "Add" button. To remove a website domain from the Ignore List, select the domain and click the "Remove" button located at the bottom of the page. When you are finished, click the "Done" button. Rev 5.0.27.215: May 26, 2010 Page 97 of 191 4.3.3 Customize Block Pages Figure 56 - Customize Block Pages Rev 5.0.27.215: May 26, 2010 Page 98 of 191 You may customize the pages that are displayed when a website is blocked due to its content or when the Internet is in Sleep Mode. Blocked Page Custom Message - This option allows you to insert a custom message into the Blocked Page. The custom message may be up to 299 characters in length. You may also enable or disable the Password Override feature that appears at the bottom of the page. Blocked Page Redirect Page - This option allows you specify your own URL to use as the Blocked Page. Users will be redirected to this URL instead of the default Block Page. The URL may be up to 255 characters in length. Blocked Page Silent Drop - Selecting this option will cause the iBoss to silently drop violations and prevent the iBoss from sending a blocked page response to the user when a violation occurs. Sleep Mode Custom Message - This option allows you to insert a custom message into the Sleep Mode Page. The custom message may be up to 299 characters in length. You may also enable or disable the Password Override feature that appears at the bottom of the page. Sleep Mode Redirect Page - This option allows you specify your own URL to use as the Sleep Mode Page. Users will be redirected to this URL instead of the default Sleep Mode Page. The URL may be up to 255 characters in length. Sleep Mode Silent Drop - Selecting this option will cause the iBoss to silently drop the connection when the computer is in sleep mode. The user will not receive the Sleep Mode Page if this option is selected and the Internet will appear to be unavailable. Rev 5.0.27.215: May 26, 2010 Page 99 of 191 4.3.3.1 Blocked Page Figure 57 - iBoss Blocked Page When a page is blocked from violation of the iBoss settings, this page will show up in the web browser to the user. You may manually login and add sites to the allowlist if you feel that you have received the blocked page in error by typing in the password and pressing Login. If a custom message is set, this will show up above the exclamation point. Rev 5.0.27.215: May 26, 2010 Page 100 of 191 4.3.4 Change Time Zone Figure 58 - Set Time Zone The "Time Zone" page allows you to edit your current time zone settings and enable daylight savings. Time Zone - This option allows you to set your local time zone. This is important for the logging and scheduling to work accurately. Daylight Savings - This option allows you to setup daylight savings time for your local time zone setting. Rev 5.0.27.215: May 26, 2010 Page 101 of 191 4.3.5 Edit System Settings Figure 59 - Edit System Settings The "Edit System Settings" page allows you to edit your device name of your iBoss. Restore Factory Defaults - This option allows you to set your iBoss settings back to factory defaults. You may also choose to Reboot & Shutdown the device from this page. Rev 5.0.27.215: May 26, 2010 Page 102 of 191 4.3.6 Setup Remote Management Figure 60 - Setup Remote Management You may enable "Remote Management" which will allow you to access and manage the iBoss through the web from any remote location. To enable "Remote Management", select the enable. Rev 5.0.27.215: May 26, 2010 Page 103 of 191 Register Unit Now - Click the "Register Unit Now" button below to assign this unit to a Remote Management Account. If you do not have a Remote Management Account created, you will have to create one. Registration information for this unit will automatically be transferred to simplify the registration process. Registration Key - Each iBoss holds a unique registration key used in the Remote Management registration process. This key provides security when using the Remote Management features through the web. You will be prompted for this key during the online registration process. You may generate a new key by clicking the "Generate Key" button below. Important Note: Generating a new key will remove this unit from any Remote Management account that it is currently assigned to. Rev 5.0.27.215: May 26, 2010 Page 104 of 191 4.4 Identify Computers & Users Figure 61 - Identify Computers & Users The Identify Computers & Users has tabs at the top to switch from identified computers, added user accounts, and groups. 4.4.1 Identify Computers Figure 62 - Identify Computers Rev 5.0.27.215: May 26, 2010 Page 105 of 191 To identify the computer you are using now, click the "Identify/Edit this computer" button. Advanced users may click the "Advanced Add" button to manually identify a computer. For the "Advanced Add", you will need to know the MAC address or IP address of the computer you wish to identify. You may click on Import to import computers to the identified list. Please see the Computer Import section for more information. Unidentified Computers - This is a list of computers on the network that have not been identified. To identify one of these computers, click Add on the computer in the list that you wish to identify. You may refresh the list by clicking on the "Refresh" button at the bottom of the list. Default Filtering Policy - These settings apply to computers that are unidentified on your network. You can choose to apply the rules set by the "default" filtering group, block all unidentified computers from accessing the Internet, or set unidentified computers to require user login. Note: If you choose to "Require user login on all unidentified computers", you must add users under the Users tab to be able to login and browse the web or have LDAP setup within the iBoss for user authentication. Rev 5.0.27.215: May 26, 2010 Page 106 of 191 4.4.1.1 Import Computers Figure 63 - Importing Computers Rev 5.0.27.215: May 26, 2010 Page 107 of 191 There are two methods that can be used to import computers. The Standard Import method is based on MAC address, Computer Name, and Filtering Group and is comma delimited. The DNS import method allows you to import from a tab delimited list exported from a DNS server (Active Directory, etc). The two methods are described below. Please select the import method option, paste the list in the box below and then click the "Import Now" button below. Standard Import - Paste information regarding computers on the network, one computer per line. The format of each line should look like the following: Computer MAC Address, Computer Name, Filtering Group Number DNS Import - Paste the list exported from your DNS server in the text box below. Computers not found in the "Unidentified Computer List" will not be added. You may also add an optional filtering group number which should be tab delimited. If the filtering group number is not present on a line, the computer will be added to the default filtering group (Group 1). The format of each line should look like the following and is tab delimited: Computer-Name Record-Type Ip-Address Optional-Filtering-Group-Number Note: Each filtering group is associated with a number. You can view them here: Filtering Groups. Other valid choices are N for "No Filtering/Bypass Filtering" and U for "Require User Login". Otherwise, please use a filtering group from 1 to 25. The maximum number of computers per import is 1000. If you have more than 1000 computers, break the list into sections of 1000 and import them separately. Each line should not exceed 200 bytes. Scan Network – You can choose to "Scan Network" which will search from computers online on the Local Area Network. This will automatically pull the MAC Address and computer name of the computers found. This will cause the iBoss to be paused while this is processing. Once finished you will receive a Save dialogue which you can save. Open this file in a text editor to copy and paste computers found on the network. Rev 5.0.27.215: May 26, 2010 Page 108 of 191 4.4.1.2 Identifying a Computer Figure 64 - Identifying a Computer To identify a computer, you may enter a Computer Nickname for the computer. When clicking on the button "Identify/Edit This Computer", the ID/MAC address is automatically entered for you. If you have the subnet setup as IP mode, the IP address will be entered here. When clicking on "Advanced Add" you may enter in the ID/MAC address or IP address for the computer you are identifying. Rev 5.0.27.215: May 26, 2010 Page 109 of 191 You may either set the Apply Filtering to "Yes, Use Default Rules" with one of the filtering groups, "No, Bypass Filtering Rules" or “Require user login for this computer” for the computer you are identifying. When finished click the "Save" button. If you want to cancel your changes click the "Cancel" button. *The "Yes, Use Default Rules" will show the assigned name of the filtering group. Computer Overrides User – This option allows you to always have the computer filtering policy in place and not allow users to override this option. Is Local Proxy Server – This option is to identify if the computer you are identifying is a proxy server on your local network. Note: Computers with filtering rules applied will be filtered by the iBoss. Computers with filtering rules bypassed will bypass the iBoss. * There are more options if you have the DMCR feature added. This will allow you to put the Port, Password and IP address of the client VNC computer. Please refer to the DMCR section for more information. Rev 5.0.27.215: May 26, 2010 Page 110 of 191 4.4.2 Identify Users Figure 65 - Identify Users This is a list of users that can log onto computers who have their filtering policy set to "Requires User Login". This allows you to share a single computer with multiple users. If the computer is set to a default filtering group, user login does not apply. You may identify up to 120 individual user logins. To create a new user, click the "Add New User" button below. These users will not have access to the iBoss settings and cannot log onto the iBoss to change settings unless configured to allow access. Rev 5.0.27.215: May 26, 2010 Page 111 of 191 4.4.2.1 Adding a User Rev 5.0.27.215: May 26, 2010 Page 112 of 191 Figure 66 - Adding a User To identify a user, you may enter a Username, Password, First Name, and Last Name. You may either set the Apply Filtering to "Yes, Use Group 1* Rules" using one of the filtering groups or "No, Bypass Filtering Rules" for the user you are identifying. You can authenticate the user via LDAP to use the users password within LDAP Daily Time Limits - This will allow you to set daily time limits for each day of the week for a user. You can set a time between 15 minutes to 23 hours that a user can be logged in from throughout the day. This means that when a user has the allocated time throughout the day to use the time limit. When finished click the "Save" button. If you want to cancel your changes click the "Cancel" button. 4.4.2.2 Delegated Admins When adding a user to the iBoss, you will also have options to give them access to filtering settings and report settings. The default name for the iBoss reports is Admin. This only applies to iBoss devices using a local report manager. For users with the External Report Manager, you will need to setup these users in the Report Manager settings. Please refer to the Report Manager section for more information. Filtering Settings Group Access – Use this option to select which groups the user will have rights to change settings for. Filtering Settings Permissions – Use these options to select which options can be changed for the users Default Management Group – This is the default management group that the user is administering. iBoss Report Settings – Choose which options to allow the delegated admin to have access to in the iBoss reports. Rev 5.0.27.215: May 26, 2010 Page 113 of 191 4.4.2.3 Importing Users Figure 67 - Importing Users Rev 5.0.27.215: May 26, 2010 Page 114 of 191 Please paste user information, one user per line, comma delimited. The format of should look like the following: Username, Password, First Name, Last Name, Enable Report Access, Filtering Group Number Note: Notice that each line should be comma delimited. Each filtering group is associated with a number. You can view them here: Filtering Groups. You may use N for "No Filtering/Bypass Filtering". Otherwise, please use a filtering group. The maximum number of users per import is 1000. If you have more than 1000 users, break the list into sections of 1000 and import them separately. Each line should not exceed 300 characters. Once you have finished, click the “Import Now” button. Rev 5.0.27.215: May 26, 2010 Page 115 of 191 4.4.2.4 Advanced User Settings Figure 68 – Advanced User Settings This page allows you to configure settings for computers that require user login. Note: These settings are global across all computers that require user login and only apply to computers which require user login. These settings do not apply to identified computers which have bypass filtering rules or have a filtering group set for it. Port Bypassing - This will allow you to bypass ports on computers that require user login. When a computer is set to require user login, Internet access is disabled when no user is logged into the computer. If you would like to allow access to certain ports even when a user is not logged in, you can configure them here. This is useful for programs that require port access at all times (for example, remote computer management). Rev 5.0.27.215: May 26, 2010 Page 116 of 191 Domain Bypassing - This will allow you to bypass domains on computers that require user login. When a computer is set to require user login, Internet access is disabled when no user is logged into the computer. If you would like to allow access to certain domains even when a user is not logged in, you can configure them here. This is useful for sites that supply updates that require access at all times (for example, Operating System & Anti-virus updates or Email access). Custom Internet Access Window Company Name Logo - This allows you to add your company name or logo easily on the "Internet Access Window" when a user is logged in. The company name in text can be 50 characters and the length for the URL can be 256 characters. If you are using an image of your company logo, you can enter in the URL of where the image is hosted. The image must be in a web viewable format (ex: .gif or .jpg) and the width of "300" pixels and height of "70" pixels. If you are using the company name text, please select "Text" and enter in the company name. If you are using an image for the company logo, please select "Image" and enter in the full URL of the image. Note: If the image that you use is not at the size of 300 x 70 it will be stretched to this size User Login Page - This allows you to create a custom User Login page or choose to use the default internal user login page. If you select the redirect option, you must enter a redirect URL that points to the externally hosted user login page. This setting is applied based on the user's IP subnet default group. Typically the default user login page group is group 1. If you've defined a different default login page group to an IP subnet under Home>Setup Network Connection->Local Subnets, select the defaut group for that subnet on the tabs above before modifying this setting. You may choose either Internal or Redirect. Note: This page must submit the same login parameters to the same form action as the default iBoss login page. In addition, if the login page is located outside of the local network, you must bypass the domain in order for users to access the page. Custom Login Message - This allows you to add a custom login message. This will be displayed on the user login page before they have logged in. You may type in 300 characters for the custom message. Mask Login iBoss Logos (Global) - This allows you to mask the iBoss logos on the login pages. This hides which filtering device you are using on your network. Custom Successful Login Message - This allows you to add a custom successful login message after a user has logged in. This will be displayed on the user login page after they have successfully logged in for the first time. You may type in 300 characters for the custom message. Custom User Homepage - This allows you to add a homepage that the users are directed to after logging in. User Session Timeout – This allows you to change how long it will take before a user is automatically logged out if the iBoss does not hear from it being logged in. This is in seconds and if you are having issues with it logging out, you may set this to a higher number in seconds or set it to ‘0’ to disable the timeout. Rev 5.0.27.215: May 26, 2010 Page 117 of 191 4.4.2.5 User Internet Access Window Figure 69 - Internet Access Window Login Figure 70 - Internet Access Window Session The iBoss Internet Access Window is the session window for the user that is logged in. This window must be kept open to remain logged in. This window will show you the Name of the user logged in, how long they have been logged in (Session Time), Time Remaining/Daily time limit and which server they are logged into if you have multiple Domains. The iBoss user login feature also allows you to put your own Company Name in text or put a URL for a Company Logo Image. The user login feature allows you to put custom messages before a user logs in and after they log in. This allows you to post company policies and rules before using the Internet to protect your company from liability conflicts. Rev 5.0.27.215: May 26, 2010 Page 118 of 191 4.4.3 Filtering Groups Figure 71 - Edit Filtering Groups Filtering groups are used to apply different Internet filtering rules to different groups of computers on your network. You may customize the group names to easily remember the different settings configured for each group. Each group name may be up to 50 characters in length. When using transparent login via Active Directory, eDirectory, or LDAP, groups with a higher priority number will match over those with a lower priority number when a user is a member of multiple groups that match the Active Directory, eDirectory, or LDAP server. Rev 5.0.27.215: May 26, 2010 Page 119 of 191 Note: When identifying computers on your network you may choose one of the filtering groups below, or instead bypass filtering entirely for a particular computer Note: You may put a higher number in the Priority group so that it has higher priority than the other filtering groups if users fall under more than one filtering group. Copy Settings – This allows you to quickly copy filtering settings from one group to another. Please select the group to copy settings from and a group to copy settings to and then click the COPY button below. Note: When you copy settings from one group to another, all filtering settings from the destination group will be erased and replaced with the source group. This process is not reversible and the original settings for the destination group will be lost. 4.4.3.1 Filtering Group Tabs Figure 72 - Filtering Group Tabs When configuring the rules for your iBoss, you will notice the Group tabs at the top of each configuration page. These pages allow you to set different filtering rules for the different filtering groups. The selected group will appear to have the tab in front of the other tabs. To switch configuration for different groups, select the group tab at the top of the page or from the drop down menu to quickly jump to a filtering group. You may use the arrows to go to the next or previous set of filtering groups. Rev 5.0.27.215: May 26, 2010 Page 120 of 191 4.5 Firmware Updates Figure 73 - Firmware Updates Firmware updates may be available from time to time. These updates include feature enhancements. The updates are downloaded over the Internet directly into the device. Firmware updates include feature enhancements only and are not related to the iBoss Internet filtering functionality. The iBoss will always be up-to-date with the latest web category URLs and online application definitions used with filtering rules. You must have an active subscription and a live Internet connection in order to download firmware updates. Model - Indicates the model of your iBoss device. Device Name - Indicates the name given to the iBoss. Current Firmware Version - Indicates the firmware version installed on your iBoss. Available Firmware Version - Indicates the latest firmware version available for download. If this version number matches the number in the "Current Version" field, then your iBoss firmware is up to date. Current Signature Version - Indicates the signature version installed on your iBoss Download/Install - The "Download/Install" button will appear when new firmware is available. Click this button to begin downloading and installing the new firmware. The "Install" button will appear when new firmware has been downloaded and is ready to install. Click this button to begin installing the new firmware. Once this process begins, do not power down the iBoss until installation is complete. When the installation is complete, you will be redirected back to the iBoss home page. Download Progress - Indicates the download progress of the firmware updates. Rev 5.0.27.215: May 26, 2010 Page 121 of 191 5 Enterprise Report Manager The iBoss is equipped with an advanced report manager capable of tracking and generating statistics and a variety of aspects of network traffic. This includes web statistics such as web sites visited and top visited domains, as well as detailed port and IP Address accesses. The report manager provides a deep drill down capability that can identify potential risks as well as help optimize the network. The high level of report detail also includes a variety of information that can be summarized for all users in a report or information specific to a particular user. This includes bandwidth usage and graphs showing accesses throughout the report period. The report manager is separated into two major subsections. The first deals with report management, scheduling and generation, while the other involves the report viewing. 5.1 External Enterprise Reporter The External Report Manager or Enterprise Reporter is an appliance that offloads the reporting onto a different server appliance. Some of the features discussed below are not in the external report manager. 5.1.1 Installing the External iBoss Enterprise Reporter on the network. Please setup the network settings for the external iBoss Enterprise Reporter before placing it on the network. Please refer to the Network Settings section for the Enterprise Reporter for more information on how to set these settings. Once the network settings have been configured, the iBoss Enterprise Reporter is ready to be installed on the network. The port you will be using is the “WAN” port located on the back of the iBoss Enterprise Reporter. Place the iBoss Enterprise Reporter on the switch just as a computer would be. For example, add a network cable from your switch to the “WAN” port of the Enterprise Reporter. Do not put the device in line, like you would when setting up the iBoss filter. After setting up the iBoss Enterprise Reporter on the network, do not forget to identify the Enterprise Reporter and Select “No, Bypass Filtering Rules”. 5.1.2 Setup Steps to Register iBoss to External Enterprise Reporter This section is a quick guide for registering iBoss devices to an Enterprise Reporter. 1. Setup an IP address for the iBoss Device (please refer to the iBoss IP address section to set this) 2. Setup an IP address for the iBoss Enterprise Reporter (please refer to the iBoss Enterprise Reporter Network Settings section to set this) Rev 5.0.27.215: May 26, 2010 Page 122 of 191 3. Log into the report manager and click on Settings General then change the Report Database Password. (please refer to the iBoss Enterprise Reporter Settings section for more information) 4. Click on Register iBoss Devices Add Device Then set the iBoss name, iBoss IP address, and copy the Security key. (please refer to the iBoss Enterprise Reporter Settings section for more information) 5. Log into the iBoss device and click on Preferences Configure Report Settings Edit General Report Settings change the ‘Configure iBoss for’ option to “External Report Manager”. (please refer to the iBoss Report Settings section for more information) 6. Enter the IP address, database password, and security key of the iBoss Enterprise Reporter and click Save. (please refer to the iBoss Report Settings section for more information) Note: Please be sure to identify the report manager within the iBoss interface to bypass any filtering rules. 5.2 Accessing the Report Manager The report manager can be accessed by logging into the iBoss via myiboss.com and then clicking on the “Report” icon, or by using the following URL: http://www.myiboss.com/reports You can access the report manager only while on the same network as the iBoss. You can access the iBoss reports from any computer on the network that has access to the iBoss interface. Note: The default IP address of the iBoss Enterprise Reporter is 192.168.1.20. 5.3 Logging into the Report Manager The default username for the report manager is admin. The administrative password for the iBoss Report Manager is the same as the password that is used to configure the iBoss filtering rules. Note: The default username for the External iBoss Enterprise Reports is admin. There is no password by default. You will need to change this setting and also be able to add users within the Enterprise Reporter settings. You can create additional users that can access the report manager by creating them within the iBoss configuration interface and giving that user privileges to access the Report Manager in the user Add/Edit screens. You can also configure specific privileges for the user to restrict the types of operations the user can perform within the report manager. This only applies when you are not using an external Enterprise Reporter. Rev 5.0.27.215: May 26, 2010 Page 123 of 191 Only users configured locally in the iBoss can be allowed access into the report manager. Users logging in through LDAP/Active directory will not have access to the report manager. This only applies when you are not using an external Enterprise Reporter. 5.4 Report Generation and Management After logging into the report manager, the iBoss presents a page detailing the current activity. This page contains information regarding what is currently occurring on the network. There are several other sections within the report management section that include viewing and creating generated reports, viewing and creating report schedules, configuring report settings, and viewing system information. Rev 5.0.27.215: May 26, 2010 Page 124 of 191 Figure 74 – Current Activity Rev 5.0.27.215: May 26, 2010 Page 125 of 191 5.4.1 Current Activity The current activity section shows active real-time information about the network. This information is updated in real-time automatically. 5.4.1.1 Real-time Web Hit Activity Graph The first section includes a real-time Web Hit Activity that includes Web Hits per second and Violation per second. Figure 75 - Real-time MRTG Bandwidth Graph 5.4.1.2 Current Top Bandwidth Consumers This section includes the top consumers of bandwidth updated in real-time. You can click on the “More” button for more details of users. Rev 5.0.27.215: May 26, 2010 Page 126 of 191 Figure 76 - Current Top Bandwidth Consumers 5.4.1.3 Real-time Web Hit activity graph This section shows total the current total webhits per second, as well as the total current violations per second. It will also show statistics at the top for the speed of hits per second, hour and day. Figure 77 - Real-time Webhit Activity Rev 5.0.27.215: May 26, 2010 Page 127 of 191 5.4.1.4 Real-time website activity This section shows the current websites being visited. The URLs are updated in real-time as users on the network access website destinations. It will also provide details about the URL access including categories. The list will highlight URLs that were blocked by the iBoss. This list is updated in real-time without the need to refresh the page. This section also has a filter to only show a specific User and/or Action (Allowed or Blocked). You may simply click the username in this list to automatically set the filter to a specific user. You may also click the Pause button to stop the list from scrolling. Rev 5.0.27.215: May 26, 2010 Page 128 of 191 Figure 78 - Real-time URL Access Activity Rev 5.0.27.215: May 26, 2010 Page 129 of 191 5.4.2 URL Log Section This section allows you to view the list of URLs. You may click the IP address, if available, for IP statistics. You may mouse over the Blue text in the description and User column for more information about the entry. Figure 79 - URL Log Rev 5.0.27.215: May 26, 2010 Page 130 of 191 5.4.2.1 Search Filters These filters allow hiding other URLs and only showing filters in which you’d like to see. This makes it easier to diagnose and look through the URLs. You can search for date ranges, users, groups, Mac addresses, source IP addresses, computer names, URL or keyword filter, location, category, action and callout. Once you have made these filters, click the “Apply” button above the search filters. You can export this You may also send this report directly from this page by entering email information under the section for Email This Report Now and clicking the “Send” button. You may also generate a report schedule by clicking on the “Create Report Schedule” button. 5.4.2.2 Site Callouts These are callouts in which site logos are displayed and search terms are tagged. For example, sites like Google will show the logo of Google and the term that was used to search with. Figure 80 - Site Callouts 5.4.3 View Reports Section This section allows you to view the generated reports that exist within the report manager. You can generate and delete reports within this section. In addition, this is where you access individual reports for viewing. The generated reports page contains a breakdown of the auto-generated daily reports as well as the user generated reports Rev 5.0.27.215: May 26, 2010 Page 131 of 191 Figure 81 - Generated Reports Section Rev 5.0.27.215: May 26, 2010 Page 132 of 191 5.4.3.1 Report Types Generated reports come in two basic types, auto-generated daily reports and user generated reports. Auto-generated daily reports are automatically created by the iBoss. There is one daily report generated per day that includes statistics for usage on that day. User generated reports are reports that are created by the user. These reports can contain custom date ranges, include particular groups, and include only certain statistics among other things. 5.4.3.2 Deleting Reports Reports are deleted as space becomes necessary, but you can select and delete any report on this page by clicking on the “Delete” button next to the report or selecting the checkboxes of the reports you wish to delete and clicking on the “Delete Selected” button. Please note that deleting reports may take a while to process as the iBoss will clean out all related data pertaining to the report. 5.4.3.3 Exporting PDF Reports To export a report, click on the export button next to the report. This will generate a PDF Report which you can select which options to include in the report. 5.4.3.4 Generating a Report To generate a report, click on the “Generate New Report” button toward the bottom of the list of generated reports. This will lead to a page that presents the options available when creating a report. There are many options available that can be configured when generating a report such as the included group users, the types of statistics you would like to include in the report, as well as the date range for the report. Rev 5.0.27.215: May 26, 2010 Page 133 of 191 Figure 82 - Generate Report Rev 5.0.27.215: May 26, 2010 Page 134 of 191 5.4.3.4.1 General Report Settings This section contains the general settings for the report to be generated. Below is a description of the options: Report Name Description Start Date End Date This is the friendly name for the report. This allows you to enter a description for the report. This is the date from which to start including data for this report. All report statistics within this report will be based on this start date. This is the end date which you wish to stop including data for the report. The end date is not included in the statistics for this report. All data up to this end date is included. The end date must be after the start date. 5.4.3.4.2 Statistics This section allows you to control what type of statistics you would like to include in the report. Note: Selecting More Performance or External Report Manager from within the iBoss Report Settings will only report Web and Bandwidth Statistics. Figure 83 - Report Statistics There are a variety of statistics that can be included. The more options that are selected, the longer it will take to generate the report. In addition, including more options will consume more of the available disk storage for the reports. Below is a description of each of the options within the statistics section. Include Web Stats When this option is enabled, the report will include web related statistics such as top visited domains, top blocked domain, visited URLs, blocked categories, as well other web Rev 5.0.27.215: May 26, 2010 Page 135 of 191 Include IP Stats (More Logging) Include Port Stats (More Logging) Include Bandwidth Stats Include Application Stats (More Logging) browsing related statistics. When this option is enabled, the report will include statistics related to IP Address accesses. This includes top visited IP Addresses, top Blocked IP Addresses, as well as other statistics related to IP Address detail. When this option is enabled, the report will include statistics related to port accesses. This includes TCP and UDP accesses including top visited ports, top blocked ports, port usage by user, as well as upstream and downstream bandwidth by port. When this option is enabled, the report will include high level bandwidth statistics related to general bandwidth usage such as overall, upstream and downstream usage. When this option is enabled, the report will include usage relating to specific applications and specific usage categories. 5.4.3.4.3 Email PDF Report Recipient This section allows the report to be emailed once generation is complete. Since report generation may take a while to complete, you may choose to configure these settings so that an email can be sent once the email generation process is complete to avoid having to wait for the report to complete. 5.4.3.4.3.1 Email Message Information Enter the email information including the recipient, sender, cc, bcc, subject, and message body. This will send the email to another person which looks like it comes from you with a personalized message. 5.4.3.4.3.2 Report Contact Information This information shows up on the cover page of the Emailed PDF Report. Enter the Name, Company Name, Address, City, State, Zip, Email, Phone and Fax. 5.4.3.4.3.3 Report Custom Introduction and Conclusion This information shows up on the second page for the introduction and the last page which is the conclusion. Enter a custom introduction and a custom conclusion. 5.4.3.4.3.4 Additional Information Rev 5.0.27.215: May 26, 2010 Page 136 of 191 This information shows who the report was prepared by, add a logo, and who it was prepared for. This allows you to customize the report to show that you were the one who prepared it and who it was prepared for. The Logo URL allows you to add a link to an image (.gif or .jpg) to the cover page of the iBoss Report. 5.4.3.4.3.5 Report Type This allows you to choose which type of report to send. There are four options to choose from: Executive, I.T., Full, and Custom. The Executive report has the least information in the report but is used for a quick overview. The I.T. Report show more information such as IP statistics, Port statistics, Application Statistics, and Bandwidth statistics. The Full Report shows all of the contained data. The Custom Report allows you to choose which you may choose which options to include in the report. You may also choose to have the report automatically deleted once it is emailed. Please note that email reports only provide a high level summary of the report. If you would like to keep the report so that you can access the details and all of the drill down capability, do not select this option. Note: You must have a configured SMTP server for the email setting to work. This is configured through “Settings” tab of the report manager. 5.4.3.4.4 Users/Groups This section allows you to select which user groups you would like included in the report. The groups correspond to the iBoss Filtering Groups configured in the iBoss interface. All users within the group will be included in the report. 5.4.3.4.5 Creating the Report Once you have configured these options, click on the “Create Report” button on the bottom of the page. This will trigger the generation of the report and take you back to the Generated Report screen. Please note that only one report generation can occur simultaneously. If there is another report generation in progress, this report will be queued and scheduled for generation. You can view the status of the report generation by refreshing the generated reports page. To do this, click on the Generated Reports button on the top of that page. You can access the report while it is being generated, however the data will continue to change as more data is added to the report until the report generation process is complete. If the report includes the current day, statistics will continue to accumulate until the report complete at which point no more data for the current day will be added to the report. 5.4.4 Report Schedules This section allows for the configuration of report generation schedules. Schedules allow you to generate reports for a specified interval of time and have them stored or emailed on a recurring basis. Report schedules also allow for the daily report to be emailed daily to specified recipients. Rev 5.0.27.215: May 26, 2010 Page 137 of 191 Figure 84 - Report Schedules Rev 5.0.27.215: May 26, 2010 Page 138 of 191 5.4.4.1 Deleting Report Schedules You can select and delete any report schedule on this page by clicking on the “Remove” button next to the report schedule or selecting the checkboxes of the report schedules you wish to delete and clicking on the “Delete Selected” button. This will terminate the schedule immediately. 5.4.4.2 Editing Report Schedules To edit a report schedule, click on the edit button next to the report schedule you wish to edit. This will take you to the report schedule editing screen. This screen is similar to adding a report schedule which is detailed in the next sections. 5.4.4.3 Report Schedule Processing Report schedules are processed when the “Next Processing Time” has been reached which is detailed next to the report schedule. The scheduler will automatically adjust the next processing time automatically. If there are multiple schedules due to be processed at the same time, only one report schedule will be processed at a time. The others will be queued and each processed one at a time until all of the due schedules have been processed. 5.4.4.4 Report Schedule Types There are two report schedule types, daily report email schedules and custom generated report schedules. Daily report email schedules allow you to email the auto-generated daily reports to specified recipients. It also allows you to enter a customized email message for the email. Custom generated report schedules allow you to create a custom report on a schedule that includes specific statistics, user groups, and more. You can additionally have the custom report emailed whenever a generation occurs. 5.4.4.5 Creating a Report Schedule To create a report schedule, click on the “Create New Report Schedule” located at the bottom of the report schedule list. 5.4.4.5.1 General Information The general information section allows you enter the following information: Schedule Name Description Run Type Active Schedule Type This is the name you would like to give this schedule. This allows for a short description of this schedule. This is the type of report that is chosen to be used. The options are Recurring report or Single Run Schedule. This is the option to turn the schedule active or inactive. This indicates the type of report schedule you would like to create. Report schedule types are described above. Daily report schedules allow you to email the autogenerated reports to specified email addresses while custom report schedules allow for the generation of custom reports Rev 5.0.27.215: May 26, 2010 Page 139 of 191 Format (if Url List Email Report chosen) on a schedule. You may also choose Url List Email Report Schedule. This is the format in which the URL list will be emailed. Options are Html and Comma Separated Values CSV. Rev 5.0.27.215: May 26, 2010 Page 140 of 191 Figure 85 - Create a Report Schedule Rev 5.0.27.215: May 26, 2010 Page 141 of 191 5.4.4.5.2 Daily Report Email Schedule Settings The options available for the daily report email schedule differ from the custom daily report. The daily report email schedule occurs once daily. You must specify email settings and the time you would like to have the daily report schedule processed. Daily report email schedules will contain information for the current day up to the time selected. 5.4.4.5.2.1 Report Schedule Email Settings This section allows you to enter the details of where you would like to have the email sent to when it is ready. You can include a custom message in the email message body to create specialized reports. 5.4.4.5.2.1.1 Email Message Information Enter the email information including the recipient, sender, cc, bcc, subject, and message body. This will send the email to another person which looks like it comes from you with a personalized message. 5.4.4.5.2.1.2 Report Contact Information This information shows up on the cover page of the Emailed PDF Report. Enter the Name, Company Name, Address, City, State, Zip, Email, Phone and Fax. 5.4.4.5.2.1.3 Report Custom Introduction and Conclusion This information shows up on the second page for the introduction and the last page which is the conclusion. Enter a custom introduction and a custom conclusion. 5.4.4.5.2.1.4 Additional Information This information shows who the report was prepared by, add a logo, and who it was prepared for. This allows you to customize the report to show that you were the one who prepared it and who it was prepared for. The Logo URL allows you to add a link to an image (.gif or .jpg) to the cover page of the iBoss Report. 5.4.4.5.2.1.5 Report Type This allows you to choose which type of report to send. There are four options to choose from: Executive, I.T., Full, and Custom. The Executive report has the least information in the report but is used for a quick overview. The I.T. Report show more information such as IP statistics, Port statistics, Application Statistics, and Bandwidth statistics. The Full Report shows all of the contained data. The Custom Report allows you to choose which you may choose which options to include in the report. Rev 5.0.27.215: May 26, 2010 Page 142 of 191 5.4.4.5.3 Custom Generated Report Schedule Settings The custom report schedule settings involve configuring extra parameters in addition to those for the daily report schedule settings. The custom report schedule will generate a new report on the schedule (unlike the daily report email schedule). 5.4.4.5.3.1 General Settings The general information section allows you enter the following information: Schedule Name Description Schedule Type This is the name you would like to give this schedule. This allows for a short description of this schedule. This indicates the type of report schedule you would like to create. Report schedule types are described above. Daily report schedules allow you to email the autogenerated reports to specified email addresses while custom report schedules allow for the generation of custom reports on a schedule. 5.4.4.5.3.2 Statistics This section allows you to configure which statistics you would like in the custom generated report. The following are statistic options: Web Stats Port Stats (More Logging) IP Stats (More Logging) Bandwidth Stats Application Stats (More Logging) Web stats include statistics relating to web browsing activity. This includes top visited domains, top blocked domains, websites visited, and website category statistics. Port Stats include statistics relating to TCP and UDP port usage on the network. This includes top used ports, top blocked ports, etc. IP Stats include statistics relating to IP traffic on the network. This includes top accessed IP Addresses, top blocked IP Addresses, etc. Bandwidth Stats include statistics relating to general bandwidth usage such as overall, downstream and upstream usage. Application Stats include statistics specific to applications used on the network. Note: Selecting More Performance or External Report Manager from within the iBoss Report Settings will only report Web and Bandwidth Statistics. 5.4.4.5.3.3 Email Settings The email settings allow you to configure options relating to the emailing of the generated report. The following describes the settings in this section. Rev 5.0.27.215: May 26, 2010 Page 143 of 191 Email Report To Email CC Email BCC Email Message Body Auto-delete after report is sent This is the email address where you would like the report sent to. You can use a semicolon between email addresses to add multiple recipients. This allows for an email carbon copy to be sent to another recipient. This allows for an email blank carbon copy to be sent to another recipient. This allows you to customize the body of the email message. If this option is enabled, the generated report will automatically be deleted once the report is emailed. This can be used to save disk space and to reduce the number of used generated reports. 5.4.4.5.3.4 Report Schedule Time This section allows you to configure what time you would like the report schedule to run and the email report sent. There are several options for this section. You can choose to have the report sent daily at a specified time, weekly at a specified time, or on a specific day of the month at a specified time. Select the appropriate option and configure the time you would like to have this report generated and emailed. 5.4.4.5.3.5 Users This section allows you to select which user groups will be included in the report. All users inside the selected groups will be included in the generated report. The *Other group contains miscellaneous traffic that might not have been identified on the network. 5.4.4.5.3.6 Create the Report Schedule When you are done configuring the options for the report, click on the “Create Schedule” button on the bottom of the page. This will return you to the report schedules overview page. This page will show the next processing time for the report schedule. 5.4.4.6 Report Schedule Space Usage Section The iBoss has a limited number of active report schedules that can be added. This section shows how many available report schedules are available for creation and how many report schedules have been created. Rev 5.0.27.215: May 26, 2010 Page 144 of 191 Figure 86 - Report Schedule Space Usage Rev 5.0.27.215: May 26, 2010 Page 145 of 191 5.4.5 Automatic Desktop Recording/Monitor/Control (DRMC) This is an add-on feature to the iBoss. This section contains the setup the DRMC feature on the iBoss with the computers on your network. The recording, viewing and controlling of desktops is done by integrating with VNC. VNC (Virtual Network Computing) is a desktop sharing application that allows remote access to another computer. There are many programs that are available that offer VNC and is compatible with Mac, Windows, and Linux. We recommend using UltraVNC (uvnc.com). 5.4.5.1 Installing VNC Once you have downloaded and installed the VNC program on the computer, you will need to configure it. If you already have it installed and setup, you will need to know the port number and password that are in the settings for the VNC program on the computer. If you are first setting it up, you may start the VNC server program and go to the Admin Properties. This will allow you to configure the port, password, and other settings of the VNC program. Please keep the settings you set for this program handy as you will need it to register the computer to the iBoss DRMC feature. Uncheck the options for Removing the wallpaper. For Multi viewer connections, select Keep existing connections and check the Allow Loopback Connections. Here is an example of recommended settings: Figure 87 - UVNC Properties 5.4.5.2 Registering a Computer to DRMC To register a computer to the DRMC feature, you will need to identify the computer through the iBoss. Please refer to the Identifying Computers section for more information. There will be 3 additional settings that are present when identifying computers; Enable/Disable VNC integration, VNC password, and VNC port. Enter these settings for the computer that you are identifying. Once you have identified this computer and enabled these settings, the computer will show up under the Video Desktop section of the reports. Rev 5.0.27.215: May 26, 2010 Page 146 of 191 5.4.5.3 Video Desktop Figure 88 - Video Desktop Monitoring This section will show you all the computers that are identified with the DRMC feature enabled. You will be able to manually Record, Control and View the desktops straight from this screen. Rev 5.0.27.215: May 26, 2010 Page 147 of 191 5.4.5.3.1 Live Desktop MultiView Figure 89 - Live Desktop MultiView This option allows you to select multiple computers and view up to 10 different screens simultaneously. Select the computers you want to view and click the “Live Desktop MultiView”. When viewing the desktops, you may click the Fullscreen button under any of the windows to just view one desktop. 5.4.5.4 Video Desktop Recordings This section will store all of the desktop recordings. All of the recordings are saved as .swf (Adobe Flash) files. In this section, you may delete, download, or play the recording. Since they are .swf files, you may view them in any standard web browser (with the flash plugin). 5.4.5.5 Recording Thresholds Recording thresholds can be set to start recording a user’s desktop automatically once a certain violation threshold is reached. For example, if a user goes to an Adult site 5 times within a minute, it will start recording their desktop for 1 minute. These settings can be configured within the iBoss interface, under the Report Settings in Preferences. Please refer to the Video Desktop Recording Settings section for more information. Rev 5.0.27.215: May 26, 2010 Page 148 of 191 5.4.6 Report Manager Settings This section contains settings used globally for the report manager which include email server settings and other configurable options. Before any email report can be sent via email, the email server settings must be configured. Figure 90 - Report Manager Settings Rev 5.0.27.215: May 26, 2010 Page 149 of 191 5.4.6.1 Email Server Settings This section allows you to configure the SMTP server you would like the iBoss to use in order to send email reports. SMTP Server Address This is the domain or IP Address of the SMTP mail server you would like to use. If your server requires a username and password, set this option to Yes. This is the username for servers that require login. If the “Requires Login” option is set to false, you can leave this option blank. This is the password of the user for servers that require login. Requires Login Username Password 5.4.6.2 Report Maintenance Settings These settings allow you to configure the maintenance options for the report manager. Maintenance occurs once per day. Perform Maintenance At Maximum time to perform maintenance Perform Full maintenance at the specified time above Email Reports if deleted for space Email To Shrink Database By X When full This is the time you would like maintenance to occur. Configure this option for a time when the network has the lightest load. This option allows you to limit the maximum maintenance time. Although maintenance may not take too long to complete, if the report manager is shrinking the database or performing other intensive routines, maintenance may take a long time to complete. It is important that the iBoss is given enough time to complete all of its tasks. The Unlimited option is recommended. This option allows you to configure a full maintenance cycle to occur at the specified time. It is highly recommended that this option is set to disabled. The report manager database will be locked if full maintenance is enabled while maintenance is taking place. This option allows you to have reports emailed if they need to be deleted for space. If the above option is yes, this is the email address where you would like the report sent to. This option allows you to configure the iBoss to shrink the database by a certain percentage once the maximum has been reached. Rev 5.0.27.215: May 26, 2010 Page 150 of 191 5.4.7 External Report Manager (Enterprise Reporter) Settings Figure 91 - External Report Manager Settings *These settings are only in the External iBoss Enterprise Reporter. 5.4.7.1 Report Manager Database Settings (only in external report manager) Figure 92 - Report Manager Database Settings These settings are only in the External iBoss Enterprise Reporter. This section allows you to configure the Enterprise Reporter Database Settings for the iBoss to report to. Report Database Password - The default Password is ibossdb. This can be left by default as the Enterprise Reporter will only allow connections from registered iBoss units however, it is recommended to change this password. Keep this password handy as you will need it to register iBoss units to it. Pudsus Url – This is the URL where the iBoss Enterprise Reporter gets its updates from. Do not change this URL unless told to do so by a Phantom Technologies Technician. This may cause the Enterprise Reporter to function improperly if changed. Browse Time Sensitivity – This option is for the time usage statistics of how long a URL is counted as being viewed after first accessed. This is only if there is no more traffic after hitting a website as it limits to this amount in seconds. Remote Diagnostics – This option allows you to enable Remote Diagnostics for a Phantom Technologies technician to assist you remotely. Rev 5.0.27.215: May 26, 2010 Page 151 of 191 5.4.7.2 Report Users (only in external report manager) Figure 93 - Report Users This section allows you to add/edit users that can log into the Enterprise Reporter. The default user is “admin” which has no password by default. It is recommended to click “Edit” and set a password for the Administrator. To add a user, click Add Report User Rev 5.0.27.215: May 26, 2010 Page 152 of 191 5.4.7.2.1 Add Report User Figure 94 - Add Report Manager User To add a user, enter the Username, First Name, Last Name, and Password. Then select which sections of the report the user can access. The options to choose from are Can Generate Reports, Can Delete Reports, Can Access Report Settings, Can Access Report System Info, Can Access Report Current Activity, Can Access Report Schedules, and Can Access Live Desktop. Rev 5.0.27.215: May 26, 2010 Page 153 of 191 After you are done settings all of the settings, click Save. 5.4.7.3 Register iBoss Devices (only in external report manager) Figure 95 - Register iBoss Devices This section allows you to add/edit/remove iBoss Devices to log to the external Report Manager. You will need to register any iBoss devices that you wish to have reporting to the external report manager. To add an iBoss Device, click Add Device. Rev 5.0.27.215: May 26, 2010 Page 154 of 191 5.4.7.3.1 Register an iBoss Device Figure 96 – Register an iBoss Device To add an iBoss Device, enter the iBoss Device Name, Device IP Address, Description, and Security key. You may change the security key to a 32 hex digit key. Please keep this key handy as you will need it when registering the iBoss settings to point to the external report manager. Rev 5.0.27.215: May 26, 2010 Page 155 of 191 Please refer to the Report Settings of the iBoss Interface for instructions on how to configure the External Report Manager Settings. 5.4.7.4 Configure Time (only in external report manager) Figure 97 - Configure Time This section allows you to set the time zone and time for the external report manager. After changing the correct time zone, click Save. The iBoss Enterprise Reporter will need to reboot after saving. Rev 5.0.27.215: May 26, 2010 Page 156 of 191 5.4.7.5 Network Settings (only in external report manager) Figure 98 - Configure IP Address Settings This section allows you to set the network settings for the external report manager. You may set the IP address, Subnet Mask, Gateway, DNS 1, and DNS 2. After entering the settings, click Save. The iBoss Enterprise Reporter will need to reboot after saving. Default iBoss Enterprise Reporter IP Address Settings IP Address Subnet Mask Gateway DNS 1 DNS 2 192.168.1.20 255.255.255.0 192.168.1.1 192.168.1.1 0.0.0.0 You may set these settings through the serial console. Please refer to the serial console settings in the iBoss serial console section. Rev 5.0.27.215: May 26, 2010 Page 157 of 191 5.4.7.6 Subscription (only in the external report manager) Figure 99 – Subscription This section allows you to enter the subscription key. You may click Edit to enter the key. Once you enter the key click Edit to save the key and then Confirm. The report manager will need to be connected to the Internet to be able to confirm this key. Please make sure it is plugged into the network to be able to verify the subscription key. Note: The report manager will not process log data and will not fully function if your subscription is not active. Rev 5.0.27.215: May 26, 2010 Page 158 of 191 5.4.8 Report Manager System Information This section contains system information pertaining to the iBoss. This includes the system log, the system uptime, and the database size. From this page, you can view and clear the system event log. In addition, you can view how much disk space the report manager is consuming and how much disk space is available. When the maximum is reached, the database will automatically shrink on the maintenance interval. 5.5 Viewing Reports You may view reports by clicking on the report you wish to view from the “Generated Reports” section of the report manager. When you click on the report, you will be taken to the web statistics section of the report. There are five main subsections in the reports; Web, Port Statistics, IP Statistics, Bandwidth Statistics, and Application Statistics. They are described below. Note: The Port, IP, and Application Stats are not visible when in High Performance Mode and while using an External Report Manager. Web Stats Web stats include statistics relating to web browsing activity. This includes top visited domains, top blocked domains, websites visited, and website category statistics. Port Stats include statistics relating to TCP and UDP port usage on the network. This includes top used ports, top blocked ports, etc. IP Stats include statistics relating to IP traffic on the network. This includes top accessed IP Addresses, top blocked IP Addresses, etc. Bandwidth Stats include statistics relating to general bandwidth usage such as overall, downstream and upstream usage. Application Stats include statistics specific to applications used on the network. Port Stats IP Stats Bandwidth Stats Application Stats Most of the items within the report manager are “clickable”. The report manager allows deep drilldown functionality to provide very detailed information very easily. 5.5.1 Report Information Section When viewing any of the report pages, the report information section will be visible at the top of the page. This section gives you information regarding the current report and allows you to switch between reports easily. Rev 5.0.27.215: May 26, 2010 Page 159 of 191 Figure 100 - Report Information Section The report information bar contains the name of the report, as well as the date range that this report covers. 5.5.1.1 Showing Report Information for Particular Users Under the option “Show Report For”, you have the capability of selecting which report information is presented on the page. If “All Users in This Report” is selected, the information in the report pages you are viewing will contain information regarding all users in the report. If you would like to view information for a particular user in the report, select the user from the drop down list. Only users that belong to the groups included in the report will be show here. Once a user is selected, all statistics on the page pertain to the particular user. Regardless of whether you have all users selected or a particular user, the information presented will look the same and is consistent. The only thing that changes is the information on the page, not the structure. 5.5.1.2 Quickly switching between reports The top right section of the report information bar has a drop down list which allows you to quickly switch between reports. Simply select a report from the drop down list and the current report page will be updated with the information from the newly selected report. This is useful for comparing information between two or more reports. 5.5.2 Web Usage Statistics This section contains information related to web browsing. This includes websites visited, top visited domains, top blocked domains, web category usage as well as other statistics. As stated above, most of the items are clickable and can be drilled down for more detail. Rev 5.0.27.215: May 26, 2010 Page 160 of 191 Figure 101 - Web Usage Statistics Rev 5.0.27.215: May 26, 2010 Page 161 of 191 The first section contains an overall bandwidth graph. This graph pertains to the current selected user or all users if “All Users in This Report” is selected. This will allow you to determine bandwidth usage by user or by report. The graph provides total bandwidth as well as downstream and upstream bandwidth. This also shows the number of hits and blocks per category. Figure 102 - Web Category Usage Rev 5.0.27.215: May 26, 2010 Page 162 of 191 5.5.2.1 Web Category Usage The next section shows overall web category usage. It displays both total accesses and blocked accesses relative to each other. You can click on any of these bars to get more detail about the particular category usage. 5.5.2.1.1 Web Category Detail If you click on the bar for a particular web category, you are taken to a detail page showing information pertaining to that particular category. Rev 5.0.27.215: May 26, 2010 Page 163 of 191 Figure 103 - Web Category Detail Rev 5.0.27.215: May 26, 2010 Page 164 of 191 5.5.2.1.1.1 Hit and Block Category Detail Graph The Hit and Block Activity graph show the activity for the currently selected category. This will give you an indication of use throughout the report period for the category selected. Remember, the information reflected on this page and the graph, pertain to either the currently selected user or all users if that option is selected in the report information section at the top. 5.5.2.1.1.2 Top Users for Web Category This section lists the top users for the selected category. Users are ordered by highest hit count first. Click on the “More” button to get a full list of users for this category. The full list can be sorted by a variety of parameters. 5.5.2.2 Category Time Usage Rev 5.0.27.215: May 26, 2010 Page 165 of 191 Figure 104 - Category Time Usage Rev 5.0.27.215: May 26, 2010 Page 166 of 191 This section shows you the top categories based on time usage. This will also show you in Hours, Minutes, and seconds of the amount of time spent on each category. You may press the expand button to see the Top 5 Users for a specific category. 5.5.2.3 Top Visited and Blocked Domain This section lists the top visited domains as well as the top blocked domains. You get a full list of domains with the ability to sort by a variety of parameters by clicking on the “More” button. 5.5.2.4 Visited Websites This section gives a detailed list of the visited websites for the report period. Figure 105 - Last Visited Websites It contains information such as the date and time the site was visited, the user that visited the site, and whether the site was allowed or blocked. Place your mouse over certain fields such as Description to get more detailed information. You can get a full list by clicking on the “More” button. This full list can be sorted by a variety of parameters. Rev 5.0.27.215: May 26, 2010 Page 167 of 191 5.5.3 Port Statistics The port statistic section provides information regarding TCP and UDP traffic port usage. In this section you can determine how your Internet traffic is utilizing ports in order to identity potential problems and optimize the network. Rev 5.0.27.215: May 26, 2010 Page 168 of 191 Figure 106 – Port Statistics Rev 5.0.27.215: May 26, 2010 Page 169 of 191 5.5.3.1 Bandwidth Activity This graph shows the total bandwidth activity throughout the report period. This graph is contained in all of the top level report subsections for reference. 5.5.3.2 Top Ports Used The following sections in this subsection contain the top ports used. The port usage is broken into three sections; Top Ports Used (which includes both upstream and downstream usage), Top Incoming Ports Used (which includes downstream port usage), and Top Outgoing Ports Used (which includes upstream port usage). You can mouse over a variety of items on this page (like the ports themselves) to get more detail on the port. Figure 107 - Top Used Ports If you click on the “More” button in any of these sections, you will get a full list of ports which can be sorted by a variety of criteria. 5.5.3.2.1 Port Detail By clicking on any of the listed ports on this page, you will be taken to a full detail page for that port. Rev 5.0.27.215: May 26, 2010 Page 170 of 191 Figure 108 - Port Detail Rev 5.0.27.215: May 26, 2010 Page 171 of 191 The port detail page contains information pertaining to a specific port. The page also allows you to view specific details about the port such as total bandwidth through the port, TCP traffic, or UDP traffic. To change to a particular protocol, select the protocol TCP, UDP, or All from the drop down list labeled “Protocol” near the top. All information on the page will adjust to reflect only the selected protocol. This page also contains the bandwidth activity throughout the report period for this particular port. You can use this to determine when and how the particular port is being utilized. Toward the bottom, a list of users for the port is listed sorted from highest use to lowest. This allows you to determine which user is utilizing the port the most. You can get a full list of these users by clicking on the “More” button. 5.5.4 IP Statistics The IP Address statistic section provides information regarding IP Address destination usage from your network. In this section you can determine how your Internet traffic is utilizing different IP Address destinations in order to identity potential problems and optimize the network. Rev 5.0.27.215: May 26, 2010 Page 172 of 191 Figure 109 - IP Address Statistics Rev 5.0.27.215: May 26, 2010 Page 173 of 191 5.5.4.1 Bandwidth Activity This graph shows the total bandwidth activity throughout the report period. This graph is contained in all of the top level report subsections for reference. 5.5.4.2 Top IP Address Utilization The following sections in this subsection contain the top IP Address destinations used. The usage is broken into three sections; Top IP Address Destinations (which includes both upstream and downstream usage), Top IP Address usage downstream (which includes downstream usage), and Top IP Address usage upstream (which includes upstream usage). You can mouse over a variety of items on this page (like the IP Addresses themselves) to get more details. Figure 110 - Top IP Address Utilization If you click on the “More” button in any of these sections, you will get a full list of IP Addresses which can be sorted by a variety of criteria. 5.5.4.2.1 IP Address Detail By clicking on any of the listed IP Addresses on this page, you will be taken to a full detail page for that IP Address. Rev 5.0.27.215: May 26, 2010 Page 174 of 191 Figure 111 - Top IP Address Detail Rev 5.0.27.215: May 26, 2010 Page 175 of 191 The IP Address detail page contains information pertaining to a specific IP Address. The page also allows you to view specific details about the IP Address such as total bandwidth to/from the destination, only TCP traffic to/from the destination, or only UDP traffic to/from the destination. To change to a particular protocol, select the protocol TCP, UDP, or All from the drop down list labeled “Protocol” near the top. All information on the page will adjust to reflect only the selected protocol. This page also contains a graph with the bandwidth activity throughout the report period for this particular IP Address. You can use this to determine when and how the particular IP Address is being utilized. Toward the bottom, a list of top users utilizing the IP Address is listed. The list is sorted from highest use to lowest. This allows you to determine which user is utilizing the IP Address the most. You can get a full list of these users by clicking on the “More” button. 5.5.5 Bandwidth Statistics The Bandwidth statistic section provides information regarding general bandwidth usages from your network. General bandwidth includes overall, downstream and upstream usage. Rev 5.0.27.215: May 26, 2010 Page 176 of 191 Figure 112 - Bandwidth Statistics Rev 5.0.27.215: May 26, 2010 Page 177 of 191 5.5.5.1 Bandwidth Activity This graph shows the total bandwidth activity throughout the report period. This graph is contained in all of the top level report subsections for reference. 5.5.5.2 Overview of Total Bandwidth Usage The following sections in this subsection contain the overview of total bandwidth usage. The bandwidth usage is broken into three sections; Overview of Overall usage, Overview of downstream usage, and overview of upstream usage. You can mouse over a variety of items on this page (like users themselves) to get more details. Figure 113 – Overview of Total Bandwidth Usage If you click on the “More” button in any of these sections, you will get a full list of the users that can be sorted by a variety of criteria. 5.5.5.2.1 Bandwidth Usage Detail By clicking on any of the more buttons on this page, you will be taken to a full detail page for bandwidth usage. Rev 5.0.27.215: May 26, 2010 Page 178 of 191 Figure 114 – Bandwidth Usage Detail Rev 5.0.27.215: May 26, 2010 Page 179 of 191 The bandwidth usage detail page contains information on all users and bandwidth information. The page also allows you to sort by Total Bytes, Upstream Bytes, Downstream Bytes, Total Packets, Upstream Packets, Downstream Packets, and Block count. Rev 5.0.27.215: May 26, 2010 Page 180 of 191 5.5.6 Application Statistics The application statistic section provides information regarding specific application usage on your network. In this section you can determine how your different network applications are utilizing the traffic on the network in order to identity potential problems and optimize the network. Figure 115 - Application Statistics Rev 5.0.27.215: May 26, 2010 Page 181 of 191 5.5.6.1 Bandwidth Activity This graph shows the total bandwidth activity throughout the report period. This graph is contained in all of the top level report subsections for reference. 5.5.6.2 Top Applications The following sections in this subsection contain the top network applications used. The usage is broken into three sections; Top overall usage, top downstream usage, and top upstream usage. You can mouse over a variety of items on this page (like the applications themselves) to get more details. Figure 116 - Top Applications Usage If you click on the “More” button in any of these sections, you will get a full list of the applications that can be sorted by a variety of criteria. 5.5.6.2.1 Application Detail By clicking on any of the listed applications on this page, you will be taken to a full detail page for that application. Rev 5.0.27.215: May 26, 2010 Page 182 of 191 Figure 117 - Application Detail Rev 5.0.27.215: May 26, 2010 Page 183 of 191 The application detail page contains information pertaining to a specific application. The page also allows you to view specific details about the application such as total bandwidth used for this application, only TCP traffic for this application, or only UDP traffic for this application. To change to a particular protocol, select the protocol TCP, UDP, or All from the drop down list labeled “Protocol” near the top. All information on the page will adjust to reflect only the selected protocol. This page also contains a graph with the bandwidth activity throughout the report period for this particular application. You can use this to determine when and how the particular application is being utilized. Toward the bottom, a list of top users utilizing the application is listed. The list is sorted from highest use to lowest. This allows you to determine which user is utilizing the application the most. You can get a full list of these users by clicking on the “More” button. Rev 5.0.27.215: May 26, 2010 Page 184 of 191 6 REMOTE MANAGEMENT Figure 118 - Remote Management Rev 5.0.27.215: May 26, 2010 Page 185 of 191 The Remote Management portal will allow you to remotely manage all of your iBoss units from anywhere in the world. You may send the daily email report remotely, configure settings, upgrade firmware, upload or download settings, and set groups for units. Easily connect and configure settings without needing to know your IP address. Connect to all your devices securely using SSL and AES encryption without needing to set up a VPN. No static IP address required! The Remote Management can securely connect to your iBoss units even through firewalls! The Remote Management portal will allow you to manage multiple locations that have the iBoss installed through one managed account. You or the iBoss units may be set up anywhere in the world with and Internet connection. 6.1 Set Up Account You may create a Remote Management account through https://www.iphantom.com/enterprisemanagement/main.html. This will allow you to manage all of your iBoss units remotely. This one account can manage multiple iBoss units. You can access your Remote Management account from anywhere in the world. 6.2 Adding Units to Your Account You may add multiple iBoss units to your account for which you would like to manage. You may also give the added unit a nickname to remember where the unit is located. 6.3 Groups You may create and edit groups to help manage your units. Using groups allows you to organize your units and manage settings together for units of the group. You may upload or sync settings for all units within a group making it easier and quicker to configure multiple units. 6.4 Management Easily connect and configure settings without needing to know your IP address of where your iBoss units are connected. The management portal automatically connects to your device using SSL and AES encryption without needing to set up a VPN. A static IP address is not required for the management portal to connect to your devices. It will even be able to connect to the devices through a secure firewall without having to hassle with any further configuration of the firewall. 6.5 Settings Settings for your iBoss units may be managed individually or grouped together. You may download a unit's settings or upload them to multiple units. 6.6 Logs You may set a report to be generated and emailed to you remotely. This allows you to send the daily report log to any email address you wish. 6.7 Firmware Firmware updates can become available from time to time. These firmware updates have new features and updates. You may remotely update your iBoss unit with the latest firmware version without having direct access to it using the management portal. Rev 5.0.27.215: May 26, 2010 Page 186 of 191 7 SUBSCRIPTION MANAGEMENT The iBoss requires an active subscription to function. The unit may already be pre-activated when you receive it, or you may need to obtain and/or activate a subscription key and register the active subscription key with your iBoss. To view and manage your subscription information, login to the iBoss interface home page and click the “Manage Subscription” button. Figure 119 - Manage Subscription This page will allow you to view your current subscription status. The following are values that may appear in the “Status” field: Active – The iBoss has an active subscription. Must Activate – An active subscription key has not been registered with the iBoss. Not Available – The iBoss is not connected to the Internet. Expired – The iBoss subscription has expired and is no longer active. Cancelled – The iBoss subscription has been cancelled and is no longer active. 7.1 Adding a Subscription Key The iBoss needs an active Subscription Key entered into the device before it can start functioning. 1. Confirm that your Subscription Key has been activated. 2. Enter the active Subscription Key for the iBoss. · Log into your iBoss and click on "Manage Subscription" button on the main page. (Please refer to the User Interface section on how to log into the iBoss) · Enter in the active Subscription Key in the boxes provided. Figure 120 - Enter Subscription Key · Click on "Apply" and "Confirm" on the next page. 3. If you do not have a Subscription Key, you may press the “Purchase Subscription Key Now” button to purchase one. This will guide you through the process of activating and registering your Subscription Key with your iBoss. Rev 5.0.27.215: May 26, 2010 Page 187 of 191 8 TROUBLESHOOTING 8.1 Password Recovery In the event that the iBoss administration password becomes lost, there is a way by which it can be recovered. If you checked the “Password Recovery” option on the iBoss when the password was initially setup, you will be prompted to have the password E-mailed to you upon a failed login attempt. Follow the link provided on the login page to have your password E-mailed to the address specified during the “Password Recovery” setup. If you did not enable the password recovery option, you can contact the Phantom Technologies support department to have the password E-mailed to a specific address. Note that you will be prompted for account authentication information before a password recovery request is fulfilled. The password may be reset by performing a factory reset on the iBoss, however this action is typically reserved as a last resort due to the fact that ALL of your settings will be erased back to factory defaults. 8.2 Resetting to Factory Defaults The iBoss can be reset back to factory default settings through two different methods. After performing the factory reset, all of the iBoss settings will be set back to default values (including Internet connection, Internet filtering and password settings. Note: The tamper log cannot be erased by a factory reset. This is by design for security reasons. 8.2.1 Through the iBoss User Interface - Login to iBoss Interface (http://myiboss.com). - From the “Home” page, go to “My Preferences” and “System Settings”. - Click the “Restore Factory Defaults” button. You will be prompted to confirm before continuing. 8.2.2 Using the iBoss Console Port - Connect your computer to the console port of the iBoss. (Please see console setup in this manual for more information on connecting the iBoss to the console port). - Choose the option Restore Factory Defaults - Confirm that you would like to reset the factory defaults. 8.3 Technical Support Phantom Technologies Inc prides itself on supporting our products and services. Please use the information below if you are in need of assistance. Website Support: http://www.iPhantom.com/troubleshooting.html Telephone Support: 1.877.PHANTECH (742.6832) E-mail Support: [email protected] Rev 5.0.27.215: May 26, 2010 Page 188 of 191 9 APPENDIX 9.1 Warranty Information For warranty information please visit: https://www.iPhantom.com/warranty.html BY PROCEEDING TO USE THE PRODUCTS AND SERVICES PROVIDED BY PHANTOM TECHNOLOGIES INC, YOU ACKNOWLEDGE YOUR AGREEMENT TO BE BOUND BY THE FOLLOWING TERMS AND CONDITIONS AVAILABLE AT: http://www.iPhantom.com/productAndServiceAgreement.html IF YOU DO NOT AGREE WITH THESE TERMS AND CONDITIONS, YOU MAY NOT USE THE PRODUCTS AND SERVICES PROVIDED BY PHANTOM TECHNOLOGIES INC. For the latest news, features, documentation and other information regarding the iBoss please visit: http://www.PhantomTechnologies.com Rev 5.0.27.215: May 26, 2010 Page 189 of 191 10 GLOSSARY Default Gateway: Every non-router IP device needs to configure a default gateway’s IP address. When the device sends out an IP packet, if the destination is not on the same network, the device has to send the packet to its default gateway, which will then send it out towards the destination. DHCP: Dynamic Host Configuration Protocol. This protocol automatically gives every computer on your home network an IP address. DNS Server IP Address: DNS stands for Domain Name System, which allows Internet servers to have a domain name (such as www.iPhantom.com) and one or more IP addresses (such as 208.70.74.14). A DNS server keeps a database of Internet servers and their respective domain names and IP addresses, so that when a domain name is requested (as in typing "iphantom.com" into your Internet browser), the user is sent to the proper IP address. The DNS server IP address used by the computers on your home network is the location of the DNS server your ISP has assigned to you. DSL Modem: DSL stands for Digital Subscriber Line. A DSL modem uses your existing phone lines to transmit data at high speeds. Ethernet: A standard for computer networks. Ethernet networks are connected by special cables and hubs, and move data around at up to 10/100 million bits per second (Mbps). IP Address and Network (Subnet) Mask: IP stands for Internet Protocol. An IP address consists of a series of four numbers separated by periods that identifies a single, unique Internet computer host in an IP network. Example: 192.168.2.1. It consists of 2 portions: the IP network address, and the host identifier. The IP address is a 32-bit binary pattern, which can be represented as four cascaded decimal numbers separated by “.”: aaa.aaa.aaa.aaa, where each “aaa” can be anything from 000 to 255, or as four cascaded binary numbers separated by “.”: bbbbbbbb.bbbbbbbb.bbbbbbbb.bbbbbbbb, where each “b” can either be 0 or 1. A network mask is also a 32-bit binary pattern, and consists of consecutive leading 1’s followed by consecutive trailing 0’s, such as 11111111.11111111.11111111.00000000. Therefore sometimes a network mask can also be described simply as “x” number of leading 1’s. When both are represented side by side in their binary forms, all bits in the IP address that correspond to 1’s in the network mask become part of the IP network address, and the remaining bits correspond to the host ID. For example, if the IP address for a device is, in its binary form, 11011001.10110000.10010000.00000111, and if its network mask is, 11111111.11111111.11110000.00000000, it means the device’s network address is 11011001.10110000.10010000.00000000, and its host ID is, 00000000.00000000.00000000.00000111. This is a convenient and efficient method for routers to route IP packets to their destination. ISP: Internet Service Provider. An ISP is a business that provides connectivity to the Internet for individuals and other businesses or organizations. Web-based management Graphical User Interface (GUI): Many devices support a graphical user interface that is based on the web browser. This means the user can use the familiar Netscape or Microsoft Internet Explorer to Control/configure or monitor the device being managed. Rev 5.0.27.215: May 26, 2010 Page 190 of 191 11 REGULATORY STATEMENT FCC This equipment has been tested and found to comply with the limits for a Class B digital device, pursuant to Part 15 of FCC rules. CE This equipment has been tested and found to comply with the limits of the European Council Directive on the approximation of the law of the member states relating to electromagnetic compatibility (89/336/EEC) according to EN 55022 Class B. FCC and CE Compliance Statement This device complies with Part 15 of the FCC Rules. Operation is subject to the following two conditions: (1) this device may not cause harmful interference, and (2) this device must accept any interference received, including interference that may cause undesired operation. Any changes or modifications not expressly approved by the party responsible for compliance could void the authority to operate equipment. Safety This equipment is designed with the utmost care for the safety of those who install and use it. However, special attention must be paid to the dangers of electric shock and static electricity when working with electrical equipment. Rev 5.0.27.215: May 26, 2010 Page 191 of 191