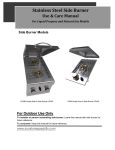
1
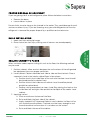
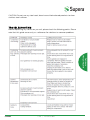
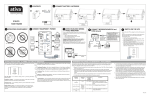
BBC-24-48G, BBC-24-60G, BBC-24-72G,
BBC-24-48, BBC-24-60, BBC-24-72
BACK BAR COOLERS
INSTRUCTION MANUAL
This manual contains important information regarding your Supera® unit. Please read this manual thoroughly prior to equipment set-up, operation and maintenance. Failure to comply with regular maintenance guidelines outlined in this manual may void the warranty.
PLEASE READ THE MANUAL THOROUGHLY PRIOR TO
EQUIPMENT SET-UP, OPERATION AND MAINTENANCE.
Notice: Use this applicance for its intended purpose as described in this User Manual.
Properly maintaining your cooler will extend the life of the unit and ensure trouble
free service.
INSTALLATION AND OPERATION
UNCRATING
1. Remove all of the packaging before installing.
2. Move the unit as close to the final location as possible
before removing the wooden pallet.
3. Use a screw driver to remove the screws from the Lbracket connecting the unit to the wooden pallet.
4. Remove pallet by unscrewing all base rail anchor
brackets. Place
pallet to the side.
5. Carefully set cabinet upright.
CAUTION: When lifting unit, do not use countertop as a lifting point.
LOCATING
•
•
•
•
•
•
Install the unit on a strong and level surface. Keep the
cooler stable to avoid vibration and noise.
Install the unit in an indoor, well-ventilated area. A space
of at least 7cm/3in should be allowed between the
surrounding walls and the cabinet wall for air circulation.
Unit should be placed far away from any head source to
avoid the decrease of refrigeration efficiency.
Install the cooler in a dry place to prevent ruse from forming on the
compartment body, which may affect the electrical insulation.
The appliance should not be exposed to rain or sun. Outdoor use of this unit
may decrease efficiency and damage the unit.
The unit should be placed close enough to the electrical supply so the
extension cords are never used.
CAUTION: Problems caused by improper position of this unit are NOT covered by
the warranty.
©SUPERA
V.1.0
|
November 2014
INSTRUCTION
MANUAL
If the unit has recently been transported, allow the unit to sit for
a minimum of 24 hours.
PROPER DISPOSAL OF EQUIPMENT
If you are getting rid of an old refrigerator, pleas follow the below instructions:
•
•
Remove the doors
Leave shelves in place
Do not climb, stand or hang on the shelved in the cooler. They could damage the unit
and cause serious injury. If you are throwing away your old refrigerator, be sure the
refrigerant is removed for proper disposal by a qualified service technician.
SHELF INSTALLATION
SEALING CABINET TO FLOOR
When sanitation codes require sealing this unit to the floor, the following method
may be used.
1.
Position cabinet: Allow one inch between the wall and rear of the refrigerated
bar equipment to assure proper ventilation.
2. Level cabinet: Cabinet should be level side to side and front to back. Place a
carpenter’s level in the interior cabinet floor in four places:
A. Position level in the inside floor of the unit near the door. Level should
be placed parallel to cabinet front.
B. Position level at the inside rear of cabinet. Level should be placed
parallel to cabinet back.
C. Perform similar procedures to steps A and B by placing the level on the
inside floor left and right sides parallel to the depth of the cooler. Level
cabinet.
3. Applying sealant
A. Draw an outline on the base of the floor.
B. Raise and block the front side of the cabinet.
C. Apply a bead of NSF Approved Sealant (see list below) to floor half an
inch inside the outline drawn. The beat must be heavy enough to seal
the entire cabinet surface when it is set down on the sealant.
D. Raise and block the rear of the cabinet.
©SUPERA
V.1.0
|
November 2014
INSTRUCTION
MANUAL
1. Hook shelf clips onto clip hanger
2. Place shelves on shelf clips, making sure all corners are seated properly.
E. Apply sealant on the floor as outlined above on the three other sides.
F. Examine to see that the cabinet is sealed to the floor and around the
entire perimeter of the unit.
NSF Approved Sealants:
ELECTRICAL INSTRUCTION
When using electrical appliances, basic safety precautions should be followed:
-
This cooler must be properly installed and located in accordance with the
installation service representative.
Do not store or use gasoline or other flammable vapors and liquids in the
vicinity of this unit or any other appliance.
Unplug the unit from the electrical outlet before cleaning or making repairs.
Setting the temperature controls the 0 (zero) position does not remove power
to the light circuit, perimeter heaters or evaporator fans.
NOTE: it is strongly recommended that any servicing be performed by an authorized
technician before it is used.
-
Please ensure that the required voltage of the compressor is being supplied at
all times. If the voltage is unstable, please select a suitable automatic voltage
regulator.
CAUTION: Low or high voltage can definitely affect the refrigeration unit.
-
©SUPERA
All units should be plugged into a grounded and properly-sized electrical
outlet with appropriate overcurrent protection. Please refer to the electrical
requirement on the nameplate. The power cord of the cooler is equipped with
a grounding plug which mates with a standard grounding wall outlet to
minimize the possibility of electric shock hazard.
V.1.0
|
November 2014
INSTRUCTION
MANUAL
Minnesota Mining #ECU800 Caulk
Minnesota Mining #ECU2185 Caulk
Minnesota Mining #ECU1055 Bead
Minnesota Mining #ECU1202 Bead
Armstrong Cork – Rubber Caulk
Products Research Co #5000 Rubber Caulk
GE Silicone Sealer
Dow Corning Silicone Sealer
NOTE: Asphalt floors are very susceptible to chemicals. A layer of tape on the floor
prior to applying the sealant will protect the floor from damage.
Standard plug: NEMA5-15P
-
-
-
-
-
Have the wall outlet and circuit checked by a qualified electrician to make sure
the outlet it properly grounded. Check the incoming voltage with a voltmeter.
DO NOT USE EXTENSION CORDS! The use of an extension cord to connect
the cooler will void the warranty. The unit must be close enough to the
electrical supply so that extension cords are never used.
The cooler should always be plugged into its own dedicated circuit with a
voltage rating that matches the rating plate. This provides the best
performance and also prevents overloading wiring circuits which could
become a fire hazard from overheated wires.
Never unplug your cooler by pulling on the power cord. Always grip the plug
firmly and pull straight out from the outlet.
Repair or replace all power cords immediately if they become frayed or
otherwise damaged. Do not use a power cord that has cracks or abrasion
damage along its length or at either of its ends.
When removing the cooler away from the wall, be careful not to damage the
power cord. It is strongly recommended that any servicing be performed by
an authorized technician.
Temperature setting:
Temperature range from 7 (coldest) to 1 (warmest)
CAUTION: Setting the temperature control to the
coldest setting may cause the evaporator coil to
freeze and ice up. This will eventually result in a
warmer cabinet temperature.
©SUPERA
V.1.0
|
November 2014
INSTRUCTION
MANUAL
If the wall outlet is a standard two prong outlet, it must be replaced with the
properly grounded wall outlet. NEVER USE AN ADAPTOR PLUG!
REGULAR MAINTENANCE
WARNING: Disconnect power cord before cleaning any parts of the unit.
CLEANING THE CONDENSER COIL
•
•
•
•
For efficient operation, it is important that the condenser surface be kept free
of dust. Dirt, and lint.
We recommend cleaning the condenser coil and fins at least once per month.
Clean with a commercial condenser coil cleaner, available from any kitchen
equipment retailer. Brush the condenser fins from top to bottom, not side to
side.
After cleaning, straighten any bent condenser fins with a fin comb.
CLEANING THE FAN BLADE AND MOTOR
•
If necessary, clean the fan blades and motor with a soft cloth. If it is necessary
to wash the fan blades, cover the fan motor to prevent moisture damage.
•
•
•
•
•
When cleaning the cabinet interior, use a solvent of warm water and mild
soap.
Do not use steel wool, caustic soap, abrasive cleaners, or bleach that may
damage the stainless steel surface.
Wash door gaskets on a regular basis, preferably weekly. Simply remove door
gasket from the frame of the door, soak in warm water and soap for thirty
minutes, dry with soft cloth and replace.
Check door gaskets for proper seal after they are replaced.
Periodically remove the shelves and pilasters from the unit and clean them
with mild soap and warm water. To remove pilasters, first remove the shelves
and shelf brackets. Then, simply lift the pilaster up and out.
STAINLESS STEEL CARE AND CLEANING
•
•
•
•
•
•
©SUPERA
Recommended cleaners for stainless steel: soap, ammonia, and detergent
medallion applied with a soft cloth or sponge for routine cleaning.
Arcal 20, Lac-O-Nu Ecoshine provides a barrier film for fingerprings and
smears
Cameo, Talc, Zud First Impression is for stubborn stains and discoloration. Rub
in direction of polish lines.
Easy-off and De-grease It Oven Aid are excellent for removals on all finished
for grease-fatty acids, blood and burnt-on foods.
Any good commercial detergent can be applied with a sponge or soft cloth to
remove grease and oil.
Benefit, Super Sheen, and Sheila Shine are good for restoration.
V.1.0
|
November 2014
INSTRUCTION
MANUAL
CLEANING THE INTERIOR OF THE UNIT
CAUTION: Do not use any steel wool, abrasive or chlorine based products to clean
stainless steel surfaces.
TROUBLESHOOTING
INSTRUCTION
MANUAL
Before requesting any service on you unit, please check the following points. Please
note that this guide serves only as a reference for solutions to common problems.
©SUPERA
V.1.0
|
November 2014
INSTRUCTION
MANUAL
©SUPERA
V.1.0
|
November 2014
www.SuperaCo.com
LIMITED WARRANTY
SUPERA REFRIGERATION EQUIPMENT MODELS:
BACK BAR COOLERS: BBC-24-48G, BBC-24-60G, BBC-24-72G, BBC-24-48, BBC-24-60, BCC-24-72
Claims: All claims for parts or labor must be made directly through SUPERA, LLC. All claims should include: model number of the unit, the serial
number of the cabinet, proof of purchase, date of installation, and all pertinent information supporting the alleged defect. In case of compressor
replacement under warranty, either compressor or compressor tag must be returned to SUPERA, LLC along with above listed information. Failure to
comply with warranty policies will result in voiding claims. Any service provided without authorization from Supera, LLC will not be covered by Supera,
LLC.
Two-Year Parts & Labor Warranty: SUPERA, LLC warrants all new refrigerated components, the cabinet and all parts, to be free from defects in
materials or workmanship, under normal and proper use and maintenance service as specified by SUPERA, LLC and upon proper installation (indoor
building only) and start-up in accordance with the instruction packet supplied with each SUPERA, LLC unit. SUPERA, LLCʼs obligation under this
warranty is limited to a period of two (2) years from the date of original purchase.
Any part, covered under this warranty that is determined by SUPERA, LLC to have been defective within two (2) years of original installation date is
limited to the repair or replacement, including labor charges, of defective parts or assemblies. The labor warranty shall include ONLY pre-authorized time
and up to sixty miles of travel for the service company.
Additional Three-Year Compressor Warranty: In addition to the two (2) year warranty stated above, SUPERA, LLC warrants its hermetically sealed
compressor to be free from defects in both material and workmanship under normal and proper use and maintenance service for a period of three (3)
additional years from the date of original installation, but not to exceed five (5) years and three (3) months after purchase.
Compressor determined by SUPERA, LLC to have been defective within this extended period will, at SUPERA, LLCʼs discretion, be either repaired or
replaced with a compressor or compressor parts of similar design and capacity.
The three (3) year extended compressor warranty applies only to hermetically sealed parts of the compressor and does not apply to any other parts or components, including,
but not limited to, cabinet, paint finish, temperature control, refrigerant, metering device, driers, motor starting equipment, fan assembly or and other electrical components,
etcetera.
Compressor Warranty: The five-year compressor warranty detailed above will be void if the following procedure is not carefully adhered to:
1. This system contains R404A or R134a refrigerant and Polyol Ester lubricant. The Polyol Ester lubricant has rapid moisture absorbing
qualities.
2. Drier replacement is very important and must be changed when a system is opened for servicing. A620 copper drier or better is highly
recommended.
3. Micron level vacuums must be achieved to insure low moisture levels in the system. 500 microns or lower must be obtained.
4. When compressor is grounded, suction drier and 620 drier or better must be replaced.
5. Compressor must be obtained through SUPERA, LLC, unless otherwise specified in writing, through SUPERA, LLCʼs warranty department.
Not Covered Under This Warranty: SUPERA, LLCʼs sole obligation under this warranty is limited to either repair or replacement of parts, subject to
the additional limitations below. This warranty neither assumes nor authorizes any person to assume obligations other than those expressly covered by
this warranty. Warranty does not cover service requests for free replacement and/or recall parts.
SUPERA, LLC HAS FINAL DESCRETION ON ALL WARRANTY REQUESTS. NO CONSEQUENTIAL DAMAGES. SUPERA, LLC IS NOT RESPONSIBLE FOR ECONOMIC
LOSS; PROFIT LOSS; OR SPECIAL, INDIRECT, OR CONSEQUENTIAL DAMAGES, INCLUDING WITHOUT LIMITATION, LOSSES, SERVICE TECHNICAN ERRORS, OR
DAMAGES ARISING FROM FOOD OR PRODUCT SPOILAGE REGARDLESS OF WHETHER OR NOT THEY RESULT FROM REFRIGERATION FAILURE. WARRANTY
IS NOT TRANSFERABLE, This warranty is not assignable and applies only in favor of the original purchaser/user to whom delivered. ANY SUCH ASSIGNMENT OR
TRANSFER SHALL VOID THE WARRANNTIES HEREIN AND SHALL VOID ALL WARRANTIES, EXPRESS OR IMPLIED, INCLUDING ANY WARRANTY OF
MERCHANTABILITY OR LABOR COVERAGE FOR COMPONENT FAILURE OR OTHER THE WARRANTY PACKET PROVIDED WITH THE UNIT. ALTERATION,
NEGLECT, ABUSE, MISUSE, ACCIDENT, DAMAGE DURING TRANSIT OR INSTALLATION, FIRE, FOOD, ACTS OF GOD. SUPERA, LLC is not responsible for the repair
or replacement of any parts that SUPERA, LLC determines have been subjected after the date of manufacture to alteration, neglect, abuse, misuse, accident, damage during
transit or installation, fire, flood, or act of GOD. IMPROPER ELECTRICAL CONNECTIONS. SUPERA, LLC IS NOT RESPONSIBLE FOR THE REPAIR OR REPLACEMENT
OF FAILED OR DAMAGED COMPONENTS RESULTING FROM ELECTRICAL POWER FAILURE, THE USE OF EXTENSION CORDS, LOW VOLTAGE, OR VOLTAGE
DROPS TO THE UNIT. NO IMPLIED WARRANTY OF MERCHANTABILITY OR FITNESS FOR A PARTICULAR PURPOSE; THERE ARE NO OTHER WARRANTIES,
EXPRESSED, IMPLIED OR STATUTORY, EXCEPT THE TWO (2) YEAR PARTS & LABOR WARRANTY AND THE ADDITIONAL THREE (3) YEAR COMPRESSOR
WARRANTY AS DESCRIBED ABOVE. THESE WARRANTIES ARE EXCLUSIVE AND IN LIEU OF ALL OTHER WARRANTIES, INCLUDING IMPLIED WARRANTY AND
MERCHANTABILITY OR FITNESS FOR A PARTICULAR PURPOSE. THERE ARE NO WARRANTIES, WHICH EXTEND BEYOND THE DESCRIPTION ON THE FACE
HEREOF. Outside U.S. and Canada; This warranty does not apply, and SUPERA, LLC is not responsible for, any warranty claims made on products sold or used outside the
continent of the United States and Canada. Installation in a residential application will void all warranties.
© SUPERA, 2014
Version 1 | November 2014
Supera Customer Care Toll-Free Service Line
1-866-953-3288
For additional product and warranty information,
please visit our website at
www.SuperaCo.com