1
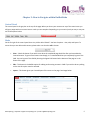
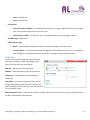
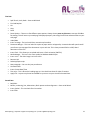
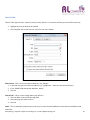
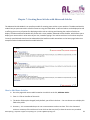
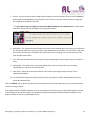
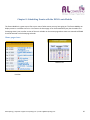
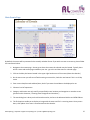
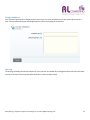
Welcome to the DotNetNuke v6 CMS
User Training Manual
Provided by:
Last Updated: March 17, 2012
Table of Contents
CHAPTER 1: USER LOGIN ...................................................................................................................................................................4
USER LOGIN .............................................................................................................................................................................................. 4
LOGOUT ................................................................................................................................................................................................... 4
CHANGING YOUR PASSWORD ....................................................................................................................................................................... 4
CHAPTER 2: HOW TO NAVIGATE WITHIN DOTNETNUKE ....................................................................................................................5
CONTROL PANEL ........................................................................................................................................................................................ 5
MODE ...................................................................................................................................................................................................... 5
MODULES TAB ........................................................................................................................................................................................... 6
PAGES TAB ................................................................................................................................................................................................ 7
TOOLS TAB ................................................................................................................................................................................................ 8
CHAPTER 3: EDITING BASIC INFORMATION WITH THE HTML MODULE............................................................................................ 10
EDITING CONTENT AREAS........................................................................................................................................................................... 10
INSERTING AN IMAGE ................................................................................................................................................................................ 12
INSET A LINK ............................................................................................................................................................................................ 15
EMBEDDING AUDIO OR VIDEO FILES .............................................................................................................................................................. 16
LINKING TO AN AUDIO OR VIDEO FILE ............................................................................................................................................................ 17
CHAPTER 4: ADDING A NEW PAGE .................................................................................................................................................. 18
CHAPTER 5: MANAGING MODULES ON A PAGE ............................................................................................................................... 20
DELETING OR MOVING A MODULE............................................................................................................................................................... 20
ADDING A MODULE .................................................................................................................................................................................. 20
CHANGING THE TITLE OF THE MODULE ......................................................................................................................................................... 21
CHAPTER 6: PAGE SETTINGS ............................................................................................................................................................ 22
PAGE NAME ............................................................................................................................................................................................ 22
PAGE VIEWING ........................................................................................................................................................................................ 22
REDIRECT TO ANOTHER WEB SITE, PAGE, OR FILE ............................................................................................................................................. 23
CHAPTER 7: CREATING NEWS ARTICLES WITH ADVANCED ARTICLES ............................................................................................... 24
HOW TO ADD NEWS ARTICLES .................................................................................................................................................................... 24
CHAPTER 8: SCHEDULING EVENTS WITH THE DNN EVENTS MODULE............................................................................................... 26
HOME PAGE VIEWS ................................................................................................................................................................................... 26
MAIN EVENTS PAGE.................................................................................................................................................................................. 27
EDITING AN EVENT.................................................................................................................................................................................... 28
ENTERING EVENT CATEGORIES AND LOCATIONS.............................................................................................................................................. 28
CHAPTER 9: GREATER CONTROL WITH THE ADMINISTRATIVE MENU/TAB ...................................................................................... 29
RLComputing | Help Desk: support.rlcomputing.com | Email: [email protected]
2
DOCUMENTATION .................................................................................................................................................................................... 29
PAGE MANAGEMENT ................................................................................................................................................................................ 29
FILE MANAGER ........................................................................................................................................................................................ 31
RECYCLE BIN............................................................................................................................................................................................ 33
EVENT VIEWER......................................................................................................................................................................................... 34
USER ACCOUNTS ...................................................................................................................................................................................... 35
SECURITY ROLES ....................................................................................................................................................................................... 36
GOOGLE ANALYTICS .................................................................................................................................................................................. 37
SITE LOG................................................................................................................................................................................................. 37
SITE SETTINGS.......................................................................................................................................................................................... 38
RLComputing | Help Desk: support.rlcomputing.com | Email: [email protected]
3
Chapter 1: User Login
User Login
User login is the first thing that you’ll need to know to be able to get into the CMS. Once at the site, you will see on the
bottom of every page, a login link. Click this link.
You will then be presented with a page that has a login dialog box present. This is where
you will enter your user name and password. If you forgot your password, don’t worry, a
“forgot your password?” link is provided on the login page. It will email you your
username and password.
You do not have to log in from the home page. Remember, you can log in from any page
on the site. You can be browsing the site and decide to click the login link on any page. By
doing this, once logged in, you will be right on the page that you were browsing, instead
of starting on the home page.
Logout
Once you are logged into the CMS the Login link will change to your name and a log out link. When you are done editing
the web site you should either close your browser or click on the Logout link. This prevents anyone else from using your
account to edit the web site. The web site will automatically log you out after 20 minutes of inactivity.
Changing Your Password
After you log in the first time you should change your password. To change your password, click on your name at the
bottom of the page.
Once you click your name you will be brought to your profile. Click on Edit Profile.
Then click on Manage Password at the top. You will have to enter your current password and then your new password
twice.
*** When creating a new password it must be 8 characters and a combination of letters, numbers, and special
characters. Special characters are !@#$%^&*()
If you password is changed successfully you will see a green checkmark at the top of the page. If it was not successful
you will see a red X.
RLComputing | Help Desk: support.rlcomputing.com | Email: [email protected]
4
Chapter 2: How to Navigate within DotNetNuke
Control Panel
The control panel is the gray bar at the top of the page. When you hover your mouse over any of the menu items you
will get a popup with more menu items or tasks you can complete. Depending on your security level you may or may not
see all the options below.
Mode
On the far right of the control panel there is a picklist called “Mode”. You have 3 options - view, edit, and layout. To
ensure that you are able to edit content, please make sure that the edit is chosen.
•
View – Check this button if you wish to see what the completed page looks like after you have edited or
inserted content. To get an even better view though, it is recommended that you completely log out of the
CMS. You can log out of the CMS by locating the logout link located at the bottom of the page or in the
footer of the page.
•
Edit – This button is the default option for editing and inserting content in CMS. If you wish to do any editing
on the site this option must be selected.
•
Layout – This button gives you a boxed layout of the areas on the page. See image below.
RLComputing | Help Desk: support.rlcomputing.com | Email: [email protected]
5
Modules Tab
When you hover over the “Modules” link in the control panel, you
can add a module to the page. A module in DNN essentially is a
self contained area where content will go on the web page. The
most common module is the HTML module. This is what is used on
almost every page of your site to put the text of the page in.
There are 1000’s of modules out there. If you would like additional
functionality on the site just let us know what you are looking for.
Modules are purchased through http://store.dotnetnuke.com.
•
Add New Module – This is the default button for when
you wish to add a module to a page.
•
Add Existing Module – This option enables you to add
an existing module, which is located on a different
page, to this page. This comes in handy when you need
to add the side menu onto a page. You use this option
to copy the side menu from one page to another. To
do this, click add existing module. Then the window
will refresh showing you a list of pages in the first dropdown. Select the page that has the side menu on it
that you want. Then in the pane dropdown choose where you want it (e.g. left pane). Then in the module
dropdown choose the module you would like to copy (e.g. side menu). Then click Add Module to Page.
•
Category – Unless you are adding a HTML module to the page, change this to “All Categories” in order to see
all the modules that are installed in the system.
•
Module – This is where you select what module you wish to install on the page. HTML module is the most
common, which allows you to input text. DNNchildlinks is the module for the side menu.
•
Pane – Pane is the location where the module will be inserted. Generally, ContentPane will be where you
want to put a module since this is the main middle area of content. The sidemenu always goes in the
leftpane.
•
Insert – This option is for when there are other modules already present in a particular pane, such as
ContentPane. If the ContentPane already has an HTML module for instance, and you wanted a new HTML
module to sit above the existing HTML module, you can select, above from this picklist and choose the
module name from the Module picklist.
•
Visibility – This option allows you to specify if you want the module to be visible to anyone that can
presently see the page, same as page, or if you want, you can make this module only available to those
RLComputing | Help Desk: support.rlcomputing.com | Email: [email protected]
6
persons whom have edit access to the page, page editors only. Generally, you will not need to be using this
drop down, as the default option, same as page, should suffice.
•
Add Module to Page – The final button with the green plus sign is the final step to actually add a module
onto a page. Click this link to add the module to the page.
Pages Tab
The pages menu always you to manage the page you are currently on and add new pages.
Actions
•
Page Settings – This button will let you change settings for the current page, such as page name, title,
description, permissions, etc. This is where you can hide the page from the public while you developing it.
•
Add – DO NOT USE – Easier to use Copy so that page design and desired modules can be copied to the new
page.
•
Copy – The copy button will allow you to create a new page from the page you are currently on. This is how
you should always create new pages.
•
Delete – This button will let you delete the current page. Be CAREFUL when using this button. If you delete
the wrong page your site can become unusable (e.g. Home Page).
RLComputing | Help Desk: support.rlcomputing.com | Email: [email protected]
7
•
Export - DO NOT USE
•
Import – DO NOT USE
Copy Actions
•
Copy Permissions to Children – If you edited the permissions on a parent page and you want to propagate
them to the children below you can click on this link.
•
Copy Design to Children – DO NOT USE. This is already done when you copy the page to create it.
Add New Page – DO NOT USE
Update Current Page
•
Name – You can update the page name which also updates the page name in the menus.
•
Include in Menu – If you uncheck this option the page will not be displayed in the menu. This is one way to
hide the page BUT if someone searches for something on the page, the page will be accessible.
Tools Tab
The tools menu contains a few items from the admin
menu that you might use often. Depending on your
security level you may not see this option.
Add User – Add a new user to the web site.
Add Role – Add a new security group to the web site.
Upload File – Simple version of the File Manager to
upload files.
Clear Cache – If you make a change and don’t see the
changes reflected they might be stored in the web site
cache. Clicking this link will clear your web site cache but
not your browser cache.
Recycle Application Pool – This should be used very carefully. This will restart your web site. When restarting, the web
site will not be available to the end users.
RLComputing | Help Desk: support.rlcomputing.com | Email: [email protected]
8
Admin Tab
Depending on the access your user account has, you may not be able to have access to all of the Admin Tasks. Please see
Chapter 9 for details about each option in the Admin Tab.
RLComputing | Help Desk: support.rlcomputing.com | Email: [email protected]
9
Chapter 3: Editing Basic Information with the HTML Module
The HTML Module is the most commonly used module for entering content into the CMS. This will no doubt be the
module that you will use most often. Familiarizing yourself with the editor for the HTML module will give you a
fundamental understanding of entering content and editing within the CMS.
Editing Content Areas
There are two ways to edit a content area that is already inserted on a page.
The first way, is to click on the Edit Content link, always located on the bottom of the content area. The second way is to
hover over the Manage button. Choose Edit -> Edit Content.
When you click either of the edit content links, you will be brought to the HTML editor screen, which looks similar to
using MS Word.
The toolbar is described below. If you hover over a button, a tooltip will come up, giving details as to what the button is.
RLComputing | Help Desk: support.rlcomputing.com | Email: [email protected]
10
First Row
•
•
•
•
•
•
•
•
•
•
•
•
•
•
•
•
•
•
•
Spell Check, Undo, Redo – Same as MS Word
Find and Replace
Cut
Copy
Paste
Paste Options – There are a few different paste options. Always choose paste as plain text to remove all hidden
formatting. This will ensure your web page is displayed properly. Not using this will have adverse effects on your
web page.
Undo/Redo
Insert an Image - The icon looks like a mountain and sunshine.
Document Manger – This icon looks like a piece of paper with a red paperclip. A new window will open that will
you allow to you manage all the documents in your web site. This is how you would link to a PDF, Word
document or other file.
Insert Flash – This allows you to upload and insert a Flash animation (SWF file)
Media Manger – This icon is the same symbol as Windows Media Player.
Insert a Link - The chain image is to insert a link.
Remove Link
Subscript/Superscript
New paragraph – You can also just press Return.
Horizontal Rule
Insert Current Date/Time
Text style – This is where the heading tags are. You should use these for titles of sections.
Apply CSS – Any extra styles we have added for you to use on your site will be located here.
Second Row
• Bold/Italic
• Bullets, numbering, lists, indentations, block quotes and text alignment – Same as MS Word.
• Insert Symbol – This icon looks like a horseshoe
• Inset Table
RLComputing | Help Desk: support.rlcomputing.com | Email: [email protected]
11
Inserting an Image
You can insert a JPG, GIF or PNG on the web site. Bitmaps are not an appropriate file type due to their low quality.
*** When inserting a photograph, please make sure you resize the photo in a graphics program (e.g. Photoshop or
GIMP). This resizes the image proportionally and does not make it distorted. Anything that you insert should not be
more than 300px wide on a standard page. That will take up almost half your web site width. By not resizing your images
you will eventually will have problems loading the image manager and your web site will load slower. Never put images
directly from your digital camera to the web site.
When naming your photos, make sure you name them something you will recognize. Don’t leave them a bunch of
numbers. They will be hard to locate later on and Google does look at your image names for SEO.
*** If you are using an image that is not yours make sure you are not violating and copyright rules. Best way to prevent
any issues is to buy stock photograph at sites like istock.com or bigstockphotos.com
To insert an image:
1. Click on the icon in the tool bar in the first row.
RLComputing | Help Desk: support.rlcomputing.com | Email: [email protected]
12
2. The image manager will popup.
3. Click on the IMAGES folder. All images should be put in the images folder to keep the web site organized.
4. To upload a new image click on the UPLOAD link at the top of the screen. Another screen will appear. You can
then browse and select more than one image. If you are updating the image make sure you click “overwrite of
file exists”. Click Upload. This will make a copy of the image on your machine and upload it to the server.
RLComputing | Help Desk: support.rlcomputing.com | Email: [email protected]
13
5. Navigate through the directory until you locate the image you uploaded. Click
on the image you want to insert.
6. The properties screen will appear on the right. There are a couple of fields
you should fill in. First being the ALT Text. This is very important. It is for
people who are visually impaired and for anyone who has images turned off.
This should be a brief yet descriptive description of the image.
7. For Align, choose left or right. This aligns the picture to the left or right of the
text and the text will automatically wrap around the picture.
8. If you align the picture to the right, put 5 in the left margin. If you align to the
left, put 5 in the right margin.
9. Do NOT alter the image size here. Make sure you resize the image in an
image editor prior to uploading the image. If you need to tweak the image
size just a few pixels you can use width/height at the top of this window.
Make sure you click the “link” next to these two boxes first. This ensures the
image is resized proportionally.
10. Click insert.
RLComputing | Help Desk: support.rlcomputing.com | Email: [email protected]
14
Inset a Link
There are four types of links – external, internal, email, and file. To create any of these you start off the same way.
1. Highlight the text you want to be clickable.
2. Click the globe with a chain link icon in the first row of the toolbar.
External Link – This is a link to an external web site. (E.g. Google)
1. In the URL box type in the web site address. E.g. – google.com – make sure you leave the http://
2. In the TARGET field choose New Window (_Blank)
3. Click OK.
Internal Link – This is a link to a page within your web site.
1. Click the down arrow next to the page field.
2. Select the page you want to link to.
3. Click OK.
Email – This is used when you want users to send you an email. All email addresses on the web site should be made
email links.
RLComputing | Help Desk: support.rlcomputing.com | Email: [email protected]
15
1. Click on the EMAIL tab.
2. If not already there type in the email address.
3. Click OK.
File – This is a link to a Word document, PDF, Excel file, etc.
*** If you are using Office 2007 make sure you save your documents as Word 2003 format. Not everyone can open
Office 2007/2010 formatted documents. The best practice is to make sure every file is in PDF format. This prevents any
compatibility issues.
There are two ways to link files. You can click the hyperlink manager as you have in the above steps OR instead click on
the icon with a piece of paper with a paperclip in the HTML editor window.
1. Click on the icon that has a piece of paper with a paperclip.
2. Click on the DOCS or DOCUMENTS folder. If you don’t have one you can create one by clicking on New folder
icon which is the folder with a +. Type in a folder name and save it.
3. Once in the documents folder either choose a file you would like to link to OR click UPLOAD to upload a new file.
4. If uploading a new file browse to locate the file on your machine and upload it.
5. Navigate until you locate the file and highlight it.
6. Click INSERT.
Embedding audio or video files
To link to an mp3 audio file or a SHORT video click on the icon that has an arrow inside a color wheel. This is the media
manager. This will often be used to manage podcasts. The web server can handle SHORT videos. When you want to have
long videos or commercials you are better off putting them on YouTube and linking to them or embedding them.
*** This will put the video or audio file embedded on the page so it will load automatically
1. Click on the media manager.
2. Navigate to the folder where you will store all media files.
3. Upload the file just like you uploaded an image or file.
4. Insert the file.
RLComputing | Help Desk: support.rlcomputing.com | Email: [email protected]
16
Linking to an audio or video file
To provide just a link to a video or audio file that is stored on the web server, so it won’t load automatically:
1. Go to the File Manager to upload the file.
2. Navigate to the folder you would like to store the media files.
3. Click on Upload in the File Manager
4. Browse to locate the file on your computer that you want to upload.
5. Upload the file.
6. Then go to the page you would like the link to the file on.
7. Click Edit Content.
8. Click on the document manager – looks like the piece of paper with a paperclip.
9. Navigate to the location you stored the files. Click on the file and click on insert.
JavaScript
If you are pasting JavaScript into the HTML editor it will be removed when you save the page. This is a security
precaution. The editor removes all non-HTML code. If you must have JavaScript on the page then you need to edit the
settings of the page and put the JavaScript code in the Header box on the page settings page.
RLComputing | Help Desk: support.rlcomputing.com | Email: [email protected]
17
Chapter 4: Adding a New Page
There are a number of different ways to add a new page. The easiest way is to COPY a current page because this copies
the format/layout of the page and all the modules like the side menu.
1. Go to a page that is within the section you want to add it to.
2. Click Pages Tab at the top and choose Copy.
3. On the Page Details tab, enter the page name. This is what will show up in the menu. Keep it to 1-3 words max.
4. If you leave the page title blank it will automatically fill in with the default web site title with the keywords and
page name.
5. Fill in the description and keywords if desired. This will help with SEO.
6. Parent Page – This should already be filled in if you selected the correct page to copy. If not select the correct
parent page.
7. You can choose to place the page within the current menu if desired. This can always be changed afterwards in
the Admin menu -> Pages.
8. Choose whether you want the page to show in the main menu. This can be used to hide a page if you are still
working on it or don’t want it accessible to the public.
9. Permissions Tab – Make sure All Users has View permissions and at least Site Editors has Edit permissions.
10. Copy Page Tab – The key to this area is choose Reference if you want it to be identical to the page you are
copying and if you change it in one location it changes all locations (e.g. sidemenu). Choose New if you want that
area but will be adding the content. Choose Copy if you want an exact copy of the module on the original page
but do not want them linked like referencing does.
a. SideMenu (DNN ChildLinks) – Always choose Reference unless you did not copy the correct page. Then
choose Copy. Reference means copy all settings and formatting of the side menu so you won’t have to
make any changes.
b. HTML/Text area in ContentPane – Always choose NEW. You can change the title right here or wait until
you are back on the page. The content/text will not be copied. It will put a blank area for you to start
typing in.
RLComputing | Help Desk: support.rlcomputing.com | Email: [email protected]
18
11. Advanced Settings – If you want this new page to link to a file or an external URL then click on the + next to
Advanced Settings.
a.
b.
c.
d.
Scroll down to Link URL
File – Links to a document
Page – Links to another page within your site
URL – This will redirect the menu item to an external web site.
12. Click on Add Page.
RLComputing | Help Desk: support.rlcomputing.com | Email: [email protected]
19
Chapter 5: Managing Modules on a Page
A module is the areas on the page where you can type text or that is displaying data.
Deleting or Moving a Module
If you have to delete a module on a page, hover over the Manage button and you will see the delete link – click this.
Upon confirmation, the module will be deleted. Please be careful when doing this. You can also edit the settings of a
module by clicking on the icon that looks like a gear or mouse over the Manage button and choose Settings. There is a
Delete option at the bottom of the screen.
To move a module, hover over the Manage button and at the very bottom of the list you will see move – hover over
move. More options will expand; here you will see your other options of where you can move your module. If when
creating your module, if the module did not appear where you wanted it to go, you can always come here and fix the
position.
Adding a Module
If you want to add a module to a page, first make sure you have access to do it. If you do not see the Modules Tab, you
will need to talk to your web site administrator or email RLComputing because you do not have access to the Modules
area. If you do see the Modules Tab follow the directions below.
Most of the module’s names are self-explanatory. If you are looking for the side menu module it is called “DNN
Childlinks”.
1.
2.
3.
4.
5.
Go to the Modules Tab
Choose All Categories from the Category picklist
Choose the module you want to add from the picklist
Choose the Pane it will be going in – LeftPane, ContentPane(center), RightPane, TopPane(Banner below menu)
Click Add Module
Adding a SideMenu
1.
2.
3.
4.
5.
6.
Go to the Modules Tab
Choose Existing module instead of New
Choose the page that contains the exact side menu you want on this page.
Choose SideMenu from the module list.
Choose LeftPane
Click Add Module
RLComputing | Help Desk: support.rlcomputing.com | Email: [email protected]
20
Changing the Title of the Module
When you first create a module, the module title will be the manufacturer of the module, such as HTML/TEXT. You have
two ways to change the title of the module.
Option 1 –
To do this, click the gear icon located in the lower right corner of the module. In the next
screen you will see many dialog boxes. Please only change the Module Title, which is the
second box from the top. Once done, scroll to the bottom and click Update. Please be
careful when in the settings screens.
*** If you do not want the title to display at all, click on the Page Settings tab. Where is says display container, uncheck
the box.
Module Title
RLComputing | Help Desk: support.rlcomputing.com | Email: [email protected]
21
Chapter 6: Page Settings
If you would like to hide the page from the public, change the page name or change where it goes, you will click on the
Pages Tab. Then click Edit.
Page Name
The page name appears in the menu and in the breadcrumbs if your site has them. When creating page names, do NOT
put special characters in the name. Also keep it short and to the point. You do not want to have the menu items being
really long. Make sure you use plain vocabulary when creating page names. Do not use industry jargon.
To edit the page name, click on the EDIT in the Page Tab menu. Change the page name field. Click update at the bottom
of the page.
Page Viewing
There are a few ways you can have your page not
viewable by the public or not display in the
menu.
Don’t display in the menu but viewable
To have the page viewable but not in any menus,
in the page settings uncheck “Include in menu”.
Not viewable by public
To hide the page from the public but you can see it when you log in, go to the page settings. On the permissions tab,
uncheck All Users ->View.
RLComputing | Help Desk: support.rlcomputing.com | Email: [email protected]
22
Redirect to another web site, page, or file
You can have a menu item (page) link to a file, another page within your site or automatically go to an external web site.
1. To do this go to the Pages Tab and choose Edit. Then click on the Advanced Settings tab.
2. Scroll down and expand the Other Settings area. In the Link URL, choose your desired option – file, page, URL.
3. If you are linking to a file choose file. Then choose the correct folder the file is in – DOCS or DOCUMENTS. If the
file is not currently on the site choose upload new file. Browse your computer for the file and upload it. Then
click update.
4. If you are linking to another page on your web site choose page. In the dropdown choose the page you want to
link to.
5. If you are linking to an external web site choose URL. Then type in the URL you want to link to including the
http:// - EG http://rlcomputing.com
*** If you want the external link to open a NEW window you need to type the following in the URL box:
javascript:void(window.open('http://www.daybreaktv.org'))
RLComputing | Help Desk: support.rlcomputing.com | Email: [email protected]
23
Chapter 7: Creating News Articles with Advanced Articles
The Advanced Articles Module is an excellent module for creating news articles on your web site. The Advanced Articles
module lets you post news within a familiar format to using the HTML editor. A date and author can be displayed as well
as offering you an array of options for displaying articles such as archiving and choosing the number of articles to
display. The Advanced Articles Module also comes with a sister module, Advanced Articles Satellite, which allows you to
display your news articles in other areas of your site, instead of typing in the articles each time in more than one place.
Currently most DNN web sites have the Advanced Articles Satellite module somewhere on the home page. Below is an
example of what the Advanced Articles module looks like.
How to Add News Articles
1. Go to the page with news module located on it and click on the link, Add New Article.
2. Enter in a Title or Headline of the article
3. The Author field may be changed, but by default, you will be in that box. – You can choose not to display this
field to the public.
4. Summary – It is recommended to put in one or two sentences at the most here. This is the shortened
version or summary of the article until a user clicks on the story itself, to have the entire story revealed.
RLComputing | Help Desk: support.rlcomputing.com | Email: [email protected]
24
5. Picture - You may choose to add an image that will display next to the summary of the article (THUMBNAIL).
New images can be uploaded for this purpose from this screen or you may choose to select an image that
has already been uploaded to the CMS.
*** If you choose to put an image here it must be 100px by 100px so it is not distorted. It is meant to be a
thumbnail. We can remove this image from showing if you desire.
6. Description - This is where the actual body of the content will be entered. Most of the time, you would enter
this information before the summary, and just copy and paste the first sentence or two from here and paste
that into the summary box. You MUST enter some content here. If nothing else copy the summary to this
area. DO NOT leave it blank.
7. Link - Gives you the ability to link this story to an external web page or another page on this site. Default is,
none.
8. Publish Date – This allows you to control the publish date. If you do not want the article to display
immediately, you may enter a future date here.
9. Expiry Date – When do you want the article to come off the news and go into the archives? This is
automatically 120 days.
10. The final options allow you to feature an article; stick to top and to include in RSS. By default all articles
should be included in RSS.
Then click Publish. You’re done! If you do not wish to publish the article now, but want to save it, you have that option
as well, by saving as a draft.
If the Advanced Articles Satellite module is set up on your website, articles that you just entered will appear on the top
of that module (check the home page). You can always change the settings of the Advanced Articles module to only
display X number of articles or just featured articles.
RLComputing | Help Desk: support.rlcomputing.com | Email: [email protected]
25
Chapter 8: Scheduling Events with the DNN Events Module
The Events Module is a great way to inform your users of what events you may have going on. The Events Module can
display events in a calendar view or in a list view on the home page. It can be formatted any way that is needed. The
home page view is just a smaller version of the main calendar on the events page where events are entered. NOTHING
should be entered on the home page calendar.
Home page views
Month View
List View
RLComputing | Help Desk: support.rlcomputing.com | Email: [email protected]
26
Main Events Page
By default, the events will be presented in the monthly calendar format. If you wish to create a new event, please follow
the instructions below.
1. Navigate to the events page – do not go to where the events sub calendar may be located. Typically there
will be a news and events page created on your site – go to this and the events or calendar page.
2. Click on the blue plus button located in the upper right hand corner of the screen (above the calendar)
3. On the next screen you will start off with entering an event title, check the next button if this is an all day
event.
4. Enter a start date/time and end date/time, check if you want the end date to be displayed or not
5. Choose a level of importance.
6. Category and location are only used if you specifically enter locations and categories on another screen
(please see this document, “Entering Event Categories and Locations”)
7. The next dialog box is what you should now be used to, similar to the Advanced Articles and HTML Editors.
8. The final options enable you to display an image with the event and if it’s a recurring event. Once you are
done, click Update. Your event is now entered into the calendar.
RLComputing | Help Desk: support.rlcomputing.com | Email: [email protected]
27
The Events Calendar allows you to display events on another page, such as the homepage. By default, most, web sites
will have this option enabled on the home page. Similar to the Advanced Articles Satellite, this will save you from
entering data in more than one place. To have this feature set up, please contact RLComputing.
You can also show just categories of events on other pages. So your site can have one main calendar where everything is
entered. Then on other sections of your web site you can display only certain categories of events.
Editing an Event
1. Go to the calendar and click on the event you wish to edit.
2. If you wish to change something on the event, click edit; if you wish to delete an event, click delete. These will
be towards the bottom of the event.
Entering Event Categories and Locations
By taking the time to enter commonly used categories or locations, you will generate a list of items to select from when
entering a new event in the calendar. For instance, if you’re a church, and continually hold events at the church, it may
be a good idea to enter the church/address.
To add/edit categories, next to the event calendar, hover over the small blue arrow and scroll down about half way and
you will see, edit categories and edit locations. When entering this date, you specify a title, coloring and just click, add.
The procedure is similar for adding locations and categories. These items, if chosen, when entering a new event, will
display on the calendar.
RLComputing | Help Desk: support.rlcomputing.com | Email: [email protected]
28
Chapter 9: Greater control with the Administrative Menu/Tab
The Admin Tab gives you as an administrator, more control to critical components of the CMS, such as the recycle bin
and the file manager. This chapter goes over some of the important and commonly used modules within the admin
menu.
Documentation
This module is simply a link to the RLComputing web site page that contains examples and manuals for specific modules
available with DotNetnuke (DNN).
Page Management
The Pages module is where you would go to rearrange page order and manage pages that redirect to files or external
web sites. This will affect the main menu and the side menus. If you rearrange pages, you will see the order become
changed on the main navigation menu instantly.
Pages are organized in a hierarchical tree structure or referred to as a parent/child structure. To view the child pages
click on the + sign before the page name. You will then see its children. If you are unsure, you can verify what children
belong to what parents by hovering over that particular parent in the main navigation bar and seeing what drops down
under it. With this knowledge, you may choose to move individual pages or groups of pages to another level.
RLComputing | Help Desk: support.rlcomputing.com | Email: [email protected]
29
Moving a Page
If you wish to move a page, click and hold. Then drag the page to where you would like it to be. Release the mouse once
you have moved the page to the correct location.
Rename a Page
To rename a page just double click on the page name. You can then type in the new name.
Editing a Page
Another reason to use this area is if you have redirected a page to an external web site and need to change that link or
undo the redirection, this is the only area that you can access the page. To make changes to that page right click on the
page name. Then choose Page Settings.
RLComputing | Help Desk: support.rlcomputing.com | Email: [email protected]
30
File Manager
The file manager is an excellent “one stop” area to manage files on the server. The structure is organized similar to
windows explorer, with folders on the left, and files on the right.
Adding a Folder
To add a new folder, navigate to where you want to add a new folder (stay within the images or documents folder). You
can expand current folders by clicking on the + sign next to the folder name. Once you are in the correct spot type the
name of the folder you want to create in the empty textbox at the top of the file manager. Do NOT put spaces or special
characters in the folder names. Click Add Folder.
Uploading many pictures
If you know you will be uploading many photos to the site, it is recommended you zip up all the images on your
computer so you can upload them all at once. It is also recommended if you’re adding images, to make a folder within
images folder just for these photos. To zip up the pictures on a PC, highlight them all then right click. Choose send to ->
compressed Zip file.
RLComputing | Help Desk: support.rlcomputing.com | Email: [email protected]
31
Once you have the zip file go to the file manager. Choose Upload. Click the Browse button. Locate your zip file and click
open. Then choose the folder you want all the pictures to be in from the Folder Picklist. Check “Decompress ZIP files”.
Finally click Upload File. Your pictures will automatically unzip into the folder you selected.
Move Files
If you would like to move files from one folder to another, check the files you want to move in the far right checkbox.
Then click Move in the tool bar of the File Manager. Click OK when you receive a popup asking you to confirm the move.
Next you will need to select the new location you want the files moved too. Select the folder on the left side of the File
Manager.
If you moved files to another folder any link within the web site will automatically be updated.
RLComputing | Help Desk: support.rlcomputing.com | Email: [email protected]
32
Recycle Bin
The recycle bin allows you to recover any deleted modules or pages from your web site.
On the Pages tab you will see any pages that have been deleted. If you want to restore them, click on the page name.
Then click Restore Selected Page. The same goes with the Modules.
NEVER click on the EMPTY RECYCLE BIN. There is no turning back from this.
RLComputing | Help Desk: support.rlcomputing.com | Email: [email protected]
33
Event Viewer
If you are having an issue on your web site or you receive an error on a page you should look here first. This area will
show you exactly where the problem is. This is your first area to troubleshoot a problem. Each event can be clicked on
to view its details.
RLComputing | Help Desk: support.rlcomputing.com | Email: [email protected]
34
User Accounts
Not everyone will have access to this area. There are usually 1-2 people for each site with access to this area. This is
where you will manage the user account for people who have access to edit your web site. This list of users should be
maintained regularly. As people leave your organization you should remove their account from the web site.
Security can give users access to edit all pages on the web site, just a section or just a page.
Add a User
Click on Add New User. Type in the requested fields. For a username we recommend the first initial of the first name
then the full last name. Every account must have an email address. The user will be notified automatically via email that
they have been granted access to the web site along with their username/password. Once the account is created you
need to add the user to the appropriate security group. To add them to the appropriate security group, click on the
paper icon next to their username. Click on Manage Roles for this User.
Edit a User
Click on the paper icon next to the username. You can change the user’s password, unlock their account or update the
user’s information.
Delete a User
Click on the trash can next to the username. This will disable their account. If you want to permanently remove all
deleted accounts, click on Remove Deleted Users.
RLComputing | Help Desk: support.rlcomputing.com | Email: [email protected]
35
Security Roles
This area allows you to manage groups of users and grant them access to areas of the web site. The security groups
should be granted permissions to edit pages/sections of your web site NOT users. This makes it much easier to manage
your web site.
Every site will have the groups below along with Site Editors. Site Editors is the group that had administrative access to
the web site and full access to manage all pages on the web site. This group should be used for admins only. Other
groups should be created for general users. The administrators group should never be used for content editors.
Add a New Security Role
Click on Add New Role. Type in the name of the new role. Make it something that will be easily recognizable what it
should be managing.
Add Users to a Security Role
Click the icon that looks like people next to the role name. This will show which users are part of this group. You can add
new users to the group here too.
RLComputing | Help Desk: support.rlcomputing.com | Email: [email protected]
36
Google Analytics
Once you have signed up for a Google Analytics account you can enter the code here. All you need to do is enter the
code. This will automatically put the Google Analytics code on every page of the web site.
Site Log
The Site Log will display limited site analytics for your web site. You should rely on Google Analytics data since this keeps
a history of all data. The Site Log will delete data after a certain number of days.
RLComputing | Help Desk: support.rlcomputing.com | Email: [email protected]
37
Site Settings
This area should only be accessed by high level administrators. This is where some of the main settings of the site are
managed.
The keywords and description fields should be filled in. These will be used on every page unless on the page itself they
are filled in.
This area will be covered in the training workshop for site administrators.
RLComputing | Help Desk: support.rlcomputing.com | Email: [email protected]
38