1
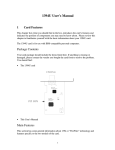
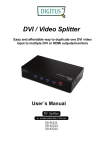
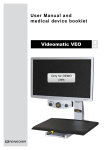
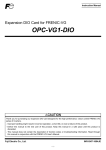
48016
Quick Operation Manual
©2014 i3 International Inc.
The contents of this user manual are protected under copyrights and computer program laws.
1
YOUR VEO DVR
Your Veo DVR is a piece of electronic surveillance equipment. Up to 16 analog cameras are connected to the DVR and the
recorded video is stored on the internal hard drive.
This user guide will show you how to use your Veo DVR to view LIVE video to monitor your facility or to track an event
or an individual. You will also learn how to SEARCH previously recorded video based on the Date, Time and Camera.
Finally, the guide will demonstrate the steps for SAVING a portion of the recorded video onto a Flash USB drive or onto
the CD/DVD for evidence.
VEO FRONT PANEL
To control your Veo DVR, to view live video or to search recorded video, you may use the buttons on the front of your
unit or use a USB mouse as you would with a regular computer.
The diagram below will briefly explain how the front panel buttons can be used to operate your Veo. The rest of the
guide will show you how to complete each task while using a USB mouse.
Channel Selection Buttons.
Enter the channel number to quickly display
individual channels in the full screen mode.
CD/DVD
eject button.
USB Ports. Plug in
your USB mouse
and your USB Flash
drive here.
Shuttle Wheel (outside wheel). Adjust playback speed
by turning clockwise to speed up playback or counter
clockwise to slow playback down.
Jog (inside wheel). When playback is paused, use to
move footage forwards or backwards, frame by frame
Cursor keys. Used to navigate the menus.
The Enter key
is located in the centre.
Press Enter to select an item or to apply a
setting.
Additional keys:
DISPLAY: Switch between multi-screen display options in Live and Search modes.
SEARCH: Go to the Search screen to search recorded video.
MENU: Display Veo setup menus.
2
LOGIN
Important: Your Veo DVR is pre-programmed to log out after 10 minutes of inactivity.
To view live or recorded video, you must first login.
Step 1.
Using the mouse cursor, click on the UP / DOWN arrows to select the user type from ADMIN, MANAGER or USER.
Step 2.
With the mouse cursor, click inside the PASSWORD field. Then, use the on-screen keyboard to enter your password.
When done, click ENTER.
3
VIEWING LIVE VIDEO
After logging in, you will be able to view live video from all connected cameras in a multi-screen view.
Where no camera is present, or where camera is out of order, blue screen will be displayed with text “NO SIGNAL”.
Call your installer for service if a previously working camera can no longer be seen in the Live view screen.
In the example below, no video signal has been detected for Channels 15 and 16.
To bring a specific camera screen into full screen mode, position your mouse cursor over the camera video stream on screen and double-click
the left mouse button. Repeat to return to the multi-screen mode.
Quick menu panel is displayed in the bottom of the screen. Note the Search and Archive buttons, which will be discussed in the following
sections.
Use your mouse cursor
to double-click on
the camera view you
would like to see in
the Full Screen mode.
Double-click on the screen to move between
multi-screen and Full Screen modes.
4
SEARCHING RECORDED VIDEO / PLAYBACK
To search recorded video, click the SEARCH icon in the Quick Menu panel.
The SEARCH window will be displayed.
Search Window
Your DVR uses a calendar and timeline search method for quick access to recorded footage. Playing back your video is as easy as 1-2-3.
Step 1.
Use your mouse cursor to click
on the calendar day you would
like to search.
Note: Only days highlighted
in yellow have recorded video
footage. As different days are
selected, the timeline display
also changes to show recorded
footage on that day.
Step 2.
Use your mouse cursor to click
on the UP/DOWN arrows to
set the Playback start time.
The yellow line in the grid to
the right will be positioned
over the set time.
Step 3.
Click on these buttons to go to the Previous/Next Calendar Year.
Click on these buttons to go to the Previous/Next Calendar Month.
The recorded footage
for each camera is
represented by coloured
bars, where each type of
recording is represented
with a particular colour.
Panic: White;
Motion: Green;
Timer: Blue;
Alarm: Pink.
Step 1
Step 2
See p.7 for instructions
on using PANO feature.
Step 3
Click the PLAY button to begin playback.
5
EXIT SEARCH
SCREEN.
RETURN TO
LIVE MODE.
Playback Mode
Playback Mode window will be displayed. Use the Playback Control panel at the bottom of the screen to control video playback.
Use your mouse cursor
to double-click on
the camera view you
would like to see in
the Full Screen mode.
Double-click on the screen to move between
multi-screen and Full Screen modes.
Playback Control Panel
REW. Fast Rewind.
Click to increase the
reverse playback speed.
Select one of the offered screen
divisions to display fewer or more
video cameras on the screen.
Reverse
Playback
Play Video
Pause
FF. Fast Forward.
Click to increase playback speed.
EXIT PLAYBACK MODE.
RETURN TO THE SEARCH
SCREEN
Playback date and time
6
PANO (PANORAMIC) PLAYBACK
Pano Playback feature segments recorded video footage from the selected calendar day into eight 3-hour clips and plays them back
simultaneously in a split screen mode. Pano feature can only be used on one camera at-a-time. This feature allows fast, at-a-glance review of
video footage from a single camera. Video recording plays back chronologically, without skipping the gaps in video recording. Gray screen is
displayed during a gap in the video footage with an on-screen message “END VIDEO”. The last screen division contains Pano control panel.
To access Pano feature, click the PANO button in the
Search screen.
Pano Playback screen will be displayed.
The screens are labelled 00H (12:00AM),
03H (3:00AM), 06H (6:00AM), ..., 18H (6:00PM),
21H (9:00PM) to specify the “base time” for the video
segment being played in that particular screen.
The first screen will play video recorded from 12:00AM
until 3:00AM, the second screen will play video recorded
from 3:00AM until 6:00AM, and so on.
In this example, Pano feature is playing back the video
footage from January 28th, 2011 for CH1 (Camera 1).
The first (00H/midnight) screen shows the message
Pano Control Panel
“END VIDEO”, which means no video was recorded at 12:00AM on this camera.
Pano Control Panel
Playback speed. To increase/
decrease playback speed,
use the Shuttle wheel on the
DVR front panel or use your
mouse cursor to click REW
or FF buttons in the Pano
Control Panel.
To switch to a different
video camera, use the cursor
to click the UP/DOWN arrows
until you see the desired
camera on screen.
REW. Fast Rewind.
Click to increase the
reverse playback
speed.
Reverse
Playback
Play FF. Fast
Video Forward.
Click to
Pause
increase
playback
speed.
EXIT PANO MODE.
RETURN TO THE
SEARCH SCREEN
Selected calendar day. To choose a different video recording day, click
the Exit button and click on a different Calendar day in the Search screen.
7
BASE TIME corresponds to the screen label.
E.g. The base time for the first screen is 00H = 12:00AM/midnight.
The running timer indicates how long the video has been playing for.
Add the running time to the BASE TIME to calculate the video time stamp.
ARCHIVING VIDEO FOOTAGE TO USB FLASH DRIVE OR CD/DVD
To archive / save a video clip, follow the steps below.
Step 1.
Plug in your USB flash drive into the USB port on the front panel of the DVR, if using, OR
Press the CD/DVD eject button on the front panel of the DVR and insert a blank CD or DVD disk into the drive. Press the eject button again to
close the drive.
Step 2.
In the Live Mode, use your mouse cursor to click
the ARCH icon in the Quick Menu panel.
ARCHIVING window will be displayed.
Step 3.
In the ARCHIVING window, use the mouse cursor to set
the FROM time and date. This determines the start date
and time of the saved video clip.
Step 4.
Use the mouse cursor to set the TO time and date. This
determines the end date and time of the saved video clip.
Step 5.
Use the mouse cursor to click on the UP / DOWN arrows inside the DEVICE field.
Set the destination device to either DVDRAM to burn a CD/DVD or select the name
of your USB Flash drive to save the video clip to your USB drive.
Step 2
Step 6.
Step 7
Step 6
Step 3
Step 5
Step 4
Position your mouse cursor over the TAG NAME field,
then use the on-screen keyboard to enter the tag
name.
Step 7.
Select the cameras for backup. To select all video
cameras for backup, use your mouse cursor to check
the ALL checkbox. To save one or more cameras, check
all corresponding camera checkboxes. In this example,
only CH 5 has been selected for backup.
EXIT ARCHIVING SCREEN.
RETURN TO LIVE MODE.
See the next page for further instructions
8
Step 8.
Click the QUERY icon to calculate the total size of the video
backup.
Step 8
Step 9.
Make sure there is sufficient available empty space on
your selected DEVICE to accommodate the file of that size.
In this example, the total size of the backup is 125.6 MB.
Step 10.
Click the BURN icon.
Step 11.
In the pop-up BURNING window, click the START icon.
Wait until the writing process is completed.
Step 9
Step 12.
Step 10
EXIT ARCHIVING SCREEN.
RETURN TO LIVE MODE.
Wait until “Burning Success.” message is displayed. Click the OK icon to close it.
Step 13.
Click the CLOSE icon in the BURNING window to close it.
Step 12
Step 10
Step 12
Step 14.
Remove your backup media: USB or CD/DVD.
The backup AVI clips will be saved to your selected media. AVI Player is included with the installation package. Make sure to install the codec
included with the backup to be able to play back the AVI video on your PC.
9