1
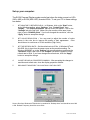
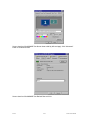
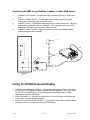
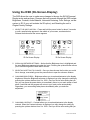
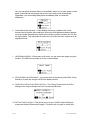
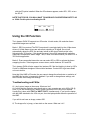
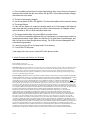
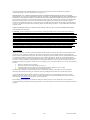
i-glassesSVGA User Manual
The highest performance Personal Display
System™
Congratulations on your purchase of an i-glasses SVGA Head Mounted Display.
The I-glasses SVGA functions like a high resolution Plug and Play portable
monitor. The optional stereo version supports frame sequential stereo supplied by
nVidia game drivers or other applications.
For best results, please read these instructions before installing your i-glasses
SVGA.
Specifications:
Resolution: 1.44 million pixels (800 x 600 RGB color sequential system)
Input: VGA (640x480) or SVGA (800x600) at 56-100Hz
Display Refresh rate: Double the input refresh rate up to 60Hz. Above 60Hz the
display refresh rate equals the input refresh rate.
Field of View: 26.5 degrees diagonal
Brightness: 13 fL
Contrast: 25:1
Eye Relief: 25 mm
IPD Adjustment: None Required
Exit Pupil: 3mm V x 10mm H
Color Depth: 18 bit
Focus Distance: 13 feet at the center
100% Overlap
Convergence: 7.5 feet
Operating Temperature: 0 to 90 degrees F
Power Consumption: 4W
Input Voltage: 7-18VDC
Components included with i-glasses SVGA Unit
1 each
1 each
1 each
1 each
2/5/02
i-glasses SVGA Personal Display Unit
Power Cube, Output: 9VDC at 800 mA
Combination of VGA/Audio/Power cable
User’s Manual
1 of 1
SVGA User Manual
Set up your computer:
The SVGA Personal Display system works best when the video source is a VGA
(640 x 480) or SVGA (800 x 600) format at 60Hz. To set your PC to these settings,
see below:
1.
SET MONITOR TO 800X600 PIXELS – In Windows, click on the “Start” button,
on the Windows taskbar, select “Settings,” then “Control Panel,” then
“Display.” The “Display Properties” pop-up screen will appear. Click on the
“Settings” tab at the top right. Make sure your monitor screen area (lower
right) is set to “800X600 pixels.” If you have changed the resolution, click the
“Apply” button to accept the change.
2.
SET COLOR RESOLUTION – You may want to adjust the number of colors
shown in the color box to improve the quality of their appearance.
should be set to a minimum of 16-bit resolution (High Color).
3.
Color
SET THE REFRESH RATE – Set the refresh rate to 60 Hz. In Windows NT and
Win2000, this is done from the same screen as the resolution setting. For
Windows 95/98/ME, go to the “Settings” tab as outlined above and press the
“Advanced” button, then click on the “Adapter” tab when it appears. Set the
refresh rate to 60Hz. If you have changed the refresh rate, click the “Apply”
button to accept the change.
4.
CLOSE THE DISPLAY PROPERTIES WINDOW – After accepting the changes to
resolution and refresh rate, close the display properties window.
5.
DISCONNECT MONITOR IF YOU HAVE ONLY ONE VGA PORT.
Screen Shot from Windows NT-Resolution is contained in “Desktop Area” and should be set to 800
x 600. Refresh Frequency should be set to 60Hz.
2/5/02
2 of 2
SVGA User Manual
Screen shot from Win 95/98/ME. Set Screen Area to 800 by 600 and apply. Click “Advanced”
button to set Refresh Rate.
Screen shot from Win 98/98/ME. Set Refresh Rate to 60 Hz.
2/5/02
3 of 3
SVGA User Manual
Connect your HMD to any Desktop, Laptop, or other VGA source
1.
CONNECT VGA SOURCE – Connect the video source plug into your VGA output
2.
CONNECT POWER SUPPLY – Connect the power supply plug into the power
3.
CONNECT AUDIO – Connect the audio plug into your audio source jack. This may
port.
source jack. Plug power cube into an AC socket.
4.
be the audio output jack from your computer. This is required only if you wish to
hear sound. Otherwise you may leave it disconnected.
CONNECT CABLE TO HMD – Firmly seat cable connector into headset header,
located above the left eye display.
TO WALL SOCKET
4
2
1
VGA OUT
SOUND CARD OUTPUT
3
COMPUTER
(REAR VIEW)
Using the SVGA Personal Display
1. TURN ON YOUR PERSONAL DISPLAY – Press the power button. This will illuminate
the LED next to the button and within a few seconds the display will show your video.
Your SVGA Personal Display unit has been preset at the factory and no further
adjustments should be necessary.
2. ADJUSTING AUDIO – If you have an audio source, you can increase or decrease the
volume level using the Up/Down buttons.
3. ADJUSTING VIDEO OR AUDIO BALANCE – If you need to make video or audio balance
changes to your unit, please see “Using the OSD” below.
2/5/02
4 of 4
SVGA User Manual
Using the OSD (On-Screen-Display)
The OSD allows the user to make some changes to the way the SVGA Personal
Display works and performs. Changes that can be made through the OSD include:
Brightness, Contrast, Audio Balance, Horizontal Centering, Color Settings, set the
system to 3D (If your unit includes the 3D option), and Resetting the unit to
Original Factory Settings.
1. SELECT THE OSD FUNCTION – Press and hold the power button for about 3 seconds
or until a small window appears in the middle of your screen, as shown below.
Release the button after the screen appears.
2D On Screen Display
3D On Screen Display
2. SCROLLING BETWEEN SETTINGS – Notice that the Brightness Icon is highlighted and
the word Brightness appears just under the icons. Pressing the up/down button allows
you to scroll through all the Main Menu choices.
3. SELECTING A SETTING TO CHANGE – Once you have chosen the function you would
like to change, momentarily press the power button to open the submenu window.
4. CHANGING BRIGHTNESS – Brightness allows you to make adjustments to the display
brightness. When the Brightness submenu is displayed you may change the setting by
pressing the up/down buttons from 0 to 100%. Once you find a value setting that you
like, you may press the power button to immediately return to your main screen or wait
about 2 seconds and the program will return to your main screen automatically.
Regardless, your new setting takes places immediately after you make the
adjustment.
5. CHANGING CONTRAST – Contrast allows you to make adjustments to the display
contrast. When the Contrast submenu is displayed you may change the setting by
pressing the up/down buttons from 0 to 100%. Once you find a value setting that you
2/5/02
5 of 5
SVGA User Manual
like, you may press the power button to immediately return to your main screen or wait
about 2 seconds and the program will return to your main screen automatically.
Regardless, your new setting takes places immediately after you make the
adjustment.
6. CHANGING AUDIO BALANCE – Audio Balance allows you to balance the sound
between the left and the right earphones. When the Audio Balance submenu appears
you may change the balance by pressing the left/right (up/down) buttons until you find
the right balance. This adjustment is easier when you have the audio volume set to an
appropriate level.
7. CENTERING SCREEN – If the screen is off center, you can center the image using this
function. The HMD will remember up to five custom settings.
8. SETTING RGB COLOR BALANCE – You can set each of the primary colors-Red, Green,
and Blue- for each eye using the RGB color balance control.
9. SELECTING THE FACTORY RESET OPTION – The Factory Reset returns all off the
settings to the original settings when the unit was manufactured.
10. SETTING THE 3D OPTION – This allows you to set your SVGA Personal Display to
accept and display 3Dimensional images. This option will only work on those units
2/5/02
6 of 6
SVGA User Manual
with the 3D option installed. When the 3D submenu appears, select 3D1, 3D2, or turn
the 3D off.
NOTE THAT FOR 3D, YOU WILL WANT TO INCREASE YOUR REFRESH RATE TO 85
or 100Hz. Do this prior to activating the 3D.
Using the 3D Function
The i-glasses SVGA 3D supports two 3D modes. In both modes, full resolution frame
sequential images are required.
Mode 1: DDC line protocol-The DDC line protocol is used principally by the nVidia stereo
drivers. If nVidia stereo drivers are active and outputting a 3D signal, the unit will
automatically detect the DDC line and stay locked to this signal. Note that this is the
highest priority 3D function. If this signal is present, the unit will automatically make the
corrections to maintain a stereo image. Thus, it does not matter whether you select 3D1 or
3D2 for this application.
Mode 2: Frame sequential stereo-the user can select 3D1 or 3D2 to activate the frame
swapping function. If the images are reverse stereo, switch between 3D1 and 3D2.
The i-glasses SVGA will also support line interlace 3D if the line blanking is done by IOD’s
Cruiser or MMGamer dongles or other similar hardware. Contact IOD to get more detail
on how to do this.
Note that if the HMD is 3D mode, the user cannot change the refresh rate or resolution of
the HMD-this function is temporarily disabled. If you wish to change these settings, exit
the 3D mode, then change the settings.
Troubleshooting and FAQs:
Q: I don’t get an image on the screen. What can I do?
A: Confirm that the resolution and refresh rate on your computer are set to 800 x 600 @
60Hz. If you are connecting to a laptop, make sure that the VGA out port is enabled.
Usually this is done with “FN-F5 or SHIFT-FN-F5” simultaneously. If you boot the laptop
with the HMD attached to the VGA out port, then the laptop should detect the presence of
the HMD.
If you still do not have an image, contact IOD.
Q: The image rolls, is jumpy, or has static on the screen. What can I do?
2/5/02
7 of 7
SVGA User Manual
A: This is probably caused by an incorrect input setting. Also, ensure that you computer’s
resolution and refresh rate are set to 800 x 600 @ 60Hz. If the problem persists, change
the refresh rate up or down.
Q: The text in the image is illegible.
A: Set the resolution to 800 x 600 @60Hz. Text should be legible at this resolution setting.
Q: The image flickers.
A: If the unit is a stereo unit, make sure that the stereo is off. If the image is still flickering,
make sure that the incoming refresh rate is 60Hz. At this frequency, the display refresh
rate is doubled to 120 Hz, which should be flicker free.
Q: The image darkens after using the HMD for a period of time.
A: The LCDs are overheating because the unit is operating in an environment outside its
operating temperature range. Make sure that the unit is used within it specifications, and
that it is kept out of direct sunlight when running. The LCDs will not be damaged if they
overheat during operation.
Q: I am trying to play 3D on my laptop and it is not working.
A: Turn off the LCD flat panel.
If the image still is not correct, contact IOD at the above number.
Limited Warranty and Product Use Warning
Personal Display Systems, LLC
Limited Warranty and Product Use Warning
Limited Warranty. This Limited Warranty is provided only to you as the original consumer purchaser of the enclosed Product, and no
other person. Personal Display Systems, LLC warrants to you that for a period of one hundred and eighty (180) days with respect to
labor charges, and for a period of one hundred and eighty (180) days with respect to parts, the Product will be free from defects in
materials and workmanship and will perform substantially in accordance with documentation supplied by Personal Display Systems,
LLC in the original packaging for the Product.
Exclusive Remedy. PERSONAL DISPLAY SYSTEMS’ ENTIRE LIABILITY AND YOUR EXCLUSIVE REMEDY UNDER THIS
LIMITED WARRANTY SHALL BE, AT PERSONAL DISPLAY SYSTEMS’ OPTION, EITHER (A) REPAIR OR REPLACEMENT
OF THE PRODUCT , OR (B) A REFUND OF THE PURCHASE PRICE PAID FOR THE PRODUCT. THIS REMEDY IS
AVAILABLE TO YOU ONLY UPON RETURN BY YOU TO PERSONAL DISPLAY SYSTEMS OF THE PRODUCT AND YOUR
RECEIPT SHOWING THE DATE OF PURCHASE OF THE PRODUCT. If a failure to conform to this limited warranty is reported to
Personal Display Systems during the first one hundred and eighty (180) days after the date of purchase, the Personal Display Systems
will either (a) replace the Product or the labor and parts necessary for the repair of the Product, or (b) refund the purchase price for the
Product. IN NO EVENT DOES THE WARRANTY COVER DEFECTS OR MALFUNCTIONS DUE DIRECTLY OR INDIRECTLY
TO ACCIDENT, MISUSE OR NEGLECT OF THE PRODUCT, WITH THE PRODUCT OR AN ACT OF GOD. All Other Warranties.
EXCEPT AS SPECIFICALLY PROVIDED ABOVE, THERE ARE NO EXPRESS WARRANTIES, CLAIMS OR
REPRESENTATIONS MADE BY PERSONAL DISPLAY SYSTEMS REGARDING THE PRODUCT. ANY IMPLIED
WARRANTIES, INCLUDING IMPLIED WARRANTIES AGAINST CLAIMS THAT THE PRODUCT INFRINGES ON
PROPERTY RIGHTS OF THIRD PARTIES, IMPLIED WARRANTIES OF FITNESS FOR A PARTICULAR PURPOSE, AND
IMPLIED WARRANTIES OF MERCHANTABILITY, SHALL TERMINATE 180 DAYS AFTER THE DATE OF PURCHASE.
Some states do not allow limitations on how long an implied warranty lasts, so above limitation may not apply to you. TO THE
MAXIMUM EXTENT ALLOWED BY APPLICABLE LAW, IN NO EVENT WILL PEFRSONAL DISPLAY SYSTEMS, NOR
ANYONE ELSE WHO HAS BEEN INVOLVED IN THE CREATION, OR DELIVERY OF THE PRODUCT BE LIABLE TO YOU
OR ANY OTHER PERSON FOR ANY DIRECT, INDIRECT, OR CONSEQUENTIAL OR INCIDENTAL DAMAGES, OR ANY
PUNITIVE DAMAGES (FOR EXAMPLE, DAMAGES FOR LOSS OF PROFITS OR BUSINESS INTERRUPTION) ARISING OUT
OF THE USE OF OR INABLILITY TO USE THE PRODUCT, A DEFECT IN THE PRODUCT, OR THE FAILURE OF THE
PRODUCT TO PERFORM, EVEN IF PERSONAL DISPLAY SYSTEMS HAS BEEN ADVISED OF THE POSSIBILITY OF SUCH
CLAIMS. IN NO EVENT WILL PERSONAL DISPLAY SYSTEMS BE LIABLE TO YOU OR ANY OTHER PERSON,
REGARDLESS OF THE BASIS OF THE CLAIM OR ACTION, FOR ANY AMOUNT EXCEEDING PURCHASE PRICE
2/5/02
8 of 8
SVGA User Manual
ACTUALLY PAID BY YOU FOR THE PRODUCT. Some states do not allow the exclusion or limitation of incidental or
consequential damages, so the above limitations may not apply to you.
Warranty Service. ALL WARRANTY REPAIR WORK SHALL BE PERFORMED BY PERSONAL DISPLAY SYSTEMS’
TECHNICIANS AT A FACILITY OF PERSONAL DISPLAY SYSTEMS. YOU ARE RESPONSIBLE TO PAY FOR SHIPMENT OF
THE PRODUCT TO PERSONAL DISPLAY SYSTEMS’ FACILITY FOR WARRANTY REPAIRS. Personal Display Systems will
pay for shipment of the Product to you from Personal Display Systems’ facility after warranty repairs are made. If you suspect that the
Product is not working properly or if you have questions about the performance pf your Products, call Personal Display Systems’
customer service department at (800) 778-1759 from 9:00 A.M to 5:00 P.M Pacific Time Monday through Friday, excluding holidays,
or write our customer service department at the following address: Personal Display Systems, Inc., 1338 N. Market Blvd., Sacramento,
California, 95834.
LIMITED WARRANTY GIVES YOU SPECIFIC LEGAL RIGHTS, AND YOU MAY ALSO HAVE OTHER RIGHTS, WHICH
VARY FROM STATE TO STATE.
Use Warning. All of Personal Displays Systems’ Products have been designed with precision optics to minimize the potential for
motion sickness. Certain individuals may experience nausea or disorientation while viewing certain games or videos. If you feel a sense
of dizziness or light-headedness discontinue use. Do not use any Products near balconies or stairs, or on uneven ground. In addition, do
not use the unit while moving, walking, standing, driving, swimming, operating machinery, or doing anything else that requires your full
attention. Warning: Consult your physician before using any Personal Display Systems Products if you, or anyone in your family, has an
epileptic condition. A very small portion of the population may experience epileptic seizures when viewing certain kinds of flashing
lights or patterns that are commonly present in our daily environment. These persons may experience seizures while watching certain
kinds of television pictures or playing certain video games, including viewing through Personal Display Systems Products. Persons who
have not had any previous seizures may nonetheless have an undetected epileptic condition. Discontinue use immediately if you
experience any of the following symptoms while using any Personal Display Systems Products: eye or muscle twitching, involuntary
movements, disorientation, loss of awareness of your surroundings, mental confusion, dizziness, sickness, and/or convulsions.
FCC STATEMENT
Changes or modifications to any FCC tested Personal Display Systems Product not expressly approved by Personal Display Systems
void the users’ right to operate the Product, unless it has been tested and found to comply with the limits for class B digital device,
pursuant to Part 15, Subpart B of the FCC Rules. These limits are designed to provide reasonable protection against harmful interference
in a residential installation. This equipment generates, uses, and can radiate radio frequency energy and, if not installed and used in
accordance with the instructions, may cause harmful interference to radio communications. There is no guarantee that interference will
not occur in a particular installation. If this equipment does cause harmful interference to radio or television reception, which can be
determined by turning the equipment on and off, the user is encouraged to try to correct the interference by one or more of the following
measures:
•
Reorient or relocate the receiving antenna
•
Increase the separation between the equipment and receiver
•
Connect the equipment into an outlet on a circuit different from that to which the receiver is needed
•
Consult the dealer or an experienced radio/TV/PC technician for help
According to FCC regulations, use of the Product is subject to the following conditions: The Products may not cause harmful
interference and the Product must accept any interference received, including interference that may cause undesired operation.
i-glasses and Personal Display System are trademarks of i-O Display Systems, LLC or Personal Display Systems, Inc. All other
trademarks are property of their respective owners. All rights reserved. Numerous US and International patents issued and pending.
Please check the www.i-glasses.com web page for a list of issued patents.
Personal Display Systems shall not be held liable for technical or editorial omissions or errors made herein; nor for incidental or
consequential damages resulting from furnishing, performance, or use of this material. This document contains information protected by
copyright.
2/5/02
9 of 9
SVGA User Manual