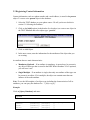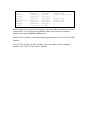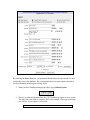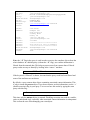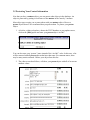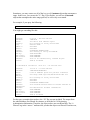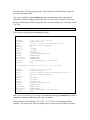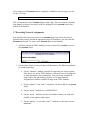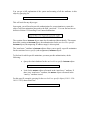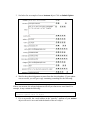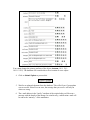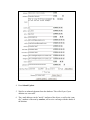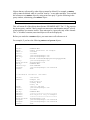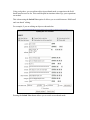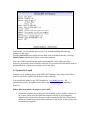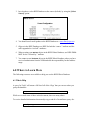
1
RIPE Whois Database User Manual:
Getting Started
Andrei Robachevsky
Shane Kerr
Vesna Manojlovic
Vasco Asturiano
Document ID: ripe-375
Date: May 2006
Obsolete: ripe-253
See also: ripe-358
Intended Audience
This document is intended for users who have no previous experience with the RIPE
Whois Database. It should give the reader a basic understanding of the following
concepts:
• What the RIPE Whois Database is
• How to get information from the RIPE Whois Database
• How to maintain information in the RIPE Whois Database
It is not intended to be a complete reference. Full information on the RIPE Whois
Database may be found in the following documents:
•
•
RIPE Whois Database Query Reference Manual [1]
RIPE Database Reference Manual [2]
Abstract
This is a hands-on tutorial that walks the reader through the basic concepts and
techniques that are needed to use the RIPE Whois Database using examples and
exercises.
Conventions Used in This Document
We use <label> for a placeholder or to indicate syntax.
We use [option] to indicate an optional text or command argument.
We use a BOLD font to indicate an object type.
We use “attribute:” to indicate an attribute of an object.
"RIPE Whois Database" usually means the interface software rather than the information
in the database. Where there may be any doubt, this manual will make clear what is being
discussed.
Table of Contents
RIPE Whois Database User Manual: Getting Started......................................................... 1
Intended Audience .......................................................................................................... 1
Abstract ........................................................................................................................... 1
Conventions Used in This Document ............................................................................. 2
Table of Contents............................................................................................................ 3
1.0 The RIPE Whois Database........................................................................................ 4
1.1 Database Objects................................................................................................... 4
1.2 TEST Database ..................................................................................................... 5
2.0 How to Get Information from the TEST Database................................................... 5
2.1 Web Queries.......................................................................................................... 5
2.2 Making Simple Queries ........................................................................................ 5
3.0 How to Maintain Information in the Whois Database .............................................. 6
3.1 Selecting the Database .......................................................................................... 6
3.2 Creating Objects.................................................................................................... 7
3.3 Registering Contact Information........................................................................... 8
3.4 Registering Authentication Information ............................................................. 11
3.5 Protecting Your Contact Information ................................................................. 15
3.6 Locating Network Assignments.......................................................................... 18
3.7 Recording Network Assignments ....................................................................... 21
3.8 Modifying the INETNUM Object ...................................................................... 25
3.9 Deleting Objects...................................................................................................... 27
4.0 Extra Features ......................................................................................................... 30
4.1 Keeping a Password in Webupdates Memory ................................................... 30
4.2 Edit an Object in Text-Based View Using Webupdates..................................... 30
4.3 Updates By E-mail.............................................................................................. 32
4.4 Whois Client ....................................................................................................... 34
4.5 Important Query Flags ........................................................................................ 35
5.0 Using the Production RIPE Whois Database.......................................................... 36
6.0 Where to Learn More.............................................................................................. 37
6.1 Whois Help ......................................................................................................... 37
6.2 Database FAQ..................................................................................................... 38
6.3 RIPE Whois Database Documents...................................................................... 38
6.4 LIR Training Courses ......................................................................................... 38
6.5 Specific Questions .............................................................................................. 38
References..................................................................................................................... 38
1.0 The RIPE Whois Database
The RIPE Network Management Database, often called the ‘RIPE Database’ is a public
database that contains information about registered IP address space and AS Numbers,
routing policies, and reverse DNS delegations in the RIPE NCC service region. It is used
for Internet network management.
1.1 Database Objects
Records in the RIPE Database are called "objects". Each object is a list of "attributevalue" pairs displayed in plain text. An example:
person:
address:
John Smith
Example LTD
High street 12
St.Mery Mead
Essex, UK
phone:
+44 1737 892 004
e-mail:
[email protected]
nic-hdl:
JS1-TEST
remarks:
*******************************
remarks:
This object is only an example!
remarks:
*******************************
abuse-mailbox: [email protected]
changed:
[email protected] 20051104
source:
TEST
This is a person object for John Smith. The attributes are "person:", "address:", "phone:"
and so on. An attribute name always starts in the first column, and ends with a colon (:).
Everything after the colon is the value.
Objects can store information about different resources. For example:
Network Management Resource
IP Address Ranges
Routing Policies
Reverse DNS Delegations
Contact Information
Authentication Information
Object types
inetnum, inet6num
aut-num, route, route6
domain
person, role, organisation
mntner
1.2 TEST Database
The RIPE NCC provides a TEST database where users can learn how to use the whois
database software. The TEST database uses the same software as the RIPE Whois
Database, but changes in one do not affect the other. The data in the TEST database is not
a copy of the real data in the RIPE Whois Database and is provided purely for learning
purposes.
All examples below use the TEST database. However, all procedures described are the
same for the RIPE Database. In section 5.0 Using the Production RIPE Whois Database,
we will explain what the differences are when using the RIPE Whois Database. Do not
use the production RIPE Whois Database for testing purposes. It is good practice to
delete all objects you have created in the TEST database when you have finished the
exercises in this guide.
2.0 How to Get Information from the TEST Database
2.1 Web Queries
The simplest way to get information from the TEST database is to use the web interface
available at:
http://www.ripe.net/perl/test-whois
2.2 Making Simple Queries
To query for a particular object the user specifies its "primary key:". This is an attribute
value that identifies a unique occurrence of the object type.
Object Type
inetnum
inet6num
person
Primary Key Attribute
“inetnum:”
“inet6num:”
“nic-hdl:”
Example Primary Key Value
193.0.0.0 - 193.0.0.255
2001:0610:0240::/42
JS1-TEST
Example:
We are going to query for the person object with the “nic-hdl:” attribute JS1-TEST.
Type the following in the query box:
js1-test
The reply includes the object in section 1.1 Database Objects. Note that the attribute
value is not case-sensitive.
3.0 How to Maintain Information in the Whois
Database
The RIPE Whois Database is used for storing information about Internet resources. You
will need to create objects in the database to document your usage of these resources.
Objects in the RIPE Whois Database must reflect the current state of the resources they
describe. It is important to modify objects as the details of resources change, or delete
objects if resources are no longer used. When IP addresses are assigned to customers, or
new staff members are appointed as contacts, it is important to create new objects to
reflect this in the database.
You can make updates to the database by using the online update interface (webupdates)
available at:
https://www.ripe.net/fcgi-bin/webupdates.pl
With webupdates, authorised users can directly create, modify or delete database objects
using automated processing. After you submit an object update, the screen will return a
complete report of the requested operation.
If there were any errors, the update will fail, and the report will describe the reason(s) for
this failure. If the error report does not help you locate the problem, you can send a copy
of it to <[email protected]>. A RIPE NCC support engineer will help you locate the
problem.
The following sections describe the process of creating and maintaining objects in the
TEST database. By the end of this document, you will have learned how to create and
protect an object representing a network assignment.
3.1 Selecting the Database
Throughout much of this document, you will learn how to perform modifications using
the TEST database. Before each update is performed, you need to select the TEST
database as source in webupdates.
To select the TEST database as source, go to:
https://www.ripe.net/fcgi-bin/webupdates.pl
1. Click [Select Source] in the header of webupdates:
2. Select “RIPE TEST database” from the list and press Select Update Source.
3.2 Creating Objects
The inetnum object contains information about registered IP address space; this includes
the range of addresses, status, and responsible contacts.
Before this object can be created in the database, you must first create some preliminary
objects. These objects contain information that is referenced by the inetnum object. This
requires the creation of the following objects:
•
A person object that contains information about the administrative and technical
contacts for this network. This is referenced from the "admin-c:" and "tech-c:"
attributes of the inetnum object.
•
A mntner object that contains authentication information that identifies who can
modify the contents of this object. This is referenced from the "mnt-by:" attribute
of the inetnum object. The mntner object protects the inetnum object.
3.3 Registering Contact Information
Contact information, such as a phone number and e-mail address, is stored in the person
object. To create a new person object in the database:
1. Select the TEST database as your update source. We tell you how to do this in
section 3.1 Selecting the Database.
2. Click on the [Add] option (in the header of webupdates) to create a new object in
the TEST Database and select object type: “person”:
3. Click on Add Object.
4. In the next screen, enter the information for the attributes of the object that you
are creating.
An attribute has two main characteristics:
•
Mandatory/Optional – If an attribute is mandatory, it must always be present in
any object of that type that is stored in the RIPE Whois Database. If it is optional,
you can leave it out.
•
Single/Multiple – If an attribute is single, then only one attribute of that type can
be present in an object. If it is multiple, the object can contain more than one
instance of the same attribute.
Note: To see the full template of an object type including the characteristics of all its
attributes, you can query the database for: “-t [object type]”.
Example:
Click on [Query Database] and enter:
-t person
person:
address:
phone:
fax-no:
[mandatory]
[mandatory]
[mandatory]
[optional]
[single]
[multiple]
[multiple]
[multiple]
[lookup key]
[ ]
[ ]
[ ]
e-mail:
org:
nic-hdl:
remarks:
notify:
abuse-mailbox:
mnt-by:
changed:
source:
[optional]
[optional]
[mandatory]
[optional]
[optional]
[optional]
[optional]
[mandatory]
[mandatory]
[multiple]
[multiple]
[single]
[multiple]
[multiple]
[multiple]
[multiple]
[multiple]
[single]
[lookup key]
[inverse key]
[primary/look-up key]
[ ]
[inverse key]
[inverse key]
[inverse key]
[ ]
[ ]
When creating a new object with webupdates, only the mandatory attributes are shown
automatically. You can add optional attributes and/or other instances of multiple
attributes by using the Add New Field section.
Return to the webupdates screen and prepare a person object to be created in the TEST
database.
Use "AUTO-1" for the "nic-hdl:" attribute, your e-mail address for the "changed:"
attribute, and "TEST" for the "source:" attribute.
By checking the Force New box, you guarantee that the object is only created if it does
not already exist in the database. We recommend that you keep this option checked, to
avoid accidentally modifying an existing object.
5. When you have finished setting up the object, press Submit Update.
6. Wait for an acknowledgement from the TEST database to appear on your screen.
This may take some time to complete. Here is an example of the type of message
you will see, if your update is successful:
Create SUCCEEDED: [person] JS1-TEST John Smith
***Warning: Date '20051104' added to changed:
attribute '[email protected]'
Note: The text after the [person] tag (JSI-TEST) is the NIC handle of the person. It
replaces the AUTO-1 value of the “nic-hdl:” attribute in the original submission. It will
be unique and is the primary key of this person object. Any references to this person
object will use this NIC handle.
You can use the new NIC handle value to query for this object. If you do this, you can
also see that the "changed:" attribute has had the date of the creation added. This is
normal behaviour and is the reason for the “***Warning:” message in the example above.
If there was an error, the acknowledgement will tell you that the update has failed and
will also report any errors. For example, it may contain the following:
Update FAILED: [person] AUTO-1 John Smith
***Error: Syntax error in object
This message means that the update failed because of a problem with the syntax in the
object. Check for invalid attribute values to find the cause of the error.
3.4 Registering Authentication Information
"Authentication" is when you prove that you are who you claim to be. This information is
prevents other users from modifying your data. In the database, the information that
verifies authentication is stored in the mntner object (also called the maintainer object).
To create a new mntner object in the database, do the following:
1. As with the creation of your person object, choose the TEST database as update
source, and then select mntner from the object list in the [Add] section:
2. Set up your mntner object using webupdates. Follow the same steps that you
used previously for the person object.
Note: For any object type, you can get the object’s template with a detailed description of
the meaning and syntax of each allowed attribute, by querying for: “-v [object type]”.
To get a full description of all the mntner object’s fields, query the RIPE Whois
Database for:
-v mntner
Check the syntax definition for the “mntner:” attribute field, when choosing your own
mntner name:
A unique identifier of the mntner object.
Made up of letters, digits, the character
underscore "_", and the character hyphen
"-"; the first character of a name must
be a letter, and the last character of a
name must be a letter or a digit.
For the "admin-c:" and "tech-c:" attributes, you should use the value of the "nic-hdl:"
from the person object that you created earlier in this tutorial. The database will not
allow you to create a mntner object unless this person object already exists.
The "auth:" attribute begins with a keyword identifying the authentication method. This
is followed by the authentication information.
In the example below, we have used the MD5-PW method. For both the MD5-PW and
CRYPT-PW methods, a password is used to authenticate database updates. To encrypt
your password to either MD5-PW or CRYPT-PW, you can use this web tool:
https://www.ripe.net/cgi-bin/crypt.cgi
Here is an example of an “auth:” attribute using an MD5 encrypted password:
auth:
MD5-PW $1$9KZv4vZf$zD8GoM7Ppvc74ypGmjedt/
The “mnt-by:” attribute refers to the mntner that is authorised to perform updates on an
object. The mntner object usually maintains itself, so use your maintainer name (the
value of the “mntner:” attribute) in the “mnt-by:” attribute.
Use "TEST-DBM-MNT" in the "referral-by:" attribute.
3. When you have finished composing the object, press Submit Update.
4. Wait for an acknowledgement from the TEST database to appear on your screen.
This may take some time to complete. Here is a sample of the type of message
you will see, if your update is successful:
Create SUCCEEDED: [mntner] EXAMPLE-MNT
If there was an error, correct the faulty attribute value(s) and re-submit the update.
5. The e-mail address in the “mnt-nfy:” attribute of the mntner will receive an email that will contain details of the new object.
You can now query the whois server and see your new mntner object. Type the
following in the query window, substituting your mntner name:
-B example-mnt
Your new mntner object, as well as the person object referenced, will be returned.
% Information related to 'EXAMPLE-MNT'
mntner:
descr:
admin-c:
tech-c:
EXAMPLE-MNT
Sample maintainer for example
JS1-TEST
JS1-TEST
upd-to:
mnt-nfy:
auth:
notify:
abuse-mailbox:
mnt-by:
referral-by:
changed:
source:
[email protected]
[email protected]
MD5-PW $1$wCDUXtMe$MptgAFcPa3sy9QqQnbX4X/
[email protected]
[email protected]
EXAMPLE-MNT
TEST-DBM-MNT
[email protected] 20051104
TEST
person:
address:
John Smith
Example LTD
High street 12
St.Mery Mead
Essex, UK
+44 1737 892 004
[email protected]
JS1-TEST
*******************************
This object is only an example!
*******************************
[email protected]
[email protected] 20051104
TEST
phone:
e-mail:
nic-hdl:
remarks:
remarks:
remarks:
abuse-mailbox:
changed:
source:
Note: the “-B” flag in the query is used in order to retrieve the complete objects from the
whois database. In a default query (without the “-B” flag), user contact information is
filtered from the returned data. This helps to protect users from contact abuse. Filtered
query results are easy to identify by looking at the “source:” attribute:
source:
TEST
# Filtered
If the keyword “# Filtered” is shown, it means that the query result has been filtered and
some of the attributes are not shown.
By default, a query returns other objects containing associated contact information. This
is why it returns the person object. If you do not want to see this information, use the ‘-r’
(disable recursion) flag in your query. You can see how this works by typing the same
query with this flag:
-r -B example-mnt
This time, only the mntner object is returned. Disabling recursion can result in a smaller,
easier to understand reply, especially when associated contact information is unimportant.
This is often the case when managing your own objects.
3.5 Protecting Your Contact Information
Now that you have a mntner object, you can protect other objects in the database. An
object is protected by putting in a reference to the mntner in the "mnt-by:" attribute.
Most object types require you to protect them with your mntner object. However,
person objects do not. We recommend that you protect them. To protect your person
object:
1. As before, within webupdates, choose the TEST database as your update source,
click on the [Edit] option and enter your person object “nic-hdl:”
You can also enter your “person:” name instead of the “nic-hdl:” value. In this case, a list
will be returned with all person objects that have that name. For common names, there
may be many entries returned. Choose your object from this list.
2. The editor screen that follows, will show your person object with all of its current
attribute values:
Using the Add New Field section, add your mntner as the "mnt-by:" for your person
object.
Fill in the value of the new attribute with your mntner object:
The database will not allow you to use a "mnt-by:" value, unless the mntner object
already exists. An error will appear in the acknowledgement returned after you submit the
update.
3. Add an additional “changed:” attribute to reflect the fact that you are modifying
the object. Follow the same procedure shown above for the “mnt-by:” attribute. It
must be placed after the existing “changed:” attribute values.
4. When you add a “mnt-by:” attribute to an object, you must authenticate yourself
as the new mntner object. As this example uses the MD5-PW method, add a
“password:” field to the object, using the Add New Field section. The position of
this field in the object is not important.
In this new “password:” field, type the clear-text password that you used to encrypt the
MD5 string present in the “auth:” attribute of your mntner object. For example:
5. The final edited object should look similar to the one shown below. Click on
Submit Update when you are ready.
6. Wait for an acknowledgement from the database. This will indicate the success or
failure of your update. If the password entered did not match the one used in the
mntner object, the update will fail and you will see a message similar to:
Modify FAILED: [person] JS1-TEST John Smith
***Error: Authorisation failed
***Info: Syntax check passed
In this case, you can just correct the password and re-submit the update.
3.6 Locating Network Assignments
Network assignments are represented by inetnum objects. Before you can create a new
inetnum object, you must find a range of IP addresses that are not currently assigned.
This section describes how you can query the database for this information. You can also
use the queries whenever you want to get IP address information from the database.
By default, the database returns the smallest range that encompasses the entire range that
you specify in your query. This is a ‘less specific’ object. For example, if you query the
following:
10.11.12.0 - 10.11.13.255
You might get something like this:
inetnum:
netname:
descr:
descr:
details
country:
admin-c:
tech-c:
status:
remarks:
enterprise
remarks:
mnt-by:
mnt-lower:
mnt-routes:
source:
10.0.0.0 - 10.255.255.255
IANA-ABLK-RESERVED1
Class A address space for private internets
See http://www.ripe.net/db/rfc1918.html for
EU # Country is really world wide
AA1-TEST
AA2-TEST
ALLOCATED UNSPECIFIED
This network should never be routed outside an
See RFC1918 for further information
TEST-DBM-MNT
TEST-DBM-MNT
TEST-DBM-MNT
TEST # Filtered
This is called the less specific match. The range 10.11.12.0 - 10.11.13.255 fits entirely
within the range 10.0.0.0 - 10.255.255.255. This is the smallest inetnum object in the
database that encompasses the IP range in your query.
If you want the server to give you only an exact match, then you can request this using
the "-x" flag. An exact match is one where the IP range of the inetnum object is the same
as the IP range in the query.
-x 10.11.12.0 - 10.11.13.255
In this case you will get only an exact match, or an error that tells you that no such
inetnum object exists:
%ERROR:101: no entries found
%
% No entries found in the selected source(s).
Sometimes, you may want to see all of the less specific inetnum objects that encompass a
range. In this case, you can use the "-L" flag. If you do this, you will see all inetnum
objects that encompass the entire range queried, as well as any exact match.
For example, if you query the following:
-L 10.11.12.0 - 10.11.13.255
You might get something like this:
% Information related to '0.0.0.0 - 255.255.255.255'
inetnum:
netname:
descr:
country:
org:
admin-c:
tech-c:
status:
remarks:
mnt-by:
mnt-lower:
mnt-routes:
remarks:
source:
0.0.0.0 - 255.255.255.255
IANA-BLK
The whole IPv4 address space
EU # Country is really world wide
ORG-TT1-TEST
AA1-TEST
AA2-TEST
ALLOCATED UNSPECIFIED
The country is really worldwide.
TEST-ROOT-MNT
TEST-DBM-MNT
TEST-DBM-MNT
This is an automatically created object.
TEST # Filtered
% Information related to '10.0.0.0 - 10.255.255.255'
inetnum:
netname:
descr:
descr:
details
country:
admin-c:
tech-c:
status:
remarks:
enterprise
remarks:
mnt-by:
mnt-lower:
mnt-routes:
source:
10.0.0.0 - 10.255.255.255
IANA-ABLK-RESERVED1
Class A address space for private internets
See http://www.ripe.net/db/rfc1918.html for
EU # Country is really world wide
AA1-TEST
AA2-TEST
ALLOCATED UNSPECIFIED
This network should never be routed outside an
See RFC1918 for further information
TEST-DBM-MNT
TEST-DBM-MNT
TEST-DBM-MNT
TEST # Filtered
For the query examples shown above, the “-B” flag was not included. The output from
the whois database was filtered for contacts, as described in 3.4 Registering
Authentication Information. Therefore, the objects above are not shown fully. The “#
Filtered” tag in the “source:” attribute tells you that the object was filtered. From here on,
we will use the “-B” flag in most queries. This will retrieve the full objects as they are
stored in the database itself.
You can also look for smaller inetnum objects corresponding to sub-ranges that are
completely contained within a given range. This is a more specific query. You can use
this on an allocation to look for ranges that have no other assignments. To do this, use the
"-m" flag.
-B -m 10.11.0.0 - 10.11.255.255
You will get a reply that looks something like this:
% Information related to '10.11.11.0 - 10.11.11.255'
inetnum:
netname:
descr:
descr:
country:
admin-c:
tech-c:
status:
notify:
mnt-by:
mnt-lower:
mnt-routes:
changed:
source:
10.11.11.0 - 10.11.11.255
Example-Network
This is a fictitious assignment for the
End-User called "Example"
GB
JS1-TEST
JS1-TEST
ASSIGNED PA
[email protected]
EXAMPLE-MNT
EXAMPLE-MNT
EXAMPLE-MNT
[email protected] 20051125
TEST
% Information related to '10.11.13.0 - 10.11.13.255'
inetnum:
netname:
descr:
descr:
country:
admin-c:
tech-c:
status:
notify:
mnt-by:
mnt-lower:
mnt-routes:
changed:
source:
10.11.13.0 - 10.11.13.255
Example-Network-2
This is another fictitious assignment for the
End-User called "Example"
GB
JS1-TEST
JS1-TEST
ASSIGNED PA
[email protected]
EXAMPLE-MNT
EXAMPLE-MNT
EXAMPLE-MNT
[email protected] 20051125
TEST
This is a one-level more specific query. This means that the largest inetnum object that is
completely contained within the given range is returned.
In this example, the IP addresses 10.11.12.0 - 10.11.12.255 are not assigned and are
available. You will need to find an available range to do the exercise in the next section.
If you want to see all inetnum objects completely contained in a given range, you can
use the "-M" flag:
-M 10.0.0.0 - 10.255.255.255
This will return all levels of inetnum objects in the range. This can return an extremely
large number of objects, but can be useful for finding all of the inetnum objects for a
portion of the Internet.
3.7 Recording Network Assignments
Now that all of the objects necessary for an inetnum object have been created and
protected and you have located an appropriate range of IP numbers, you can create the
inetnum object itself. To create a new inetnum object in the database:
1. As before, choose the TEST database as source, then click on [Add] to create a
new inetnum object:
2. Use the object editor to enter your network information. The following attributes
are worth mentioning:
•
For the “inetnum:” attribute, enter the IP range that you want to register.
Since this is just for the TEST database, it doesn’t have to be a range that
is really allocated to your organisation. You can use any available IP
range. Follow the instructions in section 3.6 Locating Network
Assignments to find an available IP range in the TEST database.
•
For the “admin-c:” and “tech-c:” attributes, use the nic-hdl of your person
object.
•
For the “status:” attribute use ‘ASSIGNED PA’.
•
For the “notify:” attribute, use the e-mail address where you wish to be
notified of any updates to this object.
•
For the “mnt-by:” or any other “mnt-*:” attribute, use the name of your
maintainer.
You can get a full explanation of the syntax and meaning of all the attributes in this
object by querying for:
-v inetnum
This will work for any object type.
Once again, you will need to provide authentication for your maintainer to create this
object. Add your maintainer password to the field “password:”. You can find out how to
do this in Section 3.5 Protecting Your Contact Information.
The creation of new inetnum objects must also be authorised hierarchically. This means
that while creating an inetnum object, the authentication for the one-level less specific
inetnum object (encompassing IP address range) is also required.
The “mnt-lower:” attribute in inetnum objects allows you to specify a specific maintainer
for the creation of more specific (sub-assignments) inetnum objects.
To find out for which specific maintainer you must provide authentication, do the
following:
•
Query the whois database for the one-level less specific inetnum object:
-l [your IP range]
•
Look for the mntner object referenced in the “mnt-lower:” attribute. If
there is no “mnt-lower:” attribute, the mntner object referenced in the
“mnt-by:” attribute is used.
For this specific example, querying for the one-level less specific object (-l 10.11.12.0 10.11.12.255) shows that it has:
mnt-lower:
TEST-DBM-MNT
To allow users to freely create inetnum objects in the TEST database, we have published
the password for this maintainer. You can find it in the mntner object itself:
mntner:
descr:
admin-c:
tech-c:
auth:
remarks:
remarks:
remarks:
mnt-by:
referral-by:
remarks:
source:
TEST-DBM-MNT
Mntner for TEST DBM objects.
AA1-TEST
AA2-TEST
MD5-PW $1$N2zhyJ3g$hzX7XTL84DtBkCWhBZE2c/
****************************************************
Password is "emptypassword" without the quotes.
****************************************************
TEST-ROOT-MNT
TEST-ROOT-MNT
This is an automatically created object.
TEST # Filtered
To pass the hierarchical authentication, you need to add an extra “password:” field to the
object update with the password from TEST-DBM-MNT:
3. See below for an example of a new inetnum object. Click on Submit Update.
4. Wait for the acknowledgement to return from the whois database. If your update
was successful, you will get a reply containing something like the following:
Create SUCCEEDED: [inetnum] 10.11.12.0 - 10.11.12.255
If there was an error, the acknowledgement will tell you what errors were found. For
example, it may contain the following:
Update FAILED: [inetnum] 10.11.12.0 - 10.11.12.255
***Error: Syntax error in object
5. If it is successful, the e-mail address in the "mnt-nfy:" attribute of your mntner
object will receive an e-mail with the details of the new object.
3.8 Modifying the INETNUM Object
You can modify information in your inetnum object. You might need to do this if the
technical contact has changed and is now represented by the person object "MJ3-TEST".
(You must first create a new person object before you can follow this example.) To
modify an existing object, do the following:
1. Click on [Edit] in webupdates. In the text box, enter one IP address of the
inetnum object range, the full IP range, the “netname:”, or even the name from
the referenced person object(s). Click on Edit Object.
2. From the “Search Results” list, select your inetnum object and click on Edit.
3. Using the object editor, change the "tech-c:" attribute to the new person object.
Add a "notify:" attribute, so the new technical contact will be notified when the
inetnum object is modified.
You also need to include the password for your maintainer so that the
modification is authorised, as well as a new “changed:” line to keep track of the
history of modifications to the object. The new “changed:” line must follow all
existing ones.
Note: The hierarchical authorisation is only required for creation of inetnum
objects, not modification. You do not have to include the second password (from
the less-specific IP block) in this update.
You cannot change the primary attribute of the object (inetnum: 10.11.12.0 10.11.12.255). The database will consider this to be a creation of a new object.
4. Click on Submit Update to process this:
5. Wait for an acknowledgement from the database. This will tell you if your update
was successful. If there was an error, the message that you receive will tell you
what was wrong.
6. The e-mail address in the "notify:" attribute of the original object will be sent a
message with the details of the change. In a similar way, a notification e-mail will
be sent to the “mnt-nfy:” of the maintainer.
3.9 Deleting Objects
Sometimes you no longer need objects that you maintain. You should delete these.
For example, if an assignment is no longer used you should delete the inetnum object
and all person and mntner objects that are only referenced from that object.
To delete an existing object:
1. Select the object that you wish to remove using the [Edit] option in webupdates.
Follow steps 1 and 2 in Section 3.8 Modifying the INETNUM Object.
2. In the object editor, do not change any of the attributes. If the object submitted is
not an exact copy of the one stored in the whois database, the deletion will fail.
Add only a “password:” field to authenticate you as the valid maintainer. Deletion of
objects in the RIPE/TEST database must also be authorised.
3. At the bottom of the editor page, enter the reason for this object deletion in the
Reason box. Click on Delete Object, when done.
This will automatically submit the update for processing to the TEST database adding a
line in the format:
delete: [reason for deletion]
This indicates that this object is to be deleted from the database.
Example of a deletion:
4. Press Submit Update.
5. Wait for an acknowledgement from the database. This will tell you if your
deletion was successful.
6. The e-mail addresses in the "notify:" attribute of the object, as well as the “mntnfy:” attribute of the mnt-by: mntner, will receive a message with the details of
the deletion.
Objects that are referenced by other objects cannot be deleted. For example, a mntner
object cannot be deleted while it is used in "mnt-by:" or any other attribute. You can find
the references to a mntner object by using an inverse query. Type the following in the
query window, substituting your mntner object:
-i mnt-by,mnt-lower,mnt-routes,mnt-domains,mnt-ref -r EXAMPLE-MNT
This will return all of the objects that reference EXAMPLE-MNT. The "-i" flag requests
the inverse query, and the "mnt-by,mnt-lower,mnt-routes,mnt-domains,mnt-ref" specify
which attributes you want to look at. There must not be a space after any of the commas.
The "-r" disables recursion (associated objects will not be displayed).
Before you can delete a mntner object, you must remove all references to it.
For example, if you have the following mntner and person objects:
% Information related to 'EXAMPLE-MNT'
mntner:
descr:
admin-c:
tech-c:
upd-to:
mnt-nfy:
auth:
notify:
abuse-mailbox:
mnt-by:
referral-by:
changed:
source:
EXAMPLE-MNT
Sample maintainer for example
JS1-TEST
JS1-TEST
[email protected]
[email protected]
MD5-PW $1$wCDUXtMe$MptgAFcPa3sy9QqQnbX4X/
[email protected]
[email protected]
EXAMPLE-MNT
TEST-DBM-MNT
[email protected] 20051104
TEST
% Information related to 'JS1-TEST'
person:
address:
phone:
e-mail:
nic-hdl:
mnt-by:
remarks:
remarks:
remarks:
abuse-mailbox:
changed:
changed:
source:
John Smith
Example LTD
High street 12
St.Mery Mead
Essex, UK
+44 1737 892 004
[email protected]
JS1-TEST
EXAMPLE-MNT
*******************************
This object is only an example!
*******************************
[email protected]
[email protected] 20051104
[email protected] 20051109
TEST
The mntner "EXAMPLE-MNT" cannot be deleted, because it is referenced by the
person "JS1-TEST". The person "JS1-TEST" cannot be deleted, because it is referenced
by the mntner "EXAMPLE-MNT". To delete these objects, do the following:
1. Modify the person object, and remove the "mnt-by:" attribute. This removes
all protection, but this is not a security issue, because the object will be
deleted.
2. Delete the mntner object.
3. Delete the person object.
(Please remember to delete all objects you created in the TEST database while doing
these exercises.)
4.0 Extra Features
4.1 Keeping a Password in Webupdates Memory
If you want to use your maintainer authentication password in several updates, you can
keep it in memory for a specified amount of time.
To do this:
1. Before starting to update any of your objects, click on the [Authorisation] option.
2. Type in your password and select the amount of time that you want to keep your
password in memory.
3. Click on Register
You can now start editing your objects. From here on, and for however long that you
specify, all updates submitted through webupdates from your computer will
automatically include the password you entered.
4.2 Edit an Object in Text-Based View Using Webupdates
Using webupdates, you can edit an object in text-based mode, as opposite to the fieldbased interface used so far. This can be helpful in situations when copy-paste operations
are needed.
This is done using the Switch View option. It allows you to switch between ‘field-based’
and ‘text-based’ editing.
For example, if you are editing an object as shown below:
Pressing the Switch View button allows you to switch to text-based mode:
In this mode, you can edit the object as free text, including adding and removing
attributes to the object.
Pressing Switch View once again switches back to the field-based interface. Pressing
Submit Update submits your update to the whois database.
You can switch between both edit modes interchangeably while editing an object.
However, please notice that webupdates will only let you switch from text-based mode to
field-based mode, if there are no syntax errors in the object.
4.3 Updates By E-mail
Another way of updating objects in the RIPE/TEST database is by using e-mail. This is
useful if you need to update several objects at the same time.
You should send updates to the TEST database to <[email protected]>. We
automatically process all updates sent to this e-mail address, no human handling is
involved.
Follow these steps when you prepare your e-mail:
1. Include the complete objects that you wish to update (create, modify or delete) in
the e-mail, with at least one blank line between each object, and completely
aligned to the left (no space characters in the beginning of the lines). Please don’t
include any blank lines in between the attributes of any object, as this will prevent
it from being recognised.
2. If you want to delete an object, include the complete object exactly as stored in
the whois database and add an extra field to the object with the syntax:
delete: [reason for deleting]
3. Include in the e-mail, all the clear-text passwords needed to perform the updates,
with the following syntax:
password: [clear-text password]
4. Send your e-mail to <[email protected]>
Here is an example of an e-mail update to the TEST database:
inetnum:
netname:
descr:
10.11.12.0 - 10.11.12.255
Example-Network
This is a new fictitious assignment
for the end-user called "Example"
country:
NL
admin-c:
JS1-TEST
tech-c:
MJ3-TEST
status:
ASSIGNED PA
notify:
[email protected]
notify:
[email protected]
mnt-by:
EXAMPLE-MNT
mnt-lower: EXAMPLE-MNT
mnt-routes: EXAMPLE-MNT
changed:
[email protected] 20051129
changed:
[email protected] 20051130
source:
TEST
delete:
IP assignment has been cancelled
person:
address:
phone:
e-mail:
nic-hdl:
mnt-by:
remarks:
remarks:
remarks:
abuse-mailbox:
changed:
changed:
changed:
source:
John Smith
Example LTD
High street 12
St.Mery Mead
Essex, UK
+44 1742 812 991
[email protected]
JS1-TEST
EXAMPLE-MNT
***********************************************************
This object is still an example, but the phone has changed!
***********************************************************
[email protected]
[email protected] 20051104
[email protected] 20051109
[email protected]
TEST
password: this is my clear-text password, really!
After your update has been processed, you will receive the results by e-mail. The reply
will tell you which objects were updated successfully and which ones failed. For the
objects that failed, you will get an explanation with the errors. This is similar to what is
shown in the webupdates report.
4.4 Whois Client
You can also perform queries on the database by using a whois software client.
There is a whois client, developed by the RIPE NCC, available for free download. [3]
To perform queries on the TEST database, use the syntax:
whois –h test-whois.ripe.net <query-text>
Where <query-text> is the full query text that would be entered in the web query box
shown in Section 2.1 Web Queries.
4.5 Important Query Flags
Here is a list of commonly used flags that can be useful when querying the whois
database. Please note that these flags are case-sensitive.
General query flags:
-B
Disables the default query behaviour of filtering the "notify:", "changed:" and "email:" attributes, in place to protect users from contact abuse. This flag is helpful
for retrieving the objects exactly as they are stored in the whois database. It is
important to use this flag when updating database objects by e-mail, to prevent
information from being lost in the update.
-r
Disables the default query behaviour of recursion for contact information after
retrieving the objects that match the lookup key. You should use this flag if you
do not want to retrieve also the person and role objects that contain the contact
information associated to the object that you are querying for.
-t <object-type>
Requests a template for the specified object type. Using this flag
you can see all the possible attributes used in an object type as well as their
characteristics.
-v <object-type>
Requests a verbose template for the specified object type. This flag
works as –t, but also gives you a detailed explanation of each attribute, and the
expected syntax. It can be very helpful when you receive a syntax error while
updating an object in the whois database.
-i <attribute-name> <inverse-key>
Perform an inverse query. This flag is useful to
see in which objects a certain object is referenced. For example:
-i mnt-by EXAMPLE-MNT
will show all the objects that are maintained for updates by the maintainer
EXAMPLE-MNT.
IP range query flags:
-l <ip-lookup>
One-level less specific query. This returns the smallest inetnum
range that encompasses the entire IP range specified in the query, excluding the
exact match.
-L <ip-lookup>
All-levels less specific query. This returns all the less specific
inetnum objects that encompass the IP range specified in the query, including the
exact match.
-m <ip-lookup>
One-level more specific query. This returns the largest inetnum
ranges that are completely contained in the IP range specified in the query,
excluding the exact match.
-M <ip-lookup>
All-levels more specific query. This returns all the levels of
inetnum objects contained in the IP range specified in the query, excluding the
exact match. This can return an extremely large number of objects, depending on
which IP range is used.
-x <ip-lookup>
Exact match query. This returns the inetnum object that exactly
corresponds to the IP range specified in the query. If no exact match is found no
objects are returned.
In a default IP range query, without any of the flags mentioned above, the exact match
object will be returned. If no exact match is found, the one-level less specific inetnum
object will be returned.
To see a full list of all the flags that you can use when querying the whois database, enter
‘help’ in the query box:
help
5.0 Using the Production RIPE Whois Database
You should now have an understanding of the basic concepts of the RIPE Whois
Database and be able to maintain your own data and perform queries. This section
explains the differences between the TEST database and the RIPE Database.
For the RIPE Whois Database:
1. Queries use a different search tool:
http://www.ripe.net/whois
2. For queries using a whois client, connect to the server: whois.ripe.net
whois –h whois.ripe.net <query-text>
3. In webupdates, select RIPE Database as the source (default), by using the [Select
Source] option:
4. You should send e-mail updates to the RIPE Database to <[email protected]>.
5. Objects in the RIPE Database use RIPE for both the “source:” attribute and the
suffix appended to “nic-hdl:” attributes.
6. When creating your mntner object in the RIPE Whois Database, use RIPE-DBMMNT for the “referral-by:” attribute.
7. You cannot create inetnum objects in the RIPE Whois Database unless you have
received authorisation from the LIR that holds the responsibility for that address
range.
6.0 Where to Learn More
The following resources are available to help you use the RIPE Whois Database.
6.1 Whois Help
A query for "help" will return a full list of all of the ‘flags’ that you can use when you
query the database.
help
While we covered some of these in this document, there are many others.
To receive detailed information about an object type and all of its attributes, query for:
-v <object-type>
6.2 Database FAQ
The Database Frequently Asked Questions (FAQs) are available at:
http://www.ripe.net/info/faq/db/index.html
We frequently update this page with helpful information based on the needs of users and
new features offered by the software.
6.3 RIPE Whois Database Documents
The definitive source of information for the RIPE Whois Database is the database area of
the RIPE Document Store:
http://www.ripe.net/ripe/docs/database.html
Here you can find the latest versions of the RIPE Whois Database Reference Manuals,
which contain detailed information about all of the topics covered in this guide, as well as
other relevant documents covering how to use the RIPE Whois Database.
6.4 LIR Training Courses
The RIPE NCC provides training for Local Internet Registries. You can find more
information about this at:
http://www.ripe.net/training/
6.5 Specific Questions
If you have a specific question that has not been answered in this guide, send it to <[email protected]>. A RIPE NCC support engineer will answer your mail.
You can also post a question to the <[email protected]> mailing list. You can find
information about this list at:
http://www.ripe.net/mailman/listinfo/db-help/index.html
References
[1] RIPE Whois Database Query Reference Manual:
http://www.ripe.net/ripe/docs/db-query-manual.html
[2] RIPE Database Reference Manual
http://www.ripe.net/ripe/docs/databaseref-manual.html
This contains detailed information about updating objects in the RIPE Whois Database. It
will be replaced by a new document: “RIPE Whois Database Update Reference Manual”.
[3] Whois Client
You can find the latest version at:
http://whois.sourceforge.net/