1
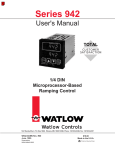
Watlow EZ-Zone Controller – Ovens Profile Programing Guide Watlow Controller Watlow EZ-Zone for Sheldon Ovens WATLOW PROGRAMING GUIDE Last Revised: March 11, 2014 Part Number (Guide): 9920715 Sheldon Manufacturing 300 N. 26th Ave Cornelius, OR 97113 EMAIL: [email protected] PHONE 1-800-322-4897 (503) 640-3000 PURPOSE This guide describes how to program and launch heating profiles in the Watlow EZ-Zone Temperature Controller, when installed in Sheldon Manufacturing ovens. It is a simplified alternative to Chapter 7 of the controller’s factory-provided manual, and explains the most commonly used programing options. INTRODUCTION The Watlow EZ-Zone Controller can hold up to four heating (4) profiles, each with ten (10) sequential steps. Each step can be used to initiate one of three commonly used options: Timed Interval. Heating or cooling the oven. Soak. Constant temperature period. End. Concludes a running profile. Each option includes parameters that can be set by the user. For example, the Soak option comes with time duration parameters for hours, minutes, and seconds. All steps are stored sequentially in the controller’s long-term memory. Profile 1: steps 1 -10 Profile 2: steps 11 – 20 Profile 3: steps 21 – 30 Profile 4: steps 31 - 40 Steps and heating profiles will remained stored when the oven is turned off or experiences a power outage. In the event of a power interruption while running a profile, the oven will restart if the Power Switch is in the On position, but it will not automatically resume the profile. An interrupted profile must be re-launched by the user. 2|Page TABLE OF CONTENTS Purpose ..................................................................................................................................................... 2 Introduction ................................................................................................................................................ 2 Main Temperature Control ........................................................................................................................ 4 Commonly Used Profile Step Options....................................................................................................... 5 Powering the External Outlet .................................................................................................................... 5 Programing a Simple Heating Profile ........................................................................................................ 6 Programing Profiles 2 - 4 ........................................................................................................................ 13 Launching Profiles ................................................................................................................................... 14 Combining Profiles .................................................................................................................................. 15 Aborting a Running Profile ...................................................................................................................... 15 3|Page WATLOW PROGRAMING GUIDE Watlow Controller Details THE RESET BUTTON MOVES 1 PAGE BACK OR RETURNS TO THE HOME PAGE THE EZ1 BUTTON INITIATES AND ABORTS HEATING PROFILE 1 CURRENT OVEN CHAMBER TEMPERATURE 20.0 C EZ1 RES E T THE UP ARROW BUTTON ADJUSTS SET POINTS OR CHANGES PARAMETERS 20.0 TEMPERATURE SET POINT (YOUR DESIRED TEMPERATURE) NUMBERS INDICATE COMMUNICATION FUNCTIONS EZ2 2 THE DOWN ARROW BUTTON ADJUSTS SET POINTS OR CHANGES PARAMETERS RAMPING SYMBOL INDICATES THAT A HEATING PROFILE IS RUNNING THE ADVANCE BUTTON SCROLLS THROUGH MENUS AND PARAMETER LISTS MAIN TEMPERATURE CONTROL The Watlow EZ-Zone Controller is used as the main temperature controller and display on several Sheldon Manufacturing ovens, and is labeled SET TEMPERATURE. The controller has a digital display, and Up / Down Arrow buttons used for adjusting the oven’s temperature set point and for selecting menu options. On some ovens models the arrows are also used for setting the Over Temperature Limit setting. The EZ1 button is a shortcut button to launch heating Profile 1. It can also be used to manually abort a running profile. The green Advance Button advances the display through pages and option lists. The RESET Button is used to move the display back to previous pages when programing heating profiles, and to return to the Home Page. The Reset Button is labeled with an infinity ∞ symbol on older Watlows. Note: The EZ2 Button does not have a function in Sheldon Manufacturing ovens. 4|Page WATLOW PROGRAMING GUIDE COMMONLY USED PROFILE STEP OPTIONS Option Display Code Function Ramp Up / Ramp Down (Timed Interval) Ti The Timed Interval step option is used for ramping up or ramping down the oven’s temperature over a user-selected time interval. Note: Use of this option must take into account the oven’s maximum heating and cooling rates, which can vary with environmental conditions of your shop, production space, or laboratory. Soak SoAh The Soak option runs the oven at a constant temperature for a duration programed using the option’s minute, hour, and second parameter settings. End Profile End The End option ends a running profile when that step is reached. If the End option is not chosen, a running profile will advance to the next programed step stored in the controller’s memory. The User “USEr” parameter choice for End restores the oven to the user’s manual control, and returns the oven to its pre-profile heating state. POWERING THE EXTERNAL OUTLET This section does not apply to vacuum ovens. Some forced air and convection ovens are provided with an external electrical outlet for powering an accessory exhaust blower fan. Watlows for these ovens include an Event 1 parameter for each step option. Switching this parameter from Off to On will trigger the power up of the oven’s external power outlet, and any equipment attached to it, when the step is reached during a profile. Switching to parameter to Off depowers the outlet, when the step is reached. By default the Event 1 parameter is set to Off. It must be switched to On for each successive step that you want it to run during the execution of the profile. As of the current printing of this guide, the following ovens can use the Event 1 parameter to power an external exhaust blower: SMO5HP-2, SMO10HP-2, SMO14HP-2, SMO34HP-2, SMO38HP-2, and SMO5CR-2 The units previously designated as: HF4-2, HF10-2, HF15-2, HF25-2, HF37-2, and CR1-2 Note: The Event 2 parameter is not associated with an output or a function for Sheldon ovens. Always leave Event 2 set to Off. 5|Page WATLOW PROGRAMING GUIDE PROGRAMING A SIMPLE HEATING PROFILE This is three-step profile that will ramp the oven up to 150°C over a one (1) hour period; then soak at 150°C for four (4) hours; and then return the oven to its preprofile state, and manual user control. An instructional video showing how to program this profile can be found at: http://www.shellab.com/store/virtual-tour-vac-oven.html. The Home Page Temp in Red Set Point in Green The video applies to all ovens with the Watlow EZ-Zone Controller. If at any time during the procedure you find yourself on the wrong screen, press the Reset Button once to jump back one page. Begin procedure on next page 6|Page WATLOW PROGRAMING GUIDE Accessing the Profile Selection Menu Page 5 seconds 1) Profile Selection Menu 1. Push and hold the green Advance Button for five (5) seconds. The display will advance twice. Release the button after the second advance, when the display shows “P1” “ProF”. This is the Profile Selection Page. a. The P1 indicates that Profile 1 is selected. You can scroll through all four profiles using the Up and Down Arrow buttons. Stay on P1 for this exercise. Profile 1, Step 1 (1 hour ramp up to 150°C) 2) Step Menu, Profile 1 2. Press the green Advance Button again to choose Profile 1. The display should now read “1 P1”, indicating that the display is showing Step 1 of Profile 1. This is the Step Selection Menu. 3) Option Setup Page 3. Press the Advance Button again to move to the Option Setup Page for Step 1. The “S.tYP” page name will show in green, and options for the step are shown in red. 4) Timed Interval Option 4. Press the Up or Down Arrow until the top display shows “Ti” for Timed Interval. This is the ramping timed interval option. It can be used to both ramp up and ramp down the oven’s temperature over a user-specified time period. 5) Temp. Set Point 5. Press the Advance Button once. The display will show “tSP1” for the Temperature Set Point 1 parameter, and an adjustable temperature set point in red. 7|Page WATLOW PROGRAMING GUIDE 6) Set Point 150 C Press and hold 6. Adjust the temperature set point to 150°C using the Arrow buttons. Holding down an Arrow Button will cause the adjustment to speed up. 7. Press the Advance Button. This saves the setting of 150°C and advances to the Hour Parameter page. 7 ) Hour Parameter Page a. Use the Arrow Buttons to adjust the Hour setting to 1. b. Press the Advance Button advance to the Minute and then Second Parameter Pages. Adjust these parameters to zero (0) using the Arrow Buttons. 8) Event Pages 8. Press the Advance Button two (2) times to move through the “Ent1” and “Ent2” event parameter pages. Leave both of these parameters set to “oFF”. a. Pressing the Advance Button the second time will return the display to the Timed Interval Option setup page. 9) Timed Interval 9. Once back at the Timed Interval Option setup page press the Reset Button to return to the Step 1 on Profile 1’s Step Selection Menu. 10) Step 1 Profile 1 Saved 10. Step 1 of Profile 1 is now saved. 8|Page WATLOW PROGRAMING GUIDE Profile 1, Step 2 (4 hour constant temperature soak at 150°C) 11) Step 2 Profile 1 11. Use the Up Arrow Button to advance the top red display to “2”, for step 2 of the profile. 12) Setup Page 2 12. Press the Advance Button once to advance to the Option Setup page for Step 2. 13) Soak Setup 13. Use the Up Arrow Button to scroll through the options in the red menu to the “SoAh” Soak option. Soaking is a period of constant temperature. The default temperature for a soak is the last temperature set point selected in a previous step. In this case, the 150°C chosen in step 1. 14) Soak Time 14. Press the Advance Button to move to the “hour” parameter page. a. Use the Up Arrow to enter a value of four (4) hours in the top display for the soak. b. Press the Advance Button three (3) times to save the Hour value, then move through and save the Minute and Second parameters at 0. 15) Event Pages 15. Press the Advance Button two more times to move through the “Ent1” and “Ent2” event menu pages. Leave both parameters set to “oFF”. a. Pressing the Advance Button the second time will return the display to the Soak Option setup page. 9|Page WATLOW PROGRAMING GUIDE 16) Soak Saved 16. Once back at the setup Soak Option Page, press the Reset Button to save the programed soak. 17) Step 2 Profile 1 Saved 17. Step 2 of Profile 1 has now been saved. Procedure continued on next page. 10 | P a g e WATLOW PROGRAMING GUIDE Profile 1, Step 3 (Ending the Profile) 18) Step 3 Profile 1 18. Press the Up Arrow to advance to Step 3. 19) Option Page, End 19. Press the Advance Button to move to the “S.tYP” setup option menu page for Step 3. a. Use the Up Arrow to select the “End” option to end the profile. 20) User Parameter 20. Use the Advance Button to move to the End Option parameter menu page. a. Use the Arrow Buttons to select the “USEr” parameter setting. b. The User setting will restore manual control of the oven to the user, and return the oven to its pre-profile heating state when the step is run. 21) Event Pages 21. Press the Advance Button three times to save the End parameter as User, and leave the Event 1 and Event 2 parameters set to Off. 22) End Setup, Saving 22. Once back at the “End S.tYP” setup page, press the Reset Button to save and return to Profile 1’s Step Selection Menu Page. 11 | P a g e WATLOW PROGRAMING GUIDE 23) End Setup Saved 23. Steps 1 – 3 of Profile 1 are now saved and ready to run as a self-terminating, three (3) step profile. a. Press the Reset Button to return to the home page. 23) End Setup Saved Profile 1 Launch (Optional) 24. Press the orange EZ1 shortcut button to quick launch Profile 1. A red “EZ1” will illuminate on the bottom right of the Home Page, and a red ramping icon will show just to the right of the green temperature set point. It may take several seconds for the controller to perform its calculations and then start heating the oven. The profile is now active and will run for its five (5) hour, three (3) step duration, unless aborted by pressing the EZ1 Button again. 12 | P a g e WATLOW PROGRAMING GUIDE PROGRAMING PROFILES 2 - 4 The following procedure is used to start programing Profiles 2 – 4, beginning at the Home Page. 1) Profile Page Hold 1. Hold down the Advance Button for five (5) seconds to reach the Profile Selection Menu. a. Press an Arrow Button to select P2, or P3, or P4. “P2” indicates Profile 2, etc. 2) Step 1 Profile 1 2. Press the Advance Button. a. If P2 was chosen, the screen will now show “11 P2”. b. “11” indicates step 11. Profile 2 consists of steps 11 – 20 in the controller’s memory. 3) Setup Page 3. Press the Advance Button again to advance to the Option Setup Menu for Step 11. Program as many of Steps 11 – 20 of Profile 2 as needed, using the Timed Interval and Soak options. Choose the End option for the final step you wish to end the profile on. Repeat this procedure to program Profiles 3 or 4 as needed. 13 | P a g e WATLOW PROGRAMING GUIDE LAUNCHING PROFILES Profile 1 may be quick launched from the Home Page by pressing the EZ1 Button once. All four (4) profiles may be launched from the Profile Start Menu. 1) Profile Start Menu 1. Starting at the Home Page, press the Advance Button repeatedly until the Profile Start Menu appears in the display, with a step between 1 and 40 shown in red at the top right.. 2) Profile 2 Selected 2. Use an Arrow Button to scroll to the you wish to launch a. Scroll to Step 1 to launch Profile 1; Step 11 to launch Profile 2; Step 21 to launch Profile 3; Step 31 to launch Profile 4. 3) Profile Action Request Page 3. After scrolling to the step, press the Advance Button. The display will advance to the Profile Action Request Page (P.AC1) 4) Profile Launching 4. Use an Arrow Button to change “nonE” to “Step”. Approximately three (3) seconds after changing the parameter setting, the heating profile will launch automatically, and the red ramping indicator will illuminate. The “Step” parameter setting will automatically revert back to “nonE” when the profile launches. Procedure continued on next page 14 | P a g e WATLOW PROGRAMING GUIDE 5) Returned to Home Page 5. Press the Reset Button to return to the Home Page while the profile is running. COMBINING PROFILES Profiles may be combined by programing their steps sequentially as a single profile. For example, programming steps 1 – 14 sequentially, and choosing the End option for Step 14, will cause Profile 1 to run through all 14 steps when launched. Launching Profile 2 in this programing configuration would only run Steps 11 – 14. ABORTING A RUNNING PROFILE The EZ1 Button can be used to abort a running profile. Press the button once to abort Profile 1 if it was launched using the EZ1 quick launch function. Press the button twice to abort any profiles launched from the Profile Start Page, as described in items 1 – 5 on the previous pages. Note: Pressing the EZ1 Button while running a profile launched from the Profile Start Page does the following. It immediately launches Profile 1, ending the previous profile. Pressing the button a second time then aborts the newly launched Profile 1. End of Guide 15 | P a g e