1
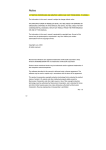
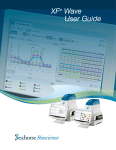
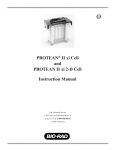
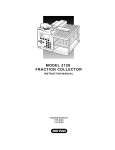
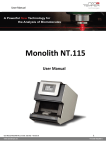
DCOG960030/GS-525/505 I.M.
5/12/99 7:52 AM
Page CVR1
Model GS-525/Model GS-505
Molecular Imager®
Storage Phosphor Imaging Systems
Instruction Manual
Catalog Numbers
GS-525 GS-505
170-7477 170-8300
170-7478 170-8302
170-7480 170-8303
170-7481 170-8305
For Technical Service Call Your Local Bio-Rad Office or in the U.S. Call 1-800-4BIORAD (1-800-424-6723)
DCOG960030/GS-525/505 I.M.
5/12/99 7:52 AM
Page CVR2
Warranty and Regulatory Notices
Warranty Statement
This warranty may vary outside of the continental United States. Please contact your local
Bio-Rad office for the exact terms of your warranty.
Bio-Rad Laboratories warrants to the customer that the Model GS-525 Molecular Imager
system (catalog numbers 170-7477 to 170-7481) and the Model GS-505 Molecular Imager
system (catalog numbers 170-8300 to 170-8305) will be free from defects in material and
workmanship, and will meet all performance specifications for the period of 1 year from the
date of shipment. This warranty covers all parts and labor.
In the event that the instrument must be returned to the factory for repair under warranty, the instrument must be packed for return in the original packaging.
Bio-Rad shall not be liable for any incidental, special, or consequential loss, damage, or
expense directly or indirectly arising from the use of the Model GS-525 or GS-505 Molecular
Imager systems. Bio-Rad makes no warranty whatsoever in regard to products or parts furnished by third parties, such being subject to the warranty of their respective manufacturers.
Service under this warranty shall be requested by contacting your nearest Bio-Rad office.
The following items are considered Customer-installable consumables: storage phosphor
screens and eraser bulbs. These parts are not covered by this warranty. All customer-installed
parts are warranted only to be free from defects in workmanship.
This warranty does not extend to any instruments or parts thereof that have been subject
to misuse, neglect, or accident, or that have been modified by anyone other than Bio-Rad or
that have been used in violation of Bio-Rad instructions.
The foregoing obligations are in lieu of all other obligations and liabilities including negligence, and all warranties of merchantability, fitness for a particular purpose, or otherwise,
expressed or implied in fact or by law, and state Bio-Rad's entire and exclusive liability and
buyer's exclusive remedy for any claims or damages in connection with the furnishing of goods
or parts, their design, suitability for use, installation, or operation. Bio-Rad will in no event be
liable for any special, incidental or consequential damages whatsoever, and Bio-Rad's liability
under no circumstances will exceed the contract price for the goods for which liability is claimed.
Regulatory Notices
Important: This Bio-Rad instrument is designed and certified to meet EN55011, EN500821, and IEC 1010-1 requirements, which are internationally accepted electrical safety standards.
Certified products are safe to use when operated in accordance with the instruction manual.
This instrument should not be modified or altered in any way. Alteration of this instrument will:
Void the manufacturer’s warranty.
Void the regulatory certifications.
Create a potential safety hazard.
Note: This equipment has been tested and found to comply with the limits for a Class A
digital device, pursuant to Part 15 of the FCC rules. These limits are designed to provide reasonable protection against harmful interference when the equipment is operated in a commercial environment. This equipment generates, uses, and can radiate radio frequency energy and, if not installed
and used in accordance with the instruction manual, may cause harmful interference to radio
communications. Operation of this equipment in a residential area is likely to cause harmful interference in which case the user will be required to correct the interference at his own expense.
Bio-Rad Laboratories is not responsible for any injury or damage caused by the use of this
instrument for purposes other than those for which it is intended, or by modification of the
instrument not performed by Bio-Rad Laboratories or an authorized agent.
DCOG960030/GS-525/505 I.M.
5/12/99 7:52 AM
Page CVR3
Table of Contents
Section 1
Introduction ..................................................................................................1
1.1
1.2
1.3
1.4
The Molecular Imager Systems .................................................................................1
Storage Phosphor Imaging Technology.....................................................................2
Overview of Phosphor Imaging Procedure ...............................................................3
Important Safety Information.....................................................................................4
Section 2
Product Description .....................................................................................5
2.1
2.2
2.3
2.4
2.5
GS-525 and GS-505 Molecular Imager Laser Scanner.............................................5
Host Computer Recommendations ............................................................................7
Imaging Screen Cassettes...........................................................................................7
Screen Eraser............................................................................................................10
Sample Loading Dock..............................................................................................12
Section 3
Setting up the Molecular Imager System................................................14
3.1
3.2
3.3
3.4
Installation Program .................................................................................................14
Selecting the Location of System Components.......................................................14
SCSI Connection......................................................................................................15
Unpacking the Imaging Screen Cassette .................................................................16
Section 4
Operation of the Molecular Imager System ...........................................16
4.1
4.2
4.3
Quick Guide .............................................................................................................16
Detailed Procedures..................................................................................................18
Factors Affecting Image Quality .............................................................................27
Section 5
Troubleshooting..........................................................................................28
5.1
5.2
Problem Solving Guide............................................................................................28
Technical Service .....................................................................................................28
Section 6
Specifications ..............................................................................................29
DCOG960030/GS-525/505 I.M.
5/12/99 7:52 AM
Page 1
Section 1
Introduction
1.1 The Molecular Imager Systems
The GS-525 and GS-505 Molecular Imager systems form a versatile system for capturing digital images of radioactive and chemiluminescent samples using a storage phosphor
technology. The systems eliminate the need for x-ray film, as well as a darkroom and developing chemicals, by capturing an image on a reusable Imaging Screen. This technology is
more accurate and more sensitive than x-ray film autoradiography. Due to the wide linear
dynamic range of the Molecular Imager system, radioactive and chemiluminescent samples
can be accurately quantitated over a wide range of concentrations. The expanded linear
response minimizes the chances of over- or under-exposure commonly encountered with film,
where an incorrect exposure affects image quality and quantitation, and requires repeated
exposures. In addition, the sensitivity of the Molecular Imager system permits detection of
radioisotope signals 10 to 100 times faster than film. For chemiluminescence, this system
requires only seconds or minutes of exposure for most applications.
The GS-525 Molecular Imager system (Figure 1.1) consists of the five components: the
storage phosphor Imaging Screen Cassettes (20 x 25 cm or 35 x 43 cm), the Laser Scanner or
Molecular Imager per se, the Sample Loading Dock, the Screen Eraser, and the Molecular
Analyst® software (Macintosh® or PC) which runs on your host computer. The Imaging Screen
contains microscopic storage phosphor particles which are extremely sensitive to radiation
in the form of both visible light and emissions from isotopic decay. Exposing a screen to such
emissions creates a latent image, which is subsequently recovered by scanning the screen
with the infrared laser in the Molecular Imager system The signal is recorded as a digitized
image in the host computer. The GS-505 Molecular Imager system consists of all the above,
and accepts only the 20 x 25 cm screens. The Molecular Analyst software processes this
image on a gray scale with 216 or 65,536 levels for quantitative analysis, and for video display and hard-copy output. The Sample Loading Dock is a light-tight apparatus for exposing
the Imaging Screen to your samples. The Imaging Screens are prepared for reuse in the Screen
Eraser, which floods the phosphor with infrared light. This brings the storage phosphor in the
entire screen back down to its base state.
Laser Scanner
Host Computer
Screen Eraser
20 x 25 cm
Sample Loading
Dock
35 x 43 cm
Imaging Screen
Cassette
Fig. 1.1. GS-525/GS-505 Molecular Imager systems.
1
DCOG960030/GS-525/505 I.M.
5/12/99 7:52 AM
Page 2
1.2 Storage Phosphor Imaging Technology
The storage phosphor layer of Bio-Rad Imaging Screens consists of a strontium sulfide
matrix doped with the rare earth elements Cerium and Samarium. When a radioactive emission or a chemiluminescent photon strikes the screen, an electron is donated from Cerium
(oxidation) to Samarium (reduction). When such an activated site is illuminated with infrared
light, the electron is transferred back to Cerium, emitting a photon of visible light at a characteristic wavelength. Bio-Rad's unique screen chemistry is also sensitive to the photons of visible light emitted by common chemiluminescent substrates, such as Luminol®, AMPPD®,
CSPD®, and CDP-Star®, in addition to radioisotope emissions.
The acquisition of an image using storage phosphor screens is therefore a two-part process. The first part is exposure of the sample to the screen, which captures a "latent image" of
the sample embodied in the number and pattern of charged crystals. In the second part of the
process, the screen is scanned by a pulsed, infrared laser (910 nm), which causes the electrons in charged areas to fall back to the ground state, emitting photons of visible light
(525 nm) in the process. The emitted photons are counted by a photomultiplier tube, generating an "intensity" for each scanned pixel. This quantity is expressed in "counts" or "pixel density units" by analogy to the darkness of spots exposed in autoradiography. The host computer
builds a digitized image of the sample by tracking the pixel signal as the scanner head moves
over the screen surface. One advantage of this system is that the response is linear over a
wide range of radiation intensities from the sample.
The image is captured as a 16-bit digital file, which can then be analyzed and manipulated
by the Molecular Analyst software for quantitation and visualization. Portraying the image in
a two-dimensional format is traditional, where the darkness of the pixel is proportional to the
intensity of the signal strength at that location in the sample (Figure 1.2, top). For the purpose of image analysis, however, it is helpful and more accurate to think of the data as a threedimensional structure, where the height or z-axis dimension at each pixel is again proportional
to the signal strength (Figure 1.2, bottom). Sample spots or bands can then be visualized as
the familiar peaks in a profile analysis along the length of a gel lane, or perceived as topographic volumes when quantitating the total signal from a sample.
Y-axis (cm)
2-D Image
2-D Image
3-D Image
3-D Image
X-axis (cm)
Z-axis (Intensity, Counts)
Y-axis (cm)
X-axis (cm)
Fig. 1.2. Two and 3-dimensional representations of a digitized image.
2
DCOG960030/GS-525/505 I.M.
5/12/99 7:52 AM
Page 3
1.3 Overview of Phosphor Imaging Procedure
The procedure for imaging a sample using this storage phosphor technology is shown
in Figure 1.3. Step 1 involves removing any background or prior sample signals from the
Imaging Screen using the Screen Eraser. This normally takes10-20 minutes. Step 2 involves
preparing and attaching the sample to the Loading Dock for subsequent direct contact with
the Imaging Screen. Signal from the sample is recorded onto the screen in this step. Step 3
includes placing the screen into the pulsed, infrared Laser Scanner for the acquisition and
digitization of the recorded signal. This step typically takes about 10 minutes. Step 4 is
analysis of the digitized image which is displayed on the computer monitor. The Molecular
Analyst software supports two primary functions—profile analysis for examining peaks or
bands, and volume analysis for the quantitation of spots, bands, or other user defined areas.
The Imaging Screen is erased again and is ready to be re-exposed.
Step 4
Analyze digitized image using
Molecular Analyst software
Step 1
Blank or “zero” screen
using Screen Eraser
Chemiluminescent or
radioactive sample
Storage Phosphor
Imaging Screen
Step 3
Extract signal stored on
screen using laser scanner
Fig. 1.3. Procedure for storage phosphor imaging.
3
Step 2
Expose sample to screen
using Loading Dock
DCOG960030/GS-525/505 I.M.
5/12/99 7:52 AM
Page 4
1.4 Important Safety Information
Laser Safety Information
Caution: Use of controls or adjustments or performance of procedures other than
those specified herein may result in hazardous laser radiation exposure.
This instrument and its accessories are certified according to 21 CFR 1040 of the Center
for Devices, Radiological Health (CDRH) as a class I laser device (see Figure 1.4). The laser
contained within the scanning unit of the GS-525/GS-505 Molecular Imager systems produces diode laser energy up to 45 milliwatts at 910 nm. The cover of the system is designed
to protect the user. Do not remove the cover for any reason.
Caution: Removal of the top cover is intended for trained service personnel only.
Do not attempt to operate the product with the cover removed. There are no operator serviceable parts inside the instrument. The Molecular Imager system should
be serviced only by Bio-Rad or its trained representatives.
Fig. 1.4. Laser warning label visible when top cover is removed.
Power Safety Information
Figure 1.5 shows the serial number certification label which is found at the rear of the
Model GS-525/GS-505 Molecular Imager systems. This label provides manufacturing data
about the instrument, its voltage settings, and CDRH compliance information. This instrument
and its accessories conform to the IEC and CDRH standards for electrical and laser safety.
Fig. 1.5. Instrument serial number label on the rear of the instrument.
4
DCOG960030/GS-525/505 I.M.
5/12/99 7:52 AM
Page 5
Screen Eraser Safety Information
• The Screen Eraser must be located in an area with adequate ventilation. Insure that the
intake vents and fan exhaust ports are not blocked, and have at least 12 inches of clearance.
• The Screen Eraser must be plugged into a grounded electrical outlet.
• Before changing a bulb, be sure to unplug the Screen Eraser, and allow adequate time
for the bulbs to cool.
Instrument Moving Safety Information
Caution: Care should be taken when lifting and moving the Molecular Imager
systems to avoid personal injury. Although the scanner weighs only 31 Kg, it is
recommended that two people, one on each side of the instrument, lift the scanner
from the bottom. The instrument legs allow enough clearance to easily remove your
hands from underneath the instrument once the scanner is placed on its work space.
Avoid subjecting the Molecular Imager system to shock or vibration while moving.
Section 2
Product Description
2.1 GS-525 and GS-505 Molecular Imager Laser Scanner
General Description
The primary function of the GS-525 Molecular Imager scanner unit is to acquire the latent
image stored on the phosphor screen and convert it into 16-bit digital data. As a SCSI-based
instrument, it is controlled by the host computer, a Macintosh or PC-based system. The
instrument can scan any region of the Imaging Screen, and scan at 800, 200, or 100 µm
resolution. The GS-525 automatically identifies the size of the 20 x 25 cm and the 35 x 43 cm
Imaging Screens, and can fuse scans of one sample taken at different resolutions into a
single, combined image without loss or redundancy of data. The last feature permits
performing a low resolution scan (800 µm) to survey the image profile and then selectively
imaging the area of interest at higher resolution. The GS-505 Molecular Imager scanner
operates in the same manner, accepting only a 20 x 25 cm Imaging Screen.
These features are easily controlled from the scanning window of the Molecular Analyst
software. Refer to the software manual(s) for details.
• LCD Display
• On Line Button
• Contrast Button
Screen Entrance
Door
Fig. 2.1. GS-525/GS-505 Molecular Imager laser scanner.
5
DCOG960030/GS-525/505 I.M.
5/12/99 7:52 AM
Page 6
The LCD display on the front of the Imager displays internal diagnostic data and information relating to the instrument version. When the power is first turned on, the LCD should
display the following messages in order:
Start-up Display Sequence
1.
2.
3.
4.
5.
6.
7.
8.
Bio-Rad GS-525 or GS-505
Molecular Imager
Self Testing
Hardware v. x.xx
Firmware v. x.xx
Initializing
Checking Laser
Ready: No Screen
Note: If any other messages are shown after 2 minutes, the scanner is inoperative and the
scanning window cannot be opened from the host computer. Contact your Bio-Rad
Technical Service Department for assistance.
The only visible controls on the instrument are the ON LINE button and the CONTRAST
button (Figure 2.1). The ON LINE button should be depressed only if the internal software
cannot stop the scanner. The CONTRAST button controls the brightness of the LCD display, which is adjusted by holding down the button. The CONTRAST function cycles so
that continuous depression of the button will cause the display to get lighter and then darker
again. The ON/OFF power switch is on the left side of the scanner.
The scanner is connected to the host computer via a SCSI link, the port for which is on
the rear of the scanner. Before connecting (or disconnecting) the scanner to the host computer, both devices must be turned off to prevent damage to the hardware. As is usual for SCSI
peripheral devices, the scanner should be switched on before the host computer is powered up,
in order for the computer to recognize the peripheral device; an exception is certain PowerMac
configurations, where the computer is turned on first. A service port is also on the rear panel
of the unit; it is used only by Bio-Rad field service personnel. The serial number is on the
back of the unit.
Caution: Before connecting (or disconnecting) the scanner to the host computer,
both devices must be turned off to prevent damage to the hardware.
Scanning Unit Maintenance
The Model GS-525 or GS-505 Molecular Imager system should provide years of troublefree operation. If you suspect that the Molecular Imager system requires maintenance, contact your local Bio-Rad office.
Scanning Unit Precautions
• When the unit is first turned on, allow it to warm up for at least 15 minutes prior to scanning.
• The scanning unit should be turned on at least 40 seconds before the host computer to
allow initialization of the scanner with a Macintosh or PC. With certain PowerMac configurations, this start-up order is reversed; if your PowerMac does not recognize the
scanner following the standard order, turn both units off, then try powering the computer up before the scanner.
• The door should not be opened during a scan since this may cause loss of image data.
6
DCOG960030/GS-525/505 I.M.
5/12/99 7:52 AM
Page 7
Caution: Do not remove the cover from the Molecular Imager system, as this voids
the warranty. There are no user-serviceable components in the scanning unit.
Attempting to operate the product with the cover removed may damage the instrument and expose the operator to laser energy. The Molecular Imager system can be
serviced only by Bio-Rad or its trained representatives. If you experience technical
difficulties with the instrument contact Bio-Rad to schedule a service appointment.
2.2 Host Computer Recommendations
The Model GS-525 and GS-505 Molecular Imager systems are capable of producing
image files up to 30 megabytes in size. To easily manipulate such large images, a powerful
computer is required. The host computer should meet the following recommendations:
• Recommended PC Specifications
Pentium PC
32 megabytes of RAM
1 Gigabyte or larger hard disk
Enhanced 101 keyboard
3.5" floppy disk drive
256 gray level accelerated graphics engine (ATI 8514 Ultra is recommended)
256 gray level color monitor
Windows 3.1 or Windows ’95 or better
Windows compatible mouse
Adaptec SCSI adaptor model 1542XX (required; Bio-Rad catalog number 170-7338)
• Recommended Macintosh Specifications
Power Macintosh
40 megabytes of RAM
1 gigabyte or larger hard disk
16" color monitor
Apple Macintosh mouse
Please refer to your Molecular Analyst/PC or Molecular Analyst/Macintosh software user
manual for detailed host computer system and software requirements. Note that Apple Quadra
700–950 computers require an ATTO Silicon Express SCSI 2 Adaptor (Bio-Rad catalog number 170-7335). To improve the performance of any system, we recommend installing additional RAM or employing utility programs which allow more efficient use of RAM. If the computer
is not purchased from Bio-Rad, the compatibility is the responsibility of the user. Please check with
your local Bio-Rad office regarding compatibility for your specific brand of computer.
2.3 Imaging Screen Cassettes
General Description
The Bio-Rad Imaging Screen is packaged as a cassette, which consists of a screen cover
and the phosphor sheet attached to a metal plate. There are two sizes of Imaging Screens which
can be used with the Molecular Imager System–small format (20 x 25 cm phosphor area) (Figure
2.2) and large format (35 x 43 cm) which can only be used on the GS-525 Molecular Imager
(Figure 2.3). The cassette cover provides protection from light and mechanical abrasion during
transport of the phosphor screen. The phosphor layer contains microscopic storage phosphor particles which are extremely sensitive to both radiation and visible light; the crystals are mixed
7
5/12/99 7:52 AM
Page 8
in an organic binder and covered with a protective plastic sheet. The latent image stored in the
phosphor is recovered by excitation with infrared light from the laser in the Molecular Imager
scanner. Residual signal is removed from the phosphor layer using the Screen Eraser.
Prolonged exposure to light or radiation will not damage or use up the Imaging Screen phosphor, but it will necessitate longer erasing periods. The chemistry of the storage phosphor
found in Bio-Rad Imaging Screens is not compatible for use with other storage phosphor
imaging systems.
The Imaging Screen exhibits the following capabilities:
• Linear response greater than six orders of magnitude.
• 200 µm spatial resolution.
• Sensitive to Alpha-, Beta-, Gamma-emissions and visible light with wavelengths
between 400 and 500 nm.
Screen Sizes
Both sizes of Imaging Screen Cassettes can be used with the GS-525 Molecular Imager
system but only the small format Imaging Screen is accepted by the GS-505 Molecular Imager
system. The two sizes use the same types of phosphor formulation, so that screens of a given
type may be used interchangeably in the GS-525, depending simply on the size and number
of samples you wish to expose at the same time.
The small format Imaging Screen has a phosphor detection area of 20 x 25 cm (Figure 2.2).
This size must be used with a GS-505 Sample Loading Dock. Small screens will not fit into
the GS-525 Loading Dock properly. Small format screens can be used with the GS-525 and
GS-505 Laser Scanner and GS-525 Screen Eraser. The cassette cover of the small screen has
a Release Button in the top surface, which is pushed down to unlatch the cover from the
screen after it is inserted into the Scanner, Eraser, or Loading Dock (Figure 2.2). The two
magnets on the front edge of the Imaging Screen hold the screen in these devices until the
cover is replaced over the Imaging Screen and the latch is re-engaged. The Release Button can
be turned 90 degrees to lock the cover onto the screen. Always lock the cover before carrying the cassette by the handle (Figure 2.2) to prevent the inadvertent release of the screen.
Unlock
Phosphor Imaging Screen
Magnets
Screen Cover
Lock
Screen Release
Button
➡
DCOG960030/GS-525/505 I.M.
Fig. 2.2. Small format, 20 x 25 cm, Imaging Screen Cassette consists of the screen cover and the
phosphor Imaging Screen.
8
5/12/99 7:52 AM
Page 9
The large format Imaging Screen has a phosphor detection area up to 35 x 43 cm
and can only be used with the GS-525 Molecular Imager system (Figure 2.3). The
Screen Cassette has a Release Button in the edge of the handle, which unlatches the
cover from the screen. In order to release the screen from its cover in the Scanner,
Loading Dock or Eraser, first hold the Imaging Screen Cassette by its handle with
your thumb on the Release Button, and then pull the Release Button towards the
center of the screen while pressing it inwards (Figure 2.3). The two-action mechanism
of the large screen cover is designed to prevent accidental release of the screen from its cover.
Magnets
Storage Phosphor
Imaging Screen
(43 x 35 cm)
Screen Cover
Screen Release
Button
➡
DCOG960030/GS-525/505 I.M.
Fig. 2.3. The large format, 35 x 43 cm, Imaging Screen Cassette consists of the screen cover and
the phosphor Imaging Screen.
Imaging Screen Types
There are four types of Imaging Screens which have been developed for specific applications (Table 1).
• BI (Beta Imaging): Used to detect high energy beta isotopes (125I, 32P, and 33P) as well as
lower energy 14C and 35S. This screen is not optimized for weak energy isotopes, so, if
greater sensitivity is required, the CS-type should be used. In general, the BI screen is 20fold more sensitive than film for 125I and 10-fold more sensitive than film for 32P and 33P.
• CS (Weak Beta): Used to detect weak beta energy isotopes (14C and 35S). This screen is
not optimized for high beta energy isotopes. In general, the CS screen is 20-fold more sensitive than film for 35S and 14C. It is 3-fold more sensitive than the BI-type for these weak
isotopes.
• TR (Tritium): Used to detect tritium (3H). In general, the TR screen is 10-fold more sensitive than film without enhancers for 3H. Enhancers should not be used with this Imaging
Screen.
• CH (Chemiluminescence): Used to detect chemiluminescent substrates, e.g. Luminol,
CSPD and CDP-Star. This screen is not recommended for radioisotopes. While the exposure times for the CH Screen are twice as long as for film, most chemiluminescent screen
exposures are short (30 seconds to 30 minutes).
9
DCOG960030/GS-525/505 I.M.
5/12/99 7:52 AM
Page 10
Table 1. Imaging Screen Specifications
Screen Name
Imaging Screen-BI
Primary Resolution
Application
32P, 33P, 125I
Sensitivity
32P–300
µ
32P–9 disintegrations/mm2
0.15 dpm/mm2 in a 1 hr
exposure
(14C, 35S)
Imaging Screen-CS
33P, 14C, 35S
14C–200
µ
14C–60
Imaging Screen-TR
3H
3H–200
µ
3H
Imaging Screen-CH
20 x 25
35 x 43
170-7320
170-7326
disintegrations/mm2 20 x 25 170-7324
1.0 dpm/mm2 in a 1 hr
31 x 42* 170-7328
exposure. 35S is comparable. 20 x 25
- 24,000
disintegrations/mm2
400 dpm/mm2 in a 1 hr
exposure
CDP-Star 428 nm–200 µ 1.1 pJ/mm2 at 428 nm
CSPD
AMPPD
Enhanced
Luminol
Screen Catalog
Size (cm) Number
170-7325
20 x 25
170-7322
35 x 43
2.3 pJ/mm2 at 477 nm
Same as film to 2-fold less
sensitive than film depending
upon the reagent used.
170-7328
* The large format CS Imaging Screen has a slightly smaller phosphor area. The usable sample coordinates are indicated on the
Loading Dock Exposure Pad as the area inside of the red border line. On the image, the area outside of the phosphor region appears
as a lighter region of laser scanner background.
2.4 Screen Eraser
General Description
The GS-525 and GS-505 Screen Erasers remove any residual signals from the screen
phosphor prior to exposure to a sample. The complete erasure process accomplishes "zeroing"
or "blanking" the screen. Erasing the screen to the basal level is critical because this affects
the sensitivity, linear response range, quantitation, exposure time, and image quality generated
by the entire system. Ground level for the erased screen is defined as signal that is 0.1 mean
count above the scanner's background noise, which is the level obtained by performing a scan
without a screen in the scanner. Typically, 10–20 minutes erasure is sufficient for "blanking"
the screen. The eraser removes the signal on the screen by illuminating the entire screen with
infrared light. This light is produced by filtering the output of a set of incandescent light bulbs
to block visible wavelengths.
Note: Erasing the screen to the basal level is critical since this affects the sensitivity, linear
response range, quantitation, exposure time, and image quality generated by the entire system.
LCD Panel/
Control Keys
Door Interlock
Button
Fig. 2.4. Screen Eraser.
10
DCOG960030/GS-525/505 I.M.
5/12/99 7:52 AM
Page 11
The GS-525 Screen Eraser can be used with both small format (20 x 25 cm) and large
format (35 x 43 cm) Imaging Screens. The GS-505 Screen Eraser can only be used with the
small format (20 x 25 cm). The front door is opened by pressing on and releasing the finger
icon (Figure 2.4). The screen is then inserted into this opening. The front door prevents room
light from leaking into the eraser and exposing the screen. Thus, the door must be closed
immediately after inserting the screen.
The Screen Eraser is controlled by the touch pads on the left side (Figure 2.4). The function of each key is described below.
- The CONTRAST key controls the brightness of the LCD display and can be adjusted by
holding down the button. The contrast function cycles so that continuous depression of
the button will cause the display to get lighter and then darker again.
- The TIMED keys permits precise selection of erasure time by using the RAISE and
LOWER pads. The LCD displays "XX.XX= Remain" in hours/minutes when in this
mode. This parameter counts down. The function is preprogrammed with the initial value
of "00.10" or 10 minutes.
- The HOLD key turns the Eraser on continuously. The LCD displays "XX.XX Elapsed"
in hours/minutes when in this mode. The elapsed time counts up.
- The STOP key ends the erasing process.
Safety Information
• The Screen Eraser must be in an area with adequate ventilation. Insure that the intake vents
and fan exhaust ports are not blocked, and have at least 12 inches of clearance.
• The Screen Eraser must be plugged into a grounded electrical outlet.
• Before changing a bulb, unplug the Screen Eraser, and allow adequate time for the bulbs
to cool.
Changing a Screen Eraser Bulb
Power Switch
Light Bulbs
Infrared Filters
Power Cable
Safety Port
Lid Release
Screw
Fig. 2.5. GS-525 Screen Eraser with the lid opened.
11
DCOG960030/GS-525/505 I.M.
5/12/99 7:52 AM
Page 12
The GS-525 Screen Eraser uses twelve 40-watt incandescent light bulbs (Figure 2.5).
Locations of light bulbs are numbered 1 to 12. The GS-505 Screen Eraser uses six 40-watt
incandescent light bulbs. Locations of light bulbs are numbered 1 to 6. When a bulb burns out,
a warning beep will sound and the LCD panel will flash the location number of the defective
bulb.
1. Note the bulb location number shown on the LCD panel.
2. Turn off the power switch and unplug the electrical cord in the back.
3. Turn the lid release screw (Figure 2.5) counter-clockwise.
4. Pull the screw outward and lift the eraser lid up until it is fully extended with the
catch engaged.
5. Wait five minutes for the bulbs to cool and replace the defective bulb indicated on
the LCD panel.
6. Close the eraser lid and tighten the release screw.
7. Plug in the electrical cable into the unit's receptacle.
Caution: Use only 40 W bulbs (catalog number 170-7390). Higher wattage bulbs
can damage Imaging Screens. Weaker bulbs will not erase the screens effectively.
Screen Eraser Care and Maintenance
The infrared optical filter (Figure 2.5) requires occasional cleaning to remove dust accumulation from its surface. To clean the filter, follow the steps recommended below:
1. Open the eraser by following the procedure described in the above section.
2. Use compressed air to blow away the dust.
3. Gently wipe the filter with moist, lint-free paper.
4. Close the lid and tighten the release screw.
5. Plug the electrical cord into the unit's receptacle.
2.5 Sample Loading Dock
General Description
The primary function of the Sample Loading Dock is to insure close contact between the
phosphor of the Imaging Screen and your sample, which is mounted on the exposure pad. This
is necessary for achieving optimal image quality and resolution. The Loading Dock also provides
a light-proof environment during the sample-to-screen exposure, continuing the protection provided by the screen cassette cover. The Loading Dock is designed to be stacked on top of another Loading Dock or a Laser Scanner, reducing the amount of bench space taken up by the system.
There are two models of Sample Loading Dock—GS-505 and GS-525. The GS-525 Loading
Dock is used only for exposing samples to the large format Imaging Screen (35 x 43 cm), while
the GS-505 Loading Dock is used exclusively for exposing samples to the small format Imaging
Screen (20 x 25 cm). Figure 2.6 shows the GS-505 Loading Dock unit and two types of sample
exposure pads—one used for microtiter plates and the other used for blots, gels or TLC plates.
Figure 2.7 shows the GS-525 Loading dock with the large size (35 x 43 cm) exposure pad.
The exposure pad has grid coordinates which match those found in the scanning window
of the Molecular Analyst software. The two coordinate systems align to ± 2 mm; thus, by
12
DCOG960030/GS-525/505 I.M.
5/12/99 7:52 AM
Page 13
noting where you have placed your sample on the exposure pad, it is easy to specify where the
computer should direct the scanner to obtain an image. Identifying the precise sample area will
reduce the required scanning time.
The clamping levers are labeled "IN USE" (red color), which indicates that an exposure
is in progress. The opposite is "EMPTY" (green color). Long term light protection is ensured
only when the loading dock is in the IN USE position.
Clamping Levers
Removable
Clock/timer
Exposure Pad
for Microtiter
Plates
Exposure Pad
for Gel, Blot,
and TLC Plate
Samples
Screen Entrance
Fig. 2.6. GS-505 Loading Dock and exposure pads for use with 20 x 25 cm Imaging Screen.
Clamp Lever
Removable
Exposure Pad
(43x 35 cm)
Sliding
Drawer
Removable
Clock/timer
Door
Screen Entrance
Fig. 2.7. GS-525 Sample Loading Dock and exposure pad for use with the 35 x 43 cm Imaging
Screen.
Loading Dock Maintenance
This is a simple device that should not require maintenance other than simple cleaning of
the exposure pad to remove any residue or possible radioactive contamination. Use a paper
towel moistened with detergent solution such as Bio-Rad's Cleaning Concentrate (catalog
number 161-0722), diluted 1 to 20 with water, to wipe the surface of the pad. Do not immerse
the pad in liquids.
13
DCOG960030/GS-525/505 I.M.
5/12/99 7:52 AM
Page 14
Section 3
Setting up the Molecular Imager System
3.1 Installation Program
There are three steps for the installation of the GS-525 or GS-505 Molecular Imager
system. The components are delivered to your lab, a service representative unpacks and sets
up the Molecular Imager system and verifies its operation, and a Bio-Rad representative
trains your laboratory staff on the operation of the Molecular Imager system and the accompanying peripherals and software. When the Molecular Imager system arrives in your lab,
verify that all of the proper components have been received. Contact your Bio-Rad service
representative to arrange for the complete installation program and training.
Your GS-525/GS-505 Molecular Imager system should arrive complete with the following items:
Quantity
1
1
1
1
2
1
1
1
1
Item
GS-525 or GS-505 Molecular Imager scanner
Large Imaging Screen Cassette-BI (GS-525) or
Small Imaging Screen Cassette-BI (GS-505)
GS-525 or GS-505 Sample Loading Dock
GS-525 or GS-505 Screen Eraser
Power Cord
Molecular Analyst software (PC or Macintosh)
SCSI Interface Cable (PC or Macintosh)
Instruction Manual
Warranty Card (please complete and mail promptly)
Note: Do not unpack the laser translation mechanism! The Molecular Imager scanning mechanism is protected from shipping damage by fixing this component in
place with specialized packing materials. These restrain the movement of the mechanism. Removal of these materials must be performed by a qualified Bio-Rad Field
Service representative to avoid damaging this mechanism.
Retain all packaging materials. Additional charges will be assessed if packaging is not
available for instrument warranty service shipping.
Lastly, on-site training will be scheduled. A Bio-Rad representative will visit your laboratory to conduct in-depth training in the function and operation of the Molecular Imager system.
3.2 Selecting the Location of System Components
Laser Scanner and Host Computer
Precautions should be taken when lifting and moving the Molecular Imager to avoid personal
injury. Although the scanner weighs only 31 Kg, it is recommended that two people, one on
each side of the instrument, lift the scanner from the bottom. The instrument legs allow enough
clearance to easily remove your hands from underneath the instrument once it is placed on its
work space. Avoid subjecting the Molecular Imager system to shock or vibration while moving.
The Laser Scanner should be placed on a bench where it can be easily connected to the
host computer, and where there is adequate room to insert the Imaging Cassette into the door
on the front of the scanner. Both the Molecular Imager system and its host computer should
be connected to a high quality electrical surge suppresser to avoid damage from A/C voltage
14
DCOG960030/GS-525/505 I.M.
5/12/99 7:52 AM
Page 15
fluctuations on a circuit free of strong electrical noise. The host computer should be located
at a work station which minimizes operator fatigue. These components should be in an area
free of excessive dust or moisture, strong magnetic fields, and ionizing radiation.
Screen Eraser
The Screen Eraser is equipped with a self-resetting, high temperature cut-off switch,
designed to avoid the accumulation of excessive heat in the screen erasing chamber.
• The Screen Eraser must be placed in an area with adequate ventilation. Insure that the
intake vents and fan exhaust ports are not blocked, and have at least 12 inches of clearance.
• The Screen Eraser must be plugged into a grounded electrical outlet.
• Before changing a bulb, be sure to unplug the Screen Eraser, and allow adequate time
for the bulbs to cool.
Sample Loading Dock
The Sample Loading Dock does not require any power, therefore it can be placed at any
convenient location where radioactive materials are normally handled. If desired, the Loading
Dock can be placed on top of the Scanner or another Loading Dock.
3.3 SCSI Connection
The host computer must be connected to the Model GS-525or GS-505 Laser Scanner via
a SCSI interface. ALL INSTRUMENTS MUST BE TURNED OFF PRIOR TO ATTEMPTING ANY CONNECTION! The proper SCSI cable is included with the scanner depending
on whether the PC or Macintosh configuration was ordered. The Laser Scanner is a SCSI terminating device when its power is on; call Bio-Rad Technical Service for additional details.
PC SCSI Connection
The PC SCSI connection requires that an Adaptec SCSI card Model 1542XX be installed
in the IBM AT-compatible 16-bit PC. Other brands of SCSI interface adaptors are not compatible. The Adaptec SCSI adaptor is available from Bio-Rad (catalog number 170-7338).
The Adaptec card must have the proper installation and jumper settings as listed in the
Molecular Analyst/PC user manual.
Attach one end of the SCSI cable to the 50-pin port on the Adaptec SCSI adaptor. Attach
the other end to the 50-pin female SCSI port on the back of the Laser Scanner. Clip the connector bails on the scanner to the sides of the SCSI connector.
Macintosh SCSI Connection
Power Macintosh computers are supplied with a configuration suitable for direct connection to the Laser Scanner. Other Apple computers requires that an ATTO Silicon Express brand
SCSI 2 card be installed in a Macintosh NuBus slot. Other brands of SCSI interface adaptors
are not compatible. The ATTO card can be purchased from Bio-Rad (catalog number
170-7335). Follow the instructions which accompany the ATTO card for proper installation.
Attach the small 'D' connector of the SCSI cable to port of the Power Macintosh or the
ATTO SCSI 2 card. Next, connect the 50-pin Centronics connector to the 50-pin female
Centronics SCSI port on the back of the Laser Scanner. Clip the connector bails on the scanner to the sides of the SCSI connector.
15
DCOG960030/GS-525/505 I.M.
5/12/99 7:52 AM
Page 16
3.4 Unpacking the Imaging Screen Cassette
Imaging Screen Cassettes are shipped sealed in a light- and moisture-proof metalized
barrier bag. Remove the Imaging Screen Cassette from its box, and unzip or cut open one
end of the sealed bag. Retain all packaging for screen storage and shipping.
The Imaging Screens are light sensitive. The phosphor surface of the screen should only be
exposed briefly in subdued room light, or in a darkroom under safelight illumination. Exposing the
phosphor surface to direct room light for extended periods of time will require lengthy erasure times
before use. The screen cassette cover is a light baffling system and is not 100% light tight. Therefore,
the imaging screen cassette should not be left in room light for an extended period of time.
Section 4
Operation of the Molecular Imager System
4.1 Quick Guide
Warm-up Scanner
for 15 min
Erase Screen
for 10 min
Prepare Sample
(Seal in plastic wrap)
Cover with Screen-Guard
Expose Sample
Scan Sample
Analyze Data
For the purpose of this discussion, it is assumed that you are imaging a wet, 32P Southern
blot and a dry, 32P sequencing gel. The samples will be exposed to a large format 35 x 43 cm
Imaging Screen-BI and scanned on the GS-525 Molecular Imager system.
1. Turn on the Molecular Imager scanner and allow it to warm up for at least 15 minutes.
Remember to switch on the scanner first, wait for 40 seconds until the LCD panel displays
"READY: No Screen", then turn on the host computer. A PowerMac may require
reverse start-up order.
2. Insert the Imaging Screen-BI (35 x 43 cm) into the Eraser, remove the cover and immediately close the Eraser door. Select the TIMED key and set a 10 minute erasure time.
- See Section 2.3 for functional descriptions of each type of Imaging Screen.
- See Section 4.2 for screen erasing guidelines.
3. Enclose your wet 32P sample in a heat-sealable bag and CHECK FOR LEAKAGE.
Reseal if there are any leaks and then wipe the outside of the bag completely dry.
- See Section 4.2 for a detailed description of sample preparation for other types of
samples, i.e. chemiluminescence, or wet or dry 14C and 32P samples.
16
DCOG960030/GS-525/505 I.M.
5/12/99 7:52 AM
Page 17
4. Tape the sides of the sample securely onto the Loading Dock Exposure Pad (Figure 4.1).
Make sure that the sample lies flat and has no folds or wrinkles. Wrinkles will prevent
close contact with the screen and will degrade the resolution of the image.
5. Cover the entire exposure pad with a sheet of Screen-Guard film - 35 x 43 cm (catalog number 170-7484) (Figure 4.1). Tape the Screen-Guard to the Exposure Pad at four
corners. DO NOT USE SMALL-SIZED SCREEN-GUARD ON THE LARGE PAD.
➡
➡
Tape on
both sides
Wet blot in a
Sequencing
heat sealable bag
gel
Screen Guard
(43 x 35 cm)
Tape all
four corners
Fig. 4.1. Preparing Samples for Exposure to an Imaging Screen.
6. Place the Exposure Pad into the Loading Dock and make sure that it is locked firmly
into the spring lock mechanism by pulling up on the exposure pad.
7. Using the cassette cover, remove the Imaging Screen-BI from the Screen Eraser and
insert into the Loading Dock. The phosphor side of the Imaging Screen must face down.
8. Remove the screen cover and pull both Loading Dock clamp levers towards you. The
"IN USE" label on the clamp levers should be visible. The screen is now being exposed
to the sample.
9. After the appropriate exposure time (typically 1/10 the exposure time of film), push
both clamp levers away from you, reinsert the screen cover, and remove the screen.
10. Insert the screen cassette into the scanner, remove the cover, and immediately close the
scanner door. THE SCANNER WILL NOT OPERATE WITH THE DOOR OPEN.
11. From the host computer, open the Molecular Analyst software by double-clicking
on the icon.
For the PC version, select New from the File menu to open the scanning window.
Refer to the Molecular Analyst software user manual for detailed instructions.
For the Mac version, under the File menu, select Acquire to open the scanning
window. Refer to the Molecular Analyst software user manual for detailed instructions.
12. Enter the appropriate sample coordinates from the exposure pad into the scanning window.
13. Choose the desired resolution setting and select Acquire for Mac and Scan for PC
software. DO NOT OPEN THE DOOR UNTIL THE SCAN IS COMPLETE.
Your data will be permanently lost if you open the door during the scan.
14. Save the image file on the computer. Recover and erase the screen for 10–20 minutes before storage.
15. The data are ready for analysis. For a quick guide to the software, read the "10
Minute" Molecular Analyst Software Guide- Bulletin 1904 for the PC and Bulletin
1905 for the Macintosh.
17
DCOG960030/GS-525/505 I.M.
5/12/99 7:52 AM
Page 18
4.2 Detailed Procedures
Using Imaging Screens.
Preparing A New Imaging Screen for Use
The Imaging Screen Cassettes -BI, -CH, and -CS are shipped in a light- and moisture-proof
metalized barrier bag (catalog number 170-7353) containing desiccant. The Imaging Cassette-TR
(catalog number 170-7325) is shipped in an additional, black light-tight bag (catalog number
170-7329).
Optimal image quality can only be achieved with a thoroughly erased screen. A very weak
intensity sample will require that the Imaging Screen be erased down to 0.1 mean count above
the baseline level (baseline value is obtained by scanning with no screen in the scanner).
Note: The Imaging Screens are not erased prior to shipment from the factory and
should be erased for 24 hours prior to first use. Subsequent erasures should only
take 10 minutes.
Because the Imaging Screens are activated by visible light, exposing the phosphor surface
to direct room light will necessitate lengthy erasure times. If it is necessary to remove the
cover of the screen, do so under photographic safelight conditions to minimize the need for
erasing. The screen cover is a light baffling system, but it is not 100% light-tight. Therefore,
the imaging screen cassette should not be left in room light for an extended period of time.
Note that the tritium screen cassette has a finer light-baffling felt in the cover, and it should
be stored in the light-tight black bag when not in use.
To insure the long term storage and safe-keeping of the screens please retain the original
boxes and bags for these purposes.
Caution: The phosphor surface of the screen is sensitive to damage from moisture,
mishandling, and improper use of solvents.
Erasing the Imaging Screen
The Screen Eraser contains a series of bulbs that produce light which is filtered to the
approximate wavelength of the Molecular Imager's infrared laser (910 nm). Exposing the
Imaging Screen in the Screen Eraser reduces all of the phosphor crystals to the ground state,
removing any residual latent images and background noise.
To erase the Imaging Screen, open the door in the front of the Screen Eraser and insert the
screen until its magnets catch on the back of the unit. If using the 20 x 25 cm screen, depress
and hold the screen cover lock button and slide the cover off of the screen. If using the 35 x 43
cm screen, pull the Release Button toward the center and press inward to release the cover
from the screen (Figure 4.2). Close the door to the eraser and set the timer to the desired
erasure time. To erase continuously set the eraser to HOLD.
18
DCOG960030/GS-525/505 I.M.
5/12/99 7:52 AM
Page 19
• Timed key
• Raise key
• Lower key
Screen Release
Button
Fig. 4.2. Insertion of large format Imaging Screen into GS-525 Screen Eraser.
It is normal for the light bulbs inside the screen eraser to turn off and on periodically.
This is the result of a heat sensor which keeps the Imaging Screen from getting too hot while
being erased.
The erasing process will typically require only 10–20 minutes before each use, assuming
the previous use has not charged the phosphor in the screen above 65,000 pixel density units.
An erasing time guideline is shown below.
Erasing Guidelines
• Before each exposure:
10 minute erasure
• After a high dosage exposure (up to 5,000 PD units):
60 minute erasure
• After exposure to room light (> 65,000 PD units):
24 hour erasure
Imaging Screens should be erased to less than 0.1 mean count above scanner baseline
level. Check this using the following the procedure:
1. Perform an 800 µm resolution scan without an Imaging Screen in the scanner, i.e. an
"air scan."
2. Determine the mean counts using the volume analysis tool in the Molecular Analyst
Software.
3. Perform an 800 µm scan with the erased Imaging Screen that you wish to check.
4. Again, determine the mean counts using the volume analysis tool.
5. Calculate the difference between the two mean count values.
Note: For optimal sensitivity, image quality, and quantitation, an Imaging Screen
must be erased down to 0.1 mean count above the scanner baseline level. The screen
will not be damaged by extended erasing.
Bio-Rad Imaging Screens will accumulate background signals from cosmic radiation at
a rate of approximately one mean count per day. If the screen is exposed to room light, it will
gain approximately 1,000 mean counts/second. After 30 minutes of exposure to room light,
the Imaging Screen will be completely activated, and about 24 hours of erasing will be required
to completely erase the screen. Exposure to a red safelight in a darkroom will not significantly activate the Imaging Screen.
19
DCOG960030/GS-525/505 I.M.
5/12/99 7:52 AM
Page 20
Screen Cassette Care and Maintenance
Storage of the Imaging Screens
Always erase the screen prior to storage. Because the screen cassette cover is not 100%
light proof, it is recommended that the screen be stored in its original packaging. If the screen
will not be used for some time, it should be sealed in a moisture-proof bag, e.g. the Bio-Rad
Screen Storage Bag with desiccant (catalog number 170-7353; provided with Imaging ScreenCS and Imaging Screen-TR), and placed in its original box. The surface of the screen should
be completely protected. Do not place heavy objects on top of the Imaging Screen Cassette.
With proper care, the imaging screen should maintain its performance through years of use.
In areas of high humidity (>50%), use of the Bio-Rad Screen Storage Bag with desiccant will
prevent moisture contamination of the screen.
Always store TR-screen cassettes in the Screen Storage Bag when not in use.
Care of Imaging Screens
Utmost care should be taken to ensure that the protective plastic covering over the phosphor is not damaged. The phosphor crystals are hygroscopic and any holes, nicks or punctures
in this environmental barrier will eventually cause damage to the phosphor and render that portion unusable. For the same reason, the Imaging Cassettes CS and TR, with their thinner coverings mandated by the weak particle energies, should never be directly exposed to wet gels
or to wet chemicals.
To check a screen for radioactive contamination:
1. Erase the screen to background levels.
2. Check for full erasure by scanning at 800 microns.
3. Place the screen in a dark area, such as a lab drawer, for 6 to 24 hours.
4. Scan the screen at 800 microns. Any contamination will be visible as a high signal
overbackground. If there is contamination, clean the screen as described below and
clean the Sample Loading Dock exposure pad with the same cleaning solution. Screen
contamination will be minimized by using Screen Guard metalized plastic
sheets (catalog number 170-7483 for small size, 170-7484 for large format) to separate
the phosphor screen from wet gels and from radioactive samples.
Cleaning Imaging Screens
If contaminated, the screens should be cleaned to remove any radioactive contamination,
sample residue, or dust. To reduce the amount of erasing time, the screens should be cleaned
in a dark room under a photographic safe light. If the screens are cleaned under normal room
light, they will need to be erased for 24 hours before use. The recommended cleaning
solution for BI-, CS-, and CH-screens is Bio-Rad Cleaning Concentrate (catalog number
161-0722), diluted 1 to 20 with water. TR-screens should only be cleaned by very brief treatment with high purity water.
Caution: Imaging Screens should not be cleaned with any other liquids.
20
DCOG960030/GS-525/505 I.M.
5/12/99 7:52 AM
Page 21
To clean a screen:
1. In a dark room, carefully remove the screen from the cassette cover. Handle the
screen only by the edges. Avoid touching the screen coating with any sharp articles,
such as finger nails. The screen is coated with a thin layer of plastic and scratching
this protective layer could damage the screen, making that area unusable.
2. Apply the cleaning liquid to a soft, lint-free-cloth and gently wipe the screen.
3. With a dry section of the cloth, gently wipe the screen to remove any excess moisture.
If the screen had radioactive contamination, properly discard the radioactive cloth.
4. To confirm that the screen has been cleaned from high energy radioactive contamination,
use a Geiger counter.
5. Without touching the screen coating, place the screen back in its cassette cover.
6. Erase the screen to background before use. Repeat the contamination check above.
Preparing your Sample
Dry Radioactive Samples
Dry, thin samples such as nitrocellulose membranes, dried gels or plastic TLC sheets can
be exposed directly to the Imaging Screens using the Loading Dock. A sheet of Screen-Guard
should be placed between the sample and the screen to eliminate any chances of radioactive
contamination (Figure 4.3).
Dry, thick samples, such as glass TLC plates, can be exposed using the Loading Dock, but
the clamping levers should be tightened only partially to avoid breaking the glass plate.
Alternatively, such samples can be imaged in a darkroom. Place the sample right-side-up on a
clean, flat surface and cover it with a Screen-Guard film. Remove the screen from the cassette
cover, invert the screen and lower it onto the sample so that the sample is centered under the
screen. The weight of the screen will ensure adequate contact. Placing the sample and screen in
an Exposure Bag (catalog number 170-7329) will prevent inadvertant exposure to room light.
Wet Radioactive Samples
Precautions must be taken to prevent wet samples from contaminating the Imaging Screen.
Wet, thin samples must be completely enclosed in a heat-sealable bag, and moist samples
must be covered with plastic wrap before being exposed to the Imaging Screen using the
Exposure Pad. A sheet of Screen-Guard should always be placed between the sample and the
screen to minimize screen contamination due to leakage (Fig. 4.3). Plastic wraps will attenuate weak beta radiation signals according to the following table:
Attenuation of Radiation by Various Plastic Wraps
Wrap Type
32P
2 mil Seal-A-Meal Bag
14C
3H
Application
16% 82%
>99.99%
Use for wet samples
1/2 mil Saran Wrap
6%
50%
99.7%
Use for moist samples
0.25 mil Screen-Guard Film
3%
23%
98%
Use for radioactive samples
except 3H
Note: When enclosing the sample in plastic wrap or heat-sealable bags, make sure that there
are no surface wrinkles on the side of the sample that will come in contact with the screen.
Wrinkles prevent close contact with the screen, which will result in poor image resolution.
21
DCOG960030/GS-525/505 I.M.
5/12/99 7:52 AM
Page 22
Chemiluminescent Samples
Because chemiluminescent samples are wet, precautions must be taken to prevent moisture from contacting the screen. We recommend placing the chemiluminescent blot between
two full-sized (8.5 x 11 in), clear plastic overhead transparency sheets. Attach the sample
package onto the exposure pad by taping at all four corners. Then wipe the outside dry.
Alternatively, the sample can be contained in a heat-sealable bag, taped on all four sides onto
the exposure pad, and covered with an overhead transparency sheet. Hold the transparency
onto the exposure pad by taping at the four corners. Screen Guard cannot be used for chemiluminescent samples because it is opaque to light.
Note: We recommend placing the chemiluminescent blot between two full-sized (8.5 x
11 inches), clear plastic sheets. Attach the sample package onto the exposure pad by taping at all four corners. Then wipe the outside completely dry.
Microtiter Plate Samples
Simply place the sample into the exposure pad designed for microtiter plates (catalog
number 170-7386); this accessory can only be used with the GS-505 Sample Loading Dock
and small format Imaging Screens. Four microtiter plates can fit onto the exposure pad. Use
only weak b-emitting isotopes (14C and 35S) with plastic microtiter plates since these emissions
do not penetrate into adjoining wells; this eliminates "cross talk" and halo images. Be sure to
cover the wells of the microtiter plate with plastic wrap or adhesive film to prevent radioactive contamination with the Imaging Screen. A sheet of Screen-Guard can also be placed
between the microtiter plate and the Imaging Screen.
For chemiluminescent samples, use white microtiter plates to prevent "cross talk" between
wells. Place an overhead transparency sheet (8.5 x 11 in) between the microtiter plate and
the Imaging Screen.
Exposing the Imaging Screen to Your Sample
Using the GS-505 or GS-525 Sample Loading Dock
1. Lift the door of the loading dock upward and then outward to pull out the drawer
(Figure 2.7).
2. Remove the exposure pad from the loading dock by pushing to the rear and upward to
disengage the spring locking mechanism.
3. Place the sample on the exposure pad and tape securely in place (Figure 4.3). Samples
with sharp edges should be taped on all sides to prevent accidental scratching of the
phosphor screen. If a sample is thick, has curled edges or bunches of plastic wrap lifting the edges, be sure to tape the edges securely. Try to eliminate surface wrinkles or
unevenness that may interfere with the contact between the screen and the sample.
Poor contact between the screen and the sample will degrade image resolution.
4. Overlay the sample with a sheet of Screen-Guard for radioactive samples (Figure 4.3).
For chemiluminescent samples, use an 8.5 x 11 inch overhead transparency sheet.
Tape all four corners to hold the sheet onto the exposure pad.
22
DCOG960030/GS-525/505 I.M.
5/12/99 7:53 AM
Page 23
➡
➡
Tape on
both sides
Wet blot in a
Sequencing
heat sealable bag
gel
Screen Guard
(43 x 35 cm)
Tape all
four corners
Fig. 4.3. Preparing radioactive samples for exposure to a large format Imaging Screen.
5. Place the pad into the drawer, making sure that it is engaged in the spring lock and
lies flat against the bottom of the drawer. To engage the spring lock, push the exposure
pad to the rear and down (Figure 4.4). Lift up gently on the exposure pad up to check
that the exposure pad is held firmly in place.
Exposure Pad
covered with
Screen-Guard
Spring Lock
Loading Dock
Drawer
Exposure Pad
covered with
Screen-Guard
Fig. 4.4. Engaging the exposure pad in the Loading Dock drawer.
23
5/12/99 7:53 AM
Page 24
6. Push the drawer back into the closed position.
Reminder: Erase the Imaging Screen for 10 min immediately before use for the best results.
7. Insert the screen into the Loading Dock.
a) Turn the screen cassette upside-down, i.e. phosphor side down.
b)Push the entire cassette into the screen entrance slot in the front of the drawer (Figure 4.5).
c) Insert until the screen contacts the back of the Loading Dock, permitting the magnets
of the screen to attach to the back of the Loading Dock.
d) When using the 20 x 25 cm Imaging Screen, push down the screen release button and
pull the screen cover back out of the Loading Dock (Figure 4.5). When using the 35 x 43 cm
Imaging Screen, pull the Release Button toward the center of the screen and press
inward while pulling the screen cover back out of the loading dock (Figure 4.6).
Clamping levers
➡
DCOG960030/GS-525/505 I.M.
Screen Cassette
with phosphor
side face down
Fig. 4.5. Insertion of small Imaging Screen into the GS-505 Loading Dock.
Screen Cassette
with phosphor
side face down
Screen Release
Botton
Fig. 4.6. Insertion of large Imaging Screen into the GS-525 Screen Eraser.
8. Turn both clamping levers towards you simultaneously until they stop. This is the engaged
position in which the screen is lowered onto the sample. The drawer cannot be pulled out
if the screen is clamped in the loading dock. This mechanism prevents accidentally exposing the screen to room light.
24
DCOG960030/GS-525/505 I.M.
5/12/99 7:53 AM
Page 25
9. Use the timer to precisely measure the duration of sample exposure to the Imaging Screen.
Typical exposure times are 1/10 the exposure that you would give to autoradiography
film. Optimal quantitation of samples will be obtained if the strongest pixel signals
approach but do not equal the maximum value of 65,635 or "saturation."
10. To remove the screen, turn the clamp levers away from you simultaneously, and reverse the
steps described above. For the best image quality, the screen should be scanned immediately.
The clamping levers are labeled IN USE (red color) which indicates that an exposure is
in progress. The EMPTY (green color) position should be indicated when your Imaging
Screen and sample have been removed. Long-term light protection is ensured only when the
Loading Dock is in the IN USE or engaged position.
Turning on the Molecular Imager Laser Scanner
To turn on the Molecular Imager scanner, press the power switch located on the right
side of the unit. The LCD display on the front of the Molecular Imager displays internal diagnostic data and information relating to the instrument version. When the power is first turned
on, the LCD should display the sequence of messages shown below. This process usually
takes approximately 40 seconds.
1.
2.
3.
4.
5.
6.
7.
8.
Bio-Rad GS-525 or GS-505
Molecular Imager
Self Testing
Hardware v. x.xx
Firmware v. x.xx
Initializing
Checking Laser
Ready: No Screen
When the "Ready: No Screen " message is displayed, the host computer can be turned on.
Some PowerMac configurations will require that the computer be turned on before the scanner.
Note: If any other messages are shown after waiting for two minutes, the scanner is
inoperative and the scanning window cannot be opened from the host computer.
Contact your Bio-Rad Technical Service Department for assistance.
To control the scanner from the host computer, please refer to the PC or Macintosh
Molecular Analyst Software Instruction Manual.
The CONTRAST button is located on the display in the upper left-hand corner of the
unit. This button controls the contrast of the LCD display and can be adjusted by holding
down the button. The CONTRAST function cycles so that continuous depression of the button will cause the display to get lighter and then darker again. The ON LINE button near the
LCD panel should be depressed only in the unlikely event that the internal software cannot stop
the scanner.
Scanning Unit Precautions
The scanning unit is controlled by the external host computer. The following precautions
should be observed:
- The scanner should be warmed up for at least 15 minutes prior to scanning. Usually the
scanner can be left on unless it will not be used for more than 48 hours.
- The scanner should be turned on at least 40 seconds before the host computer to allow
initialization of the scanner. Certain PowerMac configurations must be turned on first.
- The door should not be opened during a scan since this will cause loss of image data.
25
DCOG960030/GS-525/505 I.M.
5/12/99 7:53 AM
Page 26
Placing the screen in the scanner
The Imaging Screen will retain a significant percentage of the latent image signal over a
24 hour period, depending upon which particular isotope or chemiluminescent substrate system is being used, and on the signal strength of the sample. However, maximal image quality will be obtained by scanning the screen as soon as possible after sample exposure.
Note: Do not insert the Imaging Screen cassette into the Molecular Imager Laser
Scanner without first powering up the Molecular Imager as this may damage the
scanning head.
1. Insert the Imaging Screen cassette into the Molecular Imager scanner until it comes to
stop and the magnets catch at the back of the unit.
2. When using the 20 x 25 cm Imaging Screen, press the cassette cover release button and
gently pull the cassette cover completely from the Molecular Imager, leaving the
Imaging Screen in place. When using the 35 x 43 cm Imaging Screen, pull the Release
Button toward the center of the screen and press inward while pulling the screen cover
back out of the scanner.
3. The Molecular Imager door can then be closed.
Scanning the Imaging Screen
1. Run the Molecular Analyst Software and, under the File menu, select Acquire (Mac)
or New (PC) to open the scan window.
Note: Refer to the Molecular Analyst Software Manuals for detailed instructions.
2. Enter the coordinates of the sample on the exposure pad into the scanning window.
There will be a rectangular outline indicating the scanning area.
3. Select the desired resolution setting. The highest resolution is 100 µm and the lowest
is 800 µm.
4. Select Acquire to begin scanning.
Caution: Do not open the door of the scanner while the unit is scanning. This
will terminate your scan prematurely and may result in the complete loss of the
image data file.
5. When scanning is completed, open the Molecular Imager door. This will cause
the scanning head to automatically return to its 'home' position. Insert the screen cassette
cover into the Molecular Imager until the locking mechanism latches onto the screen.
Remove the Imaging Screen cassette, providing support underneath the Imaging Screen.
Analyzing the Acquired Image
After the image has been acquired and saved, it can be manipulated in order to optimize
its use and appearance for several subsequent tasks. These uses include quantitation of signal
by volume analysis, profile analysis of lanes, including regression analysis and molecular
weight determination, printing as hard copy, and export to other software programs, for example for specialized functions such as RFLP analysis, or for development of sophisticated presentation materials (Figure 4.7). Derived data tables can also be exported to other software
programs for preparation of charts or graphs.
26
DCOG960030/GS-525/505 I.M.
5/12/99 7:53 AM
Page 27
Refer to the Molecular Analyst software for detailed instructions.
Acquire Digitized Image
Optimize Image
for Specific Tasks
Volume Analysis
Profile Analysis
Print hard copy
Export to other
software
Analyze an plot data
Print charts or graphs
Fig. 4.7. Flow chart of image file applications.
4.3 Factors Affecting Image Quality
Resolution
Close contact of the sample to the active surface of the Imaging Screen is important to produce the highest quality image. Excess layers of tape or wrinkles may produce a gap of only
a few thousandths of an inch, but this can be enough to produce a fuzzy image.
Samples that are over-exposed will result in images with low resolution. If this occurs,
erase the screen and expose the sample again for less time. Also, high background on a screen
can cause decreased resolution of weak signals. In this case, make sure the screen is thoroughly erased before exposing it.
Sensitivity
Optimal sensitivity can only be achieved with a thoroughly erased screen. A very weak
intensity sample is better visualized if the Imaging Screen is erased down to one count above
the baseline (baseline is measured with no screen in the scanner- refer to the Erasing Guidelines
for more information).
A 1 hour exposure will allow a detection limit of approximately 0.15 dpm/mm2 for 32P
with a well-erased Imaging Screen. A rough estimate for the proper exposure would be to
expose the Imaging Screen one-tenth the time normally used for film.
The Transformation function in the user software will have a dramatic effect on the
sensitivity. This function changes the darkness of the 8-bit screen image. You can scan an
image and see a blank computer screen simply because the Transformation function has
defaulted to a value that is too high for your image. Adjust the function until you see the
image. This only affects the image presented on the monitor; it does not affect your data.
See the software manual for more information.
27
DCOG960030/GS-525/505 I.M.
5/12/99 7:53 AM
Page 28
Section 5
Troubleshooting
5.1 Problem-Solving Guide
Problem
Possible Cause
Solution
Scanner is not responding
to host computer.
Door to Scanner is open.
Close door.
Scanner is not on-line.
Press on-line button.
SCSI cable not connected
to Scanner or host computer.
Connect SCSI cable properly.
Image is not visible on
monitor.
Scans have dark "halos."
Start-up sequence is wrong.
Turn off units and restart in
opposite order.
SCSI cable is defective.
Replace the SCSI cable.
Computer has a conflicting
program or init.
Call Bio-Rad for assistance.
The "Transformation" function
is set too high.
Set to a lower maximum value.
Insufficient exposure time.
Expose sample for a longer
time.
Area of sample exposure
was not scanned.
Check location of sample
on Loading Dock pad and
rescan.
Water from sample has
penetrated the screen coating.
The screen may need to be
replaced. Follow the protection
guidelines in this manual.
Radioactive contamination on
the phosphor surface coating.
Check and clean using
protocols in this manual.
5.2 Technical Service
For technical assistance with the Molecular Imager system including all hardware and
software, contact your local Bio-Rad office, or in the US call 1-800-424-6723. All spare parts
not listed in this document can be ordered by contacting your local Bio-Rad office or, in the
US, call 1-800-424-6723.
28
DCOG960030/GS-525/505 I.M.
5/12/99 7:53 AM
Page 29
Section 6
GS-525 Molecular Imager System Specifications
System Technical Specifications
Linear dynamic range
Pixel resolution
Image resolution
Pixel density
Signal decay
Scanning area
Operating Conditions:
Supply voltage
Frequency
Environmental conditions:
Temperature
Humidity
Total weight
1:100,000
100, 200, or 800 µm, selectable
2.5 line pairs/mm or 200 µm
16 bit (0 - 65,635)
32P 75% retention 24 hr
35 x 43 cm or 20 x 25 cm
100–240 VAC ±10%
50–60 Hz
0 to 70 °C
0 to 95%
60 kg
GS-525/GS-505 Molecular Imager Component Specifications
Laser Scanner
Dimensions
Construction
Weight
ElectricalMaximum power
Input voltage range
Fuses
EnvironmentalOperating
Storage
43 (depth) x 48 (width) x 17.5 (height) cm
Aluminum chassis
31 kg
650 Watts
100–240 VAC, 50–60 Hz
No user-serviceable fuses
50 °F (10 °C) to 90 °F (32 °C) temperature
30-80% humidity
32 °F (0 °C) to 140 °F (60 °C) temperature
10-90% humidity
Screen Eraser, GS-525
Dimensions
Construction
Weight
Input voltage range
Fuses
Illumination
23 (height) x 51 (width) x 57 (depth) cm
Aluminum chassis
13.6 kg
100/120 VAC, 50–60 Hz
220/240 VAC, 50–60 Hz
6.3 Amp (100/120 VAC)
3.15 Amp (220/240 VAC)
12 x 40 Watt user-replaceable bulbs
Loading Dock, GS-525
Dimensions
Weight
Construction
63.5 (length) x 49.5 (width) x 11.4 (height) cm
14.5 kg
Aluminum chassis
29
DCOG960030/GS-525/505 I.M.
5/12/99 7:53 AM
Page 30
Screen Eraser, GS-505
Dimensions
Construction
Weight
Input voltage range
Fuses
Illumination
19.7 (height) x 37.5 (width) x 47.6 (depth) cm
Aluminum chassis
10 kg
100/120 VAC, 50–60 Hz
220/240 VAC, 50–60 Hz
3.15 Amp (100/120 VAC)
1.6 Amp (220/240 VAC)
6 x 40 Watt user-replaceable bulbs
Loading Dock, GS-505
Dimensions
Weight
Construction
42.7 (length) x 42.9 (width) x 10.2 (height) cm
7 kg
Aluminum chassis
Imaging Screen Cassette, Large Format
Dimensions
Weight
Construction
63.5 (length) x 37.5 (width) x 2.3 (height) cm
2.25 kg
Aluminum, laminate on honeycomb
Imaging Screen Cassette, Small Format
Dimensions
Weight
Construction
48.5 (length) x 37.3 (width) x 2.1 (height) cm
2.7 kg
Aluminum
Macintosh and Power Macintosh are a registered trademarks of Apple Computers, Inc., Microsoft and Windows are registered trademarks
of Microsoft Corp., AMPPD, CSPD and CDP-Star are trademarks of Tropix, Inc., and Luminol is a trademark of Amersham International.
30
DCOG960030/GS-525/505 I.M.
5/12/99 7:53 AM
Page CVR2
Bio-Rad
Laboratories
Molecular
Bioscience Group
2000 Alfred Nobel Drive
Hercules, California 94547
Telephone (510) 741-1000
Fax: (510) 741-5800
4000054 Rev A
Australia, Bio-Rad Laboratories Pty Limited, Block Y Unit 1, Regents Park Industrial Estate, 391 Park Road, Regents Park, NSW 2143 • Phone 02-9914-2800 • Fax 02-9914-2888
Austria, Bio-Rad Laboratories Ges.m.b.H., Auhofstrasse 78D, 1130 Wien • Phone (1) 877 89 01 • Fax (1) 876 56 29
Belgium, Bio-Rad Laboratories S.A./N.V., Begoniastraat 5, 9810 Nazareth Eke • Phone 09-385 55 11 • Fax 09-385 65 54
Canada, Bio-Rad Laboratories (Canada) Ltd., 5671 McAdam Road, Mississauga, Ontario L4Z 1N9 • Phone (905) 712-2771 • Fax (905) 712-2990
China, Bio-Rad Laboratories, 14, Zhi Chun Road, Hai Dian District, Beijing 100088 • Phone (01) 2046622 • Fax (01) 2051876
Denmark, Bio-Rad Laboratories, Symbion Science Park, Fruebjergvej 3, DK-2100 Copenhagen • Phone 39 17 9947 • Fax 39 27 1698
Finland, Bio-Rad Laboratories, Business Center Länsikeskus, Pihatörmä 1A SF-02240, Espoo, • Phone 90 804 2200 • Fax 90 804 1100
France, Bio-Rad S.A., 94/96 rue Victor Hugo, B.P. 220, 94 203 Ivry Sur Seine Cedex • Phone (1) 49 60 68 34 • Fax (1) 46 71 24 67
Germany, Bio-Rad Laboratories GmbH, Heidemannstraße 164, D-80939 München/Postfach 450133, D-80901 München • Phone 089 31884-0 • Fax 089 31884-100
India, Bio-Rad Laboratories, C-248 Defence Colony, New Delhi 110 024 • Phone 91-11-461-0103 • Fax 91-11-461-0765
Italy, Bio-Rad Laboratories S.r.l.,Via Cellini, 18/A, 20090 Segrate Milano • Phone 02-21609 1 • Fax 02-21609-399
Japan, Nippon Bio-Rad Laboratories, 7-18, Higashi-Nippori 5-Chome, Arakawa-ku, Tokyo 116 • Phone 03-5811-6270 • Fax 03-5811-6272
The Netherlands, Bio-Rad Laboratories B. V., Fokkerstraat 10, 3905 KV Veenendaal • Phone 0318-540666 • Fax 0318-542216
New Zealand, Bio-Rad Laboratories Pty Ltd., P. O. Box 100-051, North Shore Mail Centre, Auckland 10 • Phone 09-443 3099 • Fax 09-443 3097
Pacific, Bio-Rad Laboratories, Unit 1111, 11/F., New Kowloon Plaza, 38, Tai Kok Tsui Road, Tai Kok Tsui, Kowloon, Hong Kong • Phone 7893300 • Fax 7891257
Singapore, Bio-Rad Laboratories (Singapore) Ltd., 221 Henderson Rd #05-19, Henderson Building, Singapore 0315 • Phone (65) 272-9877 • Fax (65) 273-4835
Spain, Bio-Rad Laboratories, S. A. Avda Valdelaparra 3, Pol. Ind. Alcobendas, E-28100 Alcobendas, Madrid • Phone (91) 661 70 85 • Fax (91) 661 96 98
Sweden, Bio-Rad Laboratories AB, Gärdsvägen 7D, Box 1276, S-171 24 Solna • Phone 46-(0)8-735 83 00 • Fax 46-(0)8-735 54 60
Switzerland, Bio-Rad Laboratories AG, Kanalstrasse 17, Postfach, CH-8152 Glattbrugg • Phone 01-809 55 55 • Fax 01-809 55 00
United Kingdom, Bio-Rad Laboratories Ltd., Bio-Rad House, Maylands Avenue, Hemel Hempstead, Herts HP2 7TD • Free Phone 0800 181134 • Fax 01442 259118
SIG 020996
Printed in USA