1
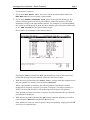
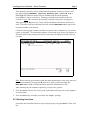
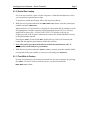
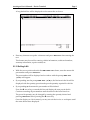
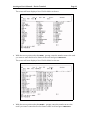
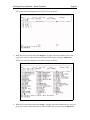
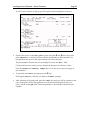
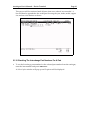
Autologue User’s Manual - Dealer Terminal
Page i
Table Of Contents
21. Introduction – Dealer Terminal ...................................................................................... 1
21.1 How To Dial Into Your Supplier .................................................................................. 1
21.2 How To Look Up Parts And Prices .............................................................................. 1
21.3 Deleting Line Items......................................................................................................... 4
21.4 Printing A Picking Ticket .............................................................................................. 5
21.5 Description Overrides .................................................................................................... 5
21.6 Adding A Ship To Address ........................................................................................... 5
21.7 Adding A Comment Line............................................................................................... 6
21.8 Performing A Quick Stock Check ................................................................................ 7
21.9 Part Scrolling In A Workspace...................................................................................... 7
21.10 Partial Part Lookup........................................................................................................ 8
21.11 Text Write In Feature .................................................................................................... 8
21.12 Selling A Kit ................................................................................................................... 9
21.13 Selling Alternate Part Numbers ................................................................................. 10
21.14 Displaying Supersessions............................................................................................ 10
21.15 Accessing Electronic Cataloging................................................................................. 11
21.16 Looking Up Information In The Catalogue.............................................................. 12
21.17 Selling A Part From The Catalogue............................................................................ 17
21.18 Checking The Interchange Part Numbers For A Part ............................................. 19
21.19 Function Keys................................................................................................................. 20
Revision 3/02
Version 7.1
Autologue User’s Manual – Dealer Terminal
Page 1
21. Introduction – Dealer Terminal
The Dealer Terminal Point Of Sale (POS) software provides the functions necessary
for checking stock on part numbers, creating and printing interim picking tickets,
and optionally accessing your suppliers Electronic Cataloging (provided they have
cataloging).
Dealers are supplied with accurate inventory and pricing information, and are able
to better serve their customers.
This user’s manual will aid and instruct you how to create picking tickets, check
stock on part numbers and optionally look up parts within the AMS Electronic
Catalogue.
21.1 How To Dial Into Your Supplier
•
With your screen and modem powered on, type atdtxxxxxxx (xxxxxxx will be the
suppliers phone number for the modem on the suppliers end) and press <Return>.
•
When the cursor is sitting next to the login: prompt, enter the login assigned to
you from your supplier and press <Return>.
The invoicing screen will appear and the cursor will be positioned below the field
labeled MFR-PART NO as shown:
21.2 How To Look Up Parts And Prices
•
With the cursor positioned below the field labeled MFR-PART NO, enter the part
number desired and press <Return>.
Autologue User’s Manual – Dealer Terminal
Page 2
If the part number entered is in the supplier’s Inventory file, the cursor will be
positioned under the field labeled QTY (quantity) and will display your prices under
the fields labeled UNIT and CORE, your Customers price under the field labeled
LIST, and the quantity next to the field labeled ON HAND as shown:
If the part number entered is not in the supplier’s inventory file or is typed
incorrectly, a PART NOT FOUND window will pop up as shown:
Autologue User’s Manual – Dealer Terminal
Page 3
You now have 2 options:
1. If you select TRY AGAIN (F11), the cursor will be positioned back under the
MFR-PART NO and you can retype a part number.
2. If you select SEARCH INVENTORY FILE, point of sale will search and pop up a
window displaying a list of the 10 part numbers, within the Inventory file, that
matched as closely to the part number entered. For example, if you entered 3570,
the system would bring up all parts that have 3570 as part of its part number body
(i.e. REB-3570PL) and any part numbers larger.
Shown below is an example of the search window:
Pressing the <F8> (forward) and <F9> (backward) keys will scroll forward and
backwards through the part numbers within the selection window.
•
With the cursor positioned at the Select Part: prompt, enter the number next to
the part number you wish to order and press <Return>.
When a part number is called up, the following fields of information will be
displayed: Description, List price, Core price, Unit price, Tax status, Quantity on
Hand, On Order, Back Order, a sell-up message and the preset sell quantity.
If the quantity on hand is less than or equal to zero the terminal will beep when the
part number is displayed.
•
With the cursor positioned under the QTY column, enter the quantity you wish to
order and press <Return> and then the
arrow key.
If the number of units you want is equal to the preset quantity, simply press the
arrow key to extend the line.
Autologue User’s Manual – Dealer Terminal
Page 4
If the quantity entered to sell is greater than the quantity on hand, a window will
pop up prompting WARNING! Quantity Exceeds QOH, Override Y/N ?.
Entering N will extend as many units as available and record the quantity
unavailable for sale as a stock out. Entering Y will allow the amount sold to be
extended. Note: This will cause the quantity on hand of the part to be negative!
After pressing the
arrow key, Point of Sale will adjust both the line and invoice
total. The cursor will be positioned below the column MFR-PART NO, ready for the
next part number to be entered.
Continue entering part numbers until the invoice has been completed or you wish to
create a workspace. The maximum number of line items in an invoice/workspace is
400 at the time of this printing, but only 16 items may be displayed on the screen at
one time.
Hint: When entering part numbers with the same manufacturer code as the previous
entered part number, pressing the
arrow key, when positioned under the
MFR-PART NO column, will automatically repeat the manufacturer code.
After entering all part numbers requested, you have two options:
1. Press the <F15> (Interim Invoice) key and a pick ticket will print out on the supplier’s
invoice printer.
2. Press the <F11> key will take you back to the login: prompt.
21.3 Deleting Line Items
Line items may be deleted from an open workspace by using the <F16> (Delete Line)
key.
Autologue User’s Manual – Dealer Terminal
•
Using the
or
Page 5
arrow keys, position the cursor on the line item you wish to delete.
The and arrow keys may only be used when the cursor is positioned in the
MFR-PART NO column.
•
Press the <F16> (Delete Line) key and the line item will be deleted from the invoice.
Notice that all line items below the deleted line item will be renumbered and that the
invoice totals will also be adjusted.
If you wish to add additional line items, use the arrow key to position the cursor
at the bottom of the invoice, below the last part number.
21.4 Printing A Picking Ticket
•
With the open workspace displayed on the screen, press the <F15> (Interim Invoice)
key. The prompt PRINT PRICES (Y/N) ? will appear.
Enter Y and press <Return> to have the pick ticket print out with prices.
Enter N and press <Return> to have the pick ticket print with the report codes by
each line item and no prices.
After printing, the screen will return to the login: prompt. The open workspace
remains stored until the supplier finalizes the invoice.
21.5 Description Overrides
Description overrides allow a more detailed or appropriate description to be entered
during the extending of that line item. Using the <F12> (Description Override) key,
up to 14 characters may be entered in Point of Sale to describe the item being sold.
•
While the cursor is positioned in the QTY column, press the <F12> (Description
Override) key.
The cursor will now be positioned under the DESCRIPTION column.
•
Enter the new description and press <Return>.
•
With the cursor positioned under the QTY column, enter the quantity you want,
press <Return>, and then the
arrow key to extend the line.
You also have the ability to change the description on an item already extended.
•
Using the key, move the cursor to the item you want to override and press the
<F12> (Description Override) key. Enter in the description and press <Return>.
21.6 Adding A Ship To Address
A Ship To address may be added to any invoice/workspace to print on a finalized
invoice or interim invoice. The user can add up to three lines, with 30 characters per
line.
•
With the cursor positioned under the column MFR-PART NO and after the last line
item, press the <F13> (Ship To) key.
Autologue User’s Manual – Dealer Terminal
Page 6
A pop up Ship To window will appear, prompting for the Ship To address
information as shown:
•
With the cursor positioned on the first ship to address line, enter the first line of ship
to address information and press <Return>.
•
With the cursor positioned on the second ship to address line, enter the second line
of ship to address information and press <Return>.
•
With the cursor positioned on the third ship to address line, enter the third line of
ship to address information and press <Return>.
The cursor will appear under the column MFR-PART NO.
21.7 Adding A Comment Line
A Comment Line may be added to any invoice/workspace to print on an interim or
finalized invoice. A counterman can add one line of 30 characters to an
invoice/workspace.
•
With the cursor positioned under the MFR-PART NO column and after the last line
item, press the <F14> (Comment Line) key.
Autologue User’s Manual – Dealer Terminal
Page 7
A Comment Line pop up window will appear as shown:
•
With the cursor positioned within the Comment Line window, enter the comment line
information and press <Return>.
The cursor will appear under the MFR-PART NO column.
21.8 Performing A Quick Stock Check
To perform a quick stock check, follow the steps listed below:
•
With the cursor positioned under the MFR-PART NO column, enter a part number
and press <Return>.
The screen will display quantity on hand, on order and back order quantities for the
part number.
With the cursor positioned in the QTY column, press the <F16> (Delete Line) key to
delete the part number just looked up.
The cursor will appear under the MFR-PART NO column.
21.9 Part Scrolling In A Workspace
You also have the ability to scroll forwards and backwards in a workspace after calling
up the part in a workspace. To scroll forwards, press the key, to scroll backwards,
press the key.
Autologue User’s Manual – Dealer Terminal
Page 8
21.10 Partial Part Lookup
If you are not sure how a part is in the computer or what the manufacturer code is,
you can perform a partial part lookup.
To perform a partial part lookup, follow the steps listed below:
•
With the cursor positioned under the MFR-PART NO column, enter the partial part
number and press <Return>.
When the Part Not Found window is displayed, select option #2 (by number or with
the highlight bar) and the computer will automatically search for every Like Part
within the Inventory file. A Search PART INDEX File window will pop up
displaying a list of the 10 parts, within the Inventory file, which matched as closely
to the part number entered.
Pressing the <F8> (Forward) and <F9> (Backward) keys will scroll forwards and
backwards through the part numbers within the window.
Note: The partial part entered should not include the manufacturer code. It
searches only on the body of a part number.
•
With the cursor positioned at the Select Part: prompt, enter the number which
corresponds to the part number you want to order and press <Return>.
21.11 Text Write In Feature
Seventy-five characters of text may be inserted into an open workspace by pressing
the <F12> (Text Write-In) key while the cursor is positioned under the
MFR-PART NO column.
Autologue User’s Manual – Dealer Terminal
Page 9
A long dashed line will be displayed on the current line as shown:
•
Enter any character except the ? character and press <Return> after entering the
text.
This feature may be used for entering vehicle information, credit card numbers,
warranty information, repairs needed, etc.
21.12 Selling A Kit
•
With the cursor positioned under the MFR-PART NO column, enter the master kit
part number and press <Return>.
The part number will be displayed and a window with the prompt SEE KIT
(Y/N)? will appear.
•
By responding Y to the prompt SEE KIT (Y/N)?, the first item in the kit will be
displayed with the quantity preset based upon the quantity required for this kit.
•
By responding N, the master kit part number will be deleted.
Press the
arrow key to extend this line and display the next part in the kit.
Continue extending all part numbers until the entire kit has been listed out.
The preset kit quantity may be changed by entering the quantity desired and
pressing <Return> before pressing the
arrow key.
Once the display on a kit is started, you may not exit the invoice or workspace until
the entire kit has been displayed.
Autologue User’s Manual – Dealer Terminal
Page 10
21.13 Selling Alternate Part Numbers
If the supplier has setup alternate part numbers within his system, they will be
automatically displayed when any alternate part number is keyed in.
•
With the cursor positioned under the MFR-PART NO column, enter in the part
number and press <Return>.
If the entered part number has available alternates, a window will pop up displaying
all alternates, descriptions, quantity on hand and unit prices.
•
Use the and arrow keys to move the highlighted bar to the desired alternate
part number and press <Return>. The selected alternate part number will appear
on the line item just entered.
If desired, the original part number entered can be moved to the description of the
alternate part number selected by pressing the <F12> key while viewing all
available alternates and before pressing <Return>.
Pressing the <F11> (Exit) key will allow the original part number to be extended.
•
Enter the quantity to sell, press <Return> and then press the
the line item.
arrow key to extend
21.14 Displaying Supersessions
Supersession information is only displayed when the superseded part has a
quantity on hand of zero. This allows the counterman to sell out all remaining stock
of the old number before using the new part number.
•
With the cursor positioned under the MFR-PART NO column, enter in the part
number and press <Return>.
If a window appears displaying the message SEE SUPERSESSION (Y/N)?, the
part number entered has been superseded by the manufacturer and the old number
is no longer in stock.
•
Enter Y to display the new number. The cursor will be positioned in the QTY column
of the new part number.
The description of the superseded part number will be changed to
**SUPERSESSION.
•
Enter N and the superseded part number will be deleted.
•
Enter the quantity to be sold, press <Return> and then press the
extend this line item.
arrow key to
Autologue User’s Manual – Dealer Terminal
Page 11
21.15 Accessing Electronic Cataloging
The Electronic Cataloging program provides the functions necessary to look up part
numbers and get the prices and quantity on hand of parts within your supplier’s
inventory. This information can then be transferred directly into your workspace
without having to re-type all the selected parts and prices.
•
With the cursor positioned under the MFR-PART NO column, press the <F16> key.
A Select Option pop up window be displayed as shown:
•
Using the arrow keys, select Dealer AMS Catalogue and pressing <Return> or
enter the number corresponding to the selection you desire and press <Return>.
Autologue User’s Manual – Dealer Terminal
Page 12
The Main Catalogue screen will appear as follows:
21.16 Looking Up Information In The Catalogue
The cursor will now be positioned at the Year: prompt.
•
If you know the Car Code number, press the arrow key to position the cursor at the
Car Code: prompt. Enter the Car Identification Code and press <Return>. This will
bypass having to enter the year, make, model and engine size information. The
cursor will then be positioned next to the Group: field.
•
If you want to display a choice list window of the last 10 Car Identification Codes
called up for this customer, press the <F3> key.
Autologue User’s Manual – Dealer Terminal
Page 13
A window will pop up displaying a list of the last 10 Car Codes called up for this
particular customer number as shown:
•
Position the cursor on the desired Car Code using the and arrow keys and press
<Return>, or simply enter the letter which is next the desired Car Code. This will
bypass having to enter the year, make, model and engine size information. The
cursor will then be positioned next to the Group: field.
•
A few lines down the screen, the allowable year range will be displayed. Only enter
numbers within the range displayed. There are two ways you can enter the year:
1989 or just 89 and press <Return>.
Autologue User’s Manual – Dealer Terminal
Page 14
The screen will now display a list of Vehicle Makes as shown:
•
With the cursor positioned at the Make: prompt, enter the number next to the make
you want or enter the first few letters of the make and press <Return>.
The screen will now display a list of Vehicle Models as shown:
•
With the cursor positioned at the Model: prompt, enter the number next to the
model you want or enter the first few letters of the model and press <Return>.
Autologue User’s Manual – Dealer Terminal
Page 15
The screen will now display a list of Engine Sizes as shown:
•
With the cursor positioned at the Engine: prompt, enter the number next to the
engine you want or enter the first few letters of the engine and press <Return>.
The screen will now display a list of Part Groups as shown:
•
With the cursor positioned at the Group: prompt, enter the number next to the part
group you want or enter the first few letters of the part group and press <Return>.
Autologue User’s Manual – Dealer Terminal
Page 16
Press the <Page> and <Shift> <Page> keys to see the next or previous page of
Part Groups.
The screen will now display a list of Part Types as shown:
•
With the cursor positioned at the Part: prompt, enter the number next to the part
type you want or enter the first few letters of the part type and press <Return>.
Press the <Page> and <Shift> <Page> keys to see the next or previous page of
part types.
Note: This field allows you to jump directly to specific types of parts within a Part
Group. It saves you from having to scroll through many pages of part numbers for a
Part Group!
Autologue User’s Manual – Dealer Terminal
Page 17
The screen will now display a list of parts, with the manufacturer names beside
them, possibly footnotes, and possibly quantity on hands and list and selling price
information (if part number exists in the Inventory file) as shown:
Note: The sell price shown is according to the customers exception and standard
pricing matrix setups!
21.17 Selling A Part From The Catalogue
•
With the cursor positioned at the Sell: prompt, enter the number next to the part
number or enter the first few characters of the part number and press <Return>.
Autologue User’s Manual – Dealer Terminal
Page 18
A Select Option window will pop up and 2 options will be displayed as shown:
•
Position the cursor on the Sell part option using the and arrow keys and
press <Return>, or enter S (Sell part) and the part number will be selected to be
brought back into point of sale upon exiting out of the catalogue.
The part number selected will now be displayed next to the Sell: field.
Continue this process until you have selected all the parts you desire to order.
Press the <Page> and <Shift> <Page> keys to see the next or previous page of
part numbers.
•
To get back to the Part: prompt, press the
key.
Pressing the <F1> key will take you back to the Year: prompt.
•
After selecting all desired parts, press the <F11> key and you will be returned to the
open workspace and the first part that was selected will be displayed and your
cursor will be in the QTY field. Enter the quantity to sell and then extend the part
number.
Autologue User’s Manual – Dealer Terminal
Page 19
This process will be continued until all parts, that were selected, are extended. A
line will then be appended to the workspace showing the year, make, model, engine
size and car code number as shown:
21.18 Checking The Interchange Part Numbers For A Part
•
To see the Interchange part numbers for the selected part number from the catalogue,
enter the item number and press <Return>.
A Select Option window will pop up and 2 options will be displayed.
Autologue User’s Manual – Dealer Terminal
•
Page 20
Position the cursor on the Interchange option using the and arrow keys and
press <Return> or enter I (Interchange) and an Interchange window will pop up
showing the interchange parts and prices within the catalogue for the selected part
number as shown:
A Press any key to continue... message will be displayed within the window.
•
Press any key to continue to use the catalogue.
If the window didn’t pop up, this means there were no interchanges to be displayed.
21.19 Function Keys
F1
F11
F12
F13
F14
F15
F16
This does nothing except re-enter the workspace (redraw the screen)
Exit
Description Override
Ship To
Comment Line
Print Pick Ticket
Delete Line/External Programs REDUCED Menu