1
Installation Guide
Installation Guide
Schrödinger Suite 2011
Schrödinger Press
Installation Guide Copyright © 2011 Schrödinger, LLC. All rights reserved.
While care has been taken in the preparation of this publication, Schrödinger
assumes no responsibility for errors or omissions, or for damages resulting from
the use of the information contained herein.
Canvas, CombiGlide, ConfGen, Epik, Glide, Impact, Jaguar, Liaison, LigPrep,
Maestro, Phase, Prime, PrimeX, QikProp, QikFit, QikSim, QSite, SiteMap, Strike, and
WaterMap are trademarks of Schrödinger, LLC. Schrödinger and MacroModel are
registered trademarks of Schrödinger, LLC. MCPRO is a trademark of William L.
Jorgensen. Desmond is a trademark of D. E. Shaw Research. Desmond is used with
the permission of D. E. Shaw Research. All rights reserved. This publication may
contain the trademarks of other companies.
Schrödinger software includes software and libraries provided by third parties. For
details of the copyrights, and terms and conditions associated with such included
third party software, see the Legal Notices, or use your browser to open
$SCHRODINGER/docs/html/third_party_legal.html (Linux OS) or
%SCHRODINGER%\docs\html\third_party_legal.html (Windows OS).
This publication may refer to other third party software not included in or with
Schrödinger software ("such other third party software"), and provide links to third
party Web sites ("linked sites"). References to such other third party software or
linked sites do not constitute an endorsement by Schrödinger, LLC. Use of such
other third party software and linked sites may be subject to third party license
agreements and fees. Schrödinger, LLC and its affiliates have no responsibility or
liability, directly or indirectly, for such other third party software and linked sites,
or for damage resulting from the use thereof. Any warranties that we make
regarding Schrödinger products and services do not apply to such other third party
software or linked sites, or to the interaction between, or interoperability of,
Schrödinger products and services and such other third party software.
April 2011
Contents
Document Conventions ..................................................................................................... ix
Chapter 1: Installation Notes .......................................................................................... 1
1.1 Linux Installation Process Summary ..................................................................... 1
1.2 Windows Installation Process Summary .............................................................. 2
Chapter 2: Hardware and Software Requirements ......................................... 5
2.1 General Requirements.............................................................................................. 5
2.1.1 All Platforms........................................................................................................ 5
2.1.2 All Linux Platforms .............................................................................................. 5
2.1.3 Linux x86 32-bit executables............................................................................... 5
2.1.4 Linux x86 64-bit executables............................................................................... 7
2.1.5 Windows ............................................................................................................. 7
2.1.6 Intel Hardware..................................................................................................... 8
2.2 Disk Space for Installation ....................................................................................... 9
2.3 Maestro 9.2 Requirements ..................................................................................... 10
2.3.1 Graphics............................................................................................................ 10
2.3.2 Linux ................................................................................................................. 10
2.3.3 Windows ........................................................................................................... 11
2.4 Product Notes .......................................................................................................... 11
2.4.1 Canvas 1.4 ........................................................................................................ 11
2.4.2 Desmond 3.0..................................................................................................... 11
2.4.2.1 Queueing systems ................................................................................. 11
2.4.2.2 Network ................................................................................................. 12
2.4.3 Jaguar 7.8 ......................................................................................................... 13
2.4.4 Prime 2.3........................................................................................................... 13
2.4.5 PrimeX 1.8 ........................................................................................................ 13
2.4.6 QSite 5.7 ........................................................................................................... 13
2.4.7 Schrödinger KNIME Extensions 1.4.................................................................. 14
2.5 Prime Third-Party Software and Databases ....................................................... 14
2.6 Documentation Requirements .............................................................................. 16
Installation Guide
iii
Contents
Chapter 3: Installing the Products on Linux ....................................................... 17
3.1 Access to the Software .......................................................................................... 17
3.2 Verifying System Compliance ............................................................................... 18
3.3 Installing the Software and Documentation ....................................................... 19
3.4 Setting the Environment Variables ....................................................................... 24
3.5 Runtime Libraries .................................................................................................... 26
3.6 Enabling Hardware Stereo Viewing...................................................................... 27
3.7 Access to the Web .................................................................................................. 27
3.8 Installing Script Center Scripts............................................................................. 28
3.9 Installing Prime Third-Party Software and Databases from a Download ...... 28
3.10 Installing the Prime Threading Module from a Download ............................. 31
3.11 Installing and Updating Schrödinger KNIME Extensions from the Web..... 32
3.11.1 Installing into an Existing Version of KNIME ................................................... 32
3.11.2 Adding New Schrödinger Extensions.............................................................. 34
3.11.3 Updating Existing Schrödinger Extensions ..................................................... 35
3.12 Installing VMD for Desmond ............................................................................... 36
3.13 Installing a Noncommercial Version of Desmond into an Existing
Schrödinger Installation ................................................................................. 37
Chapter 4: Installing the Products on Windows .............................................. 39
4.1 Installing Schrödinger Software ........................................................................... 39
4.1.1 Preparing for Installation ................................................................................... 39
4.1.2 Installation Notes .............................................................................................. 40
4.1.3 Installing From the DOS Command Line .......................................................... 41
4.1.4 UNC Path Checking .......................................................................................... 42
4.1.5 Troubleshooting................................................................................................. 43
4.2 Installing and Updating Schrödinger KNIME Extensions ................................ 44
4.2.1 Installing from the Software Distribution ........................................................... 45
4.2.2 Installing into an Existing Version of KNIME ..................................................... 45
iv
Schrödinger Suite 2011
Contents
4.2.3 Updating Existing Schrödinger Extensions ....................................................... 47
4.2.4 Adding New Schrödinger Extensions................................................................ 47
4.3 Installing Prime Third-Party Software and Databases ..................................... 49
4.4 Uninstalling Schrödinger Software ...................................................................... 51
Chapter 5: Obtaining and Installing Licenses ................................................... 55
5.1 Determining Your License Type ............................................................................ 55
5.2 Obtaining Machine Information ............................................................................ 56
5.3 Requesting a License ............................................................................................. 57
5.4 Explanation of License Codes .............................................................................. 57
5.5 Installing the License ............................................................................................. 59
5.6 Setting Up Access to the License Server ........................................................... 60
5.6.1 Linux Clients ..................................................................................................... 60
5.6.2 Windows Clients ............................................................................................... 61
5.7 Setting Up a License Server on UNIX .................................................................. 61
5.7.1 Setting Up the Schrödinger License Server Daemon ....................................... 62
5.7.2 Enabling License Communication Across a Firewall or Proxy .......................... 63
5.7.3 Troubleshooting................................................................................................. 63
5.7.3.1 Token-based licenses ............................................................................. 63
5.7.3.2 IP-based licenses .................................................................................. 63
5.7.3.3 Node-locked licenses ............................................................................. 64
5.7.3.4 Requesting assistance ........................................................................... 64
5.8 Setting Up a License Server on Windows .......................................................... 66
Chapter 6: Preparing for Job Submission ........................................................... 67
6.1 The Hosts File .......................................................................................................... 67
6.1.1 The name and host Settings ............................................................................. 70
6.1.2 The user Setting................................................................................................ 71
6.1.3 The tmpdir Setting............................................................................................. 71
6.1.4 The processors Setting ..................................................................................... 72
6.1.5 The schrodinger Setting.................................................................................... 72
Installation Guide
v
Contents
6.1.6 The env Setting................................................................................................. 73
6.1.7 The include Setting ........................................................................................... 74
6.1.8 The base Setting............................................................................................... 74
6.1.9 Customizing the Hosts File ............................................................................... 75
6.2 Setting Up Access to Remote Hosts ................................................................... 75
6.2.1 Setting Up Access To and From Linux Hosts.................................................... 76
6.2.2 Setting Up Access from a Windows Host to Linux Hosts.................................. 77
6.2.3 Configuring the Firewall .................................................................................... 79
6.2.3.1 Linux Firewalls ....................................................................................... 79
6.2.3.2 Windows Firewalls ................................................................................. 80
6.3 Preparing for Batch Queue Submission ............................................................. 81
6.3.1 Setting Up the Hosts File for Batch Queues ..................................................... 82
6.3.2 Adding Support for an Unsupported Queueing System.................................... 83
6.3.2.1 The submit Script ................................................................................... 84
6.3.2.2 The cancel Script ................................................................................... 84
6.3.2.3 The Job Script Template File .................................................................. 85
6.3.3 Configuring Queuing Systems for Open MPI Parallel Execution ...................... 87
6.3.3.1 GE configuration .................................................................................... 88
6.3.3.2 PBS Family configuration ....................................................................... 89
6.3.3.3 LSF configuration................................................................................... 90
6.4 Setting Up License Checking for Queueing Systems ...................................... 90
6.4.1 Adding License Attributes to the Queueing System Configuration ................... 91
6.4.1.1 Adding License Attributes for GE ............................................................ 91
6.4.1.2 Adding License Attributes for LSF ........................................................... 92
6.4.1.3 Adding License Attributes for PBS Pro .................................................... 93
6.4.2 Configuring the Load Scripts ............................................................................ 94
6.4.3 Installing the Load Scripts................................................................................. 95
6.4.3.1 Installing for GE ..................................................................................... 95
6.4.3.2 Installing for LSF .................................................................................... 96
6.4.3.3 Installing for PBS Pro ............................................................................. 97
6.4.4 Turning On License Checking in Job Control.................................................... 97
6.5 Configuring Clusters .............................................................................................. 98
6.6 Testing the Installations and Connections ......................................................... 99
vi
Schrödinger Suite 2011
Contents
Appendix A: Setting Environment Variables on Windows ...................... 101
A.1 Windows XP .......................................................................................................... 101
A.2 Windows Vista and Windows 7 ......................................................................... 102
Appendix B: Access to the Web via a Proxy ................................................... 103
Appendix C: Alternative MPI Implementations for Jaguar ..................... 105
C.1 Using Precompiled Compatibility Libraries .................................................... 105
C.2 Using Jaguar with Other MPI Implementations ............................................. 106
Appendix D: Setting Up Passwordless rsh Access ..................................... 107
Appendix E: Setting Up Passwordless ssh Access Manually on
Windows ................................................................................................................................... 109
Index ............................................................................................................................................ 113
Installation Guide
vii
viii
Schrödinger Suite 2011
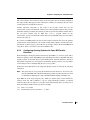
Document Conventions
In addition to the use of italics for names of documents, the font conventions that are used in
this document are summarized in the table below.
Font
Example
Use
Sans serif
Project Table
Names of GUI features, such as panels, menus,
menu items, buttons, and labels
Monospace
$SCHRODINGER/maestro
File names, directory names, commands, environment variables, and screen output
Italic
filename
Text that the user must replace with a value
Sans serif
uppercase
CTRL+H
Keyboard keys
Links to other locations in the current document or to other PDF documents are colored like
this: Document Conventions.
In descriptions of command syntax, the following UNIX conventions are used: braces { }
enclose a choice of required items, square brackets [ ] enclose optional items, and the bar
symbol | separates items in a list from which one item must be chosen. Lines of command
syntax that wrap should be interpreted as a single command.
File name, path, and environment variable syntax is generally given with the UNIX conventions. To obtain the Windows conventions, replace the forward slash / with the backslash \ in
path or directory names, and replace the $ at the beginning of an environment variable with a
% at each end. For example, $SCHRODINGER/maestro becomes %SCHRODINGER%\maestro.
In this document, to type text means to type the required text in the specified location, and to
enter text means to type the required text, then press the ENTER key.
References to literature sources are given in square brackets, like this: [10].
Installation Guide
ix
x
Schrödinger Suite 2011
Installation Guide
Chapter 1
Chapter 1:
Installation Notes
This document describes the installation of the Schrödinger Suite 2011 software, which
comprises Maestro 9.2, Canvas 1.4, CombiGlide 2.7, ConfGen 2.3, Core Hopping 1.1,
Desmond 3.0, Epik 2.2, Glide 5.7, Impact 5.7, Jaguar 7.8, Liaison 5.7, LigPrep 2.5,
MacroModel 9.9, MCPRO+ 2.0, Phase 3.3, Prime 3.0, QikProp 3.4, QSite 5.7, Schrödinger
Knime Extensions 1.4, SiteMap 2.5, Strike 2.0, and WaterMap 1.3, in addition to the solutions
Induced Fit Docking, Ligand & Structure-Based Descriptors, Quantum-Polarized Ligand
Docking, and Virtual Screening Workflow.
Periodically, we release updates of our software. These minor releases are not automatically
shipped on DVD, but are posted on the Schrödinger Support Center. You are invited to download these updates for the version of the software package you have purchased. You can check
for updates or patches using the script $SCHRODINGER/utilities/checkupdates or by
choosing Check for Updates from the Maestro menu in the Maestro main window.
Schrödinger software is supported on Linux platforms, and on Windows, with a few exceptions. In this manual, the designation “UNIX”, where a broader term is needed, includes Linux.
If you have difficulty with the installation, please contact your system manager or Schrödinger
(by phone at (503) 299-1150, or by e-mail at [email protected]).
1.1
Linux Installation Process Summary
This is a summary of the installation process. For detailed instructions, see the page number
provided in each step.
1. Check this guide for:
• System requirements (page 5)
• Disk space requirements (page 9)
• Maestro requirements (page 10)
• Product-specific installation information (page 11)
2. Mount the DVD (page 17) or download the software from the Schrödinger Support Center. If you download the software, extract the downloaded tar file:
tar xvf Schrodinger_Internet_Download.tar
Installation Guide
1
Chapter 1: Installation Notes
3. Run the platform script to verify that your machine meets the system requirements
(page 18).
4. Run the INSTALL script to install the products (page 19).
5. Set the SCHRODINGER and DISPLAY environment variables (page 24).
6. Obtain a license for the products:
a. Obtain machine information (page 54).
b. Request a license (page 55).
c. Install the license (page 57).
7. Optional: Substitute run-time libraries (page 26).
8. Test the Maestro installation by typing $SCHRODINGER/maestro (page 24).
If jobs will be run on remote hosts:
9. Set up the hosts file (page 65).
10. Set up communication between hosts, if not already done (page 73).
11. Optional: Prepare for Batch Queue Submission (page 79).
12. Test the installation and communications (page 97).
1.2
Windows Installation Process Summary
1. Insert the product DVD into the DVD drive, or double-click the installer icon.
The setup program should start.
2. Select an installation directory that does not contain spaces.
3. Select the products you want to install.
4. Obtain a license1 for the products:
a. Obtain machine information (page 54).
b. Request a license (page 55).
c. Install the license (page 57).
5. Test the Maestro installation by double-clicking the Maestro icon on the desktop.
1.
2
For installation of Maestro only at academic institutions, the license is provided in the same location as the
setup program, and should be copied to the installation directory.
Schrödinger Suite 2011
Chapter 1: Installation Notes
If jobs will be run on remote hosts:
6. Set up the hosts file (page 65).
7. Set up communication between hosts, if not already done (page 73).
8. Optional: Prepare for Batch Queue Submission (page 79).
1.3
Notes
This section contains important notes about changes made for Suite 2011.
• Changes to Job Control make it incompatible with earlier releases. You should ensure
that the schrodinger settings in the hosts file (Section 6.1.5) only refer to the current
release. If you customize the location of the job database, it should not be set to the same
location as previous releases.
• For Prime, it is no longer necessary to install separate software for web-based searches.
This software is installed by default. Local searches are performed if the databases are
available locally, otherwise web-based searches are performed.
Installation Guide
3
4
Schrödinger Suite 2011
Installation Guide
Chapter 2
Chapter 2:
Hardware and Software Requirements
2.1
General Requirements
This section lists the general minimum system requirements and recommendations for
Schrödinger products. If the product-specific requirements differ from those listed below, they
are given in Section 2.4 on page 11. For each product, the platforms that are supported have a
corresponding entry in Table 2.1 on page 9.
If you install Maestro, the system must meet additional requirements. These requirements are
given in Section 2.3 on page 10.
2.1.1
All Platforms
• 256 MB memory minimum, 1 GB recommended.
• For computational jobs, 4 GB scratch disk space minimum; 60 GB recommended, at
10000 RPM.
• For Maestro stereo viewing, a monitor with a refresh rate of 100 Hz or more is recommended. Most LCD displays do not have a sufficiently high refresh rate; however some
vendors now supply LCD displays with a refresh rate of 120 Hz.
• Larger cache sizes result in improved performance of most Schrödinger software.
2.1.2
•
•
•
•
All Linux Platforms
Perl version no earlier than 5.004
gunzip
Python 2.7 (32-bit), if you want to use your own Python installation.
Linux-supported network card with a configured network interface
2.1.3
Linux x86 32-bit executables
This section describes requirements for installation of the Linux-x86 32-bit executables, which
can be run on both 32-bit and 64-bit hardware and operating systems.
• Installation of back-compatibility glibc options is usually not necessary, but might be
helpful. If these options are supplied, we recommend that they are installed.
• NFS file locking must be enabled. On RedHat and CentOS systems, NFS file locking is
provided by the nfs-utils package.
Installation Guide
5
Chapter 2: Hardware and Software Requirements
Operating systems:
The 32-bit executables in Schrödinger Suite 2011 were built on CentOS 3.9 with libc 2.3.2.
They should run on 64-bit x86 hardware and operating systems provided the appropriate
libraries are installed.
The following operating systems are supported:
•
•
•
•
RHEL 3.9, 4.x and 5.x
CentOS 3.9, 4.x and 5.x
SUSE SLES and SLED 9.x, 10.x (except 10.3), and 11.x.
Ubuntu 10.04 LTS
Additional requirements for specific operating systems are:
• On RHEL 5.2 and CentOS 5.2, the nss_ldap patch described in http://rhn.redhat.com/
errata/RHBA-2008-0611.html should be installed.
• On Ubuntu, symbolic links to the the libssl and libcrypto libraries must be made
because of versioning differences:
cd /usr/lib
ln -s libssl.so.0.9.8 libssl.so.6
ln -s libcrypto.so.0.9.8 libcrypto.so.6
• On Ubuntu, the lsb subsystem must be installed:
sudo apt-get install lsb-core
Hardware:
• x86-compatible processor, such as a Pentium family processor (including Pentium-4 and
Xeon), AMD K6, Athlon or Opteron. Our executables are supported on the Opteron
under either 32- or 64-bit operating systems.
2.1.4
Linux x86 64-bit executables
This section describes requirements for installation of the Linux-x86 64-bit executables,
labeled Linux-x86_64.
NFS file locking must be enabled. On RedHat and CentOS systems, NFS file locking is
provided by the nfs-utils package.
The 64-bit executables in Schrödinger Suite 2011 were built on CentOS 5.2 with glibc 2.5.
The version of glibc on your operating system must therefore be at least 2.5. For older operating systems or earlier glibc versions, you can run the 32-bit executables.
6
Schrödinger Suite 2011
Chapter 2: Hardware and Software Requirements
The following 64-bit operating systems are supported:
•
•
•
•
RHEL 5.2 and later 5.x versions
CentOS 5.2 and later 5.x versions
SUSE SLES 11 and SLED 11
Ubuntu 10.04 LTS
Additional requirements for specific operating systems are:
• On Ubuntu, the lsb subsystem must be installed:
sudo apt-get install lsb-core
• On Ubuntu, symbolic links to the the libssl and libcrypto libraries must be made
because of versioning differences:
cd /usr/lib
ln -s libssl.so.0.9.8 libssl.so.6
ln -s libcrypto.so.0.9.8 libcrypto.so.6
• On RHEL 5.2 and CentOS 5.2, the nss_ldap patch described in http://rhn.redhat.com/
errata/RHBA-2008-0611.html should be installed.
Hardware:
• x86 64-bit processor.
2.1.5
Windows
All products and job types are supported for local use on Windows except for Desmond simulations, MCPRO+, WaterMap, Jaguar jobs using multiple selected entries, and Prime fold
recognition jobs. Remote job submission from Windows is not available for Canvas, MCPRO+,
and WaterMap, but is available for Desmond.
Operating systems and software:
The following operating systems are supported. Both 32-bit and 64-bit Schrödinger executables are available.
•
•
•
•
•
Windows 7, 32-bit and 64-bit
Windows Vista SP1, 32-bit and 64-bit
Windows Server 2008 and 2008 R2, 64-bit
Windows HPC Server 2008 and 2008 R2, 64-bit (for Glide and LigPrep only)
Windows XP (Home or Pro version) SP2 or SP3, 32-bit only
Installation Guide
7
Chapter 2: Hardware and Software Requirements
In addition, the following software is required:
• Visual C++ 2008 libraries for 32-bit executables (x86), Visual C++ 2010 libraries for 64bit executables (x64).
If these libraries are not already installed, you can obtain them from:
32-bit: http://www.microsoft.com/downloads/details.aspx?familyid=A5C84275-3B974AB7-A40D-3802B2AF5FC2&displaylang=en
http://www.microsoft.com/downloads/en/details.aspx?familyid=BD512D9E64-bit:
43C8-4655-81BF-9350143D5867&di splaylang=en
2.1.6
Intel Hardware
If you plan to run jobs on an Intel processor that supports hyper-threading (such as Pentium 4
or Xeon), you may want to turn hyper-threading off, because it can significantly slow down the
execution of applications. You can turn off hyper-threading in the system BIOS Setup program.
See http://www.intel.com/support/processors/sb/cs-017343.htm for more information.
2.1.7
Queueing Systems
The following queueing systems are supported:
•
•
•
•
•
•
•
PBS, including PBS Pro
Grid Engine, including SGE and GE
LSF
Condor
SLURM
Torque
LoadLeveler
Special requirements for queueing systems are as follows:
• SGE version must be no earlier than 6.0u8. From 6.2u3 on, a patch or SGI reconfiguration is required if SGE preemption is used.
8
Schrödinger Suite 2011
Chapter 2: Hardware and Software Requirements
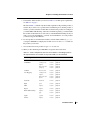
2.2
Disk Space for Installation
Approximate disk space requirements in MB for the installation of each product are given in
Table 2.1, separated into software (listed under the platform) and common data, which only
needs to be installed once per installation. Disk space required for the documentation is
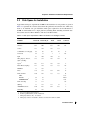
80 MB. A full installation for a single platform (excluding Prime threading and Prime databases) takes about 4-5 GB on Windows, and about 5-6 GB on Linux.
Table 2.1. Disk space requirements in MB for installation of Schrödinger software.
Product
Linux x86 Linux x86_64
Windows
32-bit
Windows
64-bit
Common
Maestro, Strike
128
215
137
125
26
mmshare
668
800
673
706
528
Canvas
127
186
147
131
CombiGlide, Core Hopping
65
68
49
48
17
Desmondb
44
37
1
1
274
83
160
120
97
Glide, Impact , Liaison,
QSitea, SiteMap
329
322
158
152
81
Jaguarb
263
411
147
182
4
MacroModel, LigPrep
121
196
139
137
159
77
155
716
751
272
648
12
290
261
137
137
88
54
34
61
21
9337
10289
1551
Prime threading
37
111
747
QikProp
73
151
113
91
3
520
487
552
538
2
69
149
Epik
b
MCPRO+
Phase
Prime, PrimeX
8
c
PDB
BLASTd
HMMER/PFAMd
KNIME Extensions
WaterMap
a.
b.
c.
d.
21
Does not include Jaguar disk space.
Includes parallel binaries, client on Windows.
Third party database only - no software
Third party software and database; database size listed in Common column.
Installation Guide
9
Chapter 2: Hardware and Software Requirements
2.3
Maestro 9.2 Requirements
Maestro is supported on Linux x86, Linux x86_64, Windows XP, Windows Vista, Windows
Server 2008, and Windows 7 platforms.
2.3.1
Graphics
This section lists graphics requirements and recommendations for Maestro on all platforms.
• 16-bit color is required.
• 1280 x 1024 resolution is strongly recommended, but lower resolutions are supported.
• A graphics card that supports hardware-accelerated OpenGL is strongly recommended.
You should install a vendor-supplied graphics driver rather than rely on the driver supplied
with the operating system. If you upgrade the operating system, the driver must be reinstalled.
Note:
An out-of-date graphics driver is the most common cause of Maestro display problems. An inadequate graphics card is the second most common cause.
For stereo viewing, one of the following requirements must be met:
• A graphics card that supports quad-buffered OpenGL stereo, or
• A monitor that supports interlaced stereo.
A monitor with a refresh rate of 100 Hz or more is recommended for stereo display. Older
LCD displays do not have a sufficiently high refresh rate.
2.3.2
Linux
Software requirements are as follows:
• An X11R6 X server on any machine to which Maestro is displayed, compatible with
XFree86 4.3.0.
• X servers must include the GLX OpenGL extension, and OpenGL must be enabled.
• fontconfig, in a version compatible with 2.2.1-13.
• Firefox web browser for display of online help. Other browsers may be used, but are not
guaranteed to work. If CentOS 4.4 is installed, a version no earlier than Firefox 2.0 is recommended due to some incompatibilities with Firefox 1.x that prevent help from being
displayed.
• PDF reader for display of manuals. If Adobe Reader is installed, a version no earlier than
7.0.5 is recommended.
10
Schrödinger Suite 2011
Chapter 2: Hardware and Software Requirements
2.3.3
Windows
• Microsoft Visual C++ 2008 SP1 Redistributable Package for 32-bit Maestro executables
(x86), Microsoft Visual C++ 2010 Redistributable Package for 64-bit Maestro executables (x64). This package is included with the software distribution, and can be installed as
needed. These packages can be obtained from the following URLs:
32-bit:
http://www.microsoft.com/downloads/en/details.aspx?familyid=A5C842753B97-4AB7-A40D-3802B2AF5FC2&di splaylang=en
http://www.microsoft.com/downloads/en/details.aspx?familyid=BD512D9E64-bit:
43C8-4655-81BF-9350143D5867&di splaylang=en
• Internet Explorer for display of online help. Other browsers may be used, but are not
guaranteed to work. Searching the help does not work with IE version 7.0.5xxx.
• PDF reader for display of manuals. If Adobe Reader is installed, a version no earlier than
7.0.5 is recommended. Adobe Reader 8.0 is not supported, but later 8.x versions are supported.
• The Maestro ActiveX control for PowerPoint requires .NET 2 in addition to the Visual
C++ Redistributable Package. .NET 2 is provided with the installer for the ActiveX control.
2.4
Product Notes
This section contains notes specific to each product. These notes give information in addition
to the requirements listed above. Only external software dependencies are listed below. Dependencies on other Schrödinger products are given in Table 3.1, which lists the modules to be
installed for each product. Licenses must be obtained for each installed product.
2.4.1
Canvas 1.4
On Windows, structure editing is supported with the ChemDraw software, either as a full
installation or with the ChemDraw ActiveX plug-in. The earliest version of ChemDraw
supported is 11.0.
2.4.2
Desmond 3.0
Both 32-bit (x86) and 64-bit (x86_64) executables are available for Desmond.
Desmond can be run in parallel using Open MPI. The mmshare distribution includes Open
MPI 1.3.4 for parallel execution. Desmond does not support other MPI implementations, such
as MPICH. Parallel execution is supported on SMP hosts as well as clusters.
Installation Guide
11
Chapter 2: Hardware and Software Requirements
2.4.2.1
Queueing systems
The following queuing systems are officially supported for use with Desmond:
•
•
•
•
SGE/GE, no earlier than 6.0u8. A patch is required from 6.2u3 on if preemption is used.
PBS Pro
Torque
LSF
License checking is available for SGE, PBS Pro, and LSF—see Section 6.4 on page 89.
SLURM is unofficially supported.
2.4.2.2
Network
A high-performance network is highly recommended for parallel execution. Desmond supports
the use of ethernet and Infiniband networks for parallel execution. Use of Infiniband requires a
Linux kernel no earlier than 2.6.9, and OFED 1.2.
Myrinet is not supported.
If you are using an Infiniband network, the following installation issues must be addressed:
• If you are running 32-bit Desmond on 64-bit hardware, you must ensure that the 32-bit
libibverbs library and the 32-bit driver for InfiniBand HCA have been installed. The
following command can be used to list packages in the libibverbs library:
rpm -ql ‘rpm -aq | grep libibverbs-1‘ | grep lib/libibverbs.so.1
If this command produces no output, your 64-bit system does not have the 32-bit
libibverbs library installed.
• The system must be configured to allow unlimited locked memory. You must do at least
the following:
a. Add the following lines to /etc/security/limits.conf on all nodes:
* soft memlock unlimited
* hard memlock unlimited
b. Add the following lines to the appropriate startup scripts:
csh, tcsh:
limit memorylocked unlimited
bash, ksh:
ulimit -l unlimited
You should do this in one of the following locations:
• /etc/init.d/sshd
• /etc/profile (bash) and /etc/csh.cshrc (csh/tcsh)
12
Schrödinger Suite 2011
Chapter 2: Hardware and Software Requirements
• $HOME/.bashrc (bash) or $HOME/.cshrc (csh/tcsh)
You should also add these lines to the startup scripts for the resource manager daemons for the Torque, PBS, LSF queuing systems.
This is necessary because the limit may be reset to a lower number by some boot
procedures, or resource managers might not start with unlimited locked memory.
When you have added these lines, you must restart the resource management daemon.
2.4.3
Jaguar 7.8
500 MB of memory is required to run Jaguar.
1 GB scratch disk space minimum per process is recommended. Large jobs, such as frequency
and LMP2 calculations, can use several gigabytes of scratch disk space.
Use local disks for scratch space. Performance is significantly reduced if an NFS-mounted
scratch disk is used. Do not use scratch directories that are symbolic links, because this is
known to prevent Jaguar jobs from running under Linux.
Parallel Jaguar is available for all Linux platforms and is included in the executable set. By
default, Jaguar uses Open MPI 1.3.4, which is included in the Schrödinger software distribution. For information on use of other MPI installations, see Appendix D. Jaguar runs on
shared-memory architectures in SMP mode, or on distributed architectures and clusters.
Parallel Jaguar is not available on Windows.
To run parallel Jaguar jobs from a batch queue, you should ensure that multiple calls to MPI
per job are permitted. Some queue configuration might also be needed—see Section 6.3.2.3 on
page 83 for more information.
2.4.4
Prime 3.0
Prime requirements include requirements for Prime and Induced Fit Docking. Minimum
memory required is 512 MB, 1 GB is recommended.
Prime requires the installation of or access to various third-party products. See Section 2.5 on
page 14 for more information.
2.4.5
PrimeX 1.8
PrimeX requirements can be deduced from the constituents, Prime, Glide, MacroModel and
Epik.
Use of OpenMP is only supported on the Linux x86 platform (32-bit).
Installation Guide
13
Chapter 2: Hardware and Software Requirements
2.4.6
Schrödinger KNIME Extensions 1.4
The Schrödinger KNIME Extensions for Suite 2011 are built on KNIME 2.3.0 and Eclipse
3.6.1. These are the required minimum versions. If you add the Schrödinger KNIME Extensions to an existing KNIME installation, you must have these versions installed at a minimum.
Schrödinger Knime Extensions require a full installation of Schrödinger software.
2.5
Prime Third-Party Software and Databases
To use Prime, you must install or have access to the PDB, the BLAST program and associated
sequence databases, and the HMMER and Pfam programs and associated databases. Use of
PSIPRED is also highly recommended for secondary structure predictions and for GPCR
modeling. PSIPRED is not available on Windows.
• For Induced Fit Docking, you do not need to install the third-party programs or databases.
• For Comparative Modeling, you do not need to install the PDB or BLAST databases if
you have access to these databases on the web.
• If you do not intend to identify families for your query sequence, you do not need to
install the HMMER and Pfam programs or databases.
Disk space requirements are listed in Table 2.1.
The following versions are required for third-party software:
• BLAST 2.2.16
• PSIPRED 2.61
• glibc version more recent than the 2.2.x series (on Linux).
The required third-party programs (BLAST, HMMER and Pfam) are provided on DVD and in
the Prime download. PSIPRED is not included on the DVD—see Section 3.9 on page 28 for
information on obtaining and installing this program on Linux. The databases are provided on
DVD. If you downloaded Prime and do not have the databases, instructions for obtaining them
are provided in Section 3.9 on page 28 for Linux and Section 4.3 on page 49 for Windows.
If you install these third party products from the DVDs supplied by Schrödinger, you must run
the INSTALL script for each DVD. Do not change DVDs while the INSTALL script is being
executed: if you do, the script will fail.
After you have installed the software, you may need to set environment variables to identify
the location of the software, depending on where it is installed:
14
Schrödinger Suite 2011
Chapter 2: Hardware and Software Requirements
• If you install all of these third-party products and databases into the default location
($SCHRODINGER/thirdparty), you do not need to set any extra environment variables.
However, when you install a new Schrödinger software release, you must make sure that
these products and databases are installed in the new default location.
• If you install all of these third-party products and databases in the same, nondefault location, you can set SCHRODINGER_THIRDPARTY to the chosen location. This location should
have a database directory, in which databases are stored and a bin directory, in which
executables are stored.
• If you install any of these third-party products in a location other than the default location, $SCHRODINGER/thirdparty, you must set environment variables to identify the
location of the products that are in a nondefault location. These environment variables are
given in Table 2.2.
• If you already have copies of the third-party products, you can provide links to them
using the environment variables described in Table 2.2. You do not need to set these environment variables if you are installing Prime from the supplied DVDs.
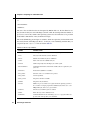
Table 2.2. Environment variables defining the nonstandard location of third-party software and
databases for Prime.
Environment Variable
Description
SCHRODINGER_PDB
PDB distribution directory (contains the data directory).
Default: $SCHRODINGER/thirdparty/database/pdb.
PSP_BLASTDB
BLAST database directory (contains directories nr and pdb).
Default: $SCHRODINGER/thirdparty/database/blast.
PSP_BLAST_DIR
BLAST executable directory.
Default: $SCHRODINGER/thirdparty/bin/platform/blast/bin.
PSP_BLAST_DATA
BLAST matrices directory.
Default: $SCHRODINGER/thirdparty/bin/platform/blast/data.
PSP_HMMER_DIR
HMMER executable directory.
Default: $SCHRODINGER/thirdparty/bin/platform/hmmer.
PSP_HMMERDB
Pfam database directory.
Default: $SCHRODINGER/thirdparty/database/pfam.
PSP_PSIPRED_DIR
PSIPRED installation (contains bin and data directories)
Default: $SCHRODINGER/thirdparty/bin/platform/psipred.
PSP_PSIPRED_DB
Identity of PSIPRED sequence database. Allowed values are nr and
pdb. Default: pdb.
PSP_SSPRO_DB
Identity of SSPRO sequence database. Allowed values are nr and pdb.
Default: pdb.
Installation Guide
15
Chapter 2: Hardware and Software Requirements
On Windows, if you are using an installed copy of the PDB to run Structure Prediction jobs,
you must set the SCHRODINGER_PDB environment variable in Windows or UNC format. See
Appendix A for information on setting environment variables on Windows.
If you want to switch between local and web-based searches, you can do so by setting and
unsetting the appropriate environment variables. The local copy of the databases must not be
installed in the Schrödinger software installation if you want to switch.
You can set the environment variables for remote hosts in the schrodinger.hosts file (see
Section 6.1 on page 65 for more information).
Information on the third-party software and databases can be found at the following locations:
BLAST: http://www.ncbi.nlm.nih.gov/blast
HMMER: http://hmmer.wustl.edu
Pfam: http://pfam.sanger.ac.uk
PDB: http://www.rcsb.org/pdb
PSIPRED: http://bioinf.cs.ucl.ac.uk/psipred/
2.6
Documentation Requirements
Online help is delivered in a browser. To view the online help you must have a browser
installed. The default browser is Firefox on Linux and Internet Explorer on Windows.
Manuals are displayed in a PDF reader. To view the manuals you must have a PDF reader
installed. The default PDF reader is Adobe Reader, with a fallback to kpdf, evince, xpdf,
then ggv on Linux platforms. If you have Adobe Reader installed, we recommend that you
use a version no earlier than 7.0.5, and that you ensure that it can be used as a plug-in to your
browser. This is so that you can make full use of the indexing and hyperlink features in the
documentation. If you want to use the search index, Adobe Reader is required.
Adobe Reader 8.0 is not supported on Windows.
16
Schrödinger Suite 2011
Installation Guide
Chapter 3
Chapter 3:
Installing the Products on Linux
Before installing Schrödinger products and documentation, read Chapter 2 for information on
hardware and software requirements, including product-specific requirements. These requirements must be met before installation. If you are installing on a cluster, read Section 6.5 on
page 96.
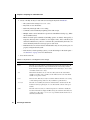
3.1
Access to the Software
The software can be obtained on a DVD or downloaded from the Schrödinger web site. You
must ensure that it is accessible from each host on which you want to install it. The directory
that contains the software for installation will be called the installer directory. When you have
completed this section, the installer directory (designated installer-dir) should be one of the
following locations:
• DVD mount directory
• directory on a remote machine containing the copied files
• download-directory/Schrodinger_Internet_Download
If you obtained the software on a DVD:
The DVD must be mounted. Most computers automatically mount the DVD when it is inserted
into the DVD drive.
Note:
DVDs are only readable by a DVD-ROM drive or a DVD-R or DVD+/-R Read/Write
drive. DVD+R Read/Write drives cannot read the DVDs we supply.
If you want to install the software on multiple hosts, you can either copy the files to a place that
is accessible to each host, as described in Step 3 below, or mount the DVD on each host.
If the DVD is not automatically mounted, consult your system administrator.
If you obtained the software on a DVD and the host you want to install on does not have
a DVD drive:
The software must be copied to the desired host, as follows.
1. Mount the product DVD on the machine that has a DVD drive.
2. Change to the mount directory and display the DVD contents.
Installation Guide
17
Chapter 3: Installing the Products on Linux
3. Copy the following files to the remote host:
•
•
•
•
•
•
•
product tar files for your platform
INSTALL file
scripts in the top-level directory
Maestro and mmshare tar files for your platform
data tar files for your product
third-party software and databases for Prime
optional: documentation tar file
4. Change file names if necessary.
If you are installing from a DVD drive on a Windows machine, Windows may change the
case of the file names. The tar files and platform script should be in lower case and the
INSTALL script and the README file should be in upper case. Use the TRANS.TBL file to
rename the files with the correct case.
If you downloaded the software:
You must extract the files from the archive (tar) file. The directory to which you downloaded
the software is represented by download-directory in what follows.
cd download-directory
tar xvf Schrodinger_Internet_Download.tar
When you have extracted the files, a subdirectory named Schrodinger_Internet_Download
is created, and the software is in this subdirectory. The installer directory is therefore download-directory/Schrodinger_Internet_Download. If you want to install the software on
multiple hosts, you should either ensure that download-directory is accessible to each host,
copy the archive file to suitable locations and extract it, or copy the files described in Step 3
above to suitable locations.
3.2
Verifying System Compliance
Before starting the installation, verify that the systems that you are installing on satisfy the
minimum requirements to run Schrödinger software. You should follow this procedure for each
host on which you plan to run the software. When you have verified the system compliance,
proceed to the software installation.
1. Log on to the desired host.
2. Change to the installer directory, which contains the platform script.
cd installer-dir
18
Schrödinger Suite 2011
Chapter 3: Installing the Products on Linux
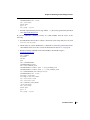
3. Enter the following command:
./platform -s
The script indicates whether your system meets the requirements or needs to be updated.
If you receive an error message, postpone installation of your Schrödinger software until
you have updated your system. For help obtaining any missing libraries, see the appropriate product-specific section of this guide.
4. Optional: If you plan to install executables intended for platform types other than that of
the current host, run the platform script without options:
./platform
and make note of the recommended version, so you can choose the correct version during
the installation.
5. Optional: To see a summary of the platform information, enter:
./platform -l
The script checks the operating system and distribution, CPU type, number of processors,
perl version number, and relevant libraries (libscs for SGI Altix and glibc for Linux).
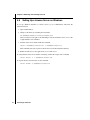
3.3
Installing the Software and Documentation
When you select the locations for installing the software, you must ensure that the software is
accessible from all hosts that are used either to submit jobs or to run jobs. This includes individual nodes on a cluster.
Note:
The installation process does not replace the $SCHRODINGER/schrodinger.hosts
or $SCHRODINGER/license files, or files in the $SCHRODINGER/queues directory.
If you want to install new versions of these files, you must move or remove them first.
1. Change to the installer directory.
2. Enter the command
./INSTALL
This script accepts a number of options for providing the required information. For
details, enter the command
./INSTALL -h
Installation Guide
19
Chapter 3: Installing the Products on Linux
3. Enter the information requested by the INSTALL script.
• You can accept the default values for each question by pressing RETURN
• You can quit the INSTALL script at any time by pressing CTRL-C.
• If you realize you have entered incorrect information, simply press RETURN at all
of the prompts, then enter n at the confirmation screen to start the questions again.
Below are explanations of the questions asked by the script:
SCHRODINGER directory: This is the installation directory, where the executables,
data files, and other files related to Schrödinger products will be installed. Depending on
the type of license you have (see Section 5.1), we recommend the following installations:
• Token-based or IP-based license: Use a shared file system so that you only have to
install the software once and all client machines with access can use it.
• Node-locked license: Use the local file system of the machine that will run the software or an NFS-mounted file system (for example, if your local file system does not
have enough free space to install the software).
We recommend that you install software for a new release in a new SCHRODINGER directory. If you are testing beta versions of the software, you should always install the beta
software in a separate SCHRODINGER directory. If you are installing an upgrade, with the
same major version numbers, you can install into the same SCHRODINGER directory as
the release to which it is an upgrade. When the script has located or created the
SCHRODINGER directory, it asks you to confirm that the selection is correct. Press
RETURN to accept.
Hardware/Software platform: In this screen, the INSTALL script recommends the most
compatible version of the executables for the current machine, based on the machine type
and operating system. Press RETURN to continue. (You will select the products in the
next screen.)
If you plan to install Schrödinger software on a machine other than that on which the
INSTALL script is running, copy the platform script to that machine, log in to it and run
the script without options:
./platform
Make a note of the recommended version so you can select it on the next screen of the
installation.
Product selection: This screen lists all the modules available for installation. Those that
are compatible with the current machine are marked with a yes in the compatible
column.
20
Schrödinger Suite 2011
Chapter 3: Installing the Products on Linux
a. To determine which modules you need, see Table 3.1. For disk space requirements,
see Table 2.1 on page 9.
The lists in Table 3.1 include only the modules required for the particular product or
solution. If you want to use a product that is included in part of another product or
solution, you must select the modules that are listed for the product. For example, if
you install Induced Fit Docking, and want to run Prime separately, you must include
the modules on the Prime list as well as those on the Induced Fit Docking list. If you
want to set up jobs from Maestro, you must also install Maestro; for some products
you must set up jobs from Maestro.
b. To select product or documentation modules, enter the index numbers (e.g. 1,2,35) and press RETURN to redisplay the list with INSTALL in the action column for
the products you selected.
c. You can then select more products or type none to start over.
d. When you have finished, press RETURN to accept the current selections.
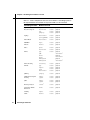
Table 3.1. Product and platform selections for installation of Schrödinger products.
All required modules are included on the product DVDs or in the download.
Schrödinger Product
Modules to Install
Canvas
canvas
version
platform
CombiGlide
combiglide
impact
mmacromodel
qikprop
version
version
version
version
platform
platform
platform
platform
ConfGen
macromodel
version
platform
Core Hopping
combiglide
impact
mmacromodel
phase
version
version
version
version
platform
platform
platform
platform
Desmond
desmond
version
platform
Epik
epik
version
platform
Glide
impact
version
platform
impact
version
platform
Induced Fit Docking
impact
psp
version
version
platform
platform
Jaguar
jaguar
version
platform
Liaison
impact
version
platform
Impact
a
Installation Guide
21
Chapter 3: Installing the Products on Linux
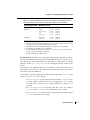
Table 3.1. Product and platform selections for installation of Schrödinger products.
All required modules are included on the product DVDs or in the download.
22
Schrödinger Product
Modules to Install
Ligand & StructureBased Descriptorsb
impact
macromodel
psp
qikpropc
version
version
version
version
platform
platform
platform
platform
LigPrep
macromodel
epik (optional)
version
version
platform
platform
MacroModel
macromodel
version
platform
MCPRO+
mcpro
version
platform
Maestro
maestro
version
platform
Phase
phase
macromodel
version
version
platform
platform
Primed
psp
pdb
blast
blast
hmmerpfam
hmmerpfam
version
platform
<database>e
platform
<database>e
platform
<database>e
Prime threading
threading
version
platform
PrimeX
psp
impact
epik
macromodel
version
version
version
version
platform
platform
platform
platform
QikProp
qikprop
version
platform
QM-Polarized Ligand
Docking
impact
jaguar
version
version
platform
platform
QSite
impact
jaguar
version
version
platform
platform
R-Group Analysis
canvasf
version
platform
Schrödinger Knime
Extensions
knime
version
platform
SiteMap
impact
version
platform
Strike
maestro
version
platform
Schrödinger Suite 2011
Chapter 3: Installing the Products on Linux
Table 3.1. Product and platform selections for installation of Schrödinger products.
All required modules are included on the product DVDs or in the download.
Schrödinger Product
Modules to Install
Virtual Screening
Workflow
epik
impact
macromodel
psp
qikprop
version
version
version
version
version
platform
platform
platform
platform
platform
WaterMap
watermap
desmond
version
version
platform
platform
a. Induced Fit Docking does not require installation of third party software or databases.
b. This list includes all products that can be used to generate descriptors. If you only want
descriptors for some products, install only those products.
c. Optional module. If not installed, filtering based on properties is not available.
d. The modules are distributed over several DVDs.
e. You must install these third party databases—see Section 2.5 on page 14. These databases are not provided with the download.
f. Required only if Canvas MCS is used.
Scratch directory: This directory is for the large, temporary files generated by computational programs during calculations. We recommend this directory be located on a fast,
local drive with at least 4 GB of disk space. The INSTALL script checks for existing
directories named /scr, /scratch or /usr/tmp and suggests the first of these as the
default.
If you decide to use a different directory, you will need to create it first. The INSTALL
script will not create it for you. Also, make sure each person who wants to run jobs has
write access to the scratch directory.
Once you have specified a scratch directory, the INSTALL script adds a localhost entry
to the schrodinger.hosts file as follows:
• If a schrodinger.hosts file already exists and contains a localhost entry,
no action is taken, even if there is no tmpdir setting in the localhost entry.
You will need to add the tmpdir setting manually (see Section 6.1 on
page 65).
• If a schrodinger.hosts file already exists but it does not contain a
localhost entry, a localhost entry is added with a tmpdir setting.
• If a schrodinger.hosts file does not exist, the script creates the file with just
a localhost entry and tmpdir setting.
Installation Guide
23
Chapter 3: Installing the Products on Linux
4. Confirm the information you provided.
When you have finished entering the information, the INSTALL script summarizes your
choices. In addition to the products you specified, the product mmshare is listed and
installed since it is needed to run all Schrödinger software. If any of the summary information is incorrect, answer “n” at the prompt to run through the questions again. Once
you are satisfied with your answers, press RETURN to install the software. The installation can take several minutes. Prime installation, including third-party software and
databases, can take 20 minutes.
5. Record the machid information and copy it into an e-mail.
When the installation is complete, the INSTALL script runs the machid program, which
generates machine-specific information about the computer on which it is run. Copy this
information into an e-mail to request a license for your Schrödinger software. See
Chapter 5 for full details on how to request a license.
If the executables you installed are intended for platforms other than that on which the
DVD is mounted, machid fails. You will need to log in to the machine on which you plan
to run the Schrödinger software run machid from there. See Section 5.2 on page 54.
6. Remove temporary installation directories and files. If you copied tar files onto a remote
machine, delete those files now.
Repeat this procedure for all hosts on which you want to use the software. Once you have
installed the software, you must obtain a license to run it—see Chapter 5.
3.4
Setting the Environment Variables
Before you can launch Schrödinger software, you must set some environment variables. In
addition to those listed below, there may be product-specific environment variables that need to
be set—see the requirements section for each product.
SCHRODINGER
required for all Schrödinger products
DISPLAY
required for Maestro (may be automatically set on login)
To set the SCHRODINGER environment variable, enter the following command, replacing installdirectory with the full installation path (for example, /software/Schrodinger):
24
csh, tcsh:
setenv SCHRODINGER install-directory
bash, ksh:
export SCHRODINGER=install-directory
Schrödinger Suite 2011
Chapter 3: Installing the Products on Linux
To avoid using the wrong installation when a new installation is made or when you use
different installations, we recommend that you do not add a SCHRODINGER definition to your
shell startup script file or add $SCHRODINGER to your path definition. Instead, you can use
aliases to set SCHRODINGER to the appropriate location, for example:
csh, tcsh:
alias schro2011 “setenv SCHRODINGER installdir”
bash, ksh:
alias schro2011=”export SCHRODINGER=installdir”
You can also set aliases to specific programs that substitute the current SCHRODINGER, so that
you do not have to type $SCHRODINGER to run a program. For example:
csh, tcsh:
alias maestro \$SCHRODINGER/maestro
bash, ksh:
alias maestro=\$SCHRODINGER/maestro
An alternative to setting the environment variables directly is to use environment management
software, such as the Environment Modules package found at http://modules.sourceforge.net.
Python is used for a number of Maestro panels and for scripts that run the programs. If you
have PYTHONPATH set, and it includes standard modules that come with the Python distribution, it must point to a 32-bit version of Python no earlier than 2.6 for Schrödinger software to
run correctly. If you do not want to set PYTHONPATH to include a compatible version of Python
standard modules, you can set SCHRODINGER_PYTHONPATH instead: setting it to an empty
string uses the Python modules in the Schrödinger installation. This variable is used by
Schrödinger software instead of PYTHONPATH to locate Python modules if it is defined.
The DISPLAY environment variable is usually set automatically when you log in to a local host
or connect via ssh to a remote host. If you need to set DISPLAY for a remote host, enter the
following command, replacing machine-name with the name of the display machine.
csh, tcsh:
setenv DISPLAY machine-name:0.0
bash, ksh:
export DISPLAY=machine-name:0.0
To determine the name of the display machine, enter the command hostname. To set DISPLAY
for a local host, you should omit machine-name.
If you expect either long delays when a program tries to obtain a license token, or competition
between programs for license tokens, you can set the time limit for trying to obtain a license
token in the SCHRODINGER_LICENSE_RETRY environment variable. This environment variable can be set to time values, such as 300s, 10m, 2h, or to an integer value, which is interpreted as a time in seconds. The default is 10 minutes.
To use PyMOL from Maestro or Canvas, you need to add the top-level PyMOL directory to the
PATH and PYMOL4MAESTRO environment variables.
Installation Guide
25
Chapter 3: Installing the Products on Linux
Online help for Maestro and Canvas is displayed in a browser. To choose a browser other than
the default, set the environment variable SCHRODINGER_HELP_BROWSER to the full path to the
browser. The default browser is Firefox.
Manuals are displayed in a PDF viewer. The default PDF viewer is Adobe Reader, with a fallback to kpdf, evince, xpdf, then ggv if the acroread command is not found. To choose the
PDF viewer, set the environment variable SCHRODINGER_PDF_VIEWER to the full path to the
PDF viewer. Note that the text search and some hyperlink capabilities are only available with
Adobe Reader.
To check that you have set the SCHRODINGER and DISPLAY environment variables correctly,
start Maestro with the following command:
$SCHRODINGER/maestro &
If you have set MAESTRO_HELP_BROWSER and SCHRODINGER_PDF_VIEWER, you can test that
they are set correctly by choosing the Online Help and Manuals Index items on the Help menu.
You can also set environment variables for each host in the schrodinger.hosts file. See
Section 6.1 on page 65 for more information.
3.5
Runtime Libraries
Schrödinger products are distributed for Linux as dynamically linked executables, with certain
requisite dynamic libraries provided in the distributions. There are several reasons for this:
• Dynamic linking allows easy user-implementation of hardware-accelerated OpenGL on
Linux. See below for more information.
• Dynamic linking simplifies the process of updating a particular library.
• Some of the libraries used in Schrödinger products are covered by the LGPL license,
which stipulates, among other things, that our software be distributed in such a manner
that end-user library modifications can be linked with our code. Distributing shared
libraries, which are loaded at run-time, allows you to “plug in” your own compiled
library replacements.
The libraries used by Schrödinger software products are stored in the directories:
$SCHRODINGER/product/lib/platform
where product is the product name and version number, and platform describes the platform
and operating system. When a Schrödinger software program is launched, the startup script
sets the appropriate environment variable so that the dynamic linker can locate the necessary
libraries. This ensures that the library versions provided in the distribution are used in lieu of
equivalents resident in the system.
26
Schrödinger Suite 2011
Chapter 3: Installing the Products on Linux
To use a system library instead of the Schrödinger library, move the Schrödinger library from:
$SCHRODINGER/product/lib/platform
to:
$SCHRODINGER/product/disabled_lib/platform
The exception to the library search path is the graphics libraries. The libraries provided by the
system are searched first, then the Schrödinger libraries, so that any library that is installed to
take advantage of hardware graphics capabilities is used by default. If Maestro fails to find the
OpenGL library in the shared library search path, the library in $SCHRODINGER/maestrovversion/lib/linux-x86/gl is used. To force the use of this library, launch Maestro with the
-SGL option, or set the environment variable SCHRODINGER_GL to a non-null value.
3.6
Enabling Hardware Stereo Viewing
To run Maestro in hardware stereo mode, you must edit /etc/X11/xorg.conf, /etc/X11/
XF86Config-4 or /etc/X11/XF86Config to set the driver in stereo-capable mode. For information on the option that is required, consult the documentation for your graphics card. The
required options for Nvidia cards are
Option "Stereo" "3"
in the Device section, and in the Extensions section
Option "Composite" "Disable"
3.7
Access to the Web
Some applications retrieve data from the web. The system libraries that are used for web access
have different versioning in various Linux distributions. Schrödinger software is linked to the
libraries libssl.so.0.9.8 and libcrypto.so.0.9.8, which are the versions used by Red
Hat and CentOS. On other Linux distributions, such as Ubuntu, these libraries are versioned as
libssl.so.6 and libcrypto.so.6. To ensure that web access does not fail for these Linux
distributions, you should create a symbolic link between the libraries.
cd /usr/lib
ln -s libssl.so.0.9.8 libssl.so.6
ln -s libcrypto.so.0.9.8 libcrypto.so.6
For information on web proxy server configuration, see Appendix C.
Installation Guide
27
Chapter 3: Installing the Products on Linux
3.8
Installing Script Center Scripts
Scripts that have been downloaded from the Script Center can be installed from the command
line or using Maestro (see Section 14.1.1 of the Maestro User Manual for details). When
installing from the command line, you can choose whether to install into just your user area or
into a common area for all users. The default common area is the directory $SCHRODINGER/
mmshare-vversion/python/common, but a different common area can be specified by setting
the MAESTRO_SCRIPT_LOCATION environment variable to the desired directory before
proceeding with the installation.
First, extract the tar file containing the scripts with the command:
tar -xvf Schrodinger_Scripts_Download.tar
To install into a common area from the command line:
cd Schrodinger_Scripts_Download
$SCHRODINGER/run installscripts.py -c -d MaestroPythonScripts
$SCHRODINGER/run installscripts.py -c -d CommandLineScripts
To install into your user area from the command line:
cd Schrodinger_Scripts_Download
$SCHRODINGER/run installscripts.py -u -d MaestroPythonScripts
$SCHRODINGER/run installscripts.py -u -d CommandLineScripts
3.9
Installing Prime Third-Party Software and
Databases from a Download
Prime third-party products are available on the Prime DVD set and are included in the web
download and are installed by default, with the exception of PSIPRED. The PDB, BLAST, and
Pfam databases are required for a full Prime installation. PSIPRED is not required, but is
highly recommended.
If you already have any of the third-party products installed and want to use the existing installation rather than installing another copy, you can do so by setting the appropriate environment
variables, which are described in Section 2.5 on page 14. Likewise, if you want to install any of
these products in a location other than the standard location in $SCHRODINGER/thirdparty,
you should use that location in the relevant steps below, and set the appropriate environment
variables. The instructions below assume that you are installing into the standard location.
It is assumed that you have already installed the Prime software and set the SCHRODINGER
environment variable.
28
Schrödinger Suite 2011
Chapter 3: Installing the Products on Linux
To install the PDB and BLAST databases:
• Run the following scripts:
$SCHRODINGER/utilities/update_BLASTDB
$SCHRODINGER/utilities/rsync_pdb
The BLAST databases are installed in the first location found in the following list:
• $PSP_BLASTDB
• $SCHRODINGER_THIRDPARTY/database/blast
• $SCHRODINGER/thirdparty/database/blast
Likewise, the PDB is installed in the first location found in the following list:
• $SCHRODINGER_PDB
• $SCHRODINGER_THIRDPARTY/database/pdb
• $SCHRODINGER/thirdparty/database/pdb
If an environment variable in these lists is not defined, the list item is skipped. The environment variables are described in Section 2.5 on page 14.
To install the Pfam database:
1. Create the required directory:
mkdir -p $SCHRODINGER/thirdparty/database/pfam
2. Using the link below, download the Pfam database into the directory you just created.
ftp://ftp.schrodinger.com/support/hidden/prime/Suite2011/Pfam/Linux/psp-hmmerpfamthirdparty-database.tar.gz
3. Change to the new pfam directory:
cd $SCHRODINGER/thirdparty/database/pfam
4. Extract the compressed file:
gunzip Pfam_fs.gz
To install PSIPRED on Linux-x86:
1. Create the required directory:
mkdir -p $SCHRODINGER/thirdparty/bin/Linux-x86/psipred
This is the standard location for use of PSIPRED by Prime.
2. Download psipred261.tar.gz from the PSIPRED download site at
http://bioinfadmin.cs.ucl.ac.uk/downloads/psipred/old/psipred261.tar.gz.
Installation Guide
29
Chapter 3: Installing the Products on Linux
3. Unpack PSIPRED into the directory you created:
tar xzvf psipred261.tar.gz -C $SCHRODINGER/thirdparty/bin/Linuxx86/psipred
To compile and install PSIPRED for other platforms:
1. Create a directory in which to download and build PSIPRED.
This directory will be referred to as the build directory and labeled build-dir.
2. Download psipred261.tar.gz into the build directory.
The download is located at http://bioinfadmin.cs.ucl.ac.uk/downloads/psipred/old/
psipred261.tar.gz. If this location changes, the PSIPRED home page is located at http://
bioinf.cs.ucl.ac.uk/psipred, and contains information about the program, referrals to
terms of use and license terms (in the README file), and a link to download the program. The link to download PSIPRED is in the section of the page labeled “Software
Download”. You must download version 2.61 to work with Prime 3.0.
3. Change to the build directory and unpack the source code:
cd build-dir
tar xzvf psipred261.tar.gz
4. Compile the code:
cd src
make
make install
cd ..
5. Create a directory in $SCHRODINGER for the software (if it does not already exist):
mkdir -p $SCHRODINGER/thirdparty/bin/arch/psipred
where arch is Linux-x86 for a 32-bit Linux platform and Linux-x86_64 for a 64-bit
Linux platform.
If you are not certain what your architecture is, run the command
$SCHRODINGER/platform -d
6. Copy the bin and data directories from the build directory:
cp -r bin/ $SCHRODINGER/thirdparty/bin/arch/psipred/
cp -r data $SCHRODINGER/thirdparty/bin/arch/psipred/
7. Check the final layout:
30
Schrödinger Suite 2011
Chapter 3: Installing the Products on Linux
ls -R $SCHRODINGER/thirdparty/bin/arch/psipred/
The layout should look as follows:
.:
bin
data
./bin:
pfilt psipass2
./data:
weights.dat
weights.dat2
psipred
seq2mtx
weights.dat3
weights.dat4
weights_p2.dat
weights_s.dat
weights_s.dat2
weights_s.dat3
3.10 Installing the Prime Threading Module from a
Download
1. Download the software, threading-vversion.tar, into a temporary directory.
The software can be found at
ftp://ftp.schrodinger.com/support/hidden/help/Threading/
You should choose the version of this file that best matches your installation. Specifically,
the version should match that of Prime (psp-vversion). The file is approximately 1 GB.
If you are prompted, use anonymous for the user name and your e-mail address for the
password. Due to the size of the file, we ask that you download this file at the end of your
day and allow it to download overnight.
2. In the temporary directory, extract the file:
tar -xf threading-vversion.tar
The extracted files are placed in the temporary directory, and should include an INSTALL
script.
3. Verify that $SCHRODINGER is set to your current Prime installation directory.
4. Run the INSTALL script in the temporary directory:
./INSTALL
a. When you are prompted for $SCHRODINGER, verify again that this is the directory
of your current Prime installation.
b. Select threading for the architecture for installation.
When you have finished, you should have a file named fr in your $SCHRODINGER directory
and a $SCHRODINGER/threading-vversion/ directory.
Installation Guide
31
Chapter 3: Installing the Products on Linux
3.11 Installing and Updating Schrödinger KNIME
Extensions from the Web
This section covers installation and updating of the Schrödinger KNIME Extensions from the
Schrödinger KNIME update site. Installation of the Schrödinger KNIME Extensions from
DVD or from a software download is described in Section 3.3 on page 19.
If you want to install the Schrödinger KNIME Extensions into an existing version of KNIME,
you can do so from the KNIME interface. The installation requires access to the Schrödinger
KNIME update site or to a local archive copy of this site, which you can do as follows:
1. Go to the download page, http://www.schrodinger.com/downloadcenter/.
2. On the product selection page, select KNIME Extensions only (as a zipped update site).
3. Complete the download process.
4. Extract the download archive file, Schrodinger_Internet_Download.tar.
The update site should be in the folder you extract to, with the name
SchrodingerKNIMEUpdateSiteversion.zip.
If you want to update the Schrödinger KNIME Extensions, you can do so from the Schrödinger
KNIME update site or from a local archive copy of this site.
3.11.1 Installing into an Existing Version of KNIME
1. Start KNIME.
2. Choose Help > Install New Software.
The Install Available Software panel opens.
3. In the Available Software tab, click Add.
The Add Repository dialog box opens.
4. Specify the location of the update site:
If you are using the web site directly:
a. Enter the following URL in the Location text box:
https://support.schrodinger.com/releases/knime/suite_2011
You can also enter a name to identify the site.
b. Click OK in the Add Repository dialog box.
c. Enter your user name (email address) and password for the Schrödinger web site.
32
Schrödinger Suite 2011
Chapter 3: Installing the Products on Linux
If you downloaded the archived site:
a. Click Archive.
b. Navigate to and select the downloaded zip file.
c. Click OK in the file selector.
d. Click OK in the Add Repository dialog box.
The available software from this site is listed in the center of the panel.
5. Select the newly created tree for the update site.
6. Ensure that Show only the latest versions of available software and Hide items that have
already been installed are both selected.
7. Select the Schrödinger nodes you want to install, by clicking the check boxes.
The Schrodinger Nodes for Knime core extensions feature must be selected to use any
Schrödinger node or renderer. The 2D renderers are optional; the renderer core feature is
required to use any of the renderers (Maestro, SD and SMILES).
8. Click Next.
License agreements are displayed.
9. Accept the license agreements and click Next.
The installation begins. Because the Schrödinger plugins are signed, you will be asked to
accept this information.
10. Exit KNIME, when prompted to restart KNIME.
To use the Schrödinger KNIME extensions, you must identify the Schrödinger installation to KNIME by setting the SCHRODINGER environment variable before restarting
KNIME.
11. Set the SCHRODINGER environment variable to the location of the Schrödinger Suite 2011
installation.
Run KNIME with the following command, to ensure that the Schrödinger environment is set
properly:
$SCHRODINGER/run knime-dir/knime
where knime-dir is the path to the KNIME installation.
Installation Guide
33
Chapter 3: Installing the Products on Linux
3.11.2 Adding New Schrödinger Extensions
Adding new Schrödinger extensions uses a very similar mechanism to installing the
Schrödinger extensions into an existing KNIME installation. You can do this from the
Schrödinger KNIME update web site or from a downloaded archive of this web site.
1. Start KNIME.
2. Choose Help > Install New Software.
The Install Available Software panel opens.
3. Ensure that Show only the latest versions of available software is selected.
4. If you are installing the new extensions from the web site, do the following:
a. Open the Schrödinger site.
The URL should be https://support.schrodinger.com/releases/knime/suite_2011/.
This URL is automatically added when you install KNIME as part of the
Schrödinger software.
You are prompted to log on to the Schrödinger web site.
b. Enter your email address and password (as you normally do to log on to the
Schrödinger web site).
Otherwise, if you are installing the new extensions from a downloaded archive of the site,
do the following:
a. In the Available Software tab, click Add.
The Add Repository dialog box opens.
b. Click Archive.
c. Navigate to and select the downloaded zip file.
d. Click OK in the file selector.
e. Click OK in the Add Repository dialog box.
The available extensions should now be displayed under the URL.
5. Select the Schrödinger nodes you want to install.
6. Click Next.
License agreements are displayed.
7. Accept the license agreement, and click Next.
34
Schrödinger Suite 2011
Chapter 3: Installing the Products on Linux
The installation begins. As the Schrödinger plugins are signed, you will be asked to
accept this information.
8. Restart KNIME when prompted.
You can also use this panel to update or install nodes from sources other than Schrödinger.
3.11.3 Updating Existing Schrödinger Extensions
If you have direct access to the web, you can update the existing Schrödinger KNIME extensions to new versions using the update mechanism in KNIME, as follows.
1. Start KNIME.
2. Choose Help > Check for Updates.
The Contacting Software Sites panel opens, and checks for updates to the software, by
contacting the web sites defined in your Available Software Sites preferences (see File >
Preferences > Install/Update). You are prompted to log on to the Schrödinger web site.
3. Enter your email address and password (as you normally do to log on to the Schrödinger
web site).
If there are updates, the Available Updates window opens, listing the updates that are
available. This list includes updates to all installed KNIME components.
4. Review the list of updates, and deselect any items that you do not want to update.
If you only want to update the Schrödinger extensions, you should deselect all other
updates.
Note:
If you update the KNIME Desktop or Eclipse, we do not guarantee that the
Schrödinger extensions will continue to work.
5. Click Next.
The detailed list of items to be upgraded is shown, including any dependencies.
6. Click Next.
License agreements are displayed.
7. Accept the license agreement, and click Finish.
The download begins. As the Schrödinger plugins are signed, you will be asked to accept
this information.
8. Restart KNIME when prompted.
Installation Guide
35
Chapter 3: Installing the Products on Linux
If you do not have direct access to the web, you can update existing extensions from a downloaded archive of the update site by following the procedure for adding extensions.
3.12 Installing VMD for Desmond
To download VMD:
1. Go to the following web site:
http://www.ks.uiuc.edu/Development/Download/download.cgi?PackageName=VMD
2. In the section Version 1.8.7 (2009-08-01) Platforms, click on LINUX OpenGL, CUDA or on
LINUX_64 OpenGL, CUDA.
The choice depends on whether you want to use the 32-bit version or the 64-bit version.
When you click on the link, a login page is displayed. If you do not already have an
account you can request one from this page and then log in. When you have logged in, the
download starts.
3. Choose a location to download the tar file, vmd-1.8.7.bin.LINUX.opengl.tar.gz.
To install and configure VMD:
1. Change to the location of the tar file and extract it:
cd location-of-tar-file
tar -zxvf vmd-1.8.7.bin.LINUX.opengl.tar.gz
2. Change to the VMD directory:
cd vmd-1.8.7
This directory contains a README file that has installation instructions. These instructions are included in the following steps.
3. Edit the configure file and set the values of the install_bin_dir and
install_library_dir variables to the locations where you wish to install the VMD
binary and its supporting libraries.
$install_bin_dir is the location where the startup script vmd will be installed. It
should be set to a location in the path of anyone wanting to run VMD.
$install_library_dir is the location of all other VMD files, including the binaries
and helper scripts. It should not be in the path.
4. Run the configuration script to generate a Makefile:
./configure
36
Schrödinger Suite 2011
Chapter 3: Installing the Products on Linux
5. Install VMD:
cd src
make install
6. Make sure that the directory containing the vmd executable (the one that you listed for
install_bin_dir inside the configure file above) is in the path for your shell.
For instance, if that directory was /usr/local/bin/vmd-1.8.7 and you are using the
bash shell you could use the following command:
PATH=$PATH:/usr/local/bin/vmd-1.8.7
To test VMD, type the command:
vmd
Two windows should be opened, VMD main and VMD version OpenGL Display.
3.13 Installing a Noncommercial Version of Desmond
into an Existing Schrödinger Installation
If you have obtained a version of Desmond from D. E. Shaw Research as a noncommercial
customer, and want to install it into a Schrödinger software installation, follow the instructions
below. If you obtained Desmond from Schrödinger, you do not need to use these instructions.
1. If you have not yet installed the Schrödinger software, ensure that it is installed.
You can download it from http://www.schrodinger.com.
2. Download the Desmond software from http://www.deshawresearch.com.
3. Set the SCHRODINGER environment variable to the Schrödinger software installation into
which you want to install Desmond.
4. Ensure that the 5-digit version numbers for mmshare and Desmond in the Desmond
download match those in the Schrödinger software installation.
5. Install only Desmond using the INSTALL script in the Desmond download. Do not install
Maestro.
6. Merge the license files by one of the following methods:
• Prepend the D. E. Shaw Research license file to the Schrodinger license file
• Set the SCHROD_LICENSE_FILE environment variable (see Section 5.6 on
page 58).
Installation Guide
37
Chapter 3: Installing the Products on Linux
3.14 Installing Open MPI Plugins
If you want to add Open MPI plugins to add support for hardware, configurations, or queueing
systems, you can compile them and install in the following directory.
$SCHRODINGER/mmshare-vversion/lib/platform/openmpi/lib/openmpi
The plugins should then be used automatically.
3.15 Setting Up Access to PyMOL
Both Maestro and Canvas can open PyMOL directly. To do so, PyMOL must be installed and
the location communicated to the application. The recommended procedure is:
1. Install PyMOL in a location outside $SCHRODINGER, using setup.sh.
You must use this script to ensure that the PyMOL installation is configured properly.
2. Add the PyMOL top-level directory to the PATH environment variable.
3. Set the PYMOL4MAESTRO environment variable to the PyMOL top-level directory.
Canvas requires that the PyMOL location is in the PATH environment variable. Maestro does
not use PATH, but uses the following sources to find an installation of PyMOL first, in the order
given:
1. The PYMOL4MAESTRO environment variable. This environment variable should point to
the top directory of the PyMOL installation. This is the preferred method of specifying
the location of PyMOL.
2. A PyMOL launch script called pymol4maestro in the Schrödinger software installation.
This script must run PyMOL.
3. A PyMOL installation in $SCHRODINGER/pymol.
4. The standard PyMOL environment variable PYMOL_PATH.
5. A launch script called $SCHRODINGER/pymol.
38
Schrödinger Suite 2011
Installation Guide
Chapter 4
Chapter 4:
Installing the Products on Windows
4.1
Installing Schrödinger Software
We recommend that you install Schrödinger software as an administrator, and install for all
users (AllUsers mode). However, if you do not have administrator privileges, you can install
Schrödinger software in single-user (OnlyForMe) mode. To do so, you must have permission
to write in the User folder of the registry and permission to create a directory that does not have
spaces in the path (see below). You can also install for all users from a non-administrator
account with RunAs on XP, but you should install the patch available at http://
support.microsoft.com/kb/949860/en-us?FR=1 first.
If Schrödinger software is installed by an administrator in OnlyForMe mode, the mode cannot
be changed to AllUsers. Instead, Maestro must be uninstalled and reinstalled in AllUsers
mode.
If you are upgrading, repairing, or removing software, you must ensure that none of the
programs that are part of the installation are running at the time, as this will prevent the operation from finishing successfully.
After you have installed the software, you must then obtain a license. If you are an academic
user installing only Maestro, the license is included and installed automatically.
To install Schrödinger software:
• If you have a DVD, setup.exe starts automatically after the DVD is placed in the drive.
• If you have downloaded the software, first unzip the downloaded zip archive,
Schrodinger_Internet_Download.zip, then double-click the installer icon or run
setup.exe.
Note:
4.1.1
Do not try to install the .msi files directly. They must be installed using setup.exe.
Preparing for Installation
Successful installation of Schrödinger Suite 2011 may depend on taking action on one or more
of the following items.
• If you are using product management software, you should be aware that Schrödinger
software includes files with a .ini extension that are not Windows .ini files. You may
have to configure your management software to treat these files as plain files.
Installation Guide
39
Chapter 4: Installing the Products on Windows
• If you do not have the Microsoft Visual C++ 2008 SP1 Redistributable Package installed,
or if the version that you have is older, you must install or update it. The required package
is included in the software distribution.
When you run the Schrödinger installer, you are informed if a compatible version of this
package is not available on your system. If you have administrator privileges, the installation of this package can be started from the Schrödinger installer. If you do not have
administrator privileges, the Schrödinger installer offers to open the folder that contains
the installer for this package. You can download this package from the following URL:
http://www.microsoft.com/downloads/details.aspx?familyid=A5C84275-3B97-4AB7A40D-3802B2AF5FC2&displaylang=en
If you use the Schrödinger installer to install or locate this package, you must run the
installer again to install the Schrödinger software once the package is installed.
• Installation log files are written by default to the following folder1:
%LOCALAPPDATA%\Schrodinger\Installer\2011
These log files may be useful for troubleshooting. If you want to change the location, set
the environment variable SCHRODINGER_INSTALLER_LOGFILE_DIR to the desired
location, which must exist and have write permission. See Appendix A for information
on setting environment variables.
• If you are installing on Windows Server 2008, you must have administrator privileges.
Non-administrator installations are not allowed by default on Windows Server 2008 systems. To allow non-administrator installations, you can add registry entries as follows:
1. Create the registry key Computer\HKEY_LOCAL_MACHINE\Software\Policies\Microsoft\Windows\Installer.
2. Under this key, create the keys DisableUserInstalls, AlwaysInstallElevated, and DisableMSI, and set their values to 0.
4.1.2
Installation Notes
The following notes describe choices that must be made or conditions that must be met when
you install the software:
• The target directory must not contain spaces. The following example is not acceptable:
C:\Program Files\Schrodinger
1.
40
%LOCALAPPDATA% is set to %USERPROFILE%\AppData\Local except on XP, where the equivalent location is
%USERPROFILE%\Local Settings\Application Data.
Schrödinger Suite 2011
Chapter 4: Installing the Products on Windows
If you are installing the software as administrator, and you browse to create a directory
and rename it, you must press F5 to force the dialog box to update the directory to the
new name, so that it is no longer shown as New Folder.
• The target directory cannot be a drive, such as C:.
• The target directory must not be the same as a previous Schrödinger software installation,
unless you are upgrading the installation for a given release year.
• The software distribution includes Schrödinger products or clients for running products
remotely, in addition to Maestro. To install these products, you must select them in the
installer. If you want to run jobs either on the local Windows host or on a remote Linux
host, you must install the product or client on the local Windows host.
Documentation for all products is installed and uninstalled automatically.
4.1.3
Installing From the DOS Command Line
If you want to install the software from the command line, without using the graphical interface, you can run the installer in a DOS shell in silent mode, as follows:
setup-silent.exe [/install|/remove|/repair|/upgrade] options
The options are described in Table 4.1.
Table 4.1. Options for setup-silent.exe
Option
Description
/install
Install products. This is the default, and includes all products.
/installdir:directory
Installation directory. The directory must not have spaces in the path. If
mmshare is already installed, the directory in which it is installed is used
and this directory is ignored; the substitution is noted in the log file.
/logpath:directory
Directory for log files. Default is
%USERPROFILE%\SchrodingerInstaller\2011
/plist:filename
Full path to text file containing list of “products” to process. The file
must contain one product name per line. The product names are casesensitive. The product name can be obtained from the initial string, up to
the version string (-vx.y), on the product line in the GUIDs.ini file,
e.g. maestro, phase-client. If this option is omitted, all products are processed for the specified action (install, remove, repair, upgrade).
/remove
Remove products rather than install them. Default is to remove all,
including documentation.
/repair
Repair the existing installation. The default is to install or upgrade.
Installation Guide
41
Chapter 4: Installing the Products on Windows
Table 4.1. Options for setup-silent.exe (Continued)
Option
Description
/upgrade
Upgrade products over an existing installation. Default is to upgrade all
products.
/interactive_mode
[:on|:off]
Vista only. Display output from the installer after it finishes if set to on,
close console window immediately if set to off. Default: on. For XP,
the console window remains open after installation.
/user[:all|:current]
Install for all users or for the current user. Default is all users.
To check the progress of the installation you can look at the log files, which are located by
default in %LOCALAPPDATA%\Schrodinger\Installer\2011, and contain the following
information:
schrodingerSetup.log
Overall progress.
schrodingerInstaller.log
Information for the product installer that was last run or is
currently running.
4.1.4
UNC Path Checking
If files for running a job are specified with a UNC path, the job fails. This is because cmd.exe
checks for UNC paths, which it does not allow—see http://support.microsoft.com/kb/156276
for details. Two solutions to this problem are as follows:
• Map the UNC path to a drive, and use the drive instead.
• Suppress the UNC path checking by adding a registry entry.
You can do the latter for the current user with the following procedure:
1. 1. Choose Start > Run.
The Run dialog box opens.
2. Enter regedit in the Open text box and click OK.
The Registry Editor opens.
3. Open HKEY_CURRENT_USER > Software > Microsoft > Command Processor.
4. Choose Edit > New > DWORD Value.
A new line is added, and focus is placed in the Name cell.
5. Enter DisableUNCCheck as the name.
6. Choose Edit > Modify.
42
Schrödinger Suite 2011
Chapter 4: Installing the Products on Windows
The Edit DWORD Value dialog box opens.
7. Change the value to 1 and click OK.
8. Close the Registry Editor.
If you want to disable UNC path checking for all users of a particular computer, open
HKEY_LOCAL_MACHINE instead of HKEY_CURRENT_USER in Step 3.
4.1.5
Troubleshooting
If the installation fails with the following error message, it may be that some of the software
required for the installation is not registered on your machine.
Error 1720. There is a problem with this Windows Installer package. A script required for
this install to complete could not be run. Contact your support personnel or package
vendor.
To provide us with information on your registry, you can download RegDllView from http://
www.nirsoft.net/utils/registered_dll_view.html, run it and send the output to [email protected].
If a warning is posted that there is not enough disk, you will have to clean up your primary disk
before proceeding, even if the disk that you are installing to has plenty of space. This is
because Windows caches the installers to the primary disk before installing, so you must have
enough space on your primary disk.
If you have problems with the installation, please send the following files, which are in the
directory %LOCALAPPDATA%\Schrodinger\Installer\2011, to [email protected]:
•
•
•
•
schrodingerInstaller.log
SchrodingerPreInstallReg.reg.txt
schrodingerSetup.log
SchrodingerPostInstallReg.reg.txt
You should also send the file schrodinger_machid.txt, which is on your desktop. If you
have installed software versions for more than one release, there will be multiple copies of this
file, named schrodinger_machid-N.txt, where N is a number. In this case you should
check that you send the correct version of the file (which will usually be the latest version).
If Maestro fails to start, send email to [email protected] describing the circumstances,
and attach the file maestro_error.txt. If Maestro fails after startup, attach this file and the
file maestro.EXE.dmp. These files can be found in the following directory:
%LOCALAPPDATA%\Schrodinger\appcrash
Installation Guide
43
Chapter 4: Installing the Products on Windows
On Windows XP, %LOCALAPPDATA% is not set by default, but should correspond to
C:\Documents and Settings\username\Local Settings\Application Data.
When sending e-mail messages, please include the following information:
•
•
•
•
•
•
•
•
All relevant user input and machine output
Schrödinger software purchaser (company, research institution, or individual)
Primary Schrödinger software user
Computer platform type
Operating system with version number
Version numbers of products installed
Maestro version number
mmshare version number
Most of this information is in the file schrodinger_machid.txt.
4.2
Installing and Updating KNIME Extensions
The Schrödinger KNIME Extensions are available with the software distribution, either on
DVD or the software download page, or from the Schrödinger KNIME update web site. The
software distribution includes KNIME itself as well as the extensions.
• To install KNIME and the Schrödinger extensions from the software distribution, just
select the KNIME Extensions in the installer when you install the Schrödinger software.
The installer creates an icon on your desktop that you can use to start KNIME.
• If you already have a compatible version of KNIME installed and want to use this version
of KNIME instead, you should install from the Schrödinger KNIME update web site,
using the instructions in Section 4.2.1. You can obtain an archived copy of this site as follows:
1. Go to the download page, http://www.schrodinger.com/downloadcenter/.
2. On the product selection page, select KNIME Extensions only (as a zipped update
site).
3. Complete the download process.
4. Extract the download zip file, Schrodinger_Windows_Download.zip.
The update site should be in the folder you extract to, with the name
SchrodingerKNIMEUpdateSiteversion.zip.
• If you want to update the Schrödinger KNIME Extensions, use the update site or a downloaded archive of this site (see the previous paragraph). See Section 4.2.2.
44
Schrödinger Suite 2011
Chapter 4: Installing the Products on Windows
4.2.1
Installing into an Existing Version of KNIME
If you want to install the Schrödinger extensions into an existing version of KNIME, you can
do so from the KNIME interface. If the version of KNIME does not meet the minimum
requirements, you must update your version of KNIME first. The installation requires access to
the Schrödinger KNIME update web site or to a local archived copy of this site.
1. Start KNIME.
2. Choose Help > Install New Software.
The Install Available Software panel opens.
3. In the Available Software tab, click Add.
The Add Repository dialog box opens.
4. Specify the location of the update site:
If you are using the web site directly:
a. Enter the following URL in the Location text box:
https://support.schrodinger.com/releases/knime/suite_2011
You can also enter a name to identify the site.
b. Click OK in the Add Repository dialog box.
c. Enter your user name (email address) and password for the Schrödinger web site.
If you downloaded the archived site:
a. Click Archive.
b. Navigate to and select the downloaded zip file.
c. Click OK in the file selector.
d. Click OK in the Add Repository dialog box.
The available software from this site is listed in the center of the panel.
5. Select the newly created tree for the update site.
6. Ensure that Show only the latest versions of available software and Hide items that have
already been installed are both selected.
7. Select the Schrödinger nodes you want to install, by clicking the check boxes.
The Schrodinger Nodes for Knime core extensions feature must be selected to use any
Schrödinger node or renderer. The 2D renderers are optional; the renderer core feature is
required to use any of the renderers (Maestro, SD and SMILES).
Installation Guide
45
Chapter 4: Installing the Products on Windows
8. Click Next.
License agreements are displayed.
9. Accept the license agreements and click Next.
The installation begins. Because the Schrödinger plugins are signed, you will be asked to
accept this information.
10. Exit KNIME, when prompted to restart KNIME.
To use the Schrödinger KNIME extensions, you must identify the Schrödinger installation to KNIME by setting the SCHRODINGER environment variable before restarting
KNIME.
11. Set the SCHRODINGER environment variable to the location of the Schrödinger Suite 2011
installation.
See Appendix A for general information on setting environment variables.
• Set the SCHRODINGER environment variable to the location of the Schrödinger Suite 2011
installation.
• Add %SCHRODINGER%\unxutils to the PATH environment variable.
If you want to use the Schrödinger 2D renderers, you must also do the following:
• Set the MMSHARE_EXEC environment variable to:
%SCHRODINGER%\mmshare-vversion\bin\WIN32-x86
• Add %MMSHARE_EXEC% to the PATH environment variable.
• Copy %MMSHARE_EXEC%\libcanvas2dGen.dll.manifest to your KNIME installation directory and rename it knime.exe.manifest.
4.2.2
Updating Existing Schrödinger Extensions
If you have direct access to the web, you can update the existing Schrödinger KNIME extensions to new versions using the update mechanism in KNIME, as follows.
1. Start KNIME.
2. Choose Help > Check for Updates.
The Contacting Software Sites panel opens, and checks for updates to the software, by
contacting the web sites defined in your Available Software Sites preferences (see File >
Preferences > Install/Update). You are prompted to log on to the Schrödinger web site.
46
Schrödinger Suite 2011
Chapter 4: Installing the Products on Windows
3. Enter your email address and password (as you normally do to log on to the Schrödinger
web site).
If there are updates, the Available Updates window opens, listing the updates that are
available. This list includes updates to all installed KNIME components.
4. Review the list of updates, and deselect any items that you do not want to update.
If you only want to update the Schrödinger extensions, you should deselect all other
updates.
Note:
If you update the KNIME Desktop or Eclipse, we do not guarantee that the
Schrödinger extensions will continue to work.
5. Click Next.
The detailed list of items to be upgraded is shown, including any dependencies.
6. Click Next.
License agreements are displayed.
7. Accept the license agreement, and click Finish.
The download begins. As the Schrödinger plugins are signed, you will be asked to accept
this information.
8. Restart KNIME when prompted.
If you do not have direct access to the web, you can update existing extensions from a downloaded archive of the update site by following the procedure for adding extensions.
4.2.3
Adding New Schrödinger Extensions
Adding new Schrödinger extensions uses a very similar mechanism to installing the
Schrödinger extensions into an existing KNIME installation. You can do this from the
Schrödinger KNIME update web site or from a downloaded archive of this web site.
1. Start KNIME.
2. Choose Help > Install New Software.
The Install Available Software panel opens.
3. Ensure that Show only the latest versions of available software is selected.
4. If you are installing the new extensions from the web site, do the following:
Installation Guide
47
Chapter 4: Installing the Products on Windows
a. Open the Schrödinger site.
The URL should be https://support.schrodinger.com/releases/knime/suite_2011/.
This URL is automatically added when you install KNIME as part of the
Schrödinger software.
You are prompted to log on to the Schrödinger web site.
b. Enter your email address and password (as you normally do to log on to the
Schrödinger web site).
Otherwise, if you are installing the new extensions from a downloaded archive of the site,
do the following:
a. In the Available Software tab, click Add.
The Add Repository dialog box opens.
b. Click Archive.
c. Navigate to and select the downloaded zip file.
d. Click OK in the file selector.
e. Click OK in the Add Repository dialog box.
The available extensions should now be displayed under the URL.
5. Select the Schrödinger nodes you want to install.
6. Click Next.
License agreements are displayed.
7. Accept the license agreement, and click Next.
The installation begins. As the Schrödinger plugins are signed, you will be asked to
accept this information.
8. Restart KNIME when prompted.
You can also use this panel to update or install nodes from sources other than Schrödinger.
48
Schrödinger Suite 2011
Chapter 4: Installing the Products on Windows
4.3
Installing Prime Third-Party Software and
Databases
Prime allows you to do both web-based searches of the BLAST and PDB databases and
searches of a local copy of these databases. The required Prime third-party software is included
in the Prime installer, and is installed into the thirdparty folder of the installation by default.
The databases needed for web-based searches are also included in the Prime installer, and are
installed by default. When you do a default installation of Prime, you need not do anything
more to enable web-based searches (for finding homologs, secondary structure prediction, and
alignments). If you have a web proxy server, you may have to configure it—see Appendix C.
If you want to run HMMER/Pfam to find families, you must download the following file and
unzip it into your Schrödinger installation:
ftp://ftp.schrodinger.com/support/hidden/prime/Suite2011/Pfam/Windows/psp-hmmerpfamthirdparty-database.zip
If you want to use local databases, you must install the databases and set the appropriate environment variables. However, if you install the databases into another location, you should
consider installing the software in that location also.
The required Prime third-party software and databases are available from the Schrödinger FTP
site as a set of zip files, and can also be obtained on DVDs. When you install the databases, you
should consider installing them to a network-mounted disk, because of the space required and
so that they can be used by multiple users. If you do so, you must set—see Table 2.2 on
page 15
The databases are not synchronized with the latest version on installation, so you must update
them yourself. Instructions are given below for updating the BLAST and PDB databases.
Note:
PSIPRED is not supported on Windows.
To download and install the PDB and BLAST databases (and software):
1. Go to the following site:
ftp://ftp.schrodinger.com/support/hidden/prime/Windows_Suite2011/
If you double-click on this link, it should open up a file explorer that lists all the files
available at this location.
2. Download the following zip files:
psp-blast-thirdparty-database-Nof4.zip
psp-pdb-thirdparty-database-Nof14.zip
psp-thirdparty-WIN32-x86.zip
Installation Guide
49
Chapter 4: Installing the Products on Windows
There are 4 files for the BLAST database, and 14 files for the PDB database. The download could take several hours, because each zip file is about 600MB. If you are installing
the databases into the Schrödinger installation folder, you do not need the last zip file.
3. Unzip the zip files into the desired location.
We recommend that you do not use the Schrödinger installation folder (which is by
default C:\Schrodinger2011) to install the databases, because they are very large, and
you would have to move them for each release; and also because you would no longer be
able to run web-based searches.
This process could take an hour or two. When it finishes, you should have the databases
in a thirdparty folder in the location you chose.
Some programs for unzipping files, such as 7-Zip, allow you to select multiple zip files to
extract into a single folder.
4. If the databases and software were not installed into the default location set the required
environment variables—see Section 2.5 on page 14.
To install the databases from DVD, you need only complete Step 3.
Note:
The copy of the PDB database installed as described here does not include an all
folder. While this does not affect the running of Schrödinger software, its absence
might affect the running of other software that relies on the presence of this folder.
To update the BLAST and PDB databases:
1. Open an explorer window and navigate to the Schrödinger installation folder.
2. Double-click the SchrodingerShell application.
A UNIX shell window opens, in which you can type the required commands.
3. If you installed the third-party databases in a nondefault location, set the path to the thirdparty databases by typing the following command:
export SCHRODINGER_THIRDPARTY=thirdparty-location
If you installed the third-party databases in the default location, skip this step.
4. Run the rsync_pdb utility by typing the following command:
$SCHRODINGER/utilities/rsync_pdb
This utility actually uses wget, which is installed in $SCHRODINGER/tools.
5. Run the update_BLASTDB utility by typing the following command:
$SCHRODINGER/utilities/update_BLASTDB
50
Schrödinger Suite 2011
Chapter 4: Installing the Products on Windows
The program starts, and displays the location of the third-party directory and the BLAST
directory.
6. At the first prompt, type y to continue.
7. At the second prompt, type 2 to choose the FTP method.
Rsync is not generally available on Windows, so you must use the FTP method.
The download starts, and the progress of the process is printed in the shell window. When
it is finished, you can close the shell window and the explorer window.
You can, however, use the environment variables to point to the location of one version or the
other when you want to run calculations with a particular version.
4.4
Setting Up Access to PyMOL
Both Maestro and Canvas can open PyMOL directly. To do so, PyMOL must be installed and
the location communicated to the application. The recommended procedure is:
1. Install PyMOL in a location outside the Schrödinger software installation.
2. Add the PyMOL location to the PATH environment variable.
3. Set the PYMOL4MAESTRO environment variable to the PyMOL location.
See Appendix A for instructions on setting environment variables. Canvas requires that the
PyMOL location is in the PATH environment variable. Maestro does not use PATH, but uses the
following sources to find an installation of PyMOL first, in the order given:
1. The PYMOL4MAESTRO environment variable. This environment variable should point to
the PyMOL installation. This is the preferred method of specifying the location of
PyMOL.
2. A PyMOL launch script called pymol4maestro in the Schrödinger software installation.
This script must run PyMOL.
3. A PyMOL installation in the Schrödinger software installation in the pymol folder.
4. The standard PyMOL environment variable PYMOL_PATH.
5. A launch script called pymol in the Schrödinger software installation.
Installation Guide
51
Chapter 4: Installing the Products on Windows
4.5
Uninstalling Schrödinger Software
Before uninstalling Schrödinger software, ensure that all Schrödinger applications and
supporting programs are not running: this includes utilities, Maestro, SchrodingerShell
windows, and any other Schrödinger applications. If remote jobs are running, you should wait
until they finish before uninstalling Maestro, otherwise the results will not be copied back to
the working directory or incorporated into the project.
If you want to kill all Schrödinger applications and supporting programs, navigate to the
mmshare-vversion\bin\WIN32-x86 folder in your Schrödinger software installation and run
SchrodingerProcKill.
You cannot use Add/Remove Programs to uninstall the software: this has been explicitly
disabled, because setup.exe performs some tasks that are not performed with Add/Remove
Programs. You must therefore use setup.exe or its equivalent, as explained below.
For releases prior to Schrödinger Suite 2009 Update 2, you must use the setup.exe program
to uninstall the software. If you no longer have this program for the particular release, you can
download it again from the Downloads page of the Schrödinger web site.
From Schrödinger Suite 2009 Update 2 on, you can use one of the following methods:
• Run the setup.exe program that you used to install the software. If you no longer have
this program, you can use one of the other options below.
• Run the uninstall.exe program, which is located in the installer folder of your
Schrödinger software installation (%SCHRODINGER%\installer).
• Run the uninstaller by going to Start > All Programs > Schrodinger-year > Uninstall.
• Run uninstall-silent.exe from a DOS window. This program is also in the
installer folder of your Schrödinger software installation. It accepts the same arguments as setup-silent.exe, given in Table 4.1 on page 41, except that the default and
only allowed action is /remove, so you do not need to specify the action.
If you are uninstalling beta software, you should in general use the beta installer, because there
can be changes between the beta release and the general release.
When you uninstall Schrödinger software you can choose whether to uninstall Maestro and the
various applications. Selecting Maestro does not uninstall other applications, which must be
selected separately. To uninstall the entire software package, you should ensure that you uninstall the other applications as well as Maestro.
If you have installed the third-party databases required by Prime, the installer does not remove
them, and you must remove them manually from the installation.
52
Schrödinger Suite 2011
Installation Guide
Chapter 5
Chapter 5:
Obtaining and Installing Licenses
To obtain a license:
1. Determine your license type (Section 5.1).
2. Collect your machine information (Section 5.2).
3. Visit the web page http://www.schrodinger.com/licensing to request the license
(Section 5.3).
4. Install the license codes (Section 5.5).
Schrödinger products use FLEXlm licenses. If you have questions about the FLEXlm license
manager, consult the latest version of the License Administration Guide at
http://www.globes.com/support/utilities/fnp_LicAdmin_11_9_1.pdf
or download it from the utilities site,
http://www.globes.com/support/fnp_utilities_download.htm
Note:
5.1
If you are an academic user installing only Maestro on Windows, the license is
included with the software and is installed automatically. You do not need to obtain a
license separately.
Determining Your License Type
Schrödinger issues the following types of licenses:
Token-based (productspecific)
Allows jobs for a specific product to be run on any machine, but only
up to the total number of jobs specified in the license code.
Token-based (interchangeable):
Allows jobs for any product listed in the license code to be run on any
machine, but only up to the total number of jobs specified in the license
code.
IP-based (with server
restriction)
Allows the software to be run on any machine whose IP address falls in
the private ranges 192.168.*.*, 10.*.*.*, and 172.16.*.* through
172.31.*.*.
IP-based (subnet)
Allows the software to be run on any machine whose IP address falls in
the address range specified in the license code.
Node-locked
Allows the software to be run on a single, specific machine.
Installation Guide
53
Chapter 5: Obtaining and Installing Licenses
Note:
Schrödinger uses the term “token”, while FLEXlm uses the word “license”. In the
context of obtaining your license, both words mean the same thing.
The following licenses require a license server:
• Token-based (both product-specific and interchangeable)
• IP-based (with server restriction)
The license server does not need to be a particularly powerful machine, as the license server
process is a lightweight process. However, the license server does need to be accessible over
the network to any machines that can check out licenses, so you should choose a machine that
has good network connectivity and is not frequently shut down or rebooted.
The license server should be a Linux or UNIX machine. However, if you cannot use a Linux or
UNIX machine, contact us for information on how to install and start the license server
daemon under Windows.
5.2
Obtaining Machine Information
Linux: If you have Schrödinger software installed, run the machid program, located in the
installation directory, as described below for each license type.
Token-based license:
Run the machid command on the machine designated as the license server. If
you wish to run in redundant-server mode, send us the machid output from 3
machines and specify which should be the primary server.
IP-based license:
Run the machid command on one representative machine in each of the IPsubnets in which you plan to run the software. It is not necessary to send us the
machid output for every machine in each subnet. If you are using certain private IP-subnets (see previous page for a list), you must also send the machid
output for the machine you have chosen as a license server.
Node-locked license:
Run the machid command on the machine where the software will be run.
Please check very carefully that the machid command is executed on the
machine where you plan to run the software, as we use this information to generate a single license for that machine only.
Multiple licenses:
Run the machid command on each machine on which you installed the software, copy the output from each machine and send that output to Schrödinger
as described below.
The command to run is
$SCHRODINGER/machid -hostid
The output from this command consists of two lines, which contain the host ID and the
machine name. The host ID is needed to request a license.
54
Schrödinger Suite 2011
Chapter 5: Obtaining and Installing Licenses
If you do not have Schrödinger software installed on your license server, but have FlexLM
installed, you can obtain the host ID information with the following command:
lmutil lmhostid
The output looks like the following:
lmutil - Copyright (c) 1989-2010 Flexera Software, Inc. All Rights Reserved.
The FLEXnet host ID of this machine is "hostid"
The host ID is the part between the double quotes on the second line.
If you do not have Schrödinger software installed on your license server and FlexLM is not yet
installed, you can obtain the machine information with the following commands:
hostname
/sbin/ifconfig interface
where interface is one of the active network interfaces, e.g. eth0. The host ID is the HWaddr
field, without the colons.
Windows: On Windows platforms, the machine information is displayed in a dialog box that
opens when you try to run Maestro without a license. This information is written to the
Desktop in the file schrodinger_machid.txt. If you need to generate the information, you
can navigate to %SCHRODINGER%\mmshare-vversion\win32-x86 and double-click on
schrodinger.machinfo.exe to obtain the machine information.
If you do not have Schrödinger software installed on your license server, first open a DOS
window (Start > Run, then enter cmd).
• If you have FlexLM already installed on your license server you can obtain the machine
information by changing to the directory that contains lmutil and entering the following
command:
lmutil lmhostid
• If you do not have FlexLM installed, enter the following command:
ipconfig /all
5.3
Requesting a License
To request a license from Schrödinger, visit the web page http://www.schrodinger.com/
licensing and follow the instructions on this page.
Once Schrödinger receives your request, we will generate your license code and send it to you
via e-mail, usually within one business day.
Installation Guide
55
Chapter 5: Obtaining and Installing Licenses
5.4
Explanation of License Codes
Your license is sent to you by e-mail in the form of an attachment. Below is a full example of a
token-based license code. The other license codes have slight differences and are listed in the
following sections.
Token-Based License Code (Product-Specific)
SERVER firth 690571cd
VENDOR SCHROD
INCREMENT IMPACT_MAIN SCHROD 30 31-May-2005 42 HOSTID=ANY
ISSUED=14-Jun-2004 SIGN="0444 4239 EBF0 A6D2 686F
3067 186E 6F45 5E82 9193 66F8 2130 BFFC 1701 52E7
40FF 8C2F 6DBA DD9F 07E4 3259 A17E 6ADC C2AB 0778
SUPERSEDE \
0E21 5F30 \
2926 4F5D \
5676"
This example contains the following elements:
Server:
SERVER firth 690571cd
Vendor:
VENDOR SCHROD
Increment or Feature:
(start of new license code)
Module:
IMPACT_MAIN
Vendor:
SCHROD
Version:
30 (Impact 3.0)
Expiration Date:
31-May-2005
Number of Tokens:
42
Host ID:
HOSTID=ANY
Issue Date:
ISSUED=14-Jun-2004
License Code:
SIGN="0444 ..."
Token-Based License Code (Interchangeable)
Included modules:
PACKAGE SUITE SCHROD COMPONENTS="PSP_SSP:14 ..."
Options:
OPTIONS=SUITE
Number of shared tokens: INCREMENT SUITE SCHROD 10
IP-Based License Code (with Server Restriction)
56
Server:
SERVER melix 000d613b40dc
Host ID range:
HOSTID=INTERNET=192.168.0.*
Schrödinger Suite 2011
Chapter 5: Obtaining and Installing Licenses
IP-Based License Code (Subnet)
Server:
no server listed
Number of tokens:
uncounted
Host ID range:
HOSTID=INTERNET=*.*.*.*
Node-Locked License Code
5.5
Server:
no server listed
Number of tokens:
uncounted
Host ID (one machine):
HOSTID=000ea681ad36
Installing the License
Schrödinger licenses are stored in the license file license (Linux) or license.txt
(Windows), which is kept in the installation directory, $SCHRODINGER. This file may contain
multiple license codes (e.g. for demos, multiple machines, etc.). Schrödinger programs identify and use the appropriate current license code. However, we recommend removing expired
license codes from the license file. If you want to keep them for archival purposes, make sure
that the active license codes are earlier in the file.
To install the license:
1. Copy the license codes from the e-mail attachment and paste it into your license file.
Make sure there is an end quote and a carriage return at the end of each license code.
2. Save the changes to the license file and close it.
3. Check that the license file has the appropriate read permissions.
If you have a node-locked license, your installation is complete. For other kinds of licenses,
continue with the instructions below.
4. Copy the license file to the appropriate hosts:
• Token-based license—place a copy of (or symbolic link to) the license file in the
installation directory ($SCHRODINGER) of each host listed on a SERVER line.
• IP-based license with server restriction (there should be a SERVER line in the license
code)—place a copy of (or symbolic link to) the license file in the installation directory of each host listed on a SERVER line.
• IP-based license for subnet (there should be no SERVER line in the license code)—
place a copy of (or symbolic link to) the license file in the installation directory of
any other hosts that fall in the IP address range specified by the
HOSTID=INTERNET= lines.
Installation Guide
57
Chapter 5: Obtaining and Installing Licenses
If the installation directory is on a networked file system that is accessible to all the hosts,
you do not need to copy the license file.
If you want to install the licenses in a location other than $SCHRODINGER, or use a different
name, you can do so, but you must set the environment variable SCHRODINGER_LICENSE or
SCHROD_LICENSE_FILE to point to the new license file—see Section 5.6 on page 58.
5.6
Setting Up Access to the License Server
If the client machines do not have access to the license file directly (for example, if the license
file is on a local disk), you can do one of the following:
• Set an environment variable to identify the location of the license file or server.
• Copy the license file to the $SCHRODINGER directory on the client. This option only
works if no environment variables are set to locate the license file or server.
Both of these methods can be used on Windows or on Linux. The instructions below and in the
subsections below are for setting an environment variable.
If you do set an environment variable, we recommend that you set SCHROD_LICENSE_FILE
in preference to LM_LICENSE_FILE, because SCHROD_LICENSE_FILE is used in preference to
LM_LICENSE_FILE for Schrödinger software. However, you can use LM_LICENSE_FILE if,
for example, you want to serve both Schrödinger and non-Schrödinger licenses from the same
file or license server, and you only want to set a single environment variable to locate it.
You can add multiple file or server locations to the environment variable. The first file or server
on the list that satisfies the license request is used. So if you want to try first for a local license
then a license on a remote server, put the local license server or file first in the list.
If a license is not found in either SCHROD_LICENSE_FILE or LM_LICENSE_FILE, then the
environment variable SCHRODINGER_LICENSE is used. This variable must point to a single
file.
5.6.1
Linux Clients
If SCHROD_LICENSE_FILE is not already set, you can set it as follows:
csh, tcsh:
setenv SCHROD_LICENSE_FILE [port]@host
bash, ksh:
export SCHROD_LICENSE_FILE=[port]@host
In the commands above, host is the host name of the machine on which the license server
(lmgrd) is running, and port is the port number that is specified as the third argument after the
58
Schrödinger Suite 2011
Chapter 5: Obtaining and Installing Licenses
word SERVER on the SERVER line of the license file. If no port is specified on the SERVER line,
or if the port is in the default range of 27000-27009, then the value for port may be omitted.
If SCHROD_LICENSE_FILE is already defined and does not include this host, you can add to the
definition on Linux as follows:
csh, tcsh:
setenv SCHROD_LICENSE_FILE $SCHROD_LICENSE_FILE:[port]@host
bash, ksh:
export SCHROD_LICENSE_FILE=$SCHROD_LICENSE_FILE:[port]@host
You can add as many file or server locations as you need, separating them with colons.
If none of the environment variables are set, the default is $SCHRODINGER/license.
5.6.2
Windows Clients
Follow the procedure in Appendix A to set the chosen environment variable to [port]@host.
Here, host is the host name of the machine on which the license server (lmgrd) is running, and
port is the port number that is specified as the third argument after the word SERVER on the
SERVER line of the license file. If no port is specified on the SERVER line, or if the port is in the
default range of 27000-27009, then the value for port may be omitted. However, if security
software is checking port usage, then you must add the port number.
If you need to specify multiple files or server locations, you can separate them with semicolons
when you define the environment variable.
If none of the environment variables are set, the default is the license.txt file in your
Schrödinger software installation folder.
5.7
Setting Up a License Server on UNIX
For licenses that are managed by a license server, Schrödinger software uses the FLEXlm
license server. A copy of the license server software is supplied with the installation. It is
highly recommended that you use this copy and the supplied licadmin utility.
If you are familiar with FLEXlm and the use of lmgrd and lmutil to manage licenses, you do
not need to use licadmin or the Schrödinger-supplied software. You must, however ensure
that the version of the FLEXlm software is compatible with (i.e. at least as recent as) that
supplied by Schrödinger, and set up the license file and environment appropriately. The version
of the Schrödinger-supplied software can be obtained with the following command:
$SCHRODINGER/licadmin VER
Installation Guide
59
Chapter 5: Obtaining and Installing Licenses
The following steps describe how to set up the license server using the Schrödinger-supplied
software. You must perform one or more of the following steps. These steps are described in
detail in the following subsections.
5. Set up the license server daemon (Section 5.7.1).
6. Enable license communication across a firewall or proxy (Section 5.7.2).
If you encounter any problems, see Section 5.7.3 on page 61.
5.7.1
Setting Up the Schrödinger License Server Daemon
The instructions in this section are for use of the Schrödinger-supplied copy of the license
server daemon, lmgrd. This daemon listens for license requests on the port designated by the
third argument after the word SERVER on the SERVER line of the license file. For example, in
the following SERVER line
SERVER lsnode b0019732 27000
27000 is the port on which the machine lsnode listens for license requests. If no port is specified on the SERVER line, a default port in the range 27000-27009 is used.
First, ensure that you are logged on to the license server host.
• If you have just installed a new version of Schrodinger software, you should stop the
license server daemon and restart it, to ensure that you are using the latest version. To
stop the license server daemon, use the following command:
$SCHRODINGER/licadmin STOP [-c license-file]
The license file should normally be $SCHRODINGER/license, which is the default if
you omit the -c option.
• If the license server daemon is not running, or if you just stopped it, start it with the following command:
$SCHRODINGER/licadmin START -l lmgrd.‘hostname‘.log [-c license-file]
• If you have requested a license that allows you to run on three redundant servers, you
must execute the above command or commands on each of the three servers. A port must
be specified on each of the three SERVER lines. In most cases a port is already included in
the license code. This port may be changed if the default ports specified in the license
code are already in use on the machines acting as the redundant servers.
• If the license server daemon is already running and is compatible, and you have added
licenses to the license file, enter the following command to instruct lmgrd to reread the
license file:
60
Schrödinger Suite 2011
Chapter 5: Obtaining and Installing Licenses
$SCHRODINGER/licadmin REREAD [-c license-file]
You must execute this command each time you make a change to the license file.
• To check the status of available licenses, enter the following command:
$SCHRODINGER/licadmin STAT [-c license-file]
• To see usage information for the licadmin utility, enter the command:
$SCHRODINGER/licadmin HELP
5.7.2
Enabling License Communication Across a Firewall or Proxy
If the client machine and the license server are separated by a firewall or proxy, you may need
to specify a port on the DAEMON line of the license code in order to enable communication. Any
unused port may be chosen, but the port specified must be made available on the firewall or
proxy. For example, if the license code looks like the following:
SERVER lsnode b0019732 27000
DAEMON SCHROD PORT=10081
and the client machine and license server are separated by a firewall or proxy, then ports 27000
and 10081 must be made available to the client.
5.7.3
Troubleshooting
If you experience problems installing the license, first check that the read permissions are set
appropriately on the license file.
The formatting of the license file is important. The following command can be used on Linux
to check for formatting or content errors:
$SCHRODINGER/licadmin CKSUM -c $SCHRODINGER/license
5.7.3.1
Token-based licenses
Token-based licenses limit the number of instances of specific features of the program that may
be used simultaneously. The licadmin utility can be used to check how many tokens are available for a specific FEATURE or INCREMENT. From the license server, enter the command:
$SCHRODINGER/licadmin STAT -c license-file
If you are logged in to a client machine, enter the command:
$SCHRODINGER/licadmin STAT -c $LM_LICENSE_FILE
Installation Guide
61
Chapter 5: Obtaining and Installing Licenses
5.7.3.2
IP-based licenses
IP-based licenses are restricted by IP address and have the words HOSTID=INTERNET= in the
FEATURE or INCREMENT section of the license code. If you have difficulty obtaining a license
from a client machine, ensure that the client machine falls within the IP address subnet specified for that feature in the license code.
5.7.3.3
Node-locked licenses
Node-locked licenses are restricted to one specific machine, identified by HOSTID=alphanum.
Node-locked features can only be used on the machine whose HOSTID value matches the
HOSTID value specified for that feature in the license code.
5.7.3.4
Requesting assistance
If you have difficulties installing or using the license on the license server machine:
1. Set the FLEXLM_DIAGNOSTICS environment variable as follows:
csh, tcsh:
setenv FLEXLM_DIAGNOSTICS 3
bash, ksh:
export FLEXLM_DIAGNOSTICS=3
2. Run the following command to generate diagnostic information, on the machine where
lmgrd is running:
$SCHRODINGER/licadmin INFO -c $SCHRODINGER/license
This command generates a .tar.gz file. If this command fails for some reason, run the
following commands to generate the same diagnostic information, on the machine where
lmgrd is running:
echo $SHELL
hostname
whoami
pwd
echo $SCHRODINGER
$SCHRODINGER/machid
ls -l $SCHRODINGER/license
cat -v $SCHRODINGER/license
cat $SCHRODINGER/lmgrd.log
$SCHRODINGER/licadmin CKSUM -c $SCHRODINGER/license
$SCHRODINGER/licadmin STAT -c $SCHRODINGER/license
$SCHRODINGER/licadmin DIAG -c $SCHRODINGER/license
ps -ef|egrep ’SCHROD|lmgrd’
cat $SCHRODINGER/schrodinger.hosts
62
Schrödinger Suite 2011
Chapter 5: Obtaining and Installing Licenses
$SCHRODINGER/hunt -rtest
cat /etc/hosts
which perl
perl -V
env |grep -i perl
3. Send the output from the previous step and the .log file (if any) generated by the failed
job to [email protected].
If you have difficulties obtaining a license on a client machine from the server, do the
following:
1. Test whether the client is able to connect to the license server using other protocols (such
as telnet, ssh, or ping).
2. Check with your system administrator to determine if a firewall is present between the
client and the license server. If so, follow the instructions in Section 5.7.2 on page 61.
3. Run the following commands on the client machine, and send the output to
[email protected]:
echo $SHELL
hostname
whoami
pwd
echo $SCHRODINGER
$SCHRODINGER/machid
echo $LM_LICENSE_FILE
$SCHRODINGER/licadmin STAT -c $LM_LICENSE_FILE
$SCHRODINGER/licadmin DIAG -n -c $LM_LICENSE_FILE
cat $SCHRODINGER/schrodinger.hosts
$SCHRODINGER/hunt -rtest
nslookup ‘hostname‘
nslookup license-server-name
cat /etc/resolv.conf
cat /etc/host.conf
echo $RESOLV_SERV_ORDER
/sbin/ifconfig
cat /etc/hosts
which perl
perl -V
env |grep -i perl
Installation Guide
63
Chapter 5: Obtaining and Installing Licenses
5.8
Setting Up a License Server on Windows
To set up a Windows machine as a license server, log on as administrator and follow the
instructions below:
1. Open a DOS window.
2. Change to the directory containing the executables:
cd installation\mmshare-vversion\bin\WIN32_x86
where installation is the path to the Schrödinger software installation, and version is the
5-digit mmshare version number.
3. Start the license server daemon with the command:
lmgrd -c installation\license.txt -l installation\lmgrd.log
This command creates the log file for the license server in the installation directory
4. Enable firewall access to the applications schrod and lmgrd.
To verify that the license server daemon is running, examine the output of the command:
lmutil lmstat -a -c installation\license.txt
To stop the license server daemon, use the command:
lmutil lmdown -c installation\license.txt
64
Schrödinger Suite 2011
Installation Guide
Chapter 6
Chapter 6:
Preparing for Job Submission
Schrödinger products use a common Job Control facility, which allows the user to submit,
monitor, suspend and terminate jobs. The Job Control facility is described in detail in the Job
Control Guide. To run jobs on the local host only, no additional configuration is needed.
To run jobs on remote hosts, run distributed jobs, run jobs on remote hosts, or submit jobs to
batch queues you must first set up the hosts file, schrodinger.hosts. This task is described
in Section 6.1. Next, you must enable access to these remote hosts using the ssh command (or
the rsh command) without specifying a password (see Section 6.2). For batch queues, additional configuration is needed (see Section 6.3), and for some queueing systems, it is also
possible to set up license checking (Section 6.4).Finally, this chapter provides information on
configuring clusters (Section 6.5) and checking the installation and connections (Section 6.6)
6.1
The Hosts File
The Job Control facility obtains information about the hosts on which it will run jobs from the
hosts file. The default name for this file is schrodinger.hosts. Maestro also uses the hosts
file to set up the menus in the Start dialog box.
This file must contain information on all hosts to which jobs can be submitted, and a copy of
this file must be accessible on all hosts from which jobs will be submitted. The copy of the file
that is stored in the installation directory provides the default settings for all users and all hosts.
To customize job submission for a user, copy schrodinger.hosts to the directory $HOME/
.schrodinger on UNIX, or %USERPROFILE%\Schrodinger on Windows, and edit it. A
user copy is necessary if the user has a different user name on any host on which Schrödinger
products will be run.
The hosts file consists of one or more entries, each of which describes a configuration for
running jobs on a given host. Each entry consists of a number of settings, one per line. Default
values for all hosts are taken from the localhost entry, which defines the settings for the
current host. Settings are described in more detail in the following subsections.
To add entries to the hosts file:
1. Open the schrodinger.hosts file in a text editor.
When the software is installed, there is a copy of this file in the installation directory.
Installation Guide
65
Chapter 6: Preparing for Job Submission
2. Create or modify an entry for each remote host using the keywords in Table 6.1.
• The syntax for the settings is keyword: value.
• Keywords are case-insensitive.
• Each entry must begin with a name setting.
• Comments can be included by beginning a line with a # sign.
• Multiple entries can be included for a given host with different settings (e.g. different scratch directories).
• Entries for batch queue submission (including queues on clusters) must specify a
temporary directory that is available on all compute nodes, and is writable by all
valid users. This directory can be on a common file system shared by the nodes, or it
can be identically-named local storage space on each node.
• Individual nodes in a cluster must be included unless they are only used as part of a
properly-configured batch system.
• If the host has a batch queueing system, you can add settings for the batch queue—
see Section 6.3 on page 79 for more information.
3. Save and close the file.
Table 6.1. Keywords for schrodinger.hosts file settings.
66
Keyword
Description
base
The name of an entry (the base entry) that is the basis for the current entry. All
the keywords from the base entry are inherited by the current entry, and new
keywords may be added, in any order. May be used recursively (i.e. a base entry
can include another base entry).
env
Environment variables to be set on the host. The syntax for the environment
variables is variable=value, regardless of the shell used. List each environment
variable on a separate env line.
host
The host name. This entry is only needed if it is different from the name setting
or if the batch queueing software is only available on a particular host.
include
The name of an auxiliary hosts file to be included in the current hosts file. The
inclusion is done by replacing the include line with the contents of the specified file.
name
The name of the host entry or of the batch queue. For a host this is usually the
host name. This name is displayed in Maestro by job control. The name must not
contain spaces. The value localhost is a special value that means the host on
which the job is launched.
Schrödinger Suite 2011
Chapter 6: Preparing for Job Submission
Table 6.1. Keywords for schrodinger.hosts file settings.
Keyword
Description
nodelist
List of entry names, used to define a multiple-host entry. Each name may be followed by a colon and a number of processors. Can be combined with a host setting.
processors
Number of processors available on the host. If the host is part of a cluster, this
number should be the total number of processors available on the cluster. For
multicore processors, the number should be the total number of cores available.
The default is 1, except for the localhost entry, where the default is the number of available processors (or cores).
proxyhost
Host on which to run jproxy. This setting should be made when the host from
which a job is launched cannot open a socket connection on the host on which
the job is actually run. By default, jproxy is run on the host specified by the
host keyword, and is only run when using a queuing system. This setting is
only needed in cases where using the default is impossible or impractical.
Only valid when the host entry also contains a queue setting.
proxyport
Specify the port or range of ports that jproxy may use. Ports can be specified as
comma or colon-separated lists without spaces. Ranges can specified with a
dash, for example, 5987:5989-5992:5994.
Only valid when the host entry also contains a queue setting.
qargs
Arguments to be used when submitting jobs to a batch queue. These arguments
should specify any parameters that define the queue.
queue
Queuing system name. PBS, SGE, LSF, LL, SLURM, and Condor are the supported systems. Must be set to the subdirectory of $SCHRODINGER/queues that
contains the support files for the queuing system.
schrodinger
The path to the Schrödinger software installation on the host.
tmpdir
Base directory for temporary or scratch files, also called the scratch directory.
The file system on which this directory is mounted should be large enough for
the largest temporary files, should be mounted locally, and should be writable by
the user. Do not use symbolic links, as these can cause some programs to fail.
The actual directory created for scratch files is /tmpdir/username/jobname,
where tmpdir is the directory defined here and username is the user name. Multiple tmpdir settings can be added for a given host and are used by Maestro, but
the first setting is used otherwise.
user
The user name to use on the host. This should never be set in the hosts file in the
installation directory. It is required if the user has a different user name on the
defined host than on the host on which the job is launched.
You can test the connections to the hosts in the schrodinger.hosts file by using
installation_check, which is described in Section 6.6 on page 97.
Installation Guide
67
Chapter 6: Preparing for Job Submission
A sample schrodinger.hosts file is shown below.
# Schrodinger hosts file
#
name:
localhost
schrodinger: /software/schrodinger2011
tmpdir:
/scr
#
name:
larry
name:
curly
name:
moe
#
name:
server
schrodinger: /usr/local/schrodinger2011
tmpdir:
/big_scr
processors: 8
#
name:
cluster
host:
manager
queue:
PBS
qargs:
-lwalltime=1000:00:00
schrodinger: /sw/schrodinger2011
env:
SCHRODINGER_THIRDPARTY=/fast/disk
processors: 16
tmpdir:
/storage/TMPDIR
#
# End of Schrodinger hosts file
6.1.1
The name and host Settings
The name setting must be the first line for each entry. This is the name that is used to select the
host (or batch queue) with the configuration specified in the following settings. It is displayed
in the list of hosts in the Start dialog box Host menu or table. Usually, entry-label is the name
of a host that can be used to run a calculation. If it is not, you must include a host setting that
supplies the host name. The host setting is only needed if the name line does not give the host
address. You might, for example, want to provide an alias in the name setting and define the
host name in a host setting if the host name is long. Another use of multiple entries for a
single host is to specify different settings on a host, such as different scratch directories or
different software installations. You can also use the name and host settings to specify a batch
queue name and the host on which the batch system is available. The name setting must not
contain spaces.
68
Schrödinger Suite 2011
Chapter 6: Preparing for Job Submission
The host name does not need to be the fully qualified domain name: it can be any name that
can be resolved by the domain name server (DNS). You will probably need the full name if the
host on which you plan to run (the execution host) is not on the same local network as the host
from which you plan to submit jobs (the submission or launch host). For a hosts file on
Windows, you must use a name for the host that you used when setting up remote access—see
Section 6.2.2.
The value localhost is a special name setting that means the host from which the job was
submitted. In addition to this function, the settings for the localhost entry are used as the
default values for all other entries. In the schrodinger.hosts file example above, the host
entries ahost and bhost inherit the schrodinger setting from the localhost entry.
If you run jobs from the command line, the name setting is what you should use with the
–HOST option to select the hosts to run the job.
6.1.2
The user Setting
If you have different user names on the submission and execution hosts, you can include a
user setting for the execution host in the hosts file on the submission host. The user setting
should never be added to entries in the hosts file in the installation directory, because this
would prevent other users from using those entries. If a user setting is required, the hosts file
should be copied by the user to the directory $HOME/.schrodinger (Unix) or
%USERPROFILE%\Schrodinger (Windows) on the submission hosts and the user settings
added to this copy. If the user name on all remote hosts is the same, an alternative to making a
user setting is to set the environment variable SCHRODINGER_REMOTE_USER to the remote
user name. This can be useful if, for example, a user has one user name on Windows machines
and a different user name on Linux machines.
6.1.3
The tmpdir Setting
The tmpdir setting specifies the scratch directory, where temporary files can be written.
Examples are /scr or /temp. The file system on which this directory is mounted should be
large enough for the largest temporary files, should be mounted locally, and should be writable
by the user. Do not use symbolic links, as these can cause some programs to fail. The actual
directory created for scratch files (the job directory) is tmpdir/username/uniquename, where
tmpdir is the directory defined here and username is the user name.
You can include multiple tmpdir settings for a given host. These settings are listed by Maestro
in the Scratch directory option menu of the Start dialog box, and can be selected for a job. If
you do not start a job from Maestro, the first tmpdir setting is used and the others are ignored.
Installation Guide
69
Chapter 6: Preparing for Job Submission
If you do not specify tmpdir for a host, the tmpdir setting from the localhost entry is used,
if there is one. Otherwise, the scratch directory is set to $HOME/.schrodinger/tmp on Unix
and to %LOCALAPPDATA%\Schrodinger\tmp on Windows.1 The use of the home file system
for large temporary files is discouraged in most places, so you should always ensure that
tmpdir is defined for the hosts you run jobs on, if the job requires temporary storage.
You can override the tmpdir setting in the schrodinger.hosts file by setting the
SCHRODINGER_TMPDIR environment variable or using the -TMPDIR command-line option—
see Section 2.3 of the Job Control Guide for more information. For example, if the directory
designated by tmpdir becomes full with files that you don’t have permission to delete, you
can set SCHRODINGER_TMPDIR to a different directory and continue to run jobs.
6.1.4
The processors Setting
For hosts with multiple processors that are not running a queueing system, set processors to
the number of processors on the host. For batch queues, set processors to the number of
processors available to the queue.
Here, “processors” refers to hardware units capable of running a job, which for most recent
hardware means “cores”.
6.1.5
The schrodinger Setting
The schrodinger setting specifies the directory in which your Schrödinger software is
installed on this host (the installation directory). This setting is used as a fallback by Job
Control to locate compatible software versions on the remote machine. The way in which this
is done is described in Section 2.5 of the Job Control Guide. If you want to submit jobs from a
Windows host to a Linux host, you must add schrodinger settings to ensure that the software
is located, because the default is to use the path to the local installation, and the Windows
installation path will never be located on Linux.
Note:
The schrodinger settings in the hosts file should always point to an installation for
the current release. This is particularly important for Suite 2011 because of changes in
Job Control that are not compatible with earlier releases.
You can provide multiple schrodinger settings for a single host entry. You may want to do
this if you have installations of several versions of Schrödinger software in different directories. For example, suppose your Schrödinger software was installed on a Linux host in the
directory /usr/bin/schrodinger2011, and you have a cluster named mycluster in which
the software is installed in /storage/schrodinger2011. If /storage is only accessible to
the cluster, you could set up your hosts file with the following schrodinger settings:
1.
70
On XP, LOCALAPPDATA is equivalent to %USERPROFILE%\Local Settings\Application Data.
Schrödinger Suite 2011
Chapter 6: Preparing for Job Submission
name:
localhost
schrodinger: /usr/bin/schrodinger2011
name:
host:
queue:
qargs:
schrodinger:
clus4hr
mycluster
PBS
-l walltime=04:00:00
/storage/schrodinger2011
In this example, the cluster is running queuing software. Another way of making the settings is
to include both schrodinger settings for the localhost entry:
name:
localhost
schrodinger: /usr/bin/schrodinger2011
schrodinger: /storage/schrodinger2011
name:
host:
queue:
qargs:
clus4hr
mycluster
PBS
-l walltime=04:00:00
In this case, both schrodinger settings are used in the default search for software on any
host, not just on mycluster.
You can override the schrodinger setting with the -VER and -REL options if you run a
program from the command line. See Table 2.4 on page 11 for details.
6.1.6
The env Setting
The env setting specifies an environment variable that is to be set on this host when any job is
started. The syntax of the setting is variable=value (regardless of the UNIX shell used), where
variable is the environment variable and value is its value. For example,
env: SCHRODINGER_THIRDPARTY=/software/databases
To set multiple environment variables, include one env setting for each variable. Environment
variables set in the hosts file take precedence over any that are set in your UNIX shell, either on
the local host or the remote host.
For products that use OpenMP multithreaded execution, you should set the environment variable OMP_NUM_THREADS to the number of processors or cores on a host that you want to use
for multithreaded execution.
For Desmond, it is useful to set the environment variable OMPI_MCA_btl to self,sm,tcp if
the host does not have an Infiniband network and is used for parallel execution. This setting
Installation Guide
71
Chapter 6: Preparing for Job Submission
suppresses warnings that are generated by Desmond, which uses Infiniband if it can when
running in parallel.
For Open MPI parallel use, it is advisable to set one of the environment variables TMPDIR,
TEMP, or TMP to a local file system, in order to avoid performance issues with temporary files.
See Section 6.3.3 on page 85 for more information.
6.1.7
The include Setting
The include setting is a convenient way of maintaining a hosts file that can be used across
multiple installations of the software. For example, suppose you have installations in the
following locations:
/opt/schrodinger/schrodinger2011/
/opt/schrodinger/schrodinger2010/
/opt/schrodinger/schrodinger2009/
By adding a file /opt/schrodinger/global.hosts that contained the hosts that could be
used by all software versions, you can then use the include setting to refer to this file in the
schrodinger.hosts file for each installation:
# Hosts file for Suite 2009
name:
localhost
schrodinger: /opt/schrodinger/schrodinger2009
tmpdir:
/var/tmp
processors: 4
include /opt/schrodinger/global.hosts
Because the localhost settings are inherited by all other hosts, the location of the installation
(schrodinger setting) can be specified in the hosts file for the particular release, and omitted
from the global hosts file.
6.1.8
The base Setting
The base setting can be used to specify settings that are common to a number of entries,
without having to duplicate them for each entry. For example, on a queue host you might have
several queues with different characteristics, but all have the same host name, queuing software, software installation, and scratch directory. You could use the base setting as follows:
# Base setting for cluster1
name:
cluster1
host:
cluster1
schrodinger: /cluster1/schrodinger/schrodinger2011
72
Schrödinger Suite 2011
Chapter 6: Preparing for Job Submission
queue:
tmpdir:
SGE
/var/tmp
# Small queue
name:
base:
processors:
on cluster1
small1
cluster1
16
# Medium queue on cluster1
name:
medium1
base:
cluster1
processors:
64
# Large queue
name:
base:
processors:
6.1.9
on cluster1
large1
cluster1
256
Customizing the Hosts File
You can copy and edit the schrodinger.hosts file from the installation directory
($SCHRODINGER) to customize its settings. You usually do not need to do this unless you have
different user names on different hosts. If you have installed Schrödinger products on multiple
hosts, you may need to edit the schrodinger.hosts file on each host to add entries for the
other hosts.
6.2
Setting Up Access to Remote Hosts
To run jobs on remote hosts, you must set up access to these hosts by allowing use of the ssh
command without specifying a password. If you have a firewall, you must allow access across
the firewall. Setting up access is described in the subsections below.
In this release, remote jobs can only be submitted to Linux hosts.
• To be able to run jobs on remote hosts, Schrödinger products must be installed on both
the local (job launch) host and the remote hosts, or on a file system that is accessible to
both.
• If access has been set up previously, you do not need to do so again.
The domain name server (DNS) must be enabled to run remote jobs from Windows.
It is also possible to use the rsh command, but the use of ssh is recommended, both for security reasons and for its greater flexibility. Use of rsh is described in Appendix E.
Installation Guide
73
Chapter 6: Preparing for Job Submission
6.2.1
Setting Up Access To and From Linux Hosts
To use passwordless ssh, the hosts to which you want to connect must be configured to satisfy
the following requirements:
• An sshd server must be running.
• RSA public key authentication must be enabled and empty passphrases must be allowed
in the sshd configuration.
Note:
Public key authentication is enabled in OpenSSH by default.
The following steps allow you to use ssh between computers that share your login directory
without specifying a password.
1. Generate a public/private RSA key pair on a host of your choice, whose home directory is
shared with the remote hosts that you want to run jobs on:
cd ~/.ssh
ssh-keygen -t rsa
Note:
When asked for a passphrase do not enter one; just press ENTER. If you specify a
passphrase it defeats the purpose of configuring passwordless ssh.
2. Add your public key to the list of keys allowed to log in to your account:
cat id_rsa.pub >> authorized_keys
cat id_rsa.pub >> authorized_keys2
The two separate files are necessary to support both OpenSSH 1.5 and OpenSSH 2.0 protocols. Some versions use just one or the other of these files.
3. Suppress the confirmation dialog you ordinarily get when you connect to a machine for
the first time:
echo "StrictHostKeyChecking no" >> config
This is necessary if you want to use ssh non-interactively and you cannot get RSA signatures for every host to which you want to allow connections in your known_hosts file
ahead of time.
4. Remove your known_hosts file:
rm known_hosts*
This is necessary so that the new RSA key-pair mechanism is used for every host. Otherwise, hosts to which you previously connected using passwords might not use the new
system automatically.
74
Schrödinger Suite 2011
Chapter 6: Preparing for Job Submission
5. Make sure your home directory cannot be written by anyone but you:
chmod go-w ~
This is required before ssh will allow passwordless access to your account.
For each home directory that is not shared with that of the chosen host, run the following
command:
ssh-copy-id user@remote-host
This command copies the keys and performs the necessary setup and permissions changes. If
for some reason this does not work, you can do the setup manually as follows:
1. Copy the public and private keys to that home directory:
scp ~/.ssh/id_rsa* other-host:~/.ssh/
2. Connect to the host on which that home directory is mounted and change to the .ssh
directory:
cd ~/.ssh
3. Repeat Step 2 through Step 5 above.
4. Ensure that id_rsa (the private key) is readable and writable only by the user:
chmod go-rwx ~/.ssh/id_rsa
6.2.2
Setting Up Access from a Windows Host to Linux Hosts
On Windows, passwordless ssh is handled using plink.exe, which is provided in the
Schrödinger software distribution. To set up passwordless ssh, you can use the Remote Login
Configuration tool to guide you through the process, which involves generating and saving keys
with the PuTTY Key Generator, then configuring your remote hosts. This application is available from the Start menu, under Schrodinger-2011. You can also run the setup process manually—see the instructions in Appendix F.
Before you start, you should ensure that your hosts file, schrodinger.hosts, contains
settings for all the hosts that you want to use. This file is used in the second stage of the setup.
The schrodinger.hosts file used is the first one found in the following locations:
• The startup directory of the configuration tool.
• %USERPROFILE%\Schrodinger.
• The installation (%SCHRODINGER%).
If you want to use a schrodinger.hosts file from a particular directory, right-click on the
shortcut for the configuration tool, and change the Start in directory.
Installation Guide
75
Chapter 6: Preparing for Job Submission
The first panel is labeled Passwordless Remote Access Setup. A summary of the steps is given
in the panel; these steps are given in detail below.
1. Click Generate Keys.
The PuTTY Key Generator panel opens.
2. In the Actions section, click Generate.
A progress bar is displayed in the Key section.
3. Move the pointer around randomly in the Key section until a key is generated.
The random movement is what generates the key. The progress bar is replaced with the
key and information on the key when the key is generated.
Do NOT enter a key passphrase. (This would defeat the purpose of the entire setup.)
4. Click Save private key.
A warning about saving the key without a passphrase is displayed.
5. Click Yes.
A file browser opens.
6. Navigate to %USERPROFILE% and save the file as remoteusername.ppk.
You must use the user name on the remote (Linux) host when you name the file. The
default value of the USERPROFILE environment variable on Windows Vista, Windows 7,
and Windows Server 2008 is C:\Users\username, and on Windows XP is
C:\Documents and Settings\username. (If you prefer to place this file in a folder of
your choice, see Appendix F for instructions.)
7. Click Save public key.
A file browser opens. It should open in the same location as you saved the private key. If
not, navigate to this location.
8. Save the file as publickey.txt.
9. Close the PuTTY Key Generator panel.
Now that you have generated and saved the required keys, you can continue to the next panel,
in which you set up and initialize the passwordless access to the remote hosts.
10. Click Initialize Host Access.
The second panel opens. In this panel, the available hosts are listed in two tables. In the
first, you can edit the table cells to enter a host name and a user name. The second table
contains a list of all hosts in the hosts file in the installation, schrodinger.hosts.
76
Schrödinger Suite 2011
Chapter 6: Preparing for Job Submission
If you stored the public key or the private key in a nondefault location, click Settings to
select the location of these keys before configuring the hosts.
11. Select a host from the second list, and click Initialize.
A connection is opened to this host, and the public key is appended to the authorized keys
file on the host. Progress and results of the connection are displayed in the Status area. A
dialog box opens, asking if you want to add this host to the list of known hosts.
12. Click Yes.
13. Repeat Step 11 and Step 12 for each host that you want to initialize access to.
You can only initialize access to one host at a time, so you must select each host and initialize
access to it. If several hosts share a common home file system, you only need to initialize
access to one of those hosts, but you should test all of them. Likewise, you only need to
initialize access to a queue host for one of the hosts file entries for the queues on that host.
• To test access to a host, select a host in either table and click Test.
Results are shown in the Status area.
If you want to initialize access to a host that is not in the hosts file (for example, before adding
it to the hosts file) you can add it to the User Specified hosts table, select it and click Initialize.
6.2.3
Configuring the Firewall
If you have a firewall, exceptions need to be made in order to run remote jobs.
6.2.3.1
Linux Firewalls
Most Linux systems do not run firewalls, but some do. For remote job submission to work
properly, the firewall on the remote host must allow incoming TCP/IP socket connections. If
jobs are not submitted to a queuing system on the remote host, all ports above 1023 must be
opened. If jobs are submitted to a queue manager on the remote host, the port range used by
Job Control can be restricted to a specific range by setting the following environment variables:
csh, tcsh:
setenv SCHRODINGER_JSERVER_PORT lowport-highport
setenv SCHRODINGER_JPROXY_PORT lowport-highport
setenv SCHRODINGER_JMONITOR_PORT lowport-highport
bash, ksh:
export SCHRODINGER_JSERVER_PORT=lowport-highport
export SCHRODINGER_JPROXY_PORT=lowport-highport
export SCHRODINGER_JMONITOR_PORT=lowport-highport
Installation Guide
77
Chapter 6: Preparing for Job Submission
where lowport and highport are the lowest and highest port numbers that can be used. These
numbers are separated by a hyphen; no spaces are permitted. The ports in these ranges must be
opened on the remote host. It is recommended that these environment variables be set by the
system administrator for all users on each host that is used for job submission; if individual
users set them, they should ask the system administrator for the port range to use.
The number of jserver or jproxy ports specified in the port range must be equal to or
greater than the total number of Schrödinger software users, as Job Control uses one port per
user for jserver. Each jmonitor process opens two ports, and there is one such process for
each job running on the host. The number of ports should therefore be twice the anticipated
maximum number of simultaneous jobs running on the host. See Section 2.1 of the Job Control
Guide for a description of the function of jserver, jproxy, and jmonitor.
6.2.3.2
Windows Firewalls
With Windows firewalls you will often see a popup dialog box asking you if you wish to block
or unblock a specific application. Below are the scenarios where you need to unblock certain
applications, and the list of applications in each case. Unless noted below these instructions
apply to all versions of Windows operating systems.
Launching jobs:
• perl.exe (%SCHRODINGER%\mmshare-vversion\bin\WIN32-x86\perl.exe)
• python.exe (%SCHRODINGER%\mmshare-vversion\bin\WIN32-x86\python.exe)
• sh.exe (%SCHRODINGER%\unxutils\sh.exe)
Running remote jobs:
• plink.exe
Below are other requirements for various firewalls.
Windows XP Service Pack 2
Windows XP SP2 has a built-in firewall. An additional exception needs to be made beyond the
above mentioned ones.
1. Open port 113 for the TCP packets in the firewall.
2. Do one of the following:
• Run Security from the Control Panel and specify port 113 as an exception.
• Log in as administrator and enter the following command in a DOS window:
netsh firewall add portopening tcp 113 rsh
78
Schrödinger Suite 2011
Chapter 6: Preparing for Job Submission
McAfee
Add the remote machine to the Trusted IP list using the settings. You can configure the firewall
to trust all the machines in your LAN as well, but make sure the subnet mask is properly set.
Norton
Should work when the “internet access” prompts to unblock the packets are answered. But
make sure you “trust” your LAN in this case too.
6.3
Preparing for Batch Queue Submission
Schrödinger supplies support for the PBS, SGE (Sun Grid Engine, now Grid Engine, GE; here
it will continue to be referred to as SGE), LSF, Condor, SLURM, Torque, and LoadLeveler
queueing systems in the standard software installation. Below are links to information about
these queueing systems:
• PBS: http://www.openpbs.org, http://www-unix.mcs.anl.gov/openpbs
• GE: http://sourceforge.net/projects/gridscheduler, http://gridengine.org,
http://www.univa.com/products/grid-engine.php
• LSF: http://www.platform.com/products/wm/LSF
• Condor: http://www.cs.wisc.edu/condor
• SLURM: https://computing.llnl.gov/linux/slurm/slurm.html
• Torque: http://www.clusterresources.com/products/torque-resource-manager.php
• LoadLeveler: http://www-03.ibm.com/systems/software/loadleveler
Enabling batch queue submissions to a supported queueing system only requires the addition
of a few lines to the schrodinger.hosts file and the specification of the queueing system and
the queue name. These additions are described in the next subsection.
You should also check that the values of the QPATH and QPROFILE settings in the file
$SCHRODINGER/queues/queue/config are appropriate—see Section 6.3.2 on page 81. For
SGE, you may need to set the QPROFILE variable in the config file to point to a file that sets
up the environment for the queuing software. You should not use the –cwd argument to qsub
for SGE in the hosts file, the config file, the template.sh file, or SGE queue aliases, as this
causes jobs to fail.
It should be reasonably straightforward to configure a Schrödinger software installation to
support other queueing systems as well. The components required to support a batch system
are a few text files that can be added or modified after installation. The nature of these files is
explained in the following subsection.
If you intend to run distributed jobs on a cluster that is set up with batch queues, you should
ensure that jobs can be submitted to the queues from a compute node on the cluster.
Installation Guide
79
Chapter 6: Preparing for Job Submission
6.3.1
Setting Up the Hosts File for Batch Queues
To enable job submissions to a batch queue on a supported queueing system, you must add
host entries that define the available queues to the schrodinger.hosts file. The command
syntax is described in Table 6.1 on page 66. There are two settings that define the queue: the
Queue setting and the Qargs setting. A sample of the host entries to be inserted into the hosts
file is shown below:
# Batch submission to ’bigjobs’ queue under PBS
Name: bigq
Host: cluster
Queue: PBS
Qargs: -q bigjobs
tmpdir: /storage/TMPDIR
#
# Batch submission to ’shortjobs’ queue under PBS
Name: shortq
Host: cluster
Queue: PBS
Qargs: -q shortjobs
tmpdir: /storage/TMPDIR
This example defines two entries named bigq and shortq to which jobs can be sent on the
host cluster.
The Job Control facility distinguishes batch queues from hosts by the presence of the Queue
setting, which specifies the queueing system. The Queue setting must be set to the subdirectory
of $SCHRODINGER/queues that contains the support files for the queueing system. The subdirectories for the supported queueing systems are PBS, SGE, LL, and LSF. The Qargs setting
specifies command line arguments for the queueing system’s job submission command; for
SGE, for instance, this is the qsub command.
You must also include a host setting because the name setting is used to specify the queue.
Like normal remote host entries, host entries for batch queues inherit settings made in the
localhost entry of the schrodinger.hosts file. If the queueing software is available to all
hosts to which you have access, you should set host to localhost. Otherwise you should set
it to the host that runs the queueing software.
Batch queue entries can also have any of the other settings that host entries have, such as
schrodinger and tmpdir. For queues on clusters, the tmpdir setting is required and should
refer to a directory that is available to all the nodes and writable by all users who will use that
queue. On shared memory machines, the tmpdir setting is optional.
80
Schrödinger Suite 2011
Chapter 6: Preparing for Job Submission
You should also consider adding an env setting to set the SCHRODINGER_LICENSE_RETRY
environment variable, particularly if there is likely to be a communication delay in obtaining a
license or if the license pool is oversubscribed. See Appendix B of the Job Control Guide for
the syntax.
For SGE queues that support the use of MPI for parallel execution, you should add -pe pe
%NPROC% to the Qargs setting, to select the parallel environment to use for the queue. The
value of pe depends on the queueing system configuration. The %NPROC% variable is described
in Table 6.1 on page 66. More information on configuring SGE queues for MPI applications
(including Open MPI for Desmond, Jaguar, and Impact) is given in Section 6.3.3 on page 85.
You should not add -cwd to the Qargs setting for SGE, as this causes jobs to fail.
The LoadLeveler queueing system does not use command-line arguments to set queue parameters. Rather, it uses directives in the job script that is submitted to the queue. You can pass
directives using the Qargs setting in the hosts file by adding a succession of @param=value
LoadLeveler keyword-value pairs. For example, to assign the jobs to the bigjobs class with a
wall clock time limit of twelve hours, add the following qargs setting:
Qargs: @class=bigjobs @wall_clock_limit=12:00:00
The LoadLeveler keyword-value pairs are substituted at launch time into the job script that is
submitted to LoadLeveler.
6.3.2
Adding Support for an Unsupported Queueing System
To allow job submission to a batch queueing system, Job Control requires the following text
files to be installed on any host on which queue commands can be executed (the queue host):
1. A submit script, which is a wrapper for the queueing system’s own job submission utility
(qsub for PBS and SGE).
2. A cancel script, which is a wrapper for the queueing system’s job removal command
(qdel for PBS and SGE).
3. A config file, which contains settings for the keywords QPATH, QSUB, QDEL, QSTAT, and
QPROFILE. For the supported queuing systems, this is the only file that you should have
to change, because it contains the path to the queuing software. The default submit and
cancel scripts are defined in terms of these settings.
As an example, $SCHRODINGER/queues/PBS/config contains the settings:
QPATH=/usr/local/pbs/bin
QSUB=qsub
QDEL=qdel
QSTAT=qstat
Installation Guide
81
Chapter 6: Preparing for Job Submission
The QPROFILE keyword specifies the absolute path on the queue host of a configuration
file that needs to be sourced to set up the environment to use the queue. This variable is
useful for setting up an environment for the queuing system that does not affect the global
environment.
4. A template.sh file, which is a template for the shell script that is actually submitted to
the batch queue and used to launch your calculation on the execution host.
These files are installed in a subdirectory of the $SCHRODINGER/queues directory on the
queue host.
The name of this subdirectory is used as the name of the queueing system for the purposes of
the hosts file, as described above. The standard software installation creates $SCHRODINGER/
queues/PBS and $SCHRODINGER/queues/SGE directories, containing submit, cancel,
config, and template.sh files for the PBS and SGE systems.
To modify these files or to provide new ones for an unsupported queueing system, you must
understand what Job Control requires from each one. Each of the scripts is discussed below.
6.3.2.1
The submit Script
The submit script needs to support the command line syntax:
submit job-script [qsub-options]
where job-script is the name of a shell script that starts a job on the queue. This is always the
first (and possibly only) command line argument to submit. Anything else on the command
line must be passed on as arguments to the actual job-submission command.
If job submission is successful, submit should extract the batch ID from the output of the
underlying job-submission command and report it in its output, in the form:
BatchId: batchid
If job submission fails for some reason, the script should exit with a non-zero exit code.
If you are creating your own submit script to support a new queueing system, you can use the
submit scripts provided for PBS, SGE, and LSF as templates. Use the QSUB variable rather
than the actual submission command in your script, and define QSUB in the config file.
6.3.2.2
The cancel Script
The cancel script must support the command line syntax:
cancel batchid
82
Schrödinger Suite 2011
Chapter 6: Preparing for Job Submission
where batchid is a batch ID assigned by the queueing system. Job Control keeps track of the
batch ID of each submitted job so that the ID can be used for cancelling jobs. The cancel
script should return a nonzero exit status if the operation fails, for Job Control to be able to
detect the failure.
If you are creating your own cancel script to support a new queueing system, you can use the
cancel scripts provided for PBS, SGE, and LSF as templates. Use the QDEL variable rather
than the actual submission command in your script, and define QDEL in the config file.
6.3.2.3
The Job Script Template File
The template.sh file is a skeleton for the Bourne-shell script that is actually submitted to the
batch queue. The Schrödinger job-launching mechanism reads this file and inserts the
commands necessary to launch the user’s job, and then submits the resulting file to the
queueing system using the submit command described above.
The following information from the template.sh file supplied for the PBS system illustrates
how the template.sh file works.
#!/bin/sh
#PBS -N %PBSNAME%
#PBS -j oe
#PBS -r n
#PBS -l nodes=%NPROC%
#
# Batch-submission script for OpenPBS system
#
PATH=/usr/bin:/bin:/usr/bsd:/usr/sbin:/sbin:/usr/local/bin:$PATH
QPATH=/usr/local/pbs/bin
curdir=‘echo $0 | sed -e ’s#/[^/]*$##’‘
if [ -f "$curdir/config" ]; then
. $curdir/config
fi
PATH=$QPATH:$PATH
SCHRODINGER_BATCHID="$PBS_JOBID"
export SCHRODINGER_BATCHID
if [ -n "$PBS_NODEFILE" ]; then
SCHRODINGER_NODEFILE="$PBS_NODEFILE"
export SCHRODINGER_NODEFILE
Installation Guide
83
Chapter 6: Preparing for Job Submission
fi
%ENVIRONMENT%
%COMMAND%
The #PBS lines are directives that are interpreted by PBS. In this case, the first directive sets
the job name for this job to the Schrödinger job name, while the fourth specifies the number of
processors to use for the job. Most other queueing systems also allow directives to be provided
in the initial comment lines of the job submission scripts.
The words delimited by percent signs are variables, which are replaced at job launch time with
the actual job name, Schrödinger job ID, etc., for the job you are submitting. Variables that you
can put in any new template.sh file are listed in Table 6.2.
Table 6.2. Batch script variables.
84
Variable
Variable action
%NAME%
Schrödinger job name, usually derived from your input file name.
%DIR%
Directory from which the job was submitted.
%HOST%
Machine from which the job was submitted.
%USER%
Name of the user who submitted the job.
%JOBID%
Job ID assigned by the Schrödinger job control system.
%ENVIRONMENT%
Commands which define environment variables that are required for your
job to run.
%PRODUCT%
Product name (NOT the executable).
%APP_EXEC%
The name of the exec variable for the product.
%VER_ARGS%
Version arguments.
%HUNT_PATH%
The path to the hunt executable.
%JOBDB%
The path to the job database.
%NPROC%
Number of processors that were requested from the queueing system for
the execution of a single program. For distributed jobs, this is set to 1; for
MPI parallel jobs, this is set to greater than 1.
%LOGDIR%
The directory in which log files are written.
%HOME%
Home directory on the submission host.
%COMMAND%
Command that launches the Schrödinger jmonitor program, which sets
up, runs, and cleans up after your calculation.
Schrödinger Suite 2011
Chapter 6: Preparing for Job Submission
The %ENVIRONMENT% and %COMMAND% lines are the only lines that are absolutely required in
this script and they must appear in this order. These variables are assigned by the job control
system and are not configurable by the user.
Another important component of this script is the two-line section that sets the
SCHRODINGER_BATCHID environment variable to the actual batch ID assigned to this job. The
batch ID is usually provided by the queueing system in a special environment variable such as
the PBS_JOBID variable used by PBS. The jmonitor program checks for the
SCHRODINGER_BATCHID environment variable and saves the batch ID in the job record, where
the user can look it up.
If you want to run MPI parallel jobs, the list of host names assigned to the job by the queuing
system must be made available in a file, and the SCHRODINGER_NODEFILE environment variable must be set in the script to point to this file. An example of this is shown in the PBS batch
script above, in the if block above the %ENVIRONMENT% line.
6.3.3
Configuring Queuing Systems for Open MPI Parallel
Execution
Desmond, Impact, and Jaguar parallel execution use Open MPI 1.3.4, and can operate with a
number of queuing systems. Open MPI provides tight integration that is compatible with many
queuing systems via the PLS (Process Launch Subsystem) and RAS (Resource Allocation
Subsystem) components. Loose integration, in which the queuing system is only responsible
for allocating resources and dispatching the jobs, is also possible.
Instructions and requirements for the supported queuing systems are listed in the following
subsections.
Note:
The queues that are set up using the instructions below should only be used for jobs
that run under MPI such as Desmond and Jaguar parallel jobs. They should not be used
for distributed computing jobs, such as distributed Glide, LigPrep, and Prime jobs.
Open MPI can create large temporary files, which are written in the location defined by
TMPDIR, TEMP, TMP, with a fallback to /tmp. To avoid performance problems, you should
ensure that these files are written to a local file system with sufficient space, by setting one of
these environment variables in the hosts file. For example,
env: TEMP=/mylocaldisk
env: SCHRODINGER_MPIRUN_OPTIONS='-x TEMP'
Installation Guide
85
Chapter 6: Preparing for Job Submission
6.3.3.1
SGE configuration
Any SGE queue to which parallel jobs are submitted must be configured to support multiprocessor jobs. The schrodinger.hosts file must include an entry to describe the queue.
For SGE queuing systems this entry should look like the following:
Name: my-queue-name
Queue: SGE
Qargs: -q SGE-queue-name -pe pe %NPROC%
Host: my-cluster-name
processors: processors-in-queue
where pe is the name of the parallel environment. The value to use for pe depends on the
queueing system configuration, and it may be necessary to consult the documentation for the
queueing system to determine how to select a suitable value. The command qconf -spl
provides a list of defined parallel environments. An example of the output of this command is
as follows:
lam
mpi
mpich
These names are merely labels and may have no particular significance—for example,
choosing the mpich environment does not mean that you must run MPICH. You can find out
more information about a defined particular parallel environment using the command:
qconf -sp pe
The SGE man page for sge_pe documents the output from this command.
The number of processors to specify is the total number of cores available to the queue. It is
generally recommended that you use “fill-up” scheduling for the queues. The use of “roundrobin” scheduling has a larger risk of failure on startup that may be related to an SGE bug
(http://gridengine.sunsource.net/issues/show_bug.cgi?id=2393). You can set the allocation rule
to $fill_up either in the QMON interface (started with the qmon command) or by editing the
parallel environment with the command
qconf -mp pe
This command opens a text editor, in which you can change or add the allocation_rule
setting. Regardless of the allocation rule, it is advisable to use a high-quality network for
Desmond, and, if possible, to separate MPI traffic from other I/O traffic.
86
Schrödinger Suite 2011
Chapter 6: Preparing for Job Submission
6.3.3.2
PBS Family configuration
The TM API is used to allocate slots and launch processes in Open MPI for all of the family of
PBS queuing systems. For more information of running jobs on PBS Pro or Torque, check the
OpenMPI FAQs at http://www.open-mpi.org/faq/?category=tm.
The schrodinger.hosts file must include entries to define each queue. The queue entry
should look like the following:
Name: my-queue-name
Queue: PBS
Qargs: -l nodes=nodes:ppn=ppn
Host: my-cluster-name
processors: processors-in-queue
where nodes is the number of nodes available to the queue and ppn is the number of processors
(or cores) to be used per node. An example of the Qargs setting for jobs that use a multiple of
8 processors running on nodes that have 8 CPUs (or cores) is as follows:
Qargs: -l nodes=%NPROC/8%:ppn=8
The value %NPROC/8% is interpreted by rounding up to the nearest integer the result of dividing
the value of %NPROC% by 8. Any integer can be used instead of 8; of course you should use the
actual number of processors per node. (This syntax is specific for this case: it does not imply
support for general arithmetic operations.) For jobs that use 8 or fewer CPUs on a 8-core node,
you can use the following setting to run on a single node:
Qargs: -l nodes=1:ppn=%NPROC%
For jobs that request more than 8 CPUs but fewer than the number of nodes, you can use one
CPU per node with the following entry:
Qargs: -l nodes=%NPROC%:ppn=1
PBS Pro: Tight integration for PBS Pro 9.1 should work without any configuration. It might
also work for older version of PBS Pro. If the bundled components do not work on your
queuing system, you can remove those components and use loose integration:
cd $SCHRODINGER/mmshare-vversion/openmpi/lib/openmpi
rm mca_plm_tm.la mca_plm_tm.so mca_ras_tm.la mca_ras_tm.so
If loose integration is used, however, your parallel jobs will not be the under control of PBS
Pro, and in the case of a failure, the slave processes might not be terminated by MPI. Alternatively, you can replace the bundled Open MPI with your own Open MPI installation (contact
[email protected] for more information).
Installation Guide
87
Chapter 6: Preparing for Job Submission
Torque: Due to a naming conflict, components for Torque have been placed under
$SCHRODINGER/mmshare-vversion/lib/arch/openmpi/disabled_lib/openmpi.
If
you are using the Torque queuing system, you should copy those components to the standard
location:
cd $SCHRODINGER/mmshare-vversion/lib/arch/openmpi/disabled_lib/openmpi/
cp -rf mca_plm_tm.la mca_plm_tm.so mca_ras_tm.la mca_ras_tm.so \
$SCHRODINGER/mmshare-vversion/lib/arch/openmpi/lib/openmpi
Note:
If you are currently running multiple queuing systems from the same installation you
may need to create two installations, one with these changes, and one without them.
The bundled Torque components depend on the libtorque.so.2 library from Torque 2.2.1.
If you do not have a compatible libtorque.so.2 library on your system, you may also need
to copy it:
cd $SCHRODINGER/mmshare-vversion/lib/arch/openmpi/disabled_lib/
cp libtorque.so.2 $SCHRODINGER/mmshare-vversion/lib/arch/openmpi/lib
6.3.3.3
LSF configuration
Loose integration for LSF should work without change. Tight integration is supported by LSF
from version 7.0.2 on. For 6.x versions, Platform Computing provides a script-based tight integration using its Generic PJL (Parallel Job Launcher) Framework. PJL is part of the LSF HPC
extension so you must install it first.
88
Schrödinger Suite 2011
Chapter 6: Preparing for Job Submission
6.4
Setting Up License Checking for Queueing
Systems
On large clusters, it is possible for jobs to fail because there are too few licenses for all the jobs
to run. A mechanism has been provided to ensure that a queued job will not run unless all the
licenses it requires are available. This facility is available for the SGE 6.0, PBS Pro 10.1, and
Platform LSF 6.2 queueing systems. The configuration process consists of the following steps:
1. A resource representing each license must be defined in the queueing system configuration.
2. The External Load Information Manager (ELIM) script (LSF) or load sensor script (PBS
and SGE), which reports how many tokens are available for each license, must be configured so that it can find the license file and the FLEXlm utility that it uses to query the
license server.
3. This script must be installed in the appropriate queueing system directory.
4. The Schrödinger Job Control system must be configured to specify license requirements
when launching jobs.
Each of these steps is described in detail in the sections below.
6.4.1
Adding License Attributes to the Queueing System
Configuration
A resource attribute representing each license must be defined in the queueing system configuration. The utility licutil can be used to parse your license file or query the license server
and generate the configuration text that needs to be added to the queueing system configuration
files. The syntax is
$SCHRODINGER/utilities/licutil {-sgeconf|-lsfconf|-pbsconf}
[-f license-file]
The -f license-file option is not required if your license file is in the default location,
$SCHRODINGER/license, or if it is already specified by one of the environment variables
SCHROD_LICENSE_FILE, LM_LICENSE_FILE, or SCHRODINGER_LICENSE. If you want to
query the server directly, you must not use the -f option, and the environment variable you use
must be set to the server location. If you specify multiple servers, only the first is queried.
The output of this command depends on the queueing system chosen, and the output and the
action to be taken is described in the following subsections.
Installation Guide
89
Chapter 6: Preparing for Job Submission
6.4.1.1
Adding License Attributes for SGE
The output from licutil for SGE should consist of lines like the following:
IMPACT_MAIN
MMLIBS
IMPACT_MAIN
MMLIBS
INT
INT
<=
<=
YES
YES
YES
YES
0
0
0
0
There should be one line for each license in your license file.
To add the new license attributes:
1. Copy the existing configuration to a text file:
qconf -sc > complex.txt
where qconf is the SGE queue configuration command.
2. Append the new configuration lines to complex.txt:
$SCHRODINGER/utilities/licutil -sgeconf >> complex.txt
3. Load the new configuration:
qconf -Mc complex.txt
This last command should produce a number of messages like
user@host added "IMPACT_MAIN" to complex entry list
user@host added "MMLIBS" to complex entry list
To verify that the attributes have been added, display the complex configuration with
qconf -sc
and make sure the new license attributes appear.
6.4.1.2
Adding License Attributes for LSF
The output from licutil for LSF should consist of lines like the following:
Copy the text between the dashed lines below into the "Resource" section of
your lsf.shared file. (Don’t, however, copy the RESOURCENAME line below if
there’s already such a line there.)
---------------------------------------------------------------------RESOURCENAME
TYPE
INTERVAL INCREASING DESCRIPTION
IMPACT_MAIN
Numeric
10
N (IMPACT_MAIN license)
MMLIBS
Numeric
10
N (MMLIBS license)
---------------------------------------------------------------------Copy the text between the dahsed lines below into the "Parameters" section
of your lsf.cluster.<your_cluster_name> file:
----------------------------------------------------------------------
90
Schrödinger Suite 2011
Chapter 6: Preparing for Job Submission
LSF_ELIM_DEBUG=y
---------------------------------------------------------------------Copy the text between the dahsed lines below into the "ResourceMap" section
of your lsf.cluster.<your_cluster_name> file. (Don’t, however, copy the
RESOURCENAME line below if there’s already such a line there.)
---------------------------------------------------------------------RESOURCENAME
LOCATION
IMPACT_MAIN
[all]
MMLIBS
[all]
----------------------------------------------------------------------
In the first and third parts of this output, there should be one line for each license in your
license file. To add the new license attributes, follow the instructions in the output. The files
you need to modify, lsf.shared and lsf.cluster.<your_cluster_name>, are located
in the $LSF_CONFDIR directory, which is usually something like /usr/lsf/conf. If this
directory is not cross-mounted between all of the hosts to which LSF can submit jobs, you will
have to make these changes in the configuration files on each host.
To verify that the changes were made correctly, restart LSF with the commands
lsadmin reconfig
badmin mbdrestart
and then list the resources LSF recognizes using the command
lsload -l
The output should include a column for each of the new license resources, for example,
HOST_NAME
host1.mycluster.com
host2.mycluster.com
6.4.1.3
status
ok
ok
<...>
<...>
<...>
mem
365M
362M
IMPACT_MAIN MMLIBS
-
Adding License Attributes for PBS Pro
The output from licutil for PBS Pro should consist of lines like the following:
Copy the text between the dashed lines below into your
<PBS_HOME>/server_priv/resourcedef file.
---------------------------------------------------------------------IMPACT_MAIN type=long
MMLIBS type=long
---------------------------------------------------------------------Add the text between the dashed lines below to the value of
the ’resources’ parameter in your <PBS_HOME>/sched_priv/sched_config file.
E.g., if the ’resources’ line in the file was
resources: "ncpus, mem, arch"
and the text between the lines was
feature1, feature3, feature5
then the new ’resources’ line should be
resources: "ncpus, mem, arch, feature1, feature3, feature5"
Installation Guide
91
Chapter 6: Preparing for Job Submission
---------------------------------------------------------------------IMPACT_MAIN, MMLIBS
---------------------------------------------------------------------Copy the text between the dashed lines below into your
<PBS_HOME>/sched_priv/sched_config file.
---------------------------------------------------------------------server_dyn_res: "IMPACT_MAIN !/usr/bin/schro09/utilities/pbs_lic_sensor.pl IMPACT_MAIN"
server_dyn_res: "MMLIBS !/usr/bin/schro09/utilities/pbs_lic_sensor.pl MMLIBS"
----------------------------------------------------------------------
In the first and third parts of this output, there should be one line for each license in your
license file; in the second part, one word for each license. To add the new license attributes,
follow the instructions in the output. The files that you need to modify are $PBS_HOME/
server_priv/resourcedef and $PBS_HOME/sched_priv/sched_config, where
$PBS_HOME is the PBS home directory, often something like /var/spool/PBS on the head
node of your cluster.
For the changes to take effect, you must restart PBS. The command for doing this is typically
the following:
/etc/init.d/pbs restart
Refer to your PBS Administrator Guide for more information about restarting PBS.
6.4.2
Configuring the Load Scripts
Two scripts are provided that query the FLEXlm license server and report the number of tokens
available for each license in a format that the queueing software can understand. These scripts
are installed in $SCHRODINGER/utilities, and are named flexlm_sensor.pl for SGE
and elim.schrodinger for LSF.
These scripts use a FLEXlm utility, lmutil, to get license usage information from the license
server. To find the license server, the lmutil program needs to be able to read your license
file. If the license file is in the normal location in $SCHRODINGER, or is specified by one of the
standard environment variables, then the scripts should find it automatically. The lmutil
program is also installed with the Schrödinger software, and should be found automatically if
$SCHRODINGER is defined. If you want to use a different version, you can set the environment
variable SCHRODINGER_LMUTIL to specify its location. However, if you use these environment
variables, they must be defined in the environment of the queueing system daemons, which
may be different from ordinary user login environments.
To make sure the utility and license file can be found when the script is run by the queueing
software, we recommend that you add the locations of the lmutil program and the license file
to the script directly, by editing the configuration section at the top of the script. You must have
permission to change this file.
92
Schrödinger Suite 2011
Chapter 6: Preparing for Job Submission
1. Use a text editor to edit the appropriate file:
• $SCHRODINGER/utilities/flexlm_sensor.pl (SGE)
• $SCHRODINGER/utilities/elim.schrodinger (LSF)
• $SCHRODINGER/utilities/pbs_lic_sensor.pl (PBS Pro)
2. Edit the line beginning my $LICENSE so that the full path to the license is between the
quotation marks:
my $LICENSE="full-path-to-license-file";
Alternatively you can specify the license server by including port@license-server between
the quotation marks.
3. Edit the line beginning my $LMUTIL so that the full path to lmutil is between the quotation marks:
my $LMUTIL="full-path-to-lmutil";
4. Save the modified script and close the editor.
To verify that the script is configured properly, enter the following command for SGE and LSF:
perl $SCHRODINGER/utilities/scriptname
or the following command for PBS Pro:
perl $SCHRODINGER/utilities/scriptname MMLIBS
For SGE:
Press the ENTER key. You should get a block of output like
begin
global:IMPACT_MAIN:20
global:MMLIBS:20
end
showing the number of tokens currently available for each license. Exit the script by typing
CTRL-D.
For LSF:
The script should print a line like the following every thirty seconds:
2 IMPACT_MAIN 10 MMLIBS 15
The first number is the number of different licenses you have, followed by the name and token
count for each license. Exit the script by typing CTRL+C.
Installation Guide
93
Chapter 6: Preparing for Job Submission
For PBS Pro:
The script should print a single number, which is the number of available licenses of the type
specified as the command-line argument, and exit. You can replace MMLIBS with any other
license type.
6.4.3
Installing the Load Scripts
The procedure for installing the load scripts is different for each queueing system.
6.4.3.1
Installing for SGE
To install flexlm_sensor.pl under Sun Grid Engine, you need to add a load_sensor
attribute to the host configuration of one of the hosts managed by Sun Grid Engine. The load
sensor is executed periodically on that host and feeds information about license availability
back into the queueing system. You can get a list of the execution hosts using the command
qconf -sel
To add the load sensor to the host configuration for the chosen host:
1. Enter the command
qconf -mconf hostname
2. In the resulting edit window, add the line
load_sensor
installation/utilities/flexlm_sensor.pl
where installation is the installation directory, $SCHRODINGER. You must specify the
path explicitly—you cannot use environment variables in the SGE configuration files. If
there is already a load_sensor line, replace it with the above line.
3. Save the modified file and close the editor.
4. Verify that your changes were accepted by displaying the host configuration with the
command:
qconf -sconf hostname
Sun Grid Engine starts the load sensor script automatically after you have made the
load_sensor setting, and also restarts it automatically if you modify or update the script
flexlm_sensor.pl. The command
qhost -F -h hostname
displays all of the resource attributes for hostname If the load sensor is running and working
properly, you should see your licenses in this list.
94
Schrödinger Suite 2011
Chapter 6: Preparing for Job Submission
For example,
gl:IMPACT_MAIN=20.000000
gl:MMLIBS=20.000000
Sun Grid Engine should be now configured to handle Schrödinger licenses properly.
6.4.3.2
Installing for LSF
To install the ELIM under LSF, follow the instructions below.
1. Copy the edited script into the $LSF_SERVERDIR directory on the LSF master host:
cp $SCHRODINGER/utilities/elim.schrodinger $LSF_SERVERDIR
The $LSF_SERVERDIR directory is typically named something like /usr/lsf/6.2/
linux2.6-glibc2.3-x86/etc/ and also contains the program melim, which manages ELIMs.
2. Restart LSF with the following commands:
lsadmin reconfig
badmin mbdrestart
3. Check that the new ELIM is active, using the command
lsload -l
The output should now contain the number of available tokens for each license; for example,
HOST_NAME
host1.mycluster.com
host2.mycluster.com
status
ok
ok
<...>
<...>
<...>
mem
365M
365M
IMPACT_MAIN MMLIBS
10
15
10
15
LSF should now be configured to handle Schrödinger license requirements.
6.4.3.3
Installing for PBS Pro
The location of the load sensor script, pbs_lic_sensor.pl, is specified in the
sched_priv/sched_config file (see Section 6.4.1.3 on page 91). The configuration
produced by licutil points to the location of this script within the Schrödinger installation,
$SCHRODINGER/utilities/pbs_lic_sensor.pl. If this location is acceptable, no further
action is necessary. If the script needs to be installed elsewhere, you must copy it to the
required location and edit each line of sched_priv/sched_config that refers to the script
and replace the path with the new path.
Installation Guide
95
Chapter 6: Preparing for Job Submission
6.4.4
Turning On License Checking in Job Control
The final step is to instruct Job Control to specify license requirements when submitting jobs to
the queue. This step must be completed after the steps above, otherwise jobs submitted to the
queue will fail because the license software will assume that the required licenses are not available.
To turn on license checking:
1. Open the file $SCHRODINGER/queues/queueing-system/config in a text editor, where
queueing-system is SGE, PBS, or LSF.
2. Change the LICENSE_CHECKING line to read
LICENSE_CHECKING=yes
3. Save the modified file and close the editor.
6.5
Configuring Clusters
The configuration of a cluster to run Schrödinger software must take into account the special
issues of communication between the compute nodes, the manager nodes, and the job submission host, and the impact that this communication might have on performance.
Like any other host, each compute node must have access to a license, the software and the
job-related files. The requirements can be stated as follows:
1. Schrödinger software installations must be available to all hosts: the job submission host,
the manager node, and the compute nodes. These installations must contain the same
software versions, but they could be in separate physical installations.
To reduce network traffic, Schrödinger software should be installed either on each compute node’s local disk, or on a file system that is accessible internally to all cluster nodes
(that is, one that does not create network traffic through the manager node to the external
network).
2. The job submission host and the compute nodes must be able to open socket connections
to the FlexLM license server.
The license file can be stored on the external network, the internal network, or copied to
each node. Since this file is small, the location does not matter.
3. Compute nodes must be able to open socket connections to each other and to the manager
node.
96
Schrödinger Suite 2011
Chapter 6: Preparing for Job Submission
4. Passwordless ssh has to be enabled:
a. from the job submission host to the manager node;
b. from the compute nodes to the manager node.
For parallel Jaguar, the following are required in addition:
• The user’s home directory has to be mounted on the compute nodes.
• Passwordless ssh has to be enabled between compute nodes.
To optimize the performance of a cluster for Schrödinger software, we suggest that you
consider the following options when purchasing, upgrading, or configuring a cluster:
• Invest in a highly capable file server for the external network.
• Invest in a high-performance intra-cluster network (especially for Desmond).
• Invest in shared storage for the private (intra-cluster) network, to reduce traffic to and
from the external network. Shared storage makes installation and maintenance of the
code much simpler, and can be used to store large data files, either temporarily or on a
long-term basis.
• Divide services among several management nodes. For example, the queueing system,
the private network’s shared storage and the routing could all be handled by separate
management nodes. Likewise, nodes used as file servers should not run computations.
• Ensure that the management nodes have fast processors, large memory, and high-quality
motherboards and network interfaces.
• Run more recent Linux versions, which have better facilities for network address translation (NAT) and related functionality than earlier versions.
• Store large databases on high-performance network-attached storage for efficient generation, management, and screening.
• Run a robust queuing system that is relatively immune to stalling, crashing or bringing
down its host if it is heavily loaded.
6.6
Testing the Installations and Connections
Once you have installed the software and set up the hosts file on the desired hosts, you can test
the installation with the installation_check application. To run this application on
Windows, first open a Schrödinger Command Prompt Window (from the Start menu). This
application reads a hosts file and runs a test job using each host entry defined there. Errors in
the hosts file and failures in the test jobs are reported and (to the extent possible) recommendations are given for fixing the problems that were uncovered.
Installation Guide
97
Chapter 6: Preparing for Job Submission
The syntax of the command is as follows:
$SCHRODINGER/installation_check [options]
The options are listed in Table 6.3. In addition to output to the terminal, the following output is
generated: a summary, jobname.summary, a directory, jobname, and a gzipped tar file,
jobname.tar.gz, that contains the contents of the directory and the summary.
Table 6.3. Options for the installation_check command.
Option
Description
-file hostsfile
The hosts file to use. Default is to use the hosts file that would normally be used
for jobs, as defined in Section 2.3.5 of the Job Control Guide.
-testall
Run a test job for all entries in the hosts file. This is the default.
-notest namelist
Comma-separated list of host names on which test jobs should not be launched.
The list must be composed of values for the name entry in the hosts file. Jobs are
launched for all entries in the hosts file other than those listed with this option.
-test namelist
Comma-separated list of host names on which to launch test jobs. The list must
be composed of values for the name entry in the hosts file. Default is to launch
jobs on all entries in the hosts file.
-nojobs
Do not run any test jobs, just report errors in the hosts file.
-time duration
Test application (testapp) job duration, in seconds. Default is 20 sec.
-license
Have testapp check out an MMLIBS license. This is used to test the license
checkout mechanism.
The installation_check application runs a test program, testapp, that exercises all the
Job-Control-related features of a real application. You can run this program directly, as
follows:
$SCHRODINGER/testapp [options] [jobname|inputfile]
If no input file is specified, either a run time (-t) or a number of subjobs (-n) needs to be specified. If subjobs are specified, then the job runs until the subjobs all finish, regardless of the
specified run time.
The options are described in Table 6.4. In addition to these options, the standard Job Control
options –HOST, -NOLAUNCH, -SAVE, and -TMPDIR, described in Table 2.1 of the Job Control
Guide, and the extra options -INTERVAL, -LOCAL, -NOJOBID, and -WAIT, described in
Table 2.2 of the Job Control Guide, are supported.
98
Schrödinger Suite 2011
Chapter 6: Preparing for Job Submission
Table 6.4. Options for the testapp command.
Option
Description
-DEBUG
Produce debug output.
-DIR jobdir
Job launch directory. The default is chosen automatically.
-a
Write auxiliary output file.
-c time
Time for subprocess to run, in seconds.
-e
Write empty output file.
-f nfiles
Number of extra output files. Used to test file transfer.
-g
Write output file for each stage.
-i infile
Extra input file. Used to test file transfer.
-j jobname
Job name
-k signal
Send this signal to the executable at the end of the job.
-l [license]
Require the specified license. If license is omitted, require an MMLIBS license.
Used to test the license checkout mechanism. The syntax for license is
name[[:version]:count], where name is the license name, version is the 2-digit
software version number, and count is the number of licenses.
Examples: IMPACT_GLIDE:4, IMPACT_GLIDE:55:4.
-n nsubjob
Number of child jobs (subjobs) to spawn. Default is 0.
-o nlines
Number of lines in output file. Used to test file transfer.
-p usec
Time in microseconds for a single step of a rapid-update job.
-s
Initialize executable as if it were a subprocess.
-t seconds
Duration of test application job, in seconds.
-x code
Exit code to use.
Distributed computing can be tested with para_testapp. The syntax of the command is:
$SCHRODINGER/para_testapp [options]
The options are described in Table 6.5. The standard Job Control options are accepted (see
Table 2.1 of the Job Control Guide). The -DRIVERHOST option can be used to specify the host
to run the driver job, otherwise it is the first host specified by -HOST.
If the number of subjobs is not specified explicitly with the -n option, then only a single
subjob is started. Likewise, the number of processors to use must be specified explicitly using
the -HOST option. For jobs submitted to a batch queue, the Processors line from the hosts
file entry is used if it is present. -LOCAL and -NOLOCAL can be used to specify the location of
Installation Guide
99
Chapter 6: Preparing for Job Submission
Table 6.5. Options for the para_testapp command.
Option
Description
-DIR jobdir
Job launch directory. The default is chosen automatically.
-j jobname
Job name. Default: dist-njob-pid.
-n njob
Number of subjobs to start. Default: 1.
-NOLAUNCH
Stop just before running the job.
-p
Request njob processors from the queue (parallel mode), where njob is specified
by -n.
-t seconds
Duration of each subjob, in seconds. Default: 30.
temporary files, and -LOCALSUBJOB can be used to run the subjobs with -LOCAL. To test the
startup, use -NOLAUNCH which stops short of actually starting the job.
100
Schrödinger Suite 2011
Installation Guide
Appendix A
Appendix A:
Setting Environment Variables on
Windows
You can create or change environment variables in the Environment Variables dialog box. If
you are adding to the PATH environment variable, you should separate each field with a semicolon (;).
A.1
Windows XP
To open the Environment Variables dialog box:
1. Right-click on My Computer, and choose Properties from the shortcut menu.
The System Properties dialog box opens.
2. In the Advanced tab, click Environment Variables.
The Environment Variables dialog box opens.
To create a new environment variable:
1. In the User variables section, click New.
The New User Variable dialog box opens.
2. Enter the name of the variable and its value, and click OK.
The New User Variable dialog box closes, and the variable is added to the User variables
section of the Environment Variables dialog box.
To modify an existing environment variable:
1. In the User variables section, select the environment variable you want to modify.
2. Click Edit.
The Edit User Variable dialog box opens.
3. Change the value of the variable and click OK.
The Edit User Variable dialog box closes, and the variable is updated in the User variables
section of the Environment Variables dialog box.
When you have finished creating or editing environment variables, click OK in the Environment
Variables dialog box, and again in the System Properties dialog box.
Installation Guide
101
Appendix A: Setting Environment Variables on Windows
A.2
Windows Vista and Windows 7
To open the Environment Variables dialog box:
1. Click Start, then click Control Panel.
The Control Panel opens.
2. Click User Accounts.
3. Click User Accounts again.
4. In the Task side pane on the left, click Change my environment variables.
The Environment Variables dialog box opens.
To create a new environment variable:
1. In the User variables section, click New.
The New User Variable dialog box opens.
2. Enter the name of the variable and its value, and click OK.
The New User Variable dialog box closes, and the variable is added to the User variables
section of the Environment Variables dialog box.
3. Click OK in the Environment Variables dialog box.
To modify an existing environment variable:
4. In the User variables section, select the environment variable you want to modify.
5. Click Edit.
The Edit User Variable dialog box opens.
6. Change the value of the variable and click OK.
The Edit User Variable dialog box closes, and the variable is updated in the User variables
section of the Environment Variables dialog box.
When you have finished creating or editing environment variables, click OK in the Environment
Variables dialog box to save the values. You can then close the Control Panel.
102
Schrödinger Suite 2011
Installation Guide
Appendix C
Appendix C:
Access to the Web via a Proxy
Some Schrödinger applications can retrieve information from the web. If you are using a proxy
server for web access, you may have to perform some configuration to allow these applications
access to the web.
For two applications, getpdb (which retrieves a PDB file from the web) and checkupdates
(which checks the Schrödinger site for software updates), a script has been provided that
creates and stores the necessary information about the proxy server. Using this script should
should work for any proxy server that supports digest or basic authentication.
You can run this script with the following command (on Windows, open a Schrodinger
Command Prompt window first):
$SCHRODINGER/run proxy_config.py [options]
The options are given in Table C.1.
Table C.1. Options for the proxy_config.py script
Option
Description
-c[heck] url
Check a specific URL.
-f[ile] filename
Specify the file that stores the proxy configuration.
-h[elp]
Display usage message and exit.
-t[est]
Test a previously configured proxy.
-v[ersion]
Display the program version and exit.
This script tests for access to http and https URLs, and if it can access these without problems
it does not ask for proxy information. If access to either http or https URLs is blocked, it asks
for the web proxy URL.
If the web proxy requires a login and password, the script asks for these to test the configuration, but it does not store the login and password. When you run either of these applications,
you will be prompted for your login and password.
The script stores the proxy information in a file named web_proxy.json. The default location for this file is your Schrödinger user resources directory ($HOME/.schrodinger on
linux, %APPDATA%\Schrodinger on Windows). If you want to store the information in
Installation Guide
105
Appendix C: Access to the Web via a Proxy
another location, run the script with -f[ile] filename. For example, if you want to install this
file as a global resource for all users, use -f $SCHRODINGER/web_proxy.json.
When the application attempts to contact the web, it looks for the proxy information in the
following locations, and uses the first location that it finds:
• The file specified by the environment variable SCHRODINGER_PROXY_CONFIG.
• The file web_proxy.json file in your user resources directory ($HOME/.schrodinger
on Linux, %APPDATA% on Windows).
• The file web_proxy.json in the software installation ($SCHRODINGER).
If you do not want to use any of these locations, set SCHRODINGER_PROXY_CONFIG to an
empty string.
The getpdb application requires access to the addresses listed below:
www.rcsb.org
eutils.ncbi.nlm.nih.gov
www.ncbi.nlm.nih.gov
helixweb.nih.gov
www.schrodinger.com
106
Schrödinger Suite 2011
**Product** Installation Guide
Appendix D
Appendix D:
Alternative MPI Implementations for
Jaguar
By default, Jaguar uses Open MPI for parallel execution on all Linux platforms. Open MPI is
provided with the software distribution. This appendix provides instructions for the use of
other MPI implementations. For information on installing Open MPI plugins, see Section 3.14
on page 38.
Jaguar is dynamically linked to two MPI compatibility libraries of our own design that enable
different implementations of MPI to be used. We provide versions of these libraries for all of
the platforms on which we support MPI. The installed versions of the libraries are linked to
Open MPI, and since we provide a complete Open MPI distribution as part of the installation,
you should not need to compile or install anything in order to run parallel Jaguar calculations,
even if you are upgrading from an earlier release of Jaguar. If you want to run parallel calculations on a workstation, you should not even need to set any special environment variables.
However, if you use queueing software, then you will have to do some configuration work to
ensure that the MPI tasks are run on the hosts assigned by the queue. See Section 6.3.3 on
page 85 for details on queue configuration.
The two MPI compatibility libraries are named libcmp.so and libprun.so. The former
contains all of Jaguar’s MPI functionality. The latter library contains code for constructing the
mpirun launch command, which Jaguar runs from within its driver. At run time, Jaguar looks
in $SCHRODINGER/jaguar-vversion/lib/Linux-arch to find these libraries.
To ensure that the path to mpirun is available, you should prepend this path to the PATH environment variable in the template.sh script for any queueing system you plan to use, by
adding the following line after the setting of the batch ID:
PATH= path-to-mpirun:$PATH
See Section 6.3.2.3 on page 83 for more information on this file.
D.1
Using Precompiled Compatibility Libraries
For the x86 32-bit architecture, earlier versions of libcmp.so and libprun.so were linked
to MPICH-1 rather than to Open MPI. If for any reason you prefer to use MPICH-1, we still
provide 32-bit versions of libcmp.so and libprun.so which were compiled against
MPICH-1.2.6. These libraries can be found in $SCHRODINGER/jaguar-vversion/
disabled_lib/Linux-x86. To use them, back up the copies in the runtime directory
Installation Guide
107
Appendix D: Alternative MPI Implementations for Jaguar
$SCHRODINGER/jaguar-vversion/lib/Linux-x86, then copy the new versions into the
runtime directory.
MPICH is not provided with the installation, so you will have to compile and install it yourself.
You will also have to set the following required runtime environment in your shell startup
(.bashrc or .cshrc) script if you use MPICH on either architecture:
SCHRODINGER=installation-dir
JAGUAR_EXEC=$SCHRODINGER/jaguar-vjversion/bin/Linux-x86
MMSHARE_EXEC=$SCHRODINGER/mmshare-vmversion/bin/Linux-x86
REMOTE_JAGUAR_EXEC=$SCHRODINGER/jaguar-vjversion/bin/Linux-x86
REMOTE_MMSHARE_EXEC=$SCHRODINGER/mmshare-vmversion/bin/Linux-x86
LD_LIBRARY_PATH=$SCHRODINGER/mmshare-vmversion/lib/Linux-x86:
$SCHRODINGER/jaguar-vjversion/lib/Linux-x86
MPICH=path-to-MPICH-installation
PATH=$MPICH/bin:$PATH
The list of host names assigned to the job by the queuing system must be made available in a
file, and the SCHRODINGER_NODEFILE environment variable must be set in the job script
template to point to this file (see Section 6.3.2.3 on page 83). Each host name in the list must
be on a separate line—space-separated lists do not work. In addition, each user’s home directory must contain a .rhosts file listing all the compute nodes.
D.2
Using Jaguar with Other MPI Implementations
If you want to use an MPI implementation other than OpenMPI, you must install that MPI
implementation, and then recompile the compatibility libraries to use it.
The source code for the compatibility libraries is included with the Jaguar distribution, in the
file $SCHRODINGER/jaguar-vversion/lib/Linux-arch/schrodinger_mpi.tar.gz. To
build and install these libraries, unpack the schrodinger_mpi.tar.gz file and follow the
instructions in the README provided in it. You only need to recompile libprun.so if the
launcher for your MPI implementation is not called mpirun, or does not use the same
command-line options as the mpirun from MPICH-1. The make install command automatically backs up the original libraries (giving them the .orig extension) and installs the new
libraries to the proper runtime location.
108
Schrödinger Suite 2011
**Product** Installation Guide
Appendix E
Appendix E:
Setting Up Passwordless rsh Access
This appendix describes how to set up access to remote hosts using rsh without passwords.
This procedure is not generally recommended because of security and limitations.
If you have Windows XP SP2, you cannot use rsh. Due to a problem with the version of rsh
supplied with these operating systems, rsh does not work correctly.
To set up passwordless rsh access, do one of the following:
• (Linux only) Create or modify the hosts.equiv file in the /etc directory on each host.
This file should contain a list of hosts from which users can log in without giving their
passwords, provided that their user names are the same on each of the hosts. Creating a
hosts.equiv file usually requires root permission.
• Create or modify the .rhosts file in the user’s home directory on each of the remote
hosts (which must be Linux hosts). The .rhosts file should list the names of the hosts
and the user name used to log in without specifying a password. The list should contain
two lines for each machine—one with the machine name alone and one with the fully
qualified name, as follows:
host username
host.domain username
The username in the .rhosts file is optional if the user name is the same on the remote
host as on the submission host.
You do not need root permission to configure this file, but you must make sure that the
file does not have “group” or “other” write permission, and, in the interest of security,
does not have “group” or “other” read permission. To ensure the correct permissions, use
one of the following commands
chmod 600 $HOME/.rhosts
chmod go-rwx $HOME/.rhosts
To force Job Control to use rsh instead of ssh, you must also set the environment variable
SCHRODINGER_RSH to rsh. This only needs to be done on the machines where you want to
use rsh instead of ssh. For instance, you might want to force rsh to be used on your LAN and
continue using ssh on your cluster. An easy way to force rsh to be used only on certain hosts
is to add the following line to the entries for those hosts in your schrodinger.hosts file:
env:
SCHRODINGER_RSH=rsh
Installation Guide
109
Appendix E: Setting Up Passwordless rsh Access
Use of rsh on clusters is not recommended, since rsh has access to a limited number of ports
and is more likely to result in job failure as a consequence. If you want to run jobs on a cluster
using rsh, you must include each node in the cluster in the list of hosts in the hosts.equiv
file or the .rhosts file.
Once you have set up the hosts.equiv file or the .rhosts file, use the following command
on Linux hosts to check for successful communication between the host that the job will be
started on and each of the other hosts that the job will use.
rsh [-l username] hostname uname -a
This command should print information on the host and the operating system from the host
hostname.
Contact your system administrator or consult your queuing system and cluster documentation
in case there are special requirements for the hosts.equiv or .rhosts files for your particular queuing system or cluster setup.
If you have a hosts file, you can automatically check all of the machines listed in it (see page
67).
See Appendix A for instructions on setting environment variables on Windows. On Windows
you will also need to make a firewall exception for rsh.exe.
110
Schrödinger Suite 2011
**Product** Installation Guide
Appendix F
Appendix F:
Setting Up Passwordless ssh Access
Manually on Windows
This appendix describes how to manually set up access to remote hosts from Windows, rather
than using the SchrodingerPlinkWizard tool. This process involves running PuTTYgen, which
is provided in the Schrödinger software installation at %SCHRODINGER%\mmsharevversion\bin\WIN32-x86, and uses plink.exe for connection, which is also provided in
the Schrödinger software installation.
1. Double-click puttygen.exe in an explorer window or run puttygen.exe from the
command line.
The window that is displayed when PuTTYgen starts is shown in Figure F.1.
2. In the Parameters section, select the appropriate type of key to generate.
Select SSH-1 (RSA) if the remote ssh server only supports ssh protocol 1.0. Otherwise,
select SSH-2 RSA. Leave the number of bits in a generated key as 1024.
3. Click Generate, then move the pointer around in the blank area of the Key section.
You must move the pointer around, as PuTTYgen uses these movements to generate a
random key. When the key is generated, it appears in a noneditable text box at the top of
this area, along with some other text boxes (see Figure F.2).
4. Copy and paste the key into the authorized_keys file in your $HOME/.ssh directory
on the UNIX host. (You must copy and paste: do not use Save Public Key.) Append this
public key to the authorized_keys2 file if the ssh server supports only SSH 2.0 protocol.
If your home directory is not cross-mounted on all desired UNIX hosts, you must copy
and paste the key for each independent home directory.
If you prefer, you can use PuTTY to connect to the UNIX host. A version of PuTTY is
provided in the software installation in the subdirectory mmshare-vversion\bin\WIN32-x86.
5. Make sure you do not have write permissions for group or others on your $HOME and
$HOME/.ssh directory on the UNIX host:
chmod go-w $HOME $HOME/.ssh $HOME/.ssh/authorized_keys*
Installation Guide
111
Appendix F: Setting Up Passwordless ssh Access Manually on Windows
Figure F.1. PuTTYgen window before key generation.
Figure F.2. PuTTYgen window after key generation with key selected.
112
Schrödinger Suite 2011
Appendix F: Setting Up Passwordless ssh Access Manually on Windows
6. In the PuTTYgen window, leave the Key passphrase and Confirm passphrase fields
empty.
Specifying the passphrase would defeat the purpose of this whole procedure, which is to
avoid the password prompt.
7. Click Save private key.
8. Save the private key to %HOME%\unixusername.ppk if %HOME% is set, otherwise save it to
%USERPROFILE%\unixusername.ppk, where unixusername is the user name on the Unix
host.
The extension must be included when you specify the location of the file.
The default value of the USERPROFILE environment variable on Windows XP is
C:\Documents and Settings\username; on Vista it is C:\Users\username. To find
out what USERPROFILE is set to, you can open a DOS window and enter the command
set. If you do not save the private key to this location, you must set the environment variable SCHRODINGER_SSH_IDENTITY to the appropriate path.
You must have a private key for each user name that you intend to use on remote hosts. It
is recommended that you generate a private key for each user name. Repeat these instructions from Step 3 to Step 8 generate a new key for each user name.
9. Open a DOS window and run the following command once for each host to which you
want to establish a connection without supplying a password.
path-to-plink\plink.exe -ssh hostname -i "path-to-ppk" -l username ls
plink.exe should be in the same location as puttygen.exe. If the ssh server on the
remote host supports only SSH 2.0, use the following command instead:
path-to-plink\plink.exe -ssh -2 hostname -i "path-to-ppk" -l username ls
The quotes around the path to the private key are required, and the .ppk extension must
be included. This path is the one you specified in Step 8.
If the remote host can be resolved on the network using both its short name and its fully
qualified domain name, repeat the plink command for each version of the name, in
order to cache the fingerprint for each name.
10. If prompted to save the RSA key for that host, choose yes.
This choice ensures that in future the prompt is not displayed. The above command
should then list the files in your home directory on the remote host.
Installation Guide
113
Appendix F: Setting Up Passwordless ssh Access Manually on Windows
11. Set the environment variable SCHRODINGER_RSH, if necessary.
If this environment variable is not set, or if it is set to plink or plink.exe, the version
of plink installed with the Schrödinger software is used. If you want to use your own
installation of plink, you must set SCHRODINGER_RSH to the full path to the executable.
For a more detailed explanation, go to the following web site:
http://the.earth.li/~sgtatham/putty/0.58/htmldoc/Chapter8.html#pubkey
By default, the environment variable SCHRODINGER_RSH is set to plink.exe on Windows, so
the ssh mechanism is the default. For information on setting environment variables on
Windows, see Appendix A.
114
Schrödinger Suite 2011
Index
A
D
Add/Remove Programs ..................................... 51
Adobe Reader.................................................... 16
authorized_keys file .................................... 76
Desmond
byte transfer layer setting ........................... 73
disk space for installation ............................. 9
Infiniband network setup ............................ 12
installing VMD........................................... 36
modules to install........................................ 21
MPI implementations ................................. 11
queue configuration for OpenMPI.............. 87
directory
default installation, setting.......................... 72
disabled libraries......................................... 27
installation .......................... 20, 40, 41, 69, 72
installation log files (Windows).................. 41
scratch............................................. 23, 69, 71
disabled libraries directory................................ 27
DVD drives ....................................................... 17
B
batch ID....................................................... 84, 86
batch queues
configuring for OpenMPI ........................... 87
configuring unsupported............................. 83
defining arguments for................................ 69
distributed jobs ........................................... 81
environment ................................................ 84
hosts file entries .......................................... 82
script replacement....................................... 19
setting name in hosts file ............................ 69
supported systems....................................... 81
beta software
installing on Linux...................................... 20
uninstalling on Windows ............................ 53
BLAST
database, installing ............................... 29, 49
database, updating ................................ 29, 50
environment variables for location of... 15, 29
browser, default................................................. 16
C
cache size ............................................................ 5
Canvas
disk space for installation ............................. 9
modules to install........................................ 21
clusters
distributed jobs ........................................... 81
optimizing performance.............................. 98
rsh connection to....................................... 108
CombiGlide
disk space for installation ............................. 9
modules to install........................................ 21
communications port, license server................. 62
Condor queueing system................................... 81
ConfGen
modules to install........................................ 21
conventions, document...................................... ix
CPUs—see processors
E
Eclipse version .................................................. 14
entries, hosts file
batch queue configuration........................... 82
copying keywords from other entries ......... 68
definition..................................................... 67
entry name, schrodinger.hosts file............ 68
environment for queueing software .................. 84
environment variables
DISPLAY ..................................................... 24
FLEXLM_DIAGNOSTICS ............................. 64
for Prime installation .................................. 15
LM_LICENSE_FILE.................................... 60
LSF_SERVERDIR ........................................ 96
MAESTRO_HELP_BROWSER......................... 26
OMP_NUM_THREADS.................................... 73
OMPI_MCA_btl .......................................... 73
PATH ..................................................... 13, 87
PSP_BLAST_DATA...................................... 15
PSP_BLAST_DIR ........................................ 15
PSP_BLASTDB ...................................... 15, 29
PSP_HMMER_DIR ........................................ 15
PSP_HMMERDB ............................................ 16
PSP_PSIPRED_DB...................................... 16
PSP_PSIPRED_DIR.................................... 16
PSP_SSPRO_DB .......................................... 16
PYTHONPATH............................................... 25
SCHROD_LICENSE_FILE ..................... 37, 60
Installation Guide
113
SCHRODINGER ............................................ 24
SCHRODINGER_BATCHID ........................... 86
SCHRODINGER_GL...................................... 27
SCHRODINGER_INSTALLER_LOGFILE_DIR
................................................................. 40
SCHRODINGER_JMONITOR_PORT .............. 79
SCHRODINGER_JPROXY_PORT .................. 79
SCHRODINGER_JSERVER_PORT ................ 79
SCHRODINGER_LICENSE ........................... 60
SCHRODINGER_LICENSE_RETRY ........ 25, 83
SCHRODINGER_LMUTIL ............................. 94
SCHRODINGER_NODEFILE......................... 87
SCHRODINGER_PDB........................ 15, 16, 29
SCHRODINGER_PDF_VIEWER..................... 26
SCHRODINGER_PROXY_CONFIG .............. 104
SCHRODINGER_PYTHONPATH..................... 25
SCHRODINGER_REMOTE_USER .................. 71
SCHRODINGER_RSH.......................... 107, 112
SCHRODINGER_SSH_IDENTITY .............. 111
SCHRODINGER_THIRDPARTY............... 15, 29
SCHRODINGER_TMPDIR ............................. 72
setting default for host ................................ 68
setting for KNIME on Windows................. 46
USERPROFILE .................................... 78, 111
Epik
disk space for installation ............................. 9
modules to install.................................. 21, 22
execution host ................................................... 71
F
file names on CD or DVD................................. 18
firewall
applications to unblock on Windows.......... 80
license communication across .................... 63
ports to open on Linux................................ 79
FLEXlm license manager ................................. 55
G
GE queueing system ......................................... 81
license checking.......................................... 90
parallel configuration.................................. 88
Qargs settings ............................................. 83
supported version........................................ 11
Glide
disk space for installation ............................. 9
modules to install........................................ 21
114
Schrödinger Suite 2011
graphics drivers ................................................. 10
graphics libraries, use of ................................... 27
gunzip .............................................................. 5
H
host list, for MPI parallel jobs........................... 87
host name, schrodinger.hosts file ............. 68
hosts
execution..................................................... 71
setting up access to ..................................... 75
submission .................................................. 71
testing access to .......................................... 99
hosts file ...................................................... 67–75
addition of localhost entry ..................... 23
batch queue configuration........................... 82
definition..................................................... 67
example....................................................... 70
forcing passwordless rsh in..................... 107
including another hosts file in..................... 68
replacement of ............................................ 19
testing ......................................................... 99
validating .................................................... 69
hosts.equiv file........................................... 107
hyper-threading ................................................... 8
I
Impact
disk space for installation ............................. 9
modules to install........................................ 21
queue configuration for OpenMPI.............. 87
Induced Fit Docking ......................................... 14
modules to install........................................ 21
installation directory ......................................... 72
requirements ............................................... 40
selecting on Linux ...................................... 20
selecting on Windows................................. 41
setting in hosts file ...................................... 69
specifying for host ...................................... 72
Internet Explorer ............................................... 16
IP-based license
definition............................................... 55, 56
information required for ............................. 56
installing for use of..................................... 20
IP-subnets.................................................... 56, 63
J
Jaguar
alternative MPI implementations.............. 106
configuring other queueing systems for
parallel execution .................................... 87
disk space for installation ............................. 9
modules to install........................................ 21
Job Control, testing ........................................... 99
K
keys, RSA ......................................................... 76
KNIME extensions
adding ................................................... 34, 47
disk space for installation ............................. 9
Eclipse version............................................ 14
installing on Windows ................................ 44
KNIME version .......................................... 14
uninstalling on Windows ............................ 53
updating ................................................ 35, 47
xulrunner version........................................ 14
KNIME version................................................. 14
known_hosts file............................................. 76
L
Liaison
disk space for installation ............................. 9
modules to install.................................. 21, 22
libraries, disabled .............................................. 27
library search path............................................. 27
licadmin utility............................................... 63
license checking ................................................ 90
license file ......................................................... 59
access to...................................................... 60
checking the formatting of.......................... 63
replacement of ............................................ 19
rereading ..................................................... 62
license server..................................................... 56
access from cluster to ................................. 98
starting daemon .................................... 62, 66
stopping daemon................................... 62, 66
using multiple ............................................. 61
with firewall or proxy ................................. 63
licenses
academic Maestro on Windows.................. 39
IP-based .......................................... 20, 55, 56
node-locked .................................... 55, 56, 64
obtaining required information................... 56
testing checkout mechanism..................... 100
time period for obtaining ............................ 83
timeout period............................................. 25
token-based............................... 20, 55, 56, 63
troubleshooting ........................................... 63
LigPrep
disk space for installation ............................. 9
modules to install........................................ 22
Linux installation
general requirements ................................ 5, 7
Maestro requirements ................................. 10
LoadLeveler queueing system .......................... 81
directives..................................................... 83
localhost definition................................. 68, 71
locked memory.................................................. 12
LSF queueing system........................................ 81
license checking.......................................... 90
parallel configuration.................................. 90
M
machine information, obtaining ........................ 57
MacroModel
disk space for installation ............................. 9
modules to install........................................ 22
Maestro
disk space for installation ............................. 9
modules to install........................................ 22
starting ........................................................ 26
MCPRO+
disk space for installation ............................. 9
modules to install........................................ 22
modules to install, table of ................................ 21
MPI
alternative implementations for Jaguar..... 106
configuring queueing systems .................... 87
use with unsupported queuing systems ...... 87
Myrinet networks .............................................. 12
N
node-locked license
definition..................................................... 55
features ....................................................... 64
information required for ............................. 56
Installation Guide
115
O
Q
OFED version ................................................... 12
Open MPI.......................................................... 87
OpenGL library................................................. 10
OpenMP multithreaded execution .................... 73
QikProp
disk space for installation ............................. 9
modules to install........................................ 22
QSite
disk space for installation ............................. 9
modules to install........................................ 22
queue host ......................................................... 83
queueing system
adding support for....................................... 83
configuring unsupported for parallel
execution ................................................. 87
GE configuration for OpenMPI .................. 88
GE version .................................................. 11
PBS Pro configuration for OpenMPI.......... 89
setting name in hosts file ............................ 69
Torque configuration for OpenMPI ............ 90
P
parallel environments........................................ 88
PBS Pro queueing system
license checking.......................................... 90
parallel configuration.................................. 89
PBS queueing system........................................ 81
parallel configuration.................................. 89
PDB
environment variable for location of .... 15, 29
installing ............................................... 29, 49
PDF reader ........................................................ 16
Perl, minimum required version ......................... 5
Pfam database
environment variable for............................. 16
installing ............................................... 29, 49
Phase
disk space for installation ............................. 9
modules to install........................................ 22
platform script ............................................. 18
platforms, checking for compatibility............... 19
plink.exe, use on Windows..................... 75, 77
Prime
disk space for installation ............................. 9
environment variables................................. 15
modules to install........................................ 22
third-party software .................................... 28
Prime threading
disk space for installation ............................. 9
modules to install........................................ 22
third-party software .................................... 28
PrimeX
disk space for installation ............................. 9
modules to install........................................ 22
processors
scheduling for GE....................................... 88
scheduling for PBS ..................................... 89
specifying number available on host .... 69, 72
proxy, license communication via..................... 63
PSIPRED, installing.......................................... 30
Python version .............................................. 5, 25
116
Schrödinger Suite 2011
R
redundant servers
configuring.................................................. 62
information required for licensing.............. 56
remote hosts
rsh access to ............................................ 107
settings for ............................................ 67–75
ssh access to .............................................. 76
.rhosts file ................................................... 107
RSA public key authentication ......................... 76
S
schrodinger.hosts—see hosts file ............. 67
scratch directory
specifying default during installation ......... 23
specifying in hosts file .......................... 69, 71
SGE queueing system ....................................... 81
SiteMap
disk space for installation of......................... 9
modules to install........................................ 22
SLURM queueing system ................................. 81
ssh command, use for remote jobs .................. 67
stereo viewing, requirements ............................ 10
Strike
disk space for installation ............................. 9
modules to install........................................ 22
submission host................................................. 71
Sun Grid Engine................................................ 81
T
W
third-party databases, utilities for updating 29, 50
token-based license
definition..................................................... 55
features ....................................................... 63
information required for ............................. 56
installing for use of..................................... 20
tokens, checking the number available ............. 63
Torque queueing system, parallel
configuration .................................................. 90
Windows
setting environment variables ................... 101
supported products........................................ 7
Windows installation
AllUsers mode ............................................ 39
command line ............................................. 41
Maestro requirements ................................. 11
OnlyForMe mode ....................................... 39
unregistered software.................................. 43
Windows setup
access to license.......................................... 60
domain name server.................................... 75
U
uppercase file names on CD or DVD................ 18
user name for remote hosts ......................... 69, 71
V
Virtual Screening Workflow, modules to install 23
Visual C++ 2008 libraries ................................... 8
X
X server Linux requirements ............................ 10
xulrunner version .............................................. 14
Installation Guide
117
118
Schrödinger Suite 2011
120 West 45th Street
17th Floor
New York, NY 10036
101 SW Main Street
Suite 1300
Portland, OR 97204
245 First Street
Riverview II, 18th Floor
Cambridge, MA 02142
Zeppelinstraße 13
81669 München
Germany
Dynamostraße 13
68165 Mannheim
Germany
Quatro House, Frimley Road
Camberley GU16 7ER
United Kingdom
8910 University Center Lane
Suite 270
San Diego, CA 92122
SCHRÖDINGER
®