1
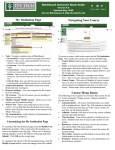
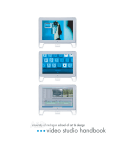
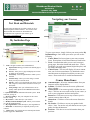
1 Blackboard Student Guide Version 8.0 Updated July, 2008 Access Blackboard at http://dl.ivytech.edu Navigating your Courses Ordering Your Text Book and Materials All text books and materials for online courses can be or dered through the Online bookstore. You can also order Microsoft and other software at discounted rates. To order the texts required for your courses, go to http://www.ivytech.bkstr.com. 1 2 3 My Institution Page 2 3 7 1 5 6 4 8 1. Tabs– Navigate common areas of Blackboard. My Institution–Brings you back to the default page as shown above. Courses– takes you to a page and displays all courses in which you are enrolled. Community– Lists all organizations in which you are enrolled. Virtual Library– Takes you to the college’s virtual library for all your research needs. Scholar—Takes you to the Scholar site where you can add, categorize, and socialize about the web sites you find useful. Click for Help– Here you will find answers to fre quently asked questions about Blackboard and other College tools. 2. System information Information about the system. Read each time you log on. 3. Browser Settings Test your computer for the correct browser settings 4. My Courses– Links directly to your courses 5. Modify Content/ Modify Layout Allows you to custom ize your My Institution Page. 6. My Organizations– Links directly to your Organizations 7. Hot Links—Links directly to frequently used Ivy Tech websites. 8. What’s New—See quickly the new material posted since you last logged in to Blackboard To get to your courses, simply click on your course on the My Institution Page. Once inside your course you will see the following. 1. Course MenuUsed to navigate to your course content items. Descriptions of each menu button are listed below. 2. Tools– Communication takes you to email, messages, group pages, discussion boards and much more. Course Tools takes you to the users manual, digital drop box, and My Grades and many more. 3. Course Frame– This area will display all course content once you click on a menu button. By default the course announcements are displayed each time you enter your course. Please make sure to read all announcements. Course Menu Items: Announcements– All course Announcements from your instructor will be displayed here. Syllabus– Click here to access the course syllabus and course calendar. Class Sessions– Your course typically is broken into ses sions. Click here to access each session of your course, as well as your assignments and tests and quizzes.. Resources– Click here to access any resources your in structor wants to share with you. Discussions– Click here to access the course discussion boards. My Grades– Click here to access your grades for this course. Note: You are the only one that has access to your grades, besides the Instructor. Professor– Click here to access information about your professor. Course Content Submitting an Assignment. An instructor may choose to use the Assignment feature to send and receive your course work. To submit an assign ment. 1. Click on the name of the assignment you want to com plete. 2. Optional: enter any comments you want in the Com ments box. 3. Click on the Browse button. 4. Locate and select the file you want to attach. 5. Click the Open button. 6. Optional: To attach additional files, click on the Add Another File button. Click Browse, locate another file, and click Open. 7. Do only one of the following: Save: To save the assignment to send at a later time, click the Save button. Submit: To send the assignment to your instructor, click the Submit button. 8. Click OK. Submitting an Assignment with SafeAssign 1. Find the assignment description for the assignment you are submitting and click View/Complete under that as signment. 2. Add any Comments in the Comments box. 3. Click the Browse button to upload your file. You should upload only Microsoft Word , text, rtf, html, or PDF documents using this submission method. If you have a file in a different format, please discuss this with your instructor before submitting. 4. To finish submitting your assignment, click Submit. Viewing your SafeAssign Originality Report It will take between 1 hour and 3 days for your originality report to be generated. To view your originality report and comments from your instructor follow the same steps you used to Submit the SafeAssign Assignment (outlined above). Click OK o the screen that indicates you have already turned the assignment in. You can view your grade on this screen as well as on the My Grades button in your Blackboard course. Marking an item Reviewed. An instructor can use the review status feature to track the course content that students have reviewed. To mark an item as reviewed, simply click on the button. Note: The mark reviewed button will change to reviewed. Taking An Assessment (Test, Quizzes, Exams) There are several types of Assessments that you can take in Blackboard. 1. Find the Assessment that you would like to take. 2. Click on the name of the Assessment. 3. Click the OK button to confirm that you are ready to take the Assessment. (The gray box at the top of the Assessment provides you with information about the assessment.) 4. When you are finished taking the assessment, click the Submit button. Then click OK button to confirm as sessment completion. Click the OK button to see your results. Note: Some assessment types will have to be graded by your instructor. Your results will then be posted in the My Grades Menu button. Course Tools Viewing Grades 1. On the course page click the My Grades menu button. 2. Click the OK button when you are finished. Creating a Student Homepage 1. In the course page, click the Tools shortcut under the course menu. 2. Click on Homepage. 3. In the Homepage Information section, enter your infor mation in the Introduction and Personal Information boxes. 4. In the Upload an Image section, click the Browse But ton, locate and select the image you want to display and click Open. 5. In the Favorite Websites section, enter Web site infor mation. 6. Click Submit when you are finished. 7. Click OK. Communication Sending a Message You can send a course specific Message to any user enrolled in a course without leaving Blackboard. 1. On the Course Page, click the Communication button under the main Course Menu. 2. Click on Messages. 3. Click the New Message button. 4. Click the To button. 5. Select the recipient in the Select Recipient box, and click the Add Recipient button (right arrow). Repeat for all users you want to send a Message to. 6. Click the Submit button. 7. Enter a message subject in the Message Subject box. 8. Enter your message in the Body box. 9. Click Submit button and click OK. 2 3 Communication (continued) Reading a Message 1. On the Course Page, click the Communication button under the main Course Menu. 2. Click on Messages. 3. Click the Inbox button. 4. Click on the subject name to open the message. 5. Optional: Click the Reply, Reply All, or Forward button. Select recipients, enter message, and click Submit. 6. Click the OK button when you are finished reading the message. Note: In the inbox, you will see an envelope icon which is closed or open. Closed means you have not viewed the message and open means you have viewed the message. Sending an Email Message You can also send an email to any user enrolled in a course without leaving Blackboard. 1. On the Course Page, click the Communication button under the Course Menu. 2. Click the Send Email button 3. Do One of the following: To send an email message select either All Users, All Groups, or All Instructors. To send an email message to a specific user or groups Select Users or Select Groups and select the users or groups you want to send the message to. 4. Enter a subject for the message in the Subject box. 5. Enter your message in the Message box. 6. Optional: to send an attachment, click attach file, click browse, locate file and click Open. 7. Click the Submit button to send the message. 8. Click OK. To read email messages 1. Log into your Campus Connect Account and click the email button Using Pronto Pronto is an Instant Messaging (IM) tool. Pronto is Ivy Tech specific so you need to know only the user ID of the student, faculty, or staff to find them in Pronto. You can use the Ivy Tech White Pages (http:// whitepages.ivytech.edu/) to find a user ID you don’t know. Send an Instant Message (IM) Doubleclick the user’s name, type a message in the chat box and press Enter on your keyboard. To respond to an instant message, type your reply into the same text box and press Enter. Using Pronto (continued) Using Voice Chat To “call” a user for voice chat, doubleclick the user’s name and click the Phone icon. Once the user accepts your call, hold down the Talk button while you speak into your microphone. Note: You must have a microphone and speakers to use this feature or a microphone mounted headset. Using Group Chat You can communicate with several people at once via IM (like a chat room), or voice chat (like a conference call), using Group Chat. 1. Invite users by selecting their names from either the Classmates or Contacts tab. 2. With the appropriate names highlighted, click the Contacts Menu. Select Invite to Group Chat, followed by New Group Chat. 3. Enter a name for your Chat Room in the Invite to Group Chat window. 4. Once users have joined, type a message, or click the Phone icon and hold down the Talk button (or click the Lock button, for handsfree mode), to communicate with the entire group. 5. When finished, click the disconnect button to stop the voice chat. Discussion Boards Viewing a Discussion Board Forum 1. On the Course page, click on the Discussions Menu item. (You can also click the Communication button under the main Course Menu and click Discussion Boards). 2. Click the forum name to access the forum. 3. Click on the thread name to view that thread and all replies. 1 2 3 1. Thread – Click the Add Thread icon to add a thread to the forum. Collect– Click Collect button to collect all threads and replies to read them all on one page. Note: you must first click the box next to all threads you want to Collect. 2. Display– By clicking the dropdown button you can select Show All, Hidden, Locked, or Published. This displays either all threads, those that have been saved, or those that have been hidden or locked by an Instructor. 3. Threads– This shows a list of Threads that were created by other students or Instructors in the course. Creating a Discussion Thread 1. Click the Add New Thread button. 2. Enter a subject in the Subject box. 3. Enter the thread text in the Message box. 4. Optional: To add an attachment, click Browse, locate and select the file you want to attach, and click the Open button. 5. Click Submit when done. Replying to a Thread 1. Click the Reply button to reply to a thread. 2. Enter text in the Message box. 3. Click Submit. Groups Emailing Group Members (continued) 5. Optional: To add an attachment, click the Attach a File button and click the Browse button. Locate and select the file you want to attach and click the Open button. 6. Click the Submit button to send the email. 7. Click the OK button. Using the Group Discussion Board The instructor must create the group discussion board forums. 1. In the Group page, click the Group Discussion Board button. 2. See the section on Discussion Boards on the previous page to learn how to navigate them. Getting Help Viewing Group Information Instructors can create groups to help students collaborate within a course. 1. Click on the Communication button under the Course Menu. 2. Click on the Group Pages button. 3. Click on the name of the group you would like to view that you are a member of. 4. In the Group Members section of the Group Page, the names of the all the members of the group are displayed. 5. Click on a students name to see the Students Homepage. Adding a File to the File Exchange You can use the File Exchange feature to post and access files from group members. 1. In the Group page, click the File Exchange button. 2. Click the Add File button. 3. Enter a name for the file in the Name box. 4. Click the Browse button. 5. Locate and select the file you want to add to the File Exchange and click the Open button. 6. Click the Submit button. Removing a File from the File Exchange 1. In the Group page, click the File Exchange button. 2. Click the Remove button next to the file you would like to delete. 3. Click the OK button to confirm deletion. 4. Click the OK button to return to the File Exchange area. Emailing Group Members You can also email group members from the Group page as well. 1. In the Group page, click the Send Email button. 2. In the To section, select the group members you want to send the email to. 3. Enter a subject for the email in the Subject box. 4. Enter email text in the Message box. Click for Help The Click for Help tab should be the first place you look for answers to any questions about Blackboard. The Click for Help tab contains quick guides to a number of Blackboard features and tools as well as answers to many commonly asked questions. There are also quick links to the Help Desk web site where you can submit a trouble ticket and the Feedback form you can use to give praise or express concerns about a course. Using the Students Manual If you ever have any questions on how to use any feature in Blackboard, you should first take a look at the Student Manual located in your course. 1. In the Course page, click the CourseTools button under the Course Menu. 2. Click the User Manual button. 3. Click a Book Icon in the Contents area to expand a topic and view all its subjects. 4. To search for Help information, enter the text you want to search for in the Search box and press Enter on your keyboard. 5. Click on a topic to view Help text for the topic. 6. When you finished, click the red X at the top right of your screen to close the window. Helpdesk Information for Ivy Tech Helpdesk hours (Indianapolis time) TuesdayThursday 7a.m.10 p.m. Friday 7 a.m.12a.m. SaturdayMonday 24 Hour availability Helpdesk requests received after hours will be processed the next business day. Contact the Helpdesk Toll Free Telephone: 1877IVYTECH (18774898324) Email:[email protected] Online helpdesk request form https://helpdesk.ivytech.edu/createissue.php Always make sure to contact your Instructor or Local Distance Education Departments with any issues you might be experiencing. 4