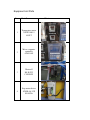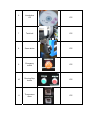
1
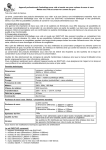
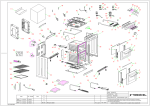
INTERNATIONAL MACHIINE CONCEPTS IMCY1 – S150 3 or 4 Side Seal Honey packaging Machine Manual 1 INTERNATIONAL MACHIINE CONCEPTS CONTENT Chapter 1: Application (3) Chapter 2: Packing material (3) Chapter 3: Main technical parameter (4) Chapter 4: Sketch of operation parts (5) Chapter 5: ATM – 19E controller user manual (6) Chapter 6: Notice (14) Chapter 7: How to operate and adjust the machine (15) Chapter 8: Steps for stopping the machine (23) Chapter 9: Matters that require your attention (23) Chapter 10: Transportation and installing (24) Chapter 11: Troubleshooting and there solution (25) Chapter 12: (28) Mechanism adjustment and troubleshooting Attachments: Electrical drawing Controller ATM – 19E controller Equipment list Spares list Dimension list 2 INTERNATIONAL MACHIINE CONCEPTS Chapter 1: Application The IMCY – 1S150 3 or 4 side seal honey packaging machine is suitable for packing sticky flowing liquid with wiredrawing phenomenon, such as balsam, honey, shampoo, butter and so on. Chapter 2: Packing material The packing material takes heat-seal lamination, Paper/PE, the lamination that the surface is PET, and its form must be in rolls, the outside diameter should below 300mm and the inner diameter is 75mm. 3 INTERNATIONAL MACHIINE CONCEPTS Chapter 3: Main Technical Parameter Capacity: 30-75bags/min Filling range: 30-150ml Bag size: Max (W*L) 80mm*110mm Heater: 110v, 250w*4 Total power consumption: 1.4kw Weight: About 400kg Dimension (L*W*H): 1000mm*1050mm*1850mm Main Motor: 220v, 750w, 1440 r/min 4 INTERNATIONAL MACHIINE CONCEPTS Chapter 4: Sketch of operation parts The marks in the figure are named as follows: 1 3 5 7 9 Machine hopper Controller Cutter clutch Horizontal sealing Film brace 2 4 6 8 10 5 Gear pump Machine house Cutter Vertical sealing Film mould INTERNATIONAL MACHIINE CONCEPTS Chapter 5: ATM-19E Controller User Manual ATM-19 Packer Continue Feeding Controller is a multi-function digital controller designed for the automatic packing machines. It can be installed on most of the automatic packing machines in the market. ATM-19 use liquid crystal display technology. ATM-19 has tracking function. The length scope is from 1 to 999mm. The counting scope is from 0 to 99999. ATM-19 has the following: 5.1. Keyboard and operation Key ATM-19 has liquid crystal screen and operation keys. The size of installation is 144 by 118 mm². The size of outer shape is 150 by 124 mm². 6 INTERNATIONAL MACHIINE CONCEPTS Operation keys: - SET: Set up the parameter - HELP: Show the help message. - ENTER: Confirm and save the parameters - (▲): Increase the parameter - Parameter Length:013mm Alarm:100 Mode:Track (▼) : Decrease the parameter - ( ): Set up the one flashing digit - CLEAR: Clear the count - DISPLAY: Display the parameter (fig 1) - SURVEY: Survey the length - JOG: Manual feeding 5.2. Functions and operation directions With power on, the main motor is stopping and the system is waiting. The liquid crystal screen will show see (fig 1). If the parameter is correct the main motor will startup. 7 INTERNATIONAL MACHIINE CONCEPTS a) Set up the functions After pressing the SET key, the screen will show five parameters, see (fig 2). When pressing the ( ) key, the digit flashes among five parameters. When pressing the ENTER key, set up the flashing digit. Take the length of the bag for example this is how we will introduces the way to set up the parameter. Parameter Length Data Mode Position Count b) Setting-up the bag length When the pointer is pointing to the length of the bag, set up by pressing the ENTER key (fig 3). The digit will be flashing and can be modified by pressing the (▲/▼) key. Parameter Length Data Mode Position Count Press the (▲) key to increase the flashing digit. Press the (▼) key to decrease the flashing digit. Press the ENTER key to save the changes. The changes will not be lost before set up the parameter again. Note: Be sure to adjust the end and then boot. 8 (fig 2) INTERNATIONAL MACHIINE CONCEPTS c) Set up the counter An alarm can be set up to remind operators to collect the bags into a large package (for example, 100 bags per package). ATM-19 will start alarming when it's processing the 5th last bag, starting with the short alarm tone and ending with the long alarm tone. Meanwhile, ATM-19 can send out a switch signal to other devices in accordance with user's needs. SET Length Data Mode Position Count ENTER SET Length:120 ENTER SET Length:121 SET (fig 3) Length:121 To change this parameter, use the SET and ENTER key as the same way as setting up the bag length in the above sections. d) The cutting knife position setting To change this parameter, use the SET and ENTER key in the same way as setting up the bag length in the above sections. 9 INTERNATIONAL MACHIINE CONCEPTS During the production, we will modify the cutting parameter so that we can modify the distance between cutting knife position and color mark. e) Set up the data To change this data, use the SET and ENTER key in the same way as setting up the bag length in the above sections. When selecting the data and pressing ENTER key, then the liquid crystal screen will show “please enter the code…” The girth has been pre-set by the manufacturer and cannot be changed by users. f) Set up the mode Parameter Length Data Mode Position Count Mode Track Mark ENTER Mode Track Mark ENTER (fig 4) 10 INTERNATIONAL MACHIINE CONCEPTS To set up the mode see (fig 4). To change this parameter, use the SET and ENTER key in the same way as setting up the bag length in the above sections. 5.3. DISPLAY key After pressing the DISPLAY key, switch among the work parameter, the running parameter and company name. show three primary parameters. The working parameter will Running this interface will show the packing quantity, packing speed, cutting knife position and the working mode. 5.4. JOG key The feeding motor will start feeding at 2M/min speed when the JOG key is pressed and held. The motor will stop when the JOG key is released. 5.5. HELP key Pressing the HELP key will give you a help message. 11 INTERNATIONAL MACHIINE CONCEPTS 5.6. ENTER key After pressing the ENTER key, confirms and saves your parameter setting. At the same time, liquid crystal screen returns to the front interface. 5.7. CLEAR key To clear the counter, press the CLEAR key and starts counting again. 5.8. ▲▼Key Press the ▲ key to increase the flashing digit. Press the▼ key to decrease the flashing digit see (fig 5). (fig 8) Total: 0 Speed: 126 Position: 19 Photo: Mark 09+00 :Photo :Position ENTER 19+00 :Photo :Position ENTER 09+10 :Photo :Position (fig 5) 12 INTERNATIONAL MACHIINE CONCEPTS 5.9. SURVEY key Autom Measure Finding signal After pressing the SURVEY key, liquid crystal Screen show survey (fig 6). (fig 6) When the system start up, feeding motor begin to feed. After finding the photo mark at the first time, system begins to survey see (fig 7). When finding the photo mark the second time, system stops surveying and show the surveyed results. Automatic Measure Then it will modified the length of the bag according Length: 182mm to the surveyed length automatically and (fig 7) return to the waiting interface. After startup the system, liquid crystal screen will show the interface see (fig 1), the controller will enter the waiting state. At first, according to the photo mark length Total: 0 Speed: 126 Position: 19 Mode: Mark (fig 8) of the packing paper it will set up the running parameter and will be ready. At that time, you’d better select the automating surveying function. 13 INTERNATIONAL MACHIINE CONCEPTS After surveying the length of the bag exactly, power on the main motor, then, the liquid crystal screen shown in (fig 8), the feeding motor will track the mark to feed according to the selected cutting knife position, the cutting knife proper position. At the time, liquid crystal screen show packing quantity, including total number, packing speed (unit/minute). ATM-19 has intelligent characteristic during the running process, pressing ▲▼ key may modify the cutting knife position at any moment the controller does not need adjust the position of the photo electricity. After the mainframe has stopped, the system will be at a waiting state. The liquid crystal screen shown in (fig1). Chapter 6: Notice a) Avoid touching the liquid crystal screen by something sharp lest the liquid crystal be damaged permanently. b) When system powers off, wait for 10 minutes. Then power on the main motor, or else the system will work abnormally. The distance between the gear sensor and the gear should be 0.5 – 1.5mm. 14 INTERNATIONAL MACHIINE CONCEPTS Chapter 7: How to operate and adjust the machine 7.1. Temperature Turn on the power switch,set the temperature of longitudinal sealing roller and cross sealing roller between 110ºC-130ºC.(Usually, for three sides sealing bag or pillow shape bag, the temperature of cross sealing roller should be 10-20ºC higher than longitudinal sealing roller. But for four sides sealing bag, the temperature of longitudinal sealing roller should be 10-20ºC higher than cross sealing roller.) 7.2. Revise the temperature To revise the temperature:Press <AT> key for more than 10 seconds till the light of <AT> key glitters. In the period of the light glittering, it is forbidden to stop the machine or revise the temperature again. 7.3. Adjust the bag size a) Choose “Mode” on computer control, then “Track”. b) Under “Track”, set the length needed. 15 INTERNATIONAL MACHIINE CONCEPTS 7.4. Wheel angle adjustment When the cross-sealing is parallel, the guide rod 02 and the motor 01 at the level of state (see diagram below). Adjustment method: When the cross- sealing is parallel, open the chain 05, with your right – hand turn guide bar sprocket 03 so that the guide rod 02 and motor 01 is at a level of state, and then connected to the chain 05. 01 Electrical 02 Rod 03 Rod sprocket 04 Horizontal sealing sprocket 16 05 Sprocket chain A 06 Spindle sprocket 07 Tensioned pulley INTERNATIONAL MACHIINE CONCEPTS Note: The agency perspective of the factory has been fine, do not adjust it. 7.5. Setting mark-track a) Choose the “Mode” key, then change it to “mark” key, make the indicator on the photoelectric probe aim at the center of the mark, then you can operate the machine. When the cross sealing roller is not press in the correct position, above the mark or below the mark, you can choose “△” and “▽”on the computer to adjust the figure and then choose the “Enter” key. b) Please notice and make sure there is no other color between the two marks, or the photoelectric probe will mistake an action. c) Adjust the sensitivity knob on the photoelectric probe, make sure the indicator light glint one time only when the marks pass the photoelectric. 17 INTERNATIONAL MACHIINE CONCEPTS d) Check whether the color of the mark is similar to the color of the film, if they are similar, the photoelectric probe will not work well. The more of a difference the better (for example, the film is black, the mark is white or the film is white, the mark is black). 7.6. Inspect the color by switch chart This chart shows you how to inspect the color by switch. 18 INTERNATIONAL MACHIINE CONCEPTS Notes: “〇”means it easy to inspect, “╳”means it hard to inspect, “—”means it cannot be inspect. 19 INTERNATIONAL MACHIINE CONCEPTS 7.7. Setting the knife Don’t set the knife until the cutter clutch is closed. Measure: when the machine has stopped, push the cutter gear wheel inside, move it away from joggle gear, run the gear forward or backwards, then loose the gear. (Please refer to schematic chart 2.) 20 INTERNATIONAL MACHIINE CONCEPTS 7.8. Setting the position of the feeding material When the cross sealing rollers are parallel, turn the cam wheel on the shaft, make the bolt on the shaft just pass the feeding switch. (Please refer to schematic chart 5.) 7.9. Processes of running and stopping the machine Steps of operating: a) Lubricate the following parts with oil. Slipping parts of feeding, cutter clutches, copper and alloyed turning parts, and relative moving parts. b) Check if the cutter and feeding clutch were opened. c) Power on, the indicator light will show that the power is on the machine. Also the indicators of the longitudinal and horizontal sealing heaters turn on. 21 INTERNATIONAL MACHIINE CONCEPTS d) Change the temperatures of the longitudinal and horizontal controllers to what you want it to run as. different packing materials. It’s depends on the Usually it is between 100° and 250°. Additionally the temperatures for the longitudinal sealing element are different from the horizontal sealing elements. This is depending on actual status. e) Fit on the packing film. f) Pull the film to the longitudinal rollers and aligned to them. g) Bag making on track condition. The error between the completed bag and real bag (length between centers of the two photo marks) is less than one millimeter. h) After bag making is complete, press Mode change Track to Mark. i) Switch on the cutter clutch, check if the cut position is correct. Turn off the motor to adjust. j) Feeding. k) When the above steps are done, the machine is ready to produce. Once powered is on and have connect the clutches. 22 INTERNATIONAL MACHIINE CONCEPTS Chapter 8: Steps for stopping the machine a) Press Stop on key R/S, which will stop the feeding. b) Turn off the cutter clutch. c) Turn off motor switch. d) Turn off power. e) Check and clean, etc. Chapter 9: Matters that requires your attention. a) Pay attention to the machine sound, and distinguish the abnormal running sound. b) Clean adhesion PE on longitudinal and horizontal rollers with cooper brush, as the adhesion would destroy the heat sealing view and weaken the drawing force of longitudinal sealing. c) Check and clean when the power is off. d) When cutters are running, people and others things are forbidden to be near them. Especially when hands have to enter them the machine must be powered off. e) Check each fastening pieces timely, to avoid loosening. 23 INTERNATIONAL MACHIINE CONCEPTS f) The reducer should be oiled 10 days after it is firsts used. Later exchange new oil each 2000 hours and the amount is up to the center of oil leveler. Chapter 10: Transportation and installing This machine can be on the casters down when moving. The ground must be flat, or the casters will break. With long term transportation, a reliable packing case is needed. The machine is fixed on the baseboard of case by four supporting feet. The upper has to be fixed by supporting plates; a cushion should be between the contact pats. The case needs to be mark with “KEEP UPRIGHT, NOT TO BE TRIED and NO STRIKE” these words must be seen on the outer case of the packing case. 24 INTERNATIONAL MACHIINE CONCEPTS Chapter 11: Troubleshooting and there solutions 11.1 When some parts refuse to start up. Reasons: a) Fuse blown. Proper ampere fuse should be renewed. b) Wring of the motor is broken. Connect again. c) Electromotor is bad. New one is needed. d) Bolts of some of the connecting gears are slap loose. Fasten them up. e) Something is in the gears or other drive parts, at this moment the motor would sound abnormally. Take them out. f) Another object has entered into the cutter and the two blade edges fit too tightly take out the objects and adjust the distance of the two blades. 11.2. Transverse sealing roller cannot rotate Reasons: Bearing of the heat sealing roller has not been filled with oil in time, and the bearing bush is dead, change with a new bearing bush. 25 INTERNATIONAL MACHIINE CONCEPTS 11.3. The malfunction of the material feeding part The packed product is inserted into the part of the transverse sealing. Reason: The time of the feeding product and sealing time of the transverse sealing are not in accordant; you should adjust the material feeding time. 11.4. The malfunction of the cutter The cutter cannot cut off the film. Reasons: a) The gap between the rotating cutter and fixed cutter is not adjusted well. Adjusting method: the gap of the two blade edges is 0.01mm for the best results. b) The blade edge of the cutter is worn. If the worn part is small, grind the cutter by oilstone, and if big, repair it by grinding machine. c) There is a malfunction of the heat sealing rollers 26 INTERNATIONAL MACHIINE CONCEPTS 11.5. The sealing is not good. Reasons: The temperature of the heat sealing has not been adjusted properly, pressure of the push spring is not enough or uneven. Method: according to the thickness and category of the used packing material, choose the correct temperature to do the heat sealing. If the sealing temperature is too low, the sealing part is easy to peel. The pressure of the heat sealing rollers is adjusted by the push spring; it needs proper temperature and pressure for the heat sealing rollers to achieve a good seal. 11.6. The malfunction of the electrical system a) The current of the heat sealer is too large or the fuse has blown. Reasons: there is short circuit in the electric heater or heat sealing circuit. b) The heat sealing roller is not hot. Reasons: (1) The heating wire is burnt out. (2) The fuse of the heat sealing has blown. (3) Electric relay problems (4) Temperature controller problems 27 INTERNATIONAL MACHIINE CONCEPTS c) The temperature of the heat sealing roller cannot be auto-control (temperature is too high). Reasons: (1) The circuit of the thermo scope is not free or the thermo scope of the longitudinal sealing and longitudinal sealing roller cannot make good contact. (2) There is malfunction in the temperature controller. (3) The temperature controller has not been corrected. Chapter 12: Mechanism Adjustment and Troubleshooting 12.1. How to adjust if the temperature controller is showing a large difference in temperature? Answer:Press the <AT> key on the temperature controller more than 10 seconds till the <AT> indicator light turns on. The temperature controller will correct it by itself; the normal difference in temperature is within 2ºC. 28 INTERNATIONAL MACHIINE CONCEPTS 12.2. How to adjust it if the speed for making bags is sometimes higher and sometimes lower? Answer: a) The reason is the length we set is far different as the actual distance between the two marks. We should make the tolerance within ±1mm. b) The sensitivity we set on the photoelectric probe is too high, so this problem will happen. The best way for setting sensitivity is: setting a lower sensitivity, turn the knob left till the indicator light is on, then setting a higher sensitivity very slowly, turn the knob right, and stop it immediately as soon as the indicator light glints. This will be the best way to set the sensitivity. c) While making the bags, photoelectric probe meets other colors on the film. d) When the cross sealing rollers parallel, to the wheel length is not at a 45º angle. 29 INTERNATIONAL MACHIINE CONCEPTS 12.3. What to do if the sides of the bags made by the running machine are not symmetrical? Answer: a) Adjust the bag former, make the midline of the bag former and the midline of the film, cross sealing roller and longitudinal sealing roller on one line. Measure: Loosen the four snails on the bag former, hold the bag former by one hand, another hand knocks the bag former lightly to make the bag former move to the unsymmetrical side. b) Adjust the stand of the bag former fore-and-after; make it vertical with the electricity box. Measure: Loose the up and down snails, move the stand to the side face where the paper comes out from. c) Inspect whether the two sides of the film are symmetrical, when the film is running out at the bottom of the bag former. Measure: If you find the coming out film in one side is less than the other side at the bottom of the bag former, you can prize the lesser side by using a screwdriver very lightly. d) Inspect whether the hoop on the bottom of the bag former is too loose? 30 INTERNATIONAL MACHIINE CONCEPTS Measure: (1) Insert one empty bag into the space between the hoop and the packing material; make the packing material cling to the bag former. (Please refer to the chart 6.) (2) Make one end of the hoop open; insert the film, set a good clearance, then weld the hoop again. 12.4. What to do if there is always material in the sealing area of the bag while the machine is running? Answer:Setting the time of the feeding material: It will be ok if there is no material when the cross roller works. 31 INTERNATIONAL MACHIINE CONCEPTS 12.5. What to do if the bags are always declining, not rectangular? Answer: Setting the stand of the bag former, make it vertical with the cross sealing roller. Measure: Loosen the two snails on the stand and move it forwards or backwards. 12.6. The machine I bought is four sides seal packing machine, why does the sides of the bags are always asymmetry and coming out? Answer: The main principle of setting four sides seal machine is to balance the pressure of the two longitudinal sealing rollers. Measure: Set the pressure of the longitudinal sealing roller to zero, then increase the pressure from the two sides, keeping the pressure balanceable. When the impression of the bag becomes clearly, stop increasing the pressure, then fix the snails to prevent loosing. necessary, you can increase the temperature. 32 If INTERNATIONAL MACHIINE CONCEPTS 12.7. When you start the machine, why doesn’t the longitudinal sealing roller run? Answer: a) The pressure of the longitudinal sealing roller is too big, reducing it will be OK. b) The interspaces between the speed testing switch and the speed testing gear are too big. Measure: Loosen the speed testing switch, make the sensor of the switch just on the midline of the speed testing gear. Put a piece of paper on the speed testing gear (Please refer to the chart 7.) Making the switch touch the paper will be OK. c) Check the vertical and horizontal sealing system bracket: First turn off the power, release the right of the vertical shaft seal bearing the shelves of the two screws, and then slowly tighten by hand while rotating vertical shaft seal, there will be resistance immediately when you stop, if a little loose open the screws to the bottom of the mat bearing copper or aluminum, and then spin locking wire, your hands feeling smooth rotating vertical shaft seal quickly, there is no resistance there. 33 INTERNATIONAL MACHIINE CONCEPTS 12.8. The cutter of my machine is clamp cutter; sometimes it cannot cut off the film, what’s wrong with it? Answer:The main principle of setting clamp cutter is to control the temperature and balance of the pressure. Measure: a) Increase the temperature of the cross sealing roller properly. b) While adjusting the pressure, please notice the balance of the pressure. 34 INTERNATIONAL MACHIINE CONCEPTS c)Because of the cross sealing roller and cutter will transform under the high temperature, we can put some fragment of can (such as Coca Cola can) under the cutter, block up the cutter, the width and length are decided by the dimension of the bag. d) If the bag is pillow shape, we can adjust the longitudinal sealing area to 5mm, make sure the high quality of superpose of the cross sealing area and longitudinal sealing area. 12.9. What kind of packing film should be used after buying IMC packing machine? How to confirm the bag size? Answer:Because IMC packing machine adopts continuous sealing that measure the packing material as it is running under high temperature and high pressure. The melting point of outside layer and inside layer of the film should be different and the more the difference the better. It is best if the outside layer doesn’t distort when the inside layer seal is strong. If the difference of the two melting point are small, the inside layer cannot be sealed under low temperature or the outside layer will melt under high temperature. 35 INTERNATIONAL MACHIINE CONCEPTS Suggestion 1: According to the different packing material, the different temperature resistance, oxygen permeability of per square meter in 20 hours is different. We suggest you choose PET as the outside layer. Suggestion 2: According to golden section, Galileo's law of falling bodies and the concept of aesthetics, we suggest you keep 1/3 space, 2/3 material when you design the bag, if it is a powder material, please leave more space in the bag. 12.10. How to do it if the finished bag releases gas? Answer: a) Inspect the film whether the layers are separated? Measure: Put the film in hand, twine it again and again, inspect if the layers are separated. b) Inspect if there are burrs on the sealing roller. Measure: Burnish the two sides of the sealing roller by sand paper. 36 Electrical Drawing Controller ATM- 19E + 15V +15V Speed measuring Photoelectric Position IN4 IN5 IN6 IN7 IN8 OV OV + 24V + 24V CP OUT 2 OUT 3 OUT 4 OV OV Connect: speed measuring photoelectric position. Sensor power (+) Connect speed measuring signal of sensor Connect photo switch signal Connect position switch signal NC NC NC Feed Paper Connect: speed measuring, photo, position. Sensor power (-) Connect: CP signal common (+) Connect: stepper motor CP signal Equipment list Device No Original supplier 1 2 Description Model AISET Temperature meter XMTG10002 HONDON Micro computer controller ATM-169E To measuring the reality temperature of horizontal and vertical sealing To adjust packing machine parameter. KS-WG22 To track the mark on the packing material 3 CNHENW Photocell 4 SNASDA Step motor driver 5 HONDON Stepping motor 6 HONDON Signal switch 7 TX 8 HONDON 9 SNASDA Frequency motor Measure speed signal switch Eccentricity controller ATMH4A/12X Usage To drive packing material working To drive bag making GD-TLQ5MC1 750KW ATM-01 ATM-PX-A To measuring the count number and photocell To drive the machine running To measure the sealing parts speed Adjust the eccentricity automatically Equipment List Parts Nos. 1 2 Part Name Temperature meter XMTG1000-2 AISET Micro computer controller ATM-169E 3 Photocell KS-WG22 CNHENW 4 Step motor driver ATMH-4A/12X SNASDA Photo 5 Stepping motor 6 Signal switch GD-TL-Q5MC1 7 Frequency motor 750KW TX 8 Measure speed signal switch ATM-01 9 Eccentricity controller ATM-PX-A SNASDA Spare Parts List Nos. Part Name 1 Power line 1 PC 2 Heating rod for horizontal sealing 2PCS Heating rod for vertical sealing 2 PCS 4 Heating ring for vertical sealing 2 PCS 5 Brush 3 Photo Recommend Quantity 1PC Introduction CD 1PC 7 Tooth belt 1PC 8 Screw button 1PC 9 Emergency switch 1PC 10 Running Stop button 1PC 11 Temperature meter 1PC 6 12 Power button 1PC 13 Wheel 1PC 14 Synthetic glass defender 1PC 15 16 Screw button Film drawer 1PC 1PC 17 Film roller 1PC 18 Screw button 1PC 19 Film reel balancer 1PC 20 Rubber tube 1PC 21 Feeder hinge 1PC 22 Door hinge 1PC 23 Lock 1PC 24 Cutter activation lever 1PC 25 Speed control pod 1PC Dimension List Part Name: Picture Diameter Elements dia16mm L200mm Vertical sealing roller Inner diameter 17mm outer diameter 26mm L270mm Inner diameter 17mm outer diameter 26mm L300mm Horizontal sealing roller Inner diameter 18mm outer diameter 25mm L310mm Inner diameter 20mm outer diameter 25mm L260mm Blade 140mm*65mm*10mm(thinckness)