1
Wabi User’s Guide
2 Elizabeth Drive
Chelmsford, MA 01824-4195
U.S.A.
Part No: 802-6306-10
Revision A, May 1996
A Sun Microsystems, Inc. Business
Copyright 1996 Sun Microsystems, Inc., 2550 Garcia Avenue, Mountain View, California 94043-1100 U.S.A. All rights reserved.
This product or document is protected by copyright and distributed under licenses restricting its use, copying, distribution, and decompilation.
No part of this product or document may be reproduced in any form by any means without prior written authorization of Sun and its licensors, if
any.
Portions of this product may be derived from the UNIX® system, licensed from Novell, Inc., and from the Berkeley 4.3 BSD system, licensed from
the University of California. UNIX is a registered trademark in the United States and other countries and is exclusively licensed by X/Open
Company Ltd. Third-party software, including font technology in this product, is protected by copyright and licensed from Sun’s suppliers.
RESTRICTED RIGHTS LEGEND: Use, duplication, or disclosure by the government is subject to restrictions as set forth in subparagraph (c)(1)(ii)
of the Rights in Technical Data and Computer Software clause at DFARS 252.227-7013 and FAR 52.227-19.
Sun, Sun Microsystems, the Sun logo, SunSoft, the SunSoft logo, Solaris, AnswerBook, Wabi, WabiServer, and the Wabi logo are trademarks or
registered trademarks of Sun Microsystems, Inc. in the United States and other countries. All SPARC trademarks are used under license and are
trademarks or registered trademarks of SPARC International, Inc. in the United States and other countries. Products bearing SPARC trademarks
are based upon an architecture developed by Sun Microsystems, Inc.
The OPEN LOOK® and Sun™ Graphical User Interfaces were developed by Sun Microsystems, Inc. for its users and licensees. Sun
acknowledges the pioneering efforts of Xerox in researching and developing the concept of visual or graphical user interfaces for the computer
industry. Sun holds a non-exclusive license from Xerox to the Xerox Graphical User Interface, which license also covers Sun’s licensees who
implement OPEN LOOK GUIs and otherwise comply with Sun’s written license agreements.
X Window System is a trademark of X Consortium, Inc.
THIS PUBLICATION IS PROVIDED “AS IS” WITHOUT WARRANTY OF ANY KIND, EITHER EXPRESS OR IMPLIED, INCLUDING, BUT
NOT LIMITED TO, THE IMPLIED WARRANTIES OF MERCHANTABILITY, FITNESS FOR A PARTICULAR PURPOSE, OR NONINFRINGEMENT.
This product incorporates technology developed by Bitstream, Inc.
This product incorporates technology used under license from Fulcrum Technologies, Inc.
Portions copyright 1988, 1989, 1990, 1991 Sam Leffler
Portions copyright 1991 Silicon Graphics, Inc.
Permission to use, copy, modify, distribute, and sell those portions of the software and documentation to which Sam Leffler or Silicon
Graphics, Inc. own the copyright is hereby granted without fee, provided that (i) the above copyright notices and this permission notice
appear in all copies of the software and related documentation, and (ii) the names of Sam Leffler and Silicon Graphics may not be used in any
advertising or publicity relating to the software without the specific, prior written permission of Sam Leffler and Silicon Graphics.
THOSE PORTIONS OF THE SOFTWARE TO WHICH SAM LEFFLER OR SILICON GRAPHICS, INC. OWN THE COPYRIGHT ARE
PROVIDED "AS-IS" AND WITHOUT WARRANTY OF ANY KIND, EXPRESS, IMPLIED OR OTHERWISE, INCLUDING WITHOUT
LIMITATION, ANY WARRANTY OF MERCHANTABILITY OR FITNESS FOR A PARTICULAR PURPOSE.
IN NO EVENT SHALL SAM LEFFLER OR SILICON GRAPHICS BE LIABLE FOR ANY SPECIAL, INCIDENTAL, INDIRECT OR
CONSEQUENTIAL DAMAGES OF ANY KIND, OR ANY DAMAGES WHATSOEVER RESULTING FROM LOSS OF USE, DATA OR
PROFITS, WHETHER OR NOT ADVISED OF THE POSSIBILITY OF DAMAGE, AND ON ANY THEORY OF LIABILITY, ARISING OUT OF
OR IN CONNECTION WITH THE USE OR PERFORMANCE OF THIS SOFTWARE.
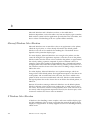
ADVERTISEMENT
Bitstream 500 Font CD
Bitstream Inc. is proud to announce the availability of the Bitstream
Font CD which contains over 500 professional-quality typefaces in both
TrueType and PostScript Type 1 format. The CD also contains Bitstream
Mini-MakeUp, an easy-to-use special effects program for Windows.
The Bitstream 500 Font CD has a suggested U.S. list price of $49.95. The
product is available directly from Bitstream (call: 800 522-3668). Please
mention “Wabi” when ordering.
The 500+ typefaces on the disc were chosen by Bitstream to provide
users with a comprehensive type library with appropriate type designs
for every possible document-creation need. The wide variety of serif
and sans-serif text designs offer real alternatives to standard Windows
fonts; and, the collection has an extensive variety of decorative faces–
from calligraphic scripts and oldstyles, to fun casual designs, to
attention-grabbing headline faces. Also included in the collection are
two unique designs from the International Typeface Corporation
Library, ITC Gorilla and ITC Pioneer.
Mini-Makeup is a standalone Windows 3.1 mini-application that lets
users stretch, bend, twist, color, shade, fill and rotate text to create
unique special effects for headlines, logos or wherever text can be used
as a graphic element in a design. It fully supports Object Linking &
Embedding (OLE), and the standard Windows graphic file formats, so
working with other Windows applications is hassle-free.
An industry leader in typographic quality and innovative technology,
Bitstream licenses type and related software to over 500 hardware
manufacturers and software developers worldwide.
Contents
Preface . . . . . . . . . . . . . . . . . . . . . . . . . . . . . . . . . . . . . . . . . . . . . . . xxiii
1. What is Wabi? . . . . . . . . . . . . . . . . . . . . . . . . . . . . . . . . . . . . . . . .
1
How the Wabi Program Works . . . . . . . . . . . . . . . . . . . . . . . . . . . .
2
Wabi Capabilities and Functions. . . . . . . . . . . . . . . . . . . . . . . . . . .
2
Functions Supported for Certified Applications. . . . . . . . . . .
3
Additional Functions in the Wabi Environment . . . . . . . . . . .
3
Functions Not Supported. . . . . . . . . . . . . . . . . . . . . . . . . . . . . .
4
Wabi Functions . . . . . . . . . . . . . . . . . . . . . . . . . . . . . . . . . . . . . .
4
What is WabiServer? . . . . . . . . . . . . . . . . . . . . . . . . . . . . . . . . . . . . .
4
New Features in Wabi 2.2. . . . . . . . . . . . . . . . . . . . . . . . . . . . . . . . .
5
System Requirements . . . . . . . . . . . . . . . . . . . . . . . . . . . . . . . . . . . .
6
Memory and Disk Space Requirements . . . . . . . . . . . . . . . . . .
6
Display Requirements . . . . . . . . . . . . . . . . . . . . . . . . . . . . . . . .
6
Requirements for Multimedia Sound Support . . . . . . . . . . . .
7
Applications You Can Use . . . . . . . . . . . . . . . . . . . . . . . . . . . . . . . .
7
v
vi
2. Starting Wabi . . . . . . . . . . . . . . . . . . . . . . . . . . . . . . . . . . . . . . . . .
9
Starting Wabi Software the First Time . . . . . . . . . . . . . . . . . . . . . .
10
Your Personal Wabi Directory . . . . . . . . . . . . . . . . . . . . . . . . . .
11
To Create Your Wabi Directory in Another Location .
11
If You Are Upgrading From a Previous Release. . . . .
11
Microsoft Windows Installation . . . . . . . . . . . . . . . . . . . . . . . .
12
Microsoft Windows Installation From Diskette . . . . .
13
Microsoft Windows Installation From Wabi Drive R.
15
Microsoft Windows Installation on a Network Server
16
Starting WabiServer the First Time . . . . . . . . . . . . . . . . . . . . . . . . .
17
Specifying the WabiServer System and
Wabi Directory Location. . . . . . . . . . . . . . . . . . . . . . .
18
Selecting a Prototype . . . . . . . . . . . . . . . . . . . . . . . . . . . . . . . . .
20
The Wabi User Interface . . . . . . . . . . . . . . . . . . . . . . . . . . . . . . . . . .
21
The Program Environment . . . . . . . . . . . . . . . . . . . . . .
21
Wabi Tools Group. . . . . . . . . . . . . . . . . . . . . . . . . . . . . .
22
Microsoft Windows Groups . . . . . . . . . . . . . . . . . . . . .
23
Wabi On-Line Help . . . . . . . . . . . . . . . . . . . . . . . . . . . .
23
The Wabi Man Page . . . . . . . . . . . . . . . . . . . . . . . . . . . .
24
Wabi Startup Options . . . . . . . . . . . . . . . . . . . . . . . . . . . . . . . . .
24
Display Wabi on a Remote System or X Terminal . . .
24
Display Wabi With Smaller or Larger System Fonts .
25
Start Wabi Without the Splash Screen . . . . . . . . . . . . .
25
Start Wabi With or Without the Font Server . . . . . . . .
26
Wabi User’s Guide—May 1996
WabiServer Startup Options . . . . . . . . . . . . . . . . . . . . . . . . . . .
26
Run the rwabi_setup Program . . . . . . . . . . . . . . . . .
27
Specify a Different Server . . . . . . . . . . . . . . . . . . . . . . .
27
Select a New Prototype to Create a New
Wabi Directory . . . . . . . . . . . . . . . . . . . . . . . . . .
28
Specify a Different Wabi Directory. . . . . . . . . . . . . . . .
28
Instructions for Getting Started. . . . . . . . . . . . . . . . . . . . . . . . . . . .
29
▼ Starting the Wabi Program. . . . . . . . . . . . . . . . . . . . .
29
▼ Starting the Wabi Program in WabiServer . . . . . . . .
29
▼ Installing Microsoft Windows From Diskette . . . . .
29
▼ Installing Microsoft Windows From Wabi Drive R.
30
▼ Exiting the Wabi Program . . . . . . . . . . . . . . . . . . . . .
31
▼ Displaying the Wabi Program on a Remote System
31
▼ Displaying the Wabi Program With Small or Large
System Fonts . . . . . . . . . . . . . . . . . . . . . . . . . . . . . . . .
32
▼ Starting Wabi Without the Splash Screen . . . . . . . . .
33
▼ Starting Wabi With or Without the Font Server. . . .
33
▼ Setting Up Your WabiServer Configuration. . . . . . .
33
▼ Specifying a Different WabiServer System. . . . . . . .
34
▼ Setting the WABISERVER Variable . . . . . . . . . . . . . . .
34
▼ Selecting a New Prototype for WabiServer . . . . . . .
34
▼ Specifying a Different Wabi Directory for
WabiServer . . . . . . . . . . . . . . . . . . . . . . . . . . . . . . . . . .
35
▼ Viewing the Wabi Man Page . . . . . . . . . . . . . . . . . . .
35
▼ Adding the Wabi Man Page to Man Pages Path . . .
35
Contents
vii
viii
Reference Material for Getting Started . . . . . . . . . . . . . . . . . . . . . .
37
Troubleshooting Startup Problems . . . . . . . . . . . . . . . . . . . . . .
37
Microsoft Windows for Workgroups 3.11 in the Wabi
Environment . . . . . . . . . . . . . . . . . . . . . . . . . . . . . . . .
40
Adding File and Print Support for WFW . . . . . . . . . .
41
3. Configuring Your Wabi Environment . . . . . . . . . . . . . . . . . . . .
43
About Configuring Your Wabi Environment. . . . . . . . . . . . . . . . .
43
The Microsoft Windows Control Panel . . . . . . . . . . . . . . . . . . . . .
44
Wabi Configuration Manager . . . . . . . . . . . . . . . . . . . . . . . . . . . . .
48
Configuration Manager Tab Sheets . . . . . . . . . . . . . . . . . . . . .
49
Tab Sheet Layout . . . . . . . . . . . . . . . . . . . . . . . . . . . . . .
50
Path Box and File Browser . . . . . . . . . . . . . . . . . . . . . .
50
Tab Sheet Buttons . . . . . . . . . . . . . . . . . . . . . . . . . . . . . .
52
Entry Validation . . . . . . . . . . . . . . . . . . . . . . . . . . . . . . .
53
Configuration Manager Tasks . . . . . . . . . . . . . . . . . . . . . . . . . .
53
Instructions for Tasks Related to Configuration Manager . . . . . .
54
▼ Opening Configuration Manager . . . . . . . . . . . . . . .
54
▼ Exiting Configuration Manager. . . . . . . . . . . . . . . . .
54
4. Setting Up Drives . . . . . . . . . . . . . . . . . . . . . . . . . . . . . . . . . . . . .
55
About Drives . . . . . . . . . . . . . . . . . . . . . . . . . . . . . . . . . . . . . . . . . . .
56
Diskette Drives . . . . . . . . . . . . . . . . . . . . . . . . . . . . . . . . . . . . . .
56
Diskette Tab Sheet . . . . . . . . . . . . . . . . . . . . . . . . . . . . .
57
Diskettes and DOS . . . . . . . . . . . . . . . . . . . . . . . . . . . . .
59
Wabi Drives . . . . . . . . . . . . . . . . . . . . . . . . . . . . . . . . . . . . . . . . .
59
Wabi User’s Guide—May 1996
Drives Tab Sheet . . . . . . . . . . . . . . . . . . . . . . . . . . . . . . . . . . . . .
60
Default Drive Assignments . . . . . . . . . . . . . . . . . . . . . . . . . . . .
62
New Drive Assignments . . . . . . . . . . . . . . . . . . . . . . . . . . . . . .
62
Change a Drive Connection. . . . . . . . . . . . . . . . . . . . . . . . . . . .
63
Disconnect a Drive . . . . . . . . . . . . . . . . . . . . . . . . . . . . . . . . . . .
63
File Locking and File Sharing . . . . . . . . . . . . . . . . . . . . . . . . . .
63
File Locking. . . . . . . . . . . . . . . . . . . . . . . . . . . . . . . . . . .
64
File Sharing . . . . . . . . . . . . . . . . . . . . . . . . . . . . . . . . . . .
64
Wabi Network Drives . . . . . . . . . . . . . . . . . . . . . . . . . . . . . . . . .
65
CD-ROM Drives . . . . . . . . . . . . . . . . . . . . . . . . . . . . . . . . . . . . .
66
Potential CD-ROM Problem . . . . . . . . . . . . . . . . . . . . .
66
Instructions for Tasks Related to Setting Up Drives . . . . . . . . . . .
67
▼ Connecting a Diskette Drive . . . . . . . . . . . . . . . . . . .
67
▼ Changing the Diskette Drive Timeout Period . . . . .
67
▼ Formatting a DOS Diskette . . . . . . . . . . . . . . . . . . . .
68
▼ Assigning a Drive . . . . . . . . . . . . . . . . . . . . . . . . . . . .
68
▼ Changing a Drive Assignment . . . . . . . . . . . . . . . . .
69
▼ Disconnecting a Drive . . . . . . . . . . . . . . . . . . . . . . . .
70
▼ Enabling File Sharing for a Drive . . . . . . . . . . . . . . .
70
▼ Setting a Network Drive . . . . . . . . . . . . . . . . . . . . . .
71
▼ Setting a Local Drive. . . . . . . . . . . . . . . . . . . . . . . . . .
72
▼ Accessing a CD-ROM Drive . . . . . . . . . . . . . . . . . . .
72
Reference Material for Drives . . . . . . . . . . . . . . . . . . . . . . . . . . . . .
74
Troubleshooting Problems With Diskette Drives . . . . . . . . . .
74
Contents
ix
x
Troubleshooting Problems With Wabi Drives . . . . . . . . . . . . .
75
Troubleshooting Problems With CD-ROM Drives . . . . . . . . .
77
5. Printing . . . . . . . . . . . . . . . . . . . . . . . . . . . . . . . . . . . . . . . . . . . . . .
79
About Printing. . . . . . . . . . . . . . . . . . . . . . . . . . . . . . . . . . . . . . . . . .
80
Supported Printer Types . . . . . . . . . . . . . . . . . . . . . . . . . . . . . .
81
Before You Can Print From Wabi . . . . . . . . . . . . . . . . . . . . . . .
81
UNIX Printer Configuration . . . . . . . . . . . . . . . . . . . . .
81
The Default Wabi Printing Setup . . . . . . . . . . . . . . . . . . . . . . .
82
Changing Print Settings . . . . . . . . . . . . . . . . . . . . . . . . . . . . . . . . . .
82
Control Panel’s Printers Dialog Box . . . . . . . . . . . . . . . . . . . . .
83
Configuration Manager’s Printers Tab Sheet . . . . . . . . . . . . .
85
Using Other PostScript Printer Descriptions. . . . . . . . . . . . . .
86
Using Epson and HP LaserJet III Printers . . . . . . . . . . . . . . . .
87
Epson or LaserJet III System Default Printer . . . . . . .
88
Using Text-Only Printers . . . . . . . . . . . . . . . . . . . . . . . . . . . . . .
89
Changing the Wabi Default Printer . . . . . . . . . . . . . . . . . . . . .
89
Connecting the UNIX Default Printer to the
Wabi Default Printer . . . . . . . . . . . . . . . . . . . . .
89
Printing to a File . . . . . . . . . . . . . . . . . . . . . . . . . . . . . . . . . . . . .
90
Printing Directly to a Serial Printer . . . . . . . . . . . . . . . . . . . . .
90
Instructions for Tasks Related to Printing . . . . . . . . . . . . . . . . . . .
91
▼ Installing Printer Drivers for PostScript, Epson,
or HP LaserJet III Printers . . . . . . . . . . . . . . . . . . . . .
91
▼ Defining the Wabi Default Printer . . . . . . . . . . . . . .
92
▼ Connecting a Wabi Printer Port to a UNIX Printer .
92
Wabi User’s Guide—May 1996
Reference Material for Printing . . . . . . . . . . . . . . . . . . . . . . . . . . . .
94
Troubleshooting Problems With Printing . . . . . . . . . . . . . . . .
94
6. Using Wabi COM Ports . . . . . . . . . . . . . . . . . . . . . . . . . . . . . . . .
97
About Wabi COM Ports . . . . . . . . . . . . . . . . . . . . . . . . . . . . . . . . . .
98
COM Port Configuration . . . . . . . . . . . . . . . . . . . . . . . . . . . . . .
98
COM Port Settings in Control Panel . . . . . . . . . . . . . .
99
COM Ports Tab Sheet in Configuration Manager. . . .
101
COM Ports and Printing . . . . . . . . . . . . . . . . . . . . . . . . . . . . . .
102
Instructions for Tasks Related to COM Ports. . . . . . . . . . . . . . . . .
103
▼ Changing COM Port Settings . . . . . . . . . . . . . . . . . .
103
▼ Connecting a COM Port to a Serial Device Driver .
103
▼ Resetting a COM Port Device Assignment to the
Default . . . . . . . . . . . . . . . . . . . . . . . . . . . . . . . . . . . . .
104
Reference Material for Tasks Related to COM Ports. . . . . . . . . . .
105
Troubleshooting Problems With COM Ports . . . . . . . . . . . . . .
105
7. Wabi International . . . . . . . . . . . . . . . . . . . . . . . . . . . . . . . . . . . .
107
About Using Wabi Internationally . . . . . . . . . . . . . . . . . . . . . . . . .
108
UNIX Environment Variables . . . . . . . . . . . . . . . . . . . . . . . . . .
108
The LANG Variable . . . . . . . . . . . . . . . . . . . . . . . . . . . . .
108
The WABI_KEYB Variable . . . . . . . . . . . . . . . . . . . . . . .
108
The WABI_CODEPAGE Variable . . . . . . . . . . . . . . . . . . .
109
Localized Microsoft Windows Versions . . . . . . . . . . . . . . . . . .
109
Control Panel’s International Settings . . . . . . . . . . . . . . . . . . .
109
Compose Key Sequences . . . . . . . . . . . . . . . . . . . . . . . . . . . . . .
111
Contents
xi
xii
Instructions for Tasks Related to International Settings. . . . . . . .
112
▼ Setting the LANG Environment Variable . . . . . . . . . .
112
▼ Setting the WABI_KEYB Environment Variable . . . .
112
▼ Setting the WABI_CODEPAGE Environment
Variable. . . . . . . . . . . . . . . . . . . . . . . . . . . . . . . . . . . . .
113
▼ Changing International Settings . . . . . . . . . . . . . . . .
114
Reference Material for International Settings . . . . . . . . . . . . . . . .
114
Locales for LANG and WABI_KEYB Variables . . . . . . . . . . . . . .
114
Code Pages for the WABI_CODEPAGE Environment
Variable. . . . . . . . . . . . . . . . . . . . . . . . . . . . . . . . . . . . .
115
8. On the Network. . . . . . . . . . . . . . . . . . . . . . . . . . . . . . . . . . . . . . .
117
About Wabi Networking . . . . . . . . . . . . . . . . . . . . . . . . . . . . . . . . .
117
The Invisible UNIX Network . . . . . . . . . . . . . . . . . . . . . . . . . .
117
Windows Sockets Networking . . . . . . . . . . . . . . . . . . . . . . . . .
118
Networking for E-Mail Applications . . . . . . . . . . . . . . . . . . . .
118
Network-Aware Applications . . . . . . . . . . . . . . . . . . . . . . . . . .
119
Novell NetWare File Systems . . . . . . . . . . . . . . . . . . . . . . . . . . . . .
119
9. Installing Microsoft Windows Applications . . . . . . . . . . . . . .
121
About Application Installation . . . . . . . . . . . . . . . . . . . . . . . . . . . .
122
The Run Command . . . . . . . . . . . . . . . . . . . . . . . . . . . . . . . . . .
124
Application Installation From Diskettes . . . . . . . . . . . . . . . . .
125
Application Installation From CD-ROM . . . . . . . . . . . . . . . . .
125
Application Installation on a Network Server . . . . . . . . . . . .
125
Application Installation From a Network Server
Through a Wabi Drive . . . . . . . . . . . . . . . . . . . . . . . .
127
Wabi User’s Guide—May 1996
Solaris Desktop Integration . . . . . . . . . . . . . . . . . . . . . . . . . . . . . . .
128
OpenWindows Integration . . . . . . . . . . . . . . . . . . . . . . . . . . . .
128
Wabi on the Workspace Menu . . . . . . . . . . . . . . . . . . .
128
Windows Applications on the Workspace Menu . . . .
129
File Manager Integration . . . . . . . . . . . . . . . . . . . . . . . .
129
Mail Tool Integration . . . . . . . . . . . . . . . . . . . . . . . . . . .
129
Print Tool Integration. . . . . . . . . . . . . . . . . . . . . . . . . . .
129
How OpenWindows Integration Works. . . . . . . . . . . . . . . . . .
130
Important Notes About OpenWindows Integration .
130
Conflicting Bindings . . . . . . . . . . . . . . . . . . . . . . . . . . .
132
CDE Integration . . . . . . . . . . . . . . . . . . . . . . . . . . . . . . . . . . . . .
132
Wabi Icon in Application Manager . . . . . . . . . . . . . . .
132
Microsoft Windows Icons in Application Manager . .
133
CDE File Manager Integration . . . . . . . . . . . . . . . . . . .
134
Mailer Integration . . . . . . . . . . . . . . . . . . . . . . . . . . . . .
134
Default Printer Tool Integration . . . . . . . . . . . . . . . . . .
135
How Wabi CDE Integration Works. . . . . . . . . . . . . . . . . . . . . .
135
Important Notes About CDE Integration . . . . . . . . . .
136
Conflicting File Associations . . . . . . . . . . . . . . . . . . . .
136
Wabi Desktop Integration Program . . . . . . . . . . . . . . . . . . . . .
137
wabidti Command Format . . . . . . . . . . . . . . . . . . . . . .
137
Instructions for Tasks Related to Installing Applications . . . . . .
138
▼ Installing a Windows Application From Diskette. .
138
▼ Installing a Windows Application From CD-ROM.
139
Contents
xiii
xiv
▼ Installing an Application on a Network Server. . . .
140
▼ Installing an Application to a Workstation From a
Network Server . . . . . . . . . . . . . . . . . . . . . . . . . . . . . .
141
▼ Setting Up Drag and Drop Printing in
OpenWindows. . . . . . . . . . . . . . . . . . . . . . . . . . . . . . .
141
▼ Printing Windows Application Files in
OpenWindows Print Tool. . . . . . . . . . . . . . . . . . . . . .
142
▼ Deleting a Binder Entry for an Application File . . .
143
Reference Material for Tasks Related to Installing Applications
144
Troubleshooting General Application Installation Problems
144
10. Using Microsoft Windows Applications. . . . . . . . . . . . . . . . . .
147
About Starting Applications . . . . . . . . . . . . . . . . . . . . . . . . . . . . . .
148
Application Startup From an Icon in Program Manager . . . .
148
Application Startup With the Run Command in Program
Manager . . . . . . . . . . . . . . . . . . . . . . . . . . . . . . . . . . . .
148
Application Startup in Microsoft Windows File Manager. . .
149
Application Startup in OpenWindows File Manager. . . . . . .
149
Application Startup at the UNIX Command Line . . . . . . . . .
149
Application Startup With an Open File . . . . . . . . . . . .
150
Using Microsoft Windows Applications in an
X Window Desktop . . . . . . . . . . . . . . . . . . . . . . . . . . . . . . .
150
Window Focus and Raising . . . . . . . . . . . . . . . . . . . . . . . . . . . .
150
Cut, Copy, and Paste . . . . . . . . . . . . . . . . . . . . . . . . . . . . . . . . .
151
X Window Managers . . . . . . . . . . . . . . . . . . . . . . . . . . . . . . . . .
151
Key Conflicts Between Applications and Open Look
Window Manager . . . . . . . . . . . . . . . . . . . . . . . . . . . .
152
Wabi User’s Guide—May 1996
Using Multimedia Features on Ultra, SPARCstation, and x86
Computers . . . . . . . . . . . . . . . . . . . . . . . . . . . . . . . . . . . . . . .
152
Audio Features . . . . . . . . . . . . . . . . . . . . . . . . . . . . . . . . . . . . . .
153
Controlling Audio Input/Output . . . . . . . . . . . . . . . .
153
Controlling Audio Volume and Balance . . . . . . . . . . .
154
Video Features. . . . . . . . . . . . . . . . . . . . . . . . . . . . . . . . . . . . . . .
155
Instructions for Tasks Related to Using Applications. . . . . . . . . .
155
▼ Starting an Application From an Icon . . . . . . . . . . .
155
▼ Starting an Application From a Run Command . . .
155
▼ Starting an Application From a UNIX Command. .
156
▼ Running an Application Transparently . . . . . . . . . .
157
▼ Opening a File When Starting an Application . . . .
158
▼ Copying and Pasting From Windows Applications
to X Applications. . . . . . . . . . . . . . . . . . . . . . . . . . . . .
159
▼ Copying and Pasting From X Applications
to Windows Applications. . . . . . . . . . . . . . . . . . . . . .
159
Reference Material for Tasks Related to Using Applications. . . .
160
11. Setting Up Remote Database Access . . . . . . . . . . . . . . . . . . . . .
161
About Remote Database Access . . . . . . . . . . . . . . . . . . . . . . . . . . .
162
Setting Up Applications to Access Remote Databases . . . . . .
163
Instructions for Remote Database Access . . . . . . . . . . . . . . . . . . .
164
Installing Applications for Remote Database Access . . . . . . .
164
Installing Oracle Data Source Software . . . . . . . . . . . . . . . . . .
167
Oracle SQL*Net TCP/IP 1.1 . . . . . . . . . . . . . . . . . . . . .
167
▼ Installing Oracle SQL*Net TCP/IP 1.1 . . . . . .
167
Contents
xv
xvi
Oracle SQL*Net V2 and Oracle TCP/IP Adapter V2
for Windows . . . . . . . . . . . . . . . . . . . . . . . . . . . .
168
▼ Installing Oracle TCP/IP Adapter and
SQL*Net Version 2.0 . . . . . . . . . . . . . . . . . . . . .
168
Installing Sybase Data Source Software . . . . . . . . . . . . . . . . . .
169
Sybase Open Client Net-Library . . . . . . . . . . . . . . . . .
169
▼ Installing the Sybase Open Client Software . .
170
Installing Intersolv DataDirect ODBC Drivers . . . . . . . . . . . .
171
▼ Installing Intersolv ODBC Drivers . . . . . . . . .
171
Configuring Data Sources for Oracle7 and
Sybase System 10 and 11 . . . . . . . . . . . . . . . . . . . . . .
171
▼ Configuring a Data Source for Oracle7 . . . . . .
172
▼ Configuring a Data Source for
Sybase System 10 or 11 . . . . . . . . . . . . . . . . . . .
172
Verifying Connection to Oracle and Sybase Servers . . . . . . .
173
▼ Verifying Connection to Oracle7 Servers . . . .
173
▼ Verifying Connection to Sybase Servers . . . . .
173
Accessing Remote Databases. . . . . . . . . . . . . . . . . . . . . . . . . . .
173
Notes About Lotus Applications . . . . . . . . . . . . . . . . .
174
12. Using a DOS Emulator in the
Wabi Environment . . . . . . . . . . . . . . . . . . . . . . . . . . . . . . . . . . . .
175
About DOS Applications . . . . . . . . . . . . . . . . . . . . . . . . . . . . . . . . .
176
Preparation for Using DOS Applications. . . . . . . . . . . . . . . . .
176
One-Time Tasks . . . . . . . . . . . . . . . . . . . . . . . . . . . . . . .
176
Tasks Done Once for Each DOS Application . . . . . . .
177
DOS Emulator Installation. . . . . . . . . . . . . . . . . . . . . . . . . . . . .
177
Wabi User’s Guide—May 1996
The DOS Emulator’s Drive C . . . . . . . . . . . . . . . . . . . .
178
DOS Emulator Command . . . . . . . . . . . . . . . . . . . . . . . . . . . . .
178
DOS Emulator Command Used With WabiServer . . .
181
DOS Sessions . . . . . . . . . . . . . . . . . . . . . . . . . . . . . . . . . . . . . . . .
181
DOS Application Installation . . . . . . . . . . . . . . . . . . . . . . . . . .
182
Create a Program Group and Item for a
DOS Application . . . . . . . . . . . . . . . . . . . . . . . .
183
To Run a DOS Application. . . . . . . . . . . . . . . . . . . . . . . . . . . . .
185
An Application’s Startup Command . . . . . . . . . . . . . .
185
A DOS Application’s Icon . . . . . . . . . . . . . . . . . . . . . . .
186
Instructions for Tasks Related to DOS Applications. . . . . . . . . . .
187
▼ Entering a DOS Emulator Startup Command . . . . .
187
▼ Starting a DOS Emulator in the Wabi Environment
187
▼ Installing a DOS Application. . . . . . . . . . . . . . . . . . .
188
▼ Creating a DOS Program Group . . . . . . . . . . . . . . . .
188
▼ Creating a DOS Program Item. . . . . . . . . . . . . . . . . .
188
▼ Starting a DOS Application . . . . . . . . . . . . . . . . . . . .
189
Reference Material for Tasks Related to Using
DOS Applications . . . . . . . . . . . . . . . . . . . . . . . . . . . . . . . . .
189
Troubleshooting DOS Application Problems . . . . . . . . . . . . .
189
A. Wabi File Layout . . . . . . . . . . . . . . . . . . . . . . . . . . . . . . . . . . . . . .
191
Wabi System Directories and Files . . . . . . . . . . . . . . . . . . . . . . . . .
192
$HOME/wabi Directories and Files . . . . . . . . . . . . . . . . . . . . . . . . .
193
Initialization Files . . . . . . . . . . . . . . . . . . . . . . . . . . . . . . . . . . . . . . .
194
Contents
xvii
B. Color From Windows to Wabi. . . . . . . . . . . . . . . . . . . . . . . . . . .
195
Color Palettes and Maps . . . . . . . . . . . . . . . . . . . . . . . . . . . . . . . . .
195
Microsoft Windows Color Allocation . . . . . . . . . . . . . . . . . . . . . . .
196
X Windows Color Allocation . . . . . . . . . . . . . . . . . . . . . . . . . . . . . .
196
The Wabi Colormap . . . . . . . . . . . . . . . . . . . . . . . . . . . . . . . . . . . . .
197
Wabi Color Variables . . . . . . . . . . . . . . . . . . . . . . . . . . . . . . . . . . . .
198
Technicolor Variable . . . . . . . . . . . . . . . . . . . . . . . . . . . . . . .
198
Other Color Variables . . . . . . . . . . . . . . . . . . . . . . . . . . . . . . . . .
199
Variable for a 24-Bit Display . . . . . . . . . . . . . . . . . . . . . . . . . . .
201
Where to Set Color Variables . . . . . . . . . . . . . . . . . . . . . . . . . . . . . .
202
C. Fonts From Windows to Wabi . . . . . . . . . . . . . . . . . . . . . . . . . . .
203
Why Does Wabi Convert Fonts? . . . . . . . . . . . . . . . . . . . . . . . . . . .
203
Font Display Types . . . . . . . . . . . . . . . . . . . . . . . . . . . . . . . . . . . . . .
204
Wabi Font Processing . . . . . . . . . . . . . . . . . . . . . . . . . . . . . . . . . . . .
205
The Wabi Font Server . . . . . . . . . . . . . . . . . . . . . . . . . . . . . . . . .
205
D. UNIX and DOS File Systems . . . . . . . . . . . . . . . . . . . . . . . . . . .
207
Files Created With Applications . . . . . . . . . . . . . . . . . . . . . . . . . . .
207
Text Files. . . . . . . . . . . . . . . . . . . . . . . . . . . . . . . . . . . . . . . . . . . . . . .
207
Text File Conversion Between UNIX and DOS Systems . . . .
207
▼ Converting a DOS Text File to a UNIX Text File . . .
208
▼ Converting a UNIX Text File to a DOS Text File . . .
208
File Names in UNIX and DOS . . . . . . . . . . . . . . . . . . . . . . . . . . . . .
209
▼ Mapping File Names to Lowercase. . . . . . . . . . . . . .
209
Index . . . . . . . . . . . . . . . . . . . . . . . . . . . . . . . . . . . . . . . . . . .
xviii
Wabi User’s Guide—May 1996
211
Figures
Figure 1-1
Wabi Program as Translator and Redirector . . . . . . . . . . . . . . .
2
Figure 2-1
Initial Wabi Windows Install Program Dialog Box . . . . . . . . .
13
Figure 2-2
Wabi Microsoft Windows Install Program Dialog Box . . . . . .
14
Figure 2-3
Microsoft Windows Install Completion Message. . . . . . . . . . .
15
Figure 2-4
The rwabi_setup Dialog Box for Specifying Server
and Directory Location . . . . . . . . . . . . . . . . . . . . . . . . . . . . . . . . .
18
The rwabi_selproto Dialog Box for Selecting a Prototype
User Environment . . . . . . . . . . . . . . . . . . . . . . . . . . . . . . . . . . . . .
20
Figure 2-6
Items Within the Wabi Tools Group. . . . . . . . . . . . . . . . . . . . . .
22
Figure 2-7
Wabi Splash Screen . . . . . . . . . . . . . . . . . . . . . . . . . . . . . . . . . . . .
25
Figure 3-1
Microsoft Windows Control Panel . . . . . . . . . . . . . . . . . . . . . . .
44
Figure 3-2
The Wabi Config Icon in Windows Control Panel . . . . . . . . . .
48
Figure 3-3
Configuration Manager Tabs. . . . . . . . . . . . . . . . . . . . . . . . . . . .
49
Figure 4-1
Diskette Tab Sheet . . . . . . . . . . . . . . . . . . . . . . . . . . . . . . . . . . . . .
57
Figure 4-2
Drives Tab Sheet . . . . . . . . . . . . . . . . . . . . . . . . . . . . . . . . . . . . . .
60
Figure 5-1
Control Panel’s Printers Dialog Box . . . . . . . . . . . . . . . . . . . . . .
83
Figure 5-2
Printers Tab Sheet . . . . . . . . . . . . . . . . . . . . . . . . . . . . . . . . . . . . .
85
Figure 2-5
xix
xx
Figure 5-3
Printers Dialog Box Showing Wabi Printer Descriptions . . . .
88
Figure 6-1
Control Panel’s Port Settings . . . . . . . . . . . . . . . . . . . . . . . . . . . .
100
Figure 6-2
COM Ports Tab Sheet . . . . . . . . . . . . . . . . . . . . . . . . . . . . . . . . . .
101
Figure 7-1
Control Panel’s International Dialog Box . . . . . . . . . . . . . . . . .
110
Figure 9-1
Run Dialog Box . . . . . . . . . . . . . . . . . . . . . . . . . . . . . . . . . . . . . . .
124
Figure 9-2
CDE Application Manager with Wabi and
MSWindows_Apps Icons . . . . . . . . . . . . . . . . . . . . . . . . . . . . . . .
133
Figure 9-3
MSWindows Application Folder in CDE. . . . . . . . . . . . . . . . . .
134
Figure 12-1
DOS Emulator Tab Sheet . . . . . . . . . . . . . . . . . . . . . . . . . . . . . . .
179
Figure 12-2
MS-DOS Prompt Icon in the Main Group . . . . . . . . . . . . . . . . .
182
Figure 12-3
New Program Object Dialog Box . . . . . . . . . . . . . . . . . . . . . . . .
183
Figure 12-4
Program Item Properties Dialog Box . . . . . . . . . . . . . . . . . . . . .
184
Figure 12-5
Run Dialog Box . . . . . . . . . . . . . . . . . . . . . . . . . . . . . . . . . . . . . . .
185
Wabi User’s Guide—May 1996
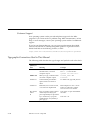
Tables
Table 1-1
Wabi Memory and Disk Space Requirements. . . . . . . . . . . . . .
6
Table 1-2
Wabi Sound Requirements. . . . . . . . . . . . . . . . . . . . . . . . . . . . . .
7
Table 2-1
Startup Problems and Solutions . . . . . . . . . . . . . . . . . . . . . . . . .
37
Table 2-2
Support for Windows for Workgroups in the
Wabi Environment . . . . . . . . . . . . . . . . . . . . . . . . . . . . . . . . . . . .
40
Table 3-1
Microsoft Windows Control Panel Settings. . . . . . . . . . . . . . . .
45
Table 3-2
UNIX File Name Substitution Characters . . . . . . . . . . . . . . . . .
51
Table 3-3
Additional Configuration Manager Information . . . . . . . . . . .
53
Table 4-1
Diskette Drive Problems and Solutions . . . . . . . . . . . . . . . . . . .
74
Table 4-2
Wabi Drive Problems and Solutions. . . . . . . . . . . . . . . . . . . . . .
75
Table 4-3
CD-ROM Drive Problems and Solutions . . . . . . . . . . . . . . . . . .
77
Table 5-1
Wabi Default Printer Used in WabiServer. . . . . . . . . . . . . . . . .
82
Table 5-2
Printing Problems and Solutions. . . . . . . . . . . . . . . . . . . . . . . . .
94
Table 6-1
COM Port Problems and Solutions. . . . . . . . . . . . . . . . . . . . . . .
105
Table 7-1
Locales Used for Environment Variables. . . . . . . . . . . . . . . . . .
114
Table 7-2
Code Pages . . . . . . . . . . . . . . . . . . . . . . . . . . . . . . . . . . . . . . . . . . .
115
Table 9-1
Windows Application Installation Problems and Solutions . .
144
xxi
xxii
Table 10-1
Windows Application Problems and Solutions . . . . . . . . . . . .
160
Table 11-1
Remote Database Software Versions Supported . . . . . . . . . . .
163
Table 11-2
Notes for Installing Applications for Remote Database Access
164
Table 12-1
DOS Application Problems and Solutions. . . . . . . . . . . . . . . . .
189
Table A-1
Wabi System Directories and Files . . . . . . . . . . . . . . . . . . . . . . .
192
Table A-2
$HOME/wabi Directories and Files. . . . . . . . . . . . . . . . . . . . . . .
193
Table A-3
Initialization Files . . . . . . . . . . . . . . . . . . . . . . . . . . . . . . . . . . . . .
194
Table B-1
Variables for 8-Bit PseudoColor Visuals . . . . . . . . . . . . . . . . . .
200
Wabi User’s Guide—May 1996
Preface
The Wabi User’s Guide provides information about all of the product functions
®
and procedures of Wabi™ software, and its technology for running Microsoft
®
Windows applications on UNIX operating systems. Topics covered include:
starting the Wabi program, configuring your Wabi environment, setting up
drives and printers, configuring ports, and installing and running applications.
Note – This manual also provides information for WabiServer™ users. Some
aspects of Wabi differ when you run it in WabiServer, a client/server Wabi
product which can be purchased separately.
Do Not Read This Manual
Instead, scan it for exactly the information you need. This guide is organized
differently than the documentation you’re used to reading. The goal is simple:
minimize the amount of material you must wade through in order to get your
job done. To accomplish this, each chapter is divided into three sections:
•
•
•
About
Instructions
Reference
The About section in each chapter explains the operating concepts of a topic
and provides background material related to the tasks described in the chapter.
Think of About as the place to go to get the “big picture” on a topic or a
xxiii
procedure. Read as much, or as little, of About as you need to get the job done.
Skip About entirely if you grasp a concept and require only step-by-step
instructions to complete a task.
The Instructions section is the place to turn for mouse clicks and keystrokes.
This section takes a no frills approach to instructions, communicating a
maximum amount of task-oriented information in a minimum amount of
space. Every Wabi task is covered in Instructions. Yet when you use the
Instructions section you won’t be distracted from the job at hand by conceptual
digressions and long-winded explanations.
A Reference section rounds out most chapters. This section contains charts and
tables of information related to the topic under discussion. Use the Reference
section when you encounter a problem completing a task. The problem-andsolution tables included there will help you troubleshoot problems you may
encounter with the Wabi program or the applications you are running.
As you scan each chapter, keep an eye on the frequent margin notes in the lefthand margin. These notes usually point to a cross-reference in a related section
within the same chapter. For example, a concept described in About carries a
cross-reference to the page in Instructions where the steps required to perform
the related task appear. (The reverse is also true.) Use margin notes to shorten
the distance between where you are and where you want to be.
Who Should Use This Book
If you use the Wabi program to load and run applications, you’ll find this
manual essential. It describes operating concepts and procedures, and provides
step-by-step instructions for completing all Wabi tasks. Similarly, if you are
responsible for supporting users, or for installing or configuring the Wabi
program, this manual is the place to turn for comprehensive information about
concepts, procedures, and system requirements.
WabiServer administrators will find this manual useful for configuring the user
environment when creating prototypes.
Before You Use This Book
To use the Wabi program, you must be familiar with the use of a mouse and
with graphic user interface techniques, including: pointing, clicking, and
choosing options from a menu. If you are not familiar with these operations,
xxiv
Wabi User’s Guide—May 1996
refer to your system user’s guide or desktop reference manual. They supply
information about performing tasks using a mouse. Experienced users will find
that the steps and procedures required to perform a task in the Wabi program
are similar to those required to perform a task in any graphical user
environment.
The Wabi program is a bridge between your UNIX operating system and a
Microsoft Windows-compatible application program. As a result, you need
some knowledge of your operating system to fully configure the Wabi
program. For example, you’ll need to know the operating system files available
to you in order to access those files. Similarly, you may need to supply the
Wabi program with the locations and names of operating system device
drivers, such as diskette device drivers, in order to use devices.
If you use WabiServer, you may not need to know much about the UNIX
operating system, provided your WabiServer administrator configures your
Wabi environment for you.
What This Guide Contains
This guide presents material as follows:
Chapter 1, “What is Wabi?” presents an overview of the Wabi system and the
WabiServer product, provides system hardware and memory requirements,
and lists the applications certified to run in the Wabi environment.
Chapter 2, “Starting Wabi,” explains how to start a standalone Wabi session
and install Microsoft Windows software, explains how to start WabiServer to
configure your WabiServer setup, and describes the Wabi user interface.
Chapter 3, “Configuring Your Wabi Environment,” introduces you to the Wabi
Configuration Manager and Microsoft Windows Control Panel, the tools you’ll
use to configure your Wabi environment.
Chapter 4, “Setting Up Drives,” explains how the Wabi program uses diskette
and network drives, and describes in detail how to create and use drives.
Chapter 5, “Printing,” examines how the Wabi program interacts with printers.
Here you’ll learn how to configure a port for printing and assign a printer to it.
You’ll also learn how to establish and change the default printing setup.
Preface
xxv
Chapter 6, “Using Wabi COM Ports,” describes how to set up and connect
Wabi COM ports to UNIX device drivers so you can use serial devices such as
modems and printers.
Chapter 7, “Wabi International,” describes methods of localizing the Wabi
program, and explains how to set up the Wabi program to use your preferences
for international settings used by applications.
Chapter 8, “On the Network,” explains the ways the Wabi program uses the
network.
Chapter 9, “Installing Microsoft Windows Applications,” details how to
install Microsoft Windows applications. It also describes how Windows
applications and their document files are integrated into the OpenWindows
environment.
Chapter 10, “Using Microsoft Windows Applications,” describes ways to start
applications in the Wabi environment, and discusses issues with X window
managers that may arise when you use applications. It also describes Wabi
support of multimedia features.
Chapter 11, “Setting Up Remote Database Access,” describes how to set up
remote database access for supported applications.
Chapter 12, “Using a DOS Emulator in the Wabi Environment,” details how
to connect a DOS emulator to the Wabi program, and install and run
DOS-based applications.
Appendix A, “Wabi File Layout,” outlines the structure of the directories and
files that make up the Wabi software.
Appendix B, “Color From Windows to Wabi,” explains Wabi color handling
and describes some variables that affect Wabi color handling.
Appendix C, “Fonts From Windows to Wabi,” discusses methods the Wabi
program uses to provide fonts to applications.
Appendix D, “UNIX and DOS File Systems,” describes utilities that help you
use DOS and UNIX files in both environments.
xxvi
Wabi User’s Guide—May 1996
Related Books
You may find it helpful to have your operating system user’s guide (from the
operating system supplier) and your Microsoft Windows User’s Guide on hand
when you use the Wabi program. These books provide background
information related to Wabi topics and detail the use of the features and
functions available in Microsoft Windows software.
If you are a WabiServer administrator, you should use the WabiServer
Administrator’s Guide to help you set up your WabiServer configuration.
Getting Help
There are several sources of help you can turn to with Wabi questions and
problems:
•
•
•
Wabi on-line Help
Wabi error messages
Wabi customer support
On-Line Help
The Wabi program provides a comprehensive on-line Help system that
describes how to use the Wabi Configuration Manager.
To use Wabi on-line Help, press F1 or choose the Help button in the
Configuration Manager window to view a context-sensitive Help screen. You
can choose the Contents button to see a table of contents for the help system.
Error Messages
Wabi Configuration Manager returns an error message when a problem occurs
that interrupts the completion of a task. Error messages describe the problem
and usually suggest a way to resolve the error condition. The Help system
provides more detailed explanations and suggestions for fixing a problem.
Preface
xxvii
Customer Support
Your operating system vendor provides telephone support for the Wabi
program. If you cannot resolve a problem using Wabi documentation, on-line
Help, or error messages, contact your operating system vendor for additional
support.
If you have an Internet browser, you can get more information about Wabi
software and SunSoft PC Desktop Integration products in general from the
World Wide Web at the following location, or URL:
http://www.sun.com/sunsoft/Products/PC-Integration-products
Typographic Conventions Used in This Manual
The following table describes the type changes and symbols used in this book.
Typeface,
symbol, or
term
xxviii
Meaning
Example
AaBbCc123
The names of commands, files,
and directories; on-screen
computer output.
Edit your .login file.
Use ls -a to list all files.
system% You have mail.
AaBbCc123
What you type, contrasted with
on-screen computer output.
machine_name% su
Password:
AaBbCc123
Command-line placeholder:
replace with a real name or
value.
To delete a file, type rm filename.
AaBbCc123
Book titles, new words or terms,
or words to be emphasized.
Read Chapter 6 in User’s Guide.
These are called class options.
You must be root to do this.
Key Names
Alt+d
F1
Keys are written as they appear
on the keyboard. Keys you
press sequentially are separated
by a comma. Keys you press
simultaneously are joined by a
plus sign (+).
Press Alt+k to open the Diskette
tab sheet.
Wabi User’s Guide—May 1996
Press Alt + F4
Type vs.
Enter
Wabi
Preface
Server
Enter vs.
Return
Meaning
Example
Type means press only the keys
indicated.
Enter means to type the
indicated keys and press the
Enter or Return keys.
Type a device driver name.
Enter a device driver name.
These keys are used
interchangeably.
Information specific to users of
WabiServer, a client/server
Wabi product that is purchased
separately.
Wabi
Server
Typeface,
symbol, or
term
You can use either your
local diskette drive or
the server diskette drive.
xxix
xxx
Wabi User’s Guide—May 1996
1
What is Wabi?
®
The Wabi™ program is a UNIX application that enables you to run Microsoft
Windows applications on several UNIX operating environments that use the X
Window System™. Wabi acts as an interface between the Windows world and
the UNIX world, translating the language of Microsoft Windows applications
to the language of UNIX and the X Window System.
Keep an eye out for margin notes
that cross-reference instructions
and other useful information.
The Wabi program lets you enjoy the benefits of the security, power, and
connectivity of your UNIX operating system, and on the same desktop, take
advantage of popular Microsoft Windows applications such as spreadsheets,
word processors, databases, graphics packages, and more. The best-selling
applications have been tested extensively running in the Wabi environment.
Applications that have been tested and certified compatible with the Wabi
program are listed in the Wabi Release Notes, which are located on-line in the
Wabi Tools group.
The Wabi program can be run locally by individual users on their own
systems, or remotely from a server by multiple users. The WabiServer™
product enables multiple users to access a single copy of Wabi software
running on a server and simplifies the system administrator’s tasks for
supporting those users. See “What is WabiServer?” on page 4 for more
information about WabiServer.
1
1
How the Wabi Program Works
Wabi software is “middle-ware.” It resides between an application and the
UNIX operating environment. In general, the Wabi program works by
intercepting a Microsoft Windows application's request, and making an
equivalent request in the UNIX environment to deliver the desired result. The
Wabi program carries out requests by translating Windows calls to X Window
and UNIX calls, and on RISC platforms, translating Intel x86 instructions to
RISC instructions. On x86 UNIX platforms, the x86 instructions are passed
directly to the x86 processor.
In slightly more concrete terms, an application uses Windows API calls to open
an icon, for example, and Wabi translates the request to equivalent X Windows
calls. A print request, and any other request involving a device, is translated
and redirected to an appropriate UNIX command or device. Much of an
application’s “behind the scenes” activity involves x86 instructions, which
Wabi translates appropriately for the processor platform on which it’s running.
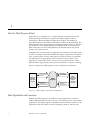
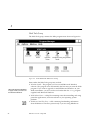
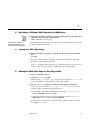
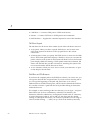
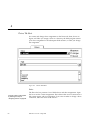
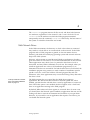
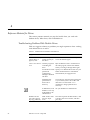
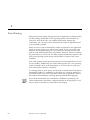
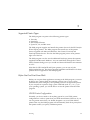
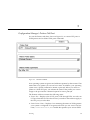
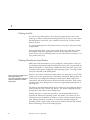
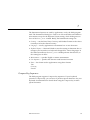
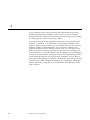
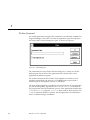
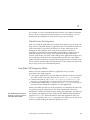
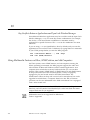
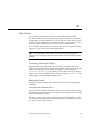
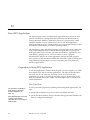
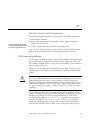
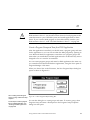
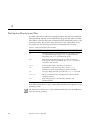
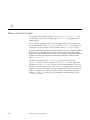
Figure 1-1 depicts the Wabi program’s role as translator and redirector.
1
A request for service,
such as printing or
disk access
Wabi redirects
request to operating
system resource
The
Wabi
Wabi
Program
Program
Microsoft
Windows
application
program
2
Figure 1-1
3
Wabi provides
requested service
to application program
4
Required resource
provided by
operating system
Native
operating
system files,
drivers
and other
resources
Wabi Program as Translator and Redirector
Wabi Capabilities and Functions
Because the Wabi program is an enabler for other applications, it has few
visible capabilities and functions of its own. You cannot do much work without
applications. The Wabi program’s capabilities are based almost entirely on the
applications that run within it, and the operating system on which it runs.
2
Wabi User’s Guide—May 1996
1
Wabi capabilities can be described only in the context of the applications that
are certified to run in the Wabi program. Most of the functions of the certified
applications are supported in the Wabi program; any exceptions are listed in
the Wabi Release Notes.
Functions Supported for Certified Applications
In the Wabi environment, certified applications can do most of the same things
they do in a Microsoft Windows environment. For example, applications are
able to use the following capabilities:
•
•
•
•
•
•
•
•
•
•
Cut, copy, and paste between Windows applications
Access DOS-formatted diskettes
Run in enhanced mode
Object linking and embedding (OLE) between Windows applications
Dynamic data exchange (DDE) between Windows applications
Network installation and use of applications
Windows Sockets networking
Remote database access
Audio playback and recording (of .WAV files), on computers with audio
hardware (except in WabiServer)
Video playback of .AVI files, if you have installed Microsoft Video for
Windows
Additional Functions in the Wabi Environment
Because the Wabi program runs in the UNIX environment, it provides the
certified applications with the following additional capabilities:
•
•
•
•
•
•
•
Cut, copy, and paste between Microsoft Windows applications and
X Window applications
Transparent access to network file systems
Use on X terminals
Run on one system, display on another system
Run more applications simultaneously on your desktop
Share serial and parallel ports
Multiple simultaneous users on one system
What is Wabi?
3
1
Functions Not Supported
Some functions are not supported for any applications. Generally, these
functions require Microsoft Windows networking, special device drivers that
the Wabi program does not support, or DOS commands. The Wabi program
does not support the following features for any application:
•
•
•
•
•
•
MIDI (Musical Instrument Digital Interface), AVI (Audio-Visual Interface)
for video laser disks and music compact disks
NetWare IPX/SPX connectivity
Shared Wabi Windows directories
Tutorials requiring VGA display drivers
DOS diskette formatting
Features requiring virtual device drivers
Wabi Functions
Functions unique to the Wabi program are those used to make connections to
the UNIX operating system. You access these functions through the Wabi
Configuration Manager, as Chapter 3, “Configuring Your Wabi Environment”
explains.
What is WabiServer?
WabiServer software is a product that you can purchase for Sun platforms. The
WabiServer product provides the Wabi program in a client/server
configuration. It enables multiple users on client systems to access a single
installation of Wabi software on a server system. WabiServer frees users from
the tasks of installing and configuring software, while enabling system
administrators to perform tasks once to provide Wabi to many users.
The system administrator installs Wabi and WabiServer software on the server
system, and installs Wabi client software on client systems. The administrator
also creates Wabi user environments called prototypes on the server, and installs
Microsoft Windows and Windows applications into the prototypes.
The first time you run WabiServer, a prototype is copied to your home
directory to create your Wabi user environment, complete with the Microsoft
Windows software and application software installed by the system
4
Wabi User’s Guide—May 1996
1
Wabi
Server
administrator. After the initial startup, using the Wabi program through
WabiServer is quite similar to using the standalone Wabi program. The
differences for WabiServer are noted in this manual as shown below:
This is a WabiServer note. If you use WabiServer, look for this symbol for
special information.
New Features in Wabi 2.2
If you have used previous Wabi releases, you should read the list below to see
what’s new in Wabi 2.2.
•
Several of the certified applications were revised recently and the new
releases are now certified to work with the Wabi 2.2 program:
• Lotus Word Pro 96 (formerly Ami Pro)
• Lotus Organizer 2.1
• Lotus SmartSuite 4.0
• Lotus cc:Mail 2.2
• PROCOMM PLUS 2.11
See the Wabi Release Notes for the complete list of certified applications, and
see for more information about applications.
•
The Wabi Configuration Manager features a new user interface. The
underlying functionality is mostly unchanged. See “Wabi Configuration
Manager” on page 48 for more information.
•
The Wabi program features improved desktop integration in the Solaris
Common Desktop Environment (CDE). The Wabi program and installed
applications are available from the desktop. In addition, applications you
install will be integrated with CDE’s File Manager, Application Manager,
Mailer, and Print Manager. See “CDE Integration” on page 132 for more
information.
•
The Wabi program has improved OpenWindows integration by allowing
you to print a file by dragging its icon from the File Manager or Mail Tool to
the Print Tool. Previously, you had to edit application bindings manually to
enable drag and drop printing. See “OpenWindows Integration” on
page 128 for more information.
What is Wabi?
5
1
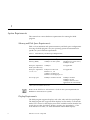
System Requirements
This section lists various hardware requirements for running the Wabi
program.
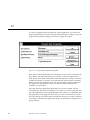
Memory and Disk Space Requirements
Table 1-1 lists minimum and optimum memory and disk space configurations
for using the Wabi program. See your operating system documentation for
specifics on your hardware requirements.
Table 1-1
Wabi Memory and Disk Space Requirements
Item
Random-access
memory (RAM)
Minimum
Recommended
RISC1
24 Mbytes on
systems
16 Mbytes on x86 systems
Disk space required for 15 Mbytes
Wabi system directory
48 Mbytes on RISC
(64 Mbytes for power users)
32 Mbytes on x86
Not applicable
Disk space required for 8 Mbytes for Microsoft
Not applicable
$HOME/wabi
Windows 3.1, 3.11
13 Mbytes for Microsoft
Windows for Workgroups 3.11
Free swap space
20 Mbytes on RISC and x86
60 Mbytes on RISC
40 Mbytes on x86
10 Mbytes more for each
application run concurrently
Wabi
Server
1. RISC systems include SPARC and PowerPC.
Please see the WabiServer Administrator’s Guide for the system requirements for
WabiServer client and server systems.
Display Requirements
The Wabi program supports displays with 1-bit, 4-bit, and 8-bit pixel depths.
The Wabi program also supports 24-bit displays in 8-bit mode, not TrueColor
mode. The X server for this display must have available an 8-bit PseudoColor
visual class in order for Wabi to display correctly. See Appendix B, “Color
From Windows to Wabi,” for more information about 24-bit displays.
6
Wabi User’s Guide—May 1996
1
Requirements for Multimedia Sound Support
The Wabi program provides support for waveform sound on the computers
listed in Table 1-2.
Table 1-2
Wabi Sound Requirements
Computer
Sound Card and Audio Driver
SPARCstation™ 4
Separately purchased sound card. The audio driver
in Solaris 2.4 needs a patch to make it work
correctly. See the Wabi Release Notes.
SPARCstation 5
Sound card included. The audio driver in Solaris 2.4
needs a patch to make it work correctly. See the
Wabi Release Notes.
SPARCstation 10
Sound card included. No patch is required for the
Solaris 2.4 audio driver.
SPARCstation 20
Sound card included. No patch is required for the
Solaris 2.4 audio driver.
Ultra™ systems
Wabi
Server
386-, 486-, or Pentium
computer
Sound card included. No patch is required.
™-based
16-bit sound card with appropriate driver (for
example, Creative Labs Sound Blaster 16 audio
card with /dev/sbpro audio device driver).
Sound is not supported with the WabiServer product.
Note – Sound is not supported on the Solaris for PowerPC platform.
Applications You Can Use
The certified applications listed in the Wabi Release Notes are the only
applications that are officially supported to run in Wabi. These applications
have been extensively tested with Wabi. However, many other applications
have been found to work well with Wabi. For a list of applications found to
work in Wabi see the following URL on the World Wide Web:
http://wabiapps.psgroup.com
What is Wabi?
7
1
8
Wabi User’s Guide—May 1996
2
Starting Wabi
This chapter explains how to start the Wabi program, describes how your user
environment is created the first time you start the Wabi program, and describes
the Wabi user interface.
Wabi
Server
If you have not yet started the Wabi program and want to learn about what
happens the first time you start it, read the next section, “Starting Wabi
Software the First Time.”
If you are using WabiServer, see the section “Starting WabiServer the First
Time” on page 17 for information specifically for WabiServer users.
If you want instructions for specific tasks, use the following table to locate the
instructions you need.
Task
Page
Starting the Wabi Program
29
Starting the Wabi Program in WabiServer
29
Installing Microsoft Windows From Diskette
29
Installing Microsoft Windows From Wabi Drive R
30
Exiting the Wabi Program
31
Displaying the Wabi Program on a Remote System
31
Displaying the Wabi Program With Small or Large
System Fonts
32
Starting Wabi Without the Splash Screen
33
9
2
Task
Page
Starting Wabi With or Without the Font Server
32
Setting Up Your WabiServer Configuration
33
Specifying a Different WabiServer System
34
Setting the WABISERVER Variable
34
Selecting a New Prototype for WabiServer
34
Specifying a Different Wabi Directory for WabiServer
35
Viewing the Wabi Man Page
35
Adding the Wabi Man Page to Man Pages Path
35
Starting Wabi Software the First Time
See the section “Starting the
Wabi Program” on page 29 for
the Wabi start procedure.
Starting the Wabi program is easy, and you can use the same method to start it
the first time or the tenth time. The method you use may depend on your
operating system because the degree of integration into the UNIX desktop
varies. However, on all systems, you can start Wabi by typing wabi at a UNIX
command prompt, provided you have added the Wabi system directory to
your UNIX path. The command has several optional switches which are
discussed in “Wabi Startup Options” on page 24.
The first time you start the Wabi program, it sets up your user environment,
which takes a few minutes. If you are a new user, the Wabi program creates
your personal wabi directory in your home directory, and then prompts you to
install Microsoft Windows. If you do not want your wabi directory in your
home directory, you can set the WABIDIR variable before starting the Wabi
program the first time. See the section “To Create Your Wabi Directory in
Another Location” on page 11 for more information.
If you are upgrading from Wabi 2.0 or earlier, the Wabi program updates your
wabi directory, and then prompts you to reinstall Microsoft Windows.
Changes in this release of the Wabi program require additional Windows files
that were not installed before Wabi 2.1.
10
Wabi User’s Guide—May 1996
2
Your Personal Wabi Directory
The Wabi startup script creates your personal wabi directory as a subdirectory
of your home directory by default. Within that directory, it creates a windows
subdirectory. These two directories are analogous to the C:\ and C:\WINDOWS
directories in a Microsoft Windows environment on a PC.
Wabi
Server
The section “Microsoft Windows
Installation” on page 12 explains
how to install Microsoft Windows.
After your personal wabi directory is created, the Wabi Windows Install
Program prompts you to install Microsoft Windows software. You must do this
before you can use the Wabi program.
If you use WabiServer you can specify the location of your wabi directory as
described in the following section, or by using the rwabi_setup program
discussed in “Specifying the WabiServer System and Wabi Directory Location”
on page 18.
To Create Your Wabi Directory in Another Location
You can tell the Wabi program to create your personal wabi directory in a
location other than your home directory by setting the WABIDIR environment
variable before you start the Wabi program. You can do this by using the
commands below, where pathname is the directory path where you want to
place your personal wabi directory.
In the C shell:
setenv WABIDIR pathname
In the Bourne or Korn shell:
WABIDIR=pathname; export WABIDIR
Include this statement in your .cshrc or .profile file in order to use this
directory each time you start Wabi. If you do not, the next time you start Wabi,
another wabi directory will be created in your home directory.
If You Are Upgrading From a Previous Release
The first time you start the Wabi program after the new release is installed,
your wabi user directory is updated. All applications you have installed
remain, and all changes you have made to your Wabi configuration, such as
drive mappings, will be unchanged. See the Wabi Release Notes in the Wabi
Tools group for more upgrade information.
Starting Wabi
11
2
Upgrading from Wabi 1.x or Wabi 2.0
If you did not install Microsoft Windows previously, the Wabi Windows Install
program prompts you to install Microsoft Windows software. You must install
Microsoft Windows before you can use the Wabi program.
If you had previously installed Microsoft Windows, you must reinstall it so
Wabi has access to some additional Windows files that were not previously
installed.
Upgrading from Wabi 2.1
Wabi
Server
Only your wabi.ini file is updated when you upgrade from Wabi 2.1. You do
not have to reinstall Microsoft Windows.
Using an Existing Wabi Directory with WabiServer
If you use an existing Wabi directory with WabiServer, your Wabi directory
will be updated the first time you start WabiServer, just as with standalone
Wabi. If the Wabi directory was created with Wabi 1.x or Wabi 2.0, you must
reinstall Microsoft Windows.
Microsoft Windows Installation
The Wabi Microsoft Windows Install program lets you install Microsoft
Windows files into your personal wabi/windows directory. The program starts
automatically the first time you start the Wabi 2.2 program, unless you are
upgrading from Wabi 2.1. You must install Windows before you can use the
Wabi program.
You can install Microsoft Windows 3.1 or 3.11, or Microsoft Windows for
Workgroups 3.11. However, bear in mind that if you install Microsoft Windows
for Workgroups, its functionality is somewhat limited because the Wabi
program does not support all its network features. Read “Microsoft Windows
for Workgroups 3.11 in the Wabi Environment” on page 40 for details about
supported and unsupported features.
The Wabi Microsoft Windows Install program lets you install either from
diskettes or from a network drive. You cannot use the program to install
Microsoft Windows onto a network server. See the section “Microsoft Windows
Installation on a Network Server” on page 16 for more information.
12
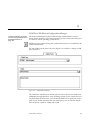
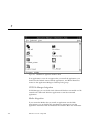
Wabi User’s Guide—May 1996
2
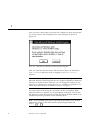
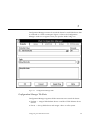
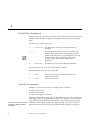
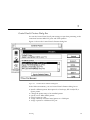
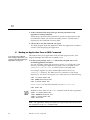
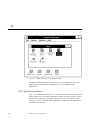
The Wabi Microsoft Windows Install Program’s initial dialog box prompts you
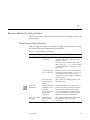
for the location of the Windows files, as shown in Figure 2-1.
Figure 2-1
Initial Wabi Windows Install Program Dialog Box
Microsoft Windows Installation From Diskette
To install Microsoft Windows from a local diskette drive, enter the letter
designation of the diskette drive. The Wabi program supports the connection
of two diskette drives: drive A and drive B. The default connection is diskette
drive A.
“Installing Microsoft Windows
From Diskette” on page 29
provides the steps required to
perform this task.
If you are using drive A to install Windows software, choose OK to accept the
default designation. If you are using drive B, change the designation from A
to B.
Starting Wabi
13
2
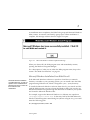
Once you enter a drive letter and choose OK, a dialog box opens and prompts
you to insert disk 1 into the diskette drive. This dialog box is shown in
Figure 2-2.
Figure 2-2
Wabi Microsoft Windows Install Program Dialog Box
After you insert the disk and choose OK, the files on disk 1 are installed in
your C:\WINDOWS directory, which is mapped to your wabi/windows
directory.
Note – The destination directory, C:\WINDOWS, cannot be changed. The Wabi
Microsoft Windows Install Program does not support installation of Microsoft
Windows to another location. However, you can change the location of your
personal wabi directory by setting the WABIDIR variable as explained in “To
Create Your Wabi Directory in Another Location” on page 11.
A progress meter in the dialog box increments as files are installed. When
disk 1 installation is complete, you are prompted to insert disk 2 and choose
OK. When you insert disk 2 and choose OK, the files on diskette number 2 are
installed. Repeat this procedure for the remaining disks.
Note – If your diskette drive does not provide an eject button, you can eject
diskettes by clicking in the Wabi window and pressing the Meta and
+ EE
E keys:
14
Wabi User’s Guide—May 1996
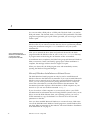
2
As installation nears completion, the Wabi Tools group and Microsoft Windows
Main, Games, Accessories, and StartUp groups open. When installation is
complete, the message window shown in Figure 2-3 opens.
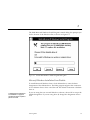
Figure 2-3
Microsoft Windows Install Completion Message
When you choose OK, the Wabi program exits and immediately restarts,
opening the Windows Program Manager.
For a description of what you see when the Wabi program starts, skip to the
section “The Wabi User Interface” on page 21.
Microsoft Windows Installation From Wabi Drive R
“Microsoft Windows Installation
on a Network Server” on page 16
explains how to install Microsoft
Windows to a server so users can
then install it on their
workstations.
If the Microsoft Windows software is copied on a hard drive or network
directory accessible to your operating system, you can install it into the Wabi
program using Wabi drive R, which is assigned to your / (root) directory.
To install the Microsoft Windows software from drive R, you enter R: and the
path the Wabi program can use to locate the Windows files. You can also use
the Browse button to navigate through the directories accessible to your system
and locate the Microsoft Windows files.
For example, suppose the Microsoft Windows 3.1 diskettes are copied into
/usr/apps/install/win31.dsk. In the entry field of the Wabi Microsoft
Windows Install Program’s initial dialog box (shown in Figure 2-1), you would
enter the following path:
R:\usr\apps\install\win31.dsk
Starting Wabi
15
2
You can use either a DOS path or a UNIX path. The back slash (\) is used in
DOS path names. The forward slash (/) is used in UNIX path names. The Wabi
program accepts both types of path names, provided you use one type of slash
within a path.
Note – You must have read permission to access the directory containing the
Windows files. If you cannot access this directory due to a permission problem,
change the permissions using the chmod command or see your system
administrator.
See “Installing Microsoft
Windows From Wabi Drive R”
on page 30 to learn
how to perform this task.
After you’ve entered the drive letter and path and chosen OK, the Wabi
program installs the Windows files in your $HOME/wabi/windows directory.
A progress meter in the dialog box increments as files are installed.
As installation nears completion, the Wabi Tools group and Microsoft Windows
Main, Accessories, Games, and StartUp groups open. When installation is
complete, the message window shown in Figure 2-3 opens.
When you choose OK, the Wabi program exits and immediately restarts,
opening the Windows Program Manager.
Microsoft Windows Installation on a Network Server
The Wabi Windows Install program can only be used to install Microsoft
Windows files into the Wabi user environment. If you want to install Microsoft
Windows onto a network server so that users can install Windows from the
server, you can use the procedure for placing Windows files on a network
server that is described in your Microsoft Windows documentation. The
documented procedure requires a DOS emulator or DOS computer on your
network so you can run the DOS command setup /a.
If you do not have a DOS computer on your network, refer to your UNIX
documentation for information about accessing DOS file systems. Once you are
able to access the DOS diskettes from your operating system, you can use
UNIX commands to copy the diskettes to a network server and set read
permission on the files.
Once you have installed Microsoft Windows to a network server, Wabi users
can use the Wabi Microsoft Windows Install program to install Windows files
into their Wabi environments as described in “Microsoft Windows Installation
From Wabi Drive R” on page 15.
16
Wabi User’s Guide—May 1996
2
Note – The Wabi Microsoft Windows Install program does not allow you to set
up your system to access a shared copy of Microsoft Windows. Each user must
have his or her own copy of Windows in $HOME/wabi/windows, and must
have a Microsoft Windows software license.
Starting WabiServer the First Time
The initial startup of the Wabi program (rwabi) using WabiServer is quite
different from the initial startup of the standalone Wabi program. When you
start WabiServer, you are presented with dialog boxes asking you to:
See “What is WabiServer?” on
page 4 for background
information on WabiServer.
•
•
Specify the server system to use as your WabiServer system
•
Select a prototype user environment to create your Wabi user directory
Specify where to store your Wabi files (that is, the location of your Wabi user
directory)
The following sections describe these dialog boxes.
Note – To access help for any of the WabiServer dialog boxes, place your cursor
on the item for which you want help and press the Help key.
Starting Wabi
17
2
Specifying the WabiServer System and Wabi Directory Location
You specify the server system name and Wabi directory location in the
rwabi_setup dialog box, shown in Figure 2-4.
Figure 2-4
The rwabi_setup Dialog Box for Specifying Server and Directory Location
WabiServer Name is the name of the server system you will use to run Wabi.
Ask your system administrator for the name of the server you should use. If
your site has more than one WabiServer system, the system administrator must
balance the user load between the servers, so it’s important that the
administrator assign you to a server.
Note – You can also set the WABISERVER environment variable if you prefer.
This setting takes precedence over the server name you specify in the
rwabi_setup dialog box. See “Setting the WABISERVER Variable” on page 34
for the command format for setting the variable.
The location for storing your Wabi files is your $HOME/wabi directory, by
default. If you do not want to create your Wabi user directory in your home
directory, you can enter the full path to another directory. The path you enter
must be the “network-aware” path, which is the path as seen from the server.
If your home directory is located on a file server, the path you normally use to
access it is the network-aware path.
18
Wabi User’s Guide—May 1996
2
If you want to create your Wabi user directory in a file system on your local
hard drive, you must first share the file system to make it accessible to the
WabiServer system. Consult the Solaris User’s Guide or ask your system
administrator for help doing this. Once the file system is shared, you can
specify the network-aware path to the directory, which is probably different
from the path you normally use. For example, suppose you have a file system
called /files on your system’s internal hard drive. You must share (or
export) /files before you can create your Wabi user directory there. If your
client system’s hostname is menemsha, the network-aware path to this
directory would probably be /net/menemsha/files. The path depends on
how your network is set up, so consult your system administrator.
Note – If you have set the WABIDIR variable, described in “To Create Your
Wabi Directory in Another Location” on page 11, the WABIDIR setting takes
precedence over the directory setting you supply in the rwabi_setup dialog
box. A warning to this effect is displayed when the dialog box opens.
If you enter the path to a Wabi directory that exists as the place where you
want your Wabi files stored, rwabi is started on the specified server using the
specified Wabi directory. If the directory that you specify does not exist, or is
not already a Wabi directory, you must select a prototype to use to create your
Wabi directory, as explained in the following section.
Starting Wabi
19
2
Selecting a Prototype
When you apply the settings in the rwabi_setup dialog box, the
rwabi_selproto dialog box opens, as shown in Figure 2-5.
Figure 2-5
The rwabi_selproto Dialog Box for Selecting a Prototype User Environment
The rwabi_selproto dialog box lists the prototypes defined on the server
you specified in the rwabi_setup dialog box. The prototypes were created by
the WabiServer system administrator. The names may indicate which
applications (Windows, Office, etc.) are contained in the prototypes, or the
users for which they were created (e.g., Marketing, Sales), or whatever
convention the system administrator decided to use for naming prototypes. At
the end of each prototype name is the number of megabytes of disk space
required to install the prototype in your Wabi directory. Make sure you have
adequate space before selecting a prototype.
When you choose the Apply button, the prototype is used to create your Wabi
directory in the location you specified previously. When the process is
complete, the Wabi program starts and is displayed on your screen. The
applications installed in the prototype are ready to use.
20
Wabi User’s Guide—May 1996
2
Note – If you exit the dialog box by choosing Quit Select, or select <none>, or
if no prototypes have been created, the Wabi Windows Install program starts
so that you can begin creating your own Wabi directory. See “Microsoft
Windows Installation” on page 12 for information about installing Microsoft
Windows.
The Wabi User Interface
The Wabi program presents the familiar screens, dialog boxes, and menus of a
Microsoft Windows graphical user interface (GUI). You make menu selections
and choose icons by pointing and clicking with a mouse, or by using keyboard
accelerator commands. Accelerator keys, designated by an underlined
character in a menu choice, are discussed in Chapter 3, “Configuring Your
Wabi Environment.”
The Program Environment
The Wabi program uses the Microsoft Windows Program Manager as its
program environment, or shell program. The shell program is specified in the
SHELL= variable in your $HOME/wabi/windows/system.ini file.
The Program Manager works as it does when you run it in Microsoft Windows
on a PC. If you are not familiar with the Program Manager, refer to the
Microsoft Windows documentation and on-line help.
Starting Wabi
21
2
Wabi Tools Group
The Wabi Tools group contains the Wabi program items shown in Figure 2-6.
Figure 2-6
Items Within the Wabi Tools Group
Items within the Wabi Tools group may include:
•
Windows Install – The program you use to install Microsoft Windows
software. This program runs automatically the first time you start the Wabi
program. If you want to upgrade or reinstall Microsoft Windows in your
Wabi environment, you must use this tool rather than the setup program
supplied with Microsoft Windows.
•
Wabi Release Notes – A help file containing notes about installing and using
particular applications, and notes relevant to your operating system
platform.
•
WabiServer Read This First – A file containing late-breaking information
about WabiServer. This file is present only if you are using WabiServer.
Wabi
22
Server
“Microsoft Windows Installation”
on page 12 tells you how to use
the Windows Install tool.
Wabi User’s Guide—May 1996
2
•
Wabi Troubleshooting Guide – A help file containing troubleshooting tips for
common problems.
•
Wabi Registration – The program you use on Solaris platforms for registering
with SunSoft.
•
Cool Stuff - Microsoft Powerpoint slide describing other PC desktop
integration products available from SunSoft.
Microsoft Windows Groups
When you install Microsoft Windows software, you see the Main, Accessories,
Games, and StartUp groups. In the Main group, the Print Manager and
Windows Setup programs are omitted because you cannot use them in the
Wabi environment. The Accessories and Games groups contain the same
programs as in Microsoft Windows on a PC. The StartUp group is empty
initially. Any program item placed in the StartUp group will be started
automatically when you start the Wabi program.
Wabi On-Line Help
The Wabi software includes on-line help for the Configuration Manager. You
can view the on-line help by choosing the Help button or pressing the F1 key
in Configuration Manager’s tab sheets. On-line help explains what you can
accomplish with the Wabi Configuration Manager.
When you use Configuration Manager, you can view Wabi configuration error
message help. A configuration error message is displayed when you try to
perform an “illegal” procedure or when Wabi software cannot complete a task
you ask it to do using Configuration Manager. For example, you’ll see an error
message if you try to assign a Wabi drive to a file system that you do not have
permission to access. Error windows displayed at these times include a Help
button you can choose for information about the error and help in resolving
the problem.
Starting Wabi
23
2
The Wabi Man Page
A manual (man) page of information is available for the Wabi program. This
man page describes command-line options, provides examples of various
startup modes, and describes Wabi environment variables. Type the command
man wabi to display the Wabi man page. The man page includes information
for the rwabi command as well.
See “Adding the Wabi Man Page
to Man Pages Path” on page 35
for the steps required to view this
man page.
To access the Wabi man page, you must have the Wabi man page directory in
your man pages path. The Wabi installation procedure may or may not have
taken care of this for you; it varies depending on your native operating system.
Some operating systems use a MANPATH environment variable in your .login,
.cshrc, or .profile file. If you cannot view the Wabi man page, you may
have to modify your MANPATH environment variable.
Wabi Startup Options
You can start applications from
the wabi command line. See
“About Starting Applications” on
page 148” for instructions.
The wabi command, which you use to start the Wabi program, provides
several switches you can use to specify options Wabi should use when it starts.
Display Wabi on a Remote System or X Terminal
You can direct the Wabi display to a remote system or X terminal. You might
do this if you want to view and use the Wabi program on a system that cannot
run the Wabi program locally, or if you want to run the Wabi program on a
central computer and display it on X terminals.
“Displaying the Wabi Program on
a Remote System” on page 31
provides the steps required for
this task.
24
You direct the Wabi display to a remote system that is open to external displays
by specifying a display name with the -display switch when starting the
Wabi program. To direct the display to a remote system every time the Wabi
program is started, you can set the DISPLAY environment variable. If you do
set this variable, be aware that the displays of all other X Window applications
you start subsequently may also be sent to this system, depending on where
you set the variable. See your UNIX documentation for information about
setting the DISPLAY variable.
Wabi User’s Guide—May 1996
Wabi
Server
2
Note – The standalone Wabi program accesses local resources such as the
diskette drive on the system where it is running. You cannot access the diskette
drive of a remote system on which the Wabi program is being displayed.
However, if you are using WabiServer, you may be able to access the diskette
drives of the server or your local system, depending how your system
administrator has configured the WabiServer system. The system administrator
may also deny WabiServer users access to diskette drives altogether.
Display Wabi With Smaller or Larger System Fonts
See “Displaying the Wabi
Program With Small or Large
System Fonts” on page 32 for the
commands used to change the
display font size.
The Wabi program adjusts the size of the system fonts it uses in dialog boxes,
icon labels, and menus according to the size of the display screen you use. On
a large display screen (one with more than 640 horizontal pixels), the Wabi
program uses a system font approximately 20 pixels high. On a small display
screen (one with 640 or fewer horizontal pixels), it uses a system font
approximately 16 pixels high. You can use the -LF and -SF command-line
switches to override the default and have Wabi use larger or smaller system
fonts.
Start Wabi Without the Splash Screen
See “Starting Wabi Without the
Splash Screen” on page 33 for
the commands used to prevent
the splash screen from
displaying.
The Wabi program normally displays its splash screen, or startup banner, as it
begins to run. The splash screen is shown in Figure 2-7.
Figure 2-7
Wabi Splash Screen
Starting Wabi
25
2
If you like, you can prevent the splash screen from displaying by using the
-nosplash switch in the wabi command line. Preventing display of the
splash screen does not start Wabi significantly faster.
Conversely, the -splash switch makes Wabi display the splash screen in
situations where it normally would not be displayed. For example, when you
start an application directly from the wabi command line, the splash screen is
not displayed. Using the -splash switch causes the splash screen to display
before the application starts.
Start Wabi With or Without the Font Server
See “Starting Wabi With or
Without the Font Server” on
page 33 for the command used.
The Wabi program automatically starts its font server, wabifs, on platforms
whose X servers use the X11R5 or X11R6 Font Service Protocol. The font server
speeds up the display of fonts in the Wabi environment.
For the most part, you should let the Wabi program determine whether to use
the font server. However, you can disable the font server if you find that Wabi
performs slowly or erratically with respect to on-screen fonts.
To start the Wabi program without starting the font server, use the -fs
command-line switch to disable the font server.
Although it is not likely, it is possible that the Wabi program could falsely
identify your X server as one that does not support the X Font Service Protocol.
If you know your X server does support the Font Service Protocol, you can use
the +fs switch to make Wabi start its font server.
Wabi
Server
WabiServer Startup Options
You use the rwabi command to start a remote Wabi session on a server with
WabiServer installed. The rwabi command works with the same command
line options used with the wabi command described in “Wabi Startup
Options” on page 24.
In addition, the rwabi command provides options that let you:
26
•
Run rwabi_setup to change your WabiServer configuration (server and
Wabi directory location)
•
Specify a different server for the current session
Wabi User’s Guide—May 1996
2
•
•
Select a new prototype to create a new Wabi directory
Specify a different Wabi directory for the current session
These options are described in the following sections.
Run the rwabi_setup Program
See the section “Setting Up Your
WabiServer Configuration” on
page 33 for the command format.
You can run the rwabi_setup program to specify a new WabiServer system
and Wabi directory location. When you use the -setup switch with rwabi,
you see the dialog box described in “Specifying the WabiServer System and
Wabi Directory Location” on page 18. You should use this option when you
want to change your server or directory for all subsequent rwabi sessions. The
information you provide is stored in your .wabiserver file in your home
directory.
If the directory you specify for your Wabi directory does not yet exist, the
rwabi_setup program starts the rwabi_selproto program so you can select
a prototype to use to create the Wabi directory.
Specify a Different Server
If you want to temporarily run Wabi from a server system other than the one
you are configured to use, you can use the -server switch to specify the name
of the server. This option is useful if your server is down for service, or if you
want to use another server for one session.
See the section “Specifying a
Different WabiServer System” on
page 34 for the command format.
To specify a different WabiServer system to use for all sessions, you should run
rwabi_setup as explained in “Run the rwabi_setup Program” on page 27, or
set your WABISERVER environment variable as explained in “Setting the
WABISERVER Variable” on page 34. The WABISERVER environment variable
setting overrides your entry in the rwabi_setup dialog box.
Note – You cannot run two separate rwabi sessions on two different
WabiServer systems using the same Wabi directory. However, you can run two
rwabi sessions on the same server or on different servers if you use a different
Wabi directory for each session.
Starting Wabi
27
2
Select a New Prototype to Create a New Wabi Directory
See the section “Selecting a New
Prototype for WabiServer” on
page 34 for information about
using the rwabi_selproto
dialog box.
If you want access to different applications installed in prototypes, you can
select a new prototype using the -select switch with the rwabi command.
This opens the rwabi_selproto dialog box, which you use to select a
prototype from a list. If you want to replace your existing Wabi directory, use
the same location for the directory. When you select a new prototype, a new
directory overwrites the existing one. To create a new directory in a different
location and preserve your existing Wabi directory, you must specify a
different directory name before starting rwabi. You can specify a different
directory name using the rwabi -setup command or by setting the WABIDIR
variable.
Specify a Different Wabi Directory
See the section “Specifying a
Different Wabi Directory for
WabiServer” on page 35 for the
command format.
28
If you want to temporarily use a Wabi directory other than the one currently
configured in your .wabiserver file, you can use the -wabidir switch with
the rwabi command. If the Wabi directory you specify does not yet exist, the
rwabi_selproto dialog box opens. Select a prototype to use to create your
Wabi directory.
If you want to permanently specify a different Wabi directory, you should run
rwabi_setup as explained in the section, “Run the rwabi_setup Program,” or
set your WABIDIR environment variable as explained in “To Create Your Wabi
Directory in Another Location” on page 11.
Wabi User’s Guide—May 1996
2
Instructions for Getting Started
This section provides detailed, step-by-step instructions for performing a
variety of tasks related to starting the Wabi program. Margin notes refer to
sections of this guide related to the task being described.
▼ Starting the Wabi Program
♦ Choose the Wabi icon in your operating system’s file manager.
or
See the section “Starting Wabi
Software the First Time” on
page 10 if you are a new Wabi
user.
♦ Place the Wabi executable directory in your path and enter the following
at the command line:
wabi
The Windows Program Manager window opens.
▼ Starting the Wabi Program in WabiServer
♦ Choose the rwabi icon in your file manager.
See the section “Starting
WabiServer the First Time” on
page 17 if you are a new
WabiServer user.
or
♦ Place the rwabi executable directory (/opt/SUNWwclt/bin by default) in
your path and enter the following at the command line:
rwabi
The Windows Program Manager window opens.
▼ Installing Microsoft Windows From Diskette
See “Microsoft Windows
Installation From Diskette” on
page 13 for detailed information
about Windows installation from
diskette.
1. Open the Wabi Tools icon.
The Wabi Tools group displays several icons.
2. Open the Windows Install icon.
The Wabi Microsoft Windows Install Program dialog box opens.
Starting Wabi
29
2
3. Specify a diskette drive letter.
If you are using diskette drive A for installation, choose OK to accept the
default drive designation. If you are using diskette drive B, replace A with B
in the entry field and choose OK.
The initial installation dialog box opens.
4. Insert the Windows program disk 1 into the diskette drive and choose OK.
The Wabi program begins to install Windows files into your C:\WINDOWS
directory.
Note – If the diskette drive does not provide an eject button, you can eject
diskettes by clicking in the Wabi window and pressing the Meta and
+ EE
E keys:
5. Follow the prompts in subsequent dialog boxes to install the files on the
remaining Windows program diskettes.
When installation is complete, the Windows program groups open and a
message box prompts you to restart the Wabi program.
6. Remove the last disk from the diskette drive.
7. Choose OK in the message box to restart the Wabi program.
Installation of the Windows software is now complete.
▼ Installing Microsoft Windows From Wabi Drive R
1. Open the Wabi Tools icon.
The Wabi Tools group displays several icons.
“Microsoft Windows Installation
From Wabi Drive R” on page 15
discusses installation from Wabi
drive R in more detail.
2. Open the Windows Install icon.
The Wabi Microsoft Windows Install Program dialog box opens.
3. Specify in the entry field the path to the Windows files.
Enter R: and the complete path from the root directory to the Windows
files. You can use either DOS or UNIX slashes in the path. You can also use
the Browse button to look through the directories available to your system
to find the path to the Windows files.
30
Wabi User’s Guide—May 1996
2
4. Choose OK.
The Wabi program begins installing files from the directory you specified
into your personal wabi/windows directory. When installation is complete,
windows open, displaying the contents of each Microsoft Windows program
group, and a message box prompts you to restart the Wabi program.
5. Choose OK in the dialog to restart the Wabi program.
Installation of Microsoft Windows software is now complete.
▼ Exiting the Wabi Program
1. Save any open files and exit all applications running within the Wabi
program.
If you try to exit before saving, the applications prompt you to save each
unsaved file.
2. Open the Program Manager’s File menu, and choose Exit.
Alternatively, press Alt+F4, or double-click the control menu box in the top
left corner of the Program Manager.
The Exit Windows confirmation window is displayed.
3. Choose OK.
Program Manager closes and the Wabi program terminates.
Alternatively, choose Cancel to exit the confirmation box without ending the
Wabi session.
▼ Displaying the Wabi Program on a Remote System
1. Set the remote system to give access to its display.
Enter the following command at the UNIX command line on the remote
system:
xhost +your-host-name
See the section “Display Wabi on
a Remote System or X Terminal”
on page 24 for reasons you might
want to do this.
2. Start the Wabi program on your system using the -display argument
followed by the remote host name and the characters :0
For example, to display to a remote system named eastoshkosh, enter:
wabi -display eastoshkosh:0
Screen output is sent to the remote system with the specified host name.
Starting Wabi
31
2
Note – To send the Wabi display to a remote system every time the Wabi
program is started, you can set a DISPLAY environment variable. For example,
to consistently display to a remote system named eastoshkosh, enter one of
the following commands.
If you use the C shell:
setenv DISPLAY eastoshkosh:0
If you use the Bourne or Korn shell:
DISPLAY=eastoshkosh:0;export DISPLAY
If you do set this variable, be aware that all other X Window applications you
start subsequently from the same UNIX command window will be displayed
on the remote system.
▼ Displaying the Wabi Program With Small or Large System Fonts
See the section “Display Wabi
With Smaller or Larger System
Fonts” on page 25 for reasons
you might want to do this.
♦ If you have a large screen and want to display Wabi with smaller fonts in
dialog boxes and menus, start Wabi by entering the following at the
command line:
wabi -SF
For WabiServer, enter
rwabi -SF
♦ If you have a small screen and want to display Wabi with larger fonts in
dialog boxes and menus, start Wabi by entering the following at the
command line:
wabi -LF
For WabiServer, enter
rwabi -LF
Note – The -LF switch has no effect on large screens because large fonts are
already being used, and the -SF switch has no effect on small screens because
small fonts are already being used.
32
Wabi User’s Guide—May 1996
2
▼ Starting Wabi Without the Splash Screen
See the section “Start Wabi
Without the Splash Screen” on
page 25 for more information.
♦ If you do not want the splash screen to display when you start the Wabi
program, enter the following command:
wabi -nosplash
For WabiServer, enter
rwabi -nosplash
♦ If you want to display the splash screen in situations when it normally
does not display, enter the following command:
wabi -splash
For WabiServer, enter
rwabi -splash
▼ Starting Wabi With or Without the Font Server
See the section “Start Wabi With
or Without the Font Server” on
page 26 for more information.
♦ If you know your X server supports the Font Service Protocol, but the
Wabi program does not start the Wabi font server, enter the following
command to start Wabi with the font server:
wabi +fs
For WabiServer, enter
rwabi +fs
♦ Enter the following command to start Wabi without the font server:
wabi -fs
For WabiServer, enter
rwabi -fs
Wabi
Server
▼ Setting Up Your WabiServer Configuration
♦ Enter the following command to run the setup program to specify your
WabiServer system, Wabi directory location, and prototype to use to create
your Wabi directory:
rwabi -setup
See the section “Specifying the WabiServer System and Wabi Directory
Location” on page 18 and “Selecting a Prototype” on page 20 for
descriptions of the dialog boxes.
Starting Wabi
33
2
Wabi
Server
▼ Specifying a Different WabiServer System
♦ Enter the following command to specify the WabiServer system to use for
the current remote Wabi session:
rwabi -server server-name
See the section “Specify a Different Server” on page 27 for more
information.
Wabi
Server
▼ Setting the WABISERVER Variable
♦ Enter one of the following commands to specify a WabiServer system
using the WABISERVER environment variable before starting rwabi:
In the C shell:
setenv WABISERVER server-name
In the Bourne or Korn shell:
WABISERVER=server-name; export WABISERVER
Include this statement in your .cshrc or .profile file in order to use this
server each time you start WabiServer.
Wabi
Server
▼ Selecting a New Prototype for WabiServer
1. Enter the following command to select a new prototype to overwrite your
current Wabi directory:
rwabi -select
2. In the rwabi_selproto dialog box, select the prototype you want to use.
See the section “Select a New
Prototype to Create a New Wabi
Directory” on page 28 for
background information on
selecting prototypes.
3. Choose the Apply button.
The prototype files are copied to your current Wabi directory.
34
Wabi User’s Guide—May 1996
If you decide not to apply your selection, choose Quit Select to exit the
dialog box and start remote Wabi using your current Wabi directory. If you
do not want to start remote Wabi, choose Quit rwabi.
2
Wabi
See the section “Specify a
Different Wabi Directory” on
page 28 for more information.
Server
▼ Specifying a Different Wabi Directory for WabiServer
♦ Enter the following command to specify a Wabi directory other than that
configured, for use in the current session:
rwabi -wabidir directory-path
Remember that the directory path must be the network-aware path, as seen
from the WabiServer system.
▼ Viewing the Wabi Man Page
♦ Display the Wabi man page by entering the following at the command
line:
man wabi
The initial screen of Wabi man page information is displayed. Press the
spacebar to view additional screens.
If the man command indicates there is no Wabi man page, you may have to
add it to your man pages path as explained in the next procedure.
▼ Adding the Wabi Man Page to Man Pages Path
1. Open a command window.
2. Locate the MANPATH variable.
Examine your .login and .cshrc (if you use the C shell) or .profile (if
you use the Bourne or Korn shell) to locate this variable.
3. Set your MANPATH variable to include the Wabi man page directory.
If MANPATH does not exist in .login or .cshrc or .profile, use a text
editor to set the variable in the appropriate file.
If you use the C shell, add the following line to either .login or .cshrc:
setenv MANPATH parentdirectory/man
If you use the Bourne or Korn shell, add the following line to .profile:
MANPATH=parentdirectory/man; export MANPATH
parentdirectory is the directory where the Wabi system software is located,
for example /usr/wabi.
Starting Wabi
35
2
If MANPATH is set in one of these files already, use a text editor to update
your MANPATH variable by adding the following at the end of the setenv
MANPATH or MANPATH= statement:
parentdirectory/man
If the Wabi system software is located in /usr/wabi, your MANPATH
directory is /usr/wabi/man.
Be sure to separate this entry from existing MANPATH entries with a colon.
Save and quit the .login, .cshrc, or .profile file once you’ve added
this statement.
4. Update your operating system to recognize this MANPATH entry.
Enter one of the following commands, depending on the file in which your
MANPATH statement is located:
source .login
or
source .cshrc
or
. .profile
36
Wabi User’s Guide—May 1996
2
Reference Material for Getting Started
This section provides reference material associated with starting and using the
Wabi program.
Troubleshooting Startup Problems
Table 2-1 suggests solutions to problems you might experience when starting
the Wabi program and installing Microsoft Windows.
Wabi
Server
Table 2-1
Startup Problems and Solutions
Symptom
Possible Cause
Solution
Can’t start Wabi
Startup command
not in path.
Use the full path name for the wabi
command. This path is specific to your
operating system.
Or, edit your user profile for the UNIX
shell you use (e.g., .cshrc for the C shell)
to include the Wabi bin directory in your
search path.
Not enough swap
space or memory.
Make sure you have at least the minimum
requirements listed in Table 1-1 on page 6.
If you need to run several programs
concurrently, you may need more memory
and swap space.
Too many other
UNIX programs
running.
Quit some of the running programs and
start Wabi again.
Can’t start
WabiServer
Client software not
installed or is not
accessible.
Server software not
installed and
configured.
Note that WabiServer is a client/server
product that can be purchased separately.
The server and client software must be
correctly installed and configured before
you can use WabiServer. See your system
administrator for more information.
Can’t access Wabi
man page
Wabi man page
directory not in
MANPATH.
See “Adding the Wabi Man Page to Man
Pages Path” on page 35 for more
information.
Starting Wabi
37
2
Table 2-1
Startup Problems and Solutions (Continued)
Symptom
Possible Cause
Can’t display to a
remote system
System not open to See “Displaying the Wabi Program on a
external displays or Remote System” on page 31 to make sure
no display
you’ve followed the correct procedure.
identified.
Can’t install
Microsoft Windows
program from
diskette.
Incorrect diskette
drive specified or
diskette drive not
configured.
See “Troubleshooting Problems With
Diskette Drives” on page 74.
Can’t install
Microsoft Windows
program from Wabi
drive R.
Drive or path
incorrect or
inadequate
permissions to
directory.
Use the Browse button to find the correct
path to the Microsoft Windows files.
Make sure you have read permission to
the directory and files.
Can’t access
Program Manager.
Windows software You must use the Wabi Microsoft Windows
incorrectly installed. Install Tool to install Microsoft Windows.
See page 12 for more information.
Wabi
38
Server
Can’t change
Some Control Panel
settings from Control functions are not
Panel.
valid under the Wabi
program.
Solution
Use operating system utilities to perform
some functions of Control Panel. See “The
Microsoft Windows Control Panel” on
page 44 for more information about the
Control Panel.
Icons missing from
Main group.
Some parts of
See “Microsoft Windows Groups” on
Windows cannot be page 23.
used in Wabi so they
are not installed.
Can’t create Wabi
user directory after
selecting prototype.
Inadequate
permissions for
designated
directory, or
incorrect path
specified.
Make sure you are using the
network-aware path to the directory. If you
do not, WabiServer attempts to create the
directory on the server disk, to which you
probably do not have write access.
Insufficient disk
space.
See the size requirement for the prototype
in the rwabi_selproto dialog box and
choose a Wabi directory location large
enough for the prototype.
Wabi User’s Guide—May 1996
2
Wabi
Server
Table 2-1
Startup Problems and Solutions (Continued)
Symptom
Possible Cause
Solution
Wabi Windows
Install program
starts when
Windows is already
installed.
Wabi may be
accessing the wrong
user directory or
creating a new one.
Determine which directory location is in
use. First check your WABIDIR setting by
entering the command:
echo $WABIDIR
If the variable is set, make sure it is set to a
network-aware path. If the variable is not
set, check your $HOME/.wabiserver file
to see which Wabi directory path is in use.
If it is not correct, run rwabi_setup to
enter the correct path name.
Starting Wabi
39
2
Microsoft Windows for Workgroups 3.11 in the Wabi Environment
Microsoft Windows for Workgroups is supported in the Wabi program, but its
functionality is somewhat limited. Table 2-2 lists the added features of
Windows for Workgroups (WFW), and describes the degree to which the Wabi
program supports them.
Table 2-2
40
Support for Windows for Workgroups in the Wabi Environment
WFW Program
Support in the Wabi Environment
Mail
Workgroup Mail is functionally similar to Microsoft Mail and
can communicate with existing Microsoft Mail post offices. It
works under the Wabi program if you connect a Wabi drive to
the post office and then add these lines to your
C:\WINDOWS\MSMAIL.INI file:
[Microsoft Mail]
ServerPath=postoffice-server-path
login=MSMail-username
For example, if you connect drive Z: to the post office, the
postoffice-server-path is Z:\maildata. The MSMail-username is
the name given to your mail account.
Please refer to your Microsoft documentation for information
about the differences between Workgroup Mail and Microsoft
Mail. (See Windows for Workgroups Resource Kit, Vol 1, page
12-28.)
Schedule +
This program, which replaces the Microsoft Windows Calendar,
lets you schedule appointments with other users on a Windows
for Workgroups network. It works under the Wabi program.
You must set up your Mail before you can use Schedule +.
ClipBook
Viewer
This program, which replaces the Microsoft Windows
Clipboard Viewer, lets you create multiple pages of clipboard
information, so you can work with more than one piece of
information at a time. This functionality is supported under the
Wabi program.
The ClipBook Viewer also lets you share clipboard pages with
other users on a Windows for Workgroups network. This
sharing is not supported under the Wabi program because it
requires Windows networking.
Hearts
This is a networked game that allows you to play with up to
three other players over the network. In the Wabi environment,
you can use it only as a single player against three
computer-generated players.
Wabi User’s Guide—May 1996
2
Table 2-2
Support for Windows for Workgroups in the Wabi Environment (Continued)
WFW Program
Support in the Wabi Environment
File Manager
The WFW File Manager can act as a file and print server, and
mount file systems from other machines on a Windows for
Workgroups network. These features require Windows
networking, so they are not supported under the Wabi
program. The network features are disabled, so the File
Manager is functionally the same as the version in Microsoft
Windows. However, you can purchase additional software to
enable your UNIX system to mount file systems from a
Windows for Workgroups network, as well as Novell NetWare
and LAN Manager networks.
Chat
WinPopup
NetWatcher
WinMeter
These programs depend on the network, so you should not try
to use them.
Adding File and Print Support for WFW
You can purchase additional software to provide file and print support in the
Solaris environment for LAN Manager-compatible systems such as Windows
for Workgroups. SolarNet™ LAN Client 1.1 for the Solaris 2.x Operating
Environment enables a SPARC or x86 system to act as a network client so you
can mount Windows for Workgroups volumes as Solaris directories. You can
then map Wabi drives to those Solaris directories and use Wabi to access
programs and files in Windows for Workgroups just as on any other drive.
Starting Wabi
41
2
42
Wabi User’s Guide—May 1996
Configuring Your Wabi
Environment
3
This chapter explains how to set up your Wabi environment to suit your
preferences and your operating system’s configuration. You use the Microsoft
Windows Control Panel and Wabi Configuration Manager to configure your
Wabi environment.
About Configuring Your Wabi Environment
You can control your Wabi environment in much the same way you control
your Microsoft Windows environment. You use the same tool, the Microsoft
Windows Control Panel, to change colors, install printer drivers, configure
COM ports, and so on. However, some of Control Panel’s settings do not apply
to the Wabi environment. The Wabi display is governed by your native
operating system’s X Window System as well as the Wabi window manager, so
some settings can only be controlled through your X Window desktop. Some X
settings, such as mouse tracking speed, apply to all windows on your desktop,
not just Wabi windows. If you change such a setting in the Control Panel, the
Wabi program simply ignores the change.
The Wabi program installs an icon for the Wabi Configuration Manager within
the Control Panel. The Configuration Manager lets you connect Wabi device
names to their UNIX counterparts.
43
Wabi
Server
3
If you are running WabiServer, your environment is preconfigured for you by
the system administrator who created the prototypes. You can change many of
the settings that affect your user environment, such as Color and International
settings, but you cannot change settings controlled by the system
administrator, such as the device name for the diskette drive.
The Microsoft Windows Control Panel
You use the Control Panel the same way you use it in Microsoft Windows. It is
located in the Main group, as shown in Figure 3-1. If you are not familiar with
the Control Panel or need help using it, please refer to the Control Panel help
or your Microsoft Windows User’s Guide for more information.
Figure 3-1
44
Microsoft Windows Control Panel
Wabi User’s Guide—May 1996
3
Table 3-1 lists the Control Panel settings and describes the degree to which you
can use them in your Wabi environment.
Table 3-1
Microsoft Windows Control Panel Settings
You can use the Color icon to change the colors in your Wabi
desktop. Colors affect only your Wabi windows. By the same token,
colors that you set using your X Window desktop’s tools do not
affect Wabi windows.
Using the Fonts icon, you can add fonts to your Wabi environment,
or remove them. You can also set TrueType options as in the
Microsoft Windows environment. Not all applications use the
settings, however.
You use the Ports icon to change settings such as baud rate, data
bits, parity, stop bits, and flow control. However, many applications
use their own settings for these port attributes, so your settings may
not be used. The Control Panel also includes advanced settings for
Base I/O Port Address and Interrupt Request Line, which Wabi
ignores. In the Wabi environment, these port attributes are
controlled by the UNIX device driver for the port.
If you want to use a serial port with an application in the Wabi
environment, it must be connected to the appropriate device driver
for your operating system. The Wabi program is set up to work
with the default drivers on all supported operating systems, so you
probably will not have to change the connection unless you use a
non-standard driver in your operating system.
The Double Click Speed and Swap Left/Right Buttons settings
work in the Mouse dialog box. Mouse Trails is ignored, and Mouse
Tracking Speed is controlled through your X Window desktop. The
X Window setting for mouse button order/swapping may also
affect your Wabi environment, but the Wabi setting will not affect
your X Window desktop. Double-click speed for each environment
is independent of the other.
Configuring Your Wabi Environment
45
3
Table 3-1
Microsoft Windows Control Panel Settings (Continued)
Many of the settings in the Desktop dialog box should not be used
in the Wabi environment, or cannot be used. The options for
decorating the desktop background (Pattern, Wallpaper) do not
work because the X Window desktop controls the background, or
root, window. You should use your X Window desktop’s settings
for colors, patterns, and bitmaps in the root window.
Although the Screen Saver is not supported, it may work on some
platforms. However, the Screen Saver should not be used even if it
does work. Your X Window desktop has its own screen saver
mechanism, which works more efficiently and covers the whole
display. Microsoft Windows screen savers use significant CPU time
creating activity on only the Wabi portion of your screen display. If
you are using the Wabi program on a system you share with other
users, the screen saver’s CPU usage will slow everyone down.
The Keyboard repeat settings have no effect in the Wabi
environment. You can enable and disable keyboard repeat in your X
Window desktop, and some desktops may also be able to set the
repeat delay rate.
You use the Printers icon to install printer drivers, set your default
printer, set up printers, and connect them to ports. The Print
Manager and options related to it (Device Not Selected,
Transmission Retry) are not used by the Wabi program. You control
your UNIX printers using UNIX printer management utilities only.
You use the International dialog just as in Microsoft Windows. The
only difference for the Wabi environment is that the Keyboard
Layout option has no effect. You must use the WABI_KEYB
environment variable to specify a keyboard language, as explained
in “Setting the WABI_KEYB Environment Variable” on page 112.
The Wabi program uses your system clock to determine the time.
You cannot change the date and time with the Date/Time dialog.
The Network icon has no function in the Wabi environment.
46
Wabi User’s Guide—May 1996
3
Table 3-1
Microsoft Windows Control Panel Settings (Continued)
386 Enhanced
The 386 Enhanced icon does not appear in the Control Panel in
your Wabi environment because there is no need for the 386
Enhanced settings in a UNIX operating system.
The ODBC icon is added to the Control Panel if you install an
ODBC driver package. You can use the ODBC icon to start the
ODBC Administrator, which lets you install, configure, and remove
ODBS data sources. See Chapter 11, “Setting Up Remote Database
Access” for more information about using ODBC in Wabi.
You can use the Drivers icon to install and remove multimedia
drivers just as in the Microsoft Windows environment. However,
your platform may or may not support the use of multimedia. The
Solaris platforms do support multimedia. See “Using Multimedia
Features on Ultra, SPARCstation, and x86 Computers” on page 152
for more information.
If your Wabi platform supports playing and recording waveform
files, you can use the Sound icon to assign sounds to system events.
If your Wabi platform does not support waveform, you can use the
icon only to enable and disable system sounds. See “Using
Multimedia Features on Ultra, SPARCstation, and x86 Computers”
on page 152 to determine if you have the correct hardware for
sound in the Wabi environment.
Configuring Your Wabi Environment
47
3
Wabi Configuration Manager
Think of Configuration Manager as the switchboard of the Wabi program. It
lets you connect Wabi devices to their UNIX counterparts so you can use the
familiar DOS-type device names for printers, COM ports, drives, and diskettes.
It also lets you configure a DOS emulator, if you have installed one on your
system. This lets you start up a DOS session from the MS-DOS Prompt icon in
the Main group.
Connections you make in Configuration Manager apply to all Wabi windows
and sessions. Common connections you might make or change include those
between a Wabi drive (E:, F:, and so on) and a file system, a Wabi diskette
drive (A: or B:) and a diskette device in your operating system, and a Wabi
LPT port and a printer. Some Configuration Manager connections require you
to supply UNIX device names. In most cases, the Wabi program recognizes
your operating system and supplies the appropriate default settings, which are
defined in the wabi/windows/wabi.ini file in your home directory.
Infrequently, you may need to enter a setting other than the default value.
You open the Configuration Manager window by double-clicking the Wabi
Config icon in the Microsoft Windows Control Panel, shown in Figure 3-2.
Figure 3-2
48
The Wabi Config Icon in Windows Control Panel
Wabi User’s Guide—May 1996
3
Configuration Manager consists of several tab sheets for each Wabi device that
is connected to a UNIX counterpart. Figure 3-3 shows the Configuration
Manager window as it appears when you open the Wabi Config icon.
Figure 3-3
Configuration Manager Tabs
Configuration Manager Tab Sheets
Configuration Manager organizes Wabi connections into several tab sheets:
•
Diskette — Assigns Wabi diskette drives A and B to UNIX diskette device
drivers.
•
Drives — Sets up Wabi drives and assigns a drive to a file system.
Configuring Your Wabi Environment
49
3
•
•
•
COM Ports — Connects COM ports to UNIX serial devices.
Printers — Connects LPT Ports to UNIX printers and commands.
DOS Emulator — Supplies the command required to start a DOS emulator.
Tab Sheet Layout
The tab sheets for all devices have similar layouts. Most tab sheets consist of:
•
A top panel, where you select a specific Wabi device, and in some cases
select some options for the device. The top panel shows the current
connections.
•
A bottom panel, where you specify the UNIX device to connect to the Wabi
device. The bottom panel often displays a Path box, where you can enter the
path to a device or file system. In the Printers tab sheet, however, the bottom
panel displays fields for entering a UNIX printer name and command. Tab
sheets with the Path box provide a browser for searching file systems. The
next section describes the file browser in detail.
•
A row of buttons which you use to save or cancel your selections, or open
on-line help for the tab sheet.
Path Box and File Browser
If you know the complete path to the UNIX device driver you want to use, you
can type it in the Path box and press Enter. If you are not sure what the path is,
you can type the beginning of the path and press Enter to see a list of
subdirectories in the file browsing area, which is the box beneath the Path box.
You can then construct a path from the list by double-clicking on directories
within the browser.
For example, to start searching at the root directory, you can type / and press
Enter. When you click on a subdirectory within the root directory, the
directories within the subdirectory are displayed. Double-click on a directory
to see the directories within it, and to add it to the drive path. By doubleclicking on subsequent directories, you construct a path that you can assign to
a drive. Double-clicking ../ takes you up a level in the directory hierarchy.
50
Wabi User’s Guide—May 1996
3
Note – A file system must be mounted in UNIX before you can see it in Wabi.
If your system uses an automatic mounting system (automounter) for file
systems on your network, you must access the file system to mount it in UNIX
before you can see it in Wabi. If you enter /net in the Path box, you will see
only the file systems that have been mounted in /net already. If you want to
access a file system in /net that is not listed, you must type more of the path
so that the file system can be mounted in UNIX. For example, if you want to
access a file system in /net/menemsha, you must type /net/menemsha in the
Path box to automount the file systems on the server called menemsha.
UNIX File Name Substitution Characters
You can use UNIX file name substitution characters to narrow your search to
directories or files matching a specific pattern. File name substitution
characters let you create a list of files or directories to choose from. Table 3-2
lists the UNIX file name substitution characters you can use in the Path box.
Table 3-2
Use this
symbol
UNIX File Name Substitution Characters
If you want to
?
match any single character. For example, /home/?quan would
match /home/lquan, /home/cquan, but not /home/jcquan.
*
match any (zero or more) characters. For example, /home/*
would match all directories and files under /home.
[...]
match any single character in the enclosed list or range. A list is
a string of characters. A range is two characters separated by a
dash (-), and includes all the characters in between. For
example, /dev/rdiskette[01] matches /dev/rdiskette0
and /dev/rdiskette1. A range such as /files/[a-c].reports
matches /files/a.reports, /files/b.reports, and
/files/c.reports.
~user
match the home directory of the specified user. For example,
~bbaker matches /home/bbaker, the home directory of the
user bbaker.
Configuring Your Wabi Environment
51
3
Tab Sheet Buttons
The Configuration Manager displays several buttons under the tab sheets:
•
OK — Choose the OK button when you are ready to save your changes and
quit Configuration Manager. If you are making changes to only one tab
sheet, you can use the OK button to validate your changes, save them in
wabi.ini, and close Configuration Manager.
•
Cancel – Choose this button to close Configuration Manager without
changing settings. Use Cancel when you examine settings, but don’t want to
change them, or when you make changes but decide not to save them. Note
that Cancel only discards changes that you have not applied.
•
Apply Now — Choose the Apply Now button to have Configuration
Manager validate the entries you made. This button validates all entries on
all tab sheets in the current session that have not already been validated. For
example, if you make changes to the Diskette tab and proceed to the Drives
tab without choosing Apply Now, the Diskette tab changes will be validated
when you apply the changes in the Drives tab. (This button has the same
function as the OK button, except that it keeps Configuration Manager
open.)
•
Help – Choose this button to start the on-line help system and to display a
context-sensitive help topic screen. Links to related help topics are included
where applicable.
Accelerator Keys
Configuration Manager incorporates accelerator keys to speed operations.
Once you are familiar with a tab sheet and its contents, you can access a
function directly from the keyboard by sequentially pressing a combination of
keys whenever the Configuration Manager window is open. Experienced users
may find this technique faster than selecting items by pointing and clicking
with the mouse.
Each Configuration Manager item includes an underlined letter. This letter
represents the accelerator key for that item.
Using an accelerator key is easy. You type the key sequence required to choose
an item. For example, when the Configuration Manager window is open, you
can choose the COM Ports tab by pressing Alt+c.
Within a tab sheet, you can choose items sequentially by using the Tab key.
52
Wabi User’s Guide—May 1996
3
Entry Validation
Configuration Manager checks, or “validates,” many of the entries you make.
This is necessary to ensure that your instructions can be carried out. A typical
example of entry validation relates to a device name.
For example, to use Wabi diskette drive B, you must connect it to a diskette
device in your native operating system. You do so by selecting a path to a
diskette device driver in the Diskette tab sheet.
Once you’ve entered a path and chosen the Apply Now (or OK) button,
Configuration Manager examines your entry to determine whether it is valid.
If the entry is valid, Wabi software assigns the device driver you’ve specified to
Wabi diskette drive B. If the entry is not valid — for example, if the device path
or file does not exist — an error message informs you of the problem.
Validation of entries occurs quickly. If a validation error occurs, you can
usually recover from it by following the instructions in the resulting error
message box. You may occasionally need to progress through a series of error
message boxes to fully resolve an error.
Each error message box provides a Help button. Choose the Help button
within an error message box to learn about the possible cause of the error and
how to clear the error condition.
Configuration Manager Tasks
Configuration Manager tasks are described in individual chapters in this
guide. Use the following table to locate detailed information about tasks.
Table 3-3
Additional Configuration Manager Information
To find information about...
See...
Wabi Drives
Chapter 4, “Setting Up Drives”
Wabi Diskette Drives
Chapter 4, “Setting Up Drives”
Printing
Chapter 5, “Printing”
COM Ports
Chapter 6, “Using Wabi COM Ports”
DOS Emulator Settings
Chapter 12, “Using a DOS Emulator
in the Wabi Environment”
Configuring Your Wabi Environment
53
3
Instructions for Tasks Related to Configuration Manager
▼ Opening Configuration Manager
1. Open the Main group.
2. Open the Control Panel icon.
The Wabi Config icon is displayed among the other Control Panel icons.
3. Open the Wabi Config icon.
The Configuration Manager window opens, displaying the Diskettes tab
sheet.
Note – You can also access Configuration Manager through dialog boxes
within Microsoft Windows. For example, when defining printers in Control
Panel, you can choose the Network button in the Connect dialog box to open
Configuration Manager’s Printers tab.
▼ Exiting Configuration Manager
There are several ways to exit Configuration Manager, including the following:
♦ Choose the OK button when you finish making changes.
♦ Choose the Cancel button if you do not want to make changes.
♦ Double-click the top left corner of the Configuration Manager window if
you do not want to save any changes.
54
Wabi User’s Guide—May 1996
4
Setting Up Drives
Drives provide access to your operating system devices, files, and directories.
Before you can use a drive, you must configure it. Configuring a drive means
telling the Wabi program the type of drive you want, as well as some specifics
about the drive. Once you configure a drive, you can access it.
If you are not familiar with drive concepts in the Wabi program and would like
to learn more about them, read the next section, “About Drives.”
If you want instructions for specific tasks related to drives, use the following
table to locate the instructions you need.
Task
Page
Connecting a Diskette Drive
67
Changing the Diskette Drive Timeout Period
67
Formatting a DOS Diskette
68
Assigning a Drive
68
Changing a Drive Assignment
69
Disconnecting a Drive
70
Enabling File Sharing for a Drive
70
55
4
Task
Page
Setting a Network Drive
71
Setting a Local Drive
72
Accessing a CD-ROM Drive
72
About Drives
The Wabi program uses two kinds of drives:
To learn about designating a drive
as a network drive, read “Wabi
Network Drives” on page 65.
•
Diskette drives – Drives A and B are diskette drives. These drives connect
(map) to diskette devices defined in your operating system. Diskette drive A
is set up for you and assigned automatically as the default diskette drive.
(You can change this assignment.) If your computer has a second diskette
drive, use diskette drive B to represent this drive.
•
Wabi drives – Drives C through Z represent Wabi drives, which are
functionally similar to the local disk drives and network drives used on
DOS-based systems. A Wabi drive can be assigned to a directory on a drive
physically located within your computer, or to a directory that is physically
located on a remote system and accessed, or mounted, over the network by
your operating system.
The Wabi program does not know if a drive’s assigned directory is local or
on the network, because it accesses the drive through a directory path. The
physical location of the directory is transparent to you and to the Wabi
program.
Diskette Drives
To use a diskette drive, you must connect it to an operating system diskette
device. A device is an operating system file that allows you to access a physical
device, such as a diskette drive. Once you make this connection, the Wabi
program retains it for all subsequent sessions, or until you change the
connection. Most likely, the Wabi program’s default connection will work for
your operating system, and you can use the diskette drive without changing
the diskette connection to the device.
56
Wabi User’s Guide—May 1996
Wabi
Learn how to make a diskette
drive connection by reading
“Connecting a Diskette Drive”
on page 67.
Server
4
The diskette drive may be on the WabiServer system or on your client system,
or diskette access may be disabled altogether. The WabiServer system
administrator sets diskette access on the server.
Diskette Tab Sheet
You use the Diskette tab sheet shown in Figure 4-1 to make and change
diskette drive connections, and to specify a timeout period for the Wabi
program’s control of your diskette drive.
Figure 4-1
Diskette Tab Sheet
Diskette Drive
The Diskette Drive list box shows the current connection recorded in
wabi.ini for the default diskette drive, A:. If you have two diskette drives,
you can select drive B: in this list so you can assign a diskette device to B:.
Setting Up Drives
57
Wabi
Server
4
If the diskette drive is connected to your client system’s diskette device, the
device entry is similar to /dev/rdiskette0:WSRDA@client-name. If the drive
is connected to the WabiServer system’s diskette drive, a simple device name
such as /dev/rdiskette0 is displayed.
Timeout
To learn how to change the
diskette timeout, go to “Changing
the Diskette Drive Timeout
Period” on page 67.
The Timeout box displays a timeout period (in seconds) for the diskette device.
The Wabi program gives up control of the diskette drive if the device has not
been used after this period of time, allowing other programs to use the diskette
drive while the Wabi program is running. Wabi regains control the next time
you access the diskette through the Wabi program.
Path
The Path box is where you specify the complete path to the UNIX diskette
device driver you want to use. If you know the complete path to the UNIX
device driver you want to use, type it in the Path box and press Enter.
If you aren't sure what the path is, you can type the beginning of the path and
press Enter to see a list of subdirectories in the file browsing area. You can then
construct a path from the list by double-clicking on directories within the
browser.
You can also use UNIX file name substitution characters such as the asterisk (*)
to narrow your search to directories or files matching a specific pattern. For
example, if you enter /dev/rd* in the Path box, the file browsing area will
display all directories and files in /dev that begin with rd. For more
information about using file name substitution characters, see “UNIX File
Name Substitution Characters” on page 51.
You can return to the default device by opening the Path list and selecting the
last device in the list.
Note – The Wabi program uses raw device files. In most operating systems,
raw device files begin with the letter r, as in /dev/rdiskette. (See your
UNIX operating system documentation for information about raw devices.)
58
Wabi User’s Guide—May 1996
4
Diskettes and DOS
See “Formatting a DOS Diskette” You cannot format a DOS diskette within the Wabi program. Before you can
use a diskette with the Wabi program, it must already have a DOS file format.
on page 68 for more about
diskette formatting procedures.
Some operating systems provide a command for formatting DOS diskettes. (In
the Solaris environment, you can use fdformat -t dos.) Please refer to your
operating system manuals for information about formatting DOS diskettes. If
your operating system is not able to format DOS diskettes, you can use
preformatted diskettes, or format diskettes yourself on a PC running DOS.
If you have a DOS emulator installed on your system, you could also start a
DOS session and use the DOS format command.
Note – You cannot use the Microsoft Windows File Manager’s Disk Format
command to format diskettes.
Wabi Drives
Wabi
Server
To learn more about designating
a drive as a network drive, read
“Wabi Network Drives” on
page 65.
Wabi drives are represented by the letters C through Z. These drives serve as a
gateway to the mounted file systems and directories of your operating system.
By assigning drives to directories, you can access information on your
computer’s local hard disk, or across a network on a remote file server. The
Wabi program cannot tell if a drive is local or on the network, because it
accesses the drive through a directory path. The physical location of the
directory is transparent to you and to the Wabi program. However, when you
connect a drive to a directory, you can tell the Wabi program to represent the
drive to applications as a network drive, whether the drive is local to your
system or on the network. This feature is important to some applications that
run in the Wabi program.
In a WabiServer environment, all drives except C, E, and H must be connected
using network-aware paths, or the paths as seen from the server system. This
means that if you want to map a drive to a file system on your local disk, the
file system must be shared on the network before you can access it. See your
Solaris documentation or your system administrator for information about
sharing or exporting file systems. After the file system is shared, you can access
it through WabiServer with a network-aware path.
Setting Up Drives
59
4
Drives Tab Sheet
You create and change drive assignments in the Drives tab sheet, shown in
Figure 4-2. When you assign a drive to a directory, the Wabi program retains
your drive assignment for all subsequent Wabi sessions, or until you change
the assignment.
Figure 4-2
Drives Tab Sheet
Drive
Connect a drive to a file system
by following the steps in
“Assigning a Drive” on page 68.
60
The Drive list box presents a list of Wabi drives and their assignments. Open
the list to see the current assignments. Drive letters that are not connected to a
file system appear with no assignment. If you want to make or change a drive
connection, select the drive in the list box.
Wabi User’s Guide—May 1996
4
The Drive panel includes the following checkboxes for specifying options for
the selected drive:
The section “Wabi Network
Drives” on page 65 explains what
this option means to applications.
The section “File Sharing” on
page 64 explains when and why
you enable file sharing.
•
Network – Checking this box makes the drive appear to an application as a
network drive, whether the assigned directory is local or on the network.
An “X” indicates the selected drive is viewed as a network drive. By default,
all drives except C are viewed as network drives.
•
CDROM – Checking this box allows Wabi to correctly map file names on
CD-ROM drives.
•
Shared – This check box is used to enable file sharing on the selected drive.
An “X” indicates file sharing is enabled on the selected drive.
Path
The Path box displays the current connection for the selected drive. If the Path
box is blank, the selected drive is not connected. You can edit the path
displayed on this field, or type a new path assignment into the field.
If you prefer to browse your file systems for a path, you can type the beginning
of a path and press Enter to see a list of subdirectories in the file browsing area.
You can then construct a path from the list by double-clicking on directories
within the browser. Enter a slash character ( / ) to begin browsing at the root
directory.
You can use UNIX file name substitution characters such as the asterisk (*) to
narrow your search to directories or files matching a specific pattern. See
“UNIX File Name Substitution Characters” on page 51 for more information
about file name substitution characters.
Note – Automounted file systems may not appear in the browser until you
access them directly. You can do this by entering the path in the Path box and
pressing Enter. You can then browse the automounted file system’s
subdirectories in the file browser.
Setting Up Drives
61
4
Default Drive Assignments
When you first open the Drives tab sheet, notice that several drives are already
assigned. Some of these assignments are permanent and you cannot change
them.
The drives you cannot change are:
The directory in which your Wabi user files are
installed.
R: -> /
The root directory. Drive R serves as a gateway to
network file systems and to all directories on your
system. Note that when you use WabiServer, drive R
is connected to the root directory of the server
system, not the client system where Wabi is
displayed.
W: -> $WABIHOME
The directory used to store Wabi program files.
Server
Wabi
C: -> $HOME/wabi
If you select the C, R, or W drive, the Path box is blank.
The preassigned drives you can change are:
E: -> $PWD
The directory that was current when the Wabi
program was started.
H: -> $HOME
Your home directory.
New Drive Assignments
Making a new drive connection is a simple process. You must:
•
•
•
To connect a network drive, follow
the steps in “Assigning a Drive”
on page 68.
62
Select a drive letter.
Specify a drive path.
Choose the Apply Now button.
Selecting a drive letter is easy: open the Drive list and click on any unassigned
letter. Type a path or the beginning of a path in the Path box. If you type only
a partial path, the file browser at the bottom of the tab sheet shows you the
directories matching the partial path. Single-clicking a directory in this list
places the directory in the Path box. Double-clicking a directory in this list
Wabi User’s Guide—May 1996
4
places the directory in the path and also opens the directory and displays its
subdirectories. By sequentially navigating remaining directories you can
construct a path to the desired file system.
When you reach the destination directory, choose the Apply Now button. The
Wabi program assigns the drive letter you selected to the path you constructed.
To save assignments you make, choose the OK button.
You need adequate file permissions to access the files and directories you
assign to Wabi drives. You will see an error message indicating that a
permission problem exists if you attempt to access a file or directory for which
you do not have adequate permissions. See your operating system
documentation for information about checking and changing file permissions.
Change a Drive Connection
Follow the steps in “Changing a
Drive Assignment” on page 69 to
accomplish this task.
You can change the connection for an individual Wabi drive, except for drives
C, R, and W, by selecting the drive letter and editing the path displayed in the
Path box, or browsing for a new path. Before you change a drive connection,
make sure it is not being used by any running applications.
Disconnect a Drive
See “Disconnecting a Drive” on
page 70 for the steps required to
break a drive connection.
You can remove the connection for an individual Wabi drive, except for drives
C, R, and W, by selecting the drive letter and deleting the path displayed in the
Path box. Before you disconnect a drive, make sure it is not being used by any
running applications.
File Locking and File Sharing
The Wabi program supports both file locking and file sharing. Each is
important and is described as follows:
•
File Locking – Prevents multiple users from accessing a file or a record at the
same time.
•
File Sharing – Enables you to share files and data with others by controlling
who can do what with a file at a given time.
Setting Up Drives
63
4
File Locking
Wabi file locking depends on the capabilities of the applications you run. If an
application requests a file or record to be locked, Wabi locks it. If an
application never uses locking because it assumes a single-user environment,
Wabi does not lock files or records for the application. You do not have to
enable file and record locking because Wabi always does it at the application’s
request. Wabi clears file locks when you close a file or exit the Wabi program.
This includes files that are open when the Wabi program is terminated
unexpectedly.
File Sharing
Wabi file sharing allows users and applications to access files simultaneously,
yet safely. File sharing occurs only if you enable it. When file sharing is
enabled, each file opened can be shared if the application supports file sharing.
The ways in which you can share files are determined by the application, not
by the Wabi program. For example, while you are using a particular file, an
application may allow another user to view that file but not write to it. An
application’s sharing methods are integral to the application, and cannot be
controlled by users.
To set a drive up for file sharing,
see “Enabling File Sharing for a
Drive” on page 70.
You enable file sharing drive-by-drive, using the Shared checkbox in the Drives
tab sheet. The default setting on all Wabi drives is sharing disabled. This is
because file sharing can increase file access time on a drive, and also may limit
the number of files that all applications running in Wabi can have open at one
time. You should enable file sharing only on drives where you really need it.
When file sharing is enabled on a drive, every file that applications open on
that drive is shared. This means that for every open file, the Wabi program
creates a share lock, which controls what can be done to the file. Share locks are
cleared when you close a file or exit the Wabi program. However, unlike file
locks, share locks are not automatically removed when the Wabi program
terminates unexpectedly on some operating systems. If this happens, you may
have to clear share locks manually. On some operating systems, the Wabi
program includes a UNIX program that clears all locks. This program, named
clearlocks, should be used with care.
64
Wabi User’s Guide—May 1996
4
The clearlocks program removes all file, record, and share locks between
two machines, regardless of who created or who “owns” the locks. To run
clearlocks on the machine on which the Wabi program terminated
unexpectedly, enter the command clearlocks followed by the host name of
the system on which the shared files are located.
Wabi Network Drives
In the Wabi environment, the directory to which a drive letter is connected
may reside on a local disk or on a remote disk on the network. To the Wabi
program, and to UNIX programs in general, it does not matter where a
directory path leads; the underlying operating system and network software
keep track of file systems.
However, it does matter to some Microsoft Windows applications whether a
given drive letter is a local drive, or is located somewhere else on the network.
These applications may check to see if a particular drive letter is local or
networked, and may behave differently in each case. For example, when you
install an application onto a drive, the installation program may try to
determine if the drive is networked. If it finds that the drive is networked, the
installation program may present you with a number of installation options
specific to servers, such as the location of shared program files and user
directories. Also, some applications may not use file locking if they detect that
the drive is local.
To set up a drive as a network
drive, see “Setting a Network
Drive” on page 71.
The Wabi program lets you control how the Wabi drives appear to
applications. The Drives tab sheet includes a Network option that, when
enabled, specifies that the selected drive is seen by applications as a network
drive. When this option is not enabled, the drive appears to be a local hard
drive to an application running in the Wabi program.
By default, Wabi makes each drive appear as a network drive. In most cases
you should leave the Network option enabled so applications that can use file
locking will detect a network environment and lock files as you open them.
However, if you install or use an application that requires a local drive, you
can disable the Network option.
Setting Up Drives
65
4
CD-ROM Drives
The Wabi program allows you to access a CD-ROM device, provided the
CD-ROM uses a media format the native operating system recognizes. For
example, if your operating system can read only CD-ROMs that use the Rock
Ridge and High Sierra File System (HSFS) format, the Wabi program has this
same limitation.
“Accessing a CD-ROM Drive” on
page 72 provides the general
steps required to mount and use
a CD-ROM drive.
Wabi
Server
Connecting to a CD-ROM drive with the Wabi program is much like
connecting any Wabi drive. You mount the device on a mount directory in the
native operating system, and then assign a drive letter to the mount directory
in the Drives tab sheet in the Wabi Configuration Manager. You should select
the CDROM checkbox to ensure that Wabi can correctly map file names on
CD-ROMs.
WabiServer users can access the CD-ROM drive on the WabiServer system
only. Access to the client system’s CD-ROM drive is not yet supported.
Note – You cannot use a CD-ROM drive to play music CDs or video laser disks
in the Wabi environment, but you may be able to play Microsoft Windows
waveform files (.WAV) on some platforms. Please consult the Wabi Release Notes
for more information. (The Wabi program on Solaris platforms does support
playing .WAV and .AVI files, as described in “Using Multimedia Features on
Ultra, SPARCstation, and x86 Computers” on page 152.)
Potential CD-ROM Problem
If you install an application that uses Microsoft CD-ROM extensions, and you
have purchased the rights to use that application on your local system (not on
a network), you may not be able to run your CD-ROM application.
This is due to a protection mechanism that the Microsoft Corporation has
incorporated in much of its CD-ROM-based application software. This
mechanism ensures that a CD-ROM application purchased for use on a local
system is not capable of running on a network. Because the Wabi program
accesses a local CD-ROM drive through a path in your operating system, it
appears to a CD-ROM application running under the Wabi program that the
application is being used on a network, not on a local CD-ROM drive.
This limitation cannot be overcome by disabling the Network option in the
Drives tab sheet.
66
Wabi User’s Guide—May 1996
4
Instructions for Tasks Related to Setting Up Drives
This section provides detailed, step-by-step instructions for performing a
variety of tasks related to diskette drives and Wabi drives. For certain tasks,
you will see samples of the command input and output associated with the
task. Margin notes refer to sections of this manual related to the task described.
▼ Connecting a Diskette Drive
1. Open the Control Panel.
2. Open the Wabi Config icon.
The Configuration Manager opens.
Read “Diskette Drives” on
page 56 for background
information about how Wabi
uses diskette drives.
3. Choose the Diskette tab.
Alternatively, press Alt+k.
4. Select the appropriate drive (A: or B:) in the Diskette Drive list.
5. Enter the full path to the device name in the Path box.
You can use the file browser to locate the device file, as explained on
page 61.
6. Choose OK to validate and save your changes, and exit Configuration
Manager.
If you want to make changes to other tab sheets before exiting, choose
Apply Now to validate and save your changes but keep Configuration
Manager open.
Alternatively, choose Cancel to quit Configuration Manager without making
changes.
▼ Changing the Diskette Drive Timeout Period
1. Open the Control Panel.
2. Open the Wabi Config icon.
The Configuration Manager opens.
Read “Timeout” on page 58 for
more about the diskette drive
timeout.
3. Choose the Diskette tab.
Alternatively, press Alt+k.
Setting Up Drives
67
4
4. Select the Timeout field and type the number of seconds the diskette
drive should be idle before the Wabi program releases control of
the drive.
5. Choose OK to validate and save your changes, and exit Configuration
Manager.
If you want to make changes to other tab sheets before exiting, choose
Apply Now to validate and save your changes but keep Configuration
Manager open.
Alternatively, choose Cancel to quit Configuration Manager without making
changes.
▼ Formatting a DOS Diskette
You must format a diskette
outside of the Wabi program.
“Diskettes and DOS” on
page 59 explains why.
You cannot format diskettes with File Manager in the Wabi environment.
However, if your native operating system provides a DOS formatting
command, the general procedure to format a DOS diskette is:
1. Open an operating system command window.
2. Place a diskette in the diskette drive.
3. Type your operating system diskette format command and press Enter.
See your operating system user’s guide for more information. In the Solaris
environment, the command is fdformat -t dos.
4. When formatting is complete, eject the diskette.
Press the Eject button on the drive or enter the command required to
remove the diskette from the drive. In the Solaris environment, the
command is eject floppy.
Note – If you have a DOS emulator, you can also format a DOS diskette by
using the DOS format command in the emulator.
▼ Assigning a Drive
1. Open the Control Panel.
“Wabi Drives” on page 59
provides an overview of Wabi
drives.
2. Open the Wabi Config icon.
The Configuration Manager opens.
68
Wabi User’s Guide—May 1996
4
3. Choose the Drives tab.
Alternatively, press Alt+d.
See page 62 for information
about working with Wabi drives.
4. Select an unassigned drive letter in the Drive list.
5. In the Path box, enter the path you want to assign to this drive.
If you would like to browse file systems, enter the beginning of a path and
press Enter. To begin at the root, enter /. You can then navigate through
directories until you reach the file system you want.
Double-click a directory name to place it in the path and view the
directory’s contents. Double-clicking on ../ brings you up one level in the
directory hierarchy.
6. Choose OK to validate and save your changes, and exit Configuration
Manager.
If you want to make changes to other tab sheets before exiting, choose
Apply Now to validate and save your changes but keep Configuration
Manager open.
Alternatively, choose Cancel to quit Configuration Manager without making
changes.
▼ Changing a Drive Assignment
1. Make sure the drive is not being used by any running applications.
2. Open the Control Panel.
3. Open the Wabi Config icon.
The Configuration Manager opens.
4. Choose the Drives tab.
Alternatively, press Alt+d.
5. Select the drive you want to change.
See “Change a Drive
Connection” on page 63 for more
about editing and entering drive
assignments.
6. Edit the path in the Path box or use the file browser to select a new path.
Setting Up Drives
69
4
7. Choose OK to validate and save your changes, and exit Configuration
Manager.
If you want to make changes to other tab sheets before exiting, choose
Apply Now to validate and save your changes but keep Configuration
Manager open.
Alternatively, choose Cancel to quit Configuration Manager without making
changes.
▼ Disconnecting a Drive
1. Make sure the drive is not being used by any running applications.
2. Open the Control Panel.
3. Open the Wabi Config icon.
The Configuration Manager opens.
4. Choose the Drives tab.
Alternatively, press Alt+d.
5. Select the drive you want to disconnect.
Before disconnecting a drive, you 6. Delete the path in the Path box.
may want to read “Disconnect a
The path assignment is cleared for the selected drive.
Drive” on page 63.
7. Choose OK to validate and save your changes, and exit Configuration
Manager.
If you want to make changes to other tab sheets before exiting, choose
Apply Now to validate and save your changes but keep Configuration
Manager open.
Alternatively, choose Cancel to quit Configuration Manager without making
changes.
▼ Enabling File Sharing for a Drive
1. Open the Control Panel.
2. Open the Wabi Config icon.
The Configuration Manager opens.
70
Wabi User’s Guide—May 1996
4
Read “File Sharing” on page 64
for more about the issues
involved with shared files.
3. Choose the Drives tab.
Alternatively, press Alt+d.
4. Select the drive for which you want to enable sharing.
5. Select the Shared check box.
An “X” appears in the box.
6. Choose OK to validate and save your changes, and exit Configuration
Manager.
If you want to make changes to other tab sheets before exiting, choose
Apply Now to validate and save your changes but keep Configuration
Manager open.
Alternatively, choose Cancel to quit Configuration Manager without making
changes.
▼ Setting a Network Drive
1. Open the Control Panel.
2. Open the Wabi Config icon.
The Configuration Manager opens.
For more about Wabi network
drives, read “Wabi Network
Drives” on page 65.
3. Choose the Drives tab.
Alternatively, press Alt+d.
4. Select the drive that you want to appear as a network drive.
5. Select the Network check box to enable it.
An “X” appears in the box.
6. Choose OK to validate and save your changes, and exit Configuration
Manager.
If you want to make changes to other tab sheets before exiting, choose
Apply Now to validate and save your changes but keep Configuration
Manager open.
Alternatively, choose Cancel to quit Configuration Manager without making
changes.
Setting Up Drives
71
4
▼ Setting a Local Drive
1. Open the Control Panel.
2. Open the Wabi Config icon.
The Configuration Manager opens.
3. Choose the Drives tab.
Alternatively, press Alt+d.
4. Select the drive that you want to appear as a local drive.
5. Select the Network check box to disable it.
The box is cleared.
6. Choose OK to validate and save your changes, and exit Configuration
Manager.
If you want to make changes to other tab sheets before exiting, choose
Apply Now to validate and save your changes but keep Configuration
Manager open.
Alternatively, choose Cancel to quit Configuration Manager without making
changes.
▼ Accessing a CD-ROM Drive
“CD-ROM Drives” on page 66
discusses specifics of using
these drives in the Wabi
program.
Follow these general steps to access a CD-ROM. The precise commands
required vary, depending on your operating system. Some operating systems
automatically make a compatible CD-ROM available when you insert the
CD-ROM into the drive. If your operating system does this, begin with Step 7.
1. Open an operating system command window.
Some cautions apply to
CD-ROM drives. Learn about
them in “Potential CD-ROM
Problem” on page 66.
2. Change to the root (/) directory.
3. Become superuser (su).
4. Create a directory named /cdrom.
5. Mount the CD-ROM.
Make sure you can read the CD-ROM from the operating system before
proceeding. For example, try to do an ls command on the /cdrom
directory.
72
Wabi User’s Guide—May 1996
4
6. Exit from superuser status.
7. If it is not already running, start the Wabi program.
8. Open Control Panel, open the Wabi Config icon, and choose the Drives
tab.
9. In the Drives tab sheet, select an unassigned drive letter.
10. In the Path box, type /cdrom (or whatever directory name the CD-ROM
is using).
11. If you want the CD-ROM drive to be seen as a network drive, select the
Network check box.
See the application’s documentation to determine if the CD-ROM can be
used on a network.
12. Select the CDROM checkbox.
This ensures that filenames on the CD-ROM are mapped correctly.
13. Choose OK to validate and save your changes, and exit Configuration
Manager.
If you want to make changes to other tab sheets before exiting, choose
Apply Now to validate and save your changes but keep Configuration
Manager open.
Alternatively, choose Cancel to quit Configuration Manager without making
changes.
14. Access the CD-ROM through the drive letter you assigned.
For example, if you connected F to /cdrom, you can run a setup program
on the CD-ROM with the command F:\setup.
Setting Up Drives
73
4
Reference Material for Drives
This section presents material you may find useful when you work with
diskette drives, Wabi drives, and CD-ROM drives.
Troubleshooting Problems With Diskette Drives
Table 4-1 suggests solutions to problems you might experience when working
with diskette drives A and B.
Table 4-1
Diskette Drive Problems and Solutions
Symptom
Possible Cause
Solution
“Device Not Ready
(Abort, Retry, or
Ignore)” error
Diskette may not be Remove diskette and reinsert it. Try to
seated properly in
access the diskette again.
the drive.
Can’t access drive A Another program is Eject the diskette with a command from
or B
controlling the
the other program, reinsert the diskette,
drive.
and try accessing it through Wabi again.
Invalid device name Specify a raw diskette device file. See your
specified in
UNIX documentation for information
Configuration
about diskette (or floppy) devices.
Manager’s Diskette
tab sheet.
Inadequate file
permissions to
device file or
directory.
In WabiServer, local See your WabiServer administrator.
diskette access may
be disabled by the
administrator.
Server
Wabi
Diskette will not
eject using special
keys (e.g., Meta+E)
74
You must have read and write permission
to your UNIX system’s device files and
directories. Use the UNIX chmod
command to change permissions if
necessary.
Wabi window does
not have input
focus.
Wabi User’s Guide—May 1996
Place mouse pointer in Wabi window, click
to make it the active window, and then
press keys.
4
Table 4-1
Diskette Drive Problems and Solutions (Continued)
Symptom
Possible Cause
Solution
Can’t format DOS
diskette
Not supported
under Wabi
program.
You can use preformatted diskettes or
format them on a PC running DOS. Your
operating system may also provide a way
to format DOS diskettes, so refer to your
operating system user’s manual.
Troubleshooting Problems With Wabi Drives
Table 4-2 suggests solutions to problems you might experience when
attempting to connect Wabi drives to directories.
Table 4-2
Wabi Drive Problems and Solutions
Symptom
Possible Cause
Wabi
Server
Can’t connect a drive Inadequate file
to a local directory permissions.
Incorrect path
assignment.
You must have read permission or more to
any directory you want to access. Use the
UNIX chmod command to change
permissions if necessary.
If you are using WabiServer, make sure you
use a network-aware path for directories
on your local system.
If you entered the path name manually,
make sure the path is a directory, not a file.
Can’t connect a drive Inadequate file
to a remote directory permissions.
You must have read permission or more to
any directory you want to access. Contact
your system administrator or the owner of
the directory.
If you are using WabiServer, make sure the
remote directory is accessible to the
WabiServer system.
Remote directory
not in Path file
browser area.
You must be able to access the directory
from the operating system before you can
access it in Wabi.
Server
Wabi
Solution
Remote file system
not mounted.
If your UNIX system automatically mounts
remote file systems, enter the path directly
in the Path box to automatically mount the
file system.
Setting Up Drives
75
4
Table 4-2
Wabi Drive Problems and Solutions (Continued)
Symptom
Possible Cause
Solution
If your UNIX system does not
automatically mount remote file systems,
see your UNIX manuals for procedures to
make remote file systems accessible.
Once the file system is accessible from the
operating system, open the Drives tab
sheet in Configuration Manager and
connect a drive to the directory.
Can’t change
Permanent drive
connection for drive connections cannot
C, R, or W
be changed.
There is no way to change the C, R, or W
connections. If you want to change the C
connection because you do not want your
user wabi directory in your home
directory, do not simply move or copy your
existing wabi directory to another location
because the numerous symbolic links will
not be preserved. Instead, try the following
procedure:
• Exit Wabi
• Rename your existing wabi directory
to wabi.old
• Create a directory named wabi in the
desired new location
• Create a symbolic link named wabi in
your home directory, with the new
directory as the target
• Restart Wabi
The Wabi program creates a new wabi
directory, placing it in the new location. If
you added any files to your original wabi
directory, move them from wabi.old to
the new directory, and then delete
wabi.old.
Drive errors when
using a DOS
Emulator
76
Dissimilar drive
mappings.
Wabi User’s Guide—May 1996
Assign the same drive letters to the same
path names in both the DOS Emulator and
Wabi. See page 177 for more information.
4
Troubleshooting Problems With CD-ROM Drives
Table 4-3 suggests solutions to problems you might experience when
attempting to access and use a CD-ROM drive.
Table 4-3
CD-ROM Drive Problems and Solutions
Symptom
Possible Cause
Solution
Can’t mount
CD-ROM
CD-ROM not in
format supported
by operating
system.
The Wabi program can only use
CD-ROMs that your operating system
can use. See your operating system
documentation for information about
CD-ROMs.
Can’t run
application off
CD-ROM
Application
detects network
environment.
Some applications on CD-ROM will not
work in Wabi because they determine the
drive is a network drive. There is no way
to use such applications. See page 66 for
more information.
Setting Up Drives
77
4
78
Wabi User’s Guide—May 1996
5
Printing
Wabi
Server
This chapter discusses printing operations and tasks. The Wabi program
supports a wide range of printers, including PostScript printers, Epson FX, LX
and MX-series printers, Hewlett-Packard LaserJet III series printers, and
text-only printers. In a network setting, the Wabi program allows you to direct
printed output to a variety of destinations, including local and network
printers and files.
WabiServer provides access to printers configured on the WabiServer system
and on your local system. Your system administrator determines which
system’s printers you can access.
If you are unfamiliar with Wabi printing concepts and procedures and want to
learn more about them, read the next section, “About Printing.”
If you want instructions for specific tasks related to printing, use the following
table to locate the instructions you need.
Task
Page
Installing Printer Drivers for PostScript, Epson, or HP
LaserJet III Printers
91
Defining the Wabi Default Printer
92
Connecting a Wabi Printer Port to a UNIX Printer
92
79
5
About Printing
Wabi print functions bridge the gap between an application’s printing method
and the printing mechanism of your operating system. Print functions are
transparent. That means once you establish Wabi printer settings and
connections, you can issue a print command from within an application and
your document is printed.
When you issue a print command from within an application, the application
passes your print request to a printer driver which, in turn, passes the print
request to an assigned printer port. Up to this point, the print process is the
same as in the Microsoft Windows environment. However, instead of sending
the print request to an LPT port, the Wabi program redirects the request to the
native print spooling system, along with the name of a printer and a print
command.
Your UNIX printing system processes print jobs from all applications you run
on your desktop, whether they run in the Wabi program or in your operating
system. Printing is done in the background, so you never have to stop your
work while a print request is carried out.
Wabi
80
Server
You manage printers, print queues, and print jobs with the same UNIX printer
management utilities or commands you normally use to manage printing on
your UNIX system. You do not need (and cannot use) a separate tool such as
the Windows Print Manager to manage printing from the Wabi program.
If your Wabi environment was created from a WabiServer prototype, your
system administrator most likely configured printers in the prototype, so you
may not need to perform any of the tasks in this chapter.
Wabi User’s Guide—May 1996
5
Supported Printer Types
The Wabi program can print to the following printer types:
•
•
•
•
Text-only
PostScript
HP LaserJet III series
Epson FX, LX, and MX series
The Wabi program supplies and installs the printer drivers for the HP LaserJet
III and Epson printers. The Wabi program also installs two of the printer
drivers supplied with Microsoft Windows: the Generic/Text Only and
PostScript Printer drivers. This lets the Wabi program print to most printers
right out of the box.
The Wabi program can also use the additional PostScript printer descriptions
supplied with Microsoft Windows. You can install them through the Control
Panel’s Printers dialog just as you would in a Microsoft Windows environment
on a PC.
Note that for HP LaserJet III and Epson printers, you can use only the
Wabi-supplied drivers. The drivers supplied with Microsoft Windows for these
printers are not supported in the Wabi program.
Before You Can Print From Wabi
Before you can print from applications running in the Wabi program, you must
be able to use a printer from the operating system. You (or your system
administrator) must configure your operating system to recognize the printer.
If you can print on a printer using a print command (such as lp or lpr) in
your operating system, you will be able to access the printer from the Wabi
program.
UNIX Printer Configuration
Normally, you do not need to do anything special to your UNIX printer
configuration in order to print from your Wabi environment. However, if you
use one printer most often, you should designate it as your UNIX default
printer. That way, the Wabi program will automatically send all its print jobs to
that printer unless you specify a different printer.
Printing
81
5
Note – If you want to print to an HP LaserJet III printer on an HP-UX® print
server, the printer definition on the server should be set up for a “dumb
device” to prevent filtering by the print server.
See your operating system documentation for more information about
installing and accessing printers, and designating a default printer.
The Default Wabi Printing Setup
Wabi
Server
The Wabi program is ready to print in many environments without any action
on your part. By default, the Wabi program assigns the PostScript Printer (or
Apple LaserWriter II NTX) driver to port LPT1, and connects LPT1 to your
UNIX default printer. These settings will work for printing to PostScript
printers in most situations. However, you can use the Microsoft Windows
Control Panel and Wabi Configuration Manager to change the default printing
setup if you like. Note that on the Solaris platform, the Apple LaserWriter II
NTX description for the PostScript driver is used by default.
When you run WabiServer, your default printer depends on whether the
WabiServer system allows you to access printers configured on the server, your
client system, or both. Table 5-1 below shows which printer is your default.
Table 5-1
Wabi Default Printer Used in WabiServer
If the WabiServer system allows access to...
Your Wabi default printer is...
Server’s printers only
Server’s UNIX default printer
Your client system’s printers only
Your client system’s UNIX default
printer
Printers configured on both server and client
Server’s UNIX default printer
Changing Print Settings
If the default Wabi printing setup is not appropriate for your environment, you
can change the print settings in Microsoft Windows Control Panel and Wabi
Configuration Manager, so you can print on any supported printer that you
can access from your operating system.
82
Wabi User’s Guide—May 1996
5
Control Panel’s Printers Dialog Box
You use the Control Panel for all print settings except those pertaining to the
connection between Wabi LPT ports and UNIX printers.
Figure 5-1 shows the Control Panel’s Printers dialog box.
Figure 5-1
Control Panel’s Printers Dialog Box
In the Wabi environment, you use Control Panel’s Printers dialog box to:
•
•
•
•
•
•
Install a different printer description for a PostScript, HP LaserJet III, or
Epson printer
Change the printer setup of an installed printer
Specify a new Wabi default printer
Set up to print to a file
Assign a directly-connected serial printer to a COM port
Assign a printer to a different LPT port
Printing
83
5
You perform these tasks in the Wabi environment the same way you would in
the Microsoft Windows environment. The Printers dialog box and related
dialog boxes work as they do in Microsoft Windows, with the following
exceptions:
•
•
•
•
84
Microsoft Windows Print Manager, whether enabled or disabled in the
dialog box, does not run in the Wabi environment.
Although you may be able to add an unsupported driver from the List of
Printers, the Wabi program may not be able to use it. The only drivers
supported are those described in “Supported Printer Types” on page 81.
Several items in the Connect dialog box, which opens when you choose the
Connect button, are not applicable in the Wabi environment. The settings
are: Device Not Selected, Transmission Retry, and Fast Printing Direct to
Port. In the Microsoft Windows environment, these settings affect Print
Manager and DOS interrupts.
The Network button located in the Connect dialog box opens the Printers
tab sheet in Wabi Configuration Manager, which you use to connect a Wabi
LPT port to a UNIX printer.
Wabi User’s Guide—May 1996
5
Configuration Manager’s Printers Tab Sheet
You use the Printers tab sheet, shown in Figure 5-2, to connect LPT ports to
UNIX printers and to define UNIX print commands.
Figure 5-2
Printers Tab Sheet
Your operating system recognizes and addresses printers by their names. That
means that every printer you can use has a name. In addition, your operating
system uses a specific command to initiate a print job. When you connect a
printer to a Wabi LPT port, you indicate the name of the printer you want to
assign to the port and the command required to start a print job.
The Printers tab sheet contains the following items:
•
Printer Port – Displays a list of LPT ports, LPT1 through LPT8. You select an
LPT port from this list. The other choices you make in this tab sheet apply to
the LPT port you select here.
•
Native Printer Name – Displays a list containing the names of all the printers
your system is configured to recognize and which you can access. The first
name, <DefaultPrinter>, is a variable that specifies your current UNIX
Printing
85
5
system default printer, which is the printer used when you print without
specifying a printer name. When you assign a port to <DefaultPrinter>,
print jobs sent to that port go to the current system default printer. If you
change the default printer on your system, the Wabi program immediately
uses the new default printer for <DefaultPrinter>.
•
“Connecting a Wabi Printer Port
to a UNIX Printer” on page 92
provides the steps for assigning a
printer to a port.
Native Print Command – Displays a list of operating system print commands.
You may also type in the box if you want to enter your own command.
Connecting a printer to a Wabi LPT port is as simple as opening the Native
Printer Name list and selecting a printer name.
In most cases, you will not have to alter the Native Print Command entry. The
default entry supplied with the Wabi program will usually be correct.
However, you can select the entry field and type in a command if you want.
You can change the native print command to any command line that you know
works in your operating system to get the output you want from the printer.
See your operating system user manuals for information about commands
used for printing.
If you change the print command and later want to return to the default print
command, select the last command in the list.
The default print command includes two placeholders for parameters used
with arguments to the print command:
•
%p – The Wabi program replaces %p with a printer name. If the printer name
is <DefaultPrinter>, the Wabi program omits the argument using %p
when a print command is issued to the operating system. This makes the
operating system use its default printer.
•
%t – The Wabi program replaces %t with the print job title. Many operating
systems require a print job title statement.
Using Other PostScript Printer Descriptions
See “Installing Printer Drivers for
PostScript, Epson, or HP
LaserJet III Printers” on page 91
for the procedure.
86
If you find that the printer output is not exactly what you want when you use
the PostScript Printer driver, you should install the PostScript printer that
matches your PostScript printer model. This lets Windows applications tailor
themselves according to your printer’s capabilities for paper size, multiple
paper trays, envelopes, and so on. It also gives the application access to all the
fonts on the printer. If your PostScript printer is a SPARCprinter, you should
install the Apple LaserWriter II NTX printer driver.
Wabi User’s Guide—May 1996
5
Note – In Microsoft Windows and in the Wabi program, all PostScript printers
listed in the Control Panel’s Printers dialog use the same driver program,
pscript.drv. However, each listed printer has its own printer description,
which provides detailed information about the printer’s capabilities. When you
select and install a particular model of PostScript printer, you are installing the
printer description, not the driver.
Using Epson and HP LaserJet III Printers
If you want to print to an HP LaserJet III or Epson printer, you must use the
HP LaserJet III (Wabi) or Epson FX-1050 (Wabi) printer drivers. The
Wabi program installs these drivers in your Wabi environment and assigns
them to LPT1 the first time you start the Wabi program.
You must use the printers that include (Wabi) in the name in the List of
Printers. The Wabi printer descriptions for Epson and HP LaserJet III printers
are at the top of the List of Printers in the Control Panel’s Printers dialog, as
shown in Figure 5-3. Other drivers in the list use the Microsoft Windows
version of the drivers, which are not supported in the Wabi program.
Epson Models — The Epson printer driver provided with Wabi software
supports many Epson printer models. If your Epson printer is not an FX-1050,
you can install a printer description that matches your particular printer
model. The following Epson printers are supported by the Wabi Epson printer
driver:
Epson
Epson
Epson
Epson
FX-80
FX-100
FX-286e
FX-1050
Epson
Epson
Epson
Epson
FX-80+
FX-100+
FX-800
FX
Epson
Epson
Epson
Epson
FX-85
FX-185
FX-850
LX
Epson
Epson
Epson
Epson
FX-86e
FX-286
FX-1000
MX
If you have an Epson PostScript printer, you should use the appropriate
PostScript driver, not the Epson FX-1050 driver.
HP LaserJet Models — The HP LaserJet III printer driver provided with Wabi
also supports the LaserJet IIID and LaserJet IIIP models. If you have these
models, you can install a printer description that matches them. The HP
LaserJet III driver can also be used with LaserJet IV printers, although the
driver may not be able to use all the LaserJet IV’s capabilities. The driver
cannot be used with LaserJet II printers. Note that the HP LaserJet III
(Wabi) driver does not support font downloading with the HP Font Installer.
Printing
87
5
Figure 5-3
Printers Dialog Box Showing Wabi Printer Descriptions
Epson or LaserJet III System Default Printer
If your system default printer is an HP LaserJet III or Epson printer, before you
print the first time, you should use Control Panel to assign the HP LaserJet
III (Wabi) or Epson FX-1050 (Wabi) printer as your Wabi default printer.
The Wabi program is set up to print to PostScript printers by default.
88
Wabi User’s Guide—May 1996
5
Using Text-Only Printers
You can print to text-only printers (such as dot-matrix printers) using the
Generic/Text Only driver supplied with Microsoft Windows. You can also use
this driver to print plain text (not graphics) to most printers. If your printer is
not supported in the Wabi environment, you can assign the Generic/Text Only
driver to it and print draft-quality documents without graphics.
Note that if your application lets you save a document as an ASCII text file,
you probably can print a text file without the generic printer driver. PostScript
printers can print text-only documents if they are configured in the operating
system to accept simple text input.
Changing the Wabi Default Printer
You set your Wabi default printer the same way you set your Microsoft
Windows default printer, using the Control Panel. The Set as Default Printer
button in the Printers dialog box sets the selected printer as the default printer.
See “Defining the Wabi Default
Printer” on page 92 for the
procedure.
Your Wabi default printer should connect to the UNIX printer you use most
frequently. For example, if most of your printing is done on an Apple
LaserWriter II NTX printer named “speedy” located near your office, attach the
Apple LaserWriter II NTX printer driver to a port such as LPT1, and then set
this printer as your default. Then use Configuration Manager to connect
“Apple LaserWriter II NTX on LPT1” to the “speedy” printer. When you print
within an application, the application sends the job to LPT1, and the Wabi
program redirects the print job to “speedy.”
Connecting the UNIX Default Printer to the Wabi Default Printer
You may find it convenient to use the same default printer for both your UNIX
and Wabi print jobs. The Wabi program is set up this way initially. If you have
changed your print setup, do the following to assign both defaults to the same
physical printer:
•
Assign a system default printer using your operating system’s print
management methods (UNIX commands or utilities).
•
•
Use Configuration Manager to connect LPT1 to <DefaultPrinter>.
Use Control Panel to connect a printer to LPT1 and set the printer as your
Wabi default printer.
Printing
89
5
Printing to a File
You can set up a Wabi printer so that all print requests that are sent to the
printer go to a file on disk instead of being printed. To do this, you can connect
the Wabi printer to the FILE “port” instead of an LPT port. Use the Control
Panel to do this.
You will be prompted for a file name whenever you print to this printer from
an application.
Some applications allow you to print a single print job to a file using a Print
Setup option within the application’s menus. If your application has this
option and you only occasionally print to a file, it may not be necessary to set
up a printer in this way.
Printing Directly to a Serial Printer
Within the UNIX environment, you can configure a serial printer so that you
can send print requests through the UNIX print system. You can print from the
Wabi environment to a serial printer configured in the UNIX print system, just
as with any other printer configured in the operating system — through a Wabi
LPT port connected to the UNIX printer.
See “Connecting a COM Port to a
Serial Device Driver” on
page 103 for the steps required to
connect a COM port to a UNIX
serial device.
However, if you have connected a serial printer to a serial port on your UNIX
system, you can also print directly to the printer through the Wabi program. To
do this, first use Configuration Manager to make sure a Wabi COM port is
connected to the serial device that controls the UNIX serial port. Then use the
Control Panel’s Ports dialog boxes to connect an appropriate printer driver to
the COM port.
The printer’s documentation should tell you what to use for COM port settings
such as baud rate, flow control, stop bits, etc. You should configure the port
through the Control Panel’s Ports dialog boxes.
Printing directly to a serial port generally is not recommended because it
bypasses the UNIX print spooling system. This means you cannot use your
usual print control commands or utilities to cancel or pause the print request.
Also, printing directly to a printer is no faster than printing through the
operating system’s print system, and you must wait for the print job to finish
before continuing to work in the Wabi program.
90
Wabi User’s Guide—May 1996
Wabi
Server
5
If you have a serial printer connected to your system and want to use it
through WabiServer, the system administrator must allow all users to access
local printers.
Instructions for Tasks Related to Printing
This section provides detailed, step-by-step instructions for performing a
variety of tasks related to setting up the Wabi program for printing.
Note – For information about tasks related to a specific printer driver, refer to
the on-line Help provided in the printer driver’s Setup dialog box.
▼ Installing Printer Drivers for PostScript, Epson, or HP LaserJet III Printers
1. Open the Control Panel.
2. Open the Printers icon.
The Printers dialog box opens.
Refer to page 86 for information
about using other PostScript,
Epson, and HP LaserJet printers.
3. Choose the Add button.
The dialog box expands to include the List of Printers and an Install button.
4. Select a printer driver appearing in the List of Printers.
You must choose either a PostScript printer model, or an HP LaserJet III or
Epson model that includes Wabi in the name. The Wabi HP LaserJet III and
Epson drivers are at the top of the list of printers, and are not listed
alphabetically with the Windows printer drivers.
5. Choose Install.
If you chose a Wabi HP LaserJet III or Wabi Epson driver, the printer is
displayed in the list of Installed Printers immediately, and you can close the
dialog box.
If you chose a PostScript driver, such as TI microLaser PS17, the Install
Driver dialog box tells you to insert the diskette containing a file needed for
the printer.
Printing
91
5
6. Insert the requested diskette and choose OK.
If your Microsoft Windows files are on a network drive, use the Browse
button to locate the requested file, and choose OK.
When installation is complete, the printer is displayed in the list of Installed
Printers.
7. Choose Close to exit the dialog box.
▼ Defining the Wabi Default Printer
1. Open the Control Panel.
“Changing the Wabi Default
Printer” on page 89 discusses
the default printer.
2. Open the Printers icon.
Alternatively, open the Settings menu and choose Printers or press Alt, s, p.
The Printers dialog box opens.
3. Select a driver/port combination in the Installed Printers list.
The item is highlighted.
4. Choose the Set As Default Printer button.
The selected driver/port combination is assigned as the default, and is
displayed in the Default Printer panel.
5. Choose Close to save your selection and exit the dialog box.
Alternatively, choose Cancel to close the dialog box without making
changes.
▼ Connecting a Wabi Printer Port to a UNIX Printer
1. Open the Control Panel.
2. Open the Wabi Config icon.
Configuration Manager opens.
3. Choose the Printers tab.
Alternatively, press Alt+p.
4. Select the Printer Port you want to connect.
LPT1 through LPT8 are available.
92
Wabi User’s Guide—May 1996
5
See “Configuration Manager’s
Printers Tab Sheet” on page 85 for
information about this sheet.
5. Select the Native Printer Name.
This is the name of the UNIX printer you want to assign to the port.
Select <DefaultPrinter> if you want to connect to your operating
system’s default printer.
Note – You must designate a default printer at the operating system level
before you can use <DefaultPrinter>.
6. Select or enter a Native Print Command.
If you do not want to use the default command provided, you can enter one
of your own by selecting the box and typing into it. If you want to return to
the default command, select the last command in the list.
7. Choose OK to validate and save your changes, and exit Configuration
Manager.
If you want to make changes to other tab sheets before exiting, choose
Apply Now to validate and save your changes but keep Configuration
Manager open.
Alternatively, choose Cancel to quit Configuration Manager without making
changes.
Printing
93
5
Reference Material for Printing
This section provides reference material for tasks related to printing.
Troubleshooting Problems With Printing
Table 5-2 suggests solutions to problems you might experience when working
with printers.
Table 5-2
94
Printing Problems and Solutions
Symptom
Possible Cause
Solution
Can’t print
Invalid native
printer name or
print command.
Make sure you can print to the same
printer outside Wabi, using a UNIX
print command such as lp or lpr. If
you can print in UNIX, try resetting the
print command to the default value by
selecting the last command in the Native
Print Command list on the Printers tab
sheet. If you cannot print using the
default, the problem is probably outside
Wabi.
Printer not
configured
correctly in
operating system.
If the printer is not configured correctly,
you cannot print outside Wabi with a
UNIX print command. If this is the case,
see your system administrator or your
UNIX system documentation for help in
configuring the printer.
Printer port
connected to
wrong printer.
Check the Printers tab sheet in
Configuration Manager to make sure the
port is connected to the UNIX printer
you want to print on. See page 92 for
more information.
Wabi User’s Guide—May 1996
5
Table 5-2
Printing Problems and Solutions (Continued)
Symptom
Possible Cause
Solution
Can’t print large
graphics files.
Out of space in
/tmp.
The /tmp directory could become filled
with temporary printing files if it does
not have enough free space, so you may
have to increase the space allotted /tmp.
On some systems, the /tmp directory is
simulated inside the system's swap
space rather than existing as separate
disk space. To find out if your system
uses disk or swap space for /tmp, enter
the command:
df -k /tmp
If the first word on the output line is
swap, the /tmp directory is simulated in
swap space. You can increase the space
allocated to /tmp by increasing your
system's swap space. See your operating
system documentation for the
procedure to do this.
Desired Windows
printer driver not
listed in List of
Printers.
Printer not
officially
supported.
If the printer is PostScript, you should
be able to use one of the listed printer
drivers. The printer’s documentation
may list other drivers you can use, or
tell you what printer is emulated. If it
doesn’t, contact the printer vendor, who
might suggest other drivers to use.
You might also contact Adobe Systems,
Inc. (the developer of PostScript) for
advice, or customer support from your
UNIX vendor.
If the printer is not PostScript, Epson,
HP LaserJet III, or a text-only printer,
you cannot use it with Wabi.
Printing
95
5
Wabi
96
Server
Table 5-2
Printing Problems and Solutions (Continued)
Symptom
Possible Cause
Solution
Desired UNIX
printer not listed in
the Native Printer
Name list.
Printer not
configured in
operating system.
See your system administrator or your
UNIX system documentation for help in
setting up a printer in the operating
system.
If you are running
WabiServer, you
may not have
access to printers
on the server or to
local printers.
See your system administrator.
Wabi User’s Guide—May 1996
6
Using Wabi COM Ports
This chapter discusses working with Wabi COM ports, or serial ports. A serial
port provides a way to connect your computer to an external device, such as a
printer or a modem.
If you are not familiar with Wabi COM ports and would like to learn more
about them, read the next section, “About Wabi COM Ports.”
If you want to go directly to instructions for specific tasks related to ports, use
the following table to locate the instructions you need.
Task
Page
Changing COM Port Settings
103
Connecting a COM Port to a Serial Device Driver
103
Resetting a COM Port Device Assignment to the Default
104
97
6
About Wabi COM Ports
Wabi
Server
A COM port is a gateway through which you access the world beyond the
Wabi program. For example, you can use a port to connect the Wabi program
to an information service located in a distant city, or to a local serial printer.
Wabi COM ports connect to a serial device in your native operating system. A
serial device is an operating system resource that enables your computer to
interact with physically-connected devices such as modems and serial printers.
There are four Wabi COM ports available: COM1, COM2, COM3, and COM4.
(Your computer probably supports fewer than four COM ports.)
When you use Wabi remotely, you have access only to the WabiServer system’s
COM ports. You cannot use the COM ports of your local computer.
Note – LPT ports provide a way for you to connect to a system printer.
Chapter 5, “Printing,” discusses the use of LPT ports and explains how to
connect them to printers in your operating system.
COM Port Configuration
Before you can use a COM port, you must be able to access serial devices
located in your native operating system. Your operating system documentation
contains instructions for accessing devices. Once you have access to a serial
device in your native operating system, you can configure a Wabi COM port to
access the device.
Note – If a COM port is being used by a native operating system program, the
port is not available for use by the Wabi program. This could occur if your
mouse connects through COM1 or if you connect your computer to a remote
system using the UNIX TIP command.
Configuring a COM port is a two-part process:
•
•
98
Specify COM port settings through the Control Panel
Connect the COM port to an operating system serial device through
Configuration Manager
Wabi User’s Guide—May 1996
6
COM Port Settings in Control Panel
You’ll find the default COM port settings appropriate for most serial
communications situations. When using a COM port, try the default settings
first. If these settings do not work, change them as necessary to establish and
maintain communication. The default settings are:
Baud Rate: 9600
Data Bits: 8
Parity: None
Stop Bits: 1
Flow Control: Xon/Xoff
You might have to change a COM port setting if you connect to an information
service through a modem. The baud rate setting of the COM port must match
the baud rate (speed) at which the service operates. For example, this might
require you to change the baud rate from 9600 baud to 2400 baud.
Note that many applications automatically adjust COM port settings by
determining the settings required and overriding the current COM port
settings.
Wabi
Server
For the steps required to make
or change port settings, see
“Changing COM Port Settings”
on page 103.
You change COM port settings through the Control Panel in the Settings for
COMx dialog box, shown in Figure 6-1. You access this dialog box by opening
the Ports icon and selecting a COM port in the Ports dialog box.
WabiServer users can also change COM port settings in Control Panel; the
settings affect use of the WabiServer system’s serial port because that is the
system on which Wabi is running.
Using Wabi COM Ports
99
6
Figure 6-1
Control Panel’s Port Settings
You change COM port settings in the Wabi environment the same way you
would in the Microsoft Windows environment. The Settings for COMx dialog
box works as it does in Microsoft Windows, with the following exceptions:
100
•
Hardware flow control is not supported. You should select either None or
Xon/Xoff flow control.
•
The Advanced Settings, which you open when you choose the Advanced
button, have no meaning in the Wabi environment. The Base I/O Port
Address and Interrupt Request Line (IRQ) are controlled by the operating
system.
Wabi User’s Guide—May 1996
6
COM Ports Tab Sheet in Configuration Manager
Wabi
Server
To make a COM port connection,
see “Connecting a COM Port to a
Serial Device Driver” on
page 103.
The serial communications ports COM1 through COM4 connect to serial
device drivers located in your native operating system. You decide which port
to connect to which operating system device.
WabiServer users cannot change this connection because it is controlled by the
system administrator.
Use the COM Ports tab sheet, shown in Figure 6-2, to make or change a COM
port connection.
Figure 6-2
COM Ports Tab Sheet
The COM Ports tab sheet lists default paths for device drivers for COM1 and
COM2 that are appropriate for your operating system. If your system does not
use the default device drivers, you can edit the Path box to specify the correct
path. If your system has more than two serial ports, you can also use the tab
sheet to specify a path for COM3 and COM4.
Using Wabi COM Ports
101
6
Note – You cannot assign the same device driver to more than one COM port.
For example, you cannot assign /dev/cua/a to both COM1 and COM2.
If you are not certain of the path to the correct serial device drivers, you can
use the file browsing feature of the Path box to locate them, as explained in
“Path Box and File Browser” on page 50.
COM Ports and Printing
See “Printing Directly to a Serial
Printer” on page 90 for more
information about printing to a
serial printer.
102
The Wabi program allows you to print to a COM port as well as to an LPT
port. When you print to a COM port, you bypass your native operating
system’s print facility. This allows you to access a printer directly, rather than
through the operating system’s print spooler. Your printer must be physically
connected to your workstation’s serial communications port. In general, it’s
best to use an LPT port for printing.
Wabi User’s Guide—May 1996
6
Instructions for Tasks Related to COM Ports
This section provides detailed, step-by-step instructions for performing a
variety of tasks related to serial ports.
▼ Changing COM Port Settings
1. Open the Control Panel.
2. Open the Ports icon.
The Ports dialog opens.
3. Select a COM port and choose Settings.
The Settings for COMx: dialog opens.
See Figure 6-1 on page 100 for a
picture of the dialog box, and a
list of the default settings.
4. Open the drop-down list of each setting you want to change and select an
item from the list.
5. Choose OK to save your choices.
The settings you’ve specified apply to the selected port.
Alternatively, choose Cancel to exit the dialog box without changing
settings.
▼ Connecting a COM Port to a Serial Device Driver
1. Open the Control Panel.
2. Open the Wabi Config icon.
Configuration Manager opens.
For information about COM port
connections to serial devices,
read “COM Ports Tab Sheet in
Configuration Manager” on
page 101.
3. Choose the COM Ports tab.
4. Select a COM port.
5. Enter the path to a device driver in the Path box.
If you do not know the path, you can type a partial path and press Enter to
begin browsing for the file. Double-click on directories to see their content.
The current path appears in the Path box. Browse until the Path box
displays the device driver you want to assign to the COM port.
Using Wabi COM Ports
103
6
6. Choose OK to validate and save your changes, and exit Configuration
Manager.
If you want to make changes to other tab sheets before exiting, choose
Apply Now to validate and save your changes but keep Configuration
Manager open.
Alternatively, choose Cancel to quit Configuration Manager without making
changes.
▼ Resetting a COM Port Device Assignment to the Default
1. Open the Control Panel.
2. Open the Wabi Config icon.
Configuration Manager opens.
3. Choose the COM Ports tab.
4. Select a COM port.
5. Open the Path list and select the last item in the list.
The last item in the list is the default value for your operating system.
6. Choose OK to validate and save your changes, and exit Configuration
Manager.
If you want to make changes to other tab sheets before exiting, choose
Apply Now to validate and save your changes but keep Configuration
Manager open.
Alternatively, choose Cancel to quit Configuration Manager without making
changes.
104
Wabi User’s Guide—May 1996
6
Reference Material for Tasks Related to COM Ports
This section provides reference material for various tasks related to configuring
and using Wabi COM ports.
Troubleshooting Problems With COM Ports
You may encounter problems when attempting to use a COM port. Table 6-1
suggests solutions to problems you might experience when working with
COM ports.
Table 6-1
COM Port Problems and Solutions
Symptom
Probable Cause
Solution
Can’t assign
COM1, device
busy
Serial port is being
used by another
device, such as a
mouse or terminal,
or by a UNIX TIP
connection.
Try using a different COM port, if
you have one that is not in use.
Can’t access COM2
Serial port not
configured at
operating system
level.
See your operating system
documentation for information
about configuring serial ports.
Insufficient
permissions on
serial device file.
Use the command chmod 666 device
to set the permissions so that all
users have read and write
permission to the device.
Inadequate
permissions to
device file or
directory.
You must have read and write access
to your UNIX system’s device files
and directories. Change permissions
in the operating system using the
chmod command.
Can’t connect
COM port to serial
device
Using Wabi COM Ports
105
6
106
Wabi User’s Guide—May 1996
7
Wabi International
This chapter discusses various issues for using Wabi internationally.
The Wabi program can be adapted for international use at several levels in the
UNIX environment, and in the Microsoft Windows environment.
If you want to learn more about how the Wabi program uses international
settings, read “About Using Wabi Internationally” on page 108. If you want to
learn more about how Wabi uses the Control Panel’s international settings,
read the section, “Control Panel’s International Settings” on page 109.
If you want instructions for specific tasks related to international settings, use
the following table to locate the instructions you need.
Task
Page
Setting the LANG Environment Variable
112
Setting the WABI_KEYB Environment Variable
112
Setting the WABI_CODEPAGE Environment Variable
113
Changing International Settings
114
107
7
About Using Wabi Internationally
Because the Wabi environment consists of programs, libraries, and files from
the UNIX world and the Microsoft Windows world, it is affected on several
levels by the international settings of both those environments. In UNIX, you
can set environment variables. In Microsoft Windows, you can install localized
Windows versions, and change International options in Control Panel.
UNIX Environment Variables
Wabi
Server
On the UNIX side, the Wabi program can be localized through environment
variables: LANG, WABI_KEYB, and WABI_CODEPAGE. The LANG variable affects
your entire X Window desktop, while the WABI_KEYB and WABI_CODEPAGE
variables affect only the Wabi program.
The WabiServer system administrator can set these variables on the server for
all WabiServer users. See the WabiServer Administrator’s Guide for more
information. WabiServer users can also set these variables before starting Wabi.
The user’s settings will take precedence over the WabiServer system’s settings
for these variables.
The LANG Variable
The procedure for setting these
variables is on page 112.
Table 7-1 on page 114 lists the
locales you can use to set the
LANG and WABI_KEYB variables.
If your version of the UNIX operating system contains international language
libraries, you can use the UNIX environment variable LANG to enable the Wabi
program to use a particular language, or locale, as it is called in the UNIX
world. International versions of the Wabi program will use the locale to
determine which language to use to display Wabi error and status messages,
Wabi on-line help, and Wabi graphical user interface components, such as the
Configuration Manager.
The WABI_KEYB Variable
The LANG environment variable also sets the keyboard to the locale you
specify. The Wabi program supports the WABI_KEYB variable to let you specify
a keyboard that is different from that specified by the LANG variable. The
WABI_KEYB variable overrides the keyboard specified by the LANG variable,
but only for the Wabi environment and applications running within it.
108
Wabi User’s Guide—May 1996
7
The LANG and WABI_KEYB variables use a two-letter or four-letter abbreviation
to identify the locale. Table 7-1 on page 114 lists the locale abbreviations.
The WABI_CODEPAGE Variable
The procedure for setting this
variable is on page 113.
Table 7-2 on page 115 lists the
code pages and the countries in
which they are commonly used.
The WABI_CODEPAGE variable lets you specify which code page Wabi should
use for OEM character translation. Microsoft Windows uses the code page set
in DOS. Since DOS is not used in the Wabi environment, the Wabi program
uses 437 by default. If you want to use a different code page, specify the code
page with this environment variable. Possible values are: 437, 850, 860, 861,
863, and 865.
Localized Microsoft Windows Versions
Most of the text you see when you run the Wabi program is provided by
Microsoft Windows; the amount of user interface text provided by Wabi
software is quite small by comparison. You can install one of several different
language versions of Microsoft Windows into your Wabi environment, and this
is what determines the language of most of the user interface.
Wabi
Server
Before you install a localized version of Microsoft Windows, you must first set
your LANG variable in your UNIX environment to the language of the
Windows version you want to install. Do this before starting the Wabi
program. In international versions of Wabi software, the Wabi Windows Install
program will use the LANG setting of the system on which it is running to
determine the language to display in its user interface.
When you use WabiServer, the language of the interface is determined by the
language version of Microsoft Windows installed in the prototype you select.
Control Panel’s International Settings
Applications running in the Wabi program use the international options set in
your win.ini file. You can customize these international conventions to your
preferences using the Microsoft Windows Control Panel’s International dialog
box. Some applications have their own menus or commands for setting some
formats. An application’s settings take precedence over the Control Panel
settings.
Wabi International
109
7
You use the International dialog box shown in Figure 7-1 to change
international settings.
Figure 7-1
110
Control Panel’s International Dialog Box
Wabi User’s Guide—May 1996
7
The International options are used by applications, not by the Wabi program
itself. The International dialog box works as it does in the Microsoft Windows
environment, except for the Keyboard Layout setting, which Wabi ignores in
favor of the WABI_KEYB variable. Briefly, the International settings are:
•
Country — sets the Date, Time, Currency, and Number Formats to the values
normally used in the selected country.
•
•
Language — used by applications to determine how to sort characters.
•
•
•
Keyboard Layout — Microsoft Windows uses this setting to determine how to
interpret your keystrokes on keyboards designed for various languages. In
the Wabi environment, the WABI_KEYB variable performs this function, so
this setting has no affect.
Measurement — specifies English or metric measurement.
List Separator — specifies the character used between list items.
Date — the format used in applications using these formats.
Time
Currency
Number
Compose Key Sequences
The Wabi program supports Compose key sequences. If your keyboard
provides a Compose key, you can use it to produce special characters. See your
keyboard documentation for details about using the Compose key to make
special characters.
Wabi International
111
7
Instructions for Tasks Related to International Settings
This section provides detailed, step-by-step instructions for performing a
variety of tasks related to international settings for your Wabi environment.
▼ Setting the LANG Environment Variable
1. At the operating system prompt, enter one of the following commands
before starting your X Window desktop:
In the C shell:
Table 7-1 on page 114 lists the
locales you can use to set the
LANG and WABI_KEYB variables.
setenv LANG locale
In the Bourne or Korn shell:
LANG=locale;export LANG
For example, to specify French as the locale/keyboard type, enter one of the
following commands:
In the C shell:
setenv LANG fr
In the Bourne or Korn shell:
LANG=fr;export LANG
2. Start your X Window desktop.
▼ Setting the WABI_KEYB Environment Variable
1. At the operating system prompt, enter one of the following commands
before starting the Wabi program:
“About Using Wabi
Internationally” on page 108
explains why you might set these
variables.
In the C shell:
setenv WABI_KEYB locale
In the Bourne or Korn shell:
WABI_KEYB=locale;export WABI_KEYB
For example, to specify French as the locale for the keyboard in the Wabi
program, enter one of the following commands:
In the C shell:
setenv WABI_KEYB fr
112
Wabi User’s Guide—May 1996
7
In the Bourne or Korn shell:
WABI_KEYB=fr;export WABI_KEYB
Or, to set the environment variable statements required to establish French
international settings with an English-language (U.S.) keyboard, enter the
following at the command line:
In the C shell:
setenv LANG fr
setenv WABI_KEYB C
In the Bourne or Korn shell:
LANG=fr;export LANG
WABI_KEYB=C;export WABI_KEYB
2. Start the Wabi program.
▼ Setting the WABI_CODEPAGE Environment Variable
1. At the operating system prompt, enter one of the following commands
before starting the Wabi programs:
In the C shell:
Table 7-2 on page 115 lists the
code pages you can use.
setenv WABI_CODEPAGE nnn
In the Bourne or Korn shell:
WABI_CODEPAGE=nnn;export WABI_CODEPAGE
For example, to specify the 850 code page, enter one of the following
commands:
In the C shell:
setenv WABI_CODEPAGE 850
In the Bourne or Korn shell:
WABI_CODEPAGE=850;export WABI_CODEPAGE
2. Start the Wabi program.
Wabi International
113
7
▼ Changing International Settings
1. Open the Control Panel.
Read “Control Panel’s
International Settings” on
page 109 for more information
about International settings.
2. Open the International icon.
The International dialog box opens.
3. Change the settings you want.
4. Choose OK.
The International dialog box closes.
Alternatively, choose Cancel to remove any changes you made in the dialog.
Reference Material for International Settings
This section provides reference material for tasks related to international
settings.
Locales for LANG and WABI_KEYB Variables
See page 112 for the procedures
to set these variables.
Table 7-1 lists the locale names available for use with the LANG and WABI_KEYB
variables and the languages and regions these variables represent. It also
includes the equivalent DOS keyboard variables.
Table 7-1
114
Locales Used for Environment Variables
Language – Country
Locale
Equivalent
DOS Variable
English – United States
en_US or C
KEYB_us
English – United Kingdom
en_UK
KEYB_uk
Danish – Denmark
da
KEYB_dk
Dutch – Netherlands
nl
KEYB_nl
Finnish – Finland
fi
KEYB_su
French – Belgium
fr_BE
KEYB_be
French – Canada
fr_CA
KEYB_cf
French – France
fr
KEYB_fr
French – Switzerland
fr_CH
KEYB_sf
Wabi User’s Guide—May 1996
7
Table 7-1
Locales Used for Environment Variables (Continued)
Language – Country
Locale
Equivalent
DOS Variable
Spanish - Latin America
es_LA
KEYB_la
Spanish – Spain
es
KEYB_sp
German – Germany
de
KEYB_gr
German – Switzerland
de_CH
KEYB_sg
Italian – Italy
it
KEYB_it
Norwegian – Norway
no
KEYB_no
Portuguese – Portugal
pt
KEYB_po
Swedish – Sweden
sv
KEYB_sv
Code Pages for the WABI_CODEPAGE Environment Variable
“Setting the WABI_CODEPAGE
Environment Variable” on
page 113 tells how to set the
variable.
Table 7-2 lists the valid code pages you can use with the WABI_CODEPAGE
variable to change the OEM character translation table used in the Wabi
environment. It also lists some of the countries in which the code pages are
commonly used.
Table 7-2
Code Pages
Code Page
Countries
437
United States
850
Western Europe
860
Portugal
861
Iceland
863
Canada
865
Denmark
Wabi International
115
7
116
Wabi User’s Guide—May 1996
On the Network
8
The Wabi program gives Microsoft Windows applications access to your
computer’s network capabilities and provides some PC network interface
support. This chapter explains Wabi network support.
About Wabi Networking
The Wabi program provides a networked environment in ways that combine
UNIX networking and PC networking. A computer running UNIX is very
likely connected to a TCP/IP network, and probably uses distributed file
system software, which allows the computer to access directories on remote
computers as if those directories were on a local hard drive. A personal
computer running DOS and Microsoft Windows is often connected to a PC
network through one of several PC network products using one of several
networking interfaces. The Wabi program uses the TCP/IP network and a
distributed file system to provide some of the services of a PC network, such as
shared file systems and devices. The Wabi program also supports the Windows
Sockets networking interface to allow certified applications, such as Lotus
Notes, to communicate through the network directly.
The Invisible UNIX Network
The Wabi program makes abundant use of the UNIX host’s TCP/IP network
and distributed file system capabilities, but this is mostly transparent to the
applications running in Wabi. The printers and drives that you connect
through Configuration Manager are often residing on the network. To an
117
8
See page 71 and page 72 for the
steps to set up drives as network
drives or local drives.
application, the printer seems locally connected to a port on a PC, but in
reality, it may be in another wing of the building, connected to a print server
on your network. The Wabi program can make any drive, local or remote in
reality, appear to an application as either local or remote. You must determine
which type of drive an application needs and set the drive accordingly.
You can connect a Wabi drive to any file system that can be accessed through
your UNIX operating system. For example, if you can access a NetWare file
system from your operating system, you can access it through a Wabi drive.
Windows Sockets Networking
Windows Sockets is a network interface allowing Microsoft Windows
applications to exchange data over a network. Windows Sockets, or Winsock, is
based on the sockets interface, a network interface used by most UNIX
operating systems, and is tailored for the Microsoft Windows environment. In
the Wabi environment, Winsock is internal to the Wabi program, so you won’t
see a winsock.dll in your windows directory.
Applications can make Winsock calls, and Wabi carries them out using TCP/IP.
The Wabi program’s Winsock capability is always available to applications,
and no configuration is necessary. Note that the Wabi program runs only the
client version of applications that use Winsock.
The Wabi program is not guaranteed to support every application that uses the
Winsock network interface. Only certified applications, such as Lotus Notes,
are supported for Winsock. See Chapter 11, “Setting Up Remote Database
Access,” for information about using supported applications featuring remote
database connectivity through Winsock.
Networking for E-Mail Applications
Wabi-certified electronic mail applications do not use a PC network interface to
exchange messages. When Microsoft Mail and Lotus cc:Mail clients run in
Microsoft Windows, they use a distributed file system provided by PC network
software. When they run in the Wabi environment, they use the distributed file
system provided by your operating system. Therefore, the Configuration
Manager does not present any network options that affect electronic mail
programs.
118
Wabi User’s Guide—May 1996
8
Network-Aware Applications
Some applications that run in the Wabi program, while not actually
communicating over the network, are “network-aware.” Such applications take
steps to prevent problems caused by multiple users having access to the same
files: locking files when open, creating temporary files for each user, storing
times in Greenwich Time for accurate time stamps across time zones, and so
on. Network-aware applications may need to know if they are using a local or
network drive. Chapter 4, “Setting Up Drives,” discusses network drives.
Novell NetWare File Systems
The Wabi program does not support the Novell NetWare API. This means you
cannot run a NetWare client to use NetWare’s file and print services directly
from the Wabi environment. The Microsoft Windows NetWare client requires
DOS-based drivers in order to communicate with the NetWare server.
However, you can set up the NetWare server and your operating system to
allow the Wabi program to access files on the NetWare server in the same way
it accesses UNIX file systems. You can purchase an add-on NetWare Loadable
Module (NLM) from Novell, Inc. to provide name space support on your
NetWare server for UNIX’s NFS-based distributed file systems. Once the NLM
is loaded, you can add an NFS name space to a NetWare volume so that the
UNIX operating system can see the files on the volume. Then, in the Wabi
environment, you can map a drive letter to the mount directory in the UNIX
file system and see the files.
You can also access files on a NetWare server that does not have the NLM for
NFS if your operating system is equipped with IPX/SPX streams drivers and a
“netware” file system type. If your system has devices named something like
/dev/ipx and /dev/spx, it has IPX/SPX streams drivers. If your system has
either additional parameter values on the mount command or an entirely new
command for mounting NetWare volumes, it has software that provides a
NetWare-type file system.
On the Network
119
8
If your operating system does not provide IPX/SPX streams drivers and a
NetWare-type file system capability as part of its core, you may be able to
obtain the necessary software as an extension to the operating system, possibly
as custom software or from a third party vendor.
If you are running the Solaris operating environment, you can purchase the
SolarNet™ LAN Client 1.1 for the Solaris 2.x Operating Environment. This
product enables a Solaris system to act as a network client so you can mount
NetWare volumes as Solaris directories. You can then use Wabi to access
programs and files on those volumes as if they were on a local disk on your
Solaris system after assigning a Wabi drive to the directories. SolarNet LAN
Client also allows you to mount Windows for Workgroups and LAN Manager
volumes in a similar fashion. Printing to NetWare and LAN Manager printers
is also enabled through the use of special print commands. You can print to
these printers through Wabi if you define a Wabi printer to use the special print
command in the Wabi Configuration Manager. See “Configuration Manager’s
Printers Tab Sheet” on page 85 for more information about defining a UNIX
print command.
120
Wabi User’s Guide—May 1996
Installing Microsoft Windows
Applications
9
Wabi
Server
This chapter discusses using the Wabi program to install Microsoft Windows
application programs. You cannot install DOS-based applications using the
procedures described here. Chapter 12, “Using a DOS Emulator in the Wabi
Environment,” discusses DOS-based applications.
WabiServer administrators should read this chapter and also refer to the
WabiServer Administrator’s Guide for information about installing applications
to create prototypes.
If you are not familiar with the installation of software under the Wabi
program and would like to learn more about it, read the next section, “About
Application Installation.”
If you want instructions for specific tasks related to installing applications, use
the following table to locate the instructions you need.
Task
Page
Installing a Windows Application From Diskette
138
Installing a Windows Application From CD-ROM
139
Installing an Application on a Network Server
140
Installing an Application to a Workstation From a Network
Server
141
121
9
Task
Page
Setting Up Drag and Drop Printing in OpenWindows
141
Printing Windows Application Files in OpenWindows Print
Tool
142
Deleting a Binder Entry for an Application File
143
About Application Installation
Installing an application requires you to place the application in a directory on
your system or on a network file server by using the application’s install or
setup program through the Microsoft Windows Program Manager.
Before you install an application, consider these important points:
“Your Personal Wabi Directory”
on page 11 discusses the
$HOME/wabi directory.
“Application Installation on a
Network Server” on page 125
discusses special considerations
for installing to network locations
in order to share an application.
122
•
You are responsible for adhering to the terms of the software license of each
application you use under the Wabi program.
•
You should use the Run command in the File menu of Program Manager to
install applications (except Microsoft Windows).
•
Before you begin installing an application, be sure to read the Wabi Release
Notes or supplementary guide you received with your version of the Wabi
program. It may contain important information about installing particular
applications.
•
Some application installation windows fill the screen, preventing you from
using other windows on your desktop. For this reason, you should not plan
to use your system for other work while you install an application. See
“Troubleshooting General Application Installation Problems” on page 144
for a possible workaround.
•
In general, when running standalone Wabi, you should not install
applications in drive C, even if the application provides drive C as the
default location for installation. Drive C is connected to $HOME/wabi, which
contains Wabi program files that should be kept separate from application
files. You should use drive C only for files of which users must have their
own copy, and for applications that must access a simulated hard drive for
their copy protection schemes to work.
You can install an application in any other location you like. The only
limitations are that you must have adequate space in the directory in which
you install the application, and you must have permission to write to the
Wabi User’s Guide—May 1996
9
directory. If you intend to store the files you create with the application in
the same directory as the application, make sure the extra space required for
these files is available in the directory.
Installing applications on drives other than C gives you the freedom to
move the application to other file systems. If you remap the drive to the new
location, the application’s setup information, such as the command to run it,
will remain valid. For example, if you map drive F to /home/me/myapps
and install Microsoft Office in F:\msoffice, you could later move
msoffice to /files/msapps/msoffice and remap F to
/files/msapps. The command path to Microsoft Word, for example,
would be F:\msoffice\winword\winword.exe for both locations.
Wabi
!
Server
If you are using WabiServer, you should not install additional applications
in drive C. If you install additional applications in drive C and later select a
new prototype to create a Wabi directory in the same location, your drive C
will be overwritten and you will have to reinstall the additional
applications. You should choose a drive other than C to avoid this problem.
Server
Wabi
WabiServer administrators should install applications on a drive to which
all users will have access. This can be accomplished by connecting a Wabi
drive to a common location on a file server and installing the applications
on that drive. The drive connection will be passed to each user’s
environment as the environment is created from the prototype.
•
Many installation programs tell you to reboot your computer after installing
the application. This is not necessary under the Wabi program. You need
only exit and restart the Wabi program.
•
The Wabi program may provide integration with your X Window desktop.
The degree of integration varies with each UNIX platform. See “Solaris
Desktop Integration” on page 128 for more information about integration in
the OpenWindows environment.
Caution – The Wabi program does not support Adobe Type Manager (ATM)
fonts. If your application includes a disk containing Adobe Type Manager or
ATM fonts, do not install this disk.
Installing Microsoft Windows Applications
123
9
The Run Command
You install applications using the Run command. You’ll find this command in
Program Manager’s File menu. To install an application, open the File menu
and choose Run. The Run dialog box opens, as shown in Figure 9-1.
Figure 9-1
Run Dialog Box
The Command Line entry field in the Run dialog box is where you tell the
Wabi program the location of the application files, and the name of the
application installation program.
The location includes the drive letter, which depends on whether you are
installing from diskette, the network, or CD-ROM. It may also include a
directory path on the diskette, network, or CD-ROM.
The name of the application’s installation program depends on the application
you are installing. Many applications use setup or install as the name of
the program that starts the installation process. If the application includes both
setup and install programs, install is likely used for DOS systems, and
setup for Microsoft Windows systems. See the application’s documentation
for the command to begin installation.
124
Wabi User’s Guide—May 1996
9
Application Installation From Diskettes
See“Installing a Windows
Application From Diskette” on
page 138 for step-by-step
procedures.
If you are installing an application from diskettes, the drive letter will be A or
B, depending on the diskette drive you are using. If there is one diskette drive,
it is usually A.
The command that you use to install a typical application from diskette is
often:
A:\SETUP
When you type this command in the Run dialog box and choose OK, the Wabi
program passes control to the application’s installation program. What you see
next depends on the installation program. Follow the instructions presented by
the installation program, inserting program disks as required throughout the
installation process.
Application Installation From CD-ROM
If you want to install an
application from CD-ROM, see
“Installing a Windows Application
From CD-ROM” on page 139.
If you are installing an application from CD-ROM, you must first make sure
the CD-ROM drive is accessible from the operating system. See “CD-ROM
Drives” on page 66 for information about using CD-ROM drives in the Wabi
program.
When you have assigned a Wabi drive letter to the CD-ROM directory, you can
install the application using the Run command in Program Manager, as
described in “The Run Command” on page 124.
Application Installation on a Network Server
If you want to install an
application on a network server,
see “Installing an Application on a
Network Server” on page 140.
Because the Wabi program runs in a networked UNIX environment with a
distributed file system, it is easy to share applications over the network. You
do not need any additional software for file sharing as you would on a PC
because your operating system provides that function. You simply connect a
Wabi drive to a directory on the network server where you want to install the
application, and specify this drive and directory when prompted for the
installation location.
Most Wabi-certified applications can be used in both standalone and network
environments and provide a way to install to a network file server. The method
used for a network installation varies from application to application. Some
Installing Microsoft Windows Applications
125
9
installation programs require a switch on the command line, which instructs
the installation program to place the files on a network server so that users can
then install the application from that location to their own workstations. Other
application installation programs offer a server installation option you can
select in a dialog box.
Some applications let users run the application from the network server
without installing all the application files to their workstations. In this case, the
installation program installs on the workstation the minimum files needed to
run the application.
Before you install an application to a shared network location:
!
126
•
Refer to the application’s manuals for specific information about installing
on a network. Some applications include on the installation diskettes a
Readme file describing network installation.
•
Connect a Wabi drive to the network directory, and make sure the Network
option is selected on the drive.
•
If users will be using the application in a workgroup arrangement (for
example, working on shared reports, spreadsheets, and so on), you should
probably use file sharing. Look through the application’s documentation to
see if you should not use file sharing. The DOS program SHARE.EXE enables
file sharing in the Microsoft Windows environment, so look for a discussion
about using SHARE.EXE. If there are no warnings against using SHARE.EXE,
select the Shared option on the Wabi drive where the shared files are stored.
•
Make sure that everyone allowed to install the application has a license to
use it. For most applications, this requirement can be fulfilled by purchasing
a single-user copy for each user, or by purchasing a “license pack” for
multiple users.
Caution – Some Wabi-certified applications are created for single-user, singletasking, nonprotected environments, and do not function well in a network
environment. In addition, sharing may be prohibited by the application’s
software license agreement. You are responsible for adhering to the terms of
the software license of each application you use under the Wabi program.
Wabi User’s Guide—May 1996
9
Application Installation From a Network Server Through a Wabi Drive
Once an application has been installed on a network server, users can install
application files to their computers through a Wabi drive.
Note – You are responsible for adhering to the terms of the application’s
software license. Each user who installs an application, whether from a drive
or from diskette, must be licensed to use the software.
If you want to install an
application from a network
server, see “Installing an
Application to a Workstation
From a Network Server” on
page 141.
The method for installing an application from a Wabi drive is the same as
installing from diskette — you use the Run command from the File menu in
Program Manager. However, the drive you specify is a Wabi drive through
which you access the directory where the application is located.
You can use the preconfigured drive R and specify a complete path name to the
directory. You can also use Configuration Manager to connect a different Wabi
drive letter to the directory containing the files. In either case, you enter in the
Run dialog box (shown in Figure 9-1) the Wabi drive letter and the path to the
application files.
For example, if the application files are located in directory path
/usr/apps/install/hg20, you could enter the following in the entry field
of the Run dialog box:
R:\usr\apps\install\hg20\setup
You could also assign drive letter F to /usr/apps/install/hg20 and enter:
F:\setup
The type of slash character you use depends on whether a UNIX or a DOS path
name is involved. The backslash (\) is used in DOS path names. The forward
slash (/) is used in UNIX path names. The Wabi program accepts both types of
slash characters, but you should use one type within a command line.
Installing Microsoft Windows Applications
127
9
Solaris Desktop Integration
The Wabi program and the applications you install into your Wabi
environment are integrated into your Solaris desktop, whether you use the
OpenWindows environment or the Common Desktop Environment (CDE).
Wabi provides integration with the file managers, mail utilities, and print tools
of both environments. This integration allows you to open Microsoft Windows
application files by double-clicking the associated icons in the file managers or
in the attachment area of a mail message. Integration also enables you to print
a Microsoft Windows file by dragging its icon and dropping it on the print
tool.
In CDE, the Wabi program itself is integrated into the desktop when you install
the Wabi package. In the less structured OpenWindows environment, the Wabi
program is not integrated into the Workspace menu automatically, but it is a
simple process to include it.
OpenWindows Integration
In the OpenWindows environment, you can add the Wabi program to your
Workspace menu to integrate Wabi in your desktop. You can also add
Microsoft Windows applications to your Workspace menu in the same manner.
When you install a Microsoft Windows application into your Wabi
environment, the Wabi program integrates the application into your
OpenWindows environment. This automatic integration lets you double-click
on the application’s document files in the OpenWindows File Manager and
Mail Tool to start the application and open the file. If the Wabi program is not
already running, it starts transparently before it starts the application. If the
Wabi program is already running, it simply starts the application and opens
the file.
Wabi on the Workspace Menu
If you want to start the Wabi program from your Workspace menu, you can
edit your .openwin-menu file or .openwin-menu-programs file to insert a
line for Wabi. Edit .openwin-menu if you would like the command on your
top-level Workspace menu. Edit .openwin-menu-programs if you want the
command on your Programs submenu. Insert the following line in the file:
Wabi...
128
exec /opt/SUNWwabi/bin/wabi
Wabi User’s Guide—May 1996
9
This example uses the default location for the Wabi program files. You should
use the correct path for your system.
Windows Applications on the Workspace Menu
If you want to start a Microsoft Windows application from your Workspace
menu, you can insert a line for the application in your .openwin-menu file or
.openwin-menu-programs file. Use the command formats described in
“Starting an Application From a UNIX Command” on page 156 or “Running
an Application Transparently” on page 157.
File Manager Integration
After you install an application into the Wabi environment, restart the
OpenWindows File Manager. You can then start the application from File
Manager by double-clicking the application's icon. You can also double-click
the icon of a file created with an application to start the application and open
the file.
If you use File Manager's Large Icon View, the icons you see look like the
familiar Microsoft Windows icons. However, in OpenWindows, icons can use
only two colors, so the icons do not have the same colors as in the Wabi
environment. If you use File Manager's Small Icon View, the icons you see are
File Manager's small default icons.
Mail Tool Integration
If you restart Mail Tool after you install an application into the Wabi
environment, you can double-click attachments in messages to start the
application associated with the attachment. For example, if you have installed
Microsoft Word in your Wabi environment and you receive a Microsoft Word
document as a mail attachment, you can double-click the attachment to start
Word and open the document.
Print Tool Integration
If you restart Print Tool after you install an application into the Wabi
environment, you can drag and drop icons for Microsoft Windows application
files on the Print Tool to print the files. When you do this, Wabi starts in the
Installing Microsoft Windows Applications
129
9
background. What happens next varies from one Microsoft Windows
application to another. The associated Microsoft Windows application may
start and display its Print dialog. Some applications display their main
window, load the file, and open a Print dialog. Some applications display only
the Print dialog, while others just transparently print the file to the default
printer. The file is printed on the printer that the application is currently set up
to use, which is usually either the default printer or the printer last used. This
may not be the same printer that is currently selected in Print Tool.
How OpenWindows Integration Works
In the OpenWindows environment, you can associate a document file with the
application that created it by binding the document file name extension to the
application’s executable file. For example, a file with a .txt extension is
associated with, or bound to, the OpenWindows Text Editor tool, so when you
double-click on a .txt file, the textedit program starts. This binding is
controlled through the OpenWindows Binder application.
See the Solaris User's Guide for
information about Binder.
See “Wabi Desktop Integration
Program” on page 137 for more
information about wabidti.
When you install a Microsoft Windows application, the Wabi program creates
the bindings for the application’s executable files so that OpenWindows knows
it must start Wabi and the executable when you open the icon for the
executable. Wabi also creates bindings for file extensions associated with the
application.
The bindings for file extensions use the Wabi Desktop Integration program,
wabidti, which is a Windows-based program that extracts from your wabi
directory some information about the file extension, including the associated
application’s location and methods for opening and printing files. The Wabi
program then uses the information to open or print the file.
Important Notes About OpenWindows Integration
Below are some important points about the integration of Windows application
files into your OpenWindows environment:
•
•
130
You can use the Binder program to change any binding that Wabi has made.
If you remove an application from your Wabi environment, you should
manually remove the bindings associated with the application using the
Binder program.
Wabi User’s Guide—May 1996
9
•
If you move or reinstall some applications to a different location, you may
have to manually update the bindings with the new path. Generally, if an
application specifies a drive letter and full path for its extensions listed in
win.ini, you must manually update the bindings with the new path. If the
application does not use a full path for extensions, you do not have to
update the bindings. For example, if you installed Microsoft Mail, your
win.ini file’s [Extensions] section would contain this entry, which is
not path-dependent: mmf=msmail.exe /f ^.mmf. If you move the
Microsoft Mail directory to another location, you do not have to update the
bindings.
•
If an installed application uses full paths for extensions, and you run Wabi
from different systems, be sure to install the application in a common Wabi
drive and path so that Wabi can access the application with the same path
name on all systems. The binding for such an application will contain drive
and path-specific information. If you have two different drive mappings on
two different systems, the File Manager and Mail Tool integration will not
work on both systems.
•
Wabi does not associate .txt files with the Windows Notepad. It is
assumed that Solaris users prefer to use Text Editor when reading text files.
However, you can bind .txt files to Notepad with Binder if you like.
•
If you are upgrading from Wabi 1.x, applications that you previously
installed will not be integrated into your OpenWindows environment
because OpenWindows integration was introduced in Wabi 2.0. If you want
to integrate them, you can use the Binder program to bind applications to
their associated file extensions, or reinstall the applications and have Wabi
create the bindings.
•
Introduction of the wabidti program in Wabi 2.2 changed Wabi’s method
of binding. Applications installed in Wabi 2.0 or 2.1 will use the earlier
binding method. If you reinstall the applications in the same or a different
location, the bindings will be updated to use the wabidti program. This
program offers the advantage of not depending on the application’s
location, unless the application itself has supplied a complete path to its
location.
Installing Microsoft Windows Applications
131
9
Conflicting Bindings
See “Deleting a Binder Entry for
an Application File” on page 143
for procedure to delete a binder
entry. See the Solaris User's
Guide for detailed information
about Binder.
Within the OpenWindows environment, applications create files with unique
extensions. However, some Microsoft Windows applications use the same file
extensions as some Solaris applications, so there may be conflicts between file
types already bound to Solaris applications and the file types that are added
when you install Windows applications. For example, the extension .doc is
used by Microsoft Word and also by the desktop publishing application,
FrameMaker. If you have FrameMaker installed in Solaris and then install
Microsoft Word into your Wabi environment, Wabi changes the binding of
.doc from FrameMaker to Word. When you restart File Manager, all .doc files
have a Word icon and if you double-click them, Word starts instead of
FrameMaker. If you want to use FrameMaker, you must either start it and open
FrameMaker .doc files from FrameMaker, or delete the .doc binding that
Wabi created.
Another possible conflict may occur if you have a UNIX version of an
application and a Microsoft Windows version of the same application
accessible on your system. For example, if you have a UNIX version of Lotus
123 and install the Lotus 123 for Windows into your Wabi environment, the
associated 123 file bindings are changed to start Wabi. Conversely, if you install
the Windows version first, and then install the UNIX version, the bindings are
changed to start the UNIX version.
CDE Integration
In the Solaris Common Desktop Environment, icons for the Wabi program and
any Microsoft Windows applications you install with it are integrated into the
desktop. The icons are installed in the Application Manager.
Wabi also provides integration with CDE’s File Manager, Mailer, and Default
Printer. This integration allows you to open a Microsoft Windows application
file by double-clicking on its icon in the File Manager or in the attachment area
of a mail message, and print an application file by dragging its icon and
dropping it on the Printer icon.
Wabi Icon in Application Manager
After the Wabi package is installed on your system, the Wabi icon appears in
the Application Manager, as shown in Figure 9-2. You can double-click the icon
to start Wabi and the Windows Program Manager.
132
Wabi User’s Guide—May 1996
9
Figure 9-2
CDE Application Manager with Wabi and MSWindows_Apps Icons
Note – If Wabi does not start when you double-click the icon, the Wabi system
directory (by default, /opt/SUNWwabi/bin) is probably not on your UNIX
path. You should add it to your .login or .profile and edit your
.dtprofile so that your profile is sourced (read) when CDE starts. See the
comments in your .dtprofile for details about sourcing your profile.
Microsoft Windows Icons in Application Manager
After you install applications, the MS-Windows Applications folder is added to
the Application Manager. As you install each application, Wabi creates the
actions, types, and icons that enable you to double-click icons to launch
applications.
Installing Microsoft Windows Applications
133
9
Figure 9-3
MSWindows Application Folder in CDE
If an application’s icons do not appear after you install the application, you
should run the Reload Actions, Reload Applications, and Reload Resources
actions in the Application Manager’s Desktop Tools group.
CDE File Manager Integration
In File Manager, you can double-click a Microsoft Windows executable or a file
created with a Microsoft Windows application to start the associated
application.
Mailer Integration
If you restart the Mailer after you install an application into the Wabi
environment, you can double-click attachments in messages to start the
application associated with the attachment and load the file in the attachment.
134
Wabi User’s Guide—May 1996
9
For example, if you have installed Microsoft Word in your Wabi environment
and you receive a Microsoft Word document as a mail attachment, you can
double-click the attachment to start Word and open the document.
Default Printer Tool Integration
After you install an application into the Wabi environment, you can drag and
drop icons for Microsoft Windows application files on the Default Printer icon
in the Front Panel to print the files. When you do this, Wabi starts in the
background. What happens next varies from one Microsoft Windows
application to another. The associated Microsoft Windows application may
start and display its Print dialog. Some applications display their main
window, load the file, and open a Print dialog. Some applications display only
the Print dialog, while others just transparently print the file to the default
printer. The file is printed on the printer that the application is currently set up
to use, which is usually either the default printer or the printer last used. This
may or may not be your UNIX default printer.
How Wabi CDE Integration Works
When you install a Microsoft Windows application into your Wabi
environment, the Wabi program:
• Converts the application’s icons from Microsoft Windows format to a format
that CDE can use, and stores them in your $HOME/.dt/icons directory.
• Creates action files in your $HOME/.dt/appmanager/MSWindows_Apps
directory, so the application’s programs can be executed from the icons.
• Creates action database files (*.dt) in your $HOME/.dt/types directory, to
provide CDE the information needed to run the application.
See “Wabi Desktop Integration
Program” on page 137 for more
information about wabidti.
When you double-click the icon of the application you installed, the action file
is executed, using the information in the action database file. The action
database file contains information about starting the application, and opening
and printing the application’s files. Wabi uses the Wabi Desktop Integration
program (wabidti) to obtain information about the application from your
$HOME/wabi directory. The wabidti program is run whenever you execute an
action by double-clicking the Windows application’s icon.
Installing Microsoft Windows Applications
135
9
Important Notes About CDE Integration
•
If you installed an application in a Wabi version prior to Wabi 2.2, whether
in the OpenWindows environment or CDE, the application will not be
integrated into your CDE environment in Wabi 2.2. We recommend
reinstalling the application to allow the Wabi program to perform the
integration.
•
If you move an application’s files after installing it in Wabi 2.2, you may
need to edit the *.dt files for the application to update the path. To find out
if you need to do this, look for the ACTION MSWindows_App_application
section in the $HOME/.dt/types/MSWindows_App_application.dt file.
Within that section, find the line beginning EXEC_STRING wabi -s. If the
application executable in this string includes a drive and path, you must
update it to the new location of the application.
For example, if you installed Quicken 4.0 and want to move it, open the file
MSWindows_App_Quicken_4_for_Windows.dt and edit the path
underlined below.
ACTION MSWindows_App_Quicken_4_for_Windows
{
LABEL
Quicken_4_for_Windows
TYPE
COMMAND
EXEC_STRING
wabi -s h:/quickenw/qw.exe
ICON
MSWindows_App_Quicken_4_for_Windows
WINDOW_TYPE
NO_STDIO
DESCRIPTION
This is Quicken_4_for_Windows Application
}
Note that you can accomplish the same thing by reinstalling the application
in the new location. Wabi will update the *.dt files.
Conflicting File Associations
Some Microsoft Windows applications use the same file extensions as some
Solaris applications. There may be conflicts between file types already
associated in CDE with Solaris applications and the file types that are added
when you install Windows applications. For example, the extension .doc is
used by Microsoft Word and also by the desktop publishing application,
FrameMaker. If you have FrameMaker installed in Solaris and then install
Microsoft Word into your Wabi environment, Wabi creates a
136
Wabi User’s Guide—May 1996
9
MSWindows_App_Microsoft_Word.dt file (in $HOME/.dt/types) which
changes the association of .doc from FrameMaker to Word. When you restart
File Manager, all .doc files have a Word icon. If you double-click them, Word
starts instead of FrameMaker. If you want to use FrameMaker, you must either
start it and open FrameMaker .doc files from FrameMaker, or have your
system administrator edit the MSWindows_App_Microsoft_Word.dt file to
delete all the sections where .doc is referenced. There are four sections that
must be deleted:
• DATA_ATTRIBUTES doc
• DATA_CRITERIA docA
• ACTION Open
• ACTION Print
Make sure to delete only those sections referring to the file types with the
conflict. Most *.dt files include information for several file types.
Wabi Desktop Integration Program
The Wabi Desktop Integration program, wabidti, is a Microsoft Windowsbased application that looks up information about installed applications in
your $HOME/wabi directory, such as the file extensions associated with the
application, command switches needed to print a file, and the location of the
Windows executables for the application. The wabidti program is used in
both OpenWindows integration and CDE integration. For OpenWindows,
the program is used in the bindings for opening and printing files. For CDE,
the program is used in the Open and Print actions included in *.dt files for
the application. When you open or print a Windows application file from its
icon, Wabi first runs the wabidti program.
wabidti Command Format
Although you should never run the wabidti program yourself, you may
need to know the format for using the command if you edit a binding in
OpenWindows, or edit a *.dt file in CDE.
For OpenWindows
In the OpenWindows Binder utility, the command to open a Windows file is:
wabi -s w:/wbin/wabidti.exe open $FILE
Installing Microsoft Windows Applications
137
9
The Print Method command for a Windows file is:
wabi -s w:/wbin/wabidti.exe print $FILE
For CDE
In CDE action database (*.dt) files, the EXEC_STRING for the Open action
is:
wabi -s w:/wbin/wabidti.exe open "%Arg_1%"
The EXEC_STRING for the Print action is:
wabi -s w:/wbin/wabidti.exe print "%Arg_1%"
Instructions for Tasks Related to Installing Applications
This section provides detailed, step-by-step instructions for performing a
variety of tasks related to the installation of Microsoft Windows applications.
▼ Installing a Windows Application From Diskette
1. Determine the directory in which you want to install the application.
If necessary, assign a Wabi drive to the directory.
Note – You should install applications on a drive other than the C drive.
See “About Application
Installation” on page 122 for
more details about installing
applications.
2. In Program Manager, open the File menu and choose Run.
The Run dialog box opens.
3. In the Command Line entry field, enter the diskette drive letter and the
name of the installation program.
For example, to install Microsoft Word for Windows, enter A:\SETUP.
4. Choose OK.
An application-specific dialog box opens providing additional instructions.
5. When prompted for a location in which to install the application, indicate
an assigned Wabi drive (and path name, if necessary).
Most applications provide a default path name on the C drive, so you
should not accept the default. Replace it with the drive and directory name
you decided on in Step 1. For example, if you connected drive D to
138
Wabi User’s Guide—May 1996
9
$HOME/winapps, and want to install the application in
$HOME/winapps/mailapps, enter D:\mailapps. The application is
placed in your $HOME/winapps/mailapps directory.
6. Follow the instructions in the installation dialog box to complete
installation.
Note – If your diskette drive does not provide an eject button, you can eject
diskettes by clicking in the Wabi window and pressing the Meta and E
keys.
+ EE
▼ Installing a Windows Application From CD-ROM
1. Determine the directory in which you want to install the application.
If necessary, assign a Wabi drive to the directory.
Note – You should install applications on a drive other than the C drive to
separate Wabi files from application files.
See “Accessing a CD-ROM
Drive” on page 72 for instructions
on assigning a Wabi drive to the
CD-ROM.
2. Open Configuration Manager and assign a Wabi drive to the CD-ROM
directory.
3. In Program Manager, open the File menu and choose Run.
The Run dialog box opens.
4. In the Command Line entry field, type the CD-ROM drive letter and the
name of the installation program.
For example, if you connected drive M to the CD-ROM directory, and the
installation program is SETUP, type M:\setup.
5. Choose OK.
An application-specific dialog box opens providing additional instructions.
6. When prompted for a location in which to install the application, indicate
an assigned Wabi drive (and path name, if necessary).
Most applications provide a default path name on the C drive, so you
should not accept the default. Replace it with the drive and directory name
you decided on in Step 1. For example, if you connected drive D to
Installing Microsoft Windows Applications
139
9
$HOME/winapps, and want to install the application in
$HOME/winapps/mailapps, enter D:\mailapps. The application is
placed in your $HOME/winapps/mailapps directory.
7. Follow the instructions in the installation dialog box to complete
installation.
▼ Installing an Application on a Network Server
See “Application Installation on a
Network Server” on page 125 for
more details about installing
applications on servers.
1. Refer to the application’s documentation for specific information about
installing on a network.
Some applications include on the installation diskettes a ReadMe file
describing network installation.
2. Start the Wabi program on your computer.
See “Assigning a Drive” on
page 68 for steps required to
connect a drive.
3. Connect a Wabi drive to the server directory where you want to install the
application.
4. Select the Network option for the drive.
5. Select the Shared option for the drive if users will be working on shared
files stored on this drive.
6. Choose the Run command from the File menu in Program Manager.
7. In the Run dialog box, enter the command needed to install the
application onto a network server.
Refer to the application’s documentation for the command you need to run,
along with any necessary switches. Enter the drive letter plus the full
directory path to the command. If the path is long, or you’re not sure what
it is, choose the Browse button and search for the directory and command
on the server.
8. Choose OK in the Run dialog box.
The installation or workstation setup program starts.
9. Follow the program’s instructions to place the application files on a
network server.
140
Wabi User’s Guide—May 1996
9
▼ Installing an Application to a Workstation From a Network Server
See “Application Installation
From a Network Server Through
a Wabi Drive” on page 127 for
more details about installing
applications from servers.
1. Make sure the network server directory where the application is installed
is accessible to your operating system.
2. Start the Wabi program on your computer.
3. Choose the Run command from the File menu in Program Manager.
4. In the Run dialog box, enter the command needed to install the
application from the network.
Refer to the application’s documentation for the command you need to run,
along with any necessary switches. Enter the drive letter plus the full
directory path to the command. If the path is long, or you’re not sure what
it is, choose the Browse button and search for the directory and command
on the server.
5. Choose OK in the Run dialog box.
The installation or workstation setup program starts.
6. Follow the program’s instructions to set up your computer to run the
application.
▼ Setting Up Drag and Drop Printing in OpenWindows
Note – This procedure is necessary only for applications you installed in a
Wabi release prior to Wabi 2.2. Drag and drop printing is set up for you when
you install an application in Wabi 2.2.
Let’s assume you installed Microsoft PowerPoint in Wabi 2.1 and placed the
files in your H:\apps directory (your $HOME/apps in UNIX). To enable drag
and drop printing of PowerPoint files, follow the steps below.
1. Start the OpenWindows Binder utility.
You can select Binder from your OpenWindows Workspace menu or enter
the following command in a Command Tool or Shell Tool:
binder &
Binder starts and displays a list of application and file types.
2. Open View and choose Personal Entries.
Installing Microsoft Windows Applications
141
9
3. Scroll down the list of application and file types and select the file type
you want to print.
For example, to print PowerPoint slides, which have the .ppt file extension,
select the entry ppt-file.
4. Open Props and choose Icon.
The Binder: Properties window shows information about that entry,
including the icon to display and its foreground and background colors.
5. Choose the [+] button at the bottom of the Properties window.
Additional information about the file type is displayed. The Application
field contains a command used to edit files of this type. The Print Method
field is blank.
6. Enter the following command in the Print Method field.
wabi -s w:/wbin/wabidti.exe print $FILE
7. Choose the Apply button in the Binder Properties dialog, and dismiss the
window.
8. Choose Save in the Binder main window, then exit Binder.
9. Restart Print Tool.
See the next section for information about printing files.
▼ Printing Windows Application Files in OpenWindows Print Tool
1. If you installed the application in a Wabi release prior to Wabi 2.2, define
the print method in the Binder utility, as explained in the previous
section.
If you installed the application in Wabi 2.2, you can skip this step.
2. Open File Manager and find a file with the extension associated with the
application, or open Mail Tool and find a message with an attached file
with this extension.
3. Drag the file icon and drop it onto the Print Tool icon.
4. The associated Microsoft Windows application starts and displays its
Print dialog.
Some applications display their main window, load the file, and open a
Print dialog. Some applications display only the Print dialog. Some
applications just print the file to the default printer.
142
Wabi User’s Guide—May 1996
9
5. Use the Print dialog as you normally would to send the file to print.
The file is printed on the printer that the application is currently set up to
use, which is usually either the default printer or the printer last used. This
may not be the same printer that is currently selected in Print Tool.
▼ Deleting a Binder Entry for an Application File
See “Conflicting Bindings” on
page 132 for reasons you might
want to do this.
1. Start the OpenWindows Binder utility.
You can select Binder from your OpenWindows Workspace menu or enter
the following command in a Command Tool or Shell Tool:
binder &
Binder starts and displays a list of application and file types.
2. Open View and choose Personal Entries.
3. Scroll down the list of application and file types and select the file
binding you want to delete.
For example, if you want to delete the .doc file binding for Word, select the
entry doc-file.
4. Choose Delete.
5. Choose Save, then exit Binder.
6. Restart File Manager, Mail Tool, and Print Tool.
Installing Microsoft Windows Applications
143
9
Reference Material for Tasks Related to Installing Applications
This section provides reference material for tasks related to installing
Windows-based applications and the Microsoft Windows software.
Troubleshooting General Application Installation Problems
Table 9-1 suggests solutions to common problems you might experience during
application installation.
Table 9-1
144
Windows Application Installation Problems and Solutions
Symptom
Possible Cause
Solution
Application will
not fully install.
Not certified to run
in Wabi program.
Only certified applications are sure
to install correctly. Uncertified
applications may use nonstandard
installation procedures or data
compression methods that Wabi has
not been designed to translate.
Application does
not install
correctly.
Special installation
procedures
required.
See the Release Notes or
supplementary manual you may
have received with the Wabi
program.
Application
installation fails
with error
“ACMSETUP
Caused a General
Protection Fault in
Module
MMSETUP.DLL.”
Some Microsoft
applications’ setup
programs alter the
system.ini file
incorrectly.
With a DOS or UNIX text editor, edit
$HOME/wabi/windows/system.ini
and insert a blank line before each
section title. Section titles are
enclosed in square brackets. (Note
that UNIX editors display blank
lines in DOS text files as ^M. You do
not need to remove them.)
Save the file, restart the Wabi
program, and reinstall the
application.
Wabi User’s Guide—May 1996
9
Table 9-1
Windows Application Installation Problems and Solutions (Continued)
Symptom
Possible Cause
Solution
Application
installation
program covers the
screen, blocking
other application
windows.
Application was
not designed for
the X Window
desktop.
Some applications do not let you
change this, but you can try the
following:
Installing Microsoft Windows Applications
•
Try reducing the size of the
window by restoring it. To
restore, click on the Wabi logo in
the upper left corner of the
window (if it’s visible) and
choose Restore in the pull-down
menu, or press Alt+Spacebar, R.
This does not work for all
installation programs.
•
If your keyboard has a key or
key combination that raises
windows, such as a Front key,
try pressing it once to make the
installation window go to the
back so you can see other
windows. It may take Wabi
several seconds to respond to
key strokes if the application
installation is loading your
computer heavily. This
technique does not work with
all installation programs.
145
9
Table 9-1
146
Windows Application Installation Problems and Solutions (Continued)
Symptom
Possible Cause
Solution
Application installs
very slowly
Application uses
nonstandard
compression
routines.
Most files must be
decompressed at
installation. If an
application uses
standard Windows
routines, it installs
quickly because
Wabi translates to
UNIX routines to
decompress. If an
application does
not use standard
routines, Wabi
must execute the
decompression
one instruction at a
time.
If you find an application installation
intolerably slow, try some of these
ideas:
Wabi User’s Guide—May 1996
•
Obtain the application on CDROM if possible. CD-ROM files
are not compressed, so Wabi
does not have to decompress,
making installation faster.
•
Check the application
documentation for an
installation option to do a
partial installation to
decompress the files. If there is,
do the partial installation, and
store the decompressed files in a
network directory where other
users can use them to do the
second half of the installation.
•
Investigate the possibility of all
the users on the network
referencing a single copy of the
application, so you only have to
install the application once.
CAUTION: If you share a single
copy, remember you must have a
license for every user of the
application. You are responsible
for adhering to the terms of the
software license of each
application you run in the Wabi
program.
Using Microsoft Windows
Applications
10
This chapter discusses starting and using Microsoft Windows applications in
the Wabi environment.
If you are not familiar with starting applications under the Wabi program and
would like to learn more about it, read the next section, “About Starting
Applications.” If you want instructions for specific tasks related to starting
applications, use the following table to locate the instructions you need.
Task
Page
Starting an Application From an Icon
155
Starting an Application From a Run Command
155
Starting an Application From a UNIX Command
156
Running an Application Transparently
157
Opening a File When Starting an Application
158
Copying and Pasting From Windows Applications to X
Applications
159
Copying and Pasting From X Applications to Windows
Applications
159
147
10
About Starting Applications
Generally, you can use Microsoft Windows applications in the Wabi
environment the same as in the Microsoft Windows environment.
You can start applications several different ways:
•
•
•
•
From within Program Manager, by opening an icon or using the Run
command
Using Microsoft Windows File Manager, by using the Run command or by
opening an executable file
Using OpenWindows or CDE File Manager, by opening an executable file or
a document file created by the application
From a UNIX command window, using the wabi command along with
some parameters
Application Startup From an Icon in Program Manager
When you install a Microsoft Windows application, the Wabi program creates
an item representing the application. This item, represented by an icon, is
stored in a group. Usually, the application’s install program creates its own
group.
See “Starting an Application
From an Icon” on page 155 for
specifics on getting an
application to run.
Running an installed application using an icon is straightforward. Open the
icon representing the application and the application starts. Once the
application starts, a window opens revealing the initial application screen.
You can minimize any application, including the Program Manager. The icons
of minimized applications are automatically placed in the upper-left corner of
your desktop. You can restore a minimized application by opening its icon. You
can also restore a minimized application by single-clicking its icon and
selecting Restore from the window control box.
Application Startup With the Run Command in Program Manager
When the Wabi program is already running Program Manager, you can start an
application using the Run option from the File menu. The command you enter
is the same command you would use to run the application on a PC, except
that the drive letter indicates a path on your UNIX system.
148
Wabi User’s Guide—May 1996
10
Application Startup in Microsoft Windows File Manager
You can use Microsoft Windows File Manager to start applications just as in
the Microsoft Windows environment: open a program file or a document file
associated with an application. In the Wabi environment, however, you cannot
open files with .COM, .PIF, or .BAT extensions because they are not Windows
executables. Only Windows executables with .EXE extensions will run in the
Wabi environment.
Application Startup in OpenWindows File Manager
When you install applications into a Wabi environment running on an
OpenWindows desktop, the Wabi program creates a binding for the application
and its associated files. This is similar in concept to the Microsoft Windows File
Manager’s Associate function, where you create an association between an
application and the file types it creates. The OpenWindows binding enables
you to open a document file in OpenWindows File Manager and have the Wabi
program start the application associated with, or bound to, the document file
type. See “Solaris Desktop Integration” on page 128 for more information.
Application Startup at the UNIX Command Line
See “Starting an Application
From a UNIX Command” on
page 156 for the command
format.
You can run an application directly with the wabi command by specifying the
application startup command as an argument to the wabi command.
Depending on how you specify the application startup command, you can
make the Wabi desktop (the Microsoft Windows Program Manager and Wabi
Tools) visible or transparent. If you want to see the Wabi desktop, simply add
the application startup command to the wabi command.
See “Running an Application
Transparently” on page 157 for
the command format.
You can use the -s switch plus the application startup command to make the
Wabi user interface transparent, so all you see is your application. This is the
recommended format to use when including an application in a UNIX desktop
menu. Note that you can access Program Manager or programs such as Control
Panel by starting them just as you would an application. For example, the
command line below starts Control Panel:
wabi -s c:/windows/control.exe
Using Microsoft Windows Applications
149
10
Application Startup With an Open File
See “Opening a File When
Starting an Application” on
page 158 for sample command
formats for specifying a data file
to open.
With any of the application startup methods, you can specify a file name to
open with the application, if the application startup command allows it (as
most do). Just include the file’s full name as an argument to the startup
command. If the directory containing the file is not on your path in your
autoexec.bat file, you must include the full path to the file.
The wabi command supports additional switches allowing you to display
Wabi on a remote system, and to display Wabi with smaller or larger system
fonts. These switches, which are described in Chapter 2, “Starting Wabi,” must
be specified before an application startup command. The application startup
command and optional file name must be the last arguments on the wabi
command line.
Using Microsoft Windows Applications in an X Window Desktop
The Wabi program is an X Window application, but in some ways it behaves
like a Microsoft Windows application. Window focus, and cut, copy, and paste
methods are areas where Wabi behaves like Microsoft Windows rather than an
X application.
Window Focus and Raising
Window managers on X Window desktops often let you choose your window
focus policy. You can configure your X Window desktop so that you must click
on a window to activate it, or so that you can move your mouse into a window
to activate it. In addition, you can also specify whether you want a window to
be raised to the top when activated. Each UNIX vendor’s desktop has its own
terminology for these desktop properties and its own utility for changing
them.
In Microsoft Windows, you must click in a window before you can type into it.
When you do, the window automatically rises to the top, overlaying other
windows. Wabi’s behavior matches that of Microsoft Windows.
Wabi windows use the click-to-focus mode even if you set your X Window
desktop to use the follow-mouse mode. because it is the only mode Microsoft
Windows applications can use. You should configure you X Window desktop
to use the click-to-focus mode so that all your windows behave the same way.
150
Wabi User’s Guide—May 1996
10
Cut, Copy, and Paste
You can cut, copy, and paste text and graphics between applications running in
the Wabi environment just as you do in the Microsoft Windows environment.
Generally, applications use menu commands (e.g., Edit, Cut) or accelerator
keys (e.g., Ctrl+X) to cut, copy, and paste. You should use the same methods
when using the applications in the Wabi environment.
See page 159 for the copying and
pasting procedures.
You can also copy and paste text between Windows applications running in
Wabi and X applications running on your X desktop. You should follow each
application’s normal methods to cut, copy, and paste. For example, some UNIX
desktops support the use of keyboard keys and menu commands to cut, copy,
and paste. You can use the special keys or commands in the X applications to
copy text and then paste it into a Windows application in Wabi using that
application’s pasting method. You cannot use the UNIX desktop special keys to
paste into the Windows application.
Note – You cannot copy and paste graphics from Windows applications to X
applications and vice versa because they use incompatible graphics formats.
X Window Managers
In the X Window System, virtual window managers create several logical views
of your desktop, and let you designate specific windows to “stick” so that they
appear in all logical views. Other windows stay in the logical screen in which
you place them. When you run the Wabi program with some virtual window
managers, conflicts can occur between the Wabi window manager and the
virtual window managers. Two virtual window managers with which Wabi is
known to have conflicts are olvwm (Open Look Virtual Window Manager) and
tvwm (Tom's Virtual Window Manager). You can use Wabi with olvwm or
tvwm, but Wabi windows will always follow you to the current view rather
than remaining on the logical screen where you've placed them.
When running the Wabi program in the CDE, HP-VUE, or SCO Panorama
window environment, any Microsoft Windows application you start is
displayed in the workspace where you first started the Wabi program (if it is
still running in this workspace).
Using Microsoft Windows Applications
151
10
Key Conflicts Between Applications and Open Look Window Manager
Some Microsoft Windows applications may have conflicts with the Open Look
Window Manager (olwm) over some key/mouse combinations. For example,
the Alt key + Left mouse button combination is sometimes used by
applications for specific functions. The olwm uses the combination for menu
selections.
If you are using olwm (as OpenWindows does by default) and you want the
application to have control of Alt + LeftMouse, try typing these two commands
at your UNIX prompt before you start the Wabi program:
echo "olwm.Modifier.WMGrab: " | xrdb -merge
xrdb -edit $HOME/.Xdefaults
Using Multimedia Features on Ultra, SPARCstation, and x86 Computers
On Ultra systems, newer SPARCstations, and x86 computers running the
Solaris operating environment, the Wabi program supports the audio and
video features of Microsoft Windows and the certified applications. Your
computer must include the necessary hardware before you can use these
features. Ultra systems, SPARCstation 5, SPARCstation 10, and SPARCstation
20 ship with both sound cards and microphones, so they are properly
equipped to play and record sound in the Wabi environment. The
SPARCstation 4 does not ship with a sound card or microphone, but can be
upgraded to include them. A computer based on a 386, 486, or Pentium
processor can also use multimedia in the Wabi environment if it is equipped
with a 16-bit sound card.
Wabi
152
Server
Note – Multimedia features such as MIDI (Musical Instrument Digital
Interface), and AVI (Audio-Visual Interface) for video laser disks and music
compact disks are not yet supported.
Multimedia sound is not supported for WabiServer.
Video is supported.
Wabi User’s Guide—May 1996
10
Audio Features
You can play, record, and edit waveform (.WAV) files using the Sound
Recorder located in the Accessories group or using a sound tool provided by
an application you have installed. You can also use the Control Panel’s Sound
option to assign system events to waveform sounds. Another program in the
Accessories group, Media Player, also lets you play waveform files.
You can embed sound objects in documents when you use an application that
supports it, as do most of the certified applications.
Note – Audio support is not provided when you use the Wabi program
remotely. You can only hear sound on the machine where the Wabi program is
running.
Controlling Audio Input/Output
By default, the Wabi program takes input from the microphone and sends
output to the speaker. You can change the input and output settings using the
Audio Control program in the Solaris environment, or by editing your
wabi/windows/system.ini file. When you use Audio Control, the change
applies only to the current Wabi session. When you edit your system.ini, the
change applies to each subsequent Wabi session.
Using Audio Control
You can start Audio Control from a Command Tool window by entering the
command:
/usr/openwin/bin/audiocontrol &
You can also start Audio Control from Audio Tool, the Solaris sound recording
and editing program. When you choose the Volume control in Audio Tool, the
Audio Control window opens.
The play, or output, options you can choose are Speaker, Headphone, or Line
Out. The Line Out option sends sound through your workstation’s output jack
to a device such as a tape recorder.
Using Microsoft Windows Applications
153
10
The record, or input, options you can choose are Microphone and Line In. The
Microphone option lets you record through a microphone connected to your
workstation’s microphone jack. The Line In option lets you record sound from
a device (such as a radio or tape player) connected to your workstation’s input
jack.
Audio Control settings are not saved for subsequent sessions.
Please refer to your Solaris User’s Guide or the audiocontrol(1) man page
for a detailed description of Audio Control.
Editing system.ini
When the Wabi program starts, it uses the settings in system.ini for its
initial audio settings. If you want to specify the input and output settings for
Wabi to use each time, edit your system.ini file to add the following section
to the file:
[solarwav]
input=
output=
To use the microphone for input, set input=mike or input=microphone. To
use a line in, set input=line. This allows you to record sound from a source,
such as a tape player, that you have connected to your workstation’s input
jack.
You can send sound output to speakers, headphones, or to an output jack to
another device, using output=speaker, output=headphone, or
output=line. You can send output to multiple ports by using the | symbol
between them. For example, to send sound to speakers, headphones, and line
out, use output=speaker|headphone|line in your system.ini.
If you want to change the settings temporarily while sound is playing, use
Audio Control.
Controlling Audio Volume and Balance
You can use the slide controls in Audio Control in your Solaris environment to
control the volume and balance of the sound produced by a program running
in either your Wabi environment or X Window environment.
154
Wabi User’s Guide—May 1996
10
Video Features
You can play Audio-Visual Interface (.AVI) files if you have installed the
Microsoft Video for Windows driver. Applications that use the driver usually
install it when you install the application. To determine if the Video for
Windows driver is installed, open Control Panel’s Drivers icon. The driver has
been installed if you see the entry [MCI] Microsoft Video for Windows.
AVI files can be played with the Microsoft Windows Media Player, located in
the Accessories group. Most applications support linked or embedded video
objects that are played using Media Player. However, some applications
provide their own video players, which should also work in the Wabi
environment.
Note – You can play .AVI files when you run the standalone Wabi program
remotely, but performance may be degraded, leading to slight pauses between
video frames. However, WabiServer systems with adequate system resources
should not show a performance degradation when playing video files.
Instructions for Tasks Related to Using Applications
This section provides detailed, step-by-step instructions for performing a
variety of tasks related to using Microsoft Windows applications.
▼ Starting an Application From an Icon
1. Install the application.
2. In Program Manager, locate the icon representing the application.
3. Open the application icon.
The Wabi program loads the application. When the application is loaded, a
window opens, displaying the application.
▼ Starting an Application From a Run Command
1. Install the application.
2. In Program Manager, open the File menu and choose Run.
The Run dialog box opens.
Using Microsoft Windows Applications
155
10
3. In the Command Line entry field, type the full path name of the
application’s startup command.
Alternatively, choose the Browse button to search your directories for the
executable file. When you find the executable, select it. The file name is
displayed in the Command Line entry field.
4. Choose OK to run the command you typed.
The Wabi program loads the application. When the application is loaded, a
window opens displaying the application.
▼ Starting an Application From a UNIX Command
This method starts your application when the Wabi program starts, with
Program Manager and Wabi tools available to you.
If you want to open a data file
when starting an application, see
“Opening a File When Starting an
Application” on page 158.
♦ At the system prompt, enter wabi followed by the path name of an
installed application executable.
You can use either a DOS path enclosed in quotes, or a UNIX path. If the
directory containing the application program is not in the path in your
$HOME/wabi/autoexec.bat, you must include a full path name.
For example, suppose you have installed Microsoft Excel in your
$HOME/excel directory. The Wabi drive H is connected to your home
directory. To start the Excel program, you could enter any of the following:
wabi ’h:\excel\excel.exe’
wabi $HOME/excel/excel.exe
wabi h:/excel/excel.exe
or if H:\EXCEL is in the PATH statement of your autoexec.bat,
Wabi
Server
wabi excel.exe
WabiServer users must use the rwabi command with the same arguments:
rwabi
rwabi
rwabi
rwabi
’h:\excel\excel.exe’
$HOME/excel/excel.exe
h:/excel/excel.exe
excel.exe
Note – The application startup command and optional file name must be the
last arguments on the wabi command line.
156
Wabi User’s Guide—May 1996
10
▼ Running an Application Transparently
This method starts your application when the Wabi program starts, without
starting Program Manager.
♦ At the system prompt, enter the Wabi startup command followed by -s
and the application startup command.
You can use either a DOS path enclosed in quotes, or a UNIX path. If the
directory containing the application program is not in the path in your
$HOME/wabi/autoexec.bat file, you must include a full path name.
Read “Application Startup at the
UNIX Command Line” on
page 149 for reasons you might
want to do this.
For example, suppose you have installed Microsoft Excel in your
$HOME/excel directory. The Wabi drive H is connected to your home
directory. To start the Excel program, you could enter any of the following
commands:
wabi -s ’h:\excel\excel.exe’
wabi -s $HOME/excel/excel.exe
wabi -s h:/excel/excel.exe
or if H:\EXCEL is in the PATH statement of your autoexec.bat,
Wabi
Server
wabi -s excel.exe
WabiServer users must use the rwabi command with the same arguments:
rwabi
rwabi
rwabi
rwabi
-s
-s
-s
-s
’h:\excel\excel.exe’
$HOME/excel/excel.exe
h:/excel/excel.exe
excel.exe
Using Microsoft Windows Applications
157
10
▼ Opening a File When Starting an Application
♦ With any of the startup methods, add the name of the file as an argument
to the application startup command.
You should always use a complete path for the file name.
If you are starting the application from within Program Manager, add the
file name in DOS format, including drive letter, to the command you enter
in the Command Line field of the Run dialog box. For example, the
Windows Install program item uses the command:
write w:\wbin\win_inst.exe
If you are starting the application from the UNIX command line, and use a
DOS path for the file to open, include the drive letter and file name within
the quotes along with the startup command. If you use a UNIX path, you
can use the drive letter or a full UNIX path, but be sure to use accurate
capitalization. If you want, you can use a UNIX path for the command, and
enclose a DOS path and drive in quotes for the file name.
For example, to start the Excel program and open your file sched.xls in
your h:\excel\files directory, you could enter any of the following
commands:
wabi
wabi
wabi
wabi
-s
-s
-s
-s
’h:\excel\excel.exe h:\excel\files\sched.xls’
h:/excel/excel.exe h://excel//files//sched.xls
h:/excel/excel.exe ’h:\excel\files\sched.xls’
h:/excel/excel.exe h:\\excel\\files\\sched.xls
Wabi
Server
When the Excel window opens, it displays the sched.xls file.
WabiServer users must use the rwabi command with the same arguments:
rwabi
rwabi
rwabi
rwabi
-s
-s
-s
-s
’h:\excel\excel.exe h:\excel\files\sched.xls’
h:/excel/excel.exe h://excel//files//sched.xls
h:/excel/excel.exe ’h:\excel\files\sched.xls’
h:/excel/excel.exe h:\\excel\\files\\sched.xls
Note – The application startup command and optional file name must be the
last arguments on the wabi or rwabi command line.
158
Wabi User’s Guide—May 1996
10
▼ Copying and Pasting From Windows Applications to X Applications
1. Click in the X application window to set the insertion point for pasting.
2. Copy the text in the Windows application using the application's normal
copying method.
For example, select the text and press Ctrl+C or choose the Copy command
from the Edit menu.
3. Click the title bar of the X application window to make it the active
window.
In some X applications, if you click in the work area of the window, the
copied text is lost because Wabi interprets this as a new text selection and
erases the contents of the clipboard.
4. Paste the text into the X application window using the application’s
normal pasting method.
The text is pasted at the insertion point you set in the first step.
▼ Copying and Pasting From X Applications to Windows Applications
1. Copy the text in the X application using the application’s copying method.
2. Click the title bar of the Windows application to make it the active
window.
3. Click in the work area of the Windows application to set the insertion
point.
4. Paste the text using the application's paste method.
For example, press Ctrl+V or choose the Paste command from the Edit
menu. The text is pasted at the insertion point.
Using Microsoft Windows Applications
159
10
Reference Material for Tasks Related to Using Applications
This section provides reference material for general tasks related to starting
and using Microsoft Windows applications. See the Wabi Release Notes for
information about specific applications.
Table 10-1 Windows Application Problems and Solutions
160
Symptom
Possible Cause
Solution
Application does
not start.
Incorrect
executable name or
directory path.
Make sure you have entered the
correct path name. See page 155.
Application not
fully functional.
Application
function not
compatible with
Wabi or X
Window System.
See the Release Notes or
supplementary manual you may
have received with the Wabi
program for information about the
application.
“Not enough
memory” or “Out
of memory”
message from
application.
Application
encountered an
unrecoverable
error.
This error message is often
generated when applications cannot
perform some function for an
unknown reason. Memory shortage
is seldom the actual cause. Contact
Wabi support.
Wabi User’s Guide—May 1996
Setting Up Remote Database Access
11
The chapter describes how to set up remote database access for certified
applications. If you want some background information on remote database
access in the Wabi environment, read the section “About Remote Database
Access” on page 162.
If you want to go directly to instructions for specific tasks related to remote
database connectivity, use the following table to locate the instructions you
need.
Task
Page
Installing Oracle SQL*Net TCP/IP 1.1
167
Installing Oracle TCP/IP Adapter and SQL*Net Version 2.0
168
Installing the Sybase Open Client Software
170
Installing Intersolv ODBC Drivers
171
Configuring a Data Source for Oracle7
172
Configuring a Data Source for Sybase System 10 or 11
172
Verifying Connection to Oracle7 Servers
173
Verifying Connection to Sybase Servers
173
161
11
About Remote Database Access
Several certified applications can access Oracle and Sybase databases on
remote DBMS servers. The supported DBMS servers are Oracle7 and Sybase
SQL Server databases running on Solaris 2 systems in TCP/IP networks.
Certified applications that can access data from servers are:
Lotus 1-2-3 version 5.0
Lotus Approach 3.02
Lotus WordPro 96
Microsoft Access 2.0
Microsoft Excel 5.0
Microsoft Word 6.0c
Paradox 5.0
Quattro Pro 6.0
Table 11-1 on page 163 lists the
supported versions of all the
software components needed for
remote database access.
These applications connect through the Wabi Winsock interface, using
additional specialized software:
•
•
data source software
an ODBC (Open Database Connectivity) driver
Data source software provides TCP/IP connectivity over Winsock to the DBMS
server. You can obtain this software from the DBMS vendors, Oracle and
Sybase. Oracle's data source product is SQL*Net® TCP/IP. Sybase's data source
product is Open Client Net-Library.
ODBC drivers enable applications to connect to remote databases. Oracle and
Sybase ODBC drivers from Intersolv have been tested with the Wabi program
and found to be compatible. You can purchase a driver from Intersolv
individually or get Intersolv’s complete DataDirect ODBC Driver Pack for
Windows.
Note – Lotus 1-2-3 also needs a proprietary component, the Lotus DataLens
driver (DLODBC), an interface to the ODBC driver. The DataLens driver is
available on the Lotus Data Access Tools 2.0 for Windows disks, which you can
obtain from Lotus.
162
Wabi User’s Guide—May 1996
11
Table 11-1 lists the version numbers of all the remote database software
components that have been tested and are supported with the Wabi program.
Table 11-1 Remote Database Software Versions Supported
Database
Management
System
Database1
Data source
ODBC drivers
Oracle
Oracle7
Oracle SQL*Net
TCP/IP Version 1.1
Intersolv Oracle 7, available
from Intersolv’s DataDirect
ODBC Driver Pack 2.0 or 2.1
Oracle 7.2.3
Oracle SQL*Net
Version 2.0 with
Oracle TCP/IP
Adapter 2.0
Sybase
Sybase SQL
Server 10
Sybase Open Client
Net-Library 10.0.2
Sybase SQL
Server 11
Intersolv Sybase System 10,
available from Intersolv’s
DataDirect ODBC Driver Pack
2.0 or 2.1. The System 10
driver works for System 11 as
well.
1. The supported database server systems have been tested only while running on Solaris 2.x on a TCP/IP
network.
Setting Up Applications to Access Remote Databases
For each application, follow these general steps to set up the application to
access remote databases:
1. Install the application fully or using a custom install option, and be sure to
include the options the application needs for remote database connectivity.
Table 11-2 on page 164 contains notes about installing each supported
application.
2. Install the Oracle and/or Sybase data source software.
3. Install the Intersolv ODBC drivers for Oracle and Sybase.
4. Run the ODBC Administrator utility in Control Panel to configure the data
sources for Oracle and Sybase.
Setting Up Remote Database Access
163
11
5. Verify the connection to the server.
Instructions for each of these procedures are included in this chapter. When
you have completed these procedures, you can use the application’s database
query facilities to access the remote databases.
Instructions for Remote Database Access
This section contains procedures for setting up applications to access remote
Oracle and Sybase databases.
Installing Applications for Remote Database Access
With the exception of Lotus 1-2-3, each application will install the files it needs
for remote database access if you do a full installation. Table 11-2 below tells
you how to install the additional software that Lotus 1-2-3 needs, and also
provides pointers on getting the files you need for the other applications if you
do not want to do a full installation of all the application’s files.
Table 11-2 Notes for Installing Applications for Remote Database Access
164
Application
Notes
Lotus 1-2-3,
version 5.0
When you install Lotus 1-2-3, choose the Customize Features
install option. After you specify the drive and path for the
123r5w directory (and lotusapp directory if you don’t
already have one), a Customize dialog box opens. Click the
Shared Data Access tab and select the database drivers you
want to install. Be sure to choose the SQL Server driver.
When you continue with the installation, you will be
prompted for the name of your SQL server.
Next, you must install drivers from the Lotus Data Access
Tools disks. Notes on the procedure are included below.
Lotus Data Access
Tools 2.0
Insert disk 1 and run the install program. Choose the
Customize Features install option. In the Customize dialog
box, click the DataLens Drivers tab and select ODBC Data
Sources, ORACLE, and SQL Server. Enter the name of your
SQL server when prompted. Complete the installation and
restart Wabi when prompted.
Wabi User’s Guide—May 1996
11
Table 11-2 Notes for Installing Applications for Remote Database Access (Continued)
Application
Notes
After installation is complete, edit the Lotus DataLens
Registration File, lotus.bcf, which is located in
x:\lotusapps\datalens, where x: is the drive where you
installed the DataLens drivers.
Insert the following lines into your lotus.bcf file to add
driver records for Oracle and Sybase:
DN=”ODBC_SYBASE” DL=”DLODBC”
DD=”DataLens Driver for ODBC Data Sources”
DB=”SYBASE” AC=UI,PW;
DN=”ODBC_ORACLE” DL=”DLODBC”
DD=”DataLens Driver for ODBC Data Sources”
DB=”ORACLE7” AC=UI,PW;
Note: When you connect to the remote database servers, you
should use these driver records instead of the ones provided
by default in lotus.bcf.
Next, install the Oracle and/or Sybase software, and
Intersolv ODBC drivers.
Lotus Approach 3.02
When you install Lotus Approach, choose the Customize
Features install option. After you specify the drive and path
for the approach directory (and lotusapp directory if you
don’t already have one), a Customize dialog box opens. Click
the PowerKeys tab and select ODBC, Oracle SQL, and SQL
Server. Continue with the installation.
Next, install the Oracle and/or Sybase software, and
Intersolv ODBC drivers.
Lotus WordPro 96
When you install Lotus WordPro 96, choose the Customize
Install and click the File Filters tab in the Customize dialog
box. Check the boxes for Data Base File Filters and ODBC
Data.
Next, install the Oracle and/or Sybase software, and
Intersolv ODBC drivers
Setting Up Remote Database Access
165
11
Table 11-2 Notes for Installing Applications for Remote Database Access (Continued)
166
Application
Notes
Microsoft Access 2.0
When you install Microsoft Access, choose the
Complete/Custom install option. When selecting which
components to install, select ODBC support.
Next, install the Oracle and/or Sybase software, and
Intersolv ODBC drivers.
Microsoft Excel 5.0
When you install Microsoft Excel, choose the
Complete/Custom install option. When selecting which
components to install, select Data Access. The Data Access
component installs Microsoft Query software and several
ODBC drivers, including the SQL Server Driver. Continue
with the installation. When installation is complete, you
should install Oracle and/or Sybase software and Intersolv
ODBC drivers.
Microsoft Word 6.0c
When you install Microsoft Word, choose the
Complete/Custom install option. When selecting which
components to install, select the Converters, Filters, and Data
Access component. This component installs Microsoft Query
software and several ODBC drivers, including the SQL
Server Driver. Continue with the installation. When
installation is complete, you should install Oracle and/or
Sybase software and Intersolv ODBC drivers.
Paradox 5.0
When you install Paradox, install the IDAPI engine. Use the
IDAPI Configuration Utility to add new drivers and aliases
for Oracle and Sybase.
Next, install the Oracle and/or Sybase software, and
Intersolv ODBC drivers.
Quattro Pro 6.0
When you install Quattro Pro, install the IDAPI engine and
the DataBase Desktop. Use the IDAPI Configuration Utility
to add new drivers and aliases for Oracle and Sybase.
Next, install the Oracle and/or Sybase software, and
Intersolv ODBC drivers.
Wabi User’s Guide—May 1996
11
Installing Oracle Data Source Software
The two tested and supported versions of Oracle data source software,
SQL*Net TCP/IP 1.1 and SQL*Net 2.0, are packaged differently and require
separate installation instructions. You should read the Oracle documentation
for detailed information. The procedures below include just the steps you need
to install the software in Wabi.
Oracle SQL*Net TCP/IP 1.1
The SQL*Net TCP/IP Version 1.1 software for Microsoft Windows includes
three diskettes labeled as follows:
Install V3.0.9.4.0
SQL*Net® TCP/IP V1.1.7.7B
Required Support Files V7.012.1.0
The following instructions are intended to supplement the Oracle manual
Setting Up SQL*Net TCP/IP for Windows Version 1.1. Please refer to the section
“Installing SQL*Net TCP/IP for Windows” in that document. The Oracle
Installer program also includes on-line help.
▼
Installing Oracle SQL*Net TCP/IP 1.1
1. Insert the Install diskette and run the ORAINST.EXE program from
Program Manager to start the Oracle Installer.
2. Follow the Oracle Installer’s prompts for your language, company, and
Oracle home path name.
Install diskettes as prompted.
3. In the Vendors dialog box, select Sun PCNFS 5.0 via winsock for the
TCP/IP vendor.
4. In the TCP/IP Services dialog box, accept the default path for the NFS
services file, which is probably C:\NFS\SERVICES.
The Oracle Installer expects this file because the Vendor selection was
PC-NFS 5.0 via winsock. The SERVICES file does not exist in the Wabi
environment. Note that accepting the default causes a temporary error,
which the next step works around.
Setting Up Remote Database Access
167
11
5. In the error dialog box that opens when Oracle Installer cannot find the
C:\NFS\SERVICES file, choose OK to accept a sample file.
6. Exit Oracle Installer.
7. Edit your AUTOEXEC.BAT file.
Add the x:\ORAWIN\BIN directory to your PATH statement, where x: is the
drive where you installed the Oracle files.
Oracle SQL*Net V2 and Oracle TCP/IP Adapter V2 for Windows
The Oracle software is available on CD-ROM or diskettes. The CD-ROM,
Oracle Products for Windows Version 2.0, contains all the software that is on
the diskettes and more.
Oracle TCP/IP Adapter Version 2.0 and Oracle SQL*Net Version 2.0 are
separate diskette kits, but are installed during the same process. According to
the Oracle documentation, you must install the TCP/IP Adapter software
before the SQL*Net software.
The Oracle TCP/IP Adapter Version 2.0 kit includes diskettes labeled:
Install V3.0.9.5.1
Oracle TCP/IP Adapter V2.0.15.0.4
Required Support Files (three disks)
The Oracle SQL*Net Version 2.0 kit includes many diskettes, but most users
will require only the diskette labeled:
SQL*Net V2.0.15.0.3
The following instructions apply to both the CD-ROM and diskettes. They are
intended to supplement the Oracle TCP/IP Adapter for Windows Installation and
User’s Guide Version 2.0.
▼
Installing Oracle TCP/IP Adapter and SQL*Net Version 2.0
1. Insert the CD-ROM or the Oracle TCP/IP Adapter Install diskette and run
the ORAINST.EXE program from Program Manager to start the Oracle
Installer.
2. Follow the Oracle Installer’s prompts for your language, company, and
Oracle home path name.
168
Wabi User’s Guide—May 1996
11
3. Select Oracle TCP/IP Adapter from the Available Products window, and
choose the Install button.
4. In the Single Selection dialog, you must select a vendor for your TCP/IP
vendor.
Wabi is not a vendor option. However, since Wabi uses Winsock, you can
choose any vendor whose implementation is through Winsock. We
recommend that you choose FTP PC/TCP 2.2 via Winsock.
5. Answer the remaining prompts as appropriate.
6. Click Yes to allow your AUTOEXEC.BAT file to be updated.
Wabi only uses the Path and Set statements in your AUTOEXEC.BAT file.
7. Exit Oracle Installer.
8. Create or obtain configuration files for SQL*Net 2.0.
The configuration files tnsnames.ora and sqlnet.ora are needed to
connect to the Oracle server. Please refer to the Oracle TCP/IP Adapter for
Windows Installation and User’s Guide Version 2.0 and SQL*Net for Windows
User’s Guide for more information about these configuration files.
Continue to “Installing Intersolv DataDirect ODBC Drivers” on page 171.
Installing Sybase Data Source Software
One version of Sybase data source software, Sybase Open Client Net-Library,
has been tested and is supported with the Wabi program.
Sybase Open Client Net-Library
The Sybase Open Client Net-Library software includes several diskettes, but
only the following diskettes are needed for establishing remote database access
in the Wabi environment:
Net-Library for PC/MS Windows
Open Client/C Developers Kit for PC/MS Windows (1)
Open Client/C Developers Kit for PC/MS Windows (2)
The following instructions are intended to supplement the SYBASE Open
Client/Server Product Installation Guide for Microsoft Windows manual.
Setting Up Remote Database Access
169
11
▼
Installing the Sybase Open Client Software
1. Insert the Net-Library disk and run the SETUP_10.EXE program from
Program Manager.
Follow the installation program’s prompts.
2. In the Net-Library Driver Selection dialog box, select Windows Sockets.
3. In the Windows Socket Driver Information dialog, enter the server
machine name and port number of the computer running the Sybase
database.
Contact your system administrator for the server machine name and port
number.
4. Specify the server name or accept the default server name, SYBASE.
5. When the installation program prompts you to modify the AUTOEXEC.BAT
file, select No.
The CALL command that the installation program would add cannot be
executed in the Wabi environment. Later, you must edit your
AUTOEXEC.BAT file to include the statements contained in the
WSYBSET.BAT file.
6. When installation is complete, eject the Net-Library diskette.
7. Insert disk 1 of the Open Client /C Developers Kit and run the
SETUP_10.EXE program from Program Manager.
Follow the installation program’s prompts to complete the installation.
8. When the installation is complete, edit your AUTOEXEC.BAT file and insert
the contents of x:\SQL10\BIN\WSYBSET.BAT.
The lines should be similar to the following:
set
set
set
set
set
set
PATH=%PATH%; x:\SQL10\BIN; x:\SQL10\DLL
SYBASE=x:\SQL10
DSQUERY=SYBASE
INCLUDE=%INCLUDE%; x:\SQL10\INCLUDE
LIB=%LIB%; x:\SQL10\LIB
USER=username
x: is the drive where you installed the Sybase SQL10 files, such as G:.
Continue to “Installing Intersolv DataDirect ODBC Drivers” on page 171.
170
Wabi User’s Guide—May 1996
11
Installing Intersolv DataDirect ODBC Drivers
Even if the application you want to use includes its own ODBC drivers, you
should install ODBC drivers from Intersolv. The Intersolv drivers have been
tested in the Wabi environment more extensively than those provided with
applications.
The Intersolv driver pack includes three diskettes labelled Intersolv DataDirect
ODBC Driver Pack 2.0 (or 2.1) for Windows.
▼
Installing Intersolv ODBC Drivers
1. Insert disk 1 and run the SETUP.EXE program from Program Manager.
2. In the DataDirect ODBC Driver Pack Setup dialog box, specify the
directory where you want to install the drivers, and choose the Select
button.
3. In the next dialog box, choose the Clear All button, then select
INTERSOLV Oracle 7 and INTERSOLV Sybase System 10.
4. Follow the installation program prompts to complete the installation.
If you are prompted to install files that will overwrite existing ones, choose
to install the new ones.
5. Read the Driver Pack release notes, and follow any instructions
applicable to the Oracle7 and Sybase System 10 drivers.
6. Configure data sources for the drivers.
The installation program prompts you to do this. You can either proceed as
prompted, or run the ODBC Administrator later from the Control Panel as
explained in the next section.
Configuring Data Sources for Oracle7 and Sybase System 10 and 11
You must configure data sources using the ODBC Administrator. Before
attempting to do so, please see the “Oracle Drivers” and “Sybase System 10
Driver” chapters in the INTERSOLV DataDirect ODBC Drivers Reference.
Setting Up Remote Database Access
171
11
▼
Configuring a Data Source for Oracle7
1. Start the Control Panel and open the ODBC icon to start the ODBC
Administrator.
2. In the Data Source dialog box, enter a data source name, which is a string
that identifies the Oracle data source.
A data source name, Oracle7 tables, may already be entered by default. You
can accept this name or enter one of your own.
3. Enter a description of the data source.
For example, you might enter Oracle server.
4. Enter the Server Name, the SQL*Net connection string designating the
server and database to be accessed.
Refer to the INTERSOLV DataDirect ODBC Drivers Reference to determine
what this should be. The rest of the entries in the dialog box are optional.
Please see the on-line help and reference manual for more information.
▼
Configuring a Data Source for Sybase System 10 or 11
1. Start the Control Panel and open the ODBC icon to start the ODBC
Administrator.
2. In the Data Source dialog box, enter a data source name, which is a string
that identifies the Sybase data source.
A data source name, Sybase System 10 or Sybase System 11, may already be
entered by default. You can accept this name or enter one of your own.
3. Enter a description of the data source.
For example, you might enter Sybase server.
4. Enter the Server Name that contains the System 10 or System 11 tables
you want to access.
This is the server name you entered when installing the Sybase Net-Library
software. The rest of the entries in the dialog box are optional. Please see the
on-line help and reference manual for more information.
172
Wabi User’s Guide—May 1996
11
Verifying Connection to Oracle and Sybase Servers
After you install the Oracle and Sybase software and configure your system,
verify the connection to the servers using utilities provided with Oracle and
Sybase software.
▼
Verifying Connection to Oracle7 Servers
♦ Run the program x:\ORAWIN\BIN\NETTEST from Program Manager.
NETTEST verifies that your SQL*Net software has been installed correctly
and that you can connect to the server. NETTEST reports information about
both successful and failed connection attempts. If the connection is
successful, NETTEST displays a “Logon Successful” message.
▼
Verifying Connection to Sybase Servers
♦ Run the program x:\SQL10\BIN\WSYBPING from Program Manager.
WSYBPING verifies that your Net-Library software has been installed
correctly and that you can connect to the Sybase server. WSYBPING reports
information about both successful and failed connection attempts. If the
connection is successful, WSYBPING displays the message “SYBASE network
address is alive!”
Accessing Remote Databases
Please refer to your application’s documentation and on-line help for
information about using the application’s remote database access facilities.
When you try to connect to a remote database, your application may offer
several choices of ODBC drivers and data sources with similar names. You may
find it confusing to determine what choice you should make to connect to a
remote server. With all the applications, we recommend you use the Oracle7
and Sybase System 10/11 ODBC drivers from Intersolv, even if the application
provides others. These recommended data sources and drivers have tested well
in the Wabi environment. Other data sources and drivers have not been tested
or have not performed reliably.
Setting Up Remote Database Access
173
11
Notes About Lotus Applications
In Lotus 1-2-3, when you connect to the Oracle7 or Sybase 10 or 11 database,
you should use the ODBC_ORACLE or ODBC_SYBASE data source names, which
you previously added to the lotus.bcf file in “Installing Applications for
Remote Database Access” on page 164.
In Lotus Approach, you connect to the remote database server by opening a
file. In the Open dialog box, select ODBC Data Sources(*) in the List Files of
Type list box. This brings up a list of data sources, including those for Oracle7
and Sybase System 10. The data source name matches the name you specified
when configuring the data sources in the ODBC Administrator in “Configuring
Data Sources for Oracle7 and Sybase System 10 and 11” on page 171. Select one
of these two data sources.
174
Wabi User’s Guide—May 1996
Using a DOS Emulator in the
Wabi Environment
12
Although the Wabi program is intended primarily for running Microsoft
Windows application programs, you can also use it to run DOS applications if
you have a DOS emulator installed on your system. This chapter discusses
using the Wabi program to install and run DOS applications after you have a
DOS emulator installed.
If you are not familiar with the installation and use of DOS emulators and
applications under the Wabi program and would like to learn more about it,
read the next section, “About DOS Applications.”
If you want instructions for specific tasks related to DOS application
installation or use, use the table below to locate the instructions you need.
Task
Page
Entering a DOS Emulator Startup Command
187
Starting a DOS Emulator in the Wabi Environment
187
Installing a DOS Application
188
Creating a DOS Program Group
188
Creating a DOS Program Item
188
Starting a DOS Application
189
175
12
About DOS Applications
The Wabi program cannot run DOS-based applications by itself, but it does
provide a method for running them that is similar to the method used for
running Microsoft Windows applications. However, you must have a DOS
emulator installed on your system before you can run DOS applications
through the Wabi program. A DOS emulator is a program that simulates a DOS
environment while running in another operating system.
The advantage to using the Wabi program to run DOS applications, rather than
using a DOS emulator alone, is that the Wabi program lets you group your
DOS applications as you do with your Microsoft Windows applications, and
start them by opening an icon. You do not have to create a program
information file (PIF) to run a DOS application through the Wabi program.
Once you have a DOS emulator installed and connected to Wabi, installing and
using DOS-based applications is as easy as installing and using Microsoft
Windows applications.
Preparation for Using DOS Applications
To use DOS applications with the Wabi program, you must prepare your Wabi
environment to be able to use DOS applications. The tasks are divided here
into tasks you do one time only, and tasks you do once for each DOS
application you want to use through the Wabi program. Instructions for the
tasks are included later in the chapter. See the margin notes for references to
related information.
One-Time Tasks
For information on installing a
DOS emulator, read “DOS
Emulator Installation” on
page 177.
Read “DOS Emulator Command”
on page 178 for detailed
information about connecting the
DOS emulator.
176
To set up the Wabi program for installing and running DOS applications, you
must:
•
•
Install a DOS emulator if you do not have one already installed.
Specify the DOS emulator startup command through the DOS Emulator tab
sheet in Configuration Manager.
Wabi User’s Guide—May 1996
12
Tasks Done Once for Each DOS Application
To install a DOS application after you’ve set up for using DOS applications:
“Creating a DOS Program Item”
on page 188 gives detailed steps
for creating an application icon.
•
•
Start the DOS emulator.
•
Create a program item and, optionally, a program group.
Install the DOS application from the DOS session, following the DOS
application’s instructions.
After you have done these tasks, you do not have to start the DOS emulator
before starting a DOS application. The Wabi program does it for you.
DOS Emulator Installation
You do not use the Wabi program to install a DOS emulator. You should install
the emulator using the instructions provided with it. Make note of the path
and command needed to start it, along with any parameters to the command
that you might want to use.
Before you use the emulator with the Wabi program, make sure it is correctly
installed, and you are able to run it by entering a command in the operating
system.
!
Caution – Drive mappings (for emulated hard drives, or virtual drives) that
you use in the DOS emulator must match the drive mappings you use in the
Wabi program (except for drive C, and possibly D, which are likely to be
permanently assigned by the DOS emulator). If the drive letters do not connect
to the same file system or directory on the host computer, the emulator may
not work correctly. See Chapter 4, “Setting Up Drives,” for more about drive
mappings.
As the caution specifies, you must coordinate the drive mappings that you
assign in the Wabi program with the drive mappings you assign in your DOS
emulator. For example, if you have assigned Wabi drive G to the native
operating system directory, /home/blue/green, the DOS emulator drive G
must also be assigned to /home/blue/green. If drive G is not mapped
identically in both programs, an error will occur if an application running
under the DOS emulator tries to access drive G through the Wabi program.
Using a DOS Emulator in the Wabi Environment
177
12
Before you run a DOS application through the DOS emulator under the Wabi
program, check all drive mappings in both the DOS emulator and Wabi to be
sure they are consistent.
The DOS Emulator’s Drive C
The DOS emulator’s drive C cannot be mapped to a Wabi drive because it is
likely a special file that the Wabi program cannot access. You should store any
files you want to use in both the Wabi program and the DOS emulator in your
home directory. Make sure both programs connect the same drive (H, for
instance) to your home directory. If you want to use the Wabi program and
your DOS emulator to run applications installed in your DOS emulator’s drive
C, you should:
•
•
•
•
•
Start the DOS emulator.
Map a DOS emulator drive to your home directory if you don’t already
have one.
Copy the application directories and files from drive C to the drive
connected to your home directory.
Start the application from the drive connected to your home directory to
make sure the application runs correctly.
When you are sure the application runs correctly, delete the application files
from drive C.
Then, both programs can access the files through the same drive letter.
DOS Emulator Command
For instructions on connecting a
DOS emulator, read “Entering a
DOS Emulator Startup
Command” on page 187.
178
The Wabi program must know the UNIX command used to start your DOS
emulator. You provide this information in Configuration Manager’s DOS
Emulator tab sheet, shown in Figure 12-1. The command should include your
DOS emulator’s UNIX path name, startup command, and startup parameters.
Once your DOS emulator is functional under the Wabi program, you can use it
to install and run a DOS application.
Wabi User’s Guide—May 1996
12
Figure 12-1 DOS Emulator Tab Sheet
In the DOS emulator command, you should include three placeholders for
parameters that enable the Wabi program to start a DOS application running
under the DOS emulator:
•
%d – This placeholder is used with the -display switch of the emulator
command. (The -display switch works with most X-based DOS
emulators.) Including %d with the -display switch makes the DOS session
appear on the same display screen as the Wabi window. The Wabi program
replaces %d with a display name. If you start the Wabi program with the
-display switch, the same remote host display name is substituted for %d
in the DOS emulator command. If you do not start the Wabi program with
the -display switch, %d is replaced by the name specified by the DISPLAY
variable in your UNIX environment.
•
%f – This placeholder is used as a parameter for a DOS emulator switch that
starts a DOS program. Including %f with a switch in the command line
allows you to start a DOS application through the Wabi program using the
Run menu item or by double-clicking the program’s icon. The switch you
See “Displaying the Wabi
Program on a Remote System”
on page 31 for instructions for
setting the DISPLAY variable.
Using a DOS Emulator in the Wabi Environment
179
12
use with %f is specific to the emulator. It is likely to be -c or -s. The Wabi
program replaces %f with the name of an executable DOS program. The
Wabi program uses the name of the executable file that you supply when
you create a program item for the application, or when you run the
application through the Run item in Windows Program Manager’s File
menu.
•
%c – This placeholder is used to specify more parameters to the DOS
emulator switch that starts a DOS program. Including %c allows you to
specify an argument such as a file name or some other parameter used in
the DOS command line to start the DOS application. You should use %c only
if you use the %f placeholder. The Wabi program replaces %c with the
remainder of the DOS command line that follows the .EXE command.
For example, suppose you want to run a DOS application called CLEANUP.EXE
on a file called PRICE.LST, and you want to send the display to the same
system where you are displaying the Wabi program. The DOS command line
you normally use to run this program on PRICE.LST looks like this:
CLEANUP.EXE PRICE.LST /X /Y
Your DOS emulator command must include the %f and %c placeholders so the
Wabi program can pass the DOS command line as arguments to the UNIX
command that starts the DOS emulator. Wabi uses the CLEANUP.EXE file name
in the %f placeholder, and the PRICE.LST file name and /X and /Y parameters
in the %c placeholder.
In the example below, the -c switch instructs the emulator to execute the
command that follows (CLEANUP.EXE PRICE.LST /X /Y, for example). If your
DOS emulator is called myemulator, the DOS emulator command might look
like this:
/usr/myemulator -display %d -c %f %c
The -c switch is just an example; your emulator may require a different switch
for passing commands. See the emulator’s documentation for information
about command-line switches.
Note – If you do not include the complete path name to the emulator’s
executable file, you must have the DOS emulator directory in your UNIX
search path. The default emulator command that the Wabi program provides
assumes your path includes the emulator directory.
180
Wabi User’s Guide—May 1996
12
Wabi
Server
DOS Emulator Command Used With WabiServer
When you run WabiServer and use SunPC as your DOS emulator, you must
use a remote shell command to run SunPC on your local system because
SunPC should not be run remotely. Use the DOS emulator command format:
Wabi
Server
rsh client-name /pathname/sunpc -display %d -c %f %c
If you use a DOS emulator that can be run remotely, the emulator’s path must
be the network-aware path, or the path as seen from the WabiServer system. If
the DOS emulator is located on your client system, you must share or export
the file system containing the emulator so the WabiServer system can access it.
See your Solaris documentation or your system administrator for information
about sharing file systems.
DOS Sessions
After making your DOS emulator connection, you can run DOS sessions as you
would in the Microsoft Windows environment on a PC. The Main group
includes an MS-DOS Prompt icon. When you open the icon in the Wabi
environment, the DOS emulator starts.
Using a DOS Emulator in the Wabi Environment
181
12
Figure 12-2 MS-DOS Prompt Icon in the Main Group
The DOS emulator starts in its own window, so you still have access to the
Wabi window, your Windows applications, and your UNIX desktop
applications.
DOS Application Installation
After you install the DOS emulator, you can install DOS applications using the
DOS emulator. You can start the emulator from the operating system, or open
the MS-DOS Prompt icon in the Main group. Once you are running a DOS
session, proceed to install the DOS application as indicated in the application’s
installation instructions.
182
Wabi User’s Guide—May 1996
12
!
Caution – You should not install any applications in the Wabi drive C or the
DOS emulator’s drive C. You should connect drives for both programs to the
same directories in your UNIX file system, and install applications in those
drives. If you want the Wabi program to access files already stored in your
DOS emulator’s drive C, read “The DOS Emulator’s Drive C” on page 178.
Create a Program Group and Item for a DOS Application
After the application is installed, you should create a program group and item
for the application so you can start it within the Wabi program by opening an
icon. Microsoft Windows applications create their own program groups and
items when you install them, but DOS applications do not because they are not
designed to run in a window environment.
You can create program groups and items for DOS applications the same way
you create them for Microsoft Windows applications, using the New option in
Program Manager’s File menu.
When you choose New in the File menu, the New Program Object dialog box
opens as shown in Figure 12-3.
See “Creating a DOS Program
Group” on page 188 for the steps
required.
For the steps to make a program
item for a DOS application, see
“Creating a DOS Program Item”
on page 188.
Figure 12-3 New Program Object Dialog Box
You use this dialog box to create groups and items. To create a group, select
Program Group and enter a Description in the Program Group Properties
dialog box that opens.
Using a DOS Emulator in the Wabi Environment
183
12
To create a program item that represents a DOS application, you choose the
Program Item button in the New Program Object dialog box. When you do, the
Program Item Properties dialog box shown in Figure 12-4 opens.
Figure 12-4 Program Item Properties Dialog Box
Note that for a DOS application, the command you enter in the Command Line
entry field is the same command you would use to start the application in
DOS. It must be in DOS format and include the Wabi drive location, and may
include parameters or switches. Do not include the DOS emulator command.
When you start the application from the icon, the Wabi program detects that
the application requires DOS, starts your DOS emulator, and passes the
command you enter here.
Microsoft Windows applications generally have icons associated with the
executable files, but DOS executables do not. When you create a program item
for a DOS application, the Program Manager uses a generic icon indicating that
the program is a DOS program. However, you can use a different icon if you
like. The Change Icon button opens a dialog box that lets you select a different
icon image to represent the application when it is minimized or displayed in a
group window.
184
Wabi User’s Guide—May 1996
12
Note – DOS applications used with a DOS emulator through the Wabi program
do not use a Program Information File (PIF).
To Run a DOS Application
To run an installed DOS-based application, you must have a DOS emulator
configured to run with the Wabi program. See “DOS Emulator Command” on
page 178 for more about setting up and using a DOS emulator.
You can use the Wabi program to start DOS applications the same way as
Microsoft Windows applications — either through Program Manager’s Run
command on the File menu or by opening an icon.
An Application’s Startup Command
See “Starting a DOS Application”
on page 189 for the steps
required.
You can run a DOS application with the File menu’s Run command in Program
Manager by entering in the Run dialog box the command to run the
application. This is the same command you would use to run the application
on a PC running DOS, except that the drive letter indicates a path in your
UNIX file system.
To run a DOS application, open the File menu and choose Run. The Run dialog
box opens, as shown in Figure 12-5.
Figure 12-5 Run Dialog Box
Using a DOS Emulator in the Wabi Environment
185
12
The Command Line entry field in the Run dialog box is where you tell the
Wabi program the location and name of the application’s startup command.
When you choose OK, the Wabi program detects that the application requires
DOS, starts your DOS emulator, and loads and runs the DOS application.
A DOS Application’s Icon
See “Create a Program Group
and Item for a DOS Application”
on page 183 if you want to create
an icon for a DOS application.
186
The simplest way to use a DOS application under the Wabi program is by
double-clicking an icon representing the application. When you open the icon,
the Wabi program detects that the application is a DOS application, starts your
DOS emulator program, and the DOS emulator runs the DOS application.
Wabi User’s Guide—May 1996
12
Instructions for Tasks Related to DOS Applications
This section provides detailed, step-by-step instructions for performing a
variety of tasks related to the installation and use of DOS-based applications.
▼ Entering a DOS Emulator Startup Command
1. Open the Control Panel.
1. Open the Wabi Config icon.
Configuration Manager opens.
2. Choose the DOS Emulator tab.
Alternatively, press Alt+e.
Read “DOS Emulator Command” 3. Enter a path name, startup command, and optional placeholder
on page 178 for more information
parameters for your DOS emulator.
about the startup command and
This is the command you would use to start the emulator in your native
placeholders in the command.
operating system. If you do not include the complete path name to the
executable file, you must have the DOS emulator directory in your path in
the UNIX environment. Note that the default emulator command the Wabi
program provides assumes your path includes the DOS emulator directory.
4. Choose OK to validate and save your changes, and exit Configuration
Manager.
If you want to make changes to other tab sheets before exiting, choose
Apply Now to validate and save your changes but keep Configuration
Manager open.
Alternatively, choose Cancel to quit Configuration Manager without making
changes.
▼ Starting a DOS Emulator in the Wabi Environment
1. Open Program Manager.
2. Open the Main group.
3. Open the MS-DOS Prompt icon.
The Wabi program runs the DOS emulator configured in your Wabi
environment.
Using a DOS Emulator in the Wabi Environment
187
12
▼ Installing a DOS Application
Read “DOS Emulator Command”
on page 178 for more about
setting up and using a DOS
emulator program.
1. Configure a DOS emulator for use with the Wabi program, as explained in
“Entering a DOS Emulator Startup Command” on page 187.
2. Start the DOS emulator, and install the DOS application as described in
the application’s documentation.
▼ Creating a DOS Program Group
1. Open Program Manager.
2. Open the File menu and choose New.
The New Program Object dialog box opens.
3. Select Program Group and choose OK.
The Program Group Properties dialog box opens.
4. Enter a description.
This text will appear below the group icon. You should enter something that
indicates this group is for DOS applications.
5. Enter a group file name.
Make this entry only if you want the group file name to be different from
the identifier entry.
6. Choose OK.
A group window with the name you specified opens. You can now create
icons for DOS applications in this group.
▼ Creating a DOS Program Item
1. Open Program Manager.
“A DOS Application’s Icon” on
page 186 provides more
information about creating icons
for DOS applications.
2. Select or create a group in which you want to place a DOS application.
3. Open the File menu and choose New.
The New Program Object dialog box opens.
4. Select Program Item and choose OK.
The Program Item Properties dialog box opens.
188
Wabi User’s Guide—May 1996
12
Figure 12-4 on page 184 shows
this dialog box, along with
information about completing it.
5. Enter the appropriate information in the Program Item Properties dialog
box.
The text you enter in the Description field appears under the icon.
6. Choose OK.
An icon representing the DOS application appears in the group selected in
Step 2.
▼ Starting a DOS Application
♦ Open the icon representing the DOS application.
The DOS emulator starts and loads the DOS application.
or
♦ In Program Manager, open the File menu and select Run, then enter the
path and DOS command to run the DOS application.
Reference Material for Tasks Related to Using DOS Applications
This section provides reference material for tasks related to installing and
running DOS-based applications.
Troubleshooting DOS Application Problems
Table 12-1 suggests solutions to problems you might experience during DOS
application installation and use.
Table 12-1 DOS Application Problems and Solutions
Symptom
Possible Cause
Solution
DOS emulator will
not start.
DOS emulator not
installed on
system.
You must install the DOS emulator
onto your UNIX system before you
can use it through the Wabi
program.
The Wabi program
cannot locate the
DOS emulator
program.
Specify a full path name in the
startup command, even if the
emulator’s directory is on your
UNIX path. See page 178 for more
information.
Using a DOS Emulator in the Wabi Environment
189
12
Table 12-1 DOS Application Problems and Solutions (Continued)
Symptom
Possible Cause
Solution
Improperly
configured startup
command string.
Make sure you can start the
emulator from a UNIX command
line first. Use this UNIX command as
the basis for your startup command
string, with placeholders inserted if
necessary. See page 178 for more
information.
Installed DOS
program does not
appear in any
group.
No icon created for
this application.
You must create a program item for a
DOS application. See page 186 for
more information.
DOS application
won’t install or
run.
DOS emulator not
installed, or not
configured
correctly.
See the DOS emulator
documentation to make sure you
have installed and configured the
emulator correctly. See page 178 for
information about connecting it to
the Wabi program.
Can’t start DOS
application by
opening its icon.
Missing
placeholders in
DOS emulator
startup command
or DOS emulator
not in UNIX path.
Make sure you have inserted the
correct placeholders in the DOS
emulator connection. Use a full path
in the emulator command if the
directory is not in your UNIX path.
See page 178.
The path specified
in the Command
Line or the
Working Directory
may no longer be
valid.
If the DOS application files have
been moved, or if you have changed
the Wabi drive connection to the
directory, the Program Item
Properties must be changed. See
page 184 for information about the
Program Item Properties dialog box.
Application
function
incompatible with
DOS emulator or X
Window system.
See documentation for the DOS
emulator for known problems. Also
see any supplemental
documentation included with your
Wabi software.
Application not
fully functional.
190
Wabi User’s Guide—May 1996
Wabi File Layout
A
This appendix discusses the structure and file layout of the Wabi software. This
hierarchy of directories and files provides the Wabi program with the resources
it needs to run your applications. There are two main areas in this file layout:
•
The Wabi system directory – This area is created when you install the Wabi
software from the distribution media. The directories within this directory
contain UNIX executable and binary files, many of which are copied into
other directories. The default location of the Wabi system directory depends
on your operating system. It could be /usr/wabi, /usr/lpp/Wabi,
/opt/SUNWwabi/wabi, or some other directory. The installation
instructions you received with the Wabi software indicates the location. This
appendix describes the file layout at the level of the Wabi system directory
and below.
•
The $HOME/wabi user directory – This area is created within your home
directory the first time you start the Wabi program. (However, if you set the
WABIDIR variable, your wabi user directory may be located elsewhere.) The
directory is expanded and modified as you install applications. The
directories located within this directory contain resource, program, and
initialization files. Symbolic links in this directory point to other locations.
In addition to these directories, the Wabi program uses initialization (.ini)
files to provide application compatibility and to control program configuration.
Initialization files are located in the $HOME/wabi/windows directory. By
changing settings in these files, you can change various Wabi configuration
items. Initialization files are discussed in “Initialization Files” on page 194.
191
A
Wabi System Directories and Files
A system of directories and files is created during the first phase of installation.
These directories and files contain UNIX binary programs and other executable
files. Table A-1 lists the directories created during the installation process on all
operating systems. Do not alter these directories or files within them in any
way unless you are following a procedure documented in this manual.
Table A-1 Wabi System Directories and Files
Name of Directory
Directory Contents
bin
The Wabi program’s UNIX executable files and scripts, such as
wabi (the Wabi startup script), wabiprog (the main Wabi
executable), and wabifs (the Wabi font server).
drvr
Files related to the Wabi kernel driver, which provides file
locking in the Solaris environment. The clearlocks program
is located in this directory.
icons
Icon image files used in the Solaris environment.
lib
Internal Wabi scripts and image files, and the locale
subdirectory which contains language-specific Wabi files.
man
Text pages displayed when you enter the man wabi command.
printers
Drivers, initialization files, and help files for HP LaserJet III
and Epson printers.
wbin
Wabi utility programs, executable files, libraries, and
initialization files.
Wabi
192
Server
Your Wabi system directory may contain additional directories specific to your
operating system.
The WabiServer Administrator’s Guide includes the file layout for the WabiServer
client and server packages.
Wabi User’s Guide—May 1996
A
$HOME/wabi Directories and Files
The first time you start the Wabi program, it creates a system of directories and
files within a wabi subdirectory in your home directory. Table A-2 lists the
directories and files created the first time you start the Wabi program.
Table A-2 $HOME/wabi Directories and Files
Name of
File or Directory
Function
autoexec.bat
This file is required to complete the installation of application
programs that modify it automatically. This file may contain
PATH statements that Wabi uses to locate installed
applications, and SET statements for setting environment
variables used by applications. PATH and SET commands are
the only commands that Wabi uses in your autoexec.bat file.
If you add other commands, Wabi ignores them.
config.sys
This file is required to complete the installation of application
programs that modify it automatically. The Wabi program
ignores all statements in this file.
fc
This directory contains font information for your display.
tmp
This directory is required by some application programs. The
directory contains no Wabi files, and may contain nothing at
all, but you should not delete it.
wabihome
This file is a link to the Wabi system directory.
windows
This directory contains Microsoft Windows files and Wabi
program resource and initialization files. The directory also
contains links to various executable files residing in the Wabi
system directory. Several .ini files are also stored in this
directory; they are described in “Initialization Files” on
page 194. The directory may also contain initialization files
installed by applications.
windows/system
This directory contains font files and dynamic link libraries
(.dll) installed with Microsoft Windows, and utilities and
files related to installed printer drivers. Some files are links to
files in the Wabi system directory. The directory may also
contain font files and dynamic link libraries installed by
applications.
Wabi File Layout
193
A
Initialization Files
Initialization (.ini) files are contained within the $HOME/wabi/windows
directory. These files are used to control certain configuration items for the
Wabi program and Microsoft Windows programs. Some of these files are
updated automatically by the applications you install. When you install
applications, the installation programs may add .ini files for the applications
to this directory. Table A-3 lists initialization files and the functions each
provides.
Table A-3 Initialization Files
194
Name of File
Function of File
win.ini
This file provides compatibility with Windows applications
(many applications modify it automatically at the time of
installation). This file also stores the window color settings you
make from Control Panel. You should not edit this file unless
instructed to do so.
system.ini
This file provides compatibility with Windows applications.
wabi.ini
This file is used to store Wabi-specific settings that you make
through Configuration Manager. This file also stores default
system settings for various operating system platforms. In
general, you should not edit this file. Make all changes through
Configuration Manager.
progman.ini
This file is used by Program Manager. It maintains lists of
groups and their contents and other miscellaneous settings. Do
not edit this file.
control.ini
This file is used by Control Panel to store your Wabi
environment settings.
Wabi User’s Guide—May 1996
Color From Windows toWabi
B
The subject of color handling in Microsoft Windows and the X Window System
is a complicated one. This appendix gives a brief overview of the major
features, and some specific information on how to influence color behavior
when using the Wabi program.
A good source of detailed information about X Window color handling is the
Xlib Programming Manual by O’Reilly & Associates, Inc.
Color Palettes and Maps
Many popular color display devices are able to generate thousands or even
millions of different colors, but can display only 256 or fewer colors at one
time. Because of this, the colors available for display at a given time must be
defined and listed, or allocated, in a place where the window system can look
them up. Colors are identified by RGB values, which are numbers that indicate
the amounts of red, green, and blue light needed to produce the color.
Microsoft Windows and X Windows both use a table of RGB values stored in
memory to determine what colors are available for use. Microsoft Windows
calls its table of colors a color palette, and X Windows calls it a colormap. Each
entry in the table is called a color cell, and specifies the RGB values for a
particular color. Each pixel on a display is assigned a number corresponding to
a color cell, and the RGB value stored in the color cell determines the color
displayed by the pixel.
195
B
Microsoft Windows and X Windows each use a color table that is
hardware-dependent, so the color tables vary from one display type to another.
Both window systems also let applications provide their own color tables, and
here is where color handling in the two systems differs markedly.
Microsoft Windows Color Allocation
Microsoft Windows tries to match the colors in an application’s color palette,
called the logical palette, to colors already allocated in the default palette.
Windows uses one of two methods for handling this. The method chosen
depends on the particular display type.
For some displays, Microsoft Windows uses a single color palette, one that
cannot be changed. If an application requests a color that is not in the palette,
Windows either uses the closest color it can find in the palette, or approximates
the color by making a pattern composed of pixels of different colors. For
example, a light yellow might be approximated using a checkerboard pattern
of bright yellow and white. This is called dithering. Usually, if the color is for a
line, Windows uses the closest color. If the color is for filling a shape, Windows
dithers the color.
For other displays, Microsoft Windows uses a palette manager, which can
change colors in the default palette. If an application requests a color that is not
in the palette, and an unallocated color cell exists, the color is added to the
palette. If there are no more unallocated color cells, Windows either matches
the logical palette color to the closest color it can find in the default palette, or
dithers it.
Because all windows running in Microsoft Windows use the default palette,
Windows allocates colors for the active window first, to make sure its colors
are correct. The inactive windows could potentially show some colors that are
not exactly what the application requested. However, for the most part, colors
in inactive windows are close to what is intended.
X Windows Color Allocation
X Windows color handling is more complex, and varies with the display type
and the capabilities of the X server, a program that controls all aspects of the
display for X applications. It usually supports several color handling methods,
called visuals.
196
Wabi User’s Guide—May 1996
B
The X server has a default visual, the method used to handle color when an X
application does not request a specific visual. The Wabi program uses the X
server’s default visual whenever possible.
On the most common types of color display, 8-bit or 8-plane, the usual default
is a visual called PseudoColor, which is therefore the visual that the Wabi
program uses most often.
Eight-plane displays generally have one hardware colormap, into which the X
server loads a default colormap when it first starts up. The default X colormap
is changeable, so X applications can change individual color cells in the default
colormap to allocate colors they need.
X applications can also provide their own colormaps, called virtual colormaps,
which are loaded into the hardware colormap. The X server can maintain more
than one virtual colormap at the same time, but only one can be used in the
hardware colormap at any given instant. This means that if the active
application swaps in its own colormap, the windows of all other (inactive)
applications must use this same colormap. As a consequence, the color cells
assigned to pixels might now contain colors completely different from those
intended, resulting in undesirable color schemes for the inactive windows.
As you change focus from one window to another, colors flash as each
application’s colormap is loaded and used by all running applications.
To minimize color flashing, only color-intensive X applications use virtual
colormaps. The Wabi program is a color-intensive X application by virtue of
the many color-intensive Windows applications it runs, so color flashing can be
a problem. You can alleviate color flashing by controlling certain aspects of the
Wabi colormap.
The Wabi Colormap
When the Wabi program uses PseudoColor visuals, it creates a virtual
colormap but tries to retain many of the colors already allocated in the default
colormap. This reduces the number of colors that might be changed for other X
applications that are running.
When the Wabi program starts, it uses the current default colormap as the
starting point for creating a virtual colormap. First, the Wabi program changes
some of the color cells in the default colormap to provide a range of colors
needed for the Windows applications you may subsequently run. It allocates
Color From Windows to Wabi
197
B
49 colors — seven shades of each of the seven solid colors (red, green, blue,
cyan, magenta, yellow, and gray). In addition, it allocates 15 more colors — five
shades of each of the primary colors (red, green, and blue). Some of these
additional reds, greens, and blues may be duplicates of the 49 shades of solid
colors, so the total number of colors allocated may be something less than 64
colors. On an eight-plane display (which has 256 colors in its colormap), this
leaves the majority of colors in the default colormap unchanged. Wabi then
copies the changed default map into its own virtual colormap. Finally, the
Wabi program frees half of the color cells it allocated in the default colormap
so that they can be allocated by other X applications.
Wabi Color Variables
“Where to Set Color Variables” on
page 202 explains where to set
the variables in win.ini.
The Wabi program provides variables that influence how the Wabi colormap is
created and how Wabi affects the default X colormap. One variable,
Technicolor, affects Wabi on all display types. The other variables depend
on Technicolor being set to 0, and apply only when Wabi is using the 8-bit
PseudoColor visual. You set the variables in your win.ini file.
Technicolor Variable
The Technicolor variable allows you to make a trade-off between color
flashing, or “technicolor,” and flexibility in allocating and changing colors in
Microsoft Windows applications running in the Wabi program. If you want
applications running in the Wabi program to be able to allocate all the colors
they want, you can set Technicolor=1, and put up with color flashing in
inactive X windows. If it does not matter if applications in Wabi get the exact
colors they want, you can set Technicolor=0, and color flashing is
minimized as Wabi tries to share colors with other X applications.
The default value is 0 (color flashing off), unless there is more than one
hardware colormap for the display screen. If there is more than one hardware
colormap, it is assumed one will be available for Wabi, and the value defaults
to 1. This may sometimes cause color flashing on 24-bit displays.
When Technicolor=0, Wabi allocates colors from the default X colormap and
then copies them to the Wabi colormap, as described in “The Wabi Colormap”
on page 197, in an attempt to share as many colors as possible.
198
Wabi User’s Guide—May 1996
B
When Technicolor=1, Wabi uses a standard X colormap as its colormap.
This often causes color flashing on 8-bit displays and 24-bit displays when you
switch between Wabi windows and other X windows.
If your X server has more than one hardware colormap, but the colormaps are
normally already in use by other X applications when you start Wabi, you can
set Technicolor to 0 to alleviate color flashing.
If your X server has one colormap, as is the case with most 8-bit displays, you
may set Technicolor to 1 to give Wabi, and the Windows applications
running under it, the most flexibility in allocating and changing color. If you
need the color flexibility and find that color flashing is annoying, try
maximizing the Wabi window when you use the Windows application. This
prevents the mouse pointer from drifting into other X application windows
and causing their colormaps to be swapped in.
Other Color Variables
The other Wabi color variables affect Wabi only when it uses 8-bit PseudoColor
visuals (on 8-bit and 24-bit displays) and Technicolor is set to 0. You can see
if Wabi is using 8-bit PseudoColor by running the X program xwininfo,
which should be present on most UNIX systems with X windows.
In a UNIX window, type the following command:
xwininfo
and then select the Wabi window when prompted.
Look for the following lines:
Depth:8
Visual Class: PseudoColor
If you see these lines, you can use the variables in Table B-1 on page 200.
If xwininfo is not available, use the xdpyinfo command. This displays
information about your X server, including the visuals that are available.
In a UNIX window, type the following command:
xdpyinfo | grep class
If you see the class PseudoColor, you can use the variables in Table B-1 on
page 200.
Color From Windows to Wabi
199
B
Table B-1 Variables for 8-Bit PseudoColor Visuals
Variable
Description
PercentFree=n
When Technicolor=0, PercentFree specifies how much of
the default X colormap Wabi should free up after allocating its
colors. The range of acceptable values is 0 through 100, with a
default of 50, which means Wabi frees 50% of the color cells.
Setting PercentFree higher could reduce color flashing as
you activate and deactivate the Wabi window, because the
other X windows use most of the colors that were in effect
when they started. However, setting PercentFree to 100
means Wabi frees all the color cells it allocated, which leaves
the same number of free color cells as there were before Wabi
started. This may cause flashing as the default X colormap and
the Wabi colormap are swapped in and out.
Setting PercentFree lower reduces the chance that other X
applications will find insufficient free color entries available. If
an X application does not find enough free color cells, it may
display incorrect colors, return an error message, or detect that
the default X colormap is too full and swap in its own virtual
colormap. This causes more color flashing when you move the
mouse out of the X application’s window.
SolidColorCount=n
When Technicolor=0, this variable defines how many
shades of each of the seven colors (red, green, blue, cyan,
magenta, yellow, and gray) are allocated. A total of 7 shades x
SolidColorCount colors are allocated. The range of
acceptable values is 1 through 16, with a default of 7.
Set this variable higher to let Wabi allocate more colors so that
applications running under Wabi don’t find it necessary to
allocate new colors.
Set this variable lower if most colors have already been
defined by X applications before Wabi starts, or if you will be
manually defining all your colors anyway (through a “paint”
program, for example).
200
Wabi User’s Guide—May 1996
B
Table B-1 Variables for 8-Bit PseudoColor Visuals (Continued)
Variable
Description
RedCubeCount=n
When Technicolor=0, these three variables define the
dimensions of the red, green, and blue components of the
color cube. The color cube comprises the additional reds,
greens, and blues that Wabi adds to its colormap. These
variables allow you to alter the number of reds, greens, and
blues, respectively, that will be used in the Wabi colormap.
The range is 4 through 9, with a default of 5.
GreenCubeCount=n
BlueCubeCount=n
You can adjust these variables if you find that Windows
applications you run need more colors of a particular shade.
These variables usually do not affect color flashing.
Variable for a 24-Bit Display
The Wabi program does not support 24-bit TrueColor displays directly.
However, some X servers that run on 24-bit displays can simulate an 8-bit
PseudoColor device. The Wabi program uses an 8-bit PseudoColor visual on
24-bit displays that support PseudoColor, so all the variables described above
apply to such 24-bit displays as well as 8-bit displays.
An additional variable, UseRootWindow, may be useful if you find Wabi has
problems drawing to your 24-bit display. UseRootWindow=n tells whether or
not Wabi can draw to and read from the root window (the “background”
window of the desktop). The default value is 1 (yes), unless the Wabi colormap
and the default colormap are of different sizes, in which case the default is
0 (no).
Most users will never need to set UseRootWindow, and should not set it
because it may cause problems, especially on 8-bit displays. You should only
consider using it if you are using a 24-bit display and Wabi appears to be
having problems drawing to the screen (windows and icons do not look right,
for example).
If you are experiencing such problems, experiment with UseRootWindow to
see if it alleviates them. If this does nothing, or makes the drawing worse,
remove the variable entirely.
Color From Windows to Wabi
201
B
Where to Set Color Variables
To set Wabi color variables, edit your $HOME/wabi/windows/win.ini file
and add them. None of the variables appear in win.ini as shipped in the
Wabi program.
If you want the variables to affect your running of Wabi on any display you
use, set the variables in the [ColorMap] section in win.ini. For example, if
all displays you use are 8-bit, set the variables in the[ColorMap] section.
If you run Wabi on more than one display and you want the variables to affect
Wabi only on a particular display, create a section whose title is the display
name and set the variables in that section. For example, to apply the variables
to Wabi only when you display it on the display jethro:0.0, create a section
called [jethro:0.0].
The Wabi program reads the [ColorMap] section first, and then the
[host:0.0] sections, so that variables set in [host:0.0] sections supercede
variables set in the [ColorMap] section for the specified displays. If you set
the same variables in both sections, the [host:0.0] variables are used for those
displays. This may be helpful if you use multiple displays and one of them is
24-bit, for example. You could set variables specific to the 24-bit display by
creating a [host:0.0] section, and set variables for all 8-bit displays in the
[ColorMap] section.
202
Wabi User’s Guide—May 1996
Fonts From Windows to Wabi
C
This appendix describes some aspects of font handling in Microsoft Windows
and in the Wabi program, so you can better understand how the Wabi program
implements fonts used by your applications. It does not fully describe either
system’s font handling.
Why Does Wabi Convert Fonts?
Fonts used in Microsoft Windows applications are described in font resource
files, usually stored in C:\WINDOWS\SYSTEM with file name extensions such as
.FON and .TTF. These files contain either the actual images of fonts and detailed
numeric information about them, or precise information about how to create
the font images.
The X Window System cannot use the Microsoft Windows font images or font
information directly because it expects font information in a different form.
The Wabi program must convert the font information so that the X server can
use it to display the desired fonts.
On X Window systems using the X11R5 protocol (or a more recent version), the
Wabi program uses the Wabi font server, which speeds up the conversion
process so that the X server can display the fonts faster.
203
C
Font Display Types
Three font display types are relevant to applications running in Microsoft
Windows and the Wabi program: bitmap fonts, outline fonts, and vector fonts.
Bitmap fonts are stored as graphic images of characters, with each point size
of a typeface stored as a separate font. Generally, in Microsoft Windows, the
fonts used in dialog boxes and in an application’s screen displays are bitmap
fonts. Bitmap fonts can be scaled (displayed in smaller and larger point sizes)
but a scaled bitmap font may display with poor resolution.
A bitmap font displayed on the screen is not the same font used by a printer.
Most WYSIWYG (“what you see is what you get”) applications running in the
Microsoft Windows or Wabi environment only use bitmap fonts that can be
matched to a printer font on the printer you are currently set up to use. The
font used by the printer, while not the same as the bitmap font shown on the
screen, usually looks nearly identical. For example, if you use the font Courier
10 in your document, you see a bitmap Courier 10 on the display. When you
print your document, you see the printer’s version of Courier 10.
Outline fonts are produced from stored information about the shape, or
outline, of the font. Outline fonts scale better because the information about the
shape is independent of the size. In both Microsoft Windows and X Window
environments, different font sizes are created by calculating the new size and
reproducing the exact shape of a character in the new size. TrueType™ fonts
and many X Window fonts, including those used by Adobe PostScript, are
outline fonts.
Outline fonts can be used both on the screen and on the printer. If you are
using a printer that can handle outline fonts in either Microsoft Windows or
Wabi environments, the outline information is passed to the printer and the
printer creates the raster images. If you are using a printer that cannot handle
outline fonts, Microsoft Windows or Wabi creates the raster images and sends
them to the printer. In either case, the fonts are the same printed and on the
screen.
Vector fonts (or plotter fonts) are stored as lists of vectors to be drawn in
sequence to generate each character. Although they are easily scalable, their
appearance is poor compared to outline fonts.
204
Wabi User’s Guide—May 1996
C
Wabi Font Processing
Each time you start the Wabi program, it creates a list of available fonts from
the[fonts] section of win.ini, which includes bitmap fonts shipped with
the Wabi program, TrueType, bitmap, and vector fonts installed with Microsoft
Windows, and any fonts installed with your applications.
The list of fonts is made available to applications, just as in Microsoft
Windows, so the applications can display a list of fonts to the user.
When you select a font name, the Wabi program finds the font information and
determines how to display it. The method for displaying the font varies
depending on whether the font is a TrueType, bitmap, or vector font, and
whether the Wabi font server is running.
Vector fonts are the easiest to display. For each character to be displayed, the
Wabi program simply draws the list of vectors, or lines, that make up the
character. Because line drawing is fast, Wabi is able to draw these characters
itself, without help from the X server. Bitmap and TrueType fonts, however, are
more complicated to produce.
If the font server is running and Wabi is asked to display characters using a
bitmap or TrueType font, Wabi simply passes the font information to the Wabi
font server. Wabi passes the text to be displayed to the X server. The X server
obtains any necessary font images or information from the Wabi font server
and displays the text.
If the font server is not running and the font requested is TrueType, Wabi
creates bitmap images of the TrueType font. The Wabi program can then draw
characters by painting these bitmaps onto the screen, using the X server’s
normal functions.
If the font server is not running, and the requested font is a Microsoft Windows
bitmap font, the font’s raster images, or bitmaps, are already created, so the
Wabi program uses them to draw the characters on the screen.
The Wabi Font Server
The Wabi font server uses the X Font Service Protocol, a method introduced in
the X11R5 release of the X Window System for separating font handling from
the X server’s other duties. (Not all X11R5 servers support the Font Service
Protocol however.)
Fonts From Windows to Wabi
205
C
If the X server is the X11R5 release and supports the Font Service Protocol,
Wabi starts its font server, wabifs, when you start the Wabi program. When
Wabi selects a font in the available fonts list, it passes the font information to
wabifs, which takes over font processing for the request and interacts with
the X server.
If the X server is the X11R4 release or does not support the Font Service
Protocol, Wabi creates bitmap images of the fonts on the X server, which then
displays them.
When the Wabi font server is running, you see two UNIX processes rather than
one. The main process is called wabiprog, and the font server process is called
wabifs. The processes work together closely.
With the Wabi font server running, the Wabi program can send text rather than
bitmapped images to the X server no matter what font you are using. Even if
you are using a TrueType font that your X server does not know about, Wabi
can act as though the X server knows about the font. The Wabi program passes
the Windows font data to the Wabi font server, which converts the font
information to a form the X server can use. The font server passes the
converted font information to the X server, which then displays the characters
on the screen in the specified font.
Font processing is most efficient when the Wabi font server is running. There is
no performance difference between TrueType and Microsoft Windows bitmap
fonts. If the font server is not running, all fonts take longer to display because
the Wabi program must create the font images and pass them to the X server.
If you have a problem with fonts and cannot tell where the problem lies, you
can take a step in isolating it by starting Wabi without the font server to see if
the symptoms change. See “Starting Wabi With or Without the Font Server” on
page 33 for instructions.
206
Wabi User’s Guide—May 1996
UNIX and DOS File Systems
D
This appendix describes some utilities to help you use DOS files in a UNIX
system and vice versa.
Files Created With Applications
The files you create with an application running in the Wabi environment are
the same as files created with the same application running in the DOS
environment with Microsoft Windows. If you run an application in both
environments, you can create a file with an application in one environment,
and edit the same file in the other environment.
Text Files
Simple ASCII text files can be used in both the UNIX and DOS worlds, but
there are a few slight differences in file format. For example, the UNIX
operating system interprets the DOS end-of-line character as a ^M (Ctrl-M), so
if you view a DOS ASCII file in a UNIX text editor, it may have a ^M at the
end of each line.
Text File Conversion Between UNIX and DOS Systems
On some platforms, the Wabi software includes two UNIX text file conversion
utilities. (Some platforms already provide these utilities, so they are not
included with the Wabi software.) You can use these utilities to convert simple
207
D
ASCII text files created with tools such as a text editor, vi, or the Microsoft
Windows Notepad, back and forth between UNIX and DOS formats. This
allows you to view and print ASCII text files in either environment. The
utilities are:
•
unix2dos – Converts text files created with UNIX-based tools, such as vi or
a text editor, to a common DOS format.
•
dos2unix – Converts text files created with DOS-based tools, such as the
Microsoft Windows Notepad, to a common UNIX format.
You run these utilities from the system prompt within a command window.
▼ Converting a DOS Text File to a UNIX Text File
The dos2unix command takes the following form, where originalfile is the
DOS file and newfile is the UNIX file:
dos2unix originalfile newfile
The original DOS text file is converted from DOS format to UNIX format. The
converted file is given the name represented by newfile. (The original file still
exists.) If the original file and the new file are the same, dos2unix will rewrite
the original file after converting it.
▼ Converting a UNIX Text File to a DOS Text File
To convert a text file from UNIX format to DOS format, enter:
unix2dos originalfile newfile
The original UNIX text file is converted from UNIX format to DOS format. The
converted file is given the name represented by newfile. (The original file still
exists.) If the original file and the new file are the same, unix2dos will rewrite
the original file after converting it.
208
Wabi User’s Guide—May 1996
D
File Names in UNIX and DOS
The DOS operating system limits file names to a format using 8 characters, a
period, and up to 3 characters in a file name extension (commonly known as
the 8.3 convention). Also, DOS recognizes only a single case so it doesn’t
matter whether you type a name in uppercase or lowercase. The UNIX
operating system accepts file names up to 128 characters and distinguishes
between uppercase and lowercase. The only UNIX file name that matches the
DOS file name format is all lowercase and no more than 8 characters plus 3
extension characters.
A file created in the UNIX system and named with a long descriptive file name
such as QuarterlyReport.doc cannot be handled by DOS. The Wabi
program must map UNIX file names that use uppercase or are longer than the
DOS 8.3 naming convention to names acceptable in both DOS and UNIX
environments because Microsoft Windows applications expect the DOS file
name format.
The Wabi program creates names that may be hard to recognize because they
may include tildes, and may sometimes not include the DOS file name
extension. For example, if you have files named ORANGE.TXT, Red.doc, and
GREENERY.ZIP in the directory $HOME/ColorFiles, they might be mapped
to names like orang~5z, red~~~s2.doc, and green~26. Note that these
names follow the 8.3 convention, but not the all-lowercase convention.
This mapping may sometimes cause a problem if the file extension is omitted.
For example, if an application you run in the Wabi program looks for files with
a particular file extension, it may not be able to find them. If you run into such
a problem, you run the wabimakelower utility to map mixed-case file names
to lowercase names, as described in the next section.
▼ Mapping File Names to Lowercase
If you find the Wabi program’s mapping of file names using uppercase to be a
problem, you can run the wabimakelower program to create symbolic links to
file names that include UNIX uppercase characters. This program only works
on file names that fit the DOS 8.3 convention but include uppercase characters.
To run the program, enter the following command:
wabimakelower directory
where directory is a directory containing files whose names you want to map.
UNIX and DOS File Systems
209
D
For the files named ORANGE.EXE, Red.doc, and GREENERY.ZIP in the
directory $HOME/ColorFiles, use the command:
wabimakelower $HOME/ColorFiles
The program creates symbolic links orange.exe, red.doc, and
greenery.zip, with the original files as their targets. This enables you to see
recognizable file names in your applications and when browsing directories in
the Wabi program.
210
Wabi User’s Guide—May 1996
Index
Symbols
$HOME/wabi directory, 191, 193
moving to a new location, 76
.dt directory, 135
.dtprofile file, 133
.openwin-menu file, 129
.openwin-menu-programs file, 129
Numerics
24-bit display
color variable for use on, 201
used in 8-bit mode, 6
24-bit displays
Technicolor variable, 198
386 Enhanced icon in Control Panel, 47
A
accelerator keys, 52
Adobe Type Manager not supported, 123
application
CD-ROM, 66
installing
from a network server, 127, 141
from CD-ROM, 125, 139
from diskettes, 125, 138
general information, 122
location, 122
on a server, 125, 140
screen blocked, 145
troubleshooting, 144
integration into OpenWindows, 128
remote database access, 162
starting
at UNIX command line, 149, 156
from an icon, 148, 155
from OpenWindows File
Manager, 149
from Run command, 148, 155
general information, 148
transparently, 157
with an open file, 150, 158
without Wabi interface, 157
application files
wrong application associated, 132
wrong application associated
(CDE), 136
assigning a drive, 62
ATM fonts, 123
audio
controlling input/output, 153
Audio Control
controlling Wabi sound with, 153
starting, 153
audio multimedia features, 153
211
autoexec.bat file, 193
automounted file systems
connecting to Wabi drives, 61
autoraise, 150
AVI, 4
AVI files, 155
B
base I/O port address, 100
baud rate, 99
binary files, location of, 192
Binder program, 130
changing entries for application
files, 143
binding, 130
bitmap fonts, 204
how they are produced, 205
BlueCubeCount variable, 201
C
C drive, 62
DOS emulator, 178
CDE
Application Manager
integration, 132
desktop integration, 132
File Manager integration, 134
how desktop integration works, 135
important notes, 136
incorrect file associations, 136
Mailer integration, 134
Printer Tool integration, 135
CDE window environment, 151
CD-ROM
accessing, 66, 72
format limitations, 66
installing applications from, 125
limitations, 66
potential problem using Microsoft
applications, 66
using applications, 66
CD-ROM drive
212
Wabi User’s Guide—May 1996
and WabiServer, 66
change icon
for DOS application, 184
clearlocks, 65, 192
click-to-type focus, 150
code page
default, 109
setting, 113
valid in Wabi, 115
color
changing in Wabi, 45
color allocation
in Microsoft Windows, 196
in X windows, 196
color cell, 195
color flashing
explanation of, 197
reducing, 200
color handling, general, 195
Color icon in Control Panel, 45
color palette, 195
color variables, 198
where to set, 202
colormap
definition, 195
Wabi, 197
COM port, 98
configuring, 98, 99
connections, 101
setting default device
assignment, 104
COM Port Connections dialog box, 101
COM port settings
default, 99
compose key, 111
concepts, of Wabi operation, 2
config.sys file, 193
Configuration Manager
icons, 49
opening, 54
window, 48
configuring the Wabi environment, 43
configuring Wabi drives, 59
connections
COM ports, 101
diskette drives, 57
drives, 60
making in Configuration
Manager, 48
contents, of this guide, xxv
Control Panel
COM port settings, 99
International, 110
Printers
when to use, 89
Control Panel settings
used in Wabi, 44
conventions, typographic, xxviii
conversion of simple text files, 207
copying and pasting
from Windows applications to X
applications, 159
from X applications to Windows
applications, 159
customer support, xxviii
cutting and pasting, 151
D
data bits, 99
data sources
configuring, 171
installing Oracle, 167
installing Sybase, 169
selecting, 173
supported, 162
Date/Time icon in Control Panel, 46
DBMS
Oracle and Sybase, 162
DDE, 3
default
COM port device assignment, 104
default printer
connecting UNIX to Wabi, 89
UNIX
Epson or LaserJet III, 88
Wabi
Index
changing, 89
WabiServer, 82
Desktop icon in Control Panel, 46
desktop integration, 128
CDE, 132
important notes, 136
device
definition of, 56
dialog box
DOS Emulator Connection, 179
New Program Object, 183
Run, 185
directory
Wabi system, 191
wabi user, 191
disconnecting a drive, 63
disk space requirements, 6
diskette
DOS formatting not possible, 59
problem ejecting, 74
diskette device
not ready, 74
diskette drives
and WabiServer, 57
configuring, 56
general information, 56
not accessible on remote system, 25
display
font size varies with, 25
remote, 24
requirements, 6
X-terminal, 24
displaying Wabi
on a remote system, 31
with small or large screen fonts, 32
dithering, color, 196
DOS application
changing the icon, 184
icon for, 186
installing, 182
to drive other than C drive, 183
preparation for using, 176
running, 185
setting up Wabi for, 176
213
starting instructions, 189
startup command, 185
using, 186
DOS diskette formatting, 4
DOS diskette, formatting outside Wabi, 59
DOS emulator
and WabiServer, 181
C drive, 178
command parameters, 179
displaying on remote system, 179
DOS command line arguments, 180
drive mappings, 177
installing, 177
instructions for startup, 187
sharing files with Wabi, 178
DOS Emulator Connection dialog
box, 179
DOS KEYB variable, 114
DOS session
starting from Wabi, 181
dos2unix, converting text files, 208
drive
A and B, 56
assigning a connection, 62
C, 62
C through Z, 56
CD-ROM, 66
configuring, 59
default assignments, 62
default but changeable, 62
disconnecting, 63
diskette, 56
E, 62
general information, 55
H, 62
hard, 56
network, 56, 65
network drive designator, 61
permanent assignments, 62
R, 62
troubleshooting problems, 75
W, 62
drive mapping, matching Wabi with DOS
emulator, 177
214
Wabi User’s Guide—May 1996
Drivers icon in Control Panel, 47
drives
connecting
in WabiServer, 59
E
E drive, 62
eight-plane display, 197
electronic mail applications, 118
enhanced mode, 3
entry validation, 53
environment variables
LANG, 108
setting, 112
WABI_CODEPAGE, 109
setting, 113
WABI_KEYB, 108
setting, 112
Epson FX-1050 (Wabi) driver, 87
Epson printers
models supported, 87
error messages, help for, xxvii
exiting Wabi, 31
F
fc directory, 193
file
opening on application startup, 158
file extensions
duplicate, 132
file layout, of Wabi, 191
file locking
clearing locks, 65
defined, 64
FILE printer port, 90
file sharing, 64
when to enable, 64
file, printing to, 90
files, initialization, 194
flow control, 99
hardware not supported, 100
focus, 150
font display types, 204
font handling, general, 203
font information, directory
containing, 193
font processing, performance, 206
font server
purpose of, 206
starting Wabi without, 26
when it is used, 206
fonts
ATM, 123
bitmap
description, 204
how produced, 205
how Wabi processes, 205
in dialog boxes, 25
list of available, 205
outline
description of, 204
screen and printer, 204
vector, 204
Fonts icon in Control Panel, 45
formatting a DOS diskette outside
Wabi, 59
functions
added by the Wabi environment, 3
not supported, 4
supported, 3
G
generic printer driver, 89
graphics
cutting and pasting, 151
GreenCubeCount variable, 201
groups
Microsoft Windows, 23
H
H drive, 62
hardware requirements, 6
help
Index
customer support, xxviii
error messages, xxvii
on-line, xxvii
sources of, xxvii
types available, 23
how Wabi works, 2
HP LaserJet III (Wabi) driver, 87
I
icons
changing for DOS applications, 184
in Control Panel, 45
initialization files, 194
table of, 194
installing Windows software
from diskette, 13, 29
from Wabi drive R, 15, 30
supported versions, 12
to a network server, 16
integration
desktop, 128
International dialog box, 111
International icon in Control Panel, 46
international settings
changing, 114
international support, 108
Intersolv ODBC drivers, 162
installing, 171
IPX/SPX, 4
IPX/SPX streams drivers, 120
IRQ, 100
K
key conflicts, 152
keyboard
layout setting in Control Panel, 111
using language-specific, 108, 112
Keyboard icon in Control Panel, 46
keyboard shortcuts, 52
215
L
LAN Manager volumes, 120
LANG environment variable, 108
setting, 112
language
specifying with LANG variable, 112
LaserJet II not supported, 87
LaserJet III
on HP-UX server, 82
LaserJet printers supported, 87
locale
defined, 108
specifying, 112
table of values for environment
variables, 114
locking,file, 63
logical palette, 196
look and feel, of Wabi, 21
M
man page
rwabi, 24
man page, Wabi, 24
accessing, 35
and MANPATH variable, 24
location of, 192
viewing, 35
MANPATH variable, setting, 35
Media Player, 153
memory
out of memory message from
application, 160
memory requirements, 6
Microsoft Video for Windows, 155
MIDI, 4
modem, 99
mounting a CD-ROM, 66
Mouse icon in Control Panel, 45
MS-DOS Prompt icon, 181
multimedia features
supported hardware, 152
216
Wabi User’s Guide—May 1996
video, 155
multimedia system requirements, 7
N
native print command, 86
native printer name, 85
NetWare file systems, 119
network configuration
email applications, 118
Windows Sockets, 118
network install of applications, 126
network-aware applications, 119
network-aware path, 18
networked printers and drives, 117
networking
about, 117
for electronic mail applications, 118
invisible use of TCP/IP, 117
NetWare file systems, 119
new features, 5
non-diskette drives, general, 59
Novell NetWare file systems, 119
O
ODBC drivers, 162
installing, 171
OLE, 3
olvwm (Open Look Virtual Window
Manager), 151
olwm (Open Look Window
Manager), 152
on-line help, general, xxvii
Open Database Connectivity, 162
OpenWindows
Binder program, 130
File Manager
integration, 129
integration of Windows
applications, 128
how it works, 130
Mail Tool integration, 129
Print Tool integration, 129
Oracle DBMS
installing data source software, 167
remote access, 162
outline fonts, 204
P
parity, 99
PercentFree variable, 200
PIF file for DOS applications, not needed
in Wabi, 176
placeholders for arguments in print
command, 86
port
serial, 98
types of, 98
port settings
changing, 45
Ports icon in Control Panel, 45
PostScript printers
driver for SPARCprinter, 86
using other printer descriptions, 86
print command
default, 86
operating system, 86
parameters and arguments, 86
print job title
argument to print command, 86
Print Manager, Windows, 80
print process, 80
Print Tool
printing Windows application
files, 142
setting up drag and drop
printing, 141
printer
configuring in operating system, 81
connecting to a port, 92
default operating system, 81, 85
default Wabi, 92
settings, default, 82
supported models, 81
printer driver
Index
available for use, 81
generic, 89
installing, 91
printer name
argument in print command, 86
in operating system, 85
Printer Output Connections dialog
box, 85
Printers icon in Control Panel, 46
printing
about, 80
directly to serial printer, 90
setting default printer, 92
text-only documents, 89
to a file, 90
troubleshooting problems, 94
progman.ini file, 194
program environment, 21
Program information file (PIF), 176
Program Item Properties dialog box, 184
prototype
definition, 4, 17
description of, 20
selecting, 20
pscript.drv, 87
PseudoColor visual, 197
how to tell if in use, 199
Q
quitting Wabi, 31
R
R drive, 62
in WabiServer, 62
RedCubeCount variable, 201
remote database access, 162
software supported, 163
summary of setup steps, 163
verifying connection, 173
remote system
diskette drive inaccessible, 25
displaying on, 24
217
Run dialog box, 185
rwabi command
options, 26
rwabi program
initial startup, 17
rwabi_selproto dialog, 20
rwabi_setup dialog, 18
S
screen saver
why you should not use, 46
serial port, 98
serial printer, 90
drawbacks of using, 90
settings
COM port, 99
sharing applications
warning about, 126
sharing,file, 63
SHELL variable in system.ini, 21
solarwav driver settings, 154
SolidColorCount variable, 200
Sound icon in Control Panel, 47
Sound Recorder, 153
sound settings, 153
special characters, Compose key, 111
starting Wabi, 29
the first time, 10
with or without font server, 26
with or without the font server, 33
with small or large system fonts, 32
stop bits, 99
SunPC
using with WabiServer, 181
supported functions, 3
swap space requirements, 6
Sybase DBMS
installing data source software, 169
remote access, 162
system requirements, 6
for multimedia, 7
218
Wabi User’s Guide—May 1996
system.ini, 153
adding sound settings to, 154
system.ini file, 194
T
tab sheets
COM Ports, 101
Printers, 85
TCP/IP network and distributed file
system, 117
Technicolor variable, 198
text files, converting DOS and UNIX
formats, 207
tmp directory, 193
translation, 2
troubleshooting
application installation, 144
diskette drive problems, 74
drive problems, 75
port problems, 105
printing problems, 94
problems with Wabi startup, 37
TrueColor display, 201
TrueColor mode not supported, 6
TrueType font options, 45
tutorials, 4
tvwm, 151
U
unix2dos, converting text files, 208
unsupported functions, 4
upgrading from an earlier release, 11
user interface of Wabi, 21
V
validation
error messages, 53
of user entries, 53
vector fonts, 204
how they are produced, 205
video features supported, 155
virtual device drivers, 4
virtual window managers, 151
visual, definition, 196
volume of sound, 153
W
W drive, 62
Wabi Config icon, 48
opening, 54
wabi directory, 11
creating in different location, 11
Wabi man page, 24
Wabi system directory, 191
Wabi Tools group, contents, 22
Wabi user directory, 191, 193
location for WabiServer, 18
wabi.ini file, 194
WABI_CODEPAGE environment
variable, 109
setting, 113
WABI_KEYB environment variable, 108
setting, 112
WABIDIR environment variable, 11
WABIDIR variable
and WabiServer, 19
wabidti program, 135, 137
wabifs program, 206
wabihome link, 193
WabiServer
CD-ROM drives, 66
default printer, 82
diskette drive
default, 57
local or server, 58
DOS emulator, 181
initial startup, 17
international variables, 108
printer configuration, 80
R drive, 62
running from different servers
simultaneously, 27
selecting a new prototype, 28
Index
serial printers on local system, 91
setting up configuration, 18
setup program, 27
specifying temporary server, 27
specifying temporary Wabi
directory, 28
starting remote Wabi, 29
using SunPC with, 181
wallpaper, 46
waveform files, 153
wbin directory, 192
win.ini file, 194
color variables in, 198
how to add color variables to, 202
window focus, 150
window managers, 151
conflicts with applications, 152
window setting, click to type, 150
Windows
installing after initial startup, 29
installing under Wabi, 12
windows directory, 193
Windows for Workgroups, 12
Windows groups, 23
Windows Print Manager, 80
Windows Sockets, 118
remote database access, 162
windows/system directory, 193
workspace menu, 129
X
X server
color visuals, 196
X Window focus, 150
xdpyinfo command
using to determine visual, 199
X-terminal
displaying on, 24
xwininfo, using to determine color
visual, 199
219
Copyright 1996 Sun Microsystems Inc., 2550 Garcia Avenue, Mountain View, Californie 94043-1100, U.S.A.Tous droits réservés.
Ce produit ou document est protégé par un copyright et distribué avec des licences qui en restreignent l’utilisation, la copie, la distribution,
et la décompilation. Aucune partie de ce produit ou de sa documentation associée ne peut être reproduite sous aucune forme, par quelque
moyen que ce soit, sans l’autorisation préalable et écrite de Sun et de ses bailleurs de licence, s’il y en a.
Des parties de ce produit pourront être dérivées du système UNIX® licencié par Novell, Inc. et du système Berkeley 4.3 BSD licencié par
l’Université de Californie. UNIX est une marque enregistrée aux Etats-Unis et dans d’autres pays et licenciée exclusivement par X/Open
Company Ltd. Le logiciel détenu par des tiers, et qui comprend la technologie relative aux polices de caractères, est protégé par un copyright
et licencié par des fournisseurs de Sun.
Sun, Sun Microsystems, le logo Sun, Sunsoft, le logo SunSoft, Solaris, AnswerBook, Wabi, WabiServer et le logo Wabi sont des marques
déposées ou enregistrées de Sun Microsystems, Inc. aux Etats-Unis et dans d’autres pays. Toutes les marques SPARC, utilisées sous licence,
sont des marques déposées ou enregistrées de SPARC International, Inc. aux Etats-Unis et dans d’autres pays. Les produits portant les
marques SPARC sont basés sur une architecture développée par Sun Microsystems, Inc.
Les interfaces d’utilisation graphique OPEN LOOK® et Sun™ ont été développées par Sun Microsystems, Inc. pour ses utilisateurs et
licenciés. Sun reconnaît les efforts de pionniers de Xerox pour la recherche et le développement du concept des interfaces d’utilisation visuelle
ou graphique pour l’industrie de l’informatique. Sun détient une licence non exclusive de Xerox sur l’interface d’utilisation graphique Xerox,
cette licence couvrant aussi les licenciés de Sun qui mettent en place l’interface d’utilisation graphique OPEN LOOK et qui en outre se
conforment aux licences écrites de Sun.
Le système X Window est un produit du X Consortium, Inc.
CETTE PUBLICATION EST FOURNIE “EN L’ETAT” SANS GARANTIE D’AUCUNE SORTE, NI EXPRESSE NI IMPLICITE, Y COMPRIS, ET
SANS QUE CETTE LISTE NE SOIT LIMITATIVE, DES GARANTIES CONCERNANT LA VALEUR MARCHANDE, L’APTITUDE DES
PRODUITS A RÉPONDRE A UNE UTILISATION PARTICULIERE, OU LE FAIT QU’ILS NE SOIENT PAS CONTREFAISANTS DE
PRODUITS DE TIERS.
Ce produit intégre une technologie développée par Bitstream, Inc.
Ce produit intégre une technologie utilisée sous licence par Fulcrum Technologies, Inc.
Droits d'auteur partiels 1988, 1989, 1990, 1991 Sam Leffler
Droits d'auteur partiels 1991 Silicon Graphics, Inc.
Le droit d'utiliser, de copier, de modifier, de diffuser et de vendre les parties du logiciel et de la documentation dont Sam Leffler ou Silicon
Graphics, Inc. détient les droits d'auteur est gracieusement accordé en vertu des présentes, sous réserve que (i) les avis de droit d'auteur cidessus et le présent avis d'autorisation figurent dans chaque exemplaire du logiciel et de la documentation connexe, et (ii) que les noms Sam
Leffler et Silicon Graphics ne soient mentionnés dans aucune publicité ou promotion du logiciel sans autorisation expresse, préalable et écrite
de Sam Leffler et de Silicon Graphics.
LES PARTIES DU LOGICIEL DONT SAM LEFFLER OU SILICON GRAPHICS, INC. DETIENT LES DROITS D'AUTEUR SONT FOURNIES
"EN L'ETAT" ET SANS GARANTIE D'AUCUNE SORTE, EXPRESSE, TACITE OU AUTRE, ET SANS LIMITATION, GARANTIE DE
COMMERCIALISATION OU D'ADEQUATION A UNE APPLICATION PARTICULIERE.
EN AUCUN CAS, SAM LEFFLER OU SILICON GRAPHICS NE POURRONT ETRE TENUS RESPONSABLES DE DOMMAGES SPECIAUX,
ACCIDENTELS, INDIRECTS OU RESULTANTS D'AUCUNE SORTE, OU DE DOMMAGES QUELCONQUES RESULTANT DE LA PERTE
D'EXPLOITATION, DE DONNEES OU DE PROFITS, QUE LA POSSIBILITE DE TELS DOMMAGES AIT ETE ANNONCEE OU NON,
QUELLE QUE PUISSE ETRE LA PRESOMPTION DE RESPONSABILITE, RESULTANTE OU SOUS-JACENTE A L'UTILISATION OU AUX
PERFORMANCES DE CE LOGICIEL.