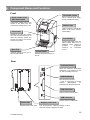
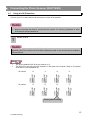
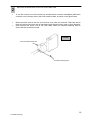
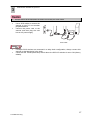
1
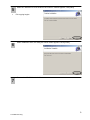
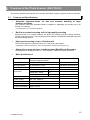
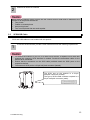
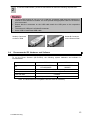
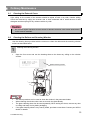
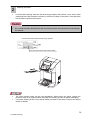
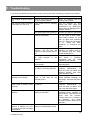
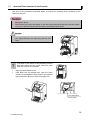
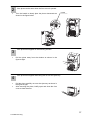
High-speed Photo Print Scanner
NS-P1S/SU
User’s Guide Version 2.20
Driver Software Version 2.2x
1
P1SeManu220-Eng
Contents
Introduction
Using the Scanner Safely
Items that May Not Be Copied
1
Installing the Driver Software.................................................................................................7
2
Overview of the Photo Scanner (NS-P1S/SU)..................................................................... 10
2.1
2.2
2.3
2.4
Features and Specifications ................................................................................................ 10
Photos to be Scanned ......................................................................................................... 11
SCSI/USB Cable ................................................................................................................. 12
Recommended PC Hardware and Software ....................................................................... 13
3
Component Names and Functions...................................................................................... 14
4
Connecting the Photo Scanner (NS-P1S/SU) ..................................................................... 15
4.1
4.2
4.3
4.4
5
Using the Scanner ................................................................................................................ 19
5.1
5.2
5.3
6
Operation Overview............................................................................................................. 19
Scanning Procedure............................................................................................................ 20
Loading Photos ................................................................................................................... 31
Ordinary Maintenance .......................................................................................................... 33
6.1
6.2
7
Cleaning the External Cover ............................................................................................... 33
Cleaning the Rollers and Scanning Window ....................................................................... 33
Troubleshooting.................................................................................................................... 35
7.1
7.2
7.3
8
Using the SCSI Interface..................................................................................................... 15
Using the USB Interface...................................................................................................... 18
Settings the Fixed Lever for Shipping to the Release Position............................................ 18
Switching on the Photo-Scanner (NS-P1S/SU) and PC ...................................................... 18
Scanned Photo Jammed in the Scanner ............................................................................. 36
Moire (Net-like Shading) on the Image................................................................................ 38
Error Messages ................................................................................................................... 39
Appendix................................................................................................................................ 41
2
P1SeManu220-Eng
Introduction
Thank you for purchasing this High-speed Photo Print Scanner NS-P1S/SU (referred to hereafter
simply as “the scanner”).
This User’s Guide describes how to use the scanner and the Driver Software Version 2.2x (referred
to hereafter as “the driver software”) bundled with the scanner. Be sure the read this User’s Guide
when using the scanner and driver software.
Notes
•
•
•
•
Unauthorized duplication of all or any part of the content of this User’s Guide is forbidden.
The contents of this User’s Guide are subject to change without notice.
Every care has been taken in the production of this User’s Guide. However, if you notice any
questionable content, errors or omissions, please contact NISCA.
The above 4 items notwithstanding, NISCA accepts no liability whatsoever for any
consequences arising from the use of this product.
Trademark Information
•
•
•
Windows, Windows 98, Windows Me, Windows XP and Windows 2000 are trademarks of the
Microsoft Corporation of the U.S. registered in the U.S. and other countries.
Windows is an abbreviated term referring to the Microsoft Windows Operating System.
All other company or product names used in this document are trademarks or registered
trademarks of their respective holders.
In the course of using this product and its associated documentation, whether for their own use or
for others, customers shall not violate any third-party rights, including the copyright, artistic copyright,
trademark copyright or design copyright of others, and shall not violate the laws of Japan or of any
other country.
3
P1SeManu220-Eng
Using the Scanner Safely
To ensure that you use the scanner safely, the icons shown below are used in this User’s Guide to
draw your attention to important information regarding areas where care is required in the handling
of the scanner. The meanings of the icons are explained below.
This icon indicates that, if this information is ignored, improper handling of the
product may cause death or serious injury.
This icon indicates that, if this information is ignored, improper handling of the
product may cause personal injury or material damage.
This icon indicates that, if this information is ignored, improper handling of the
product may result in damage to the scanner itself.
This icon indicates procedures (actions) that must be observed or information you
need to know.
Safety Precautions
Warnings
If this product is emitting smoke or unusual odors or sounds, stop using the product
immediately.
Continued use of the product could cause an electric shock or fire. Immediately turn the
product off, unplug it from the power socket and consult your NISCA dealer.
Never attempt to repair the product yourself as this is very dangerous.
Do not attempt to disassemble or modify this product.
This could result in unforeseen injuries or cause an electric shock or fire.
Only use this product with the specified power supply.
The use of other power supplies could cause an electric shock or fire.
Do not plug in or unplug this product with wet hands.
This could cause an electric shock.
Do not use a damaged power cord.
This could cause an electric shock or fire.
Take care when handling the power cord and power plug.
Improper handling of the power cord and power plug could cause a fire.
Observe the following when handling the power cord and power plug:
• Do not plug the power cord into a multi-socket adapter.
• Plug the power cord directly into a domestic power supply outlet.
• Do not plug the power cord in while there is dust or other foreign matter on the power
plug.
• Ensure that the plug is pushed in correctly so that the pins are fully inserted.
Do not push or drop metal objects or flammable materials into the ventilation slots
or other openings in the product.
This could cause an electric shock or fire.
4
P1SeManu220-Eng
Safety Precautions (continued)
Cautions
Do not continue to use this product when foreign objects, water or other fluids have
fallen into it. Also, do not place containers of water, etc. on top of this product.
This could cause a fault, electric shock or fire.
Ensure that this product is installed and stored out of the reach of small children.
There is a risk that the product could fall or tip over and cause injury.
Do not install the product in an unstable location.
This could cause the product to fall or tip over and cause injury.
Do not install or store the product in locations subject to vibration.
This could cause the product to fall or tip over and cause injury.
Do not install the product in very humid or dusty locations.
This could cause an electric shock or fire.
Do not lean on this product or place heavy objects on this product.
This could cause the product to tip over or break and cause injury.
Do not block the product’s ventilation slots.
This will cause heat buildup inside the product and could cause a fire.
Do not install this product in the following locations:
• In small, poorly ventilated locations such as a cupboard or bookcase
• On carpet or bedding
• Do not cover this product with fabric (blankets, tablecloths, etc.)
When installing this product close to a wall, leave a space of at least 15 cm between this
product and the wall.
When this product will not be used for a long period, always unplug the power cord
from the mains outlet as a safety precaution.
When moving this product, unplug the power cord from the mains outlet and check
that all the cables and wiring are disconnected before proceeding.
Periodically unplug the power cord from the mains outlet and clean the bases of the
power plug pins and the spaces between the pins.
Leaving the power plug in the mains outlet for a long period can result in a buildup of dust
at the bases of the power plug pins which could lead to a short-circuit and fire.
Connect all cables and wires as directed in the respective instruction manuals.
Faulty wiring connections could cause a fire.
Do not use this product while it is covered by a sheet or blanket, etc.
This will cause heat buildup inside the product and could cause deformation of the
casing, electric shock or a fire.
5
P1SeManu220-Eng
Notes on Installation
Caution
Install this product in the following types of location:
• On a level, stable surface
• In a well-ventilated location
• Temperature: 15°C to 30°C; Humidity: 15% to 80% with no condensation
Never install this product in the following types of location as this could cause
malfunctions or faults:
• Locations exposed to direct sunlight
• Locations subject to extreme changes in temperature or humidity
• Very dusty locations
• Locations close to flames
• Locations prone to water leakage
• Locations where volatile substances are kept
• Locations close to refrigeration equipment
• Locations subject to vibration
Do not install this product close to a TV or radio
While this product conforms to the Voluntary Control Council for Interference by
Information Technology Equipment (VCCI) standards, it may interfere with signal
reception if placed close to a radio or television receiver.
Items that May Not Be Copied
Reproduction of the following is prohibited by law:
1. Paper money, securities, etc.
• The reproduction of paper money, certificates of indebtedness, and government securities
(whether issued by the central or a regional government) is prohibited. The reproduction of
such items as samples is also prohibited.
• The reproduction of privately issued securities (share certificates, bills, checks, etc.) is also
prohibited.
2.
Revenue stamps, postage stamps and official documents
• The reproduction of revenue stamps, postage stamps and official postcards is prohibited.
• Care is also required in the reproduction of documents such as passports as well as
licenses, certificates and identification cards issued by public institutions or private bodies
and travel and meal vouchers.
3. Any reproduction, modification, deletion or other amendment of documents such as
photographs, publications, paintings, prints, maps and drawings requires the permission of the
copyright holder.
4. Note that the unauthorized use of portraits of other people constitutes a breach of copyright.
6
P1SeManu220-Eng
1
Installing the Driver Software
Use the procedure given here to install the TWAIN-compatible driver software for the scanner.
•
•
1
2
•
•
Be sure to use the procedure given here to install the driver software.
If you are installing the driver software on Windows 2000 or Windows XP, you must log in as
a user with administrator privileges (Administrator).
Check that the scanner is not connected to your PC.
Switch the PC on and launch Windows.
If one of the windows shown below appears, click the [Cancel] button to close the window.
Sample display in Windows 98.
Windows 98
•
After installing the scanner drivers, restart your computer and turn the scanner off and then
on again.
7
P1SeManu220-Eng
3
•
4
Load the “NS-P1S/SU TWAIN” CD-ROM bundled with the scanner into the CD-ROM drive.
Exit any active applications beforehand.
When the “Setup” window appears, click [Next].
If the set-up screen is not displayed
•
•
Click “Start” in the bottom-left corner of
the screen and click “Run...”. . . .
Enter “d:/setup” and click [OK].
This example assumes that the CD-ROM drive is drive D. If a different letter is as-signed to your
CD-ROM drive, substitute the correct drive designation (“E:”, “F:” etc.) in place of “D:”.
8
P1SeManu220-Eng
5
•
6
7
When the “Welcome to Photo Scanner NS-P1S/SU” window appears, click [Next].
File copying begins.
When installation ends, the dialog box shown below appears. Click [Finish].
Remove the CD-ROM and exit Windows.
9
P1SeManu220-Eng
2
Overview of the Photo Scanner (NS-P1S/SU)
This section describes the features of the scanner and lists the types of photo that can be scanned.
2.1
Features and Specifications
•
Automatic separator-feeder for fast and accurate handling of large
numbers of photos
The scanner’s automatic separator-feeder is capable of separating and feeding up to 80
photos* for scanning.
* 10 instant photos or 1 panorama-size photo.
•
Built-in no-contact scanning unit for high-quality scanning
Because there is no contact between the photo and scanning window during scanning,
Newton rings do not occur. The scanning unit also features a mechanism designed to prevent
document feed problems.
•
High-speed scanning of up to 10 photos/min
The scanner features a scanning rate of 10 L-size photos per minute*.
* Depending on the PC performance, the scanning speed for 600-dpi scanning may vary.
•
Support for a range of sizes, including Instant Mini-KG and Panorama
The supported scanning sizes are E, L, KG, Hi-Vision, Instant Photo and Panorama.
•
Main Specifications
Scanning Method
Fixed-document flat scanning with
automatic separator-feeder
Optical Resolution
600 dpi for both primary and secondary
Scanning Speed
10 photos/min (L size)
Scanning Levels
12-bit I/O for each color
Max. Load per
Photo Size
E to KG
80
Instant Mini, Instant
10
Panorama
1
Standalone performance
Interface
SCSI 2 (50-pin half-pitch x 1)
Power Supply
100 V AC, 50/60 Hz
Dimensions
275(W) x 270(D) x 420(H) mm
Weight
Approx. 12 kg
Power Consumption
Approx. 150 W
Thickness: 0.23 mm
300dpi scanning only
10
P1SeManu220-Eng
2.2
Photos to be Scanned
•
1
•
Restrictions apply to the types of photographs can be scanned by the NS-P1S/SU. Do not
attempt to scan photographs other than those listed below in accordance with their
respective scanning conditions as this could damage the scanner or the photographs
themselves. Also, take care to read and observe the notes on using the scanner.
Photos that can be scanned.
The table below lists the types and sizes of photos that can be scanned, along with the
number of each type that can be loaded into and fed out of the scanner.
Continuous Scanning
Type
E
L
DSC
HV (Hi-Vision)
KG/4R
Instant Mini
Instant
Single-print Scanning
Panorama
•
Size
82.5 x 117 mm
89 x 127 mm
89 x 119 mm
89 x 158 mm
102 x 152 mm
54 x 86 mm
86 x 108 mm
No. loadable/feedable
80
80
80
80
80
10
10
89 x 254 mm
1
Restrictions on photo curling
When a photograph is placed at rest on a flat surface as shown in the figures below, the
distance T should be no more than 5 mm.
T
T = 5 mm or less
•
T
Restrictions on loading directions for instant photos
Load instant photos into the
scanner so that the fluid
reservoir is towards you, as
shown in the figure below.
Fluid reservoir
If you use continuous scanning when there is dust or other foreign material on the front or rear
surface of the photos, the surface of the photos may be scratched or damaged in some other
way. Always clean off any dust or other foreign material on the photo surface before scanning.
If you are unable to completely clean the dust or other foreign material off the photos, scan the
photos by loading them into the auto-feed hopper one at a time.
11
P1SeManu220-Eng
2
Photos that cannot be scanned.
Never feed the following types of photo into the scanner as this could result in damage to the
scanner or to the photos themselves.
• Torn photos
• Folded or creased photos
• Wet (moist) photos
• Two or more photos that are stuck together
2.3
SCSI/USB Cable
SCSI and USB cables are not bundled with this product.
1
•
•
•
To use the SCSI interface, provide a SCSI cable that meets the following requirements:
To connect the scanner to your PC or to other SCSI devices, a separate SCSI cable that
matches the scanner’s SCSI interface is needed. Provide the appropriate cable for the
devices to be connected.
Ensure that the connectors on the SCSI cable provided match the SCSI ports on the
respective devices.
The scanner’s SCSI port is a 50-pin half-pitch connector (female).
The SCSI port on the scanner is a 50-pin
half-pitch connector (female).
The type of SCSI cable connector required is a
50-pin half-pitch connector (male).
12
P1SeManu220-Eng
To use the USB interface, provide a USB cable that meets the following requirements:
2
•
•
•
•
To connect the scanner to your PC or to a USB hub, a separate USB cable that matches the
scanner’s SCSI interface is needed. You must provide the appropriate cable for the devices
to be connected.
Ensure that the connectors on the USB cable match the USB ports on the respective
devices.
The scanner’s USB port is a Series B connector.
Use a USB 2.0 authorized USB cable.
Series B Connector
on the Scanner Side
Series A Connector
on the PC Side
2.4
Recommended PC Hardware and Software
To run the Photo Scanner (NS-P1S/SU), the following system hardware and software is
recommended:
OS
CPU
SCSI
USBNOTE
Windows 98/98SE/Me/
NT4.0/2000/XP
Windows 98SE/Me/
2000/XP
Pentium III 866MHz or higher
Memory
128MB or higher
Hard Disk Size
Recommended SCSI Board
1.5Gbyte
Adaptec 2940AU
Note: The latest Microsoft compatible USB 2.0 driver is necessary.
13
P1SeManu220-Eng
3
Component Names and Functions
Front
Panorama Loader
Photo Loader Cover
Auto-feed Hopper
This is a special photo supply
slot for panorama scanning.
These allow multiple photos to be
loaded at the same time and
continuously scanned one by one.
Status Lamp
Lights or flashes to indicate the
status of the Photo Scanner
(NS-P1S/SU).
Front Cover
Releasing the latch and pulling
this cover outwards allows you to
clean the scanning window and
remove the photo if the scanner
stops for any reason.
Scan Button
Pressing this button when the
Nisca TWAIN dialog box is
displayed starts continuous
scanning
(single-print
scanning
for
Panorama
scans).
Eject Tray
Scanned photos are fed out to
this tray and stacked.
Power Switch
Switches the Photo Scanner on
and off.
Rear
Terminator Switch
Allows the terminator (terminating
resistance) to be switched on and
off. This is normally set to ON.
SCSI-ID Switch
Sets the SCSI ID number.
→ See “4 Connecting the Photo
Scanner
(NS-P1S/SU)”
for
information on setting the SCSI ID.
SCSI Connector
Used to connect a SCSI cable.
USB Connector
Used to connect a USB cable.
Power Inlet
Plug the power cord in here.
Shipping Lock Lever
This lever locks the scanning carriage in place
when the scanner is shipped or moved.
14
P1SeManu220-Eng
4
Connecting the Photo Scanner (NS-P1S/SU)
4.1
Using the SCSI Interface
Connect your PC or other devices to the scanner via the SCSI interface.
•
•
1
Connect the scanner to your PC or to another SCSI device.
Before connecting the scanner, ensure that the scanner, PC and any peripherals or other
SCSI devices are all switched off.
Set the SCSI ID.
If you are daisy-chaining multiple SCSI peripheral devices, care must be taken to avoid
duplicating SCSI IDs. Note that if SCSI IDs are duplicated, data on the devices with the duplicate
IDs may be lost.
•
•
The factory default SCSI ID for the scanner is “6”.
The SCSI ID is set using the DIP switches on the back of the scanner. Refer to ID number
chart below to set the desired ID.
ID number
“0”
“1”
“2”
“3”
ID number
“4”
“5”
“6”
“7”
Factory default setting
15
P1SeManu220-Eng
2
Mount the enclosed ferrite core on the SCSI cable used.
•
To use this scanner, mount the ferrite core bundled with the scanner immediately behind the
connector on the scanner end of the SCSI interface cable, as shown in the figure below.
•
Mount the ferrite core so that it is no more than 2 cm from the connector. Take care also to
press the ferrite core until a click is heard and check that the locking catch is firmly fastened.
After mounting the ferrite core on the SCSI cable, attach the enclosed retaining band to
ensure that the core does not slip.
•
Scanner
Scanner end Enclosed core
Enclosed retaining band
16
P1SeManu220-Eng
3
•
•
•
Connect the scanner to your PC.
Always switch all the equipment off before connecting the SCSI cable.
Use a SCSI cable to connect the
scanner to your PC or to another
peripheral device.
Connect the power cord to the
scanner and then plug the cord
into an AC power supply.
SCSI Cable
•
•
If multiple SCSI devices are connected in a daisy-chain configuration, always connect this
scanner as the last device in the chain.
Check that the TERM (terminator) switch above the SCSI ID switches is set to ON (factory
default).
17
P1SeManu220-Eng
4.2
Using the USB Interface
Connect your PC or USB hub to the scanner via the USB connection.
•
•
4.3
Check the shape of the USB port before connecting the USB cable.
If you are using multiple USB hubs, connect the USB cable to the hub nearest of the
computer.
Settings the Fixed Lever for Shipping to the Release Position
Set the shipping lock lever to the lock release position.
•
•
Loosen the screw beside the shipping lock
lever, set the lever to the
position and then
retighten the screw.
When shipping or moving the scanner, always
move the shipping lock lever to the
position
to lock the carriage in place.
Screw
Unlocked
4.4
Locked
Switching on the Photo-Scanner (NS-P1S/SU) and PC
Switch on the Photo Scanner (NS-P1S/SU) and PC.
•
When switching on peripheral devices that include
this scanner, always switch on the peripherals on
before you switch on the PC. Conversely, when
switching off, switch the PC off first and then switch
off the peripheral devices.
18
P1SeManu220-Eng
5
Using the Scanner
5.1
Operation Overview
The flowchart below provides a simple overview of the image scanning procedure.
Launch the TWAIN-compatible application
Select the TWAIN data source
(Select the “Photo Scanner (NS-P1S/SU)”)
Start up TWAIN
Load the photos
Continuous scanning
Panorama photo scanning
First photo scanned
Photo scanned
First photo ejected
Second photo scanned
Second photo ejected
Final page scanned
End (eject)
19
P1SeManu220-Eng
5.2
Scanning Procedure
This driver software is launched from a TWAIN-compatible application running on Windows.
1
•
•
Launch the driver software.
The launching method varies depending on the TWAIN application you are using. Refer to
the user manual supplied with your TWAIN application.
When this driver software is launched from the TWAIN-compatible application, the dialog box
shown below appears.
20
P1SeManu220-Eng
2
TWAIN driver functions
Output device settings
•
In version 2.2x, AGFA D-LAB, CP8000D*, Lab-Std
and the correct monitor settings are listed
beforehand. The optimum resolution and color
correction settings are also set automatically.
AGFA D-LAB: For D-LAB manufactured by the
Agfa-Gevaert Group Japan.
CP8000D :
For the dye sublimation printer
manufactured
by
Mitsubishi
Electric
Lab-Std :
For digital laboratories
Monitor :
For ordinary monitors and for
writing to CD-R
* The CP8000D is a dye sublimation printer
manufactured by Mitsubishi Electric.
Image processing settings
•
•
Hardware
Uses the image processing functions in the Photo
Scanner (NS-P1) for scanning. This option is best
when high-speed scanning is required.
Manual
This option uses image processing software to
supplement the image processing functions in the
Photo Scanner (NS-P1). This option is best when
high-quality scanning is required, but results in a
slower scanning rate.
The user-specified values in the “Setting” pull-down
menu are used for scanning.
Resolution
•
•
Selects the output resolution.
Settings between 50 and 600 dpi can be specified in
increments of 1 dpi.
21
P1SeManu220-Eng
Photo size
•
Photo Size
Specifies the size of the photo to be scanned.
The specified photo size is displayed as the Input
Size.
The registered photo sizes are listed in “Photos that
can be scanned” in section 2.2.
Unit, Zoom
•
•
Unit
Specifies the unit used to show the Input and Output
sizes.
Zoom
Output size scales between 10% and 200% can be
specified in 1% increments.
Preview
•
•
•
If you change the settings and click the [Preview] button again, you can preview the same
photo again.
Clicking the [Scan] button performs a single-print scan using the current settings.
Clicking the [Cont. Scan] button scans all the loaded photos using the current settings.
22
P1SeManu220-Eng
Scan, Cont. Scan
•
•
Scan
Feeds through and scans 1 photo.
Cont. Scan
Continuously scans all the photos currently loaded in
the auto-feed hopper using the current settings.
Setting
•
•
The “Setting” pull-down menu allows you to select
the “Position...”, “Gamma...”, “Color...”, “Unsharp
Mask...” “Calibration” and “Default” parameters.
The “Gamma...”, “Color...” and “Unsharp Mask...” are
only valid when “Manual” is selected in “Image
Process”.
“Position...”
• Trimming
This option trims the specified amount from the
size specified in the “Photo Size” parameter.
Selecting a negative value widens the output
image while selecting a positive value trims the
image.
• Original Position
If the scanned image has been cropped or
trimmed, you can make fine adjustments to the
center and edge positions. Negative Horz
Offset
values shift the image to the left, while positive
values shift it to the right.
Negative Vert Offset values shift the image
upwards, while positive values shift it
downwards.
23
P1SeManu220-Eng
“Gamma”
• The output gamma curve can be set manually.
• Each color channel can be set individually, or
the same value can be set for all the RGB
channels by selecting “RGB”.
• When you click on the line, a point appears, and
you can modify the curve by dragging that
point around.
• If you check the grayscale check box on the
Color Adjustment offset menu, only the
grayscale channel is enabled.
“Color Adjustment Offset”
• Use this dialog box to set the color balance,
intensity and brightness.
• If you check the grayscale check box, data is
output in monochrome gray.
“Unsharp Mask”
• Sharpens the image by selectively adjusting the
contrast.
• Amount:
Sets the level of unsharp masking.
• Threshold:
Applies unsharp mask when the variation from
the target pixel exceeds a set value.
•
Entering a low threshold value applies unsharp mask even to areas with low levels of
image contrast, while a setting of 0 applies unsharp mask to the entire image.
24
P1SeManu220-Eng
“Default”
• Reset the status of currently selected output device to the initial value.
• The initial value depends on each device.
“Calibration”
• Color correction value matching with the output device can be prepared.
• Prepared color correction can be saved in the output device list under any name.
Calibration procedure
1. From the output device to be calibrated, output three sheets in total: gray chart
(Gchart.bmp), color chart 1 (Cchart1.bmp) and color chart 2 (Cchart2.bmp) stored in
chart folder (D: ¥chart¥)*1 within “NS-P1S/SU TWAIN” CD-ROM attached with this
device. Output size can be any of E., L, DSC, HV, KG/4R or Panorama among
“Photographs which can be scanned” on page 5. The output result must show 14 lines of
stripes for gray chart and 40 rectangles in total (8 vertically x 5 horizontally) for color
charts 1 and 2 as shown below:
*1: In this case, CD-ROM drive is set to D drive.
Gchart.bmp
Gray chart
Cchart1.bmp
Color chart 1
Cchart2.bmp
Color chart 2
25
P1SeManu220-Eng
2. Selecting “Calibration” on “Setting” pulldown menu
displays “Set gray chart”.
1. Set the gray chart output generated under item
2 to the hopper in the direction as shown in the
right figure. Clicking “OK” after setting starts
scanning.
←
Feeding direction
3. Scanning result-checking screen will be displayed.
While pressing the left mouse button in position 1 on
gray chart, move the cursor to position 2. Frames will
be displayed on the chart. Adjusting the frames so that
they are placed within the respective lines as shown in
the left figure below, release the left button.If any frame
is out of the line as shown in the right figure below,
perform the same step again. In case that the direction
of photograph or setting order is wrong or that any of
the lines cannot be scanned, click “Rescan” to scan
gray chart again.
When the frames are placed within the respective lines,
click “OK” to proceed to the next step.
Good example
Bad example
26
P1SeManu220-Eng
←
Feeding direction
4. When “Set color chart 1” is displayed, set color chart 1
in the direction as shown in the right figure. Clicking
“OK” starts scanning.
5. While pressing the left mouse button in position 1 as shown in the left figure below on the
checking screen, move the cursor to position 2 to release the button. Adjusting the
frames so that they are placed within the respective color boxes as shown in the right
figure below, click “OK”.
In case of scanning failure, click “Rescan” to scan color chart 1 again.
←
6. Next, when “Set color chart 2” is displayed, set color
chart 2 in the direction as shown in the right figure.
Clicking “OK” starts scanning.
Feeding direction
27
P1SeManu220-Eng
7. Like color chart 1, adjusting the frames
so that they are placed within the
respective color boxes as shown in the
right figure below, click “OK”.
8. Perform
saturation
setting.
Changing
saturation makes colors vary. Increasing the
area of lighter part lightens colors focusing on
darker ones. Increasing the area of darker
part lightens colors focusing on lighter ones. If
no special change is required, set saturation
to the default value (0, 0).
9. “Set a photograph for sample display” will be displayed.
Set it to the hopper to click “OK”.
The photograph for sample
display will be scanned to
show the preview. Here,
check the adjusting result
of
saturation.
When
saturation
setting
is
completed, click “OK” to
proceed to the next step.
If you want to change
saturation again, you can
return to the saturation
setting screen by clicking
“Rescan”.
28
P1SeManu220-Eng
10. Finally, enter the device name into the dialog
box as shown in the right figure to terminate
calibration. Color correction setting will be
added to the output device list under this
name. In this example, it is named “Printer”.
Deletion of output device
• You can delete the currently set output device.
Clicking Delete button displays the checking
dialog box.
Clicking “Yes” deletes the setting. Clicking “No”
stops deletion.
•
Default output devices (AGFA D-LAB, CP8000D, Lab-Std and Monitor) cannot be deleted.
That is why no Delete button is displayed when these settings are selected.
29
P1SeManu220-Eng
Info
•
“Info” allows you to check the driver software version
and the scanner information.
•
Version Info
Shows the driver software version.
•
Scanner Info
Shows the information stored in the scanner’s
internal memory.
•
•
•
•
Scanner firmware version
Shows the firmware version used in your
scanner.
Scanning count
Shows the number of scans performed so far.
ADF count
Shows the number of photographs that have
been fed from the auto-feed hopper.
Help
This instructions manual starts.
30
P1SeManu220-Eng
5.3
Loading Photos
There are 2 photo scanning procedures according to the type of photo.
1
Scanning photos from the auto-feed hopper.
Picture side
Loading direction
PC display
•
•
•
•
•
•
When you raise the photo loader cover open it, the photo tray drops down.
Check the list of supported photo types and quantities in the table on page 10 and then load
the photos into the hopper with the picture side facing upwards.
When you have loaded all the photos, close the photo loader cover. The photo tray lifts up
and loading is complete.
See P.10 for information on the photo sizes that can be scanned using the auto-feed hopper
and the number of photos that can be loaded.
Do not load photos of different sizes together.
Do not apply undue force to the photo loader cover as this will damage the scanner.
31
P1SeManu220-Eng
2
•
•
•
•
•
Scanning panorama photos.
Picture side
Open the panorama loader cover.
Insert the panorama photo into the photo supply slot with the picture side of the photo facing
the back of the Photo Scanner (NS-P1S/SU).
Insert the panorama photo firmly all the way into the supply slot. Take care not to insert the
photo only partway or push the photo too far into the interior of the scanner as this will
prevent successful scanning.
Only insert 1 panorama photo at a time.
Do not apply undue force to the panorama loader cover as this will damage the scanner.
32
P1SeManu220-Eng
6
Ordinary Maintenance
6.1
Cleaning the External Cover
Light soiling on the outside of the scanner should be wiped off with a dry cloth. Heavier soiling
should be removed by wiping the scanner with a cloth moistened with a small amount of mild
detergent and then wiping off any moisture with a dry cloth.
•
6.2
Do not use organic solvents such as alcohol or thinners as these could cause deterioration
in the scanner materials.
Cleaning the Rollers and Scanning Window
Use the cleaning sheet provided with the scanner to clean the rollers and the scanning window
surface as described below.
1
•
Cleaning the scanning window.
Open the front cover and use the cleaning sheet to the clean any soiling on the window
surface.
Window cleaning section
•
•
•
•
The same procedure can be used to clean the window in the panorama loader.
When cleaning the window, take care not to touch the glass directly.
The glass cleaning sheet can be used repeatedly. When storing the sheet, remove any dust
or soiling and keep it in its plastic packaging.
If the glass cleaning sheet is very heavily soiled, purchase a new sheet. Contact your NISCA
dealer for details.
33
P1SeManu220-Eng
2
•
•
•
Cleaning the rollers.
Load the roller cleaning sheet into the photo supply hopper and perform a scan. As the roller
cleaning sheet is fed through the scanner, it cleans any soiling on the rollers. If the rollers are
heavily soiled, repeat the procedure.
Never insert the roller cleaning sheet into the panorama loader.
Do not load the roller cleaning sheet with the printed surface downwards as this will damage
the scanner.
Load the sheet with the printed side facing upwards.
Peel off the protective layer before loading.
•
•
The roller cleaning sheet can be used repeatedly. When storing the sheet, reapply the
protective layer in its original position and keep the cleaning sheet in its plastic packaging.
If the roller cleaning sheet is very heavily soiled, purchase a new sheet. Contact your NISCA
dealer for details.
34
P1SeManu220-Eng
7
Troubleshooting
If you have a problem with the scanner, refer to the chart before contacting your place of purchase.
Problem
The installer program doesn’t
run
The scanner makes a strange
noise when you turn it on
Causes to Check
There is not enough memory to
run the installer program
Is the Fixed Lever for Shipping
locked?
The scanner isn’t recognized
Any cause other than the above
Is the SCSI or USB cable
correctly connected?
If you are using the SCSI
interface, did you turn the
scanner on after turning the PC
on?
Does Windows recognize the
PC USB interface or the
scanner?
There is dirt on the image
Is there dirt or dust on the photo
you scanned?
Is there dirt or dust on the pick
up rollers or scanning window?
There is moiré (net-like
shading) on the image
Has the print processing left a
mesh of fine dots on the
scanned photo?
When feeding the photo, the
photo slips or doesn’t feed
correctly
Is there dirt or dust on the pick
up rollers?
The photo is jammed in the
scanner
Are you scanning a photo that
cannot be scanned?
The status lamp on the
scanner is flashing. On your
PC monitor, an error message
is displayed
There is a problem with the
scanner or transmission device
Remedy
Close all programs that are
running and try again
Turn the scanner off, and
unlock the lever using the
procedure in 4.3, “Setting the
Fixed Lever for Shipping to the
Release Position.”
Contact your place of purchase
Connect the cable correctly. If
you are using a SCSI cable,
after turning scanner off and
then on again and restarting
your PC, follow the procedure
in 4.1, “Using the SCSI
Interface,” to reconnect the
cable
If you are using the SCSI
interface, you need to turn on
the scanner and the SCSI
device before the PC
Display the Device Manager
and
check
if
Windows
recognizes the PC USB
interface or the scanner.
Clean the photo and try
scanning again
Follow the procedure in 6,
“Ordinary Maintenance,” to
clean the pick up rollers and
cleaning window, and then
scan the photo again
Follow the procedure in 7.2,
“Moiré (Net-like Shading) on
the Image,” and scan the photo
again
Follow the procedure in 6,
“Ordinary Maintenance,” to
clean the pick up rollers, and
then scan the photo again
Follow the instructions in 7.1,
“Scanned Photo Jammed in
the Scanner,” and remove the
photo from the scanner.
Further, refer to 2.2, “Photos to
be Scanned,” and check
whether the photo is able to be
scanned
See 7.3, “Error Messages.”
35
P1SeManu220-Eng
7.1
Scanned Photo Jammed in the Scanner
Use one of the procedures described below to remove the jammed photo according to the
location of the jam.
•
•
•
1
•
•
Take particular care not to use excessive force to remove a jammed photo as this could
damage the photo.
First remove any photos that remain in the auto-feed hopper and eject tray and then switch
off your PC and the scanner before using the procedures given below.
When opening the front cover, take care not to trap
your fingers between the eject tray and the front
cover.
If the back of the photo is still protruding into the
auto-feed hopper but the photo cannot be seen
when the front cover is opened.
Open the photo loader cover.
Hold down the nip release lever (with the green
sticker) for the separator roller shown in the figure at
right and pull the photo out from the hopper end.
Jam release lever
Green sticker
36
P1SeManu220-Eng
2
If the photo can be seen when the front cover is opened.
•
Turn the handle to slowly eject the photo downwords as
shown in the figure below.
3
•
4
•
•
Handle
If the photo has stopped on the scanning window.
Pull the photo away from the window as shown in the
figure at right.
If the photo has stopped while being fed out into the eject tray.
Pull the photo carefully out over the eject tray as shown in
the figure at right.
After removing the photo, briefly open and close the front
cover to clear the error.
37
P1SeManu220-Eng
7.2
Moire (Net-like Shading) on the Image
If moire patterns appear on the scanned image, check the items listed below.
1
•
•
Has the print processing left a mesh of fine dots on the scanned photo?
Photos produced using screen printing, such as images printed in documents, are more
susceptible to moire patterns. In the same way, images made up of a mesh of fine dots are
also likely to suffer from moire effects when scanned. While moire cannot be completely
eliminated, any of the methods below can be used to minimize the effects.
Set the scanning resolution (see 5.2-2-3, TWAIN driver functions) to 300 dpi.
Try deselecting the Unsharp Mask checkbox (see 5.2-2-8, Settings).
38
P1SeManu220-Eng
7.3
Error Messages
When an error occurs, an error message appears on the monitor or the status lamp on the Photo
Scanner (NS-P1S/SU) flashes in accordance with the error status.
•
1
If the same error occurs repeatedly, take a note of the error status and contact your NISCA
dealer.
Error messages on the monitor and their responses
Error Displayed
Error Details
Response
Scanner could not be detected. The driver software failed to Check that the scanner is
Check
the
scanner recognize the scanner.
switched on and that the
connections.
SCSI cable is connected
correctly.
Close front cover.
The front cover is open.
Close
the
front
cover,
ensuring that it clicks to
indicate that it is fully closed.
Load the photo into the manual Panorama scanning was Load the panorama photo as
supply slot.
selected but no photo has described in section 5.3-2.
been loaded.
Load photos into the hopper.
Hopper-fed scanning was Load the photos as described
selected but no photos have in section 5.3-1.
been loaded.
Photos are loaded in the
hopper and manual supply slot.
Remove the photos from the
hopper.
Photos were loaded into the
hopper and manual supply
slot
when
panorama
scanning was selected.
Remove all the photos from
both loaders and then reload
the panorama photo before
scanning.
Photos are loaded in the
hopper and manual supply slot.
Remove the photos from the
manual supply slot.
Photos were loaded into the
hopper and manual supply
slot
when
hopper-fed
scanning was selected.
Remove all the photos from
both loaders and then reload
the photos in the hopper
before scanning.
A misfeed occurred. Remove A feeding error occurred in Remove the photos as
and then reload the photos.
the hopper.
described in section 7.2-1,2
and then reload the photos
into the hopper before
scanning.
A jam has occurred. Open the A photo is jammed in the Clear the jam as described in
front cover and remove the scanner.
section 7.2-3,4 and perform
photo.
the scan again.
System error. Switch the Carriage home position error Refer to items 6) to 10) in the
scanner off and then on again.
or initialization error.
status lamp actions on the
following pages.
39
P1SeManu220-Eng
2
Photo scanner status lamp flashes and their responses
Status Lamp Action
Message
Response
1) Continuous flashing at short intervals
Initialization
progress
in Normal
2) Off
Standby
Normal
3) Off
Switched off or front
cover open or
the power supply of
PC turns off in the
state
of
USB
connection.
Switch the scanner on or
close the front cover or
turn on the power supply of
PC.
4) Flashes twice at regular intervals
Photo feeding error Remove the jammed photo
(jammed photo)
and then briefly open and
close the front cover.
Perform scanning again.
5) 3 flashes followed by 1 flash
Carriage
home Release the shipping lock
position error
lever and then open and close
the front cover.
If this does not clear the error,
contact your NISCA dealer.
6) 3 flashes followed by 2 flashes
Initialization error
Contact your NISCA dealer.
7) 3 flashes followed by 3 flashes
8) 3 flashes followed by 4 flashes
9) 3 flashes followed by 5 flashes
40
P1SeManu220-Eng
8
Appendix
Uninstalling the Driver Software
This section describes how to uninstall the scanner’s driver software using Windows 98 as an
example.
1
2
3
4
Check that you have exited all active programs.
Click [Settings] > [Control Panel] in the [Start] menu.
Double-click [Add/Remove Programs].
Click “Photo Scanner NS-P1S/SU” in the list of
software and then click [Add/Remove...].
When the confirmation message appears, click
[OK].
41
P1SeManu220-Eng
Warranty
If you have any problems with this product during the warranty period, this product is covered by the
terms in the warranty. Please read the terms and conditions in the warranty carefully.
The warranty proves the period of the warranty. Make sure that the place of purchase and purchase
columns are filled in. If these columns are blank, the warranty becomes null and void. Contact your
place of purchase immediately if any of the columns are blank.
Store the warranty in a safe location. Please contact the warranty for the warranty period, and terms
and conditions of the warranty.
Warranty Maintenance
Contact your place of purchase or your local Nisca dealer.
Retention Period for Service Parts
In general, parts required for the continued functioning of this device will continue to be held in stock
for a period of 5 years from the discontinuation of manufacture, and repairs will be possible within
this period. Repairs may also be possible when this period has expired. Consult your NISCA dealer
for details.
Downloading the Latest Driver Software Information
You can download the latest version of the driver software for this scanner from the following
website:
http://www.nisca.co.jp
42
P1SeManu220-Eng