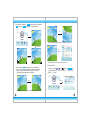
1
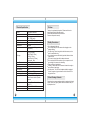
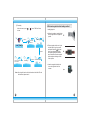
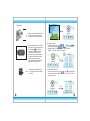
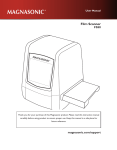
FILM SCANNER
8.Declaration
Please note products spec is subject to improvement .Any
changes of product will not make additional specify.
CONTENTS
Preface ........................................................... 1
Safety Precautions............................................1
Checking package contents..............................1
Product Structure Diagram...............................2
Slide and negative holder loading method ..... 3
Operation Guided ............................................5
Product Specification......................................12
Declaration......................................................13
13
7.Product Specification
1.Preface
Function
Interface
Image Sensor
Film scanner/USB MSDC
USB2.0
14.0 Mega pixels (4416*3312)
1/2.3” CMOS sensor
Thank you for purchasing this product!Please read this user's
manual carefully before using this product.
Please retain this manual for future reference.
Please use this product correctly
Display
Exposure Control
White Balance
Resolution
Color 2.4〞TFT LCD
Automatic / Manual (-2.0 EV~ +2.0EV)
Automatic
14.0 Mega pixels/ 22Mega pixels
(interpolation)
Film type
Picture Effects
File format
TV-OUT type
Built-in memory
External memory card
Power Supply
Language
12
135 Film(36*24mm)、
126KPK Film(27*27mm)、
110 Film(17*13mm)、
Super8 Film(4.01*5.79mm)、
Monochrome、Slide
B&W,Slides,Negatives
Picture:JPEG
NTSC/PAL
128M
SD card up to 32GB
DC 5V Adapter/ USB Port
S-Chinese / T-Chinese / English /
French /German / Italian / Spanish /
Japanese
Support system
Windows XP/vista/Windows7/
Mac10.7.3
Product Size
Weight
L104.5 x W90.5 x H102.5mm
272g
2.Safety Precautions
Do not disassemble this unit.
Do not touch inner part of the scanner after dropping or other
damage suffering.
Do stop using it if there is any problem with the scanner, such as
smoke or smell while using.
Do not clean the scanner with alcohol, gasoline, diluent and other
organic solvent.
Do not use it in many dusts with the damp environment.
Do not overload the USB connections on your computer to avoid
poor working of the scanner for overloading.
Please use films of standard size.
Cleaning:Please make sure the scanner is clean before using so
as to produce a clean image.
Non use period:The USB cord or adapter should be unplugged
from the computer or plug seat when the unit is left unused for a
long period of time.
3.Check Package Contents
Please check your scanner package whether it contained as followed
objects ,if lack of any object, please contact with retailers whom you
buythe product from.
1
110 Insert
Negative Adapter
THIS SIDE UP
110
THIS SIDE UP
Slide Adapter
(8).Connect to computer
Under main menu mode,press
,until
, press OK/Enter .
After successfull connectting to computer,you can view and edit
captured pictures.
Negative
Slide
Super8 Insert
Brush
Super 8
OK/Enter
FILM SCANNER
USB Cable
Power adapter
User’s Manual
TV cable
! Please stretch into clean from product side,when
you use cleaning brush to clean backlight
4.Product Structure Diagram
TV OUT
Gold Contacts Face UP
2
11
(7).Formatting
5.Slide and negative holder loading method
In the main menu, press
to enter.
to "
",press "OK/Enter" button
Loading Negatives
a.Hold up the negative toward the light.
Face the right side of the negative to
yourself.
Format the media?
OK/Enter
Data shall be
eliminated!
Format
and
Yes
No
Flip/Mirror
Format is successful!
Please restart!
OK/Enter
and
Format the media?
b.Take out negative holder out. Let the
side with “open” logo face yourself,
and let the side with “
”logo face
down. Open the negative holder,
then place negative into recessed
area in the holder.Close the negative
holder and press the edges so that
it locks in place
Formating......
Yes
No
c. Insert the negative holder into the
slot on the right side of the film
scanner .
Note: After using this function, all the information in the Micro SD card
will be deleted, please note it !
10
3
Loading Slides
Enter
a.Hold up the slide toward the light. Face
the righ side of the slide to yourself.
(we don't provide white small holder)
b.Take out slide holder out. Let the side
with “open” logo face yourself, and let
the side with “
”logo face down.
Open the slide holder, then place
slides into recessed area in the
holder.(films also could be loaded as
a strip into the slide holder, forming
drawer type as below picture)
Close the slide holder and press the
edges so that it locks in place
c. Insert the slide holder into the slot
on the right side of the film scanner
as shown.
Home
Home
(5).Setting Language
,unti
, press OK/Enter to
Under main menu mode,press
chose language, then press
and OK/Enter , one of following 8
language can be set:English、Franch、German、Italian、
Spanish、T-Chinese、S-Chinese、Japanese.
OK/Enter
(6).Resolution Choosing
Under main menu mode , press
, until
, press OK/Enter
to enter into Resolution Choosing Mode,you can choose14M or
22M(interpolation)
OK/Enter
4
9
(4).How to playback captured picture
,press OK/Enter enter the
In main menu, press
,unti
picture auto-playback mode press again to stop auto playback
and you can view captured pictures manually, you can press
to view;press OK/Enter again enter picture editing mode,
you can rotate : delete, exit, save, and “home”back to main menu.
! :Handle films with care to avoid scrathesor finger
prints(for the best use cotton gloves when handling
films)It is recommended to use compressed cotton
to remove any dust on the films.
6.Operation Guided
(1).Introduction of Memu
Enter
Enter
①
Enter
Exit
1
4
2
5
3
6
The current picture rotate 90 digree clockwisely
The current picture rotate 90 digree anticlockwisely
Deleting the current picture from memory card
Exit the submenu edit mode,back
Saving the current edited picture
Exit the submenu edit mode,back to scan
8
②
③
① Film Type
② Resolution
③ Capture
④ Playback ④
⑤
⑥
⑦
⑤ Format
⑥ USB MSDC
⑦ Language
(2). Capture Picture
a.Before scanning please make sure the inner backlight panel
is clean.
Note: You can use the provided brush to clean the screen.
5
b.In main Menu mode press OK/Enter enter capture mode, then press
SCAN/OK the picture would be captured.
Mode then press OK/Enter
EV 0.0
EV 0.0
EV 0.0
Flip
OK/Enter
Press right key,the image position be altered from up to down
Convert/Mode
EV 0.0
ENTER
OK/Enter
Press ENTER to set exposure compensation
c.Before pressing Mode to capture picture,you can press left
button to mirror and press right button to flip the current picture.
And you can press OK button to set Exposure. Then press
Convert/Mode button again back to main menu.
EV 0.0
(3).Operation Guide
In main menu, press
,until
,then press OK/Enter you
can chose negative(110、135、126KPK)、slide(110、135、126KPK、Super8)、
B&W(110、135、126KPK)
EV 0.0
Mirror
OK/Enter
Press left key , the image position be altered from left to right
6
7