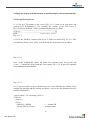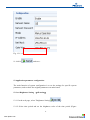
1
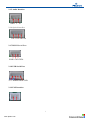
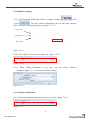
User’s Manual for QS5800 Operations
Version NO.: Ver1.9
Release date: 2011-5-16
www.pledco.com
Updated Records……………………………………………………………………………...4
1. Brief Introduction…………………………………………………………………………4
2. Interface Specification…………………………………………………………………….5
2.1 Introduction of the interface…………………………………………………………..6
2.1.1. Temperature sensing interface………………………………………………….6
2.1.2. RS232/RS485 interface…………………………………………………………6
2.1.3. Power jack……………………………………………………………………...6
2.1.4. Interface of External power supply controller…………………………………..6
2.1.5 Audio Interface………………………………………………………………….7
2.1.6 Optical interface…………………………………………………………………7
2.1.7 RS232 Serial Port………………………………………………………………..7
2.1.8 USB Serial Port………………………………………………………………….7
2.1.9 FAN Interface……………………………………………………………………7
3. Specification…………………………………………………………………………………8
4. Typical Applications…………………………………………………………………………8
4.1 Offline Application……………………………………………………………………..8
4.2 Synchronous Application……………………………………………………………….9
4.2.1 To be Synchronic with Single-board Computer via LVDS Connector………………9
4.2.2 To be synchronic with Computer via DVI Connector………………………………10
4.2.3 To be synchronic with Gigabit Ethernet Interface…………………………………..10
4.2.4 To be synchronic with Optical Fiber………………………………………………...11
5. Motherboard Configuration…………………………………………………………………11
6. Let the display enter into the test condition………………………………………………....14.
7 Send the created information to the display screen………………………………………......16
7.1. Transfer disk(offline)………………………………………………………………….16
7.2 Web…………………………………………………………………………………….17
7.3 Play the content in the SD card or USB flash disk…………………………………….17
8 Setting display scheduling……………………………………………………………………18
9 Let the display with RSS function……………………………………………………………19
10.Equip the display with the function of updating display content automatically…………….22
10.1 Set up Sharing Server………………………………………………………………….22
10.2 Allocate Motherboard…………………………………………………………………23
10.3 Confirm Download……………………………………………………………………25
11 Allocate the motherboard with WIFI function……………………………………………...25
12 Application parameter configuration………………………………………………………..27
12.1 set Brightness Setting (AD setting)…………………………………………….....27
12.2 Set the switch machine scheduling……………………………………………………28
12.3 sms and email alarm functions………………………………………………………..29
12.3.1Principle………………………………………………………………………….30
12.3.2 Set Protection……………………………………………………………………30
12.3.3 sms and email settings…………………………………………………………..30
13 Log message…………………………………………………………………………………31
13.1 View the currently playing content (real time)…………………………………………31
13.2 View Play log and export logs………………………………………………………….31
.
2
www.pledco.com
13.3 Check list update log……………………………………………………………………33
13.4 Check temperature log…………………………………………………………………..33
14 System diagnosis……………………………………………………………………………...34
14.1 Check application program version information………………………………………..34
14.2 Check tile information…………………………………………………………………..34
14.3 Check pixel information………………………………………………………………...35
15 System update………………………………………………………………………………...35
15.1 Sigma 3000 update……………………………………………………………………...35
15.2 Update package update…………………………………………………………………36
15.3 USB drive update……………………………………………………………………….38
16. Advanced application………………………………………………………………………...39
16.1 Sub-windows playing…………………………………………………………………...39
16.2 Subsidiary playing……………………………………………………………………....41
16.3 Company management………………………………………………………………….41
16.4 Web user manager……………………………………………………………………….42
17. FAQ…………………………………………………………………………………………..44
17.1 web initial password…………………………………………………………………….44
17.2 Solution for no playing content in the screen…………………………………………...44
17.3 The reasons for connection failure to the Ethernet……………………………………...45
Appendix…………………………………………………………………………………………………………………….47
.
3
www.pledco.com
version
Ver1.0
Ver1.1
Ver1.2
Ver1.3
Ver1.4
Ver1.5
Ver1.6
Ver1.7
Ver1.8
Ver1.9
modifications
Compile the first version
Modify the imperfect process
Modify part of the format
Modify part of the format
Modify part of the format
Modify hardware connection
parts
Resetting
Content modification
Add SIGMA’s upgrading and
content modification of the
WEB 1.5
Update the upgraded content in
the upgrade packs
modifier
ZWJ
ZWJ
YangLei
ZWJ
ZWJ
ZWJ
Modification date
2011-1-7
2011-1-10
2011-1-17
2011-1-17
2011-1-24
2011-2-13
ZWJ
ZWJ
ZWJ
2011-2-14
2011-2-15
2011-4-15
ZWJ
2011-5-16
1. Brief Introduction
QS5800 is a new generation of LED display main control system. Its features are as follows.
z Support offline and synchronous application.
z Support various synchronous signal input such as LVDS, DVI, GbE(gigabit Ethernet) and
optical fiber.
z Can play the file in the USB flash disk and SD card directly.
z Support the document of JPEG, MPEG, AVI and so on.
z With the display and control mode, rights management classification as well as the display
statistical functions which specific to the advertising.
z The brightness of the display can be adjusted automatically so that the energy consumption
of the display can be reduced significantly.
z Support timer switch function.
z Support the RSS function, reading the RSS Feed in real time and update the displayed
content.
z Support the function of detecting and display the temperature and humidity in real time.
z Support the forms of communication such as WIFI, GPRS, USB, RS232, RS485.
z Support the function of reporting the working state of the display by sending SMS and
E-mail.
z Support to set and operate by browser.
2. Interface Specification
.
4
www.pledco.com
Power control
interface
Audio
Peripheral
interface
Optical
interface
Interface
Display cabinet
interface
Ethernet
interface
USB
interface
USB interface
Temperature
sensing interface
R232/485
interface
SD card interface
5V power jack
Ethernet
interface
2.1 Introduction of the interface
2.1.1. Temperature sensing interface
.
5
www.pledco.com
USB
interface
USB interface
VCC
CH
CL
GND
2.1.2. RS232/RS485 interface
TXD1
(
GND
RXD1
RS232
NC
)
RS+
RS( RS485 )
2.1.3. power jack
VCC
GND
(use 5V power supply)
2.1.4. Interface of External power supply controller
NC IN2 O2
GND IN1 O1
.
6
www.pledco.com
2.1.5 Audio Interface
GMD L R
2.1.6 Optical interface
Test 3.3V Lum Lum
2.1.7 RS232 Serial Port
RXD1 GND TXD1
2.1.8 USB Serial Port
VCC HDMA HDPA GND
2.1.9 FAN Interface
.
7
www.pledco.com
3. Specification
Specification of the QS5800
CPU Type
ARM9
Run Speed
400MHz
Memory
64MB SDRAM + 128MB DDR SDRAM
Storage
256MB NAND Flash on board,
Supports SD Card and U Disk.
Operating System
Linux 2.6
Interface
One RS232
One RS485
One 10M/100M Ethernet
Two USB host
One USB device
One SD Card Socket
Communication
RS232
RS485
10M/100M Ethernet
USB
GPRS
WLAN
Working Mode
Offline or synchronous with computer
Input resolution
1024x768@60Hz
Output resolution
1024x768@60Hz
Video format supported Mpeg2,avi,mp4
Operating temperature -10~60℃
Dimensions
180mmx120mmx20mm
4. Typical Applications
4.1 Offline Application
In this application, QS5800 runs independently and plays the file that saved in the on-board
storage, SD card or U disk automatically according to the setup.
.
8
www.pledco.com
4.2 Synchronous Application
In the synchronous application, QS5800 needs devices like computer, DVD player, video
camera to offer the display contents. Following is the introduction of 5 frequently-used
synchronous systems.
4.2.1 To be Synchronic with Single-board Computer via LVDS Connector
.
9
www.pledco.com
4.2.2 To be synchronic with Computer via DVI Connector
4.2.3 To be synchronic with Gigabit Ethernet Interface
.
10
www.pledco.com
4.2.4 To be synchronic with Optical Fiber
5. Motherboard Configuration
5.1 connect the motherboard with internet, and input the IP address into the browser and
login to the motherboard
, enter into the control interface,
5.2 after logining, click “system setting”
.
11
www.pledco.com
notice:
Name
List of common features
Specific function
Name
of
function
Name of the display
IP
Width
Width of the display
Baud Rate1
Height
Height of the display
Baud Rate2
Firmware
The program version Group Addr
of CPU
Hardware Version
Reading of the type of Unit Addr
hardware
Style
Module type of the Play Mode
Name of the function
.
12
www.pledco.com
the Specific function
The
IP
address
of
motherboard
output frequency mostly
used
during
the
communication of some
special module
Group address. Used to
distinguish one line or one
row when multiple pieces
module are combined
together
Unit address. Used to
distinguish one module in
one line or one row when
multiple pieces modules are
combined together
When there are new
display
Drive Type
Connection mode of Control Mode
the display
Brightness
Adjusting
the
brightness
of
the
display
Adjusting the R, G, B
color of the display
effect
Color Temperature
playlists updating, choose to
response immediately or to
response after the original
playlists finish playing
Used in synchronized
output, be set as “offline”
generally.
5.3 Modify the IP address of the motherboard in communication parameters, and use the
communication frequency of the serial communication.
5.4 Modify the name, the width, the height and the quantity of the module of the display in the basic
parameter.
5.5 Set the play mode as “offline” and the pixel mode as “real pixel” in the FPGA parameters, set
the corresponding the signal direction and the type of the diver board as per the type of the display
module.
.
13
www.pledco.com
5.6 Set the play mode as “Play Immediately” and the DNS as the IP address of the server in the
other parameters, and set the time zone according to the actual geographic position.
5.7 Click “
” to save.
6. Let the display enter into the test condition
6.1. Login in the WEB page of the motherboard, choose “play control”
.
14
www.pledco.com
(fig 21.1.1.1).
fig 21.1.1.1
2. Use the test button on the left side to check the display.(fig 21.1.2.1)
Fig 21.1.2.1
Test button
Full red, full green, full blue, full
white
Display effect
display one color
.
15
www.pledco.com
horizontal sweep or Vertical sweep
automatic
stop
Blank screen
Stop black screen
red, green, blue, white
Forward, backward
Previous, next
play
pause
stop
reset
some horizontal or vertical moving line will turn up in the
display
Display alternates single color graphics and linear
movement graphics.
stop all the test function
Make the display become blank screen
Restore original frames
In the screen shows that the black gradually changes into
red, green, blue or white.
Playing files fast forward and backward
Play previous one or the next one directly
Start playing file
Pause playing file
Stop playing file
Reset the motherboard
7 Send the created information to the display screen
When the user need to play the multimedia file(bmp、jpg、AVI、mpeg、flv etc.)for several times,
please choose the PLAY function in the list. The user just need to get the play files (e.g. bmp、jpg、
AVI、mpeg、flv. Please refer to the directions of the editing software when making the multimedia
files) ready and then add to the playlists to play.
7.1 Transfer Disk(offline)
7.1.1. Please check whether the file layout is FAT or FAT32; if not, please reformat the USB flash
disk.
7.1.2 Add list files and play files to the USB flash disk. (Note: the main board cannot distinguish the
combination of memory card and USB flash disk of card reader.)
7.1.3 Open the playlist, delete the original content and add the following contents:
[VER10000]
[OVERWRITE]
[D]
[REV]
[1][AD][/helloworld.nmg][2011-01-01 00:00 2011-12-31 23:59 1111111]
Note( the last line): [window][group name][place and name of the playlist][ daily start date; daily
end date; which day to play]
7.1.4 Then insert the USB flash disk to the connector of main board. After a while, the main board
will start the playlist automatically. (Note: don’t do other operation when waiting.)
.
16
www.pledco.com
7.2 Web
7.2.1 Choose“playlist>add from lacal”
7.2.2 Please add the edited file HELLOWORLD.nmg to the playlist (for detailed step, please refer
to directions of SIGMA) (Note: the volume of the single file cannot surpass 20MB in the page state)
7.2.3 Choose the play window and play attribute( picture1.2.2.1), click“enter>write
” and finish to add(picture 1.2.2.2).
Fig 1.2.2.1
fig 1.2.2.2
7.3 Play the content in the SD card or USB flash disk
7.3.1 Insert the memory card or USB flash disk to the card reader of the main board or the
connector of USB. Restart the main board when insert or pull out the memory card.
7.3.2 Choose “playlist” in the WEB page, click”
played to the disolay screen.
”and add the files needed to be
7.3.3 In the pop-up dialog box, the USB flash disk will open USB DISK content(fig 3.3.3.1), SD
will open SD DISK content ( fig 3.3.3.1).
fig 3.3.3.1
fig 3.3.3.2
.
17
www.pledco.com
7.3.4 Choose the files needed to be added, click
,and at last click
8 Setting display scheduling
8.1 Loge in the page of main board with the IP address and choose
8.2 Add a file to the display screen (e.g. HELLO world.nmg, fig 7.5.1.1)
Fig 7.5.1.1
8.3 After choosing the playlist, click
and which day to play in a week. ( fig4.2.2.2)
, in the pop-up dialog box, set the date, play time
fig 7.5.2.1
8.4 After the setting((fig 7.5.3.1), click
and then click
fig 7.5.3.7
.
18
www.pledco.com
8.5 At last, click
to send to the display sreen.
9 Let the display with RSS function
Rss function can make the motherboard update the news automatically and the play list does not
need modifying. Users can update the news by this function to save a lot of time and effort.
9.1 Use the IP address to login in the motherboard page, choose “RSS setting”
.
Copy theCopy
available
RSS address
the address frame
the available
RSS to
address
9.2,Copy the available RSS address (such as:
http://news.baidu.com/n?cmd=4&class=technn
ews&pn=1&tn=rss notice: the website must
be with RSS) to the “URL address frame” in
the RSS FEED.(picture 5.1.2.1)
Fig 5.1.2.1
9.3 modify the item property in the item name,
set the playing content of the RSS. For example,
title description, put date and so on. (picture
5.1.3.1)
Fig 5.1.3.1
.
19
www.pledco.com
9.4 choose the playing effect of the RSS in the
display style, such as font style, display mode,
color and the pause time of each message.
(picture 5.1.4.1)
Fig 5.1.4.1
9.5 open the RSS function in the control, set
the quantity of the message you want to play,
the updating interval and the charset, “GBK”
are generally used in Chinese.( Picture 5.1.5.1)
Fig 5.1.5.1
9.6 choose “play list”
RSS
file
click”
,
” ,open RSS Sourceto
choose RSS1.nmg file(picture 5.1.6.1),click
“
Fig 5.1.6.1
.
20
www.pledco.com
” to save.
fig 5.1.7.1
Notice: if it still cannot be played after
modifying, please check “system setting” to
make sure whether the “play mode” is set as
“play immediately” or not. (.fig 5.1.7.1)
.
21
www.pledco.com
10.Equip the display with the function of updating display content automatically
10.1 Set up Sharing Server
11.1.1 Set up FTP content on the server (Fig. 6.1.1.1) and set up user name and
password for downloading ( For example, the content of the FTP server is
ftp://169.254.10.49/down,both user name and password are 5800).
Fig. 6.1.1.1
10.1.2 In the “DOWN” content of the server, 5 folders are added (Fig. 6.1.2.1). They
are Downlist, Picture, Text, Video, Log. Relevant file in the folder can be added.
Fig. 6.1.2.1
Note: in the DOWNLIST folder, the public list (common xml) and private xml
(*.xml,“*”should be accord with the screen name, Fig. 6.1.2.2) must be separated
when adding download listfiles.
Fig. 6.1.2.2
10.1.3 Use text editor to open common.xml and *.xml. Eliminate the content of the
original file and then add the content as follows ( refer to the auto download text for
specific information)。
<?xml version="1.0" encoding="utf-8"?>
<FileList>
<TextList>
<Text>
<WinID>1</WinID>
——window ID
<Group>Pledco</Group>
——company name
.
22
www.pledco.com
<FileNo>3</FileNo>
<Name>autodown.nmg</Name>
<ReplayTimes>1</ReplayTimes>
<TimeNum>1</TimeNum>
<Times>
<Week>127</Week>
<StartTime>
<Year>2011</Year>
<Month>01</Month>
<Day>01</Day>
<Hour>00</Hour>
<Minute>00</Minute>
</StartTime>
<EndTime>
<Year>2011</Year>
<Month>12</Month>
<Day>31</Day>
<Hour>23</Hour>
<Minute>00</Minute>
</EndTime>
</Times>
</Text>
</TextList>
</FileList>
——folder number
——download file name
—— number of times of replay
—— to change the default play time
setting“0”to be“1”
——play in some day of a week
——start time
——year
——month
——day
——hour
——minute
——end time
——year
——month
——day
——hour
——minute
10.2 Allocate Motherboard
10.2.1 Choose
in the WEB page, then click
.
10.2.2 Set up the IP address, subnet mask, default router, DNS of the motherboard. To
make the motherboard and server in the same LAN so as to avoid connect failure
(Fig6.2.2.1).
.
23
www.pledco.com
Fig.6.2.2.1
10.2.3 Choose
in the WEB page, then click
.
10.2.4 Set the “Download Setting” to be “Open” and then input the set server address
(ftp://169.254.10.49), the route of the folder (/DOWN), user name (5800), password
(5800), screen name 123. Choose corresponding download time and click “ Write in”
(Fig. 6.2.4.1 ).
.
24
www.pledco.com
Fig. 6.2.4.1
10.3 Confirm Download
10.3.1 Choose
in the WEB page. Check the motherboad record and
find if there any record of playing download file. Then check the server download
record “*.log”, and see if it is accord with the content of the list. (Fig. 6.3.1.1).
Fig. 6.3.1.1
11 Allocate the motherboard with WIFI function.
11.1 Connect USB wireless receptor (Fig. 12.1.1.1) and then connect the network with
wireless router.
.
25
www.pledco.com
Fig. 12.1.1.1
11.2 To set the wireless router, set up wireless LAN. For example: to set the network
name as QS without permissions password but with DHCP function. (Because the
allocating method of different wireless routers are different, so please refer to router
instructions.)
11.3 Choose “WIFI Setting” in the motherboard page. Set the motherboard WIFI
function to be “Open”. Choose “QS” as the access point. Input the password for the
access point if there is one, if not, keep it empty. Choose the working mode as
“DHCP” (Fig. 12.1.3.1).
Fig.12.1.3.1
Note: choose “Manual assign IP address” if you need to set manual IP address
assignment.
.
26
www.pledco.com
Fig. 12.1.3.2
11.4 click“
” and save。
12 Application parameter configuration
The main function of system configuration is to set the settings for specific system
parameters, and to check the original parameters on main board.
12.1 set Brightness Setting (AD setting)
12.1.1 In the web page, select "Brightness Setting"
,
12.1.2 Select time period and set the brightness value of the time period (Figure
.
27
www.pledco.com
(fig 9.1.2.2)。
9.1.2.1), the specific reference to "light Sensor Setting"
Set设置的时间段
time period
Fig
时间段内的亮度值
Brightness
value of
the time period
9.1.2.1
fig 9.1.2.2
12.2 Set the switch machine scheduling
12.2.1 Login motherboard, select "Power schedule"
”,
12.2.2 Check the time of the project box, enter the switch time (Fig. 10.1.2.1), Note:
The start time must be less than the off time
The 开关机时间
switch time
Fig 10.1.2.1
.
28
www.pledco.com
12.2.3 Click "
" to Save
12.3 sms and email alarm functions
This function can effectively prevent the lack of management time, no exception
processing screen appears the phenomenon, the user can promptly notify the
maintenance personnel of the functional repair.
12.3.1 Principle
Properly connected to the motherboard in the box and under the premise that once a
voltage instability box, the temperature is too high, the board will automatically
separate the different case. That is, if the voltage is set to 5V, set within 24 hours
after the event of a higher or lower than 5V situation, the message board will issue a
warning message; if the event of a heating cabinet, the board will first determine the
temperature in the range (Users pre-set), if in the dark range, to reduce the
brightness range in the off automatically shut down.
Temperature
of cabinets
Temperature
Voltage
f
Users set the
voltage range
h
Users
变暗的范围
The dark
range
set
up
temperature range
The
Temperature
of turning off
t
In the setting
r
range
Above
or或
below
高于
低 于 the
setting
voltage
设定电压
The display
The
display
growdown
dark
prow
END
In the
the setting
setting
In
range
turn off
off the
the display
Turn
display
andmessage
and
send the
END
Send发送电压报
the alarm
警邮件
e-mail
of the
voltage
12.3.2 Set Protection
12.3.2.1 Connected to the motherboard using the WEB, select "Protection Settings"
.
29
www.pledco.com
t
,
12.3.2.2 Input parameters (Fig. 11.2.2.1), complete the settings and click "
" to save.
Note: The maximum voltage must be greater than the minimum voltage, maximum
current must be greater than the minimum current.
图 11.2.2.1
12.3.3 sms and email settings
12.3.3.1 Installed on the motherboard and the receiving device external GSM SIM
card
12.3.3.2,Click on the "Protection Settings"
, set the receiver's phone
number and email address (Fig. 11.3.2.1), click on the "
" to save.
Fig 11.3.2.1
12.3.3.3 Use the numbers to receive information sent "<SIGNSTATUS>" to the GSM
SIM card within the receiving device number on
Note:
SMS: SMS alarm function to use when the SIM card, the balance must be sufficient
recognition, GSM module can be opened up after the installation of telephone
numbers, telephone numbers before you add the country code.
EMAIL: Use e-mail alert feature, you must make sure the motherboard has access to
the network; e-mail format should be: "Account Name "+@+" server name," once
every 24 hours only to send the message.
.
30
www.pledco.com
13 Log message
13.1 View the currently playing content (live time)
13.1.1 Log on to the motherboard using the WEB, click on "System Monitor"
, you can see the current display screen (Figure 13.1.1.1, refresh every
3 seconds.)
Fig 13.1.1.1
Note: The sub-window playback, there must be a window playing a movie file (*.
FLV), or sub-windows cannot play.
13.2 View Play log and export logs
13.2.1 In the WEB page, select the "Play log"
, the system will
automatically default the full broadcast day, the log display(picture 14.1.1.1),
Fig 14.1.1.1
.
31
www.pledco.com
2. 。Play the previous query log, the first click
, set the corresponding time (Fig.
14.1.2.1), click on "read back"
Fig 14.1.2.1
3. Export the log, first click
"read back"
, set the corresponding time (Fig. 14.1.3.1), click on
, click "Export"
Fig 14.1.3.1
(Fig. 14.1.3.2).
fig 14.1.3.2
Note: Cannot export, in the menu bar select "Tools
options
> security
> interne
.
32
www.pledco.com
> internet
t> Custom Level,
" will "is marked as safe for scripting activex controls Initialize and
script," selected " start "(Figure 14.1.3.3), the last point of" OK ", restart IE and then
for export.
figure 14.1.3.3
13.3 Check list update log
in the WEB, and the system
13.3.1 Click “Play List Update Log”
defaults to demonstrate the day’s blogs (Chart 15.1.1.1).
Chart 15.1.1.1
first, and then set up the
13.3.2 When checking the previous logs, click
corresponding time.
13.3.3 When searching for specific record, input username and filename (Note: the
inputted username and filename must be complete names), and then
click
.
13.4 Check temperature log
13.4.1 Click “Temperature Log”
in the WEB, and the system defaults
to demonstrate the day’s temperature logs (Chart 16.1.1.1).
Chart 16.1.1.1
.
33
www.pledco.com
13.4.2 When checking the previous logs, click
first, and then set up the
corresponding time.
13.4.3 When searching for specific record, input exterior temperature and interior
temperature (Note: the inputted temperature value must be complete temperature
value), and then click
.
14 System diagnosis
Information View Function can help users understand system version and
hardware information more easily, and facilitate the communication between user and
engineer.
14.1 Check application program version information
14.1.1 Click “System Information”
in the WEB, and you can find all
driver software information in the system (Chart 17.1.1.1).
Chart 17.1.1.1
14.2 Check tile information
14.2.1 Click “Tile Information” in the WEB, and the system automatically reads all
tile information (Chart 18.1.1.1).
Chart 18.1.1.1
.
34
www.pledco.com
14.2.2 Clicking “Real-Time Information”
can read the real time
information of the cabinet; clicking “Read”
can read back
information after the cabinet moves for a while.
14.2.3 When checking cabinet, input complete information in address, CPU version
.
number, X coordinate or Y coordinate, and then click “Read”
14.3 Check pixel information
14.3.1 Click “Pixel Inforamtion” in the WEB, and the system automatically reads all
pixel information (fig 19.1.1.1).
fig 19.1.1.1
14.3.2 Clicking “Real-Time Check”
can read the real time pixel
information; clicking “Read”
can read back information after the
pixel moves for a while.
14.3.3 When checking a pixel, input complete information in start date, end date, X
coordinate or Y coordinate, and then click “Read”
.
15 System update
15.1 Sigma 3000 update
15.1.1 In sigma, click “Tool” > “Update” > “CPU Update”, and then choose the
corresponding update package.
.
35
www.pledco.com
15.1.2 Download update file (*.cpu).
15.1.3 Wait for update complete.
15.1.4 After the box appears, click OK and reboot. The update is complete.
15.2 Update package update
For older version of update package (Ver4.0 or below)
15.2.1 Extract the update package and find “update.txt” (fig 16.2.1)
.
36
www.pledco.com
fig 16.2.1
15.2.2 The IP address should be modified to that of update main board (fig 16.2.2).
fig 16.2.2
15.2.3 Save, and then click “update.bat” (Chart 16.2.3) to update automatically.
fig16.2.3
15.2.4 After the update is complete, use Display Test to reboot (fig 16.2.4).
Fig 16.2.4
For new version of update package (Ver4.1 or above)
15.2.5 Extract the update package and double click “upLedNetUpdate.exe” (fig
16.2.5)
fig 16.2.5
15.2.6 After the interface (Chart 16.2.6) appears, input the IP address of main board.
.
37
www.pledco.com
Fig 16.2.6
15.2.7 Click
. When Chart 16.2.7 appears, the update is complete.
Fig 16.2.7
15.3 USB drive update
15.3.1 Format USB drive as FAT or FAT32.
15.3.2 Extract the particular update package into the root directory (Chart 20.3.2.1).
Fig 20.3.2.1
15.3.3 Insert USB drive into the main board, and then wait for 3 minutes.
15.3.4 Restart after finishing the above steps, and verify the system version
information.
Before update
After update
.
38
www.pledco.com
16. Advanced application
QS5800 can support multi-windows playing, playing control, subsidiary playing
and multistage user management. With these functions, users can control the playing
contents and the operations for different users’ permissions to log-in.
16.1 Sub-windows playing
16.1.1 Log in with the WEB forms, you can choose “windows setting”
click on “create”
7.1.1.1)
,
, fill the specifications in the popup dialog.(see figure
Win Name
Window ID
Coordinate X
Coordinate Y
Coordinate Z
Width
Height
Transparency
PlayMode
WinMode
Notice:
Coordinate X&Y: Designating the position of the window in the screen, if it’s
sub-windows playing, please pay attention to the value of coordinate X, Y of the
.
39
www.pledco.com
window, in case of the situation of overlapping or wrong position (the QS5800 can
support two windows at one time for the most at present, and one of them must play
*.FLV)
Coordinate Z: it must be set as 1.
Playing Mode(see figure 7.1.1.2)
First one: every window can only play one document of one company
Second one: every window can play several documents of one company.
Figure 7.1.1.2
Window Mode: aiming at the output mode of different displays. (figure 7.1.1.3)
16.1.2 Click “OK” to create a new window.(图 figure 7.1.2.1)。
Figure 7.1.2.1
16.1.3 When adding document to the lists, you can choose different “Windows ID to
realize sub-windows playing”
Figure 7.1.3.1
.
40
www.pledco.com
16.2 Subsidiary playing
16.2.1 Log in with the WEB form, choose “company manager”
, click
“create”
, fill in the reletive information (you can add 1000 company
IDs for the most) in the popup dialog (see figure 7.2.1.1).
Company name
Company ID
Description
Figure 7.2.1.1
16.2.2 Click “OK” to create a new company ID(figure 7.2.2.1)。
Figure 7.2.2.1
16.2.3 When adding documents to the lists, you can choose different
“company”(figure 7.2.3.1) to realize subsidiary playing.
Figure 7.2.3.1
16.3 Company management
16.3.1 Choose the company which needs to revise or delete (figure 7.3.1.1);
Figure 7.3.1.1
.
41
www.pledco.com
16.3.2 Click “create”
7.3.2.1);
, revise the information in the popup dialog(figure
Company name
Company ID
Description
Figure 7.3.2.1
16.3.3 Click “OK” to finish the revise (figure 7.3.3.1).
Figure 7.3.3.1
16.3.4 If you need to delete the company, you can choose it, and click “delete”
,and the d deletion is done(图 7.3.4.1)。
Figure 7.3.4.1
16.4 Web user manager
16.4.1 Log in with the WEB page, choose “user manager”
“create”
, input the data in the popup dialog(figure 7.4.1.1);
.
42
www.pledco.com
, click
Username
Password
Confirm password
Role
Company
Figure 7.4.1.1
16.4.2 Click “confirm” to create a new user.
Notice:
A Once being confirmed, the user name cannot revise;
B The limitation of the user role(figure7.4.2.1)
:
Super admin
Company admin
User
Figure 7.4.2.1
Super admin: can realize all the operations.
Company admin: can realize the operations except checking the box information,
pixel information and some other user’s roles.
User: can not realize any operations except revise the playing images.
16.4.3 Choose the users which need to revise the password(figure 7.4.3.1), click
“revise password”;
.
43
www.pledco.com
Figure 7.4.3.1
16.4.4 Click “revise password”
one(figure 7.4.4.1)
, input the present password and the new
User name
User password
New password
Confirm password
Figure 7.4.4.1
16.4.5 Click “confirm” to finish the revision(figure 7.4.5.1).
Figure 7.4.5.1
17FAQ
17.1 web initial password
The web user's initial username and password for logging is admin(lowercase).17.2
solution for no playing content in the screen
17.2.1 In the web page, change the “display mode” and “play mode” in the “system
setting” to “synchronous” and “play immediately”(figure 36.1.1.1)。
.
44
www.pledco.com
Figure 6.1.1.1
17.2.2 Check the setting of the windows, if it’s sub-windows playing, then one of the
window must play animation(figure 36.1.2.1), or it won’t be able to play; it won’t
play if there are more than two windows.
Figure 36.1.2.1
17.3 The reasons for connection failure to the Ethernet
17.3.1 Check if the net gapes are communicating between the host machine and the
main board(both of the lights are on if the net gape are communicating);
17.3.2 Check if the netting twine is broken;
17.3.3 Check if the IP addresses of the host machine and the main board are in the
same network segment(figure 37.1.3.1), the default IP address of the main board is:
169.254.10.49(when the computer is connected to the main board with netting
twine);
Figure 37.1.3.1
17.3.4 Use 232/R485 data wire to connect to the main board,and use sigma to read
the IP address of the main board, and then change the IP address of the network
.
45
www.pledco.com
card and the main board to the same network segment.
.
46
www.pledco.com
Appendix:
Download documents automatically
Dip switch list
.
47
www.pledco.com