1
WinTen² Occupancy and Rent
Calculation: Certifications
Preliminary User Manual
User Manual Edition:
11/11/2005
WinTen²
ORC Certifications
Table of Contents
COMMUNITY SERVICE AND ECONOMIC SELF-SUFFICIENCY..................................................................... 1
Maintain Community Service Information............................................................................................ 1
Maintain Summary Community Service Information....................................................................... 4
Maintain Monthly Community Service Information ........................................................................ 6
MAINTAIN HOUSEHOLDS .......................................................................................................................... 9
Add Household Members .................................................................................................................... 10
Use the Add Household Member Wizard ....................................................................................... 10
MAINTAIN INCOME ................................................................................................................................. 13
Add Income ......................................................................................................................................... 14
Use the Add Income Wizard........................................................................................................... 14
MAINTAIN ASSETS .................................................................................................................................. 22
Add Assets ........................................................................................................................................... 23
Use the Add Asset Wizard .............................................................................................................. 23
MAINTAIN EXPENSES .............................................................................................................................. 29
Add Expenses ...................................................................................................................................... 30
Use the Add Expense Wizard ......................................................................................................... 30
CERTIFICATIONS...................................................................................................................................... 34
Certification Process .......................................................................................................................... 35
Create Certifications........................................................................................................................... 37
Batch Add Certifications................................................................................................................. 37
Use the Add Certifications Wizard ............................................................................................. 38
Create a Single Certification ........................................................................................................... 39
Create a Single Certification for an Existing Tenant .................................................................. 40
Create a Single Certification for a New Admission or Portability Move-in ............................... 42
Use the Begin Certification Wizard ............................................................................................ 45
Complete Certification Steps .............................................................................................................. 54
Verify Information............................................................................................................................... 60
Maintain Verifiable Items ............................................................................................................... 62
Maintain Verification Details.......................................................................................................... 64
Maintain Online Verification Details.......................................................................................... 64
Maintain Third Party Written Verification Details ..................................................................... 66
Maintain Third Party Oral Verification Details .......................................................................... 68
Maintain Tenant Documented Details ........................................................................................ 70
Preliminary User Manual
i
WinTen²
ORC Certifications
Maintain Self-Declaration Details .............................................................................................. 72
Finalize Certifications ........................................................................................................................ 74
Use the Finalize Certification Wizard......................................................................................... 74
IMPLEMENT SETUP .................................................................................................................................. 79
Maintain Outside Agencies ................................................................................................................. 80
Maintain Certification Steps ............................................................................................................... 82
APPENDIXES ........................................................................................................................................... 86
HUD CERTIFICATION RULES .................................................................................................................. 87
HUD COMMUNITY SERVICE AND ECONOMIC SELF-SUFFICIENCY RULES ............................................. 90
EARNED INCOME DISALLOWANCE.......................................................................................................... 93
Monitor EID Information.................................................................................................................... 94
Monitor EID Participants ................................................................................................................ 95
Monitor EID Employment .............................................................................................................. 98
HUD EID RULES .................................................................................................................................. 101
INDEX .................................................................................................................................................... 105
Preliminary User Manual
ii
WinTen²
ORC Certifications
CHAPTER
1
Community Service and
Economic Self-Sufficiency
HUD mandates that all non-exempt adult residents of public housing meet minimum monthly
requirements for performing community service and/or economic self-sufficiency activities.
These requirements must be a stipulation of each resident’s lease. HUD further mandates that
your agency have a local Community Service and Economic Self Sufficiency Policy for
administering these requirements.
The ORC program allows you to track your residents’ activities to meet the requirements of your
policy.
For more information on HUD’s requirements for such activities, please see the HUD
Community Service and Economic Self-Sufficiency Rules appendix to this manual.
The remainder of this chapter walks you through using the ORC program to track resident
compliance.
Maintain Community Service
Information
We will walk through using the Maintain Community Service screen to track your residents’
community service and economic self-sufficiency activities.
Note:
The ORC program uses the term “community service” to refer to both community
service activities and economic self-sufficiency activities. From this point forward,
this manual does the same.
You can access the Maintain Community Service screen either from the Browse Community
Service screen or from the Household tab of the Tenant Detail screen.
To Access from the Browse Community Service Screen
Follow these steps to access the Maintain Community Service screen from the Browse
Community Service screen.
To Open the Browse Community Service Screen:
Press I or click the Service button on the Main Menu.
Preliminary User Manual
1
WinTen²
ORC Certifications
To Open the Maintain Community Service Screen:
Click to select the resident for whom you wish to maintain community service activity.
Press Alt+T or click the Select button.
Hint:
You can also double-click a resident’s record to select it and open the Maintain
Community Service screen.
To Access from the Household Tab of the Tenant Detail Screen
Follow these steps to access the Maintain Community Service screen from the Household tab of
the Tenant Detail screen.
To Open the Household Tab:
Press T or click the Tenant button on the Main Menu.
The Tenant Browse Form opens.
Select the tenant for whose household you wish to maintain community service activity.
Press Alt+E or click the Edit/Review button.
Hint:
You can also double-click a tenant’s record to select it and open the Tenant Detail
screen.
The Tenant Detail screen opens.
Press Ctrl+Tab or click the Household tab (at the upper left) on the Tenant Detail screen.
Preliminary User Manual
2
WinTen²
ORC Certifications
To Open the Maintain Community Service Screen:
Click to select the household member for whom you wish to maintain community service
activity.
Click the Community Service icon on the Household tab.
Maintain Community Service Screen
The Maintain Community Service screen has two tabs: Summary and Monthly Detail.
You can use the Summary tab to maintain a resident’s exempt status and view a summary of
activity hours.
You can use the Monthly Detail tab to maintain a resident’s activities on a monthly basis. We will
discuss this in the next section. (See Maintain Monthly Community Service Information.)
Preliminary User Manual
3
WinTen²
ORC Certifications
Four non-editable fields also appear at the top of this screen: Head of Household, Household
Member, Effective Date, and Meeting Community Service.
Head of Household and Household Member
These fields identify the resident whose community service activities you are maintaining and
the head of that resident’s household.
Effective Date
This field indicates the latest date for which you have entered community service information for
this resident.
Meeting Community Service
This field indicates whether this resident is meeting community service requirements, based on
the information on the Summary and Monthly Detail tabs.
Any resident can have one of four community service statuses: Yes, No, Pending, or Exempt.
Yes or No, respectively, means the resident is or is not meeting the requirements. Pending
means you have not yet verified the resident’s service. Exempt means the resident is exempt
from the requirements.
We will first walk through using the Summary tab to maintain summary activity information.
Maintain Summary Community Service
Information
Summary Community Service information includes a resident’s exempt status and a summary
of activity hours.
You can maintain this information on the Summary tab of the Maintain Community Service
screen.
To Open the Summary Tab:
This tab appears by default when you open the Maintain Community Service screen.
If you have left it, press Ctrl+Tab or click the Summary tab (at the upper left).
Preliminary User Manual
4
WinTen²
ORC Certifications
Maintain Community Service Screen: Summary Tab
This tab contains five editable data fields: Exempt Status, Delinquent hours from previous
year, Hours made up this year, Default Agency, and Comment. Exempt Status is required.
This tab also contains non-editable fields showing Hours remaining from previous year and
Current Requirements.
Exempt Status
This field indicates if and why this resident is exempt from community service requirements.
If this resident is not exempt, select “Not Exempt.” Otherwise, select the option that best
describes why this resident is exempt.
Delinquent hours from previous year
Enter the total number of hours, if any, this resident failed to meet in the previous year.
Hours made up this year
Enter the number of the delinquent hours, above, that this resident has performed in the current
year.
Hours remaining from previous year
This non-editable field calculates the number of delinquent hours still outstanding (“Delinquent
hours from previous year” minus “Hours made up this year.”)
Preliminary User Manual
5
WinTen²
ORC Certifications
Default Agency
For community service purposes, “agency” refers to the institution, organization, or school at
which the resident performs the required activities. Select the agency at which this resident
performs most of his or her community service activities, if it appears in this list.
Any agency you select here will be the default agency for each monthly community service
activity record you create for this resident on the Monthly Detail tab of this screen. You can
change the default as needed for any individual record on that tab.
This field offers the list of outside agencies you have entered in the ORC program. If this
resident’s agency does not appear as an option for the Default Agency field, you must enter it in
your outside agencies list before you can assign it to a Community Service record. (See
Maintain Outside Agencies.)
Comment
Enter any comments or additional information regarding this person’s community service status
and/or activities that may be helpful for your agency.
Current Requirements
The four fields in this section provide a summary of this resident’s activities for the current year.
They are based on the information on the Monthly Detail tab; you cannot edit them on the
Summary tab.
To Edit Summary Community Service Information:
Press Ctrl+E or click the Edit icon.
Tab or click through the fields, entering or editing the information as needed.
To save your changes, press Ctrl+S or click the Save icon.
To cancel, press Ctrl+Q or click the Cancel icon.
Maintain Monthly Community Service
Information
Monthly Community Service information includes a record of a resident’s activities for each
month.
You can maintain this information on the Monthly Detail tab of the Maintain Community Service
screen.
To Open the Monthly Detail Tab:
Press Ctrl+Tab or click the Monthly Detail tab (at the upper left) on the Maintain Community
Service screen.
Preliminary User Manual
6
WinTen²
ORC Certifications
Maintain Community Service Screen: Monthly Detail Tab
This tab contains the Community Service For option field and a table of monthly activities.
The monthly activity table displays this resident’s activities for the year(s) you have chosen in
the Community Service For field. This table contains five editable data fields: Service Month,
Exempt, Hours Completed, Agency, and Received Date. For months when this person is not
exempt, all of these fields are required. For months when this person is exempt, only Service
Month, Exempt, and Received Date are required.
Community Service For
Choose whether to view all activity for this resident or only the activity for the current year or the
previous year.
Service Month
For each record, this is the first day of the month for which you are tracking either activities or
exemption.
Exempt
This field indicates the resident’s exemption status for a given service month.
Hours Completed
If this person is not exempt for a given month, this field indicates the number of hours of service
he or she performed during the month.
Preliminary User Manual
7
WinTen²
ORC Certifications
Agency
If this person is not exempt for a given month, this field indicates the institution, organization, or
school at which he or she performed the required activities.
If you have chosen a default agency for this person on the Summary tab, that agency will
appear automatically when you create a new monthly record. You can change the default, if
necessary.
Received Date
For each record, this is the date on which you received verification of the resident’s activities or
exempt status.
To Add a Monthly Activity Record:
Press Ctrl+A or click the Add icon on the Monthly Detail tab.
Tab or click through the fields in the new row of the table, entering the information.
(For months when this person is not exempt, all fields are required. For months when this
person is exempt, only Service Month, Exempt, and Received Date are required.)
To save this new record, press Ctrl+S or click the Save icon.
To cancel, press Ctrl+Q or click the Cancel icon.
To Edit a Monthly Activity Record:
Select the month you wish to edit.
Press Ctrl+E or click the Edit icon.
Tab or click through the fields in the table, changing information as needed.
To save your changes, press Ctrl+S or click the Save icon.
To cancel, press Ctrl+Q or click the Cancel icon.
To Delete a Monthly Activity Record:
Select the month you wish to delete.
Press Ctrl+D or click the Delete icon.
Press Y or click the Yes button to confirm the deletion.
Preliminary User Manual
8
WinTen²
ORC Certifications
CHAPTER
2
Maintain Households
For each of your tenant households, you must create one “household member record” for each
person who lives in the household. You will use the Household tab of the Tenant Detail screen
to maintain this information.
Hint:
You do not have to create the record for the head of household. The program creates
this household member record automatically when you first add a tenant record. You can
edit this person’s information on the Household tab, if necessary.
To Open the Household Tab:
Locate the tenant for which you wish to maintain household members.
Open this tenant on the Tenant Detail screen.
Press Ctrl+Tab or click the Household tab (at the upper left) on the Tenant Detail screen.
Preliminary User Manual
9
WinTen²
ORC Certifications
Add Household Members
You will use the Add Household Member wizard to add household member records.
To Start the Add Household Member Wizard:
Press Ctrl+A or click the Add icon on the Household tab of the Tenant Detail screen.
Use the Add Household Member Wizard
The Add Household Member wizard will guide you through two steps to add a household
member record:
1. Enter Household Member Information
2. Confirm Household Member Information
We will walk through these steps separately.
To Move to the Next Step:
Press PageDown or click the Start or Finish button.
To Move to the Previous Step:
Press PageUp or click the Back button.
To Cancel the Wizard at Any Time:
Press Esc or click the Cancel button.
Hint:
Until you finish Step 2, you can go back and change any information you have entered.
Preliminary User Manual
10
WinTen²
ORC Certifications
Step 1: Enter Household Member Information
This step allows you to enter all the information needed to create the household member’s
record.
Step 1 contains up to fifteen editable data fields: Household Member’s SSN, First Name, MI,
Last Name, Dependent Type, Birthday, Birthplace, Gender, Race, Ethnicity, Eligibility,
Alien, Registration Number, Handicapped, and Disabled. All fields are required, except
Birthplace. (You may also leave Alien, Handicapped, and/or Disabled blank if they do not apply
to this household member.)
The non-editable Head of Household field also appears at the top of the screen. Use this to
verify that you are adding a member record to the correct household.
Dependent Type
Choose the option that best describes this person’s dependency status.
Race
Indicate this person’s racial make-up by checking all boxes that apply.
You must check at least one box. If you check more than one box, the ORC program will identify
this person as “multi-racial.”
Ethnicity
Indicate whether this person is Hispanic/Latino.
Eligibility
Choose the option that best identifies this person’s eligibility for benefits, based on the person’s
citizenship status.
Preliminary User Manual
11
WinTen²
ORC Certifications
Alien and Registration Number
Check the Alien field if this person is a resident alien.
If you do so, the Registration Number field becomes available. If this person has an alien
registration number, enter it here. You may leave this field blank if this person has no alien
registration number.
Handicapped and Disabled
Check the appropriate field(s) if this person is handicapped and/or disabled.
Hint:
According to HUD, a person is born with a handicap, but acquires a disability after birth.
To Complete Step 1:
Tab or click through the fields, entering the information.
(All fields that apply to this person are required, except Birthplace.)
Press PageDown or click the Start button to go to the next step of the Add Household
Member wizard.
Step 2: Confirm Household Member Information
Step 2 allows you to confirm all of the information before you finish creating this Household
Member record. The fields on this screen are not editable.
To Complete Step 2:
If anything is incorrect, press PageUp or click the Back button to go to the previous step and
correct it.
If everything is correct, press PageDown or click the Finish button to finish adding this
household member.
Preliminary User Manual
12
WinTen²
ORC Certifications
CHAPTER
3
Maintain Income
You must maintain a record of all sources of income for each tenant household. You will also
designate what amount, if any, of each income source to exclude from income and rent
calculations.
For additional information on maintaining income records, please see these and other resources
available from the RIMRx document page of Tenmast’s RIMCheck.com Web site
(www.rimcheck.com/rimrx).
1. Sample Income Script:
www.rimcheck.com/rimrx/documents/incomescript.pdf
2. Sample Zero Income Questionnaire/Checklist:
http://www.rimcheck.com/rimrx/documents/ZeroIncomeChecklistandWorksheet.pdf
3. HUD Guidelines for Projecting Annual Income When Upfront Income Verification (UIV) Data
is Available, January 2004:
http://www.rimcheck.com/rimrx/documents/HUDGUIDELINESForProjectingIncome.pdf
4. Income and Exclusions Chart:
http://www.rimcheck.com/rimrx/documents/IncomeDeductionsAndExemptionsTable.pdf
For each household, you will use the Income tab of the Tenant Detail screen to maintain one
income record for each of the household’s sources of income.
To Open the Income Tab:
Press T or click the Tenant button on the Main Menu.
The Tenant Browse Form opens.
Select the tenant for whose household you wish to maintain income.
Press Alt+E or click the Edit/Review button.
Hint:
You can also double-click a tenant’s record to select it and open the Tenant Detail
screen.
The Tenant Detail screen opens.
Press Ctrl+Tab or click the Income tab (at the upper left) on the Tenant Detail screen.
Preliminary User Manual
13
WinTen²
ORC Certifications
Add Income
You will use the Add Income wizard to add household income records.
To Start the Add Income Wizard:
Press Ctrl+A or click the Add icon on the Income tab of the Tenant Detail screen.
Use the Add Income Wizard
The Add Income wizard will guide you through five steps to add an income record:
1. Define the Income
2. Select Applicable Income Exclusion
3. Select Agency Information
4. Verification Form Letter
5. Confirm Income Information
We will walk through these steps separately.
To Move to the Next Step:
Press PageDown or click the Start, Next, or Finish button.
To Move to the Previous Step:
Press PageUp or click the Back button.
Preliminary User Manual
14
WinTen²
ORC Certifications
To Cancel the Wizard at Any Time:
Press Esc or click the Cancel button.
Hint:
Until you finish Step 5, you can go back and change any information you have entered.
Step 1: Define the Income
This step allows you to enter information about the owner, type, and amount of the income.
Step 1 contains at least five editable data fields: Owner of the Income, Income Type,
Starting Date, Period, and Amount per Period. Depending on your choice for Period, the
Weeks per Year and/or Hours per Week fields may also appear. All fields are required.
This step also includes the non-editable Total Income, Definition of Income Type, and
Income Includes fields.
Owner of the Income
Select the household member who receives this income.
Income Type, Definition of Income Type, and Income Includes
Choose the option in the Income Type field that best identifies the type of income.
If you are unsure what any income type means, select that type temporarily and use the
Definition of Income Type and Income Includes fields for reference. These fields show you,
respectively, HUD’s definition of the income type and specific examples of that type of income.
Starting Date
Select the date on which this person began receiving this income.
Preliminary User Manual
15
WinTen²
ORC Certifications
Period
Choose the basis for calculating this income.
Weeks per Year and Hours per Week
If you have chosen a weekly period, the Weeks per Year field becomes available. Enter the
number of weeks per year that this person receives this income.
If you have chosen an hourly period, both the Weeks per Year and the Hours per Week fields
becomes available. Enter the number of weeks per year and the number of hours per week this
person works.
Amount per Period
Enter the amount of income this person receives during each period.
Total Income
This non-editable field calculates the annual amount of the income, based on your choices for
the other fields. Depending on the income type, this annual amount will be included in the
appropriate calculations on the Totals tab of the Tenant detail screen.
To Complete Step 1:
Tab or click through the fields, entering the information.
(All editable fields are required.)
Press PageDown or click the Start button to go to the next step of the Add Income wizard.
Step 2: Select Applicable Income Exclusion
Preliminary User Manual
16
WinTen²
ORC Certifications
This step allows you to identify what portion of this income, if any, is excluded from rent
calculations for this household.
Step 2 contains two editable data fields: Income Exclusion Type and Amount Excluded.
Both are required if an exclusion exists for this income or tenant.
This step also contains the EID History function and non-editable EID Worksheet, Exclusion
Description, and Income after Exclusion fields.
Your choices from Step 1 for income owner, type, and total also appear at the top of the screen.
These fields are not editable on this step.
Income Exclusion Type and Exclusion Description
Choose the option in the Income Exclusion Type field that best identifies the exclusion. The
default is Earned Income Disallowance. Select “None” if no exclusion exists for this income or
tenant.
If you are unsure what any exclusion type means, select that type temporarily and use the
Exclusion Description field for reference. This field shows you HUD’s description of the
exclusion type.
Amount Excluded
The default for this field is the amount calculated for the EID Amount Excluded field. (See EID
Worksheet, below.) Use this amount for the Earned Income Disallowance exclusion type. For all
other exclusion types, enter the amount of the income to exclude from rent calculations. This
amount cannot exceed the total income amount.
Income after Exclusion
The program calculates this amount by subtracting the Amount Excluded field from the Total
Income field. This amount will be included in income and rent calculations for this household.
EID Worksheet and EID History
If this person is an EID participant, the EID Worksheet fields will calculate the EID Amount
Excluded. If this person is not an EID participant, the EID Amount Excluded will be zero.
Click the EID History button to view a history of all EID employment for this person. (For more
information, see Earned Income Disallowance and Monitor EID Employment.)
To View EID Employment History:
Click the EID History button.
(See Monitor EID Employment.)
To Complete Step 2:
Tab or click through the fields, entering the exclusion information.
Press PageDown or click the Next button to go to the next step of the Add Income wizard.
Preliminary User Manual
17
WinTen²
ORC Certifications
Step 3: Select Agency Information
This step allows you to identify the source of this income.
Step 3 contains the Source field and nine contact information fields. None is required.
This step also contains the Get Agency function.
Some of your choices from previous steps also appear at the top of the screen. These fields are
not editable on this step.
Source and Get Agency
This identifies the agency, organization, or company that is paying this income to the income
owner.
If you have entered this organization in your list of outside agencies, you can use the Get
Agency function to select it. (See Maintain Outside Agencies.) You can also use this function to
add an organization to the outside agencies list “on the fly.” Otherwise, enter the source and its
contact information into these fields manually.
To Use the Get Agency Function:
Click the Get Agency button.
The Agency Information screen opens.
Preliminary User Manual
18
WinTen²
ORC Certifications
Click in the agency table to select the agency.
(For information on adding an agency, see Maintain Outside Agencies.)
Click the Insert Agency button to make your choice and close the Agency Information
screen.
To cancel the Agency Information screen, click the Cancel button.
If necessary, tab or click through the fields, editing the contact information.
Hint:
You may need to edit, for example, the Contact, Extension, and/or E-mail Address fields.
Press PageDown or click the Next button to go to the next step of the Add Income wizard.
To Complete Step 3 Manually:
Tab or click through the fields, entering the agency information (optional).
Press PageDown or click the Next button to go to the next step of the Add Income wizard.
Preliminary User Manual
19
WinTen²
ORC Certifications
Step 4: Verification Form Letter
This step allows you to print a form letter addressed to the source of income (the agency you
entered on Step 3), asking them to verify the income.
Step 4 contains one editable data field, Print Form Letter. It is optional.
Some of your choices from previous steps also appear at the top of the screen. These fields are
not editable on this step.
Print Form Letter
Select the form letter, if any, you wish to print.
If you select a form letter, a print dialog box will open for it when you click the Finish button on
Step 5 of this wizard. Click the OK button on that dialog box to print the letter.
To Complete Step 4:
Select a form letter to print (optional).
Press PageDown or click the Next button to go to the next step of the Add Income wizard.
Preliminary User Manual
20
WinTen²
ORC Certifications
Step 5: Confirm Income Information
Step 5 allows you to confirm all of the information before you finish creating this income record.
The fields on this screen are not editable.
To Complete Step 5:
If anything is incorrect, press PageUp or click the Back button to go to the previous step(s)
and correct it.
If everything is correct, press PageDown or click the Finish button to finish creating the
income record.
Preliminary User Manual
21
WinTen²
ORC Certifications
CHAPTER
4
Maintain Assets
You must maintain a record of all assets owned by each tenant household, primarily to
determine how much income they derive from these assets.
You will use the Assets tab of the Tenant Detail screen to maintain household assets for each
tenant.
To Open the Assets Tab:
Press T or click the Tenant button on the Main Menu.
The Tenant Browse Form opens.
Select the tenant for whose household you wish to maintain assets.
Press Alt+E or click the Edit/Review button.
Hint:
You can also double-click a tenant’s record to select it and open the Tenant Detail
screen.
The Tenant Detail screen opens.
Press Ctrl+Tab or click the Assets tab (at the upper left) on the Tenant Detail screen.
Preliminary User Manual
22
WinTen²
ORC Certifications
Add Assets
You will use the Add Asset wizard to add asset records.
To Start the Add Asset Wizard:
Press Ctrl+A or click the Add icon on the Assets tab of the Tenant Detail screen.
Use the Add Asset Wizard
The Add Asset wizard will guide you through three steps to add an asset record:
1. Define the Asset
2. Enter the Asset Source
3. Verification Form Letter
4. Confirm Asset Information
We will walk through these steps separately.
To Move to the Next Step:
Press PageDown or click the Start, Next, or Finish button.
To Move to the Previous Step:
Press PageUp or click the Back button.
To Cancel the Wizard at Any Time:
Press Esc or click the Cancel button.
Hint:
Until you finish Step 3, you can go back and change any information you have entered.
Preliminary User Manual
23
WinTen²
ORC Certifications
Step 1: Define the Asset
This step allows you to enter information about the owner, description, and value of the asset.
Step 1 contains four editable data fields: Owner of the Asset, Description of the Asset, Cash
Value of the Asset, and Income Received from the Asset. All fields are required. (Income
Received from the Asset may be zero.)
Owner of the Asset
Select the household member who owns this asset.
Description of the Asset
Enter a short text description to identify the asset.
Cash Value of the Asset
This is the net cash gain the owner would receive if converting the asset to cash.
The cash value equals the “fair market value” minus any money the owner owes on the asset
(e.g., a mortgage or car loan) and minus any expenses involved in converting the asset to cash
(e.g., early withdrawal penalties, legal fees, or brokerage fees).
Income Received from the Asset
Enter the annual income, if any, the owner receives from this asset. An example of this might be
annual interest earned on a savings account.
Preliminary User Manual
24
WinTen²
ORC Certifications
Note:
There is sometimes more than one acceptable method for determining the income
received from assets. You could calculate income received from a savings
account, for example, based on its average balance for the past three months or
based on its current balance. Your agency must have a policy, preferably in
writing, for making these determinations and apply that policy consistently to all
tenants. Please check your agency’s policy.
To Complete Step 1:
Tab or click through the fields, entering the information.
(All fields are required.)
Press PageDown or click the Start button to go to the next step of the Add Asset wizard.
Step 2: Enter the Asset Source
This step allows you to identify the agency, if any, that can verify the value of this asset and the
income the owner receives from it.
Step 2 contains the Source field and nine contact information fields. None is required.
This step also contains the Get Agency function.
Some of your choices from previous steps also appear at the top of the screen. These fields are
not editable on this step.
Preliminary User Manual
25
WinTen²
ORC Certifications
Source
If an agency, organization, or company can verify the value of this asset and/or the income the
owner receives from it, enter that agency here. You might enter, for example, a bank that can
verify information for a bank account.
If you have entered this organization in your list of outside agencies, you can use the Get
Agency function to select it. (See Maintain Outside Agencies.) You can also use this function to
add an organization to the outside agencies list “on the fly.” Otherwise, enter the verifying
source and its contact information into these fields manually.
To Use the Get Agency Function:
Click the Get Agency button.
The Agency Information screen opens.
Click in the agency table to select the agency.
(For information on adding an agency, see Maintain Outside Agencies.)
Click the Insert Agency button to make your choice and close the Agency Information
screen.
To cancel the Agency Information screen, click the Cancel button.
If necessary, tab or click through the fields, editing the contact information.
Hint:
You may need to edit, for example, the Contact, Extension, and/or E-mail Address fields.
Press PageDown or click the Next button to go to the next step of the Add Asset wizard.
To Complete Step 2 Manually:
Tab or click through the fields, entering the verifying agency information.
Press PageDown or click the Next button to go to the next step of the Add Asset wizard.
Preliminary User Manual
26
WinTen²
ORC Certifications
Step 3: Verification Form Letter
This step allows you to print a form letter addressed to the source of asset (the agency you
entered on Step 2), asking them to verify the income.
Step 3 contains one editable data field, Print Form Letter. It is optional.
Your choices from previous steps also appear at the top of the screen. These fields are not
editable on this step.
Print Form Letter
Select the form letter, if any, you wish to print.
If you select a form letter, a print dialog box will open for it when you click the Finish button on
Step 4 of this wizard. Click the OK button on that dialog box to print the letter.
To Complete Step 3:
Select a form letter to print (optional).
Press PageDown or click the Next button to go to the next step of the Add Asset wizard.
Preliminary User Manual
27
WinTen²
ORC Certifications
Step 4: Confirm Asset Information
Step 4 allows you to confirm the information before you finish creating this asset record. The
fields on this screen are not editable.
To Complete Step 4:
If anything is incorrect, press PageUp or click the Back button to go to the previous step(s)
and correct it.
If everything is correct, press PageDown or click the Finish button to finish creating the
income record.
Preliminary User Manual
28
WinTen²
ORC Certifications
CHAPTER
5
Maintain Expenses
HUD considers certain qualified expenses of a tenant household as “deductions” from income.
Qualified expenses could include such things as childcare costs and certain costs related to a
disability of a family member.
Unreimbursed medical expenses also qualify as deductible expenses. IRS Publication 502,
Allowable Medical Expenses, provides additional information on allowable medical expenses. It
is available from the RIMRx document page of Tenmast’s RIMCheck.com Web site
(www.rimcheck.com/rimrx):
http://www.rimcheck.com/rimrx/documents/IRSPublication502AllowableMedicalExpenses.pdf
You will use the Expenses tab of the Tenant Detail screen to maintain qualified household
expenses for each tenant.
To Open the Expenses Tab:
Press T or click the Tenant button on the Main Menu.
The Tenant Browse Form opens.
Select the tenant for whose household you wish to maintain expenses.
Press Alt+E or click the Edit/Review button.
Hint:
You can also double-click a tenant’s record to select it and open the Tenant Detail
screen.
The Tenant Detail screen opens.
Press Ctrl+Tab or click the Expenses tab (at the upper left) on the Tenant Detail screen.
Preliminary User Manual
29
WinTen²
ORC Certifications
Add Expenses
You will use the Add Expense wizard to create expense records.
To Start the Add Expense Wizard:
Press Ctrl+A or click the Add icon on the Expenses tab of the Tenant Detail screen.
Use the Add Expense Wizard
The Add Expense wizard will guide you through three steps to add an expense record:
1. Define the Expense
2. Select Agency Information
3. Confirm Expense Information
We will walk through these steps separately.
To Move to the Next Step:
Press PageDown or click the Start, Next, or Finish button.
To Move to the Previous Step:
Press PageUp or click the Back button.
To Cancel the Wizard at Any Time:
Press Esc or click the Cancel button.
Preliminary User Manual
30
WinTen²
ORC Certifications
Hint:
Until you finish Step 3, you can go back and change any information you have entered.
Step 1: Define the Expense
This step allows you to enter information about the owner, type, and amount of the expense.
Step 1 contains five editable data fields: Owner of the Expense, Description, Expense Type,
Expense Period, and Cost per Period. All fields are required.
This step also includes the non-editable Annual Cost and Definition of Expense Type fields.
Owner of the Expense
Select the household member who pays this expense.
Expense Type and Definition of Expense Type
Choose the option in the Expense Type field that best identifies the type of expense.
If you are unsure what any expense type means, select that type temporarily and use the
Definition of Expense Type field for reference. This field shows you HUD’s definition of the
expense type.
Expense Period
Choose the basis for calculating this expense.
Cost per Period
Enter the amount this person pays during each period.
Preliminary User Manual
31
WinTen²
ORC Certifications
Annual Cost
This non-editable field calculates the annual amount of the expense, based on your choices for
the other fields. Depending on the expense type, this annual amount will be included in the
appropriate calculations on the Totals tab of the Tenant detail screen.
To Complete Step 1:
Tab or click through the fields, entering the information.
(All fields are required.)
Press PageDown or click the Start button to go to the next step of the Add Expense wizard.
Step 2: Select Agency Information
This step allows you to identify payee of this expense.
Step 2 contains the Payee field and nine contact information fields. None is required.
This step also contains the Get Agency function.
Your choices from previous steps also appear at the top of the screen. These fields are not
editable on this step.
Payee
This identifies the agency, organization, or company to whom this expense is paid.
If you have entered this organization in your list of outside agencies, you can use the Get
Agency function to select it. (See Maintain Outside Agencies.) You can also use this function to
add an organization to the outside agencies list “on the fly.” Otherwise, enter the payee and its
contact information into these fields manually.
Preliminary User Manual
32
WinTen²
ORC Certifications
To Use the Get Agency Function:
Click the Get Agency button.
The Agency Information screen opens.
Click in the agency table to select the agency.
(For information on adding an agency, see Maintain Outside Agencies.)
Click the Insert Agency button to make your choice and close the Agency Information
screen.
To cancel the Agency Information screen, click the Cancel button.
If necessary, tab or click through the fields, editing the contact information.
Hint:
You may need to edit, for example, the Care Of, Extension, and/or E-mail Address fields.
Press PageDown or click the Next button to go to the next step of the Add Expense wizard.
To Complete Step 3 Manually:
Tab or click through the fields, entering the payee information.
Press PageDown or click the Next button to go to the next step of the Add Expense wizard.
Step 3: Confirm Expense Information
Step 3 allows you to confirm all of the information before you finish creating this expense record.
The fields on this screen are not editable.
To Complete Step 3:
If anything is incorrect, press PageUp or click the Back button to go to the previous step(s)
and correct it.
If everything is correct, press PageDown or click the Finish button to finish creating the
expense record.
Preliminary User Manual
33
WinTen²
ORC Certifications
CHAPTER
6
Certifications
HUD requires your agency to conduct periodic examinations or “certifications” of each family
you house. The certification of a family serves three primary purposes. It allows you to establish
the family’s eligibility for benefits, determine the size of unit (number of bedrooms) they require,
and determine the amount of assistance they will receive from your agency.
Hint:
Within the context used here, “certification” and “examination” mean the same thing. The
ORC program and this manual use these terms interchangeably.
The ORC program helps you manage the certification process. It streamlines the preparation of
certification documents and allows you to track and report on all verification information needed
for RIM (Rental Integrity Monitoring) audits. It also allows your agency to define a different set of
custom steps to complete each kind of certification you perform. This lets you customize the
program to reflect your certification procedures and helps ensure consistency in the way your
caseworkers process certifications. (See Maintain Certification Steps.)
For more information on HUD’s certification rules, please see the HUD Certification Rules
appendix to this manual.
The remainder of this chapter discusses a certification process typical for most agencies and
walks you step-by-step through using the ORC program to create, process, and finalize
certifications.
Preliminary User Manual
34
WinTen²
ORC Certifications
Certification Process
The ORC program helps you manage all aspects of the certification process, including creating
and scheduling certifications, preparing documents, collecting and verifying information, and
notifying the tenant and HUD of the results.
The program includes many wizards that guide you step-by-step through complex processes
and help ensure that you enter HUD-mandated information. The verification steps built into the
program exactly match the requirements of a RIM (Rental Integrity Monitoring) audit.
Here is a typical certification process for most agencies.
Note:
Your process may be different, depending on you agency’s procedures.
If your agency uses caseworkers, each tenant’s certification will usually be conducted by that
tenant’s caseworker. Agencies without caseworkers may have certain employees who perform
all certifications or may assign certifications in some other way.
You will create interim recertifications and certifications for new admissions individually, as
needed. You can also create annual recertifications individually, but you will most often create
them in “batches” on a regular basis (usually monthly). (See Create a Single Certification and
Batch Add Certifications.)
Your time frame for beginning annual recertifications and certifications for new admissions (how
far in advance of the recertification dates or unit offers you begin the process) will depend on
your agency’s procedures. HUD requires that you allow enough time to collect and verify all
information – including third-party verifications – and still provide advanced notice to any family
Preliminary User Manual
35
WinTen²
ORC Certifications
whose rent will change. Most agencies begin certifications at least thirty to ninety days before
the recertification dates or unit offers.
Your agency can define your own set of custom steps to complete each kind of certification you
perform. After you create a certification, your agency-defined steps for that certification will
appear on the Certifications tab of the Tenant Detail screen. You will walk through each of these
steps to complete the certification. (See Maintain Certification Steps and Complete Certification
Steps.)
Most certifications require a large number of printed forms. As part of the certification-creation
process, the ORC program allows you to print an agency-defined packet of documents for each
household. These documents may include an application for initial or continued occupancy and
any number of verification forms.
One of the more important parts of a certification is the verification of a household’s total
income. HUD requires you to use up-front verification whenever possible. Up-front verification
sources are Internet or other electronic sources that allow you to confirm tenant information.
You can access these sources and begin verification even before the tenant interview.
Hint:
As of the publication of this manual, HUD is still developing its own Upfront Income
Verification (UIV) System. For more information, please visit the following Web address:
www.hud.gov/offices/pih/programs/ph/rhiip/uivsystem.cfm
For more information on up-front verification, including a partial list of other verification
sources, please see Public Housing Occupancy Guidebook, June 2003 (see Section 7.5,
“Up-Front Income Verification”):
www.hud.gov/offices/pih/programs/ph/rhiip/phguidebook.cfm
You will conduct each tenant interview at its scheduled time. During the interview, you will
collect from the tenant all information needed for the certification and have the tenant complete
and/or sign any forms required by your agency.
You must verify much of the information you gather during a certification. These “verifiable
items” include such things as income, qualified deductions from income, assets, age, Social
Security number, and citizenship or eligible immigrant status. After the interview, you will verify
any of this information you have not already verified.
HUD stipulates a hierarchy of methods of verification it prefers. For each verifiable piece of
information, you must attempt the “most-preferred” verification method first. If it is not available,
you must then attempt the next-most-preferred method, etc., until you successfully verify that
item. For each unsuccessful verification attempt, you must document when you attempted it and
why that verification method was unavailable.
For verification of income and Social Security numbers, you must use up-front verification,
mentioned above, whenever possible. If that is unavailable, written verification from a third party
and then oral verification from a third party are the second and third choices, respectively. If
neither of those is available, you may examine documents provided by the tenant. Finally, if you
have exhausted all other options, your agency’s procedures may allow you to accept a
notarized statement from the tenant as verification. This hierarchy is identical when you are
verifying information other than income and Social Security numbers, except that up-front
income verification is not an option.
Preliminary User Manual
36
WinTen²
ORC Certifications
In some cases, you may need to conduct follow-up interviews with the tenant to gather
additional information and/or to address discrepancies between tenant-reported information and
information verified by third parties.
When you have completed all the steps of a certification, you will run the Finalize Certification
wizard in the ORC program. This wizard allows you to print another agency-defined packet of
documents for the household. This set of documents may include such things as a rent change
notice for the tenant, a lease amendment, or various other documents for the tenant’s folder.
(See Finalize Certifications.)
Create Certifications
The ORC program allows you to create a “batch” of certifications, based on the next
reexamination date of each tenant household, or to create a single certification for a new or
existing tenant. We will walk through both of these options.
Batch Add Certifications
On a regular basis, usually monthly, you will create “batches” of recertifications based on the
next reexamination date of each tenant household. If you agency uses caseworkers, you can
also choose to create these recertifications only for tenants with a certain caseworker or for all
tenants.
You will use the Add Certifications wizard to batch add annual certifications. You can access
this wizard from the Browse Certifications screen.
To Open the Browse Certifications Screen:
Press C or click the Certification button on the Main Menu.
To Start the Add Certifications Wizard:
Press Ctrl+A or click the Add icon on the Browse Certifications screen.
The Add Certifications dialog box opens.
Preliminary User Manual
37
WinTen²
ORC Certifications
Verify that Batch Add Certifications is selected.
Press PageDown or click the Next button.
Use the Add Certifications Wizard
The Add Certifications wizard will guide you through two steps to batch add annual
certifications:
1. Select Certifications to Generate
2. Confirmation
We will walk through these steps separately.
To Move to the Next Step:
Press PageDown or click the Start or Finish button.
To Move to the Previous Step:
Press PageUp or click the Back button.
To Cancel the Wizard at Any Time:
Press Esc or click the Cancel button.
Hint:
Until you finish Step 2, you can go back and change any information you have entered.
Step 1: Select Certifications to Generate
This step allows you to enter all the information needed to create a set of certifications.
Preliminary User Manual
38
WinTen²
ORC Certifications
Step 1 contains three data fields: Beginning Next Reexamination Date, Ending Next
Reexamination Date, and Caseworker. All fields are required. (Caseworker may be “All.”)
Beginning and Ending Next Reexamination Date
Select the date range of the certifications you wish to create, based on the next reexamination
date of each tenant household. The ORC program will create one certification for each
household whose next reexamination date falls within this range (and whose certification has
not already been created).
Most agencies begin creating and processing certifications in the month before the actual
reexamination dates. For this reason, the date range on this step defaults to the month after
next. (In other words, if you run the wizard in January, the default date range is the month of
March; if you run the wizard in February, the default date range is the month of April; etc.) You
can change this default date range, if necessary.
Hint:
The next reexamination date for any tenant appears as the Next Exam Date field on the
Main tab of the Tenant Detail screen.
Caseworker
If you wish to create certifications only for households having a certain caseworker, select that
caseworker. Otherwise, verify that “All” is selected for this field.
Hint:
The Caseworker field also appears on the Main tab of the Tenant Detail screen.
To Complete Step 1:
Tab or click through the fields, entering the information.
(All fields are required.)
Press PageDown or click the Start button to go to the next step of the Add Certifications
wizard.
Step 2: Confirmation
Step 2 allows you to confirm all of the information before you finish creating this set of
Certifications. The fields on this screen are not editable.
To Complete Step 2:
If anything is incorrect, press PageUp or click the Back button to go to the previous step and
correct it.
If everything is correct, press PageDown or click the Finish button to finish adding this set of
Certifications.
When you finish, you return to the Browse Certifications screen, where the new certifications
appear in the table. For information on completing these certifications, please see Complete
Certification Steps.)
Create a Single Certification
You will use the Begin Certification wizard any time you wish to create a single certification,
such as for a new admission or an interim reexamination. You may occasionally wish to use this
method to create a single annual recertification.
Preliminary User Manual
39
WinTen²
ORC Certifications
This wizard will behave slightly differently depending on the tenant for whom you are creating a
certification. Namely, it will skip Step 1 if the certification is for any existing tenant. (Step 1
allows you to enter such things as the tenant’s name and Social Security number, so you do not
need it for existing tenants.)
You can start this wizard from more than one place in the ORC program, depending on your
goal and what is most convenient at the time. You have two options for starting the wizard for an
existing-tenant certification and two slightly different options for starting the wizard for a newadmission certification.
We will first walk through your options for starting the wizard and then walk through the steps of
the wizard itself.
Create a Single Certification for an Existing Tenant
You may sometimes need to create a single certification for an existing tenant, most commonly
for an interim reexamination.
You can create such a certification directly from the Browse Certifications screen, or you can
create it by first opening the tenant’s record on the Certifications tab of the Tenant Detail screen.
Here are the steps for each of these options.
To Create from the Browse Certifications Screen
Follow these steps to create a single certification for an existing tenant from the Browse
Certifications screen.
To Open the Browse Certifications Screen:
Press C or click the Certification button on the Main Menu.
To Create a Single Certification for an Existing Tenant:
Press Ctrl+A or click the Add icon on the Browse Certifications screen.
The Add Certifications dialog box opens.
Preliminary User Manual
40
WinTen²
ORC Certifications
Press DownArrow or click to select Existing Tenant Single Certification.
Press PageDown or click the Next button.
A select screen opens with a table of current tenants.
Select the tenant for whom you wish to create a certification.
Press Alt+T or click the Select button to make your choice and start the Begin Certification
wizard.
Hint:
You can also double-click the tenant’s record to select it and start the Begin Certification
wizard.
The Begin Certification wizard opens on Step 2. (Step 1 does not apply to existing tenants.)
(See Use the Begin Certification Wizard.)
To Create from the Certifications Tab of the Tenant Detail Screen:
Follow these steps to create a single certification for an existing tenant from the Certifications
tab of the Tenant Detail screen.
To Open the Tenant Browse Form:
Press T or click the Tenant button on the Main Menu.
Preliminary User Manual
41
WinTen²
ORC Certifications
To Open the Certifications Tab of the Tenant Detail Screen:
Select the tenant for whom you wish to create a certification.
Press Alt+E or click the Edit/Review button.
Hint:
You can also double-click the tenant’s record to select it and open the Tenant Detail
screen.
The Tenant Detail screen opens.
Press Ctrl+Tab or click the Certifications tab (at the upper left) on the Tenant Detail screen.
To Create a Single Certification for an Existing Tenant:
Press Ctrl+A or click the Add icon on the Certifications tab.
The Begin Certification wizard opens on Step 2. (Step 1 does not apply to existing tenants.)
(See Use the Begin Certification Wizard.)
Create a Single Certification for a New Admission or
Portability Move-in
You must conduct a certification, also known as an “Initial Eligibility Determination,” for each
new family before you can admit them to your agency’s subsidized housing program. These
include not only new residents of public housing or new housing choice voucher families, but
also “portability move-ins” to Section 8.
Preliminary User Manual
42
WinTen²
ORC Certifications
You can create such a certification directly from the Browse Certifications screen, or you can
create it by first opening any tenant record on the Main tab of the Tenant Detail screen. We will
walk through both of these options.
Note:
If you are working in a Section 8 data area and if you have enabled Section 8
voucher tracking in the Setup of the Section 8 program, you cannot add a new
tenant directly into Occupancy and Rent Calculation. You must add the tenant as
an applicant in the Applicant List program, then assign a voucher and perform a
move-in from that program. (For more information, please see the user manuals
for WinTen² Section 8 and Applicant List.)
To Create from the Browse Certifications Screen
Follow these steps to create a single certification for a new admission or portability move-in from
the Browse Certifications screen.
To Open the Browse Certifications Screen:
Press C or click the Certification button on the Main Menu.
To Create a Single Certification for a New Admission or Portability Move-in:
Press Ctrl+A or click the Add icon on the Browse Certifications screen.
The Add Certifications dialog box opens.
Press DownArrow or click to select either New Admission or Portability Move-in.
Press PageDown or click the Next button.
The Begin Certification wizard opens on Step 1.
(See Use the Begin Certification Wizard.)
Preliminary User Manual
43
WinTen²
ORC Certifications
To Create from the Main Tab of the Tenant Detail Screen:
Follow these steps to create a single certification for a new admission or portability move-in from
the Main tab of the Tenant Detail screen.
Hint:
For purposes of the wizard, it does not matter which tenant record you open on the
Tenant Detail screen.
To Open the Tenant Browse Form:
Press T or click the Tenant button on the Main Menu.
To Open the Main Tab of the Tenant Detail Screen:
Select any tenant in the table.
Press Alt+E or click the Edit/Review button.
Hint:
You can also double-click any tenant’s record to select it and open the Tenant Detail
screen.
The Tenant Detail screen opens on the Main tab.
To Create a Single Certification for a New Admission or Portability Move-in:
Press Ctrl+A or click the Add icon on the Main tab.
The Begin Certification wizard opens on Step 1.
(See Use the Begin Certification Wizard.)
Preliminary User Manual
44
WinTen²
ORC Certifications
Use the Begin Certification Wizard
The Begin Certification wizard will guide you through seven steps to create a single certification:
1. Enter Tenant Information
2. Select Transaction Type and Effective Date
3. Select the Dates for this Certification
4. Select Unit Information
5. Enter Certification Information
6. Select Documents to Print
7. Confirm New Certification
We will walk through these steps separately.
To Move to the Next Step:
Press PageDown or click the Start, Next, or Finish button.
To Move to the Previous Step:
Press PageUp or click the Back button.
To Cancel the Wizard at Any Time:
Press Esc or click the Cancel button.
Hint:
Until you finish Step 7, you can go back and change any information you have entered.
Preliminary User Manual
45
WinTen²
ORC Certifications
Step 1: Enter Tenant Information
This step allows you to enter personal information for a new admission or portability move-in.
Note:
If you are creating a certification for an existing tenant, the wizard skips this step
and opens on Step 2.
Step 1 contains twelve data fields, all of which relate to the new head of household: Social
Security Number, First Name, Middle Initial (MI), Last Name, Birthday, Birthplace, Gender,
Race, Handicapped, Disabled, Ethnicity, and Eligibility. All fields are required, except Middle
Initial. (Handicapped and/or Disabled may be blank, if they do not apply to this person.)
Race
Select the option(s) that best indicates this person’s racial make-up. Check all that apply.
Handicapped and Disabled
Check the appropriate field(s) if this person is handicapped and/or disabled.
Hint:
According to HUD, a person is born with a handicap, but acquires a disability after birth.
Ethnicity
Indicate whether this person is Hispanic/Latino.
Eligibility
Choose the option that best identifies this person’s eligibility for benefits, based on the person’s
citizenship status.
Preliminary User Manual
46
WinTen²
ORC Certifications
To Complete Step 1:
Tab or click through the fields, entering the information.
(All fields that apply to this person are required, except Middle Initial.)
Press PageDown or click the Start button to go to the next step of the Begin Certification
wizard.
Step 2: Select Transaction Type and Effective Date
This step allows you to identify the kind of certification you are creating and its effective date.
Note:
If you are creating a certification for an existing tenant, the wizard skips Step 1
and opens on Step 2.
Step 2 contains at least two editable data fields: Transaction Type and Effective Date. The
Tenant Type field is also editable for a new admission or portability move-in. All editable fields
are required.
The non-editable Head of Household Full Name and Social Security Number fields also
appear at the top of the screen.
Tenant Type
If this certification is for a new admission or portability move-in, select the type of benefit this
household is receiving from your agency. This field is not editable for existing tenants.
Transaction Type
Select the type of certification you wish to create.
Preliminary User Manual
47
WinTen²
ORC Certifications
The “Transaction Type” label corresponds to the Transaction Type field on Form HUD-50058.
Within the context used here, it pertains only to type of certification.
Note:
Not all Transaction Types are appropriate for all Tenant Types.
Effective Date
Select the effective date of the new certification.
To Complete Step 2:
Tab or click through the fields, entering the information.
(All editable fields are required.)
Press PageDown or click the Next button to go to the next step of the Begin Certification
wizard.
Step 3: Select the Dates for this Certification
This step allows you to verify or enter various dates related to this certification.
Step 3 contains seventeen editable data fields divided into three sections: Certification Dates,
Interview Dates, and Contract Dates. The Application Date and Admission Date fields are
required.
Information from previous steps also appears at the top of the screen. These fields are not
editable on this step.
Application Date
This is the date on which the tenant applied to your agency for subsidized housing.
Preliminary User Manual
48
WinTen²
ORC Certifications
Admission Date
This is the date on which the tenant was admitted to your agency’s subsidized housing program.
Next Reexamination Date
The tenant’s next reexamination is scheduled on this date.
Last Inspection Date
The tenant’s unit underwent its last inspection on this date.
Last Passed Inspection
This is the date of the last inspection that the tenant’s unit passed.
Notification of Vacancy Date
This is the date on which your agency received notice of the tenant’s intent to vacate the unit.
Vacancy Date
The tenant vacated the unit on this date.
Examination Date
This is the date of the examination associated with the change or move-in you are performing.
Next Interview Date and Time
These fields indicate the date and time of the next interview scheduled with this tenant.
To Complete Step 3:
Tab or click through the fields, entering the information.
(Application Date and Admission Date are required.)
Press PageDown or click the Next button to go to the next step of the Begin Certification
wizard.
Preliminary User Manual
49
WinTen²
ORC Certifications
Step 4: Select Unit Information
This step allows you to identify the unit this tenant occupies or will occupy.
Step 4 contains the Select Unit function and the Unit’s Landlord field.
It also contains non-editable Property ID and address information fields, which populate
automatically based on the tenant’s unit.
Information from previous steps also appears at the top of the screen. These fields are not
editable on this step.
Unit’s Landlord
If appropriate, select the landlord of the tenant’s unit.
To Use the Select Unit Function:
Click the Select Unit button.
The Browse Housing Units screen opens.
Click in the table to select the tenant’s unit.
Hint:
If you wish to view or edit detailed unit information, press Alt+E, click the Edit icon, or
double-click the unit record at this time to open it on the Maintain Housing Units screen.
Press Alt+T or click the Select button on the Browse Housing Units screen to make your
choice and close the screen.
To cancel the Browse Housing Units screen, click the Cancel button.
Preliminary User Manual
50
WinTen²
ORC Certifications
Press PageDown or click the Next button to go to the next step of the Begin Certification
wizard.
To Complete Step 4:
Tab or click through the fields, entering the agency information.
Press PageDown or click the Next button to go to the next step of the Begin Certification
wizard.
Step 5: Enter Certification Information
This step allows you to enter additional information related to this certification. The ORC
program will use this information in various income, expense, and rent calculations.
Step 4 contains four editable data fields: FMR Code, Welfare Rent, Security Deposit, and
Utility Allowance. FMR Code is required.
Information from previous steps also appears at the top of the screen. These fields are not
editable on this step.
FMR Code
Select the FMR (Fair Market Rent) Code that applies to this tenant’s unit.
Preliminary User Manual
51
WinTen²
ORC Certifications
Hint:
Your agency maintains your FMR Codes on the FMR/Payment Standard Setup screen.
You can access this screen from the Default Settings tab of the ORC Setup screen.
Open the ORC Setup screen by pressing S or clicking the Setup button on the Main
Menu. Click the Other Functions (Tools) icon drop-down arrow on the Default Settings
tab of the ORC Setup screen, and then click FMR/Payment Standard Setup.
Welfare Rent
If this tenant receives a welfare assistance payment and part of that payment is specifically
designated for housing (shelter and utilities), enter the “housing” portion of the welfare
assistance payment in this field.
Security Deposit
Enter the total amount of this tenant’s security deposit.
Utility Allowance
Enter the amount of this tenant’s monthly utility allowance.
To Complete Step 5:
Tab or click through the fields, entering the information.
(FMR Code is required.)
Press PageDown or click the Next button to go to the next step of the Begin Certification
wizard.
Step 6: Select Documents to Print
Preliminary User Manual
52
WinTen²
ORC Certifications
This step allows you to select certification documents to print at the end of this wizard.
Step 6 contains one field, Certification Documents. It is optional.
This step also contains the Mark All and Unmark All functions.
Information from previous steps also appears at the top of the screen. These fields are not
editable on this step.
Certification Documents
All documents are checked by default. Uncheck any documents you do not wish to print.
For each checked document, a print dialog box will open when you click the Finish button on
Step 7 of this wizard.
Mark All and Unmark All
Click these buttons, respectively, to check or uncheck all documents.
To Complete Step 6:
Click the checkboxes in the Certification Documents field as needed to check or uncheck
documents.
OR
Click the Mark All or Unmark All button, respectively, to check or uncheck all documents.
Press PageDown or click the Next button to go to the next step of the Begin Certification
wizard.
Step 7: Confirm New Certification
Preliminary User Manual
53
WinTen²
ORC Certifications
This step allows you to confirm the information and to enter comments before you finish creating
the certification.
Step 7 contains one editable field, Reason for Certification. It is optional.
Information from previous steps also appears at the top of the screen. These fields are not
editable on this step.
Reason for Certification
Enter any comments or additional information regarding the reason for this certification that may
be helpful for your agency.
To Complete Step 7:
Enter the Reason for Certification (optional).
If anything is incorrect, press PageUp or click the Back button to go to the previous step(s)
and correct it.
If everything is correct, press PageDown or click the Finish button to finish creating the
certification.
When you finish, you return to the screen from which you created the certification. For
information on completing the new certification, please see Complete Certification Steps.)
Complete Certification Steps
Your agency can define your own set of custom steps to complete each kind of certification you
perform. (See Maintain Certification Steps.)
After you create a certification, your agency-defined steps for that certification appear on the
Certifications tab of the Tenant Detail screen. You will process the certification by walking
through each of these steps to complete it.
You can access the Certifications tab from the Browse Certifications screen, or you can access
it by opening the tenant’s record directly on the Tenant Detail screen (by way of the Tenant
Browse form).
We will first walk through your options for accessing the Certifications tab and then walk through
the steps of processing certifications on that tab.
To Access from the Browse Certifications Screen
Follow these steps to access the Certifications tab from the Browse Certifications screen.
To Open the Browse Certifications Screen:
Press C or click the Certification button on the Main Menu.
Preliminary User Manual
54
WinTen²
ORC Certifications
To Open the Certifications Tab of the Tenant Detail Screen:
Select the certification you wish to process.
Press Ctrl+E or click the Edit icon.
Hint:
You can also double-click a certification to select it and open the Certifications tab of the
Tenant Detail screen.
To Access from the Tenant Browse Form:
Follow these steps to access the Certifications tab from the Tenant Browse Form.
To Open the Tenant Browse Form:
Press T or click the Tenant button on the Main Menu.
To Open the Certifications Tab of the Tenant Detail Screen:
Select the tenant for whom you wish to process a certification.
Press Alt+E or click the Edit/Review button.
Hint:
You can also double-click a tenant’s record to select it and open the Tenant Detail
screen.
The Tenant Detail screen opens.
Press Ctrl+Tab or click the Certifications tab (at the upper left) on the Tenant Detail screen.
Preliminary User Manual
55
WinTen²
ORC Certifications
Tenant Detail Screen: Certifications Tab
The Certifications tab contains a certification table and a detail information section.
The certification table displays one row of information for each of the current household’s
certifications.
Hint:
By default, only the top row of this table appears. The detail information section hides
the rest.
The detail information section, by default, fills most of the screen. This section displays the
steps of the certification currently selected in the table above it. You can choose to show or hide
the detail information section by pressing Ctrl+O or clicking the Show/Hide icon.
You will process certifications in the detail information section; you cannot do so directly in the
certification table.
The certification table contains seven columns of information: Action, Effective Date,
Certification Status, TTP, Utility Allowance, Tenant Rent, and Assistance Payment. These
fields display certification results; they are not editable.
The detail information section contains the Reason for Certification field and a table of
certification steps defined by your agency for this certification. (See Maintain Certification
Steps.) The table of certification steps contains three columns of information: Certification
Steps, Completed by User, and Completed On.
This section also contains the Process Step, Complete Step, Complete All, and Verifications
functions.
Preliminary User Manual
56
WinTen²
ORC Certifications
If you use the Process Step or Complete Step function, you will also have access to the Update
Certification Step dialog box.
Action
This “Action” corresponds to the Transaction Type field on Form HUD-50058. Within the context
used here, this identifies the type of certification performed.
Effective Date
This is the effective date of the certification.
Certification Status
After you create a certification, its status is “In Process” until it is “Completed.”
Hint:
The status for the latest certification also appears, by default, at the upper right of the
Tenant Detail screen itself.
TTP
This is the Total Tenant Payment.
In general, the TTP for a household is the greatest of A) 30 percent of adjusted monthly income,
B) 10 percent of total monthly income, or C) a housing stipend, if any, provided by a welfare
assistance program.
Utility Allowance
This is the tenant’s utility allowance based on your agency’s utility allowance schedule for this
tenant’s unit.
Tenant Rent
This is the family’s monthly rent payment.
In general, if your agency pays for all utilities, tenant rent equals TTP; if the tenant pays for
utilities, tenant rent equals TTP minus the utility allowance.
Assistance Payment
This is the monthly payment made by your agency to the owner of a Section 8 unit occupied by
the tenant.
In general, the assistance payment is the HAP (Housing Assistance Payment) contract rent (the
owner’s full rent for the unit) minus tenant rent.
Note:
The Assistance Payment field applies only to Section 8.
Reason for Certification
You enter this information on Step 7 of the Begin Certification Wizard. (See Create a Single
Certification and Use the Begin Certification Wizard.)
Certification Steps
This column lists your agency-defined steps for this certification.
Preliminary User Manual
57
WinTen²
ORC Certifications
Completed by User and Completed On
For each step that has been completed, these fields show who completed it and when it was
completed.
Process Step
This function helps you complete the task identified by a particular step.
Each agency-defined certification step can open a particular screen or other “location” within the
ORC program from which to complete that step. This location may be a tab of the Tenant Detail
screen, a Tenant Reports print dialog, the Browse Verifications screen, or the FSS/WtW (Family
Self-Sufficiency/Welfare to Work) Contract Information screen. (See Maintain Certification
Steps.)
When you use the Process Step function, the program will take you to the location your agency
has defined for the current step. From there, you may verify, edit, or add information as needed
or perform a particular task, such as printing documents.
When you exit from that location, the Update Certification Step dialog box (see below) opens,
allowing you to mark the step as completed.
Hint:
Instead of having an Exit icon, some (but not all) of these locations have a Return to
Certification Steps icon when you open them from the Process Step function.
Complete Step
This function allows you to mark a step as completed without going to another location within
the ORC program. It simply opens the Update Certification Step dialog box (see below), which
allows you to mark the step as completed.
Hint:
If necessary, you can also use this option to “un-complete” a step – to mark as not
completed a step that you had previously marked as completed.
Complete All
This function allows you to mark all uncompleted steps as complete. It will enter your user name
as the “Completed by User” and mark the “Completed On” field with the current date.
Hint:
The information for all previously completed steps will remain unchanged. This function
affects only uncompleted steps.
Verifications
This function allows you to maintain any verifications you receive for tenant information during
the certification. Because of the importance and complexity of this function, we will address it
separately, in the next section. (See Verify Information.)
Update Certification Step Dialog Box
This dialog box is available only from the Process Step and Complete Step functions. It allows
you to designate whether a step is completed and, if completed, its completion date.
You can also use this dialog box to “un-complete” a step – to mark as not completed a step that
you had previously marked as completed.
Preliminary User Manual
58
WinTen²
ORC Certifications
To Process a Step:
Select, in the certifications steps table, the step you wish to process.
Press Alt+P or click the Process Step button.
The agency-defined location for this step opens.
Perform any tasks related to this step.
Exit the agency-defined location.
Hint:
Depending on the location, you may exit by using an Exit icon; a Return to Certification
Steps icon; or a Print, Preview, or Cancel button.
The Update Certification Step dialog box opens.
Press Spacebar or click to check or uncheck the Mark Certification Step Complete field, as
needed.
If you have checked the Mark Certification Step Complete field, verify or enter the
Completion Date.
Press Enter or click the OK button to close the Update Certification Step dialog box and
return to the Certifications tab.
To Complete or “Un-Complete” a Step:
Select, in the certifications steps table, the step you wish to mark complete or not complete.
Press Alt+C or click the Complete Step button.
The Update Certification Step dialog box opens.
As needed, press Spacebar or click to check or uncheck the Mark Certification Step
Complete field.
If you have checked the Mark Certification Step Complete field, verify or enter the
Completion Date.
Press Enter or click the OK button to close the Update Certification Step dialog box and
return to the Certifications tab.
To Complete All Uncompleted Steps:
Press Alt+A or click the Complete All button.
For each step that was not previously completed, the program enters your user name as the
“Completed by User” and marks the “Completed On” field with the current date.
To Verify Information:
Press Alt+V or click the Verifications button.
(See Verify Information.)
Preliminary User Manual
59
WinTen²
ORC Certifications
Verify Information
You must verify much of the information you gather during a certification. These “verifiable
items” include such things as income, qualified deductions from income, assets, age, Social
Security number, and citizenship or eligible immigrant status. After the interview, you will verify
any of this information you have not already verified.
One of the more important parts of a certification is the verification of a household’s total
income. HUD strongly encourages you to use up-front income verification whenever possible.
Up-front income verification sources are Internet or other electronic sources that allow you to
confirm tenant information. You can access these sources and begin verification even before
the tenant interview.
Hint:
As of the publication of this manual, HUD is in the process of releasing its Upfront
Income Verification (UIV) System. It is currently available in some, but not all, states.
It offers access to two types of information:
1) Social Security benefits from the Social Security Administration (the same data that
has been available through the TASS system for the last 4 years).
2) Wage and income data from the State Wage Information Collection Agencies
(SWICAs) in each of the affected states. This includes any reported employment income
and unemployment benefits received by the PHA resident.
For more information, please visit the following address:
www.hud.gov/offices/pih/programs/ph/rhiip/uivsystem.cfm
For more information on up-front income verification in general, including a partial list of
other verification sources, please see Public Housing Occupancy Guidebook, June 2003
(see Section 7.5, “Up-Front Income Verification”):
www.hud.gov/offices/pih/programs/ph/rhiip/phguidebook.cfm
HUD stipulates a hierarchy of methods of verification it prefers. For each verifiable piece of
information, you must attempt the “most-preferred” verification method first. If it is not available,
you must then attempt the next-most-preferred method, etc., until you successfully verify that
item. For each unsuccessful verification attempt, you must document when you attempted it and
why that verification method was unavailable.
For income verification, you must use up-front income verification, mentioned above, whenever
possible. If that is unavailable, written verification from a third party and then oral verification
from a third party are the second and third choices, respectively. If neither of those is available,
you may examine documents provided by the tenant. Finally, if you have exhausted all other
options, your agency’s procedures may allow you to accept a notarized statement from the
tenant as verification. This hierarchy is identical when you are verifying information other than
income, except that up-front income verification is not an option.
You can use the Browse Verifiable Items screen to view and find a tenant’s verifiable items.
Preliminary User Manual
60
WinTen²
ORC Certifications
You can use the Maintain Verifiable Items screen and the Maintain Verification Detail screen to
track your verification of tenant information.
Hint:
The Maintain Verifiable Items screen exactly matches HUD’s hierarchy of preferred
verification methods.
You can access the Browse Verifiable Items screen by using the Verifications function on the
Certifications tab of the Tenant Detail screen. (See Complete Certification Steps.)
Hint:
You can also designate the Browse Verifiable Items screen as the “step location” to
open for any of your agency-defined certification steps. (See Maintain Certification
Steps.)
To Open the Browse Verifiable Items Screen:
Press Alt+V or click the Verifications button on the Certifications tab of the Tenant Detail
screen.
Browse Verifiable Items Screen
The Browse Verifiable Items screen contains a table of verifiable items for the current
certification.
This screen also gives you access to the Maintain Verifiable Items screen, which in turn gives
you access to the Maintain Verification Detail screen. You can use both of these screens to
maintain your verification of tenant information.
Preliminary User Manual
61
WinTen²
ORC Certifications
Maintain Verifiable Items
The Maintain Verifiable Items screen displays detailed information for one verifiable item.
To Open the Maintain Verifiable Items Screen:
Select, on the Browse Verifiable Items Screen, the item you wish to verify.
Press Ctrl+E or click the Edit icon.
Hint:
You can also double-click an item to select it and open the Maintain Verifiable Items
screen.
Maintain Verifiable Items Screen
This screen contains at least four sections: 3rd Party Written Verification, 3rd Party Oral
Verification, Tenant Documented, and Self-Declaration. If you are verifying an income item,
the Online Verification section also appears above the other four. These sections correspond
exactly to HUD’s hierarchy of preferred verification methods.
Non-editable fields appear at the top of this screen identifying the type of item you are verifying,
the resident’s name, and a description of the specific item you are verifying.
Each section of this screen displays either two or five non-editable fields. The Status and Date
fields always appear, although the date may be blank. The Tenant Reported, Actual Verified,
and Results fields may also appear. All of these fields are based on the information you enter
on the Maintain Verification Detail screens. You cannot edit them here.
Each section contains its own Update Results function.
Preliminary User Manual
62
WinTen²
ORC Certifications
This screen also gives you access to the Complete Verification Item dialog box.
Status and Date
The Status field can be “Not Selected,” “Pending,” “Received,” or “Not Received.” “Not Selected”
is the default; it means you have not attempted this verification method. “Pending” means you
have requested verification and are waiting for a response. “Received” means you have
received verification of the information. “Not Received” means you requested verification, but
did not receive a response within your agency’s allowable period of time.
The Date field shows when you last updated the status of that section.
Tenant Reported, Actual Verified, and Results
These fields appear for any section only if the status of that section is “Received.”
The Tenant Reported and Actual Verified fields display the information you received from the
tenant and the verifying agency, respectively.
The Results field shows whether these two “Matched,” there was a “Discrepancy,” or an
information match was “Not Determined.”
Update Results
These buttons give you access to the Maintain Verification Detail screens, which you can use to
enter information for any section. Each section has a slightly different detail screen. We will
discuss these screens separately, below. (See Maintain Verification Details.)
Because the sections are in a HUD-defined hierarchy, you should start with the top section and
work your way down until you successfully verify this item. For each unsuccessful attempt, you
should document when you attempted it and note why that verification method was unavailable.
When you successfully verify this item, use the Complete Verifiable Item dialog box (see below)
to mark this item as completed.
Complete Verifiable Item Dialog Box
This dialog box allows you to designate whether the current verifiable item is completed and, if
completed, its completion date.
You can also use this dialog box to “un-complete” a verifiable item – to mark as not completed
an item that you had previously marked as completed.
Note:
This marks the entire verifiable item as completed or not completed, not just a
particular section.
This dialog box appears automatically each time you exit the Maintain Verifiable Items screen.
You can also access it manually by clicking the Complete Verifiable Item icon on the toolbar.
Preliminary User Manual
63
WinTen²
ORC Certifications
To Update Results for a Section:
Click the Update Results button of the section you wish to update.
That section’s Maintain Verification Detail screen opens.
(See Maintain Verification Details.)
To Complete or “Un-Complete” the Verifiable Item:
Press Alt+C or click the Complete Verifiable Item icon.
OR
Press Esc or click the Exit icon to exit the screen.
The Complete Verifiable Item dialog box opens.
As needed, press Spacebar or click to check or uncheck the Completed Verification of this
Item field.
If you have checked the Completed Verification of this Item field, verify or enter the
Completion Date.
Press Enter or click the OK button to close the Update Certification Step dialog box and
return to the Browse Verifiable Items screen.
Maintain Verification Details
The Maintain Verification Detail screens allow you to enter detailed information and results for
any verification method section on the Maintain Verifiable Items screen.
There are five different Maintain Verification Detail screens, one for each of the possible
sections on the Maintain Verifiable Items screen:
•
Maintain Online Verification Detail Screen
•
Maintain Third Party Written Verification Detail Screen
•
Maintain Third Party Oral Verification Detail Screen
•
Maintain Tenant Documented Detail Screen
•
Maintain Self-Declaration Detail Screen
Because each of these screens is slightly different, we will walk through them separately.
You can access any of these screens by using the Update Results function on the Maintain
Verifiable Items screen. (See Maintain Verifiable Items.)
To Open Any Maintain Verification Detail Screen:
Click, on the Maintain Verifiable Items screen, the Update Results button of the section you
wish to update.
That section’s Maintain Verification Detail screen opens.
Maintain Online Verification Details
One of the more important parts of a certification is the verification of a household’s total
income. HUD requires you to use up-front verification whenever possible. Up-front verification
sources are Internet or other electronic sources that allow you to confirm tenant income
information, especially income and Social Security Numbers.
Preliminary User Manual
64
WinTen²
ORC Certifications
For more information on up-front income verification, including a partial list of sources, please
see Public Housing Occupancy Guidebook, June 2003 (see Section 7.5, “Up-Front Income
Verification”):
www.hud.gov/offices/pih/programs/ph/rhiip/phguidebook.cfm
You can use the Maintain Online Verification Detail screen to enter information and results for
an online income verification. This screen will open if you use the Update Results function from
an Online Verification section of the Maintain Verifiable Items screen.
Maintain Online Verification Detail Screen
This screen contains at least four editable data fields: Online System, Action Date, Status,
and Notes.
If the status is “Received,” the Annual Income, Tenant Amount Reported, and Verification
Results fields also appear.
Non-editable fields appear at the top of this screen identifying the type of item you are verifying,
the resident’s name, and a description of the specific item you are verifying.
Online System
Select the online system you used to verify this income.
Action Date
Select the date on which you verified this income.
Preliminary User Manual
65
WinTen²
ORC Certifications
Status
The Status field can be “Not Selected,” “Pending,” “Received,” or “Not Received.” “Not Selected”
is the default; it means you have not attempted this verification method. “Pending” means you
have requested verification and are waiting for a response. “Received” means you have
received verification of the information. “Not Received” means you requested verification, but
did not receive a response within your agency’s allowable period of time.
Notes
Enter any notes about this verifiable item that might be helpful for your agency or for a RIM
auditor.
Annual Income, Tenant Amount Reported, and Verification Results
These fields appear only if the status is “Received.”
The Annual Income and Tenant Amount Reported fields display the information you received
from the verifying agency and the tenant, respectively.
The Verification Results field shows whether these two “Matched,” there was a “Discrepancy,”
or an information match was “Not Determined.”
To Enter Online Verification Information:
Press Ctrl+E or click the Edit icon.
Tab or click through the fields, entering or editing the information as needed.
To save your changes, press Ctrl+S or click the Save icon.
To cancel, press Ctrl+Q or click the Cancel icon.
Press Esc or click the Exit icon to return to the Maintain Verifiable Items screen.
Maintain Third Party Written Verification Details
Use written verification from a third party if online verification is not available.
You can use the Maintain Third Party Written Verification Detail screen to enter information and
results for third party written verifications. This screen will open if you use the Update Results
function from a 3rd Party Written Verification section of the Maintain Verifiable Items screen.
Preliminary User Manual
66
WinTen²
ORC Certifications
Maintain Third Party Written Verification Detail Screen
This screen contains at least four editable data fields: Request Date, Status, Status Date, and
Notes.
If the status is “Received,” the Actual Verified, Tenant Reported, and Verification Results
fields also appear.
Non-editable fields appear at the top of this screen identifying the type of item you are verifying,
the resident’s name, and a description of the specific item you are verifying.
Request Date
Enter the date on which you requested written verification from this third party.
Status
The Status field can be “Not Selected,” “Pending,” “Received,” or “Not Received.” “Not Selected”
is the default; it means you have not attempted this verification method. “Pending” means you
have requested verification and are waiting for a response. “Received” means you have
received verification of the information. “Not Received” means you requested verification, but
did not receive a response within your agency’s allowable period of time.
Status Date
Enter the date for which the Status field value is valid (e.g., the date you received the
verification or the date on which you determined it would not be received.).
Notes
Enter any notes about this verifiable item that might be helpful for your agency or for a RIM
auditor.
Preliminary User Manual
67
WinTen²
ORC Certifications
Actual Verified, Tenant Reported, and Verification Results
These fields appear only if the status is “Received.”
The Actual Verified and Tenant Reported fields display the information you received from the
verifying agency and the tenant, respectively.
The Verification Results field shows whether these two “Matched,” there was a “Discrepancy,”
or an information match was “Not Determined.”
To Enter Third Party Written Verification Information:
Press Ctrl+E or click the Edit icon.
Tab or click through the fields, entering or editing the information as needed.
To save your changes, press Ctrl+S or click the Save icon.
To cancel, press Ctrl+Q or click the Cancel icon.
Press Esc or click the Exit icon to return to the Maintain Verifiable Items screen.
Maintain Third Party Oral Verification Details
Oral verification from a third party as your next choice if neither online verification nor third party
written verification is available.
You can use the Maintain Oral Verification Detail screen to enter information and results for a
third party oral verification. This screen will open if you use the Update Results function from a
3rd Party Oral Verification section of the Maintain Verifiable Items screen.
Preliminary User Manual
68
WinTen²
ORC Certifications
Maintain Third Party Oral Verification Detail Screen
This screen contains at least seven editable data fields: Contact Name, Position, Phone
Number, Extension, Contact Date, Status, and Notes.
If the status is “Received,” the Actual Verified, Tenant Reported, and Verification Results
fields also appear.
Non-editable fields appear at the top of this screen identifying the type of item you are verifying,
the resident’s name, and a description of the specific item you are verifying.
Contact Name and Position
Enter the name and position of the person who orally verified the information.
Phone Number and Extension
Enter this person’s phone number and extension.
Contact Date
Enter the date on which this person orally verified the information.
Status
The Status field can be “Not Selected,” “Pending,” “Received,” or “Not Received.” “Not Selected”
is the default; it means you have not attempted this verification method. “Pending” means you
have requested verification and are waiting for a response. “Received” means you have
received verification of the information. “Not Received” means you requested verification, but
did not receive a response within your agency’s allowable period of time.
Preliminary User Manual
69
WinTen²
ORC Certifications
Notes
Enter any notes about this verifiable item that might be helpful for your agency or for a RIM
auditor.
Actual Verified, Tenant Reported, and Verification Results
These fields appear only if the status is “Received.”
The Actual Verified and Tenant Reported fields display the information you received from the
verifying agency and the tenant, respectively.
The Verification Results field shows whether these two “Matched,” there was a “Discrepancy,”
or an information match was “Not Determined.”
To Enter Third Party Oral Verification Information:
Press Ctrl+E or click the Edit icon.
Tab or click through the fields, entering or editing the information as needed.
To save your changes, press Ctrl+S or click the Save icon.
To cancel, press Ctrl+Q or click the Cancel icon.
Press Esc or click the Exit icon to return to the Maintain Verifiable Items screen.
Maintain Tenant Documented Details
If you are unable to verify a piece of information using online verification or third party written or
oral verification, you may accept documents presented by the tenant as proof of the information.
You can use the Maintain Tenant Documented Detail screen to enter information and results for
this documentation. This screen will open if you use the Update Results function from a Tenant
Documented section of the Maintain Verifiable Items screen.
Preliminary User Manual
70
WinTen²
ORC Certifications
Maintain Tenant Documented Detail Screen
This screen contains at least five editable data fields: Description of Document, Person
Providing Information, Received Date, Status, and Notes.
If the status is “Received,” the Actual Verified, Tenant Reported, and Verification Results
fields also appear.
Non-editable fields appear at the top of this screen identifying the type of item you are verifying,
the resident’s name, and a description of the specific item you are verifying.
Description of Document
Enter a short description of the tenant-supplied document (e.g., pay stub, driver’s license, Social
Security card).
Person Providing Information
Enter the name of the person who supplied the document.
Received Date
Enter the date you received the document.
Status
The Status field can be “Not Selected,” “Pending,” “Received,” or “Not Received.” “Not Selected”
is the default; it means you have not attempted this verification method. “Pending” means you
have requested verification and are waiting for a response. “Received” means you have
received verification of the information. “Not Received” means you requested verification, but
did not receive a response within your agency’s allowable period of time.
Preliminary User Manual
71
WinTen²
ORC Certifications
Notes
Enter any notes about this verifiable item that might be helpful for your agency or for a RIM
auditor.
Actual Verified, Tenant Reported, and Verification Results
These fields appear only if the status is “Received.”
The Actual Verified and Tenant Reported fields display the information you received from the
verifying agency and the tenant, respectively.
The Verification Results field shows whether these two “Matched,” there was a “Discrepancy,”
or an information match was “Not Determined.”
To Enter Tenant Documented Information:
Press Ctrl+E or click the Edit icon.
Tab or click through the fields, entering or editing the information as needed.
To save your changes, press Ctrl+S or click the Save icon.
To cancel, press Ctrl+Q or click the Cancel icon.
Press Esc or click the Exit icon to return to the Maintain Verifiable Items screen.
Maintain Self-Declaration Details
If all other verification methods are unavailable, your agency’s procedures may allow you to
accept a notarized statement from the tenant as verification.
You can use the Maintain Self-Declaration Detail screen to record this type of verification. This
screen will open if you use the Update Results function from a Self-Declaration section of the
Maintain Verifiable Items screen.
Preliminary User Manual
72
WinTen²
ORC Certifications
Maintain Self-Declaration Detail Screen
This screen contains three editable data fields: Status, Signed Date, and Notes.
Non-editable fields appear at the top of this screen identifying the type of item you are verifying,
the resident’s name, and a description of the specific item you are verifying.
Status
The Status field can be “Not Selected,” “Pending,” “Received,” or “Not Received.” “Not Selected”
is the default; it means you have not attempted this verification method. “Pending” means you
have requested verification and are waiting for a response. “Received” means you have
received verification of the information. “Not Received” means you requested verification, but
did not receive a response within your agency’s allowable period of time.
Signed Date
Enter the date on which the tenant signed this verification.
Notes
Enter any notes about this verifiable item that might be helpful for your agency or for a RIM
auditor.
To Enter Self-Declaration Information:
Press Ctrl+E or click the Edit icon.
Tab or click through the fields, entering or editing the information as needed.
To save your changes, press Ctrl+S or click the Save icon.
To cancel, press Ctrl+Q or click the Cancel icon.
Press Esc or click the Exit icon to return to the Maintain Verifiable Items screen.
Preliminary User Manual
73
WinTen²
ORC Certifications
Finalize Certifications
Finalizing the certification is the last step in the certification process. The Finalize Certification
wizard allows you to verify that you have completed all certification steps, select an agencydefined packet of documents to print, and verify eTrans submission information. Completing this
wizard will also set the status of the certification itself to “Completed.”
You can access the Finalize Certification wizard from the Certifications tab of the Tenant Detail
screen.
To Start the Finalize Certification Wizard:
Open the certification you wish to finalize on the Certifications tab of the Tenant Detail
screen. (See Complete Certification Steps.)
Press Ctrl+F or click the Finalize Certification icon on the Certifications tab.
Use the Finalize Certification Wizard
The Finalize Certification wizard will guide you through four steps to finalize a certification:
1. Confirm Certification Information
2. Select Documents to Print
3. Make eTrans Record
4. Confirm Certification Information
We will walk through these steps separately.
To Move to the Next Step:
Press PageDown or click the Start, Next, or Finish button.
To Move to the Previous Step:
Press PageUp or click the Back button.
To Cancel the Wizard at Any Time:
Press Esc or click the Cancel button.
Hint:
Until you finish Step 4, you can go back and change some of the information you have
entered.
Preliminary User Manual
74
WinTen²
ORC Certifications
Step 1: Confirm Certification Information
This step allows you to confirm that you have completed all the steps of this certification.
Step 1 contains a Certification Status table, which displays the steps of the current certification
exactly as they appear on the Certifications tab of the Tenant Detail screen.
Non-editable fields at the top of the screen show identifying information for the certification and
the tenant household being certified.
This step also contains the Complete All function.
Complete All
If you agency’s procedures permit, you can use this function directly from the wizard to mark all
uncompleted steps as complete.
Using the Complete All function here is identical to using it the from the Certifications tab of the
Tenant Detail screen. (See Complete Certification Steps.) It will enter your user name as the
“Completed by User” and mark the “Completed On” field with the current date.
Hint:
The information for all previously completed steps will remain unchanged. This function
affects only uncompleted steps.
To Complete All Uncompleted Steps:
Press Alt+A or click the Complete All button.
For each step that was not previously completed, the program enters your user name as the
“Completed by User” and marks the “Completed On” field with the current date.
Preliminary User Manual
75
WinTen²
ORC Certifications
To Complete Step 1:
Verify that all steps are complete.
Press PageDown or click the Start button to go to the next step of the Finalize Certification
wizard.
Step 2: Select Documents to Print
This step allows you to select certification documents to print at the end of this wizard.
Step 2 contains one field, Certification Documents. It is optional.
This step also contains the Mark All and Unmark All functions.
The non-editable All Certification Steps Completed field flags whether all certification steps
were completed.
Certification Documents
All documents are checked by default. Uncheck any documents you do not wish to print.
For each checked document, a print dialog box will open when you click the Finish button on
Step 7 of this wizard.
Mark All and Unmark All
Click these buttons, respectively, to check or uncheck all documents.
Preliminary User Manual
76
WinTen²
ORC Certifications
To Complete Step 2:
Click the checkboxes in the Certification Documents field as needed to check or uncheck
documents.
OR
Click the Mark All or Unmark All button, respectively, to check or uncheck all documents.
Press PageDown or click the Next button to go to the next step of the Finalize Certification
wizard.
Step 3: Make eTrans Record
This step allows you to verify or enter the date of the eTrans record for this certification.
Step 3 contains one editable data field, eTrans Submission Date. It is required.
Information from previous steps also appears near the top of the screen. These fields are not
editable on this step.
eTrans Submission Date
This is the submission date of the eTrans record for this certification. It defaults to the effective
date of the certification, but you may change the default, if necessary.
To Complete Step 3:
Verify or edit the eTrans submission date (required).
Press PageDown or click the Next button to go to the next step of the Finalize Certification
wizard.
Preliminary User Manual
77
WinTen²
ORC Certifications
Step 4: Confirm Certification Information
This step allows you to confirm the information and to enter comments before you finish
finalizing the certification.
Step 4 contains one editable field, Comments. It is optional.
Information from previous steps also appears at the top of the screen. These fields are not
editable on this step.
Comments
Enter any comments or additional information regarding this certification that may be helpful for
your agency or a RIM auditor.
To Complete Step 4:
Enter any comments (optional).
If anything is incorrect, press PageUp or click the Back button to go to the previous step(s)
and correct it.
If everything is correct, press PageDown or click the Finish button to finish finalizing the
certification.
When you finish, you return to Certifications tab of the Tenant Detail screen, where the
Certification Status field of this certification appears as Completed.
Preliminary User Manual
78
WinTen²
ORC Certifications
CHAPTER
7
Implement Setup
This chapter will walk you step-by-step through entering Setup options.
Note:
Please be especially careful when entering Setup options. Inaccurate settings can
cause ORC to function in an unexpected manner. In addition, after you enter your
initial settings, prevent accidental changes by using the Master Setup program to
restrict access to the Setup screen. For help on doing this, please see the user
manual for WinTen² Master Setup.
As mentioned above, the administrator of your WinTen² programs should review the planning
and implementation of these Setup options at least annually.
You will use the ORC Setup screen to enter your options.
To Open the ORC Setup Screen:
Press S or click the Setup button on the Main Menu.
ORC Setup Screen
Preliminary User Manual
79
WinTen²
ORC Certifications
The ORC Setup screen gives you access to many different Setup options. We will walk through
the two following options, each with its own screen:
•
Maintain Outside Agencies
•
Maintain Certification Steps
Maintain Outside Agencies
“Outside agencies” are agencies, organizations, or businesses with which you may have
frequent contact regarding tenants. Your tenants may receive income from or pay expenses to
these outside agencies. You may also contact these agencies to verify tenants’ income, assets,
expenses, and/or community service activities.
You are not required to maintain a list of outside agencies; you can enter this information
manually for the appropriate tenant records. If you have frequent contact with any particular
agency, however, entering that agency in your outside agencies list will streamline data entry
and save time and effort for your staff.
The ORC program contains two screens from which you can maintain your outside agencies:
the Maintain Outside Agencies screen and the Agency Information screen. You can add,
edit, or delete agencies from either of these screens.
The Maintain Outside Agencies screen is available from the Default Settings tab of the ORC
Setup screen. We will discuss it below.
You can access the Agency Information screen from various wizards that are available from the
Tenant Detail screen. The main purpose of the Agency Information screen is to let you insert
agency information in a tenant record, but you can also use it to add, edit, or delete agencies
“on the fly.” The Agency Information screen is essentially identical to the Maintain Outside
Agencies screen, except that it has additional Insert Agency and Cancel buttons and has no
Print, Preview, or Show/Hide icons.
Below, we will walk through using the Maintain Outside Agencies screen to define your outside
agencies. Follow these same steps to work with the Agency Information screen.
You will access the Maintain Outside Agencies screen from the Default Settings tab of the ORC
Setup screen.
To Open the Default Settings Tab:
This tab appears by default when you open the ORC Setup screen.
If you have left it, press Ctrl+Tab or click the Default Settings tab (at the upper left).
Preliminary User Manual
80
WinTen²
ORC Certifications
To Open the Maintain Outside Agencies Screen:
Click the Other Functions (Tools) icon drop-down arrow on the Default Settings tab, and
then click Maintain Outside Agencies.
Maintain Outside Agencies Screen
The Maintain Outside Agencies screen contains an agency table and a detail information
section.
The agency table displays one row of information for each of your outside agencies.
The detail information section, by default, fills the bottom part of the screen. This section
displays detailed information on the agency currently selected in the table above it. You can
choose to show or hide the detail information section by pressing Ctrl+O or clicking the
Show/Hide icon.
You will add or edit agencies in the detail information section; you cannot do so directly in the
agency table.
The detail information section contains ten editable contact information fields. Outside Agency
Name is required.
Outside Agency Name
Enter the name of the agency.
Care Of
If appropriate, enter the name of your primary contact person at this agency.
Preliminary User Manual
81
WinTen²
ORC Certifications
To Show or Hide the Detail Information Section:
Press Ctrl+O or click the Show/Hide icon.
Hint:
If you have hidden this section, it will also “show” automatically when you add or edit a
record.
To Add an Outside Agency:
Press Ctrl+A or click the Add icon on the Maintain Outside Agencies screen.
Tab or click through the fields in the detail information section, entering the information.
(Outside Agency Name is required.)
To save this new outside agency, press Ctrl+S or click the Save icon.
To cancel, press Ctrl+Q or click the Cancel icon.
To Edit an Outside Agency:
Select, in the agency table, the agency you wish to edit.
Press Ctrl+E or click the Edit icon.
Tab or click through the fields in the detail information section, changing information as
needed.
To save your changes, press Ctrl+S or click the Save icon.
To cancel, press Ctrl+Q or click the Cancel icon.
To Delete an Outside Agency:
Select, in the agency table, the agency you wish to delete.
Press Ctrl+D or click the Delete icon.
Press Y or click the Yes button to confirm the deletion.
Maintain Certification Steps
The ORC program allows your agency to define a different set of custom steps to complete
each kind of certification you perform. This lets you customize the program to reflect your
certification procedures and helps ensure consistency in the way your caseworkers process
certifications. While a certification is in process, the appropriate steps will appear on the
Certifications tab of the Tenant Detail screen. (See Complete Certification Steps.)
Your agency can house many different types of tenants, such as Public Housing tenants,
Housing Choice Voucher tenants, Section 8 Homeownership tenants, etc. For each of these
types of tenants, you may perform many different types of certifications, such as new admission
certifications, annual or interim reexaminations, portability move in or move out certifications,
etc.
Hint:
The ORC program uses the labels “Transaction Code” and “Transaction Type” to identify
types of certifications. These labels correspond to the Transaction Type field on Form
HUD-50058. Within the context used here, they pertain only to certification types.
Preliminary User Manual
82
WinTen²
ORC Certifications
For each different combination of “tenant type” and “transaction code” (certification type), you
can define your own set of custom certification steps. For example, you can define one set of
steps for a Public Housing new admission, a different set for a Public Housing annual
reexamination, and a third set for a Public Housing interim reexamination. You can define
entirely different steps for Housing Choice Voucher new admissions, Housing Choice Voucher
annual reexaminations, Section 8 Homeownership new admissions, Section 8 Homeownership
annual reexaminations, etc.
Hint:
These are only a few examples; you can define custom steps for dozens of different
combinations of “tenant type” and “transaction code.”
We will walk through using the Maintain Certification Steps screen to define your certification
steps. You will access this screen from the Default Settings tab of the ORC Setup screen.
To Open the Default Settings Tab:
This tab appears by default when you open the ORC Setup screen.
If you have left it, press Ctrl+Tab or click the Default Settings tab (at the upper left).
To Open the Maintain Certification Steps Screen:
Click the Other Functions (Tools) icon drop-down arrow on the Default Settings tab, and
then click Certification Steps.
Maintain Certification Steps Screen
The Maintain Certification Steps screen contains the Tenant Type and Transaction Code
option fields, a table of certification steps, and a detail information section.
Preliminary User Manual
83
WinTen²
ORC Certifications
The Tenant Type and Transaction Code option fields appear at the top of the screen. They
allow you to specify the certification for which you are defining the steps. You can define one set
of certification steps for each different combination of tenant type and transaction code.
Hint:
The ORC program uses the labels “Transaction Code” and “Transaction Type” to identify
types of certifications. These labels correspond to the Transaction Type field on Form
HUD-50058. Within the context used here, they pertain only to certification types.
The table below these option fields displays the set of certification steps for the tenant
type/transaction code combination you have selected.
The detail information section appears at the bottom of the screen. This section displays
information on the step currently selected in the table above it.
You will add or edit certification steps in the detail information section; you cannot do so directly
in the table.
The detail information section contains three editable fields: Step Number, Step Description,
and Step Location. Step Description is required.
You will edit the Step Number field by using the Move Certification Step Up and Move
Certification Step Down icons on the icon bar.
Step Number
This field identifies the sequence of the steps as they will appear for this certification on the
Certifications tab of the Tenant Detail screen. The steps are numbered from top to bottom as
they appear on the Maintain Certification Steps screen; step number one is at the top.
You cannot edit this field directly. Instead, you will edit the Step Number by using the Move
Certification Step Up and Move Certification Step Down icons on the icon bar.
Step Description
Enter a short description to identify the step.
Step Location
Select the screen within the ORC program to open when an employee processes this step.
When an employee processes a given certification step (from the Certifications tab of the
Tenant Detail screen), the program can open a particular screen or “location” within the ORC
program from which to complete that step. This location may be a tab of the Tenant Detail
screen, a Tenant Reports print dialog, the Browse Verifications screen, or the FSS/WtW (Family
Self-Sufficiency/Welfare to Work) Contract Information screen. You can define one location for
each certification step.
To Set the Tenant Type/Transaction Type Combination:
Select the Tenant Type.
Select the Transaction Type.
Click the Show Steps button.
Preliminary User Manual
84
WinTen²
ORC Certifications
Note:
It is very important that you select and verify this combination, as it defines the
exact certification for which you are viewing, adding, editing, or deleting steps.
To Add a Certification Step:
Verify your choices for the Tenant Type and Transaction Type option fields.
Click the Show Steps button.
Press Ctrl+A or click the Add icon on the Maintain Certification Steps screen.
Tab or click through the fields in the detail information section, entering the information.
(Step Description is required.)
To save this new step, press Ctrl+S or click the Save icon.
To cancel, press Ctrl+Q or click the Cancel icon.
To Change the Order of Steps:
Verify your choices for the Tenant Type and Transaction Type option fields.
Click the Show Steps button.
Select, in the certification step table, the step you wish to move.
Click the Move Certification Step Up icon to move this step up in the list.
OR
Click the and Move Certification Step Down icon to move this step down in the list.
To Edit a Certification Step:
Verify your choices for the Tenant Type and Transaction Type option fields.
Click the Show Steps button.
Select, in the certification step table, the step you wish to edit.
Press Ctrl+E or click the Edit icon.
Tab or click through the fields in the detail information section, changing information as
needed.
To save your changes, press Ctrl+S or click the Save icon.
To cancel, press Ctrl+Q or click the Cancel icon.
To Delete a Certification Step:
Verify your choices for the Tenant Type and Transaction Type option fields.
Click the Show Steps button.
Select, in the agency table, the step you wish to delete.
Press Ctrl+D or click the Delete icon.
Press Y or click the Yes button to confirm the deletion.
Preliminary User Manual
85
WinTen²
ORC Certifications
Appendixes
Preliminary User Manual
86
WinTen²
ORC Certifications
APPENDIX
A
HUD Certification Rules
This appendix briefly discusses HUD’s certification requirements and provides a partial list of
additional certification-related resources available from HUD’s Web site and from Tenmast’s
RIMCheck.com Web site (www.rimcheck.com/rimrx).
HUD Requirements
HUD requires your agency to establish procedures for conducting both public housing and
housing choice voucher certifications. (Your certification procedures for these two types of
housing may be slightly different.) In the case of public housing certifications, your procedures
should be in accordance with your agency’s Admissions and Continued Occupancy Policy.
Hint:
The additional resources listed at the end of this appendix include a sample admissions
and continued occupancy policy.
During each certification, you must collect and verify information on each member of the family.
This information includes such things as age, Social Security number, citizenship or eligible
immigrant status, income, assets, and qualified income deductions. You must obtain third-party
verification for much of this information.
Your certification procedures must allow you to collect and verify all information in a “proper and
timely” manner and provide advanced notice to any family whose rent will change. Your
procedures should take into consideration the amount of time (often substantial) it takes to
receive third-party verifications.
Although there are other cases in which you may need to conduct certifications, you will conduct
most of them for one of three reasons: new admissions, annual recertifications, and interim
recertifications.
You must conduct a certification of each new family before you can admit them to your agency’s
subsidized housing program. This certification is also known as an “Initial Eligibility
Determination.” Certifications in this category can include those for new residents of public
housing or new housing choice voucher families. They can also include “portability move-ins” to
Section 8, families who bring to your agency vouchers they received from other agencies.
In most circumstances, you must recertify each household at least annually to verify that they
are still eligible for the program they are in and to recalculate the amount of assistance they
receive from your agency. Annual reexaminations must also verify that all adult family members
are complying with community service and economic self-sufficiency requirements. (See
Community Service and Economic Self-Sufficiency.)
You will conduct an interim recertification if a family’s income, family composition, or other
circumstances change between annual recertifications and that change would cause an
adjustment in the family’s level of assistance. Your agency’s procedures should clearly spell out
what changes trigger interim recertifications and how and when families must report these
changes to you. In general, you must conduct an interim recertification if the change would
Preliminary User Manual
87
WinTen²
ORC Certifications
cause a decrease in the family’s rent payments. Your procedures may require an interim
recertification if the change would cause in increase in rent.
Additional Resources
This manual provides only a brief, general discussion of HUD’s certification requirements, not
detailed instructions for formulating your agency’s procedures and conducting certifications. For
additional information, please see these and other resources available from HUD’s Web site
and from the RIMRx document page of Tenmast’s RIMCheck.com Web site
(www.rimcheck.com/rimrx).
1. Rental Integrity Monitoring (RIM) Guide:
www.rimcheck.com/rimrx/documents/RIMGuide.pdf
2. Glossary of RIM Terms:
www.rimcheck.com/rimrx/documents/RIMGlossary.pdf
3. Rental Integrity Monitoring (RIM) Reviews Frequently Asked Questions (FAQs):
www.rimcheck.com/rimrx/documents/RIMFAQ.pdf
4. Public Housing Occupancy Guidebook, June 2003 (see Chapter 7, “Verification Standards”;
Chapter 12, “Annual Reexamination of Income and Family Circumstances”; and Chapter 13,
“Interim Rent Adjustments”):
www.rimcheck.com/rimrx/documents/PHGuideBookNew.pdf
5. Sample Admissions and Continued Occupancy Policy, Appendix III to the Public Housing
Occupancy Guidebook (see Section VI, “Eligibility for Continued Occupancy, Annual
Reexaminations, and Remaining Family Members”):
www.hud.gov/offices/pih/programs/ph/rhiip/phgb_app3.pdf
6. Housing Choice Voucher Program Guidebook, April 2001 (see Chapter 5, “Eligibility and
Denial of Assistance,” and Chapter 12, “Reexamination Procedures”):
www.hud.gov/offices/pih/programs/hcv/forms/guidebook.cfm
7. General Income and Rent Determination Frequently Asked Questions (FAQs):
www.rimcheck.com/rimrx/documents/RentDeterminationFAQ.pdf
8. HUD Fact Sheet, “How Your Rent Is Determined,” For Public Housing and Housing Choice
Voucher Programs:
www.rimcheck.com/rimrx/documents/HUDFactsheet-HowRentIsDetermined.pdf
9. Verification Guidance for the Public Housing & Housing Choice Voucher Programs, March
2004:
www.rimcheck.com/rimrx/documents/RIMVerificationGuidance.pdf
10. Public Housing Verification Forms, Appendix VIII to the Public Housing Occupancy
Guidebook:
www.hud.gov/offices/pih/programs/ph/rhiip/phgb_app8.pdf
11. Form HUD-9886, Authorization for the Release of Information/Privacy Act Notice:
www.rimcheck.com/rimrx/documents/HUD-9886-ReleaseAuthorization.pdf
Preliminary User Manual
88
WinTen²
ORC Certifications
12. Document Package for Applicant's/Tenant's Consent to the Release of Information,
attachment to forms HUD-9887 & 9887-A:
www.rimcheck.com/rimrx/documents/HUDForm9887-ConsentPacket.pdf
13. Sample Additional Authorization for Release of Information Verification:
www.rimcheck.com/rimrx/documents/AdditionalAuthorizationForReleaseOfInformation.p
df
14. Sample Applicant and Re-exam Questionnaire:
www.rimcheck.com/rimrx/documents/ApplicantandAnnualRe-examQuestionnaire.pdf
15. Sample Interview Questionnaire/Checklist:
www.rimcheck.com/rimrx/documents/Interviewquestionnaire-HUDTraining.pdf
16. Sample Interim Questionnaire/Checklist:
www.rimcheck.com/rimrx/documents/InterimQuestions.pdf
17. Upfront Income Verification (UIV) System:
www.hud.gov/offices/pih/programs/ph/rhiip/uivsystem.cfm
18. Upfront Income Verification (UIV) System, PHA Security Procedures, April 2004:
www.rimcheck.com/rimrx/documents/UIVSecurityGuide.pdf
19. HUD Guidelines for Projecting Annual Income When Upfront Income Verification (UIV) Data
is Available, January 2004:
www.rimcheck.com/rimrx/documents/HUDGUIDELINESForProjectingIncome.pdf
Preliminary User Manual
89
WinTen²
ORC Certifications
APPENDIX
B
HUD Community Service and
Economic Self-Sufficiency Rules
This appendix addresses the primary questions regarding HUD’s rules for community service
and economic self-sufficiency:
•
What are HUD’s requirements?
•
Who is exempt from these requirements?
We also provide a partial list of additional resources available from HUD’s Web site and from
Tenmast’s RIMCheck.com Web site.
Note:
Your agency can modify some aspects of HUD’s requirements, such as eligible
activities. For this reason, your policies may differ slightly from those outlined
here. Please refer to your agency’s Community Service and Economic Self
Sufficiency Policy and/or the additional resources listed below.
HUD Requirements
Each month, each non-exempt adult resident of your public housing authority must perform at
least eight hours of community service and/or economic self-sufficiency activities somewhere
within the community served by your agency.
The requirement is not an average of eight hours per month. Under normal circumstances,
residents must meet the eight-hour minimum each month. Your agency can determine if and
when to allow residents to deviate from this monthly schedule.
Your agency’s policy should include a list of “eligible activities” residents can perform to fulfill the
requirements. The additional resources listed below include detailed lists of specific activities to
include. Your agency may choose to include additional eligible activities.
In general, community service activities can include volunteer work for any local public or nonprofit institution or organization. (This can also include volunteer work at your agency, such as
providing childcare for other residents so they may volunteer.) Self-sufficiency activities, in
general, can include educational programs, such as literacy, English as a second language,
GED, junior college, or college; “life skills” activities, such as substance abuse, mental health, or
financial counseling; or any training to enhance the resident’s job skills or job readiness.
Note:
HUD expressly excludes the following from eligible activities: political activities,
employment, and work ordinarily performed by employees of your agency.
For any month, a resident may meet the requirement with community service activities or selfsufficiency activities or a combination of both. Residents must perform these activities within the
local community and not “outside the jurisdictional area” of your agency.
Preliminary User Manual
90
WinTen²
ORC Certifications
Your non-exempt residents must provide your agency with documentation of their community
service and/or self-sufficiency activities, including the signatures of instructors, counselors, or
supervisors who certify the number of hours of activity. Residents must provide this
documentation to you at least annually (at the annual reexamination), but your agency’s policy
may require them to provide it more frequently. Your policy should include your agency’s
documentation requirements, including the documentation form residents will use.
If you find at an annual reexamination that a resident has failed to meet the requirement for any
of the previous twelve months, your agency must enter into an agreement with that resident to
make up the hours over the next twelve months. This means that, for the next twelve months,
the resident must meet both the current monthly requirements and the requirements to make up
the deficiency from the prior year.
If, at the next annual reexamination, this resident has not met and/or made up all the
requirements for the previous twenty-four months, HUD does not permit your agency to renew
the lease for this resident’s household, unless the noncompliant resident agrees to move out of
the unit.
Exemptions
Residents of public housing are exempt from community service requirements if they meet any
one of the exemption criteria. In general, a resident is exempt if he or she is:
1. Age seventeen or younger,
OR
2. Age sixty-two or older,
OR
3. Working thirty or more hours per week on a permanent basis,
OR
4. Blind or disabled and can certify to your agency that because of this disability he or she is
unable to comply with community service requirements,
OR
5. The primary caretaker of a blind or disabled individual who is unable to perform community
service,
OR
6. A member of a family receiving assistance under a state welfare program.
A resident who meets any one of the exemption criteria is exempt from community service and
economic self-sufficiency requirements. All other residents must comply.
At the original execution of a lease and at each annual reexamination, each exempt adult in the
household must provide your agency with documentation verifying that he or she is exempt.
Each adult resident of your housing authority must also notify your agency when his or her
exempt status changes during a year. Your policy should include your agency’s documentation
and notification requirements, including the forms residents will use.
Additional Resources
This manual provides only a brief, general discussion of community service and economic selfsufficiency rules, not detailed instructions for developing your agency’s policy and administering
the requirements. For additional information, please see these and other resources available
Preliminary User Manual
91
WinTen²
ORC Certifications
from HUD’s Web site and from the RIMRx document page of Tenmast’s RIMCheck.com Web
site (www.rimcheck.com/rimrx).
1. Public Housing Occupancy Guidebook, June 2003 (see Chapter 15, “Community Service and
Economic Self-Sufficiency”):
www.rimcheck.com/rimrx/documents/PHGuideBookNew.pdf
2. Appendices IV through VII to the Public Housing Occupancy Guidebook (see Appendix VI,
“Community Service and Self Sufficiency Policy”):
www.hud.gov/offices/pih/programs/ph/rhiip/phgb_app4_7new.pdf
3. Sample Blind/Disabled Notification of Community Service:
www.rimcheck.com/rimrx/documents/CommunityService-BlindDisabledVerification.pdf
4. Sample Elderly Notification of Community Service:
www.rimcheck.com/rimrx/documents/CommunityService-ElderlyNotification.pdf
5. Sample General Notification of Community Service:
www.rimcheck.com/rimrx/documents/GeneralCommunityServiceVerification.pdf
Preliminary User Manual
92
WinTen²
ORC Certifications
APPENDIX
C
Earned Income Disallowance
HUD’s earned income disallowance (EID) benefit is designed to promote tenant self-sufficiency.
It temporarily excludes or “disallows” from income calculations certain increases in earned
income for qualified tenants. The result is that an EID participant’s rent might not increase
immediately, even though the person is earning more money.
Hint:
Earned income disallowance is also known as “earned income exclusion,” “earned
income disregard,” or “mandatory earned income disallowance (MEID).” All four of these
terms mean the same thing.
While EID is an obvious and important benefit to your tenants, it can present an added burden
to your agency in tracking participation in the program and correctly calculating rents. The
Occupancy and Rent Calculation (ORC) program helps you with both of these tasks. As you
maintain household income records (see Maintain Income) and perform certifications (see
Certifications), the ORC program automatically maintains and tracks participation in EID and
automatically adjusts income and rent calculations accordingly.
For more information on EID, please see the HUD EID Rules appendix to this manual.
Note:
An adult eligible for EID can receive only one forty-eight month “disallowance
period” during his or her lifetime. The ORC program creates and maintains EID
records automatically only “going forward,” as you create income records and
perform certifications. Therefore, the program has no knowledge of previous
participation in EID.
For these reasons, you must manually enter a history of all previous EID
participation by your tenants when you first upgrade to WinTen² ORC. This is the
only time you must enter EID information manually.
The remainder of this chapter walks you through monitoring EID information in ORC, which you
can do at any time.
Preliminary User Manual
93
WinTen²
ORC Certifications
Monitor EID Information
The ORC program maintains two types of records for each individual who participates in EID.
First, the program maintains one (and only one) “participant record” per person. This participant
record identifies the individual and contains summary information on the person’s overall
participation in EID. You can use the Maintain EID Participants screen to monitor this
information. You can access this screen from the Household tab of the Tenant Detail screen.
Second, the program also maintains one record for each separate period of continuous
employment, between certifications, during which the person participates in EID.
Hint:
In other words, the ORC program creates a new “EID employment record” each time the
participant begins new employment under EID and each time the household undergoes
an interim or annual recertification while the participant is employed under EID.
If the household undergoes an interim or annual recertification while the participant is
employed under EID, the program “ends” the current employment record and
immediately creates a new employment record.
These EID employment records track actual participation and allow the ORC program to
calculate the correct disallowance amounts. You can use the Maintain EID Employment screen
to monitor this information. You can access this screen from the Maintain EID Participants
screen, above.
We will walk through monitoring both of these kinds of records.
Preliminary User Manual
94
WinTen²
ORC Certifications
Monitor EID Participants
When an individual begins participation in EID, the ORC program creates that person’s EID
participant record.
For any resident, this is triggered the first time (and only the first time) you create an income
record for the person that designates Earned Income Disallowance as the income exclusion
type. (See Maintain Income.)
You can view EID participant information on the Maintain EID Participants screen. You can
access this screen from the Household tab of the Tenant Detail screen.
To Open the Household Tab:
Locate the tenant for whose household you wish to view EID information.
Open this tenant on the Tenant Detail screen.
Press Ctrl+Tab or click the Household tab (at the upper left) on the Tenant Detail screen.
To Open the Maintain EID Participants Screen:
Click the Earned Income Disallowance icon on the Household tab.
Preliminary User Manual
95
WinTen²
ORC Certifications
Maintain EID Participants Screen
The Maintain EID Participants screen contains non-editable fields at the top of the screen to
identify the head of the selected household.
This screen also contains a participant table and a detail information section.
The participant table displays one row of information for each EID participant in the current
household.
The detail information section, by default, appears at the bottom of the screen. This section
displays detailed information on the participant currently selected in the table above it. You can
choose to show or hide the detail information section by pressing Ctrl+O or clicking the
Show/Hide icon.
The detail information section contains five data fields: EID Participant, Status, Participation
Start Date, Eligibility End Date, and Prequalifying Income.
The participant table also includes additional columns displaying Months Used at 100% and
Months Used at 50%.
Status
An EID participant can have one of four statuses: Started, Paused, Completed, or Expired.
A Started status means the person has begun participation and is currently participating in EID.
A Paused status means the person has previously participated in EID, but is not currently
participating. This status further indicates that this person is still eligible for participation (the
lifetime forty-eight-month disallowance period has not yet expired).
Preliminary User Manual
96
WinTen²
ORC Certifications
A Completed status means the person is no longer eligible for EID because of completing
twenty-four months of participation.
An Expired status means the person reached the end of the lifetime forty-eight-month
disallowance period before completing twenty-four months of participation.
Hint:
The effective result of the Completed and Expired statuses is the same: both mean the
person is no longer eligible for EID.
Participation Start Date
This is the effective date of the new employment or other increased earnings that initially
triggered this person’s eligibility for EID.
Depending on your agency’s policy, this is either the actual date of the increased earnings or
the first day of the month following the increased earnings. Please check your agency’s policy.
Note:
This date marks the beginning of the lifetime forty-eight-month disallowance
period. It refers only to this person’s very first participation in EID, not to any
subsequent months of participation.
Eligibility End Date
This date is exactly four years after the Participation Start Date and marks the end of the lifetime
forty-eight-month disallowance period.
This person’s eligibility for EID ends on this date or when this person completes the twentyfourth month of actual participation in EID, whichever comes first.
Prequalifying Income
This is the individual’s last certified annual income before participation in EID. This prequalifying
annual income remains the same during the entire forty-eight-month disallowance period.
Months Used at 100% and Months Used at 50%
During the first twelve cumulative months (the “initial period”) of participation, 100 percent of a
participant’s increased earnings are disallowed from income calculations. During the remaining
twelve cumulative months (the “phase-in period”) of participation, 50 percent of the increased
earnings are disallowed.
These columns of the table display each participant’s months of actual participation at these two
disallowance levels, based on the information for each participant as it appears on the Maintain
EID Employment screen. (See Monitor EID Employment.)
To Show or Hide the Detail Information Section:
Press Ctrl+O or click the Show/Hide icon.
To Exit this Screen:
Press Esc or click the Exit icon.
Preliminary User Manual
97
WinTen²
ORC Certifications
Monitor EID Employment
For each EID participant, the ORC program maintains one “EID employment” record for each
separate period of continuous employment, between certifications, during which the person
participates in EID.
Hint:
In other words, the ORC program creates a new EID employment record each time the
participant begins new employment under EID and each time the household undergoes
an interim or annual recertification while the participant is employed under EID.
If the household undergoes an interim or annual recertification while the participant is
employed under EID, the program “ends” the current employment record and
immediately creates a new employment record.
The ORC program uses these EID employment records to track automatically which months of
participation are at the 100% disallowance level (the first twelve cumulative months) and which
months are at the 50% disallowance level (the next twelve cumulative months).
The program then uses this information to calculate the “exclusion amount” for each income
record that uses the EID exclusion (see Maintain Income) and to calculate rent correctly during
a certification (see Certifications).
You can view EID employment information on the Maintain EID Employment screen. You can
access this screen from the Maintain EID Participants screen, above. (See Monitor EID
Participants.)
Hint:
You can also access this screen on the fly by clicking the EID History button on Step 2 of
the Add Income Wizard. (See Maintain Income and Add Income.)
To Open the Maintain EID Participants Screen:
Click the Earned Income Disallowance icon on the Household tab of the Tenant Detail
screen.
To Open the Maintain EID Employment Screen:
Select, on the Maintain EID Participants Screen, the EID participant you wish to edit.
Click the EID Detail icon.
Hint:
You can also double-click a participant record to select it and open the Maintain EID
Employment screen.
Preliminary User Manual
98
WinTen²
ORC Certifications
Maintain EID Employment Screen
The Maintain EID Employment screen contains a summary information section, a table of EID
employment records, and a detail information section.
The summary information section appears at the top of the screen. It contains summary
information on this person’s overall participation in EID. This information also appears on the
Maintain EID Participants screen. (For more information on these fields, see Monitor EID
Participants and Maintain EID Participants Screen.)
The table below the summary section displays one row of information for each of this person’s
EID employment records. In other words, each row represents the months of one period of
continuous employment, between certifications, during which this person participated in EID.
The detail information section appears at the bottom of the screen. This section displays
information on the employment record currently selected in the table above it. Note that this
information pertains only to the one employment record currently selected, not to this person’s
overall participation in EID.
The detail information section contains four data fields: EID Starting Date, EID Ending Date,
Months Used at 100%, and Months Used at 50%.
EID Starting Date
This is the effective date on which this person 1) began the new employment or other increased
earnings that initially triggered eligibility for EID, 2) resumed participation in EID after having
been unemployed, or 3) underwent an interim or annual recertification while employed under
EID.
Preliminary User Manual
99
WinTen²
ORC Certifications
EID Ending Date
This is the effective date on which this person 1) stopped working or had some other decrease
in earnings, 2) underwent an interim or annual recertification while employed under EID, or 3)
reached the end of the lifetime forty-eight-month disallowance period.
Hint:
If the household undergoes an interim or annual recertification while the participant is
employed under EID, the program “ends” the current employment record and
immediately creates a new employment record.
Months Used at 100% and Months Used at 50%
During the first twelve cumulative months (the “initial period”) of participation, 100 percent of a
participant’s increased earnings are disallowed from income calculations. During the remaining
twelve cumulative months (the “phase-in period”) of participation, 50 percent of the increased
earnings are disallowed.
Based on this person’s overall participation in EID, these fields automatically display the months
of participation at these two disallowance levels for this one period of employment.
Note:
The four fields in the detail information section pertain only to the one
employment record currently selected, not to this person’s overall participation in
EID.
To Exit this Screen:
Press Esc or click the Exit icon.
Preliminary User Manual
100
WinTen²
ORC Certifications
APPENDIX
D
HUD EID Rules
This appendix addresses the primary questions regarding HUD’s rules for earned income
disallowance:
•
Who is eligible for the benefit?
•
For those who are eligible, how much income is disallowed from income calculations and
for how long is it disallowed?
Because of the complexity of administering EID, we also provide a list of additional resources
available from Tenmast’s RIMCheck.com Web site.
Eligibility
EID is never available to new admissions to public housing or to new applicants for other
assistance. It is available only to members of households already being housed or assisted.
Minors (other than the head of household or the spouse of the head of household) also never
qualify for EID, because their earnings are not included in rent calculations.
In general, current adult residents of public housing are eligible for EID if they meet any one of
the three criteria listed below. In addition, disabled adults who receive assistance through the
Section 8 Housing Choice Voucher Program, the HOME Investment Partnerships Program, the
Housing Opportunities for Persons with AIDS (HOPWA) Program, or the Supportive Housing
Program are also eligible for EID if they meet any one of these criteria.
The three criteria are:
1. The person had an increase in annual income because of going to work after having
been unemployed for at least twelve months.
Note:
For EID purposes, the person is considered to have been unemployed if he or she
earned less in the twelve months previous to employment than he or she would
have earned if working ten hours per week for fifty weeks at the established
minimum wage.
For example, if $5.15 per hour is the established minimum wage in your locality,
the person is considered to have been unemployed if he or she earned less than
$2,575 ($5.15 x 10 x 50) in the twelve months previous to employment.
OR
2. The person had in increase in annual income because of new or increased earnings
while taking part in a job-training program or economic self-sufficiency program. This
increase in income must have occurred during participation in the program, not
afterward.
OR
Preliminary User Manual
101
WinTen²
ORC Certifications
3. The person had in increase in annual income because of new or increased earnings
while receiving benefits or within six months after receiving benefits from a qualified
welfare program, such as Temporary Assistance for Needy Families (TANF).
Note:
If these benefits were (or are) for anything other than monthly income
maintenance (e.g., if they were for wage subsidies, transportation assistance, or a
one-time benefit), the benefits must have totaled at least $500 during the six
months before the person’s increase in income. For those receiving monthly
income maintenance (cash assistance), no minimum amount of benefits is
required.
An eligible adult can receive only one EID “disallowance period” during his or her lifetime. The
disallowance period is forty-eight consecutive months, i.e., forty-eight calendar months from
start to finish.
However, the person can actually participate in EID for only twenty-four of those forty-eight
months. In other words, increased earnings from only twenty-four of the forty-eight months can
actually be disallowed from income calculations. There can be gaps in participation when, for
example, the person is again unemployed. (The twenty-four months of participation are
cumulative, not consecutive.)
The person’s eligibility for EID ends after the twenty-fourth month of participation or at the end of
the lifetime forty-eight-month disallowance period, whichever comes first. If, for example, the
person works and participates in EID for only twenty months before the disallowance period
expires, the four remaining months of participation are lost.
Disallowance Amounts
When the person begins participation in EID, you must calculate both the disallowance amount
(“exclusion amount”) and the amount of the participant’s income to include in the household’s
rent calculation. You must recalculate both of these (during an interim reexamination) each time
the person has a change in either earned or unearned income while participating in EID.
Hint:
“Disallowance” and “exclusion” mean the same thing. We use these terms
interchangeably.
The calculation of disallowance amounts can become confusing, but the ORC program will
automatically perform all of the calculations for you. If you would like to learn more about
disallowance calculations, please see the additional resources listed at the end of this appendix,
which include an EID worksheet and a spreadsheet-based calculator.
Note:
All income calculations discussed in this section refer to annual income.
Disallowance calculations always include the person’s prequalifying or “baseline” income, which
is the last certified annual income before participation in EID. This prequalifying income is set
when the person begins participation in EID and remains the same during the entire forty-eightmonth disallowance period.
Preliminary User Manual
102
WinTen²
ORC Certifications
Note:
If the person is under an imputed welfare income sanction when beginning
participation in EID, include the imputed welfare income in the prequalifying
income.
Income exclusions apply only to a person’s earned income and cannot be greater than the
earned income. When calculating exclusions, however, you must take into consideration both
earned and “other,” unearned income. Other income may include such things as welfare
assistance, Social Security, child support, or unemployment benefits.
To determine the “full exclusion” amount, calculate the participant’s total income (both earned
and unearned) and then subtract the prequalifying income. (Full Exclusion = Earned Income +
Other Income – Prequalifying Income) This is the full exclusion amount, unless it is greater than
earned income. Use this calculated amount or the person’s total earned income, whichever is
less.
During the first twelve cumulative months of EID participation, 100 percent of the full exclusion
amount is excluded from earned income. (HUD refers to this as the “initial period” of
participation.) During the remaining twelve cumulative months of participation, only 50 percent
of the full exclusion amount is excluded from earned income. (HUD refers to this as the “phasein period” of participation.)
Note:
As mentioned above, each time the person has a change in either earned or
unearned income while participating in EID, you must recalculate both the
exclusion amount and the amount of income to include in the household’s rent
calculation. You must also recalculate both of these when the person begins the
thirteenth cumulative month of participation (the beginning of the phase-in
period).
To determine how much of the EID participant’s income to include in the household’s rent
calculation, calculate the participant’s total income (both earned and unearned) and then
subtract the appropriate exclusion amount.
During the initial period (first twelve cumulative months), Income for Rent Calculation = Earned
Income + Other Income – Full Exclusion.
During the phase-in period (last twelve cumulative months), Income for Rent Calculation =
Earned Income + Other Income – 50% of Full Exclusion.
Adding together the “income for rent calculation” of all adult family members will give you the
total family income to use for the household’s rent calculation. Note, however, that income for
other family members may have exclusions other than EID. (See Maintain Income and Maintain
Expenses.)
Additional Resources
This manual provides only a brief, general discussion of earned income disallowance rules, not
detailed instructions for administering the benefit. For additional information, please see these
and other resources available from the RIMRx document page of Tenmast’s RIMCheck.com
Web site (www.rimcheck.com/rimrx).
1. Public Housing Occupancy Guidebook, June 2003 (see Section 10.9, “Earned Income
Disallowance (EID)”):
www.rimcheck.com/rimrx/documents/PHGuideBookNew.pdf
Preliminary User Manual
103
WinTen²
ORC Certifications
2. General Income and Rent Determination Frequently Asked Questions (FAQs) (see questions
twelve to eighteen, “Annual Income – Earned Income Disallowance (EID)”):
www.rimcheck.com/rimrx/documents/RentDeterminationFAQ.pdf
3. Admission and Occupancy FAQ:
www.rimcheck.com/rimrx/documents/EIDFAQ.pdf
4. Sample EID Questionnaire/Checklist:
www.rimcheck.com/rimrx/documents/EarnedIncomeDisallowanceQuestionnaire.pdf
5. EID Worksheet:
www.rimcheck.com/rimrx/documents/EarnedIncomeDisallowanceWorksheet.pdf
6. EID Worksheet and Calculator (Microsoft Excel spreadsheet):
www.rimcheck.com/rimrx/documents/HUDsEIDCalculator.xls
Preliminary User Manual
104
WinTen²
ORC Certifications
Index
Agencies .....................................................................................................................................80
Assets .........................................................................................................................................22
Certifications ...............................................................................................................................34
Batch Adding ...........................................................................................................................37
Certification Process ...............................................................................................................35
Completing ..............................................................................................................................54
Creating...................................................................................................................................37
Creating a Single Certification.................................................................................................39
Finalizing .................................................................................................................................74
Maintaining Certification Steps................................................................................................82
Rules .......................................................................................................................................87
Verifying ..................................................................................................................................60
Community Service.......................................................................................................................1
Maintaining ................................................................................................................................1
Rules .......................................................................................................................................90
Earned Income Disallowance .....................................................................................................93
Monitoring................................................................................................................................94
Rules .....................................................................................................................................101
Economic Self-Sufficiency ............................................................................................................1
Expenses ....................................................................................................................................29
Households ...................................................................................................................................9
HUD
Certification Rules ...................................................................................................................87
Community Service Rules .......................................................................................................90
EID Rules ..............................................................................................................................101
Income ........................................................................................................................................13
Setup...........................................................................................................................................79
Certification Steps ...................................................................................................................82
Outside Agencies ....................................................................................................................80
Verifications ................................................................................................................................60
Online ......................................................................................................................................64
Self-Declared...........................................................................................................................72
Preliminary User Manual
105
WinTen²
ORC Certifications
Tenant Documented................................................................................................................70
Third Party Oral .......................................................................................................................68
Third Party Written ..................................................................................................................66
Preliminary User Manual
106

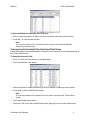
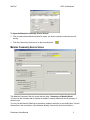
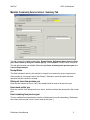
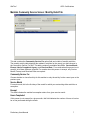
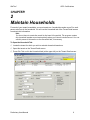
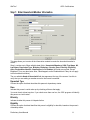
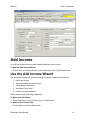
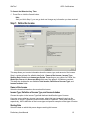
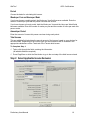
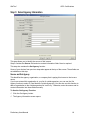
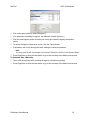
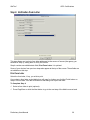

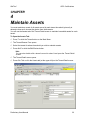
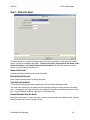
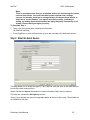
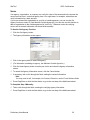
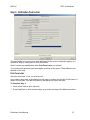

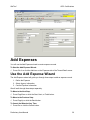
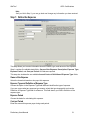


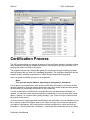
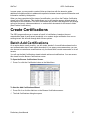
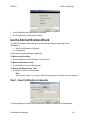
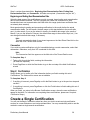
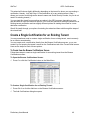

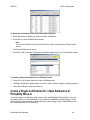
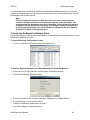
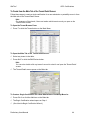

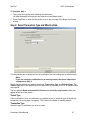
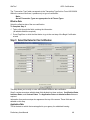
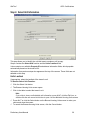
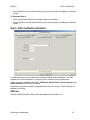
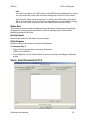
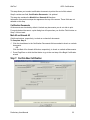
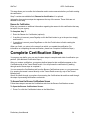
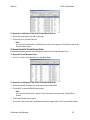
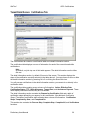
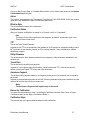
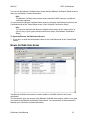
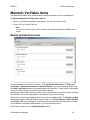


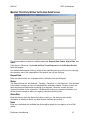

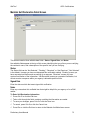
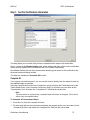
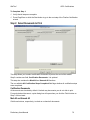
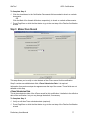
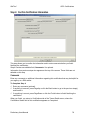
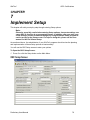
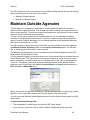

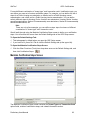


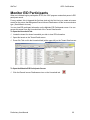

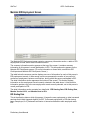


![PDF - L`action d`intérêt public [605A-FR]](http://vs1.manualzilla.com/store/data/006438551_1-a0b38f1836d812e723e577834eb667f1-150x150.png)