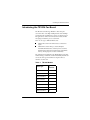
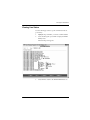
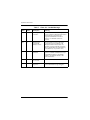
1
TR1034 PCI
T1⁄⁄ E1 Board
for LAN Fax
Applications
Hardware Manual
Software Versions 2.1.x and 3.0.x
Document Number 934-034-80
Issued July 2003
General Notices
TR1034 PCI T1⁄ E1 Board: Document Number 934-034-80, version A, issued July 2003 for Bfv
software release 2.1.x and 3.0.x.
Copyright © 2003, Brooktrout Technology, a Brooktrout Company.
All rights reserved.
This product may not, in whole or in part, be copied, photocopied, reproduced, translated, or
reduced to any electronic medium or machine readable form without prior consent, in writing,
from Brooktrout Technology.
Brooktrout Technology reserves the right to make improvements and/or changes in the products
and programs described in this Hardware Manual at any time without notice. Every attempt has
been made to insure that the information contained in this document is accurate and complete.
Brooktrout Technology will not be responsible for any inaccuracies or omissions in this or any of
its other technical publications.
Printed in the United States of America.
Trademarks
BROOKTROUT, Brooktrout, Inc. and Brooktrout Technology are registered trademarks of
Brooktrout, Inc. and TR1034 is a trademark of Brooktrout, Inc.
Windows, Windows NT, Windows 2000, and Visual C++ are registered trademarks of Microsoft
Corporation.
Linux is a registered trademark of Linus Torvalds in the United States and other countries.
Pentium and Intel are registered trademarks of Intel Corporation.
Other company or product names mentioned herein may be trademarks or registered trademarks
of their respective companies.
International Notice
Due to differing national regulations and approval requirements, certain Brooktrout products are
designed for use only in specific countries, and may not function properly in a country other than
the country of designated use. As a user of these products, you are responsible for ensuring that the
products are used only in the countries for which they were intended. For information on specific
products, contact Brooktrout Technology on the web at www.brooktrout.com. Select Products >
Global Product Approvals. Then select “By Product” or “By Country.”
Brooktrout Technical Support
For Brooktrout Technical Support, see Contacting Technical Support on page xvi.
Limited Warranty
Brooktrout, Inc. (“Brooktrout”) warrants the hardware component of the product described in
this documentation (the “Product”) to be free from defects in materials and workmanship under
normal and proper use for a period of five years from the date of purchase from Brooktrout or an
authorized Brooktrout reseller. Brooktrout also warrants the disk on which software and firmware
are recorded to be free from defects in materials and workmanship under normal and proper use
for a period of 90 days from the date of purchase from Brooktrout. This warranty does not apply to
the software and firmware themselves. This warranty also does not apply to any expendable
components, any damage resulting from abuse of the Product, or normal wear and tear. In the
event of a warranty claim, the item, if in the opinion of Brooktrout it is proved to be defective, will
be repaired or replaced with a functionally equivalent item, at Brooktrout’s sole option, upon
delivery to Brooktrout of the defective item, together with a dated proof of purchase and
specification of the problem. Brooktrout is not responsible for transportation and related charges
in connection with shipment of items to Brooktrout for warranty service. Brooktrout reserves the
right to charge for inspection at Brooktrout’s then prevailing rates if it is determined that the items
were not defective within the terms of the warranty. To obtain warranty service, contact
Brooktrout Technology Technical Support.
With respect to software and firmware, it should be understood that these components are
complex works that may contain undiscovered defects. Although the software and firmware
provided with the Product contain substantially the features described in the documentation, to
the extent applicable to the product purchased, Brooktrout does not warrant that the operation of
such software and firmware will meet the user’s requirements or be uninterrupted or free of errors.
No oral or written information or advice given by Brooktrout or its authorized representatives will
create a warranty or increase the scope of this warranty. No representative, agent, dealer or
employee of Brooktrout is authorized to give any other warranty or to assume for Brooktrout any
other liability in connection with the sale and service of the Product. Except as expressly agreed by
Brooktrout in writing, Brooktrout makes no representations or warranties of any kind, express or
implied, with respect to the Product or any hardware, software or firmware components thereof. In
particular, but without limitation of the foregoing, Brooktrout disclaims all implied warranties of
merchantability or fitness for a particular purpose and there are no warranties that extend beyond
the description or duration of this warranty. Some states or countries do no allow the exclusion of
implied warranties so the above exclusion may not apply to you.
In no event shall Brooktrout be liable for loss of profits or indirect, special, incidental, or
consequential damages arising out of the use of or inability to use the Product. The sole and
exclusive remedy, in contract, tort or otherwise, available for a breach of this warranty and for any
and all claims arising out of or in any way connected with the purchase of the Product shall be
limited to the repair or replacement of any defective item or, at Brooktrout’s sole option, the
payment of actual direct damages not to exceed the payments made to Brooktrout for the Product
in question. Some states or countries do not allow the limitation or exclusion of liability for
incidental or consequential damages, so the above limitation and exclusion may not apply to you.
This warranty gives you specific legal rights. You may also have other rights that vary from state-tostate or country-to-country. Any provision of this warranty that is prohibited or unenforceable in
any jurisdiction shall, as to such jurisdiction, be ineffective to the extent of such prohibition or
unenforceability without invalidating the remaining provisions hereof or affecting the validity of
enforceability of such provision in any other jurisdiction.
Contents
Preface . . . . . . . . . . . . . . . . . . . . . . . . . . . . . . . . . . . . . . . . . . . . . . . . . . . . . .ix
About this Guide . . . . . . . . . . . . . . . . . . . . . . . . . . . . . . . . . . . . . . . . . . . . . . . .x
Chapter Topics . . . . . . . . . . . . . . . . . . . . . . . . . . . . . . . . . . . . . . . . . . . . .x
Typographical Conventions . . . . . . . . . . . . . . . . . . . . . . . . . . . . . . . . . . . xi
Related Documents. . . . . . . . . . . . . . . . . . . . . . . . . . . . . . . . . . . . . . . . . xi
Documentation Feedback . . . . . . . . . . . . . . . . . . . . . . . . . . . . . . . . . . . . xii
Introducing the TR1034 Fax Board . . . . . . . . . . . . . . . . . . . . . . . . . . . . . . . . xiii
System Requirements . . . . . . . . . . . . . . . . . . . . . . . . . . . . . . . . . . . . . . . . . . xiv
Hardware Requirements . . . . . . . . . . . . . . . . . . . . . . . . . . . . . . . . . . . . xiv
Operating Requirements . . . . . . . . . . . . . . . . . . . . . . . . . . . . . . . . . . . . . xv
Required Cables . . . . . . . . . . . . . . . . . . . . . . . . . . . . . . . . . . . . . . . . . . . xv
Telephony Requirements. . . . . . . . . . . . . . . . . . . . . . . . . . . . . . . . . . . . . xv
Contacting Technical Support . . . . . . . . . . . . . . . . . . . . . . . . . . . . . . . . . . . . xvi
Getting Technical Support . . . . . . . . . . . . . . . . . . . . . . . . . . . . . . . . . . . xvi
Returning a Defective TR1034 Board . . . . . . . . . . . . . . . . . . . . . . . . . . xvii
Chapter 1 – Configuring Your TR1034 Board using Brooktrout Software
Version 2.1.x . . . . . . . . . . . . . . . . . . . . . . . . . . . . . . . . . . . . . . . . . . . . . . . . . . 1
Setting up Brooktrout Firmware, Software, and Configuration Files . . . . . . . . .2
Defining the TR1034 SDK Version Supplied With Your LAN Fax Application
2
Process Overview . . . . . . . . . . . . . . . . . . . . . . . . . . . . . . . . . . . . . . . . . . .4
Loading the Driver and Initializing the TR1034 . . . . . . . . . . . . . . . . . . . . . . . . .5
Updating Firmware Files . . . . . . . . . . . . . . . . . . . . . . . . . . . . . . . . . . . . . . . . . .6
Boot ROM Flash Updates . . . . . . . . . . . . . . . . . . . . . . . . . . . . . . . . . . . . .7
Downloading the Firmware . . . . . . . . . . . . . . . . . . . . . . . . . . . . . . . . . . . .8
Configuring Your LAN Fax Software . . . . . . . . . . . . . . . . . . . . . . . . . . . . . . . . .9
Configuring T1 Robbed Bit Systems . . . . . . . . . . . . . . . . . . . . . . . . . . . . . . . .10
i
Contents
Configuring Call Control Parameters for T1 Robbed Bit Systems . . . . . 10
Configuring User Configuration Parameters for T1 Robbed Bit Systems10
Configuring Telephony Parameters for T1 Robbed Bit Systems . . . . . . 13
Configuring ISDN T1 Systems . . . . . . . . . . . . . . . . . . . . . . . . . . . . . . . . . . . . 16
Configuring Call Control Parameters for ISDN T1 Systems . . . . . . . . . . 16
Configuring User Configuration Parameters for ISDN T1 Systems . . . . 17
Configuring Telephony Parameters for ISDN T1 Systems . . . . . . . . . . . 20
Configuring ISDN E1 Systems . . . . . . . . . . . . . . . . . . . . . . . . . . . . . . . . . . . . 23
Configuring Call Control Parameters for ISDN E1 Systems . . . . . . . . . . 23
Configuring User Configuration Parameters for ISDN E1 Systems . . . . 25
Configuring Telephony Parameters for ISDN E1 Systems . . . . . . . . . . . 27
BSMI Service . . . . . . . . . . . . . . . . . . . . . . . . . . . . . . . . . . . . . . . . . . . . . . . . . 31
Setting Up the BSMI Service . . . . . . . . . . . . . . . . . . . . . . . . . . . . . . . . . 31
Installing the BSMI Service . . . . . . . . . . . . . . . . . . . . . . . . . . . . . . . . . . . 32
Starting BSMI . . . . . . . . . . . . . . . . . . . . . . . . . . . . . . . . . . . . . . . . . . . . . 34
Ensuring that the Board is Working . . . . . . . . . . . . . . . . . . . . . . . . . . . . . . . . 35
Chapter 2 – Configuring Your TR1034 Board using Brooktrout Software
Version 3.0.x . . . . . . . . . . . . . . . . . . . . . . . . . . . . . . . . . . . . . . . . . . . . . . . . . 37
Setting up Brooktrout Firmware, Software, and Configuration Files . . . . . . . . 38
Defining the TR1034 SDK Version Supplied With Your LAN Fax Application
38
Process Overview. . . . . . . . . . . . . . . . . . . . . . . . . . . . . . . . . . . . . . . . . . 40
Loading the Driver and Initializing the TR1034 . . . . . . . . . . . . . . . . . . . . . . . . 41
Updating Firmware Files . . . . . . . . . . . . . . . . . . . . . . . . . . . . . . . . . . . . . . . . . 42
Boot ROM Flash Updates . . . . . . . . . . . . . . . . . . . . . . . . . . . . . . . . . . . . 43
Downloading the Firmware . . . . . . . . . . . . . . . . . . . . . . . . . . . . . . . . . . . 44
Configuring Your LAN Fax Software . . . . . . . . . . . . . . . . . . . . . . . . . . . . . . . . 45
Configuring T1 Robbed Bit Systems. . . . . . . . . . . . . . . . . . . . . . . . . . . . . . . . 46
Configuring Call Control Parameters for T1 Robbed Bit Systems . . . . . 46
Configuring User Configuration Parameters for T1 Robbed Bit Systems47
Configuring Telephony Parameters for T1 Robbed Bit Systems . . . . . . 50
Configuring ISDN T1 Systems . . . . . . . . . . . . . . . . . . . . . . . . . . . . . . . . . . . . 53
Configuring Call Control Parameters for ISDN T1 Systems . . . . . . . . . . 53
Configuring User Configuration Parameters for ISDN T1 Systems . . . . 55
Configuring Telephony Parameters for ISDN T1 Systems . . . . . . . . . . . 57
Configuring ISDN E1 Systems . . . . . . . . . . . . . . . . . . . . . . . . . . . . . . . . . . . . 60
ii
TR1034 PCI T1/E1 Board Hardware Manual
Contents
Configuring Call Control Parameters for ISDN E1 Systems . . . . . . . . . .60
Configuring User Configuration Parameters for ISDN E1 Systems . . . .62
Configuring Telephony Parameters for ISDN E1 Systems . . . . . . . . . . .65
Ensuring that the Board is Working . . . . . . . . . . . . . . . . . . . . . . . . . . . . . . . . .70
Chapter 3 – Testing. . . . . . . . . . . . . . . . . . . . . . . . . . . . . . . . . . . . . . . . . . . . 71
About the Hardware Test Application . . . . . . . . . . . . . . . . . . . . . . . . . . . . . . .72
Installing the Application . . . . . . . . . . . . . . . . . . . . . . . . . . . . . . . . . . . . . . . . .74
Checking the Installed Files . . . . . . . . . . . . . . . . . . . . . . . . . . . . . . . . . .75
Files for Version 2.0-46 . . . . . . . . . . . . . . . . . . . . . . . . . . . . . . . . . .75
Files for Version 2.0-45 . . . . . . . . . . . . . . . . . . . . . . . . . . . . . . . . . .76
Operating Notes . . . . . . . . . . . . . . . . . . . . . . . . . . . . . . . . . . . . . . . . . . .77
About Using This Software . . . . . . . . . . . . . . . . . . . . . . . . . . . . . . . . . . .78
Starting up the Test Program. . . . . . . . . . . . . . . . . . . . . . . . . . . . . . . . . . . . . .80
Configuring the Test Software . . . . . . . . . . . . . . . . . . . . . . . . . . . . . . . . . . . . .82
Defining Parameters . . . . . . . . . . . . . . . . . . . . . . . . . . . . . . . . . . . . . . . .84
Running the Test Software . . . . . . . . . . . . . . . . . . . . . . . . . . . . . . . . . . . . . . .87
Viewing the Status of Available Channels From the Main Window . . . . .88
Sending a Fax . . . . . . . . . . . . . . . . . . . . . . . . . . . . . . . . . . . . . . . . . . . . .89
Viewing Line Status . . . . . . . . . . . . . . . . . . . . . . . . . . . . . . . . . . . . . . . . .91
Receiving a Fax . . . . . . . . . . . . . . . . . . . . . . . . . . . . . . . . . . . . . . . . . . .92
Creating Log Files . . . . . . . . . . . . . . . . . . . . . . . . . . . . . . . . . . . . . . . . . .93
Stopping the Test Program . . . . . . . . . . . . . . . . . . . . . . . . . . . . . . . . . . .95
Appendix A – Hardware . . . . . . . . . . . . . . . . . . . . . . . . . . . . . . . . . . . . . . . . 97
TR1034 Models . . . . . . . . . . . . . . . . . . . . . . . . . . . . . . . . . . . . . . . . . . . . . . . .98
TR1034 Features . . . . . . . . . . . . . . . . . . . . . . . . . . . . . . . . . . . . . . . . . . . . . .99
Combining the TR1034 With Other Boards. . . . . . . . . . . . . . . . . . .99
Specifications . . . . . . . . . . . . . . . . . . . . . . . . . . . . . . . . . . . . . . . . . . . . .99
Fax Features . . . . . . . . . . . . . . . . . . . . . . . . . . . . . . . . . . . . . . . . . . . . .100
Intelligent Call Progress . . . . . . . . . . . . . . . . . . . . . . . . . . . . . . . . . . . .100
ISDN . . . . . . . . . . . . . . . . . . . . . . . . . . . . . . . . . . . . . . . . . . . . . . . . . . .101
Call Control Capabilities . . . . . . . . . . . . . . . . . . . . . . . . . . . . . . . . . . . .101
Interfaces . . . . . . . . . . . . . . . . . . . . . . . . . . . . . . . . . . . . . . . . . . . . . . .101
Voice Capabilities . . . . . . . . . . . . . . . . . . . . . . . . . . . . . . . . . . . . . . . . .102
Tone detection . . . . . . . . . . . . . . . . . . . . . . . . . . . . . . . . . . . . . . . . . . . .102
iii
Contents
Telephone Jack PinOut . . . . . . . . . . . . . . . . . . . . . . . . . . . . . . . . . . . . . . . . . 103
PRI Pinout. . . . . . . . . . . . . . . . . . . . . . . . . . . . . . . . . . . . . . . . . . . . . . . 103
Monitoring LED Activity. . . . . . . . . . . . . . . . . . . . . . . . . . . . . . . . . . . . . . . . . 104
Mounting Brackets . . . . . . . . . . . . . . . . . . . . . . . . . . . . . . . . . . . . . . . . 104
Interpreting T1/E1 LED Signals . . . . . . . . . . . . . . . . . . . . . . . . . . . . . .105
Interpreting Board Status LED Signals . . . . . . . . . . . . . . . . . . . . . . . . .106
North American Standards Compliance . . . . . . . . . . . . . . . . . . . . . . . . . . . . 107
Telephony Regulations . . . . . . . . . . . . . . . . . . . . . . . . . . . . . . . . . . . . . 107
FCC Notices for Registered Component Devices . . . . . . . . . . . . 107
FCC Rules Regarding Fax Branding . . . . . . . . . . . . . . . . . . . . . . 108
FCC Regulations For Connecting to a T1 Phone Line (Part 68) . 109
IC Equipment Attachment Limitations (CS-03) . . . . . . . . . . . . . . . 110
Electromagnetic Emissions. . . . . . . . . . . . . . . . . . . . . . . . . . . . . . . . . . 111
FCC Emissions Information . . . . . . . . . . . . . . . . . . . . . . . . . . . . . 111
IC Emissions Notice . . . . . . . . . . . . . . . . . . . . . . . . . . . . . . . . . . . 112
Safety . . . . . . . . . . . . . . . . . . . . . . . . . . . . . . . . . . . . . . . . . . . . . . . . . . 112
Appendix B – Error Codes . . . . . . . . . . . . . . . . . . . . . . . . . . . . . . . . . . . . .113
Call Progress Error Codes . . . . . . . . . . . . . . . . . . . . . . . . . . . . . . . . . . . . . . 114
Final Call Progress Codes . . . . . . . . . . . . . . . . . . . . . . . . . . . . . . . . . . 114
Result Error Codes . . . . . . . . . . . . . . . . . . . . . . . . . . . . . . . . . . . . . . . . . . . . 116
Fax Hang-up Codes . . . . . . . . . . . . . . . . . . . . . . . . . . . . . . . . . . . . . . . 116
Reset Error Codes . . . . . . . . . . . . . . . . . . . . . . . . . . . . . . . . . . . . . . . . . . . . 120
ISDN Cause Codes. . . . . . . . . . . . . . . . . . . . . . . . . . . . . . . . . . . . . . . . . . . .123
Location Octet. . . . . . . . . . . . . . . . . . . . . . . . . . . . . . . . . . . . . . . . . . . .124
Cause Value Octet . . . . . . . . . . . . . . . . . . . . . . . . . . . . . . . . . . . . . . . . 124
Diagnostic Octet . . . . . . . . . . . . . . . . . . . . . . . . . . . . . . . . . . . . . . . . . .134
Appendix C – ISDN Telephone Service Options . . . . . . . . . . . . . . . . . . . 137
About ISDN Telephone Service . . . . . . . . . . . . . . . . . . . . . . . . . . . . . . . . . .138
Ordering ISDN Telephone Service . . . . . . . . . . . . . . . . . . . . . . . . . . . . . . . .139
Connecting to ISDN . . . . . . . . . . . . . . . . . . . . . . . . . . . . . . . . . . . . . . . . . . . 140
Connecting to a PABX . . . . . . . . . . . . . . . . . . . . . . . . . . . . . . . . . . . . . 140
Recommendations Before Installing . . . . . . . . . . . . . . . . . . . . . . .140
Installation. . . . . . . . . . . . . . . . . . . . . . . . . . . . . . . . . . . . . . . . . . . 141
Troubleshooting ISDN Installations. . . . . . . . . . . . . . . . . . . . . . . . . . . . . . . . 145
iv
TR1034 PCI T1/E1 Board Hardware Manual
Contents
Important Network Characteristics . . . . . . . . . . . . . . . . . . . . . . . . . . . .145
ISDN Supplementary Services . . . . . . . . . . . . . . . . . . . . . . . . . . .146
Glossary . . . . . . . . . . . . . . . . . . . . . . . . . . . . . . . . . . . . . . . . . . . . . . . . . . . 149
v
List of Tables
Table
Page
TR1034 Models . . . . . . . . . . . . . . . . . . . . . . . . . . . . . . . . . . . . . . . . . . . . . . . xiii
TR1034 Models . . . . . . . . . . . . . . . . . . . . . . . . . . . . . . . . . . . . . . . . . . . . . . . 98
General Location . . . . . . . . . . . . . . . . . . . . . . . . . . . . . . . . . . . . . . . . . . . . . 124
Class 000 - Normal Events . . . . . . . . . . . . . . . . . . . . . . . . . . . . . . . . . . . . . . 125
Class 010 - Network Congestion . . . . . . . . . . . . . . . . . . . . . . . . . . . . . . . . . 127
Class 011 - Service or Option Not Available. . . . . . . . . . . . . . . . . . . . . . . . . 128
Class 100 - Service or Option Not Implemented . . . . . . . . . . . . . . . . . . . . . 128
Class 101 - Invalid Message. . . . . . . . . . . . . . . . . . . . . . . . . . . . . . . . . . . . . 129
Class 110 - Protocol Error . . . . . . . . . . . . . . . . . . . . . . . . . . . . . . . . . . . . . . 131
Class 111 - Internetworking . . . . . . . . . . . . . . . . . . . . . . . . . . . . . . . . . . . . . 132
Brooktrout Specific Error Codes . . . . . . . . . . . . . . . . . . . . . . . . . . . . . . . . . . 132
Diagnostic Byte . . . . . . . . . . . . . . . . . . . . . . . . . . . . . . . . . . . . . . . . . . . . . . . 134
vii
Preface
This manual explains how to configure, test, and
troubleshoot two types of TR1034 Digital Peripheral
Component Interconnect (PCI) boards:
T1
E1
Before using this book, install your TR1034 board and
connect your phone service following the instructions
in the hardware installation guide included with the
board.
The Preface contains the following sections:
About this Guide
Introducing the TR1034 Fax Board
Contacting Technical Support
ix
Preface
About this Guide
This hardware guide explains how to configure and test the
Brooktrout TR1034 universal PCI fax boards with either
T1 Robbed Bit or ISDN PRI telephone service.
Chapter Topics
This guide contains the following chapters:
Chapter 1
This chapter explains how to configure the TR1034 T1/E1
boards for your LAN Fax software based on Bfv version 2.x and
how to change the parameters that are set in software.
Chapter 2
This chapter explains how to configure the TR1034 T1/E1
boards for your LAN Fax software based on Bfv version 3.0.x
and how to change the parameters that are set in software.
Chapter 3
This chapter explains how to test your TR1034 installation
using Brooktrout’s configuration and diagnostic software.
Appendix A
This hardware appendix describes the physical features of the
TR1034 T1/E1 PCI boards and recommends personal safety
precautions when handling them. It describes pinouts and LED
activity for PRI boards, and provides information for
regulatory and standards compliance.
Appendix B
This appendix provides information about call progress error
codes, result error codes, and ISDN cause codes.
Appendix C
This appendix describes ISDN telephone service options. It
provides order and connection information about ISDN
services.
Glossary
The glossary defines the terms used in this manual.
x
TR1034 PCI T1/E1 Board Hardware Manual
About this Guide
Typographical Conventions
This manual uses the typographical conventions shown in the
following table.
Convention
Type of Information
Italic typeface
File, path, directory or program name
Bold monospace
Code or syntax entered by user
typeface
System output of code or syntax
Plain monospace
typeface
Sans serif typeface
Keys or buttons to press, screen names
The Caution icon is used to indicate an action that could cause
harm to the hardware or software.
Related Documents
The hardware installation guide that came with your
board.
TR1034 Firmware Installation and Release Notes
The software development kit manuals
xi
Preface
Documentation Feedback
Brooktrout is committed to continuously improving the
completeness and usability of our product documentation. All
suggestions, comments, or corrections are welcome. Send your
feedback to [email protected]. Include the following
information in your correspondence:
Document number, located on the title page
Release date, located on the title page
Your telephone number if you would like us to contact
you personally
A brief description of your findings and the relevant
location in the document
Your comments help us provide the highest quality
documentation possible.
xii
TR1034 PCI T1/E1 Board Hardware Manual
Introducing the TR1034 Fax Board
Introducing the TR1034 Fax Board
The Brooktrout Technology TR1034™ offers enterprise
customers a line of 33.6Kbps intelligent fax boards with high
performance fax capabilities for a variety of computer-based
fax applications, such as network fax, fax broadcast, unified
messaging, and business process automation.
There are two types of TR1034 PCI boards:
TR1034 T1 boards for the United States, Canada and
Japan:
TR1034 E1 boards for Europe (Austria, Belgium,
Denmark, Finland, France, Germany, Greece, Iceland,
Ireland, Italy, Liechtenstein, Luxembourg, Netherlands,
Norway, Portugal, Spain, Sweden, Switzerland):
The following table summarizes the TR1034 PCI boards, their
number and type of channels, and their availability. Each model
can use the same type and number of telephone lines as
interfaces on the board.
Table 1. TR1034 Models
Board Type
#
Channels
TR1034+P8H-T1
8
TR1034+P16H-T1
16
TR1034+P24H-T1
24
TR1034+P8H-E1
8
TR1034+P10H-E1
10
TR1034+P16H-E1
16
TR1034+P20H-E1
20
TR1034+P30H-E1
30
xiii
Preface
This document includes information on configuring and
testing your TR1034 board, establishing telephone network
connections, and troubleshooting any issues that might arise.
For comprehensive information about features of the TR1034
PCI series boards, see Appendix A, Hardware on page 97.
System Requirements
The following section describes:
Hardware Requirements
Operating Requirements
Cable Requirements
ISDN Requirements
Hardware Requirements
This section lists the required hardware for use with TR1034
boards in your system.
One 32- or 64-bit PCI slot (3.3v or 5v)
A hardware interrupt (assigned by system BIOS)
A block of consecutive I/O ports (assigned by system
BIOS)
xiv
12 addresses for two-channel boards
20 addresses for four-channel boards
TR1034 PCI T1/E1 Board Hardware Manual
System Requirements
Operating Requirements
This section summarizes the requirements for effective
operation of TR1034 boards in your system.
Temperature
0° - 50° C (32° - 122° F)
Humidity
10% - 95% (non-condensing)
Power
Make sure the host computer can supply the following power
requirements:
Base card: 3A at 5VDC = 15W
Required Cables
Brooktrout supplies telephone cables with the TR1034 board. If
you make cables for your TR1034, see Telephone Jack PinOut on
page 103 for cabling information.
Telephony Requirements
Regardless of the type of phone service required by the model
of Brooktrout board(s) that you have (T1 or E1 ISDN, T1
robbed-bit), when ordering phone service you should tell your
telco representative to view the board(s) as a “PABX”, and they
need to run a trunk or trunks from their central office or PABX
to the Brooktrout “PABX”.
Aside from informing your telco person that the Brooktrout
board(s) you're using need(s) trunk lines, you also need to
specify the exact type of service given the model of board you
have.
For information about ISDN, see Appendix C, ISDN Telephone
Service Options on page 137.
xv
Preface
Contacting Technical Support
Brooktrout provides technical support for customers who have
purchased their TR1034 board directly from Brooktrout
Technology, Inc. If you purchased your TR1034 board from a
reseller, contact that reseller for technical support.
Getting Technical Support
If you contact Brooktrout Technical Support, please be
prepared to work with the support personnel. You may be
asked to do several things, such as taking down your server.
Please have the following information ready:
The model of the TR1034 board in question
Test results obtained from running diagnostic software
Use one of the following methods to contact Brooktrout
Technical Support.
Web site
Go to the support section of the website
(www.brooktrout.com) and click on the Contacting Support
link.
Or enter the following location in your browser window:
http://www.brooktrout.com/contacts/technical_support.cfm
xvi
TR1034 PCI T1/E1 Board Hardware Manual
Contacting Technical Support
Returning a Defective TR1034 Board
If you suspect that your TR1034 board is malfunctioning,
contact Brooktrout Technology or the reseller from whom you
purchased the board.
Typically, Brooktrout Technical Support or your reseller
requests that you run diagnostics on the TR1034 board to
determine whether it has a hardware defect. If it does, you need
to return the board for repair to Brooktrout Technology, Inc. or
to the reseller from whom you purchased it.
In the event of equipment malfunction, Brooktrout
Technology, Inc. or an authorized agent should perform all
repairs. The user is responsible for reporting the need for
service to Brooktrout or to one of its authorized agents.
When returning a product on Return Merchandise
Authorization (RMA) to Brooktrout Technology, Inc., ship it
in the original packaging or in an antistatic bag within a
guarded box so that the board is not damaged in the shipping
process. Write the RMA number on the shipping container and
send the container to the following address:
Brooktrout Technology, Inc.
18 Keewaydin Drive
Salem, New Hampshire 03079
USA
xvii
1
Configuring Your TR1034 Board
using Brooktrout Software
Version 2.1.x
This chapter explains how to configure the TR1034
boards, and how to change the parameters that are set
in the Software Development Kit (SDK) version 2.1.x
based software.
Before configuring your board, install your TR1034
and connect your phone service to it following the
instructions in the hardware installation guide included
with the board.
This chapter includes the following activities for
setting up Brooktrout firmware, software, and
configuration files:
Setting up Brooktrout Firmware, Software, and
Configuration Files
Loading the Driver and Initializing the TR1034
Updating Firmware Files
Configuring Your LAN Fax Software
Configuring T1 Robbed Bit Systems
Configuring ISDN T1 Systems
Configuring ISDN E1 Systems
BSMI Service
Ensuring that the Board is Working
1
Chapter 1: Configuring Your TR1034 Board using Brooktrout Software Version 2.1.x
Setting up Brooktrout Firmware, Software, and
Configuration Files
See your LAN Fax application user manual for instructions on
installing and configuring your LAN Fax software. The LAN
Fax software provides a Brooktrout driver and firmware. After
you have set up your LAN Fax software to support the TR1034,
you can begin sending and receiving faxes using that software.
Defining the TR1034 SDK Version Supplied With Your
LAN Fax Application
You need to know which version of the TR1034 SDK supports
your LAN Fax application because
When you configure your board software, there are
different configuration files and parameters for the
different versions.
If you need product support, Brooktrout Tech Support
needs to know which version of the TR1034 SDK your
LAN Fax application uses to support your TR1034.
If you need to use a diagnostic tool, different versions of
the tool support different SDK versions.
Check for that information using the following procedure:
1.
On the computer system where the TR1034 board(s) are
installed, do a file search for a file named boston.sys.
To do a file search in Windows, go to Start Search For
Files or Folders, enter the name of the file, and click
Search.
Boston.sys is the driver file that the application provides to
support the TR1034 platform.
When the boston.sys file is located, move your mouse
cursor over the name and right-click your mouse.
Some selections appear.
Choose Properties.
2.
3.
2
TR1034 PCI T1/E1 Board Hardware Manual
Setting up Brooktrout Firmware, Software, and Configuration Files
4.
When the Properties window opens, left-click the Version
tab, and see what version is reported.
If your version says “4.5.x”, then your application is
using TR1034 SDK 2.1.x.
If your version says “4.6.x”, then your application is
using TR1034 SDK 3.0.x.
If your search displays more than one boston.sys driver file
loaded on your system, check with the support group or
documentation of your LAN Fax application to find out which
boston.sys file their application uses to communicate with your
TR1034 board(s).
3
Chapter 1: Configuring Your TR1034 Board using Brooktrout Software Version 2.1.x
Process Overview
Use the following general steps to configure your board:
1.
2.
3.
4.
5.
4
Installing the driver (page 5)
Starting the driver (page 5)
Downloading firmware (page 8)
Configuring your LAN Fax SW (page 9 and following)
Check on BSMI service: (page 31)
When you have SDK 2.1.x and you use ISDN, you might
need to install BSMI service. Normally the application will
install and start this service, but if not, see Starting BSMI
on page 34.
TR1034 PCI T1/E1 Board Hardware Manual
Loading the Driver and Initializing the TR1034
Loading the Driver and Initializing the TR1034
Installing the
Driver
When you install your LAN Fax software, the Brooktrout driver
should be automatically installed.
Starting the Driver
The Brooktrout Boston driver will start when you start up your
computer.
To manually start the driver, from a command (DOS prompt)
window, type:
net start boston
To manually stop or shut down the driver, from a command
(DOS prompt) window, type:
net stop boston
5
Chapter 1: Configuring Your TR1034 Board using Brooktrout Software Version 2.1.x
Updating Firmware Files
When you install your LAN Fax software, Brooktrout drivers
and firmware are installed. Normally you don’t have to update
these files.
The following table lists the firmware and flash update files.
Whether you are a T1 or E1 user, the file names and uses are the
same.
6
Filename
Definition
cp1000.bin
Control processor (PPC) firmware
for all platforms
bootdsp.hex
DSP boot loader
dsp1000_5_
v34.hex
TR1034 DSP firmware for V.34 fax
flashupd.bin
Boot ROM flash update firmware
TR1034 PCI T1/E1 Board Hardware Manual
Updating Firmware Files
Boot ROM Flash Updates
The flash firmware is firmware that remains on the board even
after powering down the system. It contains major board
characteristics and settings.
Your LAN Fax software typically provides the latest boot ROM
flash firmware along with the firmware files listed on page 6.
If you need to download the flash firmware to bring the flash
version on your board to the same level as your LAN Fax
software, you can do a one-time flash download as part of the
installation process. To download the flash, use the following
procedure:
1.
2.
3.
If it is not already set, set the switch on each PCI board to
a value in the range of 2 through F. Each board must have
a unique value (the board's module ID number).
Search your computer for the following files:
firm.exe
flashupd.bin
If you don’t find these files, call Brooktrout Technical
Support.
Make sure flashupd.bin is in the same directory as firm.exe.
Do not begin this process with the application running.
Use the firm program to perform a flash update (do not
interrupt the update process). Enter the following:
net stop boston
net start boston
firm -m <module> -t 2 flashupd.bin
For PCI boards, <module> is the board module number as
set by the rotary switch.
This process takes less than a minute to complete. Do not
interrupt the update process or the board might not reboot. In this
case, failure to comply renders the board unusable and requires
a factory RMA to fix the board. Brooktrout will not issue an
advance replacement RMA.
7
Chapter 1: Configuring Your TR1034 Board using Brooktrout Software Version 2.1.x
Downloading the Firmware
Your LAN Fax software downloads the firmware each time you
boot the machine or restart the device driver. To download the
firmware, if necessary, use the following procedure:
1.
2.
3.
Search for the script firmload.bat on your system.
Verify that DSP firmware with postfix V.34 is used.
Run the firmload script by entering the following at a
command line:
firmload -c 30 <firmware directory>
where <firmware directory> identifies the location of the
firmware files on your system.
It should take about 20 seconds for the TR1000 firmware to
download and for the board to begin operating. Proper
operation is indicated by the board status LED alternating off
for two seconds and green for two seconds.
If you use the TR1034 with LAN Fax server applications, refer to
the documentation accompanying the application software. In
most cases, the firmware is already included with the software
you received from the LAN Fax software vendor and no further
installation is required.
8
TR1034 PCI T1/E1 Board Hardware Manual
Configuring Your LAN Fax Software
Configuring Your LAN Fax Software
Your software vendor supplies default configuration files. Use
them to configure your LAN Fax software. Review the
following sections to identify possible changes you might need
to make:
Configuring T1 Robbed Bit Systems on page 10
Configuring ISDN T1 Systems on page 16
Configuring ISDN E1 Systems on page 23
Each section provides configuration information for the
following configuration files:
Call Control file
btna.cfg
User
configuration file
btcall.cfg
teleph.cfg
Telephony file
Use the default configuration files supplied by your software
vendor. The sections below provide information about
parameters that you might need to set and samples of the
configuration sections of these files. Except for the listed
parameters, the default values should work for your system.
See Defining the TR1034 SDK Version Supplied With Your LAN
Fax Application on page 2 to understand which version of the
Brooktrout API your LAN Fax software is based on.
9
Chapter 1: Configuring Your TR1034 Board using Brooktrout Software Version 2.1.x
Configuring T1 Robbed Bit Systems
The following sections provide configuration details for a
T1 Robbed Bit system.
Configuring Call Control Parameters for T1 Robbed Bit
Systems
No call control parameters need to be set. T1 Robbed Bit
systems do not use a btna.cfg file.
Configuring User Configuration Parameters for
T1 Robbed Bit Systems
You will probably need to set values in the btcall.cfg file for the
following parameters:
debug
If this keyword is present, API debug mode will be enabled after
the first channel is reset by the software if debug mode is not
already enabled by the application. An optional filename might
be specified to set up a debug function to send output to the
specified file if a debug function was not already set by the
application.
Value Type: string
Default: disabled, stdout
did_digits
Specifies the number of DID digits to capture. If the software
detects less than the specified number of DID digits, the board
terminates the call and returns a “Reorder Tone” (fast busy) to
the network.
The maximum number is 63.
Value Type: decimal
Default: 4
Value Type: decimal
Default: 0
10
TR1034 PCI T1/E1 Board Hardware Manual
Configuring T1 Robbed Bit Systems
teleph
Defines the name of the telephony configuration file that
contains telephony hardware configuration information and
static telephony connection information.
If the file specified by the teleph keyword is present, then the file
specified by the digital keyword will not be used. If not, then the
software also checks for the digital keyword file.
Value Type: character string
Default: teleph.cfg
11
Chapter 1: Configuring Your TR1034 Board using Brooktrout Software Version 2.1.x
Example 1.
User configuration section for
T1 Robbed Bit
did_digits 4
country_code 0010
ced_timeout 6000
nrings 1
teleph C:\boston\ecc.api\server\teleph.cfg
debug \temp\btlog.txt
12
TR1034 PCI T1/E1 Board Hardware Manual
Configuring T1 Robbed Bit Systems
Configuring Telephony Parameters for T1 Robbed Bit
Systems
You will probably need to set a value for the following
parameters in the teleph.cfg file:
ds1_line_type
Specifies a framing type.
Valid Values
2 = Extended SuperFrame DS1 (T1) (Default for T1).
3 = AT&T D4 format Ds1 (T1). (also known as SuperFrame)
0x02 (Extended SuperFrame DS1) is the default.
line_coding
Specifies the line coding scheme on the line.
2 = B8ZS
5 = AMI
Default = B8ZS
line_encoding
Specifies A-law/µ-law line encoding.
Requires a firmware reload to change.
1 = µ-Law (USA) (default)
port_type
Hardware port type. This value follows “unit 1”. Enter one of
the following (value is hex):
40 = T1
sig_prot
Specifies the T1 robbed-bit signaling protocol.
0 = E&M (AT&T PUB 43801) Wink.
1 = E&M (AT&T PUB 43801)
Default = Immediate (E&M Wink).
signal_mode
Specifies signal modes.
2 =Robbed Bit.
13
Chapter 1: Configuring Your TR1034 Board using Brooktrout Software Version 2.1.x
t1_line_build_out
Defines the T1 framer waveform configuration.
Values for T1:
0 = 0_133 (Default)
1 = 133_266
2 = 266_399
3 = 399_533
4 = 533_655
Example 2.
Telephony configuration section for
T1 Robbed Bit
# Sample TELEPH.CFG file for RBS-T1 line (teleph_hp02h_t1.cfg)
# ********** Module 0 **********
# Module 0 represents the default settings for all modules in the system
# unless a module section is defined for a specific board.
# Valid settings are 2 through F.
# Each board in a system must have a unique number.
module 0
unit 0 20 line_encoding=1 bus_speed=8 bus_clock=0 h110_master_drive=0
h110_master_ref=0 h110_master_ref_fallbk=10
unit 1 40 line_encoding=1 signal_mode=2 sig_prot=0 ds1_line_type=2
clock_config=1 line_loopback=1 fac_data_link=1 t1_line_build_out=0
line_coding=2
14
TR1034 PCI T1/E1 Board Hardware Manual
Configuring T1 Robbed Bit Systems
Example 2.
Telephony configuration section for
T1 Robbed Bit (Continued)
# Connections for Telephony Unit 1
connect 7 0
2 0 0 F 0 0
0
connect 7 0
3 0 0 F 0 0
1
connect 7 0
4 0 0 F 0 0
2
connect 7 0
5 0 0 F 0 0
3
connect 7 0
6 0 0 F 0 0
4
connect 7 0
7 0 0 F 0 0
5
connect 7 0
8 0 0 F 0 0
6
connect 7 0
9 0 0 F 0 0
7
connect 7 0 10 0 0 F 0 0
8
connect 7 0 11 0 0 F 0 0
9
connect 7 0 12 0 0 F 0 0 10
connect 7 0 13 0 0 F 0 0 11
connect 7 0 14 0 0 F 0 0 12
connect 7 0 15 0 0 F 0 0 13
connect 7 0 16 0 0 F 0 0 14
connect 7 0 17 0 0 F 0 0 15
connect 7 0 18 0 0 F 0 0 16
connect 7 0 19 0 0 F 0 0 17
connect 7 0 20 0 0 F 0 0 18
connect 7 0 21 0 0 F 0 0 19
connect 7 0 22 0 0 F 0 0 20
connect 7 0 23 0 0 F 0 0 21
connect 7 0 24 0 0 F 0 0 22
connect 7 0 25 0 0 F 0 0 23
15
Chapter 1: Configuring Your TR1034 Board using Brooktrout Software Version 2.1.x
Configuring ISDN T1 Systems
The following sections provide configuration details for an
ISDN T1 system.
Configuring Call Control Parameters for ISDN T1
Systems
You might need to set values in the btna.cfg file (could be
named btna.t1). This file configures the board telephony
interface to work with ISDN service. See Example 3 on page 17
for configuration values.
call_type
Outbound call type.
99 = First attempt call type is 3.1k Audio. If this fails with a
cause value greater than 34, retry with type speech. This is a
worldwide option.
0 = Speech
1 = 3.1 kHz audio (aLaw-outside US)
Default = 99
switch_type
Central Office/PABX switch type. Use only with PRI.
Default: 0 -AT&T #4 ESS
16
Value
Description
0
AT&T #4 ESS (Default)(recommended US)
1
AT&T #5 ESS
2
Northern Telecom DMS-100
3
Northern DMS-250
4
Ericsson MD-110 (North America)
5
Ericsson MD-110 (International)
6
Siemens (North America)
7
Japan
8
Other
TR1034 PCI T1/E1 Board Hardware Manual
Configuring ISDN T1 Systems
Example 3.
Call control configuration information
for ISDN T1 (USA only)
[board 0 port 0]
# T1 = 1, E1 = 2
line_length 0
switch_type 0
variant_type 0
call_type 99
net_spfc 0x00
[end
Configuring User Configuration Parameters for ISDN T1
Systems
You might need to set values for the following parameters in the
btcall.cfg file:
debug
If this keyword is present, API debug mode will be enabled after
the first channel is reset by the software if debug mode is not
already enabled by the application. An optional filename might
be specified to set up a debug function to send output to the
specified file if a debug function was not already set by the
application.
Value Type: string
Default: disabled, stdout
debug_control e b
Turns on ISDN tracing in addition to the API debug logging
(debug keyword in the user defined configuration file). This
parameter only takes effect when the debug keyword in
btcall.cfg takes effect (when the application has not already
turned on Brooktrout API debugging). The ISDN debug
information will be added to the API debug log file. Use this
parameter only to test the installation.
This parameter should never be used, unless explicitly directed
to do so by Technical Support.
17
Chapter 1: Configuring Your TR1034 Board using Brooktrout Software Version 2.1.x
did_digits
Specifies the number of DID digits to capture. If the software
detects less than the specified number of DID digits, the board
terminates the call and returns a “Reorder Tone” (fast busy) to
the network.
The maximum number is 63. This parameter is applicable for
the ISDN Called Party Number.
Value Type: decimal
Default: 4
teleph
Defines the name of the telephony configuration file that
contains telephony hardware configuration information and
static telephony connection information.
If the file specified by the teleph keyword is present, then the file
specified by the digital keyword will not be used. If not, then the
software also checks for the digital keyword file.
Value Type: character string
Default: teleph.cfg
18
TR1034 PCI T1/E1 Board Hardware Manual
Configuring ISDN T1 Systems
Example 4.
User configuration section for ISDN T1
did_digits 4
country_code 0010
ced_timeout 6000
nrings 1
teleph C:\boston\ecc.api\server\teleph.cfg
debug \temp\btlog.txt
debug_control e b
19
Chapter 1: Configuring Your TR1034 Board using Brooktrout Software Version 2.1.x
Configuring Telephony Parameters for ISDN T1
Systems
You will probably need to set a value for the following
parameters in the teleph.cfg file:
Note:
On the TR1034 platform, ISDN B channels are mapped
dynamically to fax channels within the application.
Make sure that the Connect lines in teleph.cfg have been
commented out or are not there.
ds1_line_type
Specifies a framing type.
Valid Values
2 = Extended SuperFrame DS1 (T1) (Default for T1).
3 = AT&T D4 format Ds1 (T1). (also known as SuperFrame)
0x02 (Extended SuperFrame DS1) is the default.
line_coding
Specifies the line coding scheme on the line.
2 = B8ZS
5 = AMI
Default = B8ZS
line_encoding
Specifies A-law/µ-law line encoding.
Requires a firmware reload to change.
1 = µ-Law (USA) (default)
port_type
Hardware port type (this is the value just after “unit 1”), one of
the following (value is hex):
40 = T1
sig_prot
Specifies the T1 robbed-bit signaling protocol.
255 = No in-band signaling
signal_mode
Specifies signal modes.
4 = Message oriented (T1 or E1) (Default for T1)
20
TR1034 PCI T1/E1 Board Hardware Manual
Configuring ISDN T1 Systems
t1_line_build_out
Defines the T1 framer waveform configuration.
Values for T1:
0 = 0_133 (Default)
1 = 133_266
2 = 266_399
3 = 399_533
4 = 533_655
Example 5.
Telephony configuration section for
ISDN T1
# Sample TELEPH.CFG for PRI-T1 line (teleph_hp02h_t1_isdn.cfg)
# ********** Module 0 **********
# Module 0 represents the default settings for all modules in the system
# unless a module section is defined for a specific board.
# Valid settings are 2 through F.
# Each board in a system must have a unique number.
module 0
unit 0 20 line_encoding=1 bus_speed=8 bus_clock=0 h110_master_drive=0
h110_master_ref=0 h110_master_ref_fallbk=10
unit 1 40 line_encoding=1 signal_mode=4 sig_prot=255 ds1_line_type=2
clock_config=1 line_loopback=1 fac_data_link=1 t1_line_build_out=0
line_coding=2
21
Chapter 1: Configuring Your TR1034 Board using Brooktrout Software Version 2.1.x
Example 5.
Telephony configuration section for
ISDN T1 (Continued)
# Connections for Telephony Unit 1
# connect 7 0
2 0 0 F 0 0
0
# connect 7 0
3 0 0 F 0 0
1
# connect 7 0
4 0 0 F 0 0
2
# connect 7 0
5 0 0 F 0 0
3
# connect 7 0
6 0 0 F 0 0
4
# connect 7 0
7 0 0 F 0 0
5
# connect 7 0
8 0 0 F 0 0
6
# connect 7 0
9 0 0 F 0 0
7
# connect 7 0 10 0 0 F 0 0
8
# connect 7 0 11 0 0 F 0 0
9
# connect 7 0 12 0 0 F 0 0 10
# connect 7 0 13 0 0 F 0 0 11
# connect 7 0 14 0 0 F 0 0 12
# connect 7 0 15 0 0 F 0 0 13
# connect 7 0 16 0 0 F 0 0 14
# connect 7 0 17 0 0 F 0 0 15
# connect 7 0 18 0 0 F 0 0 16
# connect 7 0 19 0 0 F 0 0 17
# connect 7 0 20 0 0 F 0 0 18
# connect 7 0 21 0 0 F 0 0 19
# connect 7 0 22 0 0 F 0 0 20
# connect 7 0 23 0 0 F 0 0 21
# connect 7 0 24 0 0 F 0 0 22
22
TR1034 PCI T1/E1 Board Hardware Manual
Configuring ISDN E1 Systems
Configuring ISDN E1 Systems
The following sections provide configuration details for an
ISDN E1 system.
Configuring Call Control Parameters for ISDN E1
Systems
The btna.cfg file (sometimes named btna.E1) configures the
board telephony interface to work with the ISDN service. You
might need to set values for the following parameters:
aoc
Advice of charge
1 = enable
0 = disable
Default = 0
call_type
Defines the outbound bearer capability.
99 = First attempt call type is 3.1k Audio. If this fails with a
cause value greater than 34, retry with type speech. This is a
worldwide option.
16 = Voice call (aLaw-outside US) (E1 voice-only applications)
17 = 3.1 kHz audio (aLaw-outside US)
Default = 99
framing
Defines framing options.
Default: 0x00 Multiframing with CRC4.
Line
Type
Framing
Meaning
E1
0x00
CRC4
ON (Si=FEBE);
Multiframing
E1
0x02
No CRC
Basic framing
23
Chapter 1: Configuring Your TR1034 Board using Brooktrout Software Version 2.1.x
network
Specifies the method for
1 = network emulation
0 = user emulation 0 (user) (Default)
overlap_recv
Overlap receive. Allows for receiving overlap calls.
0 = disable
1 = enable
switch_type
PBX switch type.
Default: 8
8
variant_type
Other (European default)
PBX variant type.
Default: 6
6
PRI only Euro-ISDN
Example 6.
Call control configuration section for
ISDN E1
[board 0 port 0]
switch_type 8
variant_type 6
call_type 99
[end]
24
TR1034 PCI T1/E1 Board Hardware Manual
Configuring ISDN E1 Systems
Configuring User Configuration Parameters for ISDN E1
Systems
You will probably need to set values for the following
parameters in the btcall.cfg file:
debug
If this keyword is present, API debug mode will be enabled after
the first channel is reset by the software if debug mode is not
already enabled by the application. An optional filename might
be specified to set up a debug function to send output to the
specified file if a debug function was not already set by the
application.
Value Type: string
Default: disabled, stdout
debug_control e b
Turns on ISDN tracing in addition to the API debug logging
(debug keyword in the user defined configuration file). This
parameter only takes effect when the debug keyword in
btcall.cfg takes effect (when the application has not already
turned on Brooktrout API debugging). The ISDN debug
information will be added to the API debug log file. Use this
parameter only to test the installation.
This parameter should never be used, unless explicitly directed
to do so by Technical Support.
did_digits
Specifies the number of DID digits to capture. If the software
detects less than the specified number of DID digits, the board
terminates the call. Set the did_digits parameter to the total
number of digits that you expect to receive; this setting works
in all circumstances.
DID behavior also depends on the value of the configuration
file variable did_variable.
Value Type: decimal
Default: 4
When sending digits using the en-block method, the
application passes the whole number in a single group. Most
installations receive DID digits in this way.
25
Chapter 1: Configuring Your TR1034 Board using Brooktrout Software Version 2.1.x
If you receive DID digits en-block, set the did_digits
parameter to the expected number of digits and the did_
variable parameter to 0. Setting did_digits to a value less
than the expected number of DID digits causes only the trailing
digits to be passed. For example, if the network sends 1234567
as the called party number and did_digits is set to 3, the
board returns 567 to the application. Setting did_digits to a
value greater than the number of digits you receive causes the
TR1034 board to reject the call.
did_variable
Sets the requirements for DID call detection based on the line
parameter value did_digits and the interdigit time limit.
0 = The board detects a DID call only when it receives the
number of decimal digits specified by did_digits.
1 = The board terminates the digits and detects a DID call when
it receives the number of decimal digits specified by did_digit or
when the interdigit time limit expires. If did_digits is 0, the
maximum value for did_digits increases to 127 digits, and
termination occurs based only on the time-out.
Value Type: decimal
Default: 0
When sending digits using the overlap receiving method, the
application passes the DID digits grouped into separate
messages. Overlap receiving is found in the following
circumstances:
The public network in some countries, notably Germany,
Austria, and Italy, allows a user-defined variable number
of sub-address DID digits.
When the supplemental service is DID and the data link is
point-to-point.
When the caller is dialing using overlap sending.
If you receive DID digits in overlap receiving mode and the
number of digits you might receive are variable, set the did_
digits parameter to the maximum you expect to receive and
set the did_variable parameter to 1. When the did_
variable parameter is set to 1, the board operates with a 5second interdigit time-out.
26
TR1034 PCI T1/E1 Board Hardware Manual
Configuring ISDN E1 Systems
teleph
Defines the name of the telephony configuration file that
contains telephony hardware configuration information and
static telephony connection information.
If the file specified by the teleph keyword is present, then the file
specified by the digital keyword will not be used. If not, then the
software also checks for the digital keyword file.
Value Type: character string
Default: teleph.cfg
Example 7.
User configuration file configuration
section for ISDN E1
did_digits 3
did_variable 0
country_code 0010
ced_timeout 6000
nrings 1
teleph C:\boston\ecc.api\server\teleph.cfg
debug \temp\btlog.txt
debug_control e b
Configuring Telephony Parameters for ISDN E1
Systems
You will probably need to set a value for the following
parameters in the teleph.cfg file:
clock_config
Defines the transmit clock source.
1 = Loop timing: T1/E1 controller is slave to the network
(Default).
2 = Local timing: local T1/E1 controller is master.
If you set the value of clock_config to 1, set h110_master_ref
to 0 and change the value of the network parameter in the
btna.cfg file (set to 0).
27
Chapter 1: Configuring Your TR1034 Board using Brooktrout Software Version 2.1.x
If you set the value of clock_config to 2, set h110_master_ref
to 128 and change the value of the network parameter in the
btna.cfg file (set to 1).
ds1_line_type
Defines the DS1 line type.
4 = Multiframing with Si=FEBE (E1)
(Default for E1).
5 = Basic framing with no CRC4, Si=1
(E1).
line_coding
Specifies the line coding scheme on the line.
3 =HDB3
line_encoding
Specifies A-law/µ-law line encoding.
Requires a firmware reload to change.
0 = A-Law (Europe) (Default for E1)
module number
Module identification numbers range from 2 through F. Use
span 0 because there is only one span per board.
port_type
Hardware port type, one of the following (value is hex):
80 = E1
signal_mode
Specifies signal modes.
4 = Message oriented (T1 or E1)
(default for E1).
t1_line_build_out
T1 framer waveform configuration.
Values for E1:
0 = 75_OHM
1 = 120_OHM (Default)
unit number
Hardware port unit number, starting from 0. Unit 0 stands for
the H.100 bus and unit 1 for the only PRI port on the TR1034.
Note:
28
On the TR1034 platform, in ISDN, B channels are mapped
dynamically to fax channels within application. The “Connect”
lines in teleph.cfg must be commented out.
TR1034 PCI T1/E1 Board Hardware Manual
Configuring ISDN E1 Systems
Example 8.
Telephony file configuration section for
ISDN E1
# Sample TELEPH.CFG for PRI-E1 line (teleph_hp02h_e1_isdn.cfg)
# ********** Module 0 **********
# Module 0 represents the default settings for all modules in the system
# unless a module section is defined for a specific board.
# Valid settings are 2 through F.
# Each board in a system must have a unique number.
module 0
unit 0 20 line_encoding=0 bus_speed=8 bus_clock=0 h110_master_drive=0
h110_master_ref=0 h110_master_ref_fallbk=10
unit 1 80 line_encoding=0 signal_mode=4 sig_prot=255 ds1_line_type=4
clock_config=1 t1_line_build_out=1 line_coding=3
29
Chapter 1: Configuring Your TR1034 Board using Brooktrout Software Version 2.1.x
Example 8.
Telephony file configuration section for
ISDN E1 (Continued)
# Connections for Telephony Unit 1
# connect 7 0
2 0 0 F 0 0
0
# connect 7 0
3 0 0 F 0 0
1
# connect 7 0
4 0 0 F 0 0
2
# connect 7 0
5 0 0 F 0 0
3
# connect 7 0
6 0 0 F 0 0
4
# connect 7 0
7 0 0 F 0 0
5
# connect 7 0
8 0 0 F 0 0
6
# connect 7 0
9 0 0 F 0 0
7
# connect 7 0 10 0 0 F 0 0
8
# connect 7 0 11 0 0 F 0 0
9
# connect 7 0 12 0 0 F 0 0 10
# connect 7 0 13 0 0 F 0 0 11
# connect 7 0 14 0 0 F 0 0 12
# connect 7 0 15 0 0 F 0 0 13
# connect 7 0 16 0 0 F 0 0 14
# connect 7 0 17 0 0 F 0 0 15
# connect 7 0 18 0 0 F 0 0 16
# connect 7 0 19 0 0 F 0 0 17
# connect 7 0 20 0 0 F 0 0 18
# connect 7 0 21 0 0 F 0 0 19
# connect 7 0 22 0 0 F 0 0 20
# connect 7 0 23 0 0 F 0 0 21
# connect 7 0 24 0 0 F 0 0 22
# connect 7 0 25 0 0 F 0 0 23
# connect 7 0 26 0 0 F 0 0 24
# connect 7 0 27 0 0 F 0 0 25
# connect 7 0 28 0 0 F 0 0 26
# connect 7 0 29 0 0 F 0 0 27
# connect 7 0 30 0 0 F 0 0 28
# connect 7 0 31 0 0 F 0 0 29
30
TR1034 PCI T1/E1 Board Hardware Manual
BSMI Service
BSMI Service
Use the BSMI Service when you use an ISDN/ECCAPI
connection and your software uses the Brooktrout SDK
version 2.1.x.
Note:
BSMI service is not valid if your system uses robbed bit
signaling in the USA.
Setting Up the BSMI Service
To setup the BSMI Service, follow this sequence of tasks:
Note:
1. Install the BSMI Service.
2. Start the BSMI Service manually or automatically.
3. Check port status.
4. Remove the BSMI Service (optional).
Before you start the BSMI Service, ensure that your:
TR1034 board is installed.
BOSTON driver is installed and started.
Firmware is downloaded to the board.
The BSMI Service must be running at all times when you are
using ISDN signaling.
Each time you restart the BSMI service, you need to download
the firmware. See Downloading the Firmware on page 8 for
instructions.
31
Chapter 1: Configuring Your TR1034 Board using Brooktrout Software Version 2.1.x
Installing the BSMI Service
The BSMI service should already have been installed by your
LAN Fax application. However, if you need to install the
service, do the following:
1.
Open a Command Prompt window. Go to the BSMI
server directory:
cd \boston\ecc.api\server\bsmisrv
All file and directory locations in this section could be changed
by your LAN Fax software provider. If you cannot find the files in
the locations below, consult your LAN Fax software
documentation for the location of the service.
2.
Enter the following command to install the BSMI server:
bsmisrv -install
The following screen displays the process for defining file
locations and installation parameters.
3.
Enter the directory path and file name of the server
configuration file:
c:\boston\ecc.api\server\btna.cfg
32
TR1034 PCI T1/E1 Board Hardware Manual
BSMI Service
4.
Enter the directory path of the btcall.cfg configuration file:
c:\boston\ecc.api\server\btcall.cfg
Note:
Parameters in the btcall.cfg that are set to filenames need to
contain absolute paths to the filename. For example, when
using the teleph.cfg parameter, enter:
teleph c:\boston\ecc.api\server\teleph.cfg
5.
Answer Y or N to enable debugging and the creation of a
log file or not.
If you answer Y, enter the path for the location of the new
log file.
The log file is generally called dump.txt and provides
information about the ISDN line status.
33
Chapter 1: Configuring Your TR1034 Board using Brooktrout Software Version 2.1.x
Starting BSMI
The BSMI service is located under the ecc.api/server directory.
Start the service under Services or as a console application by
entering the following at a console window:
net start bsmisrv
In debug mode, enter the following at the command prompt
from the directory where bsmisrv.exe is located:
bsmisrv -d 2
Make sure your btna.cfg and teleph.cfg/btcall.cfg files are
configured correctly before starting the bsmiservice.
For results, check the log file.
If the log file results were not successful, the problem could be
one of the following:
34
Default configuration files which are wrong for E1
LEDs wrong (for example, both LEDs are off)
The application could not find the configuration files
TR1034 PCI T1/E1 Board Hardware Manual
Ensuring that the Board is Working
Ensuring that the Board is Working
Brooktrout strongly recommends that you test your TR1034
board after you install it. There are two ways the board can be
tested:
If you are installing Brooktrout software and writing your
own application, successfully running the sample
application verifies your board is working correctly.
Refer to the installation instructions and the release notes
that came with your Brooktrout API for more information
on installing the Brooktrout software and firmware.
If you plan to install software from another vendor, first
run the Brooktrout Faxdiag program to test the board
installation – instructions for running this program are
explained in Chapter 3, “Testing”, on page 71.
35
2
Configuring Your TR1034 Board
using Brooktrout Software
Version 3.0.x
This chapter explains how to configure the TR1034
boards and how to change the parameters that are set
in the Software Development Kit (SDK) version 3.0.x
based software.
Before configuring your board, install your TR1034
and connect your phone service to it following the
instructions in the hardware installation guide included
with the board.
This chapter includes the following activities:
Setting up Brooktrout Firmware, Software, and
Configuration Files
Loading the Driver and Initializing the TR1034
Updating Firmware Files
Configuring Your LAN Fax Software
Configuring T1 Robbed Bit Systems
Configuring ISDN T1 Systems
Configuring ISDN E1 Systems
Ensuring that the Board is Working
37
Chapter 2: Configuring Your TR1034 Board using Brooktrout Software Version 3.0.x
Setting up Brooktrout Firmware, Software, and
Configuration Files
See your LAN Fax application user manual for instructions on
installing and configuring your LAN Fax software. The LAN
Fax software provides a Brooktrout driver and firmware. After
you have set up your LAN Fax software to support the TR1034,
you can begin sending and receiving faxes using that software.
Defining the TR1034 SDK Version Supplied With Your
LAN Fax Application
You need to know which version of the TR1034 (SDK)
supports your LAN Fax application because
When you configure your board software, there are
different configuration files and parameters for the
different versions.
If you need product support, Brooktrout Tech Support
needs to know which version of the TR1034 SDK your
LAN-fax application uses to support your TR1034.
If you need to use a diagnostic tool, different versions of
the tool support different SDK versions.
Check for that information using the following procedure:
1.
On the computer system where the TR1034 board(s) are
installed, do a file search for a file named boston.sys.
To do a file search in Windows, go to Start Search For
Files or Folders, enter the name of the file, and click
Search.
Boston.sys is the driver file that the application provides to
support the TR1034 platform.
When the boston.sys file is located, move your mouse
cursor over the name and right-click your mouse.
Some selections appear.
Choose Properties.
2.
3.
38
TR1034 PCI T1/E1 Board Hardware Manual
Setting up Brooktrout Firmware, Software, and Configuration Files
4.
When the Properties window opens, left-click the Version
tab, and see what version is reported.
If your version says “4.5.x”, then your application is
using TR1034 SDK 2.1.x.
If your version says “4.6.x”, then your application is
using TR1034 SDK 3.0.x.
If your search displays more than one boston.sys driver file
loaded on your system, check with the support group or
documentation of your LAN-fax application to find out which
boston.sys file their application uses to communicate with your
TR1034 board(s).
39
Chapter 2: Configuring Your TR1034 Board using Brooktrout Software Version 3.0.x
Process Overview
Use the following general steps to configure your board:
1.
2.
3.
4.
40
Installing the driver (page 41)
Starting the driver (page 41)
Downloading firmware (page 44)
Configuring your LAN Fax SW (page 45 and following)
TR1034 PCI T1/E1 Board Hardware Manual
Loading the Driver and Initializing the TR1034
Loading the Driver and Initializing the TR1034
Installing the
Driver
When you install your LAN Fax software, the Brooktrout driver
should be automatically installed.
Starting the Driver
The Brooktrout Boston driver starts when you start up your
computer.
To manually start the driver, from a command (DOS prompt)
window, type:
net start boston
To manually stop or shut down the driver, from a command
(DOS prompt) window, type:
net stop boston
41
Chapter 2: Configuring Your TR1034 Board using Brooktrout Software Version 3.0.x
Updating Firmware Files
When you install your LAN Fax software, Brooktrout drivers
and firmware are installed. Normally you don’t have to update
these files.
The following table lists the firmware and flash update files.
Whether you are a T1 or E1 user, the file names and uses are the
same.
42
Filename
Definition
cp.bin
Control processor (PPC) firmware
for all platforms
bootdsp.hex
DSP boot loader
dsp1000_v34.hex
TR1034 DSP firmware for V.34 fax
flashupd.bin
Boot ROM flash update firmware
TR1034 PCI T1/E1 Board Hardware Manual
Updating Firmware Files
Boot ROM Flash Updates
The flash firmware is firmware that remains on the board even
after powering down the system. It contains major board
characteristics and settings.
Your LAN Fax software typically provides the latest boot ROM
flash firmware along with the firmware files listed on page 42.
If you need to download the flash firmware to bring the flash
version on your board to the same level as your LAN Fax
software, you can do a one-time flash download as part of the
installation process. To download the flash, use the following
procedure:
1.
2.
3.
If it is not already set, set the switch on each PCI board to
a value in the range of 2 through F. Each board must have
a unique value (the board's module ID number).
Search your computer for the following files:
firm.exe
flashupd.bin
If you don’t find these files, call Brooktrout Technical
Support.
Make sure flashupd.bin is in the same directory as firm.exe.
Do not begin this process with the application running.
Use the firm program to perform a flash update (do not
interrupt the update process). Enter the following:
net stop boston
net start boston
firm -m <module> -t 2 flashupd.bin
For PCI boards, <module> is the board module number as
set by the rotary switch.
This process takes less than a minute to complete. Do not
interrupt the update process or the board might not reboot. In this
case, failure to comply renders the board unusable and requires
a factory RMA to fix the board. Brooktrout will not issue an
advance replacement RMA.
43
Chapter 2: Configuring Your TR1034 Board using Brooktrout Software Version 3.0.x
Downloading the Firmware
Your LAN Fax software downloads the firmware each time you
boot the machine or restart the device driver. To download the
firmware, if necessary, use the following procedure:
1.
2.
3.
Search for the script firmload.bat on your system.
Verify that DSP firmware with postfix V.34 is used.
Run the firmload script by entering the following at a
command line:
firmload -c 30 <firmware directory>
where <firmware directory> identifies the location of the
firmware files on your system.
It should take about 20 seconds for the TR1000 firmware to
download and for the board to begin operating. Proper
operation is indicated by the board status LED alternating off
for two seconds and green for two seconds.
If you use the TR1034 with LAN Fax server applications, refer to
the documentation accompanying the application software. In
most cases, the firmware is already included with the software
you received from the LAN Fax software vendor and no further
installation is required.
44
TR1034 PCI T1/E1 Board Hardware Manual
Configuring Your LAN Fax Software
Configuring Your LAN Fax Software
Your software vendor supplies default configuration files. Use
them to configure your LAN Fax software. Review the
following sections to identify possible changes you might need
to make:
Configuring T1 Robbed Bit Systems on page 46
Configuring ISDN T1 Systems on page 53
Configuring ISDN E1 Systems on page 60
Each section provides configuration information for the
following configuration files:
Call Control file
ecc.cfg
User
configuration file
btcall.cfg
teleph.cfg
Telephony file
Use the default configuration files supplied by your software
vendor. The sections below provide information about
parameters that you might need to set and samples of the
configuration sections of these files. Except for the listed
parameters, the default values should work for your system.
See Defining the TR1034 SDK Version Supplied With Your LAN
Fax Application on page 38 to understand which version of the
Brooktrout API your LAN Fax software is based on.
45
Chapter 2: Configuring Your TR1034 Board using Brooktrout Software Version 3.0.x
Configuring T1 Robbed Bit Systems
The following sections provide configuration details for a
T1 Robbed Bit system.
Configuring Call Control Parameters for T1 Robbed Bit
Systems
You might need to set values in the ecc.cfg file for the following
parameters in the ecc.cfg file.
ecc_signalling_
mode
Specifies the ECC operation mode
Values:
0 = robbed-bit (Default)
Using the default is safe, although it might not be necessary
since the ecc.cfg file might not be used for Robbed Bit T1.
module number
46
Module identification numbers range from 2 through F. Use
span 0 because there is only one span per board.
TR1034 PCI T1/E1 Board Hardware Manual
Configuring T1 Robbed Bit Systems
Example 1.
Call Control Configuration Information
# Sample of T1-RB version of ECC.CFG file
#
# module numbers start with 2
# span numbers start with 0
#
# configured for T1 RB
#
ecc_signalling_mode 0
[module 2 span 0]
[end]
Configuring User Configuration Parameters for
T1 Robbed Bit Systems
You will probably need to set values in the btcall.cfg file for the
following parameters:
debug
If this keyword is present, API debug mode will be enabled after
the first channel is reset by the software if debug mode is not
already enabled by the application. An optional filename might
be specified to set up a debug function to send output to the
specified file if a debug function was not already set by the
application.
Value Type: string
Default: disabled, stdout
did_digits
Specifies the number of DID digits to capture. If the software
detects less than the specified number of DID digits, the board
terminates the call and returns a “Reorder Tone” (fast busy) to
the network.
The maximum number is 63.
Value Type: decimal
Default: 4
47
Chapter 2: Configuring Your TR1034 Board using Brooktrout Software Version 3.0.x
teleph
Defines the name of the telephony configuration file that
contains telephony hardware configuration information and
static telephony connection information.
If the file specified by the teleph keyword is present, then the file
specified by the digital keyword will not be used. If not, then the
software also checks for the digital keyword file.
Value Type: character string
Default: teleph.cfg
48
TR1034 PCI T1/E1 Board Hardware Manual
Configuring T1 Robbed Bit Systems
Example 2.
User configuration section for
T1 Robbed Bit
did_digits 4
country_code 0010
ced_timeout 6000
nrings 1
teleph C:\boston\ecc.api\server\teleph.cfg
debug \temp\btlog.txt
49
Chapter 2: Configuring Your TR1034 Board using Brooktrout Software Version 3.0.x
Configuring Telephony Parameters for T1 Robbed Bit
Systems
You might need to set a value in the teleph.cfg file for the
following parameters:
ds1_line_type
Specifies a framing type.
Valid Values
2 = Extended SuperFrame DS1 (T1) (Default for T1).
3 = AT&T D4 format Ds1 (T1). (also known as SuperFrame)
0x02 (Extended SuperFrame DS1) is the default.
line_coding
Specifies the line coding scheme on the line.
2 = B8ZS
5 = AMI
Default = B8ZS
line_encoding
Specifies A-law/µ-law line encoding.
Requires a firmware reload to change.
1 =µ-Law (USA) (default)
port_type
Hardware port type (this is the value after “unit 1”), one of the
following (value is hex):
40 or 100 = T1
sig_prot
Specifies the T1 robbed-bit signaling protocol.
0 = E&M (AT&T PUB 43801) Wink.
1 = E&M (AT&T PUB 43801)
Immediate (E&M Wink).
signal_mode
Specifies signal modes.
2 =Robbed Bit.
50
TR1034 PCI T1/E1 Board Hardware Manual
Configuring T1 Robbed Bit Systems
t1_line_build_out
Defines the T1 framer waveform configuration.
Values for T1:
0 = 0_133 (Default)
1 = 133_266
2 = 266_399
3 = 399_533
4 = 533_655
Example 3.
Telephony configuration section for
T1 Robbed Bit
# Sample TELEPH.CFG file for RBS-T1 line (teleph_hp02h_t1.cfg)
# ********** Module 0 **********
# Module 0 represents the default settings for all modules in the system
# unless a module section is defined for a specific board.
# Valid settings are 2 through F.
# Each board in a system must have a unique number.
module 0
unit 0 20 line_encoding=1 bus_speed=8 bus_clock=0 h110_master_drive=0
h110_master_ref=0 h110_master_ref_fallbk=10
unit 1 40 line_encoding=1 signal_mode=2 sig_prot=0 ds1_line_type=2
clock_config=1 line_loopback=1 fac_data_link=1 t1_line_build_out=0
line_coding=2
51
Chapter 2: Configuring Your TR1034 Board using Brooktrout Software Version 3.0.x
Example 3. Telephony configuration section
for T1 Robbed Bit (Continued)
# Connections for Telephony Unit 1
connect 7 0
2 0 0 F 0 0
0
connect 7 0
3 0 0 F 0 0
1
connect 7 0
4 0 0 F 0 0
2
connect 7 0
5 0 0 F 0 0
3
connect 7 0
6 0 0 F 0 0
4
connect 7 0
7 0 0 F 0 0
5
connect 7 0
8 0 0 F 0 0
6
connect 7 0
9 0 0 F 0 0
7
connect 7 0 10 0 0 F 0 0
8
connect 7 0 11 0 0 F 0 0
9
connect 7 0 12 0 0 F 0 0 10
connect 7 0 13 0 0 F 0 0 11
connect 7 0 14 0 0 F 0 0 12
connect 7 0 15 0 0 F 0 0 13
connect 7 0 16 0 0 F 0 0 14
connect 7 0 17 0 0 F 0 0 15
connect 7 0 18 0 0 F 0 0 16
connect 7 0 19 0 0 F 0 0 17
connect 7 0 20 0 0 F 0 0 18
connect 7 0 21 0 0 F 0 0 19
connect 7 0 22 0 0 F 0 0 20
connect 7 0 23 0 0 F 0 0 21
connect 7 0 24 0 0 F 0 0 22
connect 7 0 25 0 0 F 0 0 23
52
TR1034 PCI T1/E1 Board Hardware Manual
Configuring ISDN T1 Systems
Configuring ISDN T1 Systems
The following sections provide configuration details for an
ISDN T1 system.
Configuring Call Control Parameters for ISDN T1
Systems
You will need to set values in the ecc.cfg file for the following
parameters:
ecc_signalling_
mode
Specifies the ECC operation mode by choosing this option:
module number
Module identification numbers range from 2 through F. Use
span 0 because there is only one span per board.
call_type
Outbound call type.
1 = ISDN
99 = First attempt call type is 3.1k Audio. If this fails with a
cause value greater than 34, retry with type speech. This is a
worldwide option.
0 = Speech
1 = 3.1 kHz audio (aLaw-outside US)
Default = 99
switch_type
Central Office/PABX switch type. Use only with PRI.
Default: 0 -AT&T #4 ESS
Value
0
1
2
3
4
5
6
7
8
Description
AT&T #4 ESS (Default)(recommended US)
AT&T #5 ESS
Northern Telecom DMS-100
Northern DMS-250
Ericsson MD-110 (North America)
Ericsson MD-110 (International)
Siemens (North America)
Japan
Other
53
Chapter 2: Configuring Your TR1034 Board using Brooktrout Software Version 3.0.x
Example 4.
Call control configuration section for
ISDN T1
#
# module numbers start with 2
# span numbers start with 0
#
# configured for T1 PRI
#
ecc_signalling_mode 1
[module 2 span 0]
switch_type 0
variant_type 0
call_type 99
[end]
Note:
54
If you have a custom setup for switch_type and variant_type
(for example YESS/At&T), your setup might have different
values. Refer to your LAN Fax documentation for specific
details.
TR1034 PCI T1/E1 Board Hardware Manual
Configuring ISDN T1 Systems
Configuring User Configuration Parameters for ISDN T1
Systems
You might need to set values for the following parameters in the
btcall.cfg file:
debug
If this keyword is present, API debug mode will be enabled after
the first channel is reset by the software if debug mode is not
already enabled by the application. An optional filename might
be specified to set up a debug function to send output to the
specified file if a debug function was not already set by the
application.
Value Type: string
Default: disabled, stdout
debug_control e b
Turns on ISDN tracing in addition to the API debug logging
(debug keyword in the user defined configuration file). This
parameter only takes effect when the debug keyword in
btcall.cfg takes effect (when the application has not already
turned on Brooktrout API debugging). The ISDN debug
information will be added to the API debug log file also, when
the API debug feature is turned on by the application. Use this
parameter only to test the installation.
This parameter should never be used, unless explicitly directed
to do so by Technical Support.
did_digits
Number of DID digits to capture. If the software detects less
than the specified number of DID digits, the board terminates
the call and returns a “Reorder Tone” (fast busy) to the
network.
The maximum number is 63. This parameter is applicable for
the ISDN Called Party Number.
Value Type: decimal
Default: 4
teleph
Defines the name of the telephony configuration file that
contains telephony hardware configuration information and
static telephony connection information.
55
Chapter 2: Configuring Your TR1034 Board using Brooktrout Software Version 3.0.x
If the file specified by the teleph keyword is present, then the file
specified by the digital keyword will not be used. If not, then the
software also checks for the digital keyword file.
Value Type: character string
Default: teleph.cfg
Example 5.
User configuration section for ISDN T1
did_digits 4
country_code 0010
ced_timeout 6000
nrings 1
teleph C:\boston\ecc.api\server\teleph.cfg
debug \temp\btlog.txt
debug_control e b
56
TR1034 PCI T1/E1 Board Hardware Manual
Configuring ISDN T1 Systems
Configuring Telephony Parameters for ISDN T1
Systems
On the TR1034, ISDN B channels can be mapped to the fax
channels by the application, or (more commonly) using
connect lines in this configuration file.
You will probably need to set a value for the following
parameters in the teleph.cfg file:
ds1_line_type
Specifies a framing type.
Valid Values
2 = Extended SuperFrame DS1 (T1) (Default for T1).
3 = AT&T D4 format Ds1 (T1). (also known as SuperFrame)
0x02 (Extended SuperFrame DS1) is the default.
line_coding
Specifies the line coding scheme on the line.
2 = B8ZS
5 = AMI
Default = B8ZS
line_encoding
Specifies A-law/µ-law line encoding.
Requires a firmware reload to change.
1 = µ-Law (USA) (default)
port_type
Hardware port type (this is the value just after “unit 1”), enter
the following (value is hex):
40 or 100 = T1
sig_prot
Specifies the signaling protocol.
255 = no inboard signaling
signal_mode
Specifies signal modes.
4 = message oriented (T1 or E1)
57
Chapter 2: Configuring Your TR1034 Board using Brooktrout Software Version 3.0.x
t1_line_build_out
T1 framer waveform configuration.
Values for T1:
0 = 0_133 (Default)
1 = 133_266
2 = 266_399
3 = 399_533
4 = 533_655
Example 6.
Telephony configuration section for
ISDN T1
# Sample TELEPH.CFG for PRI-T1 line (teleph_hp02h_t1_isdn.cfg)
# ********** Module 0 **********
# Module 0 represents the default settings for all modules in the system
# unless a module section is defined for a specific board.
# Valid settings are 2 through F.
# Each board in a system must have a unique number.
module 0
unit 0 20 line_encoding=1 bus_speed=8 bus_clock=0 h110_master_drive=0
h110_master_ref=0 h110_master_ref_fallbk=10
unit 1 40 line_encoding=1 signal_mode=4 sig_prot=255 ds1_line_type=2
clock_config=1 line_loopback=1 fac_data_link=1 t1_line_build_out=0
line_coding=2
58
TR1034 PCI T1/E1 Board Hardware Manual
Configuring ISDN T1 Systems
Example 6. Telephony configuration section
for ISDN T1 (Continued)
# Connections for Telephony Unit 1
connect 7 0
2 0 0 F 0 0
0
connect 7 0
3 0 0 F 0 0
1
connect 7 0
4 0 0 F 0 0
2
connect 7 0
5 0 0 F 0 0
3
connect 7 0
6 0 0 F 0 0
4
connect 7 0
7 0 0 F 0 0
5
connect 7 0
8 0 0 F 0 0
6
connect 7 0
9 0 0 F 0 0
7
connect 7 0 10 0 0 F 0 0
8
connect 7 0 11 0 0 F 0 0
9
connect 7 0 12 0 0 F 0 0 10
connect 7 0 13 0 0 F 0 0 11
connect 7 0 14 0 0 F 0 0 12
connect 7 0 15 0 0 F 0 0 13
connect 7 0 16 0 0 F 0 0 14
connect 7 0 17 0 0 F 0 0 15
connect 7 0 18 0 0 F 0 0 16
connect 7 0 19 0 0 F 0 0 17
connect 7 0 20 0 0 F 0 0 18
connect 7 0 21 0 0 F 0 0 19
connect 7 0 22 0 0 F 0 0 20
connect 7 0 23 0 0 F 0 0 21
connect 7 0 24 0 0 F 0 0 22
59
Chapter 2: Configuring Your TR1034 Board using Brooktrout Software Version 3.0.x
Configuring ISDN E1 Systems
The following sections provide configuration details for an
ISDN E1 system.
Configuring Call Control Parameters for ISDN E1
Systems
You will probably need to set a value for the following
parameter in the ecc.cfg file:
ecc_signalling_
mode
ECC operation mode
network
Specifies control of the network
1 = ISDN
Valid Values
1 = network master 0 = slave
Default: 0
call_type
Outbound call type.
99 = First attempt call type is 3.1k Audio. If this fails with a
cause value greater than 34, retry with type speech. This is a
worldwide option.
16 = Voice call (aLaw-outside US) (E1 voice-only applications)
17 = 3.1 kHz audio (aLaw-outside US)
Default = 99
switch_type
PBX switch type. Use only with PRI.
8 = other (European Option)
variant_type
PBX variant type.
6 = PRI only Euro-ISDN
[end]
60
End of module/span parameters N/A
TR1034 PCI T1/E1 Board Hardware Manual
Configuring ISDN E1 Systems
Example 7.
Call control configuration section for
ISDN E1
#
# module numbers start with 2
# span numbers start with 0
#
# configured for E1 PRI
#
ecc_signalling_mode 1
[module 2 span 0]
switch_type 8
variant_type 6
call_type 99
[end]
61
Chapter 2: Configuring Your TR1034 Board using Brooktrout Software Version 3.0.x
Configuring User Configuration Parameters for ISDN E1
Systems
You will probably need to set a value for the following
parameters in the btcall.cfg file:
debug
If this keyword is present, API debug mode will be enabled after
the first channel is reset by the software if debug mode is not
already enabled by the application. An optional filename might
be specified to set up a debug function to send output to the
specified file if a debug function was not already set by the
application.
Value Type: string
Default: disabled, stdout
debug_control e b
Turns on ISDN tracing in addition to the API debug logging
(debug keyword in the user defined configuration file). This
parameter only takes effect when the debug keyword in
btcall.cfg takes effect (when the application has not already
turned on Brooktrout API debugging). The ISDN debug
information will be added to the API debug log file, when the
API debug feature is turned on by the application. Use this
parameter only to test the installation.
This parameter should never be used, unless explicitly directed
to do so by Technical Support.
did_digits
Specifies the number of DID digits to capture. If the software
detects less than the specified number of DID digits, the board
terminates the call. Set the did_digits parameter to the total
number of digits that you expect to receive; this setting works
in all circumstances.
DID behavior also depends on the value of the configuration
file variable did_variable.
Value Type: decimal
Default: 4
62
TR1034 PCI T1/E1 Board Hardware Manual
Configuring ISDN E1 Systems
When sending digits using the en-block method, the
application passes the whole number in a single group. Most
installations receive DID digits in this way.
If you receive DID digits en-block, set the did_digits
parameter to the expected number of digits and the did_
variable parameter to 0. Setting did_digits to a value less
than the expected number of DID digits causes only the trailing
digits to be passed. For example, if the network sends 1234567
as the called party number and did_digits is set to 3, the
board returns 567 to the application. Setting did_digits to a
value greater than the number of digits you receive causes the
TR1034 board to reject the call.
did_variable
Sets the requirements for DID call detection based on the line
parameter value did_digits and the interdigit time limit.
0 = The board detects a DID call only when it receives the
number of decimal digits specified by did_digits.
1 = The board terminates the digits and detects a DID call when
it receives the number of decimal digits specified by did_digit or
when the interdigit time limit expires. If did_digits is 0, the
maximum value for did_digits increases to 127 digits, and
termination occurs based only on the time-out.
Value Type: decimal
Default: 0
When sending digits using the overlap receiving method, the
application passes the DID digits grouped into separate
messages. Overlap receiving is found in the following
circumstances:
The public network in some countries, notably Germany,
Austria, and Italy, allows a user-defined variable number
of sub-address DID digits.
When the supplemental service is DID and the data link is
point-to-point.
When the caller is dialing using overlap sending.
If you receive DID digits in overlap receiving mode and the
number of digits you might receive are variable, set the did_
digits parameter to the maximum you expect to receive and
63
Chapter 2: Configuring Your TR1034 Board using Brooktrout Software Version 3.0.x
set the did_variable parameter to 1. When the did_
variable parameter is set to 1, the board operates with a 5second interdigit time-out.
teleph
Defines the name of the telephony configuration file that
contains telephony hardware configuration information and
static telephony connection information. You must specify the
full pathname of the file.
If the file specified by the teleph keyword is present, then the file
specified by the digital keyword will not be used. If not, then the
software also checks for the digital keyword file.
Value Type: character string
Default: teleph.cfg
64
TR1034 PCI T1/E1 Board Hardware Manual
Configuring ISDN E1 Systems
Example 8.
User configuration file configuration
section for ISDN E1
did_digits 3
did_variable 0
country_code 0010
ced_timeout 6000
nrings 1
teleph C:\boston\ecc.api\server\teleph.cfg
debug \temp\btlog.txt
debug_control e b
Configuring Telephony Parameters for ISDN E1
Systems
The general format of the file is:
module mod_num
unit unit_num port_type [name=value name=value
...]
unit unit_num port_type [name=value name=value
...]
...
[
connect conn_mode src_port_class src_unit src_
stream
src_slot dest_port_class ...
connect conn_mode src_port_class src_unit src_
stream
src_slot dest_port_class ...
...
]
You will probably need to set a value for the following
parameters in the teleph.cfg file:
clock_config
Defines the transmit clock source.
1 = Loop timing: T1/E1 controller is slave to the network
(Default).
2 = Local timing: local T1/E1 controller is master.
65
Chapter 2: Configuring Your TR1034 Board using Brooktrout Software Version 3.0.x
If you set the value of clock_config to 1, set h110_master_ref
to 0 and change the value of the network parameter in ecc.cfg
file (set to 0).
If you set the value of clock_config to 2, set h110_master_ref
to 128 and change the value of the network parameter in ecc.cfg
file (set to 1).
ds1_line_type
Defines the DS1 line type.
4 = Multiframing with Si=FEBE (E1)
(Default for E1).
5 = Basic framing with no CRC4, Si=1
(E1).
h110_master_ref
For a master, the clock reference source.
0 = Span A (Default), the first T1/E1 interface is the Master
clock reference source
128 = Source clock from Internal Oscillator
To have the TR1034 board act as a network end, set this
parameter, change the clock config value to 2 and the network
value (in the ecc.cfg file) to 1. Use this configuration only for test
purposes.
line_coding
Specifies the line coding scheme on the line.
3 =HDB3
line_encoding
Specifies A-law/µ-law line encoding.
Requires a firmware reload to change.
0 = A-Law (Europe) (Default for E1)
module number
Module identification numbers range from 2 through F. Use
span 0 because there is only one span per board.
port_type
Hardware port type, one of the following (value is hex):
80 = PRI E1
200 = PRI E1
signal_mode
66
Specifies signal modes.
TR1034 PCI T1/E1 Board Hardware Manual
Configuring ISDN E1 Systems
4 = Message oriented (T1 or E1)
t1_line_build_out
T1 framer waveform configuration.
Values for E1:
0 = 75_OHM
1 = 120_OHM (Default)
unit number
Hardware port unit number, starting from 0. Unit 0 stands for
the H.100 bus and Unit 1 for the one PRI port on the TR1034.
Note:
On the TR1034, ISDN B channels can be mapped to the fax
channels by the application, or (more commonly) using
connect lines in this configuration file.
67
Chapter 2: Configuring Your TR1034 Board using Brooktrout Software Version 3.0.x
Example 9.
Telephony file configuration section for
E1 PRI
# Sample TELEPH.CFG for PRI-E1 line (teleph_hp02h_e1_isdn.cfg)
# ********** Module 0 **********
# Module 0 represents the default settings for all modules in the system
# unless a module section is defined for a specific board.
# Valid settings are 2 through F.
# Each board in a system must have a unique number.
module 0
unit 0 20 line_encoding=0 bus_speed=8 bus_clock=0 h110_master_drive=0
h110_master_ref=0 h110_master_ref_fallbk=10
unit 1 80 line_encoding=0 signal_mode=4 sig_prot=255 ds1_line_type=4
clock_config=1 t1_line_build_out=1
line_coding=3
68
TR1034 PCI T1/E1 Board Hardware Manual
Configuring ISDN E1 Systems
Example 9. Telephony file configuration
section for E1 PRI
# Connections for Telephony Unit 1
connect 7 0
2 0 0 F 0 0
0
connect 7 0
3 0 0 F 0 0
1
connect 7 0
4 0 0 F 0 0
2
connect 7 0
5 0 0 F 0 0
3
connect 7 0
6 0 0 F 0 0
4
connect 7 0
7 0 0 F 0 0
5
connect 7 0
8 0 0 F 0 0
6
connect 7 0
9 0 0 F 0 0
7
connect 7 0 10 0 0 F 0 0
8
connect 7 0 11 0 0 F 0 0
9
connect 7 0 12 0 0 F 0 0 10
connect 7 0 13 0 0 F 0 0 11
connect 7 0 14 0 0 F 0 0 12
connect 7 0 15 0 0 F 0 0 13
connect 7 0 16 0 0 F 0 0 14
connect 7 0 17 0 0 F 0 0 15
connect 7 0 18 0 0 F 0 0 16
connect 7 0 19 0 0 F 0 0 17
connect 7 0 20 0 0 F 0 0 18
connect 7 0 21 0 0 F 0 0 19
connect 7 0 22 0 0 F 0 0 20
connect 7 0 23 0 0 F 0 0 21
connect 7 0 24 0 0 F 0 0 22
connect 7 0 25 0 0 F 0 0 23
connect 7 0 26 0 0 F 0 0 24
connect 7 0 27 0 0 F 0 0 25
connect 7 0 28 0 0 F 0 0 26
connect 7 0 29 0 0 F 0 0 27
connect 7 0 30 0 0 F 0 0 28
connect 7 0 31 0 0 F 0 0 29
69
Chapter 2: Configuring Your TR1034 Board using Brooktrout Software Version 3.0.x
Ensuring that the Board is Working
Brooktrout strongly recommends that you test your TR1034
board after you install it. There are two ways the board can be
tested:
70
If you are installing Brooktrout software and writing your
own application, successfully running the sample
application verifies your board is working correctly.
Refer to the installation instructions and the release notes
that came with your Brooktrout API for more information
on installing the Brooktrout software and firmware.
If you plan to install software from another vendor, first
run the Brooktrout testnt program to test the board
installation – this is explained in Chapter 3, “Testing”, on
page 71.
TR1034 PCI T1/E1 Board Hardware Manual
3
Testing
This chapter explains how to test your TR1034
installation using Brooktrout’s configuration and
diagnostic software. If you did not receive a diskette
or CD with the test software, you can download a
copy of the test program from the Brooktrout web
site. For information about downloading the test
program or other software, see Installing the
Application on page 74.
If you have already installed your LAN Fax
application, you might want to try to use the LAN Fax
application to test your board(s). If things work, then
you will not need to proceed with this test
application. If you have not installed your LAN Fax
application, then using this test application first
should be an efficient and easy approach to testing.
Use the windows-based test program to test up to 30
channels simultaneously on one or more Brooktrout
boards in a Windows NT or Windows 2000 server.
About the Hardware Test Application
Installing the Application
Starting up the Test Program
Configuring the Test Software
Running the Test Software
71
Chapter 3: Testing
About the Hardware Test Application
The TR1034 is an intelligent one span/port v.34 capable fax
board that supports LAN Fax applications. It works with T1
Robbed-bit, T1 ISDN, and E1 ISDN digital telephony lines.
Applications written to use this board are created using the
Brooktrout Bfv API (and the Enhanced Call Control API if
ISDN functionality is required). This API code is either linked
directly into the application itself (static linking) or available to
be loaded dynamically via DLLs which would need to be
included with the application installation.
The hardware test links the API code, so no DLLs are required.
In addition, it supplies a driver to communicate between the
Bfv API function call being made in the application and the
firmware on the board. The most recent firmware is also
available in the test software package to be downloaded to the
board before running the test.
Brooktrout has provided two versions of this tool for different
API/driver versions:
SDK version Driver Version API Version Tool Version
2.1.1
4.5.6
4.5.3
2.0-45
3.0.1/3.0.3
4.6.5
4.6.3
2.0-46
If you have not installed a LAN Fax software application: Use
version 2.0-46 of the test product that installs the driver into
Windows and provides all necessary files.
If you have an installed LAN Fax software application created
using Bfv, do the following to determine the driver version:
Search your computer for the boston.sys file. Right click on the
filename and select Properties. Select the Version tab and check
the version number. If the driver version is 4.6.5, use version
2.0-46 of the test product. If the driver version is 4.5.6, use
version 2.0-45 of the test product.
If you don’t know which driver version your application is
based on, run the test tool to see if the software is compatible.
If your LAN Fax software driver is not compatible, the tool tells
72
TR1034 PCI T1/E1 Board Hardware Manual
About the Hardware Test Application
you to run the other version of the program. Start with one
based on 2.0-46, as it is more likely that your application is
based on that version.
73
Chapter 3: Testing
Installing the Application
This section describes how to access, install, and configure
product files. It has the following section:
Checking the Installed Files
Operating Notes
About Using This Software
You might have received the Brooktrout Hardware Test files on
a CD that came with your board. If you did not get the files on
a CD, you can download a self-extracting zip file from the web
by doing the following:
1.
2.
3.
4.
5.
6.
7.
8.
74
Go to the Brooktrout website (www.brooktrout.com).
Select Support.
Select TR1034.
Select Download.
Click Hardware Diagnostic Test for Windows.
Select FaxDiag_TR1034.exe to download the file.
Save the file to an empty directory.
Double click the file to extract the test files to the current
directory.
TR1034 PCI T1/E1 Board Hardware Manual
Installing the Application
Checking the Installed Files
After extracting the hardware test tool, the following files are
present:
Files for Version 2.0-46
boston.sys
Boston driver v4.6.5 (right click to view properties in File
Manager)
bt_cparm.cfg
Country configuration file. Do not change this file.
btcall.cfg
User configuration file. Change this file if you need to define a
different number of called digits.
FaxDiag.exe
The test program
install.exe
Use this program to uninstall the driver if the hardware test tool
installed it (See results.txt file to see if the driver was installed if
you don't remember seeing it on the display.)
Msg.txt
File providing text messages displayed by the test program
test.ips
One page test fax file in Brooktrout packet format
test_bootdsp.hex
test_cp.bin
test_dsp1000_
v34.hex
Standard firmware files, prefixed with word “test_”. The files
are the same ones used by an actual installation.
Additional files that might be created:
Results.txt
General troubleshooting log for the test application
logXX.txt
Troubleshooting log for each channel (also called the api debug
logs)
ecclog.txt
Enhanced Call Control layer troubleshooting log
dh.log
Dump history troubleshooting log
log_driver.txt
Driver troubleshooting log
log_isdn.txt
ISDN only layers 2 and 3 trace troubleshooting log
teleph.cfg
Telephony configuration file (make changes to this file using a
text editor only under the direction of Brooktrout Support.)
75
Chapter 3: Testing
ecc.cfg
ECC configuration file (make changes to this file using a text
editor only under the direction of Brooktrout Support.)
Files for Version 2.0-45
bt_cparm.cfg
Country configuration file. Do not change this file.
btcall.cfg
User configuration file. Change this file if you need to define a
different number of called digits.
FaxDiag.exe
The test program
Msg.txt
File providing text messages displayed by the test program
test_bootdsp.hex
test_cp.bin
test_dsp1000_
v34.hex
Standard firmware files, prefixed with word “test_”. The files
are the same ones used by an actual installation.
test.ips
One page test fax file in Brooktrout packet format
Additional files that may be created:
Results.txt
General troubleshooting log for the test application
logXX.txt
Troubleshooting log for each channel (also called the api debug
logs)
ecclog.txt
Enhanced Call Control layer troubleshooting log
dh.log
Dump history troubleshooting log
log_driver.txt
Driver troubleshooting log
log_isdn.txt
ISDN only layers 2 and 3 trace troubleshooting log
teleph.cfg
Telephony configuration file (make changes to this file using a
text editor only under the direction of Brooktrout Support.)
btna.cfg
This ECC configuration file is named and located as specified in
the Windows Registry for the ECC component of your current
LAN Fax application (edit this file only when troubleshooting
with Technical Support).
Note: btna.cfg will only be created if you select ISDN call
control.
76
TR1034 PCI T1/E1 Board Hardware Manual
Installing the Application
In the case of 2.0-45, there is a Windows service component
called BSMIService that must be previously installed in your
system if you want to do ISDN call control. Check with your
LAN Fax application vendor if you do not find this component.
Operating Notes
You might need to modify the following keyword entries in the
btcall.cfg user configuration file in certain setups as outlined
below. Make these changes before starting up the test
application.
did_digits
Specifies the number of DID digits to capture. Should be set to
the total number of digits that you ever expect to receive - this
works in all circumstances.
The parameter is applicable for T1 DNIS and the ISDN called
party number.
DID behavior also depends on the value of the did_variable
keyword.
This parameter might be needed for E1 PRI installations.
did_variable
Sets the requirements for DID call detection based on the line
parameter value did_digits and the interdigit time limit.
0 = the board detects a DID call only when it receives the
number of decimal digits specified by did_digits. This setting is
always used in case of en-block receiving, which means that the
whole number is passed in a single group. The call is terminated
if the specified number of DID digits is not detected, which
means that you have set did_digits too high.
1= the board terminated the digits and detects a DID call when
it receives the number of decimal digits specified by did_digits
or when the interdigit time limit expires. If did_digits is 0, the
maximum value for did_digits increases to 127 digits, and
termination occurs based only on the time-out. Needed when
you expect to receive a variable number of digits. You must
make sure that you set did_digits high enough.
77
Chapter 3: Testing
About Using This Software
Using the Main Window
After installing and starting the hardware test product, the
following screen provides access to most product functions. It
lists all ports on the board you selected and provides port status.
Using the Buttons on the Screens
For the buttons listed on the bottom of any window, a single
mouse click activates the button.
About
The ABOUT button provides information including the version
number of the driver and describes how to contact Brooktrout
Technical Support.
Send
The SEND button lets you send a fax again.
78
TR1034 PCI T1/E1 Board Hardware Manual
Installing the Application
Cancel
The CANCEL button or the Esc key brings you back to the
Channel Overview screen.
Help
The HELP button gives further information about what you
can do in the Status History screen.
Log
The LOG button creates a log file that records the send/
receiving activities for each channel used. If you have problems
sending and receiving faxes, click the LOG button before using
the channel. Logs are created for each fax sent or received until
the LOG button is clicked again. Look for the logs as logxx.txt
files in the current directory. To disable the LOG command,
click LOG again and following the instructions on the screen.
Quit
The QUIT button closes the test utility. See Stopping the Test
Program on page 95 for more details about closing the program.
Mouse Properties for Windows 2000 Systems
For Windows 2000 systems only, you might have to change the
mouse properties.To change mouse properties, do the
following:
1.
2.
3.
4.
Position the mouse arrow on the blue line at the top of the
test window.
Right click.
When the window appears, uncheck QuickEdit Mode and
Insert Mode.
Click Okay.
Plug and Play Drivers for Windows 2000
For Windows 2000 systems only: Future releases of the Boston
driver might be plug and play (PnP) compatible. After the PNP
driver gets installed as part of your LAN Fax application
installation, it starts up automatically and should be compatible
with this program without any modifications.
79
Chapter 3: Testing
Starting up the Test Program
Use the following procedure to start up the test program.
1.
2.
3.
Open a DOS command prompt window.
Although you can run the hardware test tool by doubleclicking it in File Manager, if you get errors, the DOS
window that opens when you start the program this way
might close before you can see those errors.
Go to the directory that supports your software version
(using the 'cd' command).
Go to the \FaxDiag46 directory first to start version 2.0-46
of the tool, unless you already know you have a 4.5 driver
version installed. If you have a 4.5 driver installed, go to
the \FaxDiag45 directory to start version 2.0-45.
To start the hardware tool, enter the following command
in the DOS window:
FaxDiag
For 2.0-46
If you are starting version 2.0-46 of the tool and no driver
is installed, a driver will be installed.
If the driver is started already, it will try to stop it and start
it.
If the driver is stopped, it will try to start it.
For 2.0-45
If you started up version 2.0-45, no driver will be installed.
If you already have a compatible driver, the system is ready
to test. If you do not have a compatible driver, the
program requests that you run version 2.0-46.
The tool also stops BSMIService if it is already running.
80
TR1034 PCI T1/E1 Board Hardware Manual
Starting up the Test Program
The system prompts you to enter a module number or to
change software parameters.
4.
Enter a module (board) number to test the board or
possibly to change parameters for that board.
You can only test one board at a time. You must restart the
application for each board you want to test. After selecting
the board, you can change telephony parameters. See
Configuring the Test Software on page 82.
81
Chapter 3: Testing
Configuring the Test Software
This window appears if you need to configure T1 telephony
parameters (default):
This window appears if you need to configure E1 telephony
parameters (choose 2 and select E1 PRI):
82
TR1034 PCI T1/E1 Board Hardware Manual
Configuring the Test Software
Choose '0' the first time you run the tool or any time you
want to create new configuration files based on your
menu selections. See the next section for configuration
values.
OR
Choose 1 to use settings from configuration files that were
created on a previous run of this tool.
Do not use your own versions of such files (from, for
example, an existing LAN Fax application) without advice
from Technical Support.
83
Chapter 3: Testing
Defining Parameters
Before you select 0 to select parameters, use the DOS-based
menu to define parameters. You must know the settings of your
line in advance if you expect this program to work. Verify your
parameter values with your Telco provider.
Signaling Mode
Select 2 to specify port type and signaling mode. Choose from
the following options:
0.
1.
2.
3.
4.
Framing
No Change
T1 Robbed Bit E&M Wink Start
T1 Robbed Bit E&M Immediate Start
T1 PRI ISDN
E1 PRI ISDN
Select 3 to specify framing.
For T1, choose from the following options:
0.
1.
2.
No change
Extended SuperFrame
SuperFrame (D4)
For E1, choose from the following options:
Line Coding
0.
No change
3.
CRC4 Multiframing with Si=FEBE
4.
Basic framing with no CRC, Si=1
Select 4 to specify line coding.
For E1, there is only one option displayed on the main screen.
4.
Line Coding: HDB3 (only choice for E1)
For T1, choose from the following options:
84
0.
No change
1.
B8ZS
3.
AMI (Basic - No suppression)
TR1034 PCI T1/E1 Board Hardware Manual
Configuring the Test Software
Line Length/
Connector Type
For T1 configurations only: select 5 to specify line length in feet.
Choose from the following options:
0.
1.
2.
3.
4.
5.
No change
0-133
133-266
266-399
399-533
533 - 655
For E1 configurations, select 5 to specify connector type.
Choose from the following options:
0.
No change
6.
75 Ohm (coaxial)
7.
120 Ohm (RJ-45/48)
After selecting and defining parameters, the software writes the
following files to the current directory:
teleph.cfg
ecc.cfg (for version 2.0-46)
btna.cfg (for version 2.0-45, this file is only created if you
made an ISDN selection.)
For Version 2.0-45 with ISDN call control only, if backup copies
of the BTNA and user configuration files do not exist, the
software attempts to create backup copies (by adding .bak to
existing file names). To locate these files, the software checks the
BSMIService Windows Registry entries for the path/names of
these files.
The newly created btna.cfg file and the “updated” btcall.cfg files
are copied over the files that were just backed up.
After creating or updating files, the software tries to start
BSMIService. If this attempt fails, contact your LAN Fax vendor
for assistance in verifying your BSMI service installation.
85
Chapter 3: Testing
The btcall.cfg teleph keyword line will be updated with the full
path of the teleph.cfg file so that the BSMI Service can find the
teleph.cfg file.
If you are using version 2.0-46 with ISDN call control, the test
tool waits for up to 5 minutes while the bearer channels come
into service. Then the user interface of the tool appears. If this
wait happens, check to make sure your ISDN line is working.
The LED next to the span/port must be solid green.
86
TR1034 PCI T1/E1 Board Hardware Manual
Running the Test Software
Running the Test Software
Use this software to do the following:
Viewing the Status of Available Channels From the Main
Window
Sending a Fax
Viewing Line Status
Receiving a Fax
Creating Log Files
Stopping the Test Program
87
Chapter 3: Testing
Viewing the Status of Available Channels From the Main
Window
The Channel Overview screen lists each channel and its status.
For button and mouse information for this and other screens,
see Operating Notes on page 77. Based on your definition of
port type and signaling mode, the screen displays the following
number of ports:
Port Type
Number of Ports
T1 Robbed Bit
24
T1 ISDN
23
E1 ISDN
30
Note: If you have EI ISDN, there is not enough display space
for 30 channels. Channels numbered 27-29 (zerobased) share a common line:
27-29
88
TR1034 H.100
Waiting for Call
TR1034 PCI T1/E1 Board Hardware Manual
Running the Test Software
Sending a Fax
Use the following procedure to send a fax.
1.
Select SEND to send the fax.
The software displays a box requesting information about
where to send a fax.
2.
3.
4.
Enter a port (channel) number.
Use the Tab key to move to the next field.
Enter the phone number of a local fax machine.
Use one of the following values to wait before dialing the
number if you need to have the channel wait for a dial
tone. Use these values only for T1 Robbed Bit systems.
Value
Definition
w
Wait for dial tone
, (comma)
1 second pause
; (semicolon)
5 second pause
To send and receive a fax through different ports on your
board, dial any phone number mapped to the T1/E1 line
connected to your board. In this configuration, the
TR1034 acts as both the sending and receiving sides of a
fax transmission so that no actual fax machine is involved.
The Status messages of the port in question change, and
these messages report the progress of the Send activity.
89
Chapter 3: Testing
If the fax goes through correctly, the following message
appears telling you so.
5.
90
Select OK to remove the window.
TR1034 PCI T1/E1 Board Hardware Manual
Running the Test Software
Viewing Line Status
Use the following procedure to get more information about
port activity:
1.
2.
Highlight the port number you want to examine further.
Select that line again or press Enter to display the Status
History screen.
The following screen appears:
3.
Select Cancel to return to the Channel Overview screen.
91
Chapter 3: Testing
Receiving a Fax
To see if your system can receive a fax from an external system,
do the following:
1.
From a local fax machine, dial the phone number
corresponding to the port.
Once the call is detected, the port picks up and starts to
receive the fax automatically.
After the fax is received, it is saved in a file and a message
is displayed.
2.
To allow the port to be available for the next call, select
OK.
To display details about the port, highlight the line that
lists the port number.
Select that line again or press Enter to display the Status
History screen.
To send the fax back out to a local fax machine, select
SEND and enter the name of the file that was received (in
this example it would be rec00.ips).
3.
4.
5.
92
TR1034 PCI T1/E1 Board Hardware Manual
Running the Test Software
Creating Log Files
The LOG button creates a log file that records the send/
receiving activities for each channel used. If you have problems
sending and receiving faxes, click the LOG button before using
the channel. Logs are created for each fax sent or received until
the LOG button is clicked again. Look for the logs as logxx.txt
files in your fax center directory. To disable the LOG command,
click LOG again and follow the screen prompts.
Starting up Log
Mode
To create log files that include all commands, data, interrupts
and messages, do the following:
1.
From the Channel Overview screen, click the Log option.
The first time you turn on a log in a session, the following
message appears:
2.
Click OK to start the Debug Mode and create log files for
each port.
If there are previous log files, the following message
appears:
93
Chapter 3: Testing
Stopping Log
Mode
Once your system is creating log files, to turn off the log mode,
click the Log option again. The following message appears:
Click OK to stop logging information.
Using the Dump
History Mode
Using the LCMON
Mode
94
The DH button is for capturing the dump history. Use this
option only when requested by Brooktrout Technical Support.
1.
When you select the DH (Dump History) option, the
following message appears:
2.
3.
Select OK to create a dump history log.
Stop the logging action by selecting the DH option again.
Use the LCMON button to disable or enable loop current
monitoring (for T1, it enables or disables answer supervision or
signaling). Only use the LCMON button if requested by
Brooktrout Technical Support.
TR1034 PCI T1/E1 Board Hardware Manual
Running the Test Software
Stopping the Test Program
Stopping
Version 2.0-45
To shut down the test program for version 2.0-45 of the
software, do the following:
Select Quit to stop the program.
If using ISDN Call control, the software restores the files
that were backed up earlier directly over the ones used by
the tool, restoring your Brooktrout installation
completely. At no time are any Windows Registry settings
ever changed by this tool for your BSMIService
installation.
Stopping
Version 2.0-46
To shut down the test program for version 2.0-46 of the
software, do the following:
1.
2.
3.
Select Quit to stop the program.
If you plan to re-use the test tool, then you are finished.
If you will not be using this tool again, you should remove
the driver if the install procedure installed a driver in the
test program folder.
See the results.txt file to see if the driver was installed. If no
driver was installed, then you are finished.
Before removing the driver, stop the driver first by
entering the following at any command prompt:
net stop boston
4.
To remove the driver, enter the following command from
the FaxDiag46 directory:
install -r
95
A
Hardware
This hardware appendix describes the physical
features of the TR1034 series of boards. It describes
various telephone services appropriate for boards,
and provides information for regulatory and
standards compliance.
It has the following sections:
TR1034 Models
TR1034 Features
Telephone Jack PinOut
Monitoring LED Activity
North American Standards Compliance
97
Appendix A: Hardware
TR1034 Models
The following table summarizes the TR1034 PCI boards, their
number and type of channels, and their availability. Each model
can use the same type and number of telephone lines as
interfaces on the board.
Table 1. TR1034 Models
98
Board Type
#
Channels
TR1034+P8H-T1
8
TR1034+P16H-T1
16
TR1034+P24H-T1
24
TR1034+P8H-E1
8
TR1034+P10H-E1
10
TR1034+P16H-E1
16
TR1034+P20H-E1
20
TR1034+P30H-E1
30
TR1034 PCI T1/E1 Board Hardware Manual
TR1034 Features
TR1034 Features
The TR1034 is built upon the same TRxStream platform as the
TR1000 and shares its highly scalable carrier-grade design.
However, it is permanently configured to meet the unique
needs of the fax service provider market, providing up to 30
channels of robust, high-performance V.34 fax in a single
PCI slot.
Note: Do not combine the TR1034 in the same chassis with a
TR114 board. This combination might not work with
your LAN Fax application.
Combining the TR1034 With Other Boards
Can combine the TR1034 in the same chassis with other
TRxStream boards
If you have multiple TR1034 in same chassis, do not
connect them using the H.100 bus.
Base card power requirements: 3A at 5VDC = 15W
Operating temperature: 0°C–50°C
Humidity: 10%–95% non-condensing
Windows NT 4 server (SP 4, 5 or 6a)
Windows 2000
Sun Solaris Intel 2.6, 2.7 (7)
Sun Solaris SPARC 2.6, 7 (2.7), 8
Unixware 2.1.3, 7.0.1, 7.1.0
Linux Redhat 6.0, 6.1, 6.2, 7.0 (uniprocessor only)
Control CPU
PowerPC 8240@200MHz
6 DSPs:
Specifications
Power and
Environmental
Operating
systems
supported
PCI Platforms
TI 320C549@100MHz
99
Appendix A: Hardware
Voice channels: Up to 30
Fax channels: Up to 30 ( V.34)
Telephony Bus:
ECTF H.100; TDM capacity: 4,096 time slots
1 RJ48C T1/E1 connector
Physical: One full-size PCI slot
Maximum speed: 33.6 Kbps
Emulates Group-3 fax device, uses ITU T.30 protocol
V.34 (33.6 Kbps), V.17, V.29, V.ter, V.21 & V.33
modulation with auto fallback
Error correction mode (ECM) is supported
Compression schemes (done “on the fly”)
MH (T.4 1-dimensional)
MR (T.4 2-dimensional)
MMR (T.6) [Is only available with ECM]
Superfine resolutions: 300x300,200x400,400x400
Supported file types:
TIFF –F
ASCII
PCX/DCX
Infopacket
ASCII conversion on the fly
Headers and footers supported
Line error detection/correction
Font download
Polling
Fax Features
Intelligent Call Progress
Detects dial tone
100
Optional with Brooktrout boards
TR1034 PCI T1/E1 Board Hardware Manual
TR1034 Features
On-board algorithms detect variety of phone line
conditions
Busy signals (regular and reorder)
Human answered
Fax tone
Special Information Tone (SIT)
3-beep warning sound
Disconnected, out of service, circuits busy, etc.
Detection of international signals
Up to 3 (8) proprietary tones can be detected
ISDN
All additional features/services inherent in ISDN can be
implemented
Providing called party number, setting calling party
number
ISDN disconnect cause can be returned to the user
Call Control Capabilities
All On-board: no separate interface card needed
Common Channel Signaling (CCS)
E1 EuroISDN
T1 North American ISDN
Channel Associated Signaling (CAS)
T1 Robbed Bit signaling – Transparent Mode E&M
CAS R2 signaling (requires extra implementation
making use of BSMI API)
Interface board connected to H.100 bus
Whatever protocol
For example, SS7 via Brooktrout Netaccess board
Interfaces
Full T1/E1 and “fractional” T1/E1 supported
101
Appendix A: Hardware
Works with telco-supplied T1/E1 lines, or T1/E1 lines
from a PBX
Various frame modes, line codings, signal protocols
supported
Inbound routing supported via DNIS, ANI, DTMF, MF or
CPN routing
Voice Capabilities
Digitizing/Compression
G.711 u-law or A-law
OKI ADPCM 24/32Kbps (6/8k sample rates)
11kHz 8/16 bit linear PCM (.WAV)
8kHz 16 bit linear PCM (.WAV)
Speech play and record
Automatic Level control record
Dynamic Range Compression
Silence Compressed Record
Noise Suppression
Voice Playback controls
Volume and Pitch Corrected Speed
Robust DTMF detection during voice playback
Voice Activated Record – with silence suppression
(Initial Silence Suppression)
Tone detection
102
Incoming digits detected automatically
DTMF and MF
Application can even implement this when using ISDN in
the first place for the called party number
Outgoing, board can dial DTMF
TR1034 PCI T1/E1 Board Hardware Manual
Telephone Jack PinOut
Telephone Jack PinOut
PRI Pinout
On all TR1034 PRI models, the 8-pin RJ-45 jack accesses all
TR1034 channels.
The pinout is as follows:
PRI Network Interface card Port
The PRI port PIN Assignments (TE)
Pin 1 = Receive Ring
pin 2 = Receive Tip
Pin 4 = Transmit Ring
Pin 5 = Transmit Tip
Pin 8
Cross over cable needed to swap
receive and transmit pins
(to swap from TE to NT)
Pin 1
103
Appendix A: Hardware
Monitoring LED Activity
LED activity can be useful in diagnosing difficulties with the
board. This section describes the significance of LED activity
for the TR1034.
Mounting Brackets
A status LED for the T1/E1 line is located below the T1/E1
connector (Figure 1).
Mounting Bracket
T1/E1 Connector A
T1/E1 Status LED A
Board Status LED
Un
Figure 1.
104
TR1034 LED Location
TR1034 PCI T1/E1 Board Hardware Manual
Monitoring LED Activity
Interpreting T1/E1 LED Signals
The following table shows the possible states for the LEDs.
T1/E1 LED
Off
Red
Green
Orange
Red/Orange
Indicates
Board is not yet configured by software.
Layer 1 is down because of one of the
following problems:
The line is disconnected.
Service not turned up.
Mismatch in physical attributes.
Layer 1 is functioning (framing, line coding,
clocking are good).
The board’s telephony port is attempting to
synchronize with the phone line.
Synchronization not quite achieved between
the board and the line.
Make sure telco is master over the line, and
the board is set as slave.
105
Appendix A: Hardware
Interpreting Board Status LED Signals
An additional LED (Board Status, see Figure 1) is provided to
indicate the overall status of the TR1034 board:
Board Status LED
Indicates
Off
The server is off, is not getting enough power,
or the wrong module is set.
Slowly flashing orange
The board powered up and passed internal
tests, no firmware downloaded yet.
Steady, or rapidly
flashing, red
The board powered up, but failed tests; or,
“hung” during fax process.
Run dump history to capture debug output.
Afterwards, we recommend a “cold boot” to
clear the system.
Flashing quickly
between orange and
green
The board is downloading firmware.
Slowly flashing green
The firmware is downloaded; the board is in
service.
Note: On TR1034, there are no LEDs specifically associated
with channels.
106
TR1034 PCI T1/E1 Board Hardware Manual
North American Standards Compliance
North American Standards Compliance
Note to developers and system integrators: The following
compliance information must be provided to your customer
and the end user as part of your system documentation.
The Federal Communications Commission (FCC) in the
United States and Industry Canada (IC) in Canada regulate all
electronic devices that connect to the telephone system and/or
generate radio frequency signals. The TRxStream board is such
a device and must comply with the regulations specified below.
Telephony Regulations
FCC Notices for Registered Component
Devices
This equipment is registered with the FCC under Part 68 as a
component device for use with a host computer. In order for
the FCC registration of this product to be retained, all other
products used in conjunction with this product must also be
FCC Part 68 registered for use with these hosts. If any of these
components are not registered, then you are required to obtain
FCC Part 68 registration of the assembled equipment prior to
connection to the telephone network. Part 68 registration
requires that you maintain this approval and as such are
responsible for the following:
Any component added to your equipment, whether it bears
component registration or not, will require a Part 68
compliance evaluation. You may need to test and make a
modification filing to the FCC before that new component can
be used.
Any modification/update made by a manufacturer to any
registered component within your equipment, will require a
Part 68 compliance evaluation. You may need to test and make
a modification filing to the FCC before that modified
component can be used.
107
Appendix A: Hardware
If you continue to produce this component you are required to
comply with the FCC's Continuing Compliance requirements.
Therefore, it is recommended that only FCC Part 68 registered
devices bearing the 'CN' or 'CE' equipment code as part of the
FCC registration number, be used. To determine if your
particular components are appropriately approved, look for the
FCC registration number on all components and ensure that
the equipment code '-CN-' or '-CE-' is part of that number.
Refer to the FCC Registration number on this product as an
example.
If at any time the ownership of this component device is
transferred to someone else (whether independently or as part
of a system), supply this manual to the new owner.
FCC Rules Regarding Fax Branding
The Telephone Consumer Protection Act of 1991 makes it
unlawful for any person to use a computer or other electronic
device to send any message via a telephone fax machine unless
such message clearly contains, in a margin at the top or bottom
of each transmitted page or on the first page of the
transmission, the date and time it is sent; an identification of
the business, other entity, or individual sending the message;
and the telephone number of the sending machine, business,
entity, or individual.
Users:
To program this information into your fax machine, follow the
procedure described in your user manual.
Developers:
You must include facilities in your application to enable the user to
enter the required information. Use the API’s BfvFaxHeader
function with the TRxStream to place this information on each
transmitted page as required. You must also include, in your user
manual, instructions for entering this information into your
system.
108
TR1034 PCI T1/E1 Board Hardware Manual
North American Standards Compliance
FCC Regulations For Connecting to a T1 Phone
Line (Part 68)
The Federal Communications Commission (FCC) has
established rules that permit a TRxStream board to be directly
connected to the telephone network:
Standardized jacks are used for connections.
This equipment may not be used on coin service provided
by the telephone company. Connection to party lines is
subject to state tariffs. (Contact your state public utility
commission or corporation commission for information.)
A malfunctioning circuit can harm the telephone network.
Disconnect a malfunctioning TRxStream from the telephone
network until you determine the cause of the malfunction and
repair it. If a malfunctioning TRxStream remains connected,
the telephone company may temporarily disconnect service.
The TRxStream board is approved as a DSX-1 device. Federal
regulations (FCC Part 68) prohibit connection of a DSX-1
device to the network without an FCC approved Channel
Service Unit (CSU). Customers connecting this device to the
network shall, upon request of the telephone company, inform
the telephone company of the particular lines to which such
connections are made and the FCC registration of the
protection device (CSU).
The CSU has been designed to prevent harm to the T1 network.
If the telephone company finds that the equipment is exceeding
tolerable parameters, the telephone company can temporarily
disconnect service, although they will attempt to give you
advance notice if possible.
If the telephone company alters their equipment in a manner
that will affect use of this device, they must give you advance
warning so as to give you the opportunity for uninterrupted
service. You will be advised of your right to file a complaint
with the FCC.
Under the FCC rules, no customer is authorized to repair this
equipment. This restriction applies regardless of whether the
equipment is in or out of warranty.
109
Appendix A: Hardware
Before connecting the TRxStream to telephone service, you
must give a representative of the local telephone company the
following information:
The telephone numbers (Port ID) to which the TRxStream
is connected.
SOC: 6.0P
FIC: 04DU9-BN
04DU9-DN 1.544Mbps SF+B8ZS
04DU9-1KN 1.544Mbps ESF
04DU9-1SN 1.544Mbps ESF+B8ZS
The type of wall jack required: USOC-RJ-48C
The FCC Registration number: Labeled on back of board
FCC registration of the protection device (CSU)
1.544Mbps SF
IC Equipment Attachment Limitations (CS-03)
The Industry Canada label identifies certified equipment. This
certification means that the equipment meets certain
telecommunications network protective, operational, and
safety requirements. Industry Canada does not guarantee the
equipment will operate to the user's satisfaction.
Before installing this equipment, users should ensure that it is
permissible to be connected to the facilities of the local
telecommunications company. The equipment must also be
installed using an acceptable method of connection. In some
cases, the company's inside wiring associated with a single line
individual service may be extended by means of a certified
connector assembly (telephone extension cord). The customer
should be aware that compliance with the above conditions
may not prevent degradation of service in some situations.
Repairs to certified equipment should be made by an
authorized Canadian maintenance facility designated by the
supplier. Any repairs or alterations made by the user to this
equipment, or equipment malfunctions, may give the
telecommunications company cause to request the user to
disconnect the equipment.
110
TR1034 PCI T1/E1 Board Hardware Manual
North American Standards Compliance
Users should ensure for their own protection that the electrical
ground connections of the power utility, telephone lines, and
internal metallic water pipe system, if present, are connected
together. This precaution may be particularly important in
rural areas. Users should not attempt to make installation
connections themselves, but should contact the appropriate
electric inspection authority or electrician, as appropriate.
The Industry Canada certification number is found on the back
of the board.
Electromagnetic Emissions
This product was tested for emissions in a computer meeting
the limits of FCC Part 15, Class A. In order to ensure that it
continues to meet the Class A emissions limits it should be
installed in a host computer or other enclosure which also
meets the Class A limits and bears an FCC Part 15 registration
number, a FCC logo and/or a CE marking.
FCC Emissions Information
All computing devices utilizing clock frequencies in excess of 10
kHz must be tested for compliance with RF emission limits set
by the FCC.
Changes or modifications to this unit not expressly approved
by Brooktrout Technology, Inc. could void the user’s authority
to operate the equipment.
Pursuant to Part 15 of the FCC Rules, this equipment has been
tested and found to comply with the limits for a Class A digital
device. These limits provide reasonable protection against
harmful interference when the equipment is operated in a
commercial environment. This equipment generates, uses, and
can radiate radio frequency energy, and if not installed and
used in accordance with the instruction manual, it may cause
interference harmful to radio communications. Operation of
this equipment in a residential area is likely to cause harmful
interference, in which case, the user will be required to correct
the interference at his or her own expense.
111
Appendix A: Hardware
IC Emissions Notice
This Class A digital apparatus complies with Canadian ICES003.
Cet appareil numérique de la class A est conforme à la norme
NMB-003 du Canada.
Safety
The TRxStream is recognized by ETL; the component
recognition number is on the back of the board. The
TRxStream has been tested and complies with UL Standard
1950, Third Edition and with CSA Standard C22.2 No.950-95,
Safety of Information Technology Equipment, Including Electrical
Business Equipment.
This product must be mounted in the final assembly so that it
is isolated from exposure to any hazardous voltages (voltages
greater than 42.4V peak or 60Vdc) within the assembly.
Adequate separation and restraint of cables and cords must be
provided.
To maintain the safety certification of the system, ensure that
the power drawn from the power supply does not exceed its
capacity. Please refer to the power usage table on the hardware
installation card applicable to your board for information on
the voltages and currents required for proper operation.
112
TR1034 PCI T1/E1 Board Hardware Manual
B
Error Codes
This appendix provides information about call
progress error codes, result error codes, reset error
codes, and ISDN cause codes.
It includes the following sections:
Call Progress Error Codes
Result Error Codes
Reset Error Codes
ISDN Cause Codes
113
Appendix B: Error Codes
Call Progress Error Codes
Final Call Progress Codes
Since the software returns the value of Final Call Progress at the
end of phase A when no fax information transfer has taken
place, any issues are telephony and not fax related. These would
be logged in cases such as failure to dial out from behind a PBX,
invalid numbers, or no connection/open circuit cables.
Value
Call
Progress Type Description
301
FCP_BUSY1
Normal busy; remote end busy (off-hook).
302
FCP_BUSY2
Normal busy; remote end busy (off-hook). Used
instead of BUSY1 in certain countries.
303
FCP_ROBUSY
Reorder or fast busy; indicates that telephone
company trunk lines are busy; on PBXs, indicates
no available outside lines.
304
FCP_RECALL
Recall dial tone detected; signal generated when
calling another party while already connected to one
or more parties (for example, conference calling,
call waiting).
305
FCP_CONFIRM
Confirmation tone; automated equipment
acknowledges successful completion of caller
requested feature (for example, call forwarding).
This is not G2 confirmation tone (CFR2).
306
FCP_PULSE
This result is reserved and should never occur.
316
FCP_HUMAN
Answer (probable human) detected; does not match
any other expected call progress signal patterns.
317
FCP_ANSWER
Remote end answered call; can occur immediately
after a break in the ring-back cycle; like HUMAN,
does not match any other call progress signal
patterns, but is marked by silence.
318
FCP_DIALTON
Dial tone detected; usually indicates the dialing
sequence did not break dial tone.
324
FCP_SILENCE
In VOICE mode, after dialing, no signal detected
during the silence timeout. In ANSWER mode, no
fax CNG tone detected after answering a call.
114
TR1034 PCI T1/E1 Board Hardware Manual
Call Progress Error Codes
Value
Call
Progress Type Description
325
FCP_RNGNOANS
Indicates the remote end was ringing but did not
answer. In fax mode, this result occurs after the
ced_timeout (default: 40 secs) has expired and the
line continues to ring (You can adjust the value of
these time-out parameters in the btcall.cfg
configuration file).
326
FCP_G2DETCT
Group 2 fax machine detected; remote machine is
capable of sending and receiving G2 facsimiles only.
327
FCP_SITINTC
Intercept tone detected; remote end originating
failure; invalid telephone number or class of service
restriction. With the ISDN TR1034, this can also
indicate a datalink mis-match (ptp or pmp).
328
FCP_QUIET
After dialing the number, no energy detected on the
line for the wait_for_ced time-out period; possible
dead line.
329
FCP_SITVACODE
Vacant tone detected; remote originating failure;
invalid telephone number.
330
FCP_SITREORD
Reorder tone detected; end office (PBX) or carrier
originating failure.
331
FCP_SITNOCIR
No circuit detected; end office or carrier originating
failure, possible dead line.
332
FCP_CNGDETCT
CNG fax calling tone detected.
339
FCP_ANSWER_TONE_
DETECT
Fax machine detected; usually a fax CED tone, but
also fax V.21 signals when the remote machine does
not send a CED tone before it sends the fax protocol
information.
340
FCP_UNKNOWN
An error occurred due to an unknown cause.
348
FCP_ISDN_CALL_
PROGRESS
By enabling call progress on an ISDN D channel,
one of the following values is in the second byte of
the FIFO buffer:
4: CALL_PROCEEDING: Call is proceeding
normally.
5: CALL_ALERTING: Ringback detected; remote
end is ringing
6: CALL_CONNECTED: Call is connected
7: CALL_DISCONNECTED: Call was disconnected
349
FCP_ISDN_CALL_
COLLISION
Indicates that a call collision occurred on the ISDN
line.
115
Appendix B: Error Codes
Result Error Codes
Fax Hang-up Codes
The fax hang-up codes are first divided into whether the fax was
being originated, or answering. They are further grouped into
which of the T.30 phases the hang up occurred. The codes and
a brief description of that code are listed below.
From the hang-up code, it is possible to identify during which
phase the hang up occurred, whether the board was originating
or answering, and obtain a description.
The Response Received? and Command Received? sections are
called from a variety of locations within the T.30 protocol, and
you also need to determine where the Response Received? or
Command Received? was called.
Value
Hang-up code
Description
Call Placement Phase A Codes
0
HNG_NORMAL_XMIT
Normal and proper end of connection.
1
HNG_RNG_DET
Ring detected without a successful
handshake.
2
HNG_ABORT
Call Aborted
3
HNG_NO_LOOP_CURRENT
No loop current or A/B signaling bits.
4
HNG_ISDN_DISCONNECT
ISDN disconnection.
11
HNG_T1_TIMEOUT
No answer, T.30 T1 time-out.
Transmit Phase B Codes (A-1)
20
HNG_XMITB_TIMEOUT
Unspecified transmit Phase B error.
21
HNG_XMITB_NORM
Remote cannot receive or send.
22
HNG_XMITB_MISC
COMREC error, Phase B transmit.
23
HNG_XMITB_COMREC_VCNR COMREC invalid command received.
24
HNG_XMITB_SE
RSPREC error
25
HNG_XMITB_DCS_FTC
DCS send three times without response.
116
TR1034 PCI T1/E1 Board Hardware Manual
Result Error Codes
Value
Hang-up code
Description
26
HNG_XMITB_DIS_FTC
DIS/DTC received three times; DCS not
recognized.
27
HNG_XMITB_TRAINFAIL
Failure to train.
28
HNG_XMITB_RSPREC_VCNR
RSPREC invalid response received.
29
HNG_XMITB_COMREC_DCN
DCN received in COMREC.
30
HNG_XMITB_RSPREC_DCN
DCN received in RSPREC.
33
HNG_PHASEB_INCOMPAT_FMT Incompatible fax formats, for example, a
page width mismatch.
34
HNG_XMITB_INVAL_DMACNT Invalid DMA count specified for transmitter.
35
HNG_XMITB_FTM_NOECM
Binary File Transfer specified, but ECM not
enabled on transmitter.
36
HNG_XMITB_INCMP_FTM
Binary File Transfer mode specified, but not
supported by receiver.
37
HNG_XMITB_INCMP_EFF
Remote does not support EFF page options
required by host.
38
HNG_XMITB_NOEFF
Remote does not support EFF page coding.
Transmit Phase D Codes
40
HNG_XMITD_RR_NORES
No response to RR after three tries.
41
HNG_XMITD_CTC_NORES
No response to CTC, or response was not
CTR.
42
HNG_XMITD_T5TO_RR
T5 time out since receiving first RNR.
43
HNG_XMITD_NOCONT_
NSTMSG
Do not continue with next message after
receiving ERR.
44
HNG_XMITD_ERRRES_EOREOP ERR response to EOR-EOP or EOR-PRIEOP.
45
HNG_XMITD_RTN_DCN
Transmitted DCN after receiving RTN.
46
HNG_XMITD_PPR_EOR
EOR-MPS, EOR-EOM, EOR-NULL, EORPRI-MPS, or EOR-PRI-EOM sent after
fourth PPR received.
51
HNG_XMITD_SE
RSPREC error.
52
HNG_XMITD_MPS_FTC
No response to MPS, repeated three times.
53
HNG_XMITD_MPS_VCNR
Invalid response to MPS.
54
HNG_XMITD_EOP_FTC
No response to EOP repeated three times.
117
Appendix B: Error Codes
Value
Hang-up code
Description
55
HNG_XMITD_EOP_VCNR
Invalid response to EOP.
56
HNG_XMITD_EOM_FTC
No response to EOM, repeated three times.
57
HNG_XMITD_EOM_VCNR
Invalid response to EOM.
60
HNG_XMITD_RSPREC_DCN
DCN received in RSPREC.
61
HNG_XMITD_PPSNULL_NORES No response received after third try for PPSNULL.
62
HNG_XMITD_PPSMPS_NORES No response received after third try for PPSMPS.
63
HNG_XMITD_PPSEOP_NORES
64
HNG_XMITD_PPSEOM_NORES No response received after third try for PPSEOM.
65
HNG_XMITD_EORNULL_NORESNo response received after third try for EORNULL.
66
HNG_XMITD_EORMPS_NORES No response received after third try for EORMPS.
67
HNG_XMITD_EOREOP_NORES No response received after third try for EOREOP.
68
HNG_XMITD_EOREOM_NORES No response received after third try for EOREOM.
No response received after third try for PPSEOP.
Receive Phase B Codes
70
HNG_RCVB_TIMEOUT
Unspecified receive Phase B error.
71
HNG_RCVB_SE
RSPREC error.
72
HNG_RCVB_MISC
COMREC error.
73
HNG_T2_PNOTREC T.30
T2 timeout, expected page not received.
74
HNG_RCVB_T1_TIMEOUT
T.30 T1 timeout after EOM received.
75
HNG_NORMAL_RCV
DCN received in COMREC. While this
value is considered by the board to be a
successful fax receive result, if it occurs in
conjunction with BT_STATUS_ERROR_
HANGUP, it still indicates that an error
has occurred.
76
HNG_RCVB_RSPREC_DCN
DCN received in RSPREC.
77
HNG_T2_TIMEOUT T.30
T2 timeout, expected page received.
118
TR1034 PCI T1/E1 Board Hardware Manual
Result Error Codes
Value
Hang-up code
Description
78
HNG_RCVB_INVAL_DMACNT
Invalid DMA count specified for receiver.
79
HNG_RCVB_FTM_NOECM
Binary File Transfer specified, but ECM not
supported by receiver.
Receive Phase D Codes
101
HNG_RCVD_SE_VCNR
SPREC invalid response received.
102
HNG_RCVD_COMREC_VCNR
COMREC invalid response received.
103
HNG_RCVD_T3TO_NORESP
T3 timeout; no local response for remote
voice interrupt.
104
HNG_RCVD_T2TO
T2 timeout; no command received after
responding RNR.
105
HNG_RCVD_DCN_COMREC
DCN received for command received.
106
HNG_RCVD_COMREC_ERR
Command receive error.
107
HNG_RCVD_BLKCT_ERR
Receive block count error in ECM mode.
108
HNG_RCVD_PGCT_ERR
Receive page count error in ECM mode.
Miscellaneous Codes
240
HNG_INTERRUPT_ACK
No interrupt acknowledges, timeout.
241
HNG_COMM_FAULT
Loop current still present while playing
reorder tone after timeout.
242
HNG_T30_HOLDUP
T.30 holdup timeout.
243
HNG_HOLDUP_DCN
DCN received from host in receive holdup
section for FAX PAD mode.
244
HNG_HOLDUP_DCN_NON_
FPAD
DCN received from host in receive holdup
section for non-FAX PAD mode.
119
Appendix B: Error Codes
Reset Error Codes
Here are some additional error codes that might occur during
the reset of the TR1034. If you add the bit values below, you get
a unique number. This unique number is returned by the reset
function, and you then can turn this unique number into its
components.
For example the reset error 1b breaks down to the following
error codes:
0x00000010L
AND
0x00000008L
AND
0x00000002L
AND
0x00000001L
The following table identifies reset status condition bit values,
as returned in the reset_status field when resetting a channel.
Bit Value
Related Function
0x00000001L
#define RST_RSTDONE_TIMEOUT Timeout occurred waiting for
reset done interrupt (fatal). If a
board has a major problem
(such as nearing a DEAD board
state), you might get an error
code value of 1.
0x00000002L
#define RST_MAGIC_BAD
The board has a bad magic
number (fatal).
0x00000004L
#define RST_RSTDONE_
NOMODEM
The reset occurred, but the
channel reported that it has no
modem.
0x00000008L
#define RST_USR_CONFIG_
UNREADABLE
The user configuration file
(btcall.cfg) could not be opened/
read.
120
Explanation
TR1034 PCI T1/E1 Board Hardware Manual
Reset Error Codes
Bit Value
Related Function
Explanation
0x00000010L
#define RST_USR_CONFIG_
BADFORMAT
The user configuration file
(btcall.cfg) is not in the correct
format.
0x00000020L
#define RST_CPARM_UNREADABLEThe country parameter file (bt_
cparm.cfg) Finish list so all files
are defined) could not be
opened/read, possible bad
format.
0x00000040L
#define RST_COUNTRY_
NOTFOUND
0x00000080L
#define RST_FIRM_UNREADABLE The firmware file specified in
the user configuration file could
not be opened/read (fatal).
0x00000100L
#define RST_FIRM_DLOAD_ERR
0x00000200L
#define RST_FONT_UNREADABLE A font file specified in the user
configuration file could not be
opened/read.
0x00000400L
#define RST_FONT_DLOAD_ERR
The country specified in the user
configuration file could not be
found.
An error occurred during
firmware download (fatal).
An error occurred during font
download (fatal).
0x00000800L
#define RST_DAA_BAD
The DAA bytes are not valid.
0x00001000L
#define RST_DID_BATT_MISSING
A DID channel does not have a
battery connected.
0x00002000L
#define RST_HW_VERSION_BAD
The hardware version that the
channel reported is not valid.
0x00004000L
#define RST_DIG_CONFIG_
UNREADABLE
The digital/ISDN configuration
file specified in the user
configuration file could not be
opened/read.
0x00008000L
#define RST_DIG_CONFIG_
BADFORMAT
The digital/ISDN configuration
file specified in the user
configuration file is not in the
correct format (fatal).
0x00010000L
#define RST_DIG_HW_ERR
A hardware error occurred
during digital/ISDN
configuration (fatal).
0x00020000L
#define RST_MEM_ALLOC_ERR
A memory allocation error
occurred.
121
Appendix B: Error Codes
Bit Value
Related Function
Explanation
0x00040000L
#define RST_ALERT
An alert occurred (fatal).
0x00080000L
#define RST_INT_ERR_OVRN
An error interrupt or interrupt
overrun occurred (fatal).
0x00100000L
#define RST_DRIVER_ERR
The driver reported an error
during reset or initialization
(fatal).
0x00200000L
#define RST_DIG_PARAM_ERR
Incorrect configuration
parameters were specified, as
reported by firmware, during
digital/ISDN configuration
(fatal).
If teleph.cfg does not have
properly defined values, you
might get error code values of
200000 (two hundred
thousand) or 40000000 (forty
million).
0x00400000L
#define RST_DIAG_ERR
Channel reported a diagnostic
error of some kind.
0x00800000L
#define RST_MAX_TIMEOUT
Maximum timeout exceeded
(fatal).
0x01000000L
#define RST_DIG_ERR_OTHER
Other digital/ISDN
configuration error (fatal).
0x02000000L
#define RST_RETAIN_ERR
Error due to channel state
retention attempt. (fatal).
0x08000000L
#define RST_PACKET_SEND_RCV
Other packet send/receive error
(fatal).
0x10000000L
#define RST_PACKET_CONTENT_ Packet content error (parse/
ERR
form) (fatal).
0x20000000L
#define RST_UNCLASSIFIED_ERR
0x40000000L
#define RST_FIRM_DETECTED_ERRFirmware detected an error.
Other unclassified error (fatal).
If teleph.cfg does not have
properly defined values, you
might get error code values of
200000 (two hundred
thousand) or 40000000 (forty
million).
0x80000000L
122
#define RST_FONT_DOWNLOADEDA font file specified was already
downloaded.
TR1034 PCI T1/E1 Board Hardware Manual
ISDN Cause Codes
ISDN Cause Codes
When the ISDN network or remote user disconnects a call for
any reason, the cause (IE) might be reported by any ISDN
aware application.
The cause IE consists of three significant octets:
Cause codes are not specific. They are guidelines and are
implementation-dependent. Certain PTTs and PABX
manufacturers use a smaller sub-set of cause codes,
covering a wide range of possible problems.
A single general location octet which indicates where the
disconnection message was generated.
Cause Value Octet
The actual cause value octet which provides a detailed
description.
Diagnostic Octet
A diagnostic octet which might be added providing
further information.
Cause codes are not specific. They are guidelines and are
implementation-dependent. Certain PTTs and PABX
manufacturers use a smaller sub-set of cause codes, covering a
wide range of possible problems.
Example 1.
Disconnect Cause IE: 80 90
Disconnect cause IE: 80 90
Decode the message using the following table:
The general location is
0x80
Remote User
The cause value is
0x90
Normal Clearing
No diagnostic octet
This message shows the remote user disconnecting (hanging
up) normally.
123
Appendix B: Error Codes
Location Octet
Table 2. General Location
Hex
Value
Description
80
0
Remote User
81
1
Private Network Serving Local User
82
2
Public Network Serving Local User
83
3
Transit Network
84
4
Public Network Serving Remote User
85
5
Remote Private Network
87
7
International Network
8A
10
Network Beyond Internetworking Point
Cause Value Octet
The Cause Codes are grouped by class number.
124
Class 000 - Normal Events, see Table 3 on page 125
Class 010 - Network Congestion, see Table 4 on page 127
Class 011 - Service or Option Not Available, see Table 5
on page 128
Class 100 - Service or Option Not Implemented, see
Table 6 on page 128
Class 101 - Invalid Message, see Table 7 on page 129
Class 110 - Protocol Error, see Table 8 on page 131
Class 111 - Interworking, see Table 9 on page 132
Values specific to Brooktrout returned by the Brooktrout
API as cause codes (not ISDN cause code values), see
Table 10 on page 132.
TR1034 PCI T1/E1 Board Hardware Manual
ISDN Cause Codes
Table 3. Class 000 - Normal Events
Hex
Value
Description
Meaning
81
1
Unallocated
number
Indicates that the requested destination,
although valid, cannot be reached.
82
2
No route to
specified network
Sending equipment (sending the cause) is
requested to route call through an
unrecognized transit network.
83
3
No route to
destination
Called user cannot be reached because the
network does not serve the destination.
86
6
Channel
unacceptable
The last identified channel is not acceptable
to the sending entity.
87
7
Call awarded
Incoming call is connected to a channel
already established fro similar calls (for
example: packet-mode X.25 virtual calls).
90
16
Normal clearing
Call is cleared by one of the users involved.
91
17
User busy
Called user cannot accept another call
although compatibility is established.
92
18
No user responding
When a user does not respond to call
establishment messages with either an
alerting or connect indication within the
allowed time.
93
19
User altering, no
answer
User provided an alerting indication but has
not provided a connect indication within the
allowed time.
95
21
Call rejected
Equipment sending the cause does not want
to accept this call although the equipment is
busy or incompatible.
96
22
Number changed
Indicates called party number is not
assigned.
9A
26
Nonselected user
clearing
User not awarded the incoming call.
125
Appendix B: Error Codes
Table 3. Class 000 - Normal Events (Continued)
Hex
Value
Description
Meaning
9B
27
Destination out of
order
Destination interface is not functioning
correctly. The cause has special significance
with the ISDN board. This message usually
indicated a failure to establish layer 2. Other
symptoms include a failure to fax to any
number, and a failure to answer any calls.
Typically caused by either physical cable
problems or an incorrect datalink protocol.
Change the datalink protocol, using briconf.
If the error message still persists, check the
cable connection. Use the onboard protocol
analyzer to determine the exact nature of the
problem.
9C
28
Invalid number
format
Called party number is invalid, or
incomplete.
9D
29
Facility rejected
Network cannot provide the facility
requested.
9E
30
Response to STATus
ENQuiry
The reason for generating the STATUS
message was the prior receipt of a STATUS
ENQUIRY message.
9F
31
Normal unspecified
Used to report normal events only when no
other cause in the normal class applies.
126
TR1034 PCI T1/E1 Board Hardware Manual
ISDN Cause Codes
Table 4. Class 010 - Network Congestion
Hex
Value
Description
Meaning
A2
34
No channel available
An appropriate channel is not currently
available to handle the call.
A3
35
Call queued (AT&T)
Network is not functioning. Immediate redial
is unlikely to succeed.
A6
38
Network out of
order
Network is not functioning. Immediate redial
is unlikely to succeed.
A9
41
Temporary failure
Network is not functioning. Immediate redial
is unlikely to succeed.
AA
42
Switching
equipment
congestion
Switching equipment generating this cause is
experiencing a period of high traffic. AB 42
user information is discarded. The network
can not deliver access information to the
remote user as requested. For example:
a user-to-user information
low-layer compatibility
sub-address as indicated in the diagnostic
The particular type of discarded access
information is optionally included in the
diagnostic.
AC
44
Requested channel
not available
The channel indicated by the requesting
entity cannot be provided by the other side of
the interface.
AF
47
Resources
unavailable or
unspecified
A resource unavailable event only when no
other cause in the resource unavailable class
applies.
127
Appendix B: Error Codes
Table 5. Class 011 - Service or Option Not
Available
Hex
Value
Description
Meaning
B1
49
Quality of service
unavailable
Throughput or transit delay cannot be
supported. The Quality of Service (as defined
in Recommendation X.213) cannot be
provided.
B2
50
Requested facility
not subscribed
Requested supplementary service not
provided by the network because the user has
not completed the necessary administrative
arrangements with its supporting networks.
B4
52
Outgoing calls
barred (AT&T)
No outgoing calls are allowed.
B6
54
Incoming calls
barred
No incoming calls are allowed.
B9
57
Bearer capability not
authorized
User is trying to make unauthorized use of
equipment providing a bearer capability.
BA
58
Bearer capability not
presently available
User has requested a bearer capability that is
implemented by the equipment generating
the cause, but is not available at this time.
BF
63
Service or option
not available or
unspecified
A service or option not available event only
when no other cause in the service or option
not available class applies.
Table 6. Class 100 - Service or Option Not
Implemented
Hex
Value
Description
Meaning
C1
65
Bearer capability not
implemented
Equipment sending this cause does not
support the requested bearer capability.
C2
66
Channel type not
implemented
Equipment sending this cause does not
support the requested channel type.
128
TR1034 PCI T1/E1 Board Hardware Manual
ISDN Cause Codes
Table 6. Class 100 - Service or Option Not
Implemented
Hex
Value
Description
Meaning
C5
69
Requested facility
not implemented
Equipment sending this cause does not
support the requested supplementary service.
C6
70
Only restricted
digital available
Request for an unrestricted bearer service,
but the equipment sending this cause only
supports the restricted version.
CF
79
Service not
implemented or
unspecified
The service or option not implemented event
only when no other cause in the service or
option not implemented class applies.
Table 7. Class 101 - Invalid Message
Hex
Value
Description
Meaning
D1
81
Invalid call
reference value
A message with a call reference that is not
currently in use on the user network
interface, received by the equipment sending
the cause.
D2
82
Channel does not
exist
Equipment sending this cause received a
request to use a channel not activated on the
interface for a call.
D3
83
Suspended call
exists, call identity
does not
A call resume attempted with a call identity
that differs from that in use for any
currently suspended call.
D4
84
Call identity in use
Network received a call suspended request.
The request contained a call identity
(including the null call identity) that is
already in use for a suspended call within the
domain of interfaces over which this call can
be resumed.
129
Appendix B: Error Codes
Table 7. Class 101 - Invalid Message
Hex
Value
Description
Meaning
D5
85
Invalid digit value
for number
Network received a call resume request. The
request contained a call identity information
element that does not indicate any
suspended call within the domain of
interfaces over which the call can be
resumed.
D6
86
Call having the
requested call
identity is cleared
The network has received a call resume
request. This request contained a call
identity information element that once
indicated a suspended call; the suspended
call was cleared while suspended (either by
network timeout, or by a remote user).
D8
88
Incompatible
destination
Equipment sending this cause received a
request to establish a call that has low layer
compatibility, high layer compatibility
attributes (for example, data rate) that
cannot be handled.
DB
91
Transit network
does not exist
Transit network does not exist.
DF
95
Invalid message
unspecified
Invalid message event only when no other
cause in the invalid message call applies.
130
TR1034 PCI T1/E1 Board Hardware Manual
ISDN Cause Codes
Table 8. Class 110 - Protocol Error
Hex
Value
Description
Meaning
E0
96
Mandatory
information
element is missing
Equipment sending this cause received a
messages that is missing an information
element that must be present in the message
before that message can be processed.
The particular Information Element is
identified in the diagnostic octet. For example,
81 E0 04 means that the bearer capability is
not included by the PABX (Private Network)
in the SETUP message. 0x04 is the Bearer
Capability Information Element Identifier as
specified int the standards.
E1
97
Message type nonexistent or not
implemented
Equipment sending this cause received a
message with a message type it does not
recognize:
Undefined message
Defined but not implemented by the
equipment sending the cause
E2
98
Message not
compatible with call
state or message
type non-existent or
not implemented
Equipment sending this cause received a
message that it considers non-permissible
while in the call state; or a STATUS message
received indicating an incompatible call state.
E3
99
Information
element nonexistent or not
implemented
Equipment sending this cause received a
message that includes information elements
not recognized because the information
element identifier is not defined, or is defined
but not implemented by the equipment
sending the cause. However, the information
element is not required to be present in the
message to enable the equipment sending the
cause to process the messages.
When this cause is presented by the board, the
particular Information Element is identified
in the diagnostic octet. For example 81 E0 04,
would mean that the bearer capability had not
been included by the PABX (Private Network)
in the SETUP message. 0x04 is the Bearer
Capability Information Element Identifier as
specified in the standards.
131
Appendix B: Error Codes
Table 8. Class 110 - Protocol Error
Hex
Value
Description
Meaning
E4
100
Invalid information
element contents
Equipment sending this cause received an
information element that it has implemented.
However, the sending equipment was not able
to implement the code because one or more of
the fields were incorrectly coded.
E5
101
Message not
compatible with call
state
The received message is incompatible with the
call state.
E6
102
Recovery on timer
expiry
A timer expired and an associated Q.931 error
handling procedure is initiated.
EF
111
Protocol error,
unspecified
An error event only when no cause in the
protocol error class applies
Table 9. Class 111 - Internetworking
Hex
Value
Description
Meaning
FF
127
Interworking
unspecified
Interworking with the network that does not
provide cause codes for its actions. Therefore,
the precise cause for a message being sent is
unknown.
Table 10. Brooktrout Specific Error Codes
Hex
Value
Description
Meaning
3E9
1001
Timeout error
Alerting message detected, but a timeout
occurred before a connect message was
detected.
3EA
1002
Timeout error
Setup acknowledge message detected, but a
timeout occurred before a connect message
was detected.
3EB
1003
Timeout error
Progress message detected, but a timeout
occurred before a connect message was
detected.
3EC
1004
Channel problem
Layer 2/D-channel went down
132
TR1034 PCI T1/E1 Board Hardware Manual
ISDN Cause Codes
Table 10. Brooktrout Specific Error Codes
Hex
Value
Description
Meaning
3ED
1005
Unexpected
termination
Wait for Complete was terminated
unexpectedly.
3EE
1006
Disconnect error
Disconnect message occurred after the
connect message check res_line_status
3EF
1007
Timeout error
Outgoing call attempted, but timeout
occurred with no response from the network.
133
Appendix B: Error Codes
Diagnostic Octet
Table 11. Diagnostic Byte
134
Hex
Value
Description
02
2
Transit network identity or network specific
facility Information Element Identifier
16
22
New destination number
1D
29
Facility identification
2B
43
Discarded Information Element Identifier
2F
47
Information Element Identifier
39
57
Attributes of bearer capability
3A
58
Attributes of bearer capability
41
65
Attributes of bearer capability
42
66
Channel type
58
88
Incompatible parameter
5F
95
Message type
60
96
Information Element Identifier
61
97
Message type
62
98
Message type
63
99
Information Element Identifier
64
100
Information Element Identifier
65
101
Message type
66
102
Timer number
TR1034 PCI T1/E1 Board Hardware Manual
ISDN Cause Codes
For protocol errors, where the cause octet indicates a class of
110 - protocol error, the diagnostic octet might indicate the
particular message or information element identifier. For
example, 81 E0 04 means that the bearer capability is not
included by the PABX (Private Network) in the SETUP
message. 0x04 is the Bearer Capability Information Element
Identifier as specified in the standards.
135
C
ISDN Telephone Service Options
This appendix describes telephone service options for
T1 and E1 ISDN lines, and provides ordering and
connecting information.
It includes the following sections:
About ISDN Telephone Service
Ordering ISDN Telephone Service
Connecting to ISDN
Troubleshooting ISDN Installations
137
Appendix C: ISDN Telephone Service Options
About ISDN Telephone Service
The ISDN Primary Rate Interface (PRI) provides dial-up digital
access to the worldwide telecommunications network. PRI
supports single (point-to-point) ISDN terminal devices on an
individual line.
PRI service provides end-to-end digital connectivity to support
a wide range of telecommunication services. These services
include voice and non-voice services.
PRI E1 provides 30 B (bearer) channels and one D (signaling)
channel, often referred to as 30B+D. PRI T1 provides 23 B
(bearer) channels and one D (signaling) channel, often referred
to as 23B+D. The B channels carry circuit-switched voice or
data at 64 kbit/s, and the D channel carries call control signaling
at 16 kbit/s. The channels are connected to telephone service
using an RJ-45 connector on the board.
PRI ISDN allows you to do inbound call routing. PRI E1 is
primarily used in Europe and Japan. PRI T1 is primarily used in
North America.
138
TR1034 PCI T1/E1 Board Hardware Manual
Ordering ISDN Telephone Service
Ordering ISDN Telephone Service
Ask for the following when ordering ISDN service:
For E1
Primary rate line, otherwise referred to as PRI, PRA, E1,
S2m (G), T2 (F), ISDN30 (Nld), ISDN30e (UK).
EuroISDN protocol, otherwise referred to as
CTR-3,DSS1, Q.931, I.421 (limited ETSI), I.451(full
ETSI), Net 8 (?), 6+,... (Net 5, Net 4, …). EuroISDN
protocol does not include 1TR6, DASS2 or DPNSS.
* Other protocols can be supported by connecting an
interface board to the TR1034.
Number of B-channels you require, if PBX or partial E1.
Check physical interface 120 Ohm (usually) or 75 Ohm.
Check if CRC-4 is enabled.
The network side should be configured as an NT, and
should provide the clock.
Ensure reception of the called party number for inbound
routing.
Be aware of the method for inbound call distribution that
is available to you. Methods of inbound call distribution
include linear, circular and random. For linear and
circular distribution, you can start from the lowest B
channel or from the highest B channel. Brooktrout
recommends Linear distribution, especially for a
fractional TR1034 board.
Linear
Calls are always placed on the same channel, and ‘roll over’ to
other channels only when that one is busy. If a problem exists,
linear distribution is recommended because it is easier to
troubleshoot.
Cylical
Calls are shared amongst the channels, by placing each new
call on the next channel in the group.
For T1:
Do not request a specific HLC such as “telephony”.
Similar to E1 with the following exceptions:
No CRC-4
No termination difference (always 120 ohm)
139
Appendix C: ISDN Telephone Service Options
Connecting to ISDN
1. Compare your pin layouts on the board as described in the
2.
hardware installation guide to the network side to make
sure they match. See the section on PRI Pinout on
page 103 for more information.
Since you are working with a high speed ISDN line, make
sure your cable is not too long.
If you have problems with synchronization or getting
ISDN Layer 2 up, first check the pin layouts and second,
reduce the cable length.
Connecting to a PABX
The bulk of this section provides generic information suitable
for all PABX installations. It acts as an installation framework
and has paragraphs targeted to the reseller and PABX Engineer.
These paragraphs provide Brooktrout ISDN TR034 detail and
highlight information to be exchanged between the reseller and
PABX Engineer.
Recommendations Before Installing
For the reseller
140
Ideally the following is required:
Experience installing and configuring ISDN TR1034s
Copy of this TR1034 PCI Hardware Manual
Soft copy of the hardware diagnostic tool: FaxDiag (For
information on this product, see Chapter 3, “Testing”, on
page 71)
Access to a telephone near the Fax server
On-site internet/FTP access
Hand-held ISDN tester, such as an AuroraPlus Combi
(www.trendcomms.com)
Brooktrout contact information
TR1034 PCI T1/E1 Board Hardware Manual
Connecting to ISDN
For the PABX
Engineer
Ideally the following:
Experience configuring the PABX for different ISDN
equipment, or the ability to contact someone with
thorough knowledge of ISDN protocol for your PABX
Portable ISDN tester
Installation
For the Reseller
Provide the following information to the PABX Engineer:
Number of licensed TR1034 ISDN channels you require.
If you use the Fractional TR1034, indicate that you require
a partial ISDN line or a full ISDN line with linear call
distribution.
Whether or not the PABX needs to present a Called Party
Number.
If the ISDN TR1034 is to be used for inbound routing of
faxes, then the PABX needs to present all or part of the
number dialed by the fax sender, in order to identify the
recipient.
The quantity and range of DID (DDI) numbers you
require.
For example, you could tell the PABX Engineer that you
require:
1 PRI line
Linear call distribution
Ten DID numbers from 555100 to 555110
The PABX needs to present a Called Party Number
Before the PABX Engineer arrives to configure the PABX,
you should ensure that the Engineer is experienced with
ISDN installations, and brings an ISDN tester to the site.
The PABX Engineer should check the ISDN requirements
detailed in the next section, and confirm to you that the
PABX is capable of matching each and every one of these
requirements.
141
Appendix C: ISDN Telephone Service Options
For the PABX
Engineer
The Reseller provides you with certain information, including:
Number of ISDN ports
Call distribution (Linear/cyclical/random)
Whether they require a Called Party Number to be
presented
Quantity and range of DID numbers
This section provides detailed information regarding the ISDN
requirements of the Brooktrout ISDN TR1034. The
information is presented in technical detail on a layer-by-layer
basis. You should ensure the PABX is configured to meet these
requirements.
General
EuroISDN protocol stack, also known as DSS1 or ETSI
300 (not 1TR6 or DASS2). Primary Rate access.
The PABX port should be a Network Termination (NT or
master) since the TR1034 is Terminal Equipment (TE or
slave).
Layer 1 – Physical Layer
ITU I.431 Standard, RJ45 interface.
Framing methods are different for T1 and E1 ISDN. Ask
the PABX engineer what framing method is being
supplied, then refer to the appropriate configuration
chapter for ds1_line_type parameter options (Chapter 1,
“Configuring Your TR1034 Board using Brooktrout
Software Version 2.1.x”, on page 1 or Chapter 2,
Configuring Your TR1034 Board using Brooktrout Software
Version 3.0.x, on page 37).
Brooktrout supports port termination at 120 Ohms (by
default), however with the help of an additional cable
adapter provided by Brooktrout, we also support port
termination at 75 Ohms.
Layer 2 – Datalink Layer
Q.921 Standard
ISDN PRI uses only point-to-point data links.
142
TR1034 PCI T1/E1 Board Hardware Manual
Connecting to ISDN
Layer 3 – Network Layer
Q.931 Standard
For maximum flexibility, bearer capabilities of Speech
and 3.1K Audio should be acceptable for both incoming
and outgoing calls.
The ISDN TR1034 can be configured to present a Calling
Party Number.
Most installations require the PABX to provide a Called
Party Number. The reseller should have indicated to you
if this is required. The Called Party Number does not
need to be the full number dialed, merely enough trailing
digits to uniquely identify a called user. Although the
quantity of received digits is usually fixed, the ISDN
TR1034 can accept a variable number of digits.
The Called Party Number should be presented in one of
the following ways:
En-Block
As a Called Party Number or a Redirecting Number
Information Element within the initial SETUP
message
Overlapped
As Called Party Number Information Elements,
distributed within the initial SETUP message and
subsequent INFO messages.
The ISDN TR1034 has a number of ISDN protocol
specific parameters that you can configure. These should
generally be left at their defaults. In cases where you are
experiencing problems during the installation, and you
have a good understanding of the ISDN protocol used by
your particular PABX, it might be useful for the reseller to
show you this list of parameters, their range and their
defaults. See the appropriate configuration chapter
(Chapter 1, “Configuring Your TR1034 Board using
Brooktrout Software Version 2.1.x”, on page 1 or Chapter 2,
Configuring Your TR1034 Board using Brooktrout Software
Version 3.0.x, on page 37) for ISDN parameter
information.
143
Appendix C: ISDN Telephone Service Options
You should now indicate to the reseller:
For The Reseller
If your PABX requires the ISDN TR1034 to present a
Calling Party Number
Exactly how many digits are present in the Called Party
Number
Indicate the framing method
Any deviations from the requirements listed above
Prior to connecting the ISDN TR1034, you should use
your portable ISDN tester to demonstrate to the reseller
that all ISDN channels can originate and receive calls.
You should also demonstrate that when receiving calls,
the Called Party Number is presented.
The PABX Engineer should have demonstrated operation of
the line. If not, you should test the line using your own ISDN
tester.
The PABX Engineer should have indicated:
If the PABX requires the ISDN TR1034 to present a
Calling Party Number
Exactly how many digits are present in the Called Party
Number by the PABX
What framing method was implemented
Any deviations from the listed requirements
You can use this information to set the following parameters:
parameters such as CPN, framing, etc. in the application
and teleph.cfg
did_digits and did_variable in btcall.cfg (user.cfg)
You should configure the board and test the installation using
the diagnostics found on the Brooktrout website. Testing
procedures are fully documented in Chapter 3, Testing, on
page 71.
144
TR1034 PCI T1/E1 Board Hardware Manual
Troubleshooting ISDN Installations
Troubleshooting ISDN Installations
Important Network Characteristics
ISDN Line
characteristics
A single standard primary rate E1 line provides 30 channels
called bearer (or B) channels that can be used simultaneously
for both incoming and outgoing calls.A single standard
primary rate T1 line provides 23 channels called bearer (or B)
channels that can be used simultaneously for both incoming
and outgoing calls. Call control for these channels is provided
over a single, shared D channel. These channels are multiplexed
together providing the 30B+D E1frame or 23B+D T1 frame.
Service indicator
(Bearer
Capability)
When placing a call, a TE presents certain characteristics of
itself in order to request a certain bearer capability of the
network and to allow a receiving device to establish if it is
compatible with the sender before answering the call. Two
important bearer capabilities are speech and 3.1k Audio.
Speech specifies the lowest level of service, and is the bearer
capability used by telephones. The bearer capability of 3.1k
Audio is recommended by the appropriate standards for fax
group 2/3. A bearer capability set to 3.1k Audio ensures a higher
quality of line than guaranteed by speech. However, some
public and private networks do not correctly handle 3.1k Audio
bearer capabilities and might reject the call.
Receiving DID
digits
There are two ways the NT can pass the DID digits to a TE, enblock and overlapped. In the vast majority of installations the
DID number is passed en-block, where the whole number is
passed in a single group. Some networks pass the DID digits
overlapped, where the DID digits are received fragmented in
separate messages.
Overlapped receiving is only found under the following
circumstances:
Countries where the public network can allow a userdefined variable number of subaddress DID digits, such
as Germany, Austria and Italy.
When the caller is dialing using overlapped sending.
145
Appendix C: ISDN Telephone Service Options
General PABX
There are many parameters including the PABX make, model,
version, configuration and country of installation that
contribute to different configurations.
Framing
Framing methods differ from E1 to T1. For E1, generally use
CRC4 multiframing, but in some countries it’s possible to
specify basic framing. For T1, generally use extended
superframing.
ISDN Supplementary Services
Direct Inward
Dialing
Direct Inward Dialing (DID) or Direct Dialing Inward (DDI) is
recommended for larger LAN fax networks with ten or more
workstations. It provides an unlimited range of numbers,
usually purchased in blocks from the PTT.
In some countries, it is possible to specify how many of the
trailing digits are sent as the Called Party Number to the TE
when a call is placed.
DID enables automatic routing of facsimiles to distinct
workstations or printers attached to the LAN fax network.
DID numbers consist of two parts: an access code that identifies
the DID subscriber and an extension number that identifies the
individual user. The length of the extension number usually
depends on the size of the DID range and on subscriber
requirements, but it is fixed for the subscription and registered
in the public ISDN network.
The LAN fax network administrator must associate each of the
workstations on the network with one of the telephone
numbers in the assigned range of DID numbers.
146
TR1034 PCI T1/E1 Board Hardware Manual
Troubleshooting ISDN Installations
For incoming calls, the telephone company includes the called
party number in the SETUP message. The called party number
might be the full DID number or the last one to five digits of the
DID number. When the TR1034 channel answers a call, it
captures the DID number and passes it to the LAN fax
application on the host, which routes the fax to the workstation
on the network associated with that number.
This service is intended for all other general purpose number
provisioning, such as in PABX.
Advice of Charge
(AOC)
It is possible to obtain the cost of a call as a supplemental service
within ISDN. There are two forms of advice of charge: advice of
charge during the call (AOC-D), and advice of charge at the end
of the call (AOC-E).
Advice of charge - during
Billing information is provided by the network throughout the
active phase of the call. The information is provided as
subtotals, and a final total is presented at the end of the call.
Advice of charge - end
Billing information is only presented as a total at the end of the
call. The billing information is delivered in two types: units and
currency.
Units:
A unit value is returned, where each unit has a pre-defined
value. This type of billing information has a simple structure
with few options.
Currency:
The actual cost of the call is returned, including currency
identifiers and multipliers. This type has a complex structure
with many options, and can vary from country to country.
AOC-D is the most common form of AOC, because it is used in
most PABX installations. Many PABX can also provide this
AOC information to their EuroISDN ports. Unit is the most
147
Appendix C: ISDN Telephone Service Options
common type, since it mirrors earlier analog billing methods,
and has a simpler structure than currency. The structure of
currency type varies from country to country.
Note:
148
Although the board can interwork with all the varieties
of AOC, if there is a choice available, we recommend
AOC-D with unit type. This is because it is more
widely available, premature disconnections result in a
partial value, implementation does not vary widely,
and it requires simple application support.
TR1034 PCI T1/E1 Board Hardware Manual
Glossary
B Channel
One of the ISDN line’s bearer channels. Operates at
64 kbit/s and carries voice, fax, data, or video.
Channel
One of the channels that transmits or receives fax or
voice data over an ISDN line’s B channel and call
setup and call signaling over the ISDN line’s D
channel.
D Channel
The ISDN line channel that carries call control and
call setup signaling (out-of-band signaling). Operates
at 16 kbit/s and can carry packet-switched data.
DDI (DID)
Direct Dialing Inward (Direct Inward Dialing). A
user network access method available on groups of
ISDN lines. Assigns the group of ISDN lines a range
of consecutive telephone numbers in blocks of 10,
100, 1,000, or 10,000 numbers.
Framing
The Brooktrout board supports two frame modes, SF
and ESF:
* Super Frame (SF)
A T1 transmission structure that divides the data into
twelve, 193-bit blocks, or frames. Also commonly
referred to as “D4” framing.
* Extended Super Frame
(ESF)
A T1 transmission structure that divides the data into
24 8,000 bps blocks, or frames.
149
Glossary
Hunt Group
A logical access made up of multiple ISDN lines on which the
telephone company can deliver incoming calls. To deliver a call,
the telephone company searches the hunt group for a free B
channel.
ImmediateStart
A DID service option where the telco waits a fixed amount of
time after seizing the line before it sends the DID digits to the
board. Then, when it detects or fails to detect the correct
number of DID digits, the board responds the same as it does
when configured for wink-start service.
ISDN
Integrated Services Digital Network. Provides dial-up digital
access to worldwide telecommunications network over twistedpair telephone lines.
ISPBX
Integrated Services Private Branch Exchange. An ISDN PBX.
Line Coding
AMI (Alternate
Mark Inversion)
Alternate “1” bits have their polarity reversed (between + and 3 volts). Also, between two successive “1”s, the voltage briefly
pauses at 0. Most often used if framing mode is SF/D4.
B8ZS (Binary 8
Zero Substitution)
Method of maintaining density of “1”s on the line by
deliberately inserting “bipolar violations”. Most often used if
framing mode is ESF.
Network
Termination
Equipment
Termination devices that provide the interface connecting
subscriber 4-wire equipment to telephone company 2-wire
equipment. Installed on subscriber premises, defines the
demarcation point between PSTN and subscriber equipment.
Types are NT1 and NT2:
NT1
Network termination type 1. A 2-wire (PSTN)/4-wire
(subscriber) interface. Installed at your site, it terminates
the public ISDN network, supplies power to the ISDN
line and your ISDN devices, and performs maintenance
functions.
NT2
150
TR1034 PCI T1/E1 Board Hardware Manual
Glossary
Network termination type 2. An intelligent device that
performs higher-level functions, such as switching and
concentration. Examples are an ISPBX, LAN, and a
terminal controller.
Reference
Points
Specifications defining the links that connect devices on an
ISDN network and their communications protocols. ISDN
standards define three user (subscriber) reference points, R, S,
and T and two Central Office (CO) reference points, U, and V:
R
An analog interface linking a TE2 to a Terminal Adapter
(TA). Tied to country-specific standards, it typically
complies with an X series and V series of ITU-T
recommendations.
S or S/T
A four-wire digital connection linking individual TE1s
or TE2s to their NT1. It separates individual terminals
from network-related communications functions.
While the S and T points are electrically identical, the S
point links a TE1 or TE2 to an NT2, and the T point
links them to an NT1.
U
Two-wire digital connection linking the NT1 to the
Central Office. Also known as the “local loop.”
V
The interface at the Central Office that links a line
termination (LT) device with an exchange termination
(ET) device.
Robbed-bit
Signaling
In this type of signaling, the least significant bit of information
in a T1 signal is “robbed” from the information stream and
used to transmit framing and clocking information. This is
sometimes called “in-band” signaling, or “A/B” signaling.
Brooktrout supports two types of robbed-bit signaling; E&M
and FXS/FXO.
151
Glossary
E&M (Ear and
Mouth)
Denotes the signaling path for the T1 signal. “E&M” means that
the signaling bits (those bits that are “robbed” from the
information stream and communicate not data, but framing
and clocking information) do whatever the A-bit does. (In
robbed-bit signaling, when the frame mode is Super Frame,
you have A + B bits, when the frame mode is Extended Super
Frame you have A, B, C + D bits.)
FXS & FXO
Foreign Exchange Office is the interface on a network or T1
node that “talks” to the PBX (or, Brooktrout board). Foreign
Exchange Subscriber is the complementary interface at the
other end of the FXO. This is a signaling method separate and
distinct from E&M signaling; in this signal protocol, the
signaling bits often do not follow what the A-bit does. If this
method is chosen, the telco/PBX side should be set up as FXO,
and the Brooktrout board set up as FXS. This is also commonly
referred to as “T1 loop start” service.
TA
Terminal adapter. Protocol converter that enables old analog
equipment (hardware and software) to communicate with the
ISDN network.
Terminal
Equipment
Any user device that connects to an ISDN line through an NT1.
Types are TE1 and TE2:
TE1
Terminal equipment type 1. An ISDN telephone,
computer, fax machine, or other equipment that you can
connect to ISDN service without going through a
terminal adapter (TA).
TE2
Terminal equipment type 2. An old, analog telephone,
modem, fax machine, or other equipment that you used
to connect to analog phone service. For ISDN, you
connect it to ISDN service through a terminal adapter
(TA).
User
Network
Access
Method
152
Defines how the subscriber’s equipment connects to the ISDN
network and accesses ISDN services. Some methods are
included in the basic service, while others are supplementary.
TR1034 PCI T1/E1 Board Hardware Manual
Glossary
Which access method a subscriber selects depends on several
factors: the number of PRI lines installed, the type of
equipment connecting to ISDN service, and whether the
installation includes an NT2 (for example, an ISPBX or LAN).
Wink-Start
A DDI service option where the board performs a “wink” after
it detects seizure of the line; that is, it momentarily reverses the
voltage polarity applied across the phone line (i.e., tip and
ring), signaling the telco that it is ready to receive the last few
digits of the dialed number.
153
Index
Numerics
advice of charge (AOC) 147
country code 42
DDI digits 42
DDI variable 42
configuring LAN fax software 9, 45
connecting PABX 140
conventions, typographical xi
B
D
B (bearer) channels 138
bfax.sys, Brooktrout driver
loading 5, 41
Brooktrout driver
loading 5, 41
Brooktrout driver, bfax.sys
loading 5, 41
btdriver
loading 5, 41
D (signaling) channel 138
DDI
receiving 63
DDI digits
en-bloc 25, 63
overlap receiving
DDI digits 26, 63
diagnostic octet
ISDN cause codes 134
documentation feedback xii
driver, loading 5, 41
2B+D 138
A
C
cables, required xv
call progress error codes 114
Call progress signals
ANSWER 114
ANSWER_TONE_DETECT 115
cause value octet
ISDN cause codes 124
computer platforms xv
configuring ISDN
E
Electromagnetic emissions 111
en-block receiving DDI digits 63
en-block sending/receiving 143
error codes
call progress 114
reset 120
result 116
155
Index
F
M
FaxDiag 70
FCC
emissions information 111
notices 107
regulations for connecting to T1 109
rules for fax branding 108
features, TR1034 99
models, TR1034 98
multiple boards, using PCI with ISA
boards 42
H
hardware requirements xiv
humidity requirements xv
I
O
operating requirements xv
ordering ISDN service 139
overlapped sending/receiving 143
P
PABX, connecting 140
power requirements xv
primary rate interface (PRI) 138
IC
emissions notice 112
equipment attachment limitations 110
ISA boards
using with PCI boards 42
ISDN
primary rate interface (PRI) 138
service
ordering 139
supplementary services 146
troubleshooting installations 145
ISDN cause codes 123
cause value octet 124
diagnostic octet 134
location octet 124
L
LAN fax software
configuring 2, 38
location octet
ISDN cause codes 124
log file 79, 93
156
R
receiving calls with called party number
144
requirements
cables xv
hardware xiv
humidity xv
operating xv
power xv
temperature xv
reset error codes 120
result error codes 116
S
Safety 112
service
ISDN. See ISDN
software
Windows NT test 71
Standards compliance 107
supplementary ISDN services 146
TR1034 PCI T1/E1 Board Hardware Manual
Index
T
Telephony regulations 107
temperature requirements xv
testing 35, 70
TR1034 board models 98
TR1034 board, testing 35, 70
TR1034 features 99
TR1034 models 98
troubleshooting
ISDN installations 145
typographical conventions xi
W
Windows NT test software 70
157