1
Nsclick User Manual
Michael Neufeld, Graham Schelle, and Dirk Grunwald
University of Colorado
Department of Computer Science
Boulder, CO 80309
{neufeldm,schelleg,grunwald}@cs.colorado.edu
CU-CS-959-03
August 2003
University of Colorado at Boulder
Technical Report CU-CS-959-03
Department of Computer Science
Campus Box 430
University of Colorado
Boulder, Colorado 80309
Nsclick User Manual
Michael Neufeld, Graham Schelle, and Dirk Grunwald
University of Colorado
Department of Computer Science
Boulder, CO 80309
{neufeldm,schelleg,grunwald}@cs.colorado.edu
August 2003
Contents
1
Introduction
1.1 What is Nsclick? . . . . . . . . . . . . . . . . . . . . . . . . . . . . . . . . . . . . . . . . . .
1.2 How Does It Work? . . . . . . . . . . . . . . . . . . . . . . . . . . . . . . . . . . . . . . . . .
2
2
2
2
Installation
2.1 Downloading Components . . . .
2.2 Unpacking Components . . . . . .
2.3 Building Simulator . . . . . . . .
2.4 Upgrading to New Nsclick Release
.
.
.
.
2
2
3
3
4
.
.
.
.
.
.
.
.
4
4
5
7
7
9
11
11
12
4
Running the Simulation
4.1 Creating Network Traffic . . . . . . . . . . . . . . . . . . . . . . . . . . . . . . . . . . . . . .
4.2 Packet Analysis . . . . . . . . . . . . . . . . . . . . . . . . . . . . . . . . . . . . . . . . . . .
12
12
14
5
Moving Between Simulation And Reality
5.1 Click Elements to be Removed . . . . . . . . . . . . . . . . . . . . . . . . . . . . . . . . . . .
5.2 Click Elements to be Modified . . . . . . . . . . . . . . . . . . . . . . . . . . . . . . . . . . .
14
14
14
6
Coding For Nsclick
6.1 Handling IP and MAC Addresses . . . . . .
6.2 Additional Jittering . . . . . . . . . . . . .
6.3 System-Specific Code . . . . . . . . . . . .
6.4 Dumping Packets to Disk . . . . . . . . . .
6.5 Click Elements Incompatible with Ns-2 . .
6.5.1 Elements Controlling Hardware . .
6.5.2 Event vs. Polling Driven Simulation
.
.
.
.
.
.
.
15
15
15
15
15
15
15
16
.
.
.
.
.
.
.
.
.
16
16
16
17
22
22
22
27
27
28
3
.
.
.
.
.
.
.
.
A Simple Example
3.1 The Scenario . . . . . . . . . . . . .
3.2 Routing Packets With Click . . . . . .
3.3 Configuring The Simulation With TCL
3.3.1 General Parameters . . . . . .
3.3.2 Addresses And Topology . . .
3.4 More Complex Examples . . . . . . .
3.4.1 Simple Wireless LAN . . . .
3.4.2 Wireless/Wired Bridge . . . .
A Example Scripts
A.1 Simple Wired LAN . . .
A.1.1 The Click Script
A.1.2 The TCL Script .
A.2 Simple Wireless LAN . .
A.2.1 The Click Script
A.2.2 The TCL Script .
A.3 Wireless Bridge . . . . .
A.3.1 The Click Script
A.3.2 The TCL Script .
.
.
.
.
.
.
.
.
.
.
.
.
.
.
.
.
.
.
.
.
.
.
.
.
.
.
.
.
.
.
.
.
.
.
.
.
.
.
.
.
.
.
.
.
.
.
.
.
.
.
.
.
.
.
.
.
.
.
.
.
.
.
.
.
.
.
.
.
.
.
.
.
.
.
.
.
.
.
.
.
.
.
.
.
.
.
.
.
.
.
.
.
.
.
.
.
.
.
.
.
.
.
.
.
.
.
.
.
.
.
.
.
.
.
.
.
.
.
.
.
.
.
.
.
.
.
.
.
.
.
.
.
.
.
.
.
.
.
.
.
.
.
.
.
.
.
.
.
.
.
.
.
.
.
1
.
.
.
.
.
.
.
.
.
.
.
.
.
.
.
.
.
.
.
.
.
.
.
.
.
.
.
.
.
.
.
.
.
.
.
.
.
.
.
.
.
.
.
.
.
.
.
.
.
.
.
.
.
.
.
.
.
.
.
.
.
.
.
.
.
.
.
.
.
.
.
.
.
.
.
.
.
.
.
.
.
.
.
.
.
.
.
.
.
.
.
.
.
.
.
.
.
.
.
.
.
.
.
.
.
.
.
.
.
.
.
.
.
.
.
.
.
.
.
.
.
.
.
.
.
.
.
.
.
.
.
.
.
.
.
.
.
.
.
.
.
.
.
.
.
.
.
.
.
.
.
.
.
.
.
.
.
.
.
.
.
.
.
.
.
.
.
.
.
.
.
.
.
.
.
.
.
.
.
.
.
.
.
.
.
.
.
.
.
.
.
.
.
.
.
.
.
.
.
.
.
.
.
.
.
.
.
.
.
.
.
.
.
.
.
.
.
.
.
.
.
.
.
.
.
.
.
.
.
.
.
.
.
.
.
.
.
.
.
.
.
.
.
.
.
.
.
.
.
.
.
.
.
.
.
.
.
.
.
.
.
.
.
.
.
.
.
.
.
.
.
.
.
.
.
.
.
.
.
.
.
.
.
.
.
.
.
.
.
.
.
.
.
.
.
.
.
.
.
.
.
.
.
.
.
.
.
.
.
.
.
.
.
.
.
.
.
.
.
.
.
.
.
.
.
.
.
.
.
.
.
.
.
.
.
.
.
.
.
.
.
.
.
.
.
.
.
.
.
.
.
.
.
.
.
.
.
.
.
.
.
.
.
.
.
.
.
.
.
.
.
.
.
.
.
.
.
.
.
.
.
.
.
.
.
.
.
.
.
.
.
.
.
.
.
.
.
.
.
.
.
.
.
.
.
.
.
.
.
.
.
.
.
.
.
.
.
.
.
.
.
.
.
.
.
.
.
.
.
.
.
.
.
.
.
.
.
.
.
.
.
.
.
.
.
.
.
.
.
.
.
.
.
.
.
.
.
.
.
.
.
.
.
.
.
.
.
.
.
.
.
.
.
.
.
.
.
.
.
.
.
.
.
.
.
.
.
.
.
.
.
.
.
.
.
.
.
.
.
.
.
.
.
.
.
.
.
.
.
.
.
.
.
.
.
.
.
.
.
.
.
.
.
.
.
.
.
.
.
.
.
.
.
.
.
.
.
.
.
.
.
.
.
.
.
.
.
.
.
.
.
.
.
.
.
.
.
.
.
.
.
.
.
.
.
.
.
.
.
.
.
.
.
.
.
.
.
.
.
.
.
.
.
.
.
.
.
.
.
.
.
.
.
.
.
.
.
.
.
.
.
.
.
.
.
.
.
.
.
.
.
.
.
.
.
.
.
.
.
.
.
.
.
.
.
.
.
.
.
.
.
.
.
.
.
.
.
.
.
.
.
.
.
.
.
.
.
.
.
.
.
.
.
.
.
.
.
.
.
.
.
.
.
.
.
.
.
.
.
.
.
.
.
.
.
.
.
.
.
.
.
.
.
.
.
.
.
.
.
.
.
.
.
.
.
.
.
.
.
.
.
.
.
.
.
.
.
.
.
.
.
.
.
.
.
.
.
.
.
.
.
.
.
.
.
.
.
.
1 Introduction
This document is a user manual to the nsclick network simulation tool. It assumes that you are already familiar
with both the ns-2 [1] network simulator and the Click Modular Router [2], and also that you’ve got at least
a basic familiarity with IP and ethernet networking concepts. Section 2 will cover installation instructions,
section 3 will give some coding examples, and the remaining sections will discuss coding and running in nsclick.
1.1 What is Nsclick?
In short, nsclick is the Click Modular Router embedded inside of the ns-2 network simulator. With minor modifications, a Click routing graph may run both on an actual system as well as under ns-2. This facilitates testing
and debugging of network code. For example, a number of ad hoc routing protocols have been implemented
and examined under ns-2. This is all well and good, but when time comes to construct a real ad hoc network, the
routing code must be redesigned and rewritten. This is a fair bit of effort, as the dearth of ad hoc routing protocol
implementations indicates. Testing is also generally conducted on small testbeds. There are periodic exceptions
to this [3], but such tests don’t appear to be conducted regularly, e.g. after protocol revisions or bug fixes. Being
able to run the implementation under a simulator permits testing under large, albeit simulated, scenarios easily
and frequently. Online information for the components can be found at:
• Ns-2 : http://www.isi.edu/nsnam/ns
• Click: http://www.pdos.lcs.mit.edu/click
• Nsclick : http://systems.cs.colorado.edu/Networking/nsclick/
1.2 How Does It Work?
To start with, nsclick uses actual wire format packets within ns-2 instead of the normal simulated types. This
allows for using Click scripts which can work both in simulation as well as real life. Nsclick also defines a new
routing module for ns-2. This module completely subverts the normal ns-2 packet routing process. Packets to
be routed are handed over to an external routine (Click in our case) which decides what to do with them and
then reinjects them back into ns-2, either sending them out another ns-2 network interface, or delivering them
directly to an ns-2 traffic application attached to the node.
2 Installation
This section will describe the installation procedure of Click, ns-2, and nsclick . The result of this installation
will be a built ns-2 simulation environment with Click embedded. We are using a most current version of
ns-2 (2.26) at the time of writing this document.
2.1 Downloading Components
Download the base software packages nsclick relies on. The three major software components are: ns-2, Click,
and libnet. Download all of them from their respective locations.
• Ns-2 : www.isi.edu/nsnam/ns/ns-build.html
Get the ”all in one” distribution, version 2.26. It is known that nsclick works with ns-2 version 2.26 at the
time of this document’s creation. If later versions of ns-2 are available, it is not guaranteed those versions
will work with nsclick . See the nsclick webpage (listed in section 1.1) for uptodate patches for future
versions of ns-2 .
2
• Click: www.pdos.lcs.mit.edu/click/
Get the latest CVS or a release *after* 1.3pre1. There are some issues with the 1.3pre1 release which have
been fixed in later versions. If you choose the CVS release, you may want to wait until you’ve unpacked
the ns-allinone-2.26 directory and place it directly in there, or make a symlink to it.
• Nsclick Patch: http://systems.cs.colorado.edu/Networking/nsclick
Simply download this patch for working with ns-2 version 2.26. Patches for future versions of ns-2 will
be found at this website as well.
• Libnet: http://www.packetfactory.net/projects/libnet/
Get version 1.0.2a. There are higher available versions of libnet, but those versions are not guaranteed to
work with nsclick.
2.2 Unpacking Components
Unpack the base software packages. NOTE: for ns-2 created directories, this section assumes that version 2.26
is being used. This is reflected in many of the directory and file names that would be altered with different
versions of ns-2 .
1. Unpack ns-2 :
tar xzvf ns-allinone-2.26.tar.gz
This will produce a directory named”ns-allinone-2.26”. Change to this directory and here you will untar
your Click release (or get the anonymous CVS source) and libnet.tar.gz:
cd ns-allinone-2.26
2. Unpack Click
If you’ve gotten a tarball of Click:
tar xzvf <path to click>
If you’re using the anonymous CVS release: Follow the directions on the Click website to get the anonymous CVS version of Click into this directory
-ORln -s <path to your Click CVS release> click
3. Unpack libnet
tar xzvf <path to libnet.tar.gz>
4. Apply nsclick patch
Apply it from inside the ”ns-allinone-2.26/ns-2.26” directory:
patch -p1 < <path to nsclick-ns-2.26.patch>
(NOTE: a pipe ”<” is being used in the line above)
2.3 Building Simulator
1. Build libnet
cd Libnet-1.0.2a
autoconf
./configure
make
cd ..
3
2. Build Click
cd click
autoconf
./configure –enable-nsclick –disable-linuxmodule
cd ns
make
cd ../..
3. Build ns-2
cd ns-2.26
autoconf
cd ..
./install
After a lot of compiler activity, nsclick should be built and ready to run.
2.4 Upgrading to New Nsclick Release
The original distribution of nsclick contained a set of patches to Click 1.2.4 as well as to ns-2. These changes
have been rolled into the main Click source tree, and hence are no longer needed. Fortunately the API between
ns-2 and Click is backward compatible, so the same set of ns-2 patches will work. The only required change is
to the ns-2.26 Makefiles since some directory and library names did change with the new release. If you’d like,
you may replace the file:
ns-<your_version>/conf/configure.in.click
with the one included in the new ns-2 version 2.26 release. Then follow the instructions for building Click
and ns-2 in this document after doing a ”make distclean” in the ns-<your_version> directory.
3 A Simple Example
The best way to get familiar with nsclick is to walk through an example. We’ll start with a simple stationary
wired LAN and describe how to define the network topology and traffic patterns as well as some details about
the Click script.
3.1 The Scenario
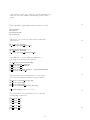
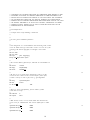
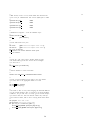
The first scenario we’ll walk through is that of a simple wired LAN with four nodes (see Figure 1), and UDP
traffic flowing from the leftmost node to the rightmost.
Figure 1: Simple Wired LAN
4
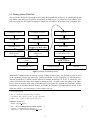
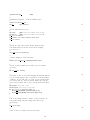
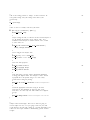
3.2 Routing Packets With Click
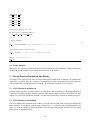
First, we’ll take a look at the Click graph we’ll be using, shown graphically in Figure 2. In a nutshell, this graph
uses ARP to send and receive IP packets. It broadcasts an ARP request if it doesn’t have an IP address in its
table, and it sends out ARP replies in response to requests for its IP address. Most of this script is standard Click,
FromSimDevice(tap0)
FromSimDevice(eth0)
Strip(14)
CheckIPHeader
HostEtherFilter
CheckIPHeader
GetIPAddress(16)
Classifier
(Arp Query, Arp Reply, Other)
MarkIPHeader
ARPResponder
ARPQuerier
GetIPAddress(16)
IPClassifier
Queue
(For Me, Not For Me)
ToSimDevice(eth0)
ToSimDevice(tap0)
Discard
Figure 2: Simple Click Routing Script
and should be straightforward, but there are a couple of things worthy of note. The first thing to point out now
are the arguments passed to the AddressInfo element (around line 70), the FromSimDevice and ToSimDevice
elements (around lines 15 and 40), and the ToSimDump element (around lines 18, 39, 45, 52, 60 and 65). The
:simnet suffix used in the AddressInfo element is analogous to the :eth suffix used in the context of the Linux
kernel. Given an argument of the form DEVNAME:simnet, Click queries the simulator for IP and MAC address
information for the simulated network interface DEVNAME. By convention, simulated ethernet devices are all
of the form ethXX, i.e. the first interface is eth0, second is eth1, etc.
//
//
//
//
//
nsclick-simple-lan.click
This is a simple and stupid flat routing mechanism.
It broadcasts ARP requests if it wants to find a destination
address, and it responds to ARP requests made for it.
elementclass DumbRouter {
$myaddr, $myaddr ethernet |
class :: Classifier(12/0806 20/0001,12/0806 20/0002, −);
mypackets :: IPClassifier(dst host $myaddr,−);
myarpquerier :: ARPQuerier($myaddr,$myaddr ethernet);
10
5
myarpresponder :: ARPResponder($myaddr $myaddr ethernet);
ethout :: Queue −> ToSimDevice(eth0);
FromSimDevice(eth0,4096)
−> Print(eth0,64)
−> ToSimDump(in eth0)
−> HostEtherFilter($myaddr ethernet)
−> class;
20
// ARP queries from other nodes go to the ARP responder module
class[0] −> myarpresponder;
// ARP responses go to our query module
class[1] −> [1]myarpquerier;
// All other packets get checked to see if they’re meant for us
class[2]
−> Strip(14)
−> CheckIPHeader
−> MarkIPHeader
−> GetIPAddress(16)
−> mypackets;
// Packets for us go to “tap0” which sends them to the kernel
mypackets[0]
−> IPPrint(tokernel)
−> ToSimDump(tokernel,2000,IP)
−> ToSimDevice(tap0,IP);
30
40
// Packets for other folks or broadcast packets get discarded
mypackets[1]
−> Print(discard,64)
−> ToSimDump(discard,2000,IP)
−> Discard;
// Packets sent out by the “kernel” get pushed into the ARP query module
FromSimDevice(tap0,4096)
−> CheckIPHeader
−> IPPrint(fromkernel)
−> ToSimDump(fromkernel,2000,IP)
−> GetIPAddress(16)
−> myarpquerier;
// Both the ARP query and response modules send data out to
// the simulated network device, eth0.
myarpquerier
−> Print(fromarpquery,64)
−> ToSimDump(out arpquery)
−> ethout;
50
60
myarpresponder
−> Print(arpresponse,64)
−> ToSimDump(out arprespond)
−> ethout;
}
// Note the use of the :simnet suffix. This means that
// the simulator will be asked for the particular value
70
6
// for the variable in this node.
AddressInfo(me0 eth0:simnet);
u :: DumbRouter(me0,me0);
The IP and MAC addresses for each node must still be specified in the simulator, but this is far easier
than creating a separate Click scripts for each simulated node with hardcoded IP and MAC addresses. The
ToSimDevice and FromSimDevice elements are used to transfer packets between Click and ns-2. Regular network interfaces are eth devices, i.e. eth0, eth1, eth2, etc. There’s also a “kernel tap” device (tap0) which is used
to get packets to and from the “operating system.” In nsclick this corresponds to ns-2 traffic applications, e.g.
Application/Traffic/CBR. The second argument in FromSimDevice is the maximum packet size in bytes which
will arrive on that interface. In the sample scripts, 4096 is used. This should be more than large enough in most
cases. The ToSimDump element is similar to the standard userlevel Click element ToDump. This element simply
dumps packets passing through it to the specified filename in libpcap format. These files may then be read and
analyzed by tcpdump.
3.3 Configuring The Simulation With TCL
Next, we’ll construct a TCL script to run the simulation. The full source for this script is in Appendix A.1.2.
We’ll review it here piece by piece, pointing out interesting items as they show up. By and large the comments
in the sample script should be self-explanatory, but we will go into a little more detail about some things.
3.3.1
General Parameters
Most of the first portion is standard ns-2. However, take special note of the code around line 45. There, we set
default source and destination ports for the UDP packets transmitted during the simulation. These ports may be
overridden when the actual agents are created. Also note that the queue and link layer types specified around
line 32 aren’t standard ns-2. Nsclick requires special queue and link layer subclasses so that Click has full
control over packet queueing. The standard ns-2 network interface expects packets to be pushed into it, and then
handles the queueing on its own. However, the standard network interface assumed by Click pulls packets out
of an attached Click Queue object. The special nsclick link layer and queue objects behave more like a regular
Click-style network interface does.
#
# nsclick-simple-lan.tcl
# A sample nsclick script simulating a small LAN
#
#
# Set some general simulation parameters
#
#
# Even though this is a wired simulation with non-moving nodes, nsclick
# uses the mobile node type. This means we have to set the size of the
# playing field and the topography even though it won’t matter.
#
set xsize 100
set ysize 100
set wtopo
[new Topography]
$wtopo load flatgrid $xsize $ysize
7
10
#
# The network channel, physical layer, and MAC are all standard ns-2.
#
set netchan
Channel
set netphy
Phy/WiredPhy
set netmac
Mac/802 3
#
# We have to use a special queue and link layer. This is so that
# Click can have control over the network interface packet queue,
# which is vital if we want to play with, e.g. QoS algorithms.
#
set netifq
Queue/ClickQueue
set netll
LL/Ext
1ms
LL set delay
#
# These are pretty self-explanatory, just the number of nodes
# and when we’ll stop.
#
set nodecount
4
set stoptime
10.0
#
# With nsclick, we have to worry
# port to use for communication.
#
Agent/Null set sport
Agent/Null set dport
Agent/CBR set sport
Agent/CBR set dport
20
30
40
about details like which network
This sets the default ports to 5000.
5000
5000
5000
5000
50
#
# Standard ns-2 stuff here - create the simulator object.
#
Simulator set MacTrace ON
set ns
[new Simulator]
#
# Create and activate trace files.
#
set tracefd
[open "nsclick-simple-lan.tr" w]
set namtrace
[open "nsclick-simple-lan.nam" w]
$ns trace−all $tracefd
$ns namtrace−all−wireless $namtrace $xsize $ysize
$ns use−newtrace
60
#
# Create the “god” object. This is another artifact of using
# the mobile node type. We have to have this even though
# we never use it.
#
set god [create−god $nodecount]
70
#
# Tell the simulator to create Click nodes.
#
8
Simulator set node factory Node/MobileNode/ClickNode
3.3.2
Addresses And Topology
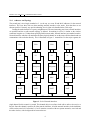
The second part is also largely standard ns-2. At the top, we create IP and MAC addresses for the network
interfaces. We’ll use these later on when attaching network interfaces to the nodes. Note that there are no
subnets specified. Currently, any special subnetting in nsclick has to be handled in the Click script.
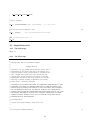
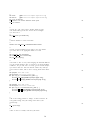
Creating the nodes themselves is pretty straightforward. The next interesting part is how network interfaces
are specified and the overall network topology is defined. Networking in nsclick is similar to the wireless
extensions in regular ns-2. Rather than specifying links between nodes, network interfaces are attached to nodes.
Network interfaces which are all attached to the same physical channel are on the same collision domain and can
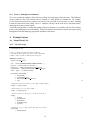
communicate with each other directly. This is illustrated in Figure 3. Around line 5 in the script segment, the
Click
Click
Click
Click
LL
LL
LL
LL
ClickQueue
ClickQueue
ClickQueue
ClickQueue
MAC
MAC
MAC
MAC
NetIF
NetIF
NetIF
NetIF
Channel
Figure 3: Nsclick Network Interfaces
single channel for this scenario is created. This channel object is used later in the call to add-wired-interface at
line 40. Since this channel is used for all of the network interfaces, all of the network interfaces in the simulation
will be on the same LAN. In Section 3.4.2 we’ll examine a scenario with two separate networks, one wired and
the other wireless, with a bridge node in between the two.
9
Finally, each node gets a unique name and Click script, using the setnodename and loadclick methods respectively. The reason for loading a Click script is pretty obvious. The utility of setting an unique name for each
node may not be so immediately obvious, but it is very useful for simulations with more than a few nodes. For
example, the Click Print and IPPrint elements can be very handy for debugging routing graphs. However, they
were built with the assumption that only one graph would be writing to the console. With nsclick this assumption
no longer holds. The nsclick version of these elements prepends the unique node identifier to each printed line,
making it possible to figure out which node is printing each message.
#
# Create a network Channel for the nodes to use. One channel
# per LAN.
#
set chan 1 [new $netchan]
#
# In nsclick we have to worry about assigning IP and MAC addresses
# to out network interfaces. Here we generate a list of IP and MAC
# addresses, one per node since we’ve only got one network interface
# per node in this case. Also note that this scheme only works for
# fewer than 255 nodes, and we aren’t worrying about subnet masks.
#
set iptemplate "192.168.1.%d"
set mactemplate "00:03:47:70:89:%0x"
for {set i 0} {$i < $nodecount} {incr i} {
set node ip($i) [format $iptemplate [expr $i+1]]
set node mac($i) [format $mactemplate [expr $i+1]]
}
10
20
#
# We set the routing protocol to “Empty” so that ns-2 doesn’t do
# any packet routing. All of the routing will be done by the
# Click script.
#
$ns rtproto Empty
#
# Here is where we actually create all of the nodes.
#
for {set i 0} {$i < $nodecount } {incr i} {
set node ($i) [$ns node]
30
#
# After creating the node, we add one wired network interface to
# it. By default, this interface will be named “eth0”. If we
# added a second interface it would be named “eth1”, a third
# “eth2” and so on.
#
$node ($i) add−wired−interface $chan 1 $netll $netmac \
$netifq 1 $netphy
#
# Now configure the interface eth0
#
$node ($i) setip "eth0" $node ip($i)
$node ($i) setmac "eth0" $node mac($i)
10
40
#
# Set
#
$node
$node
$node
50
some node properties
($i) random−motion 0
($i) topography $wtopo
($i) nodetrace $tracefd
#
# The node name is used by Click to distinguish information
# coming from different nodes. For example, a “Print” element
# prepends this to the printed string so it’s clear exactly
# which node is doing the printing.
#
[$node ($i) set classifier ] setnodename "node$i-simplelan"
#
# Load the appropriate Click router script for the node.
# All nodes in this simulation are using the same script,
# but there’s no reason why each node couldn’t use a different
# script.
#
[$node ($i) entry] loadclick "nsclick-simple-lan.click"
}
3.4 More Complex Examples
3.4.1
Simple Wireless LAN
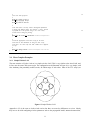
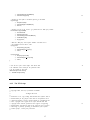
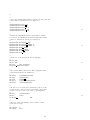
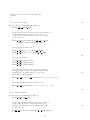
The next scenario we’ll take a look at is a simple wireless LAN. This is very similar to the wired LAN, and,
in fact, uses the same Click router script. The configuration used (illustrated in Figure 4) is very simple, with
four stationary (but potentially mobile) nodes, all within range of each other. Most of the TCL script (see
Figure 4: Simple Wireless LAN
Appendix A.2.2) is the same as in the wired version, but there are some key differences to review. Mostly
they have to do with configuring wireless parameters such as the propagation model, antenna characteristics,
11
60
70
and transmitter power. The main point of interest is the call to add-interface which creates a wireless network
interface instead of a wired one.
3.4.2
Wireless/Wired Bridge
Finally, we’ll combine mix wired and wireless nodes together with a hybrid wireless/wired “bridge” node which
allows traffic to flow between the two networks, shown in Figure 5. Most of the nodes will use the same Click
Figure 5: Wireless Bridge
configuration script as in the previous two examples. The “bridge” node will use an even simpler Click script
(See Appendix A.3.1), which blindly takes packets coming in on eth0 and sends them out eth1 and vice versa.
A more realistic configuration would route (or maybe perform NAT) between the wireless and wired networks,
but this will suffice for a simple example. The TCL script (see Appendix A.3.2) in this case does gain a bit of
complexity, primarily because there are now three different types of nodes to configure.
4 Running the Simulation
This is the same under nsclick as it is with regular ns-2. Standard trace files will be produced (both nam and
regular), and scripts designed to analyze ns-2 trace files should work on nsclick trace files without modification.
4.1 Creating Network Traffic
Creating network traffic in nsclick bears some resemblance to traffic generation in standard ns-2, but there are
some important differences. Currently, the only traffic generation application supported is CBR. This is due to
the fact that Agent/Raw only performs UDP encapsulation. This is a big limitation, but there is still interesting
work which may be done with UDP. For example, ad hoc routing protocols are typically evaluated using simple
CBR traffic [4, 5, 6, 7]. Other than that limitation, the main difference is that Agent/Raw requires source and
destination IP addresses and ports.
#
# Define node network traffic. There isn’t a whole lot going on
# in this simple test case, we’re just going to have the first node
12
# send packets to the last node, starting at 1 second, and ending at 10.
# There are Perl scripts available to automatically generate network
# traffic.
#
#
# Start transmitting at $startxmittime, $xmitrate packets per second.
#
set startxmittime 1
set xmitrate 4
set xmitinterval 0.25
set packetsize 64
#
# We use the “raw” packet type, which sends real packet data
# down the pipe.
#
set raw (0) [new Agent/Raw]
$ns attach−agent $node (0) $raw (0)
10
20
set lastnode [expr $nodecount−1]
set null (0) [new Agent/Null]
$ns attach−agent $node ($lastnode) $null (0)
#
# The CBR object is just the default ns-2 CBR object, so
# no change in the meaning of the parameters.
#
set cbr (0) [new Application/Traffic/CBR]
$cbr (0) set packetSize $packetsize
$cbr (0) set interval $xmitinterval
$cbr (0) set random 0
$cbr (0) set maxpkts [expr ($stoptime − $startxmittime)*$xmitrate]
$cbr (0) attach−agent $raw (0)
#
# The Raw agent creates real UDP packets, so it has to know
# the source and destination IP addresses and port numberes.
#
$raw (0) set−srcip [$node (0) getip eth0]
$raw (0) set−srcport 5000
$raw (0) set−destport 5000
$raw (0) set−destip [$node ($lastnode) getip eth0]
30
40
$ns at $startxmittime "$cbr_(0) start"
50
#
# Set node positions. For wired networks, these are only used
# when looking at nam traces.
#
$node (0) set X 10
$node (0) set Y 50
$node (0) set Z 0
$node (1) set X 50
$node (1) set Y 50
$node (1) set Z 0
60
13
$node (2) set X 90
$node (2) set Y 50
$node (2) set Z 0
$node (3) set X 50
$node (3) set Y 10
$node (3) set Z 0
70
#
# This sizes the nodes for use in nam.
#
for {set i 0} {$i < $nodecount} {incr i} {
$ns initial node pos $node ($i) 20
}
#
# Stop the simulation
#
$ns at $stoptime.000000001 "puts \"NS EXITING. . .\" ; $ns_ halt"
80
#
# Let nam know that the simulation is done.
#
$ns at $stoptime
"$ns_ nam-end-wireless $stoptime"
puts "Starting Simulation. . ."
$ns run
90
4.2 Packet Analysis
With nsclick, the ToSimDump element can also be used to produce trace files for analysis. These trace files may
be analyzed with any number of tools which can read the libpcap file format.
5 Moving Between Simulation And Reality
The sample Click scripts will not work in real life without some modification. Fortunately, the modifications
required are very minor. There are a number of issues which arise when constructing Click scripts which will
work well both under simulated and actual conditions. We will address the major ones in Section 6.
5.1 Click Elements to be Removed
The main change required is to replace instances of ToSimDevice and FromSimDevice with the appropriate user
or kernel level elements which get packets to and from either ethernet interfaces or the system kernel. The other
change is to get rid of the ToSimDump elements, or replace them with ToDump elements if running at user level.
5.2 Click Elements to be Modified
The call to AddressInfo() returns the node’s address. This call is located in the Click script used to initialize the
router elementes. In simulation, using the suffix :simnet tells ns-2 to return the node’s simulated address. Of
course in real life, this address would be hardcoded on the click router and returned. All calls using the :simnet
suffix need to be altered accordingly.
14
Any element that does simulation packet dumps for analysis should of course also be removed before porting
over to an actual Click implementation.
6 Coding For Nsclick
There are a few things which must be done for a Click script to work smoothly both under nsclick and regular
Click.
6.1 Handling IP and MAC Addresses
Many Click scripts have IP and MAC addresses embedded in them. This works fine if the script is going to be
run on a single machine. However, in a simulation environment we’ll typically want to run the same script on
quite a few different nodes, each with a separate IP and MAC address. Rather than requiring separate scripts
for each node with the appropriate IP and MAC addresses embedded in them, nsclick allows for IP and MAC
addresses to be assinged in ns-2 and propagated over to each Click script instance.
6.2 Additional Jittering
Protocols which make use of periodic broadcast can get into trouble in a simulated environment due to an
unrealistic level of synchronization. In the real world, variations between systems usually ensures that network
nodes pumping out broadcast packets at ostensibly the same rate probably aren’t exactly synchronized. In a
simulator, these differences don’t exist. Two nodes broadcasting messages every second will do so in exact
harmony, and blindly step on each other throughout the entire run. This may result in artificially high loss rates
and latency.
6.3 System-Specific Code
There are some Click constructs which simply will not work under nsclick as it stands. For example, Click
elements can communicate via read and write handlers using the /proc/click filesystem. This sort of thing
doesn’t have an equivalent in nsclick right now. Another example is code which attempts to manipulate system
routing tables, e.g. the LinuxIPLookup element. These types of elements either have to be eliminated or replaced
with nsclick-friendly equivalents. The difficulty of this task will vary depending on the task performed by the
specialized element.
6.4 Dumping Packets to Disk
The ToSimDump element will dump packets passing through it to a libpcap format disk file. This can be very
handy for debugging Click routing scripts, and can allow for some direct comparisons to be made between
packet-level behavior in real life and simulation. This element is equivalent to the userlevel ToDump element
with an important difference. The dump filename passed in has the node name prepended to it, much like the
Print and IPPrint elements have the node name prepended to each string they print.
6.5 Click Elements Incompatible with Ns-2
6.5.1
Elements Controlling Hardware
Certain Click elements can control hardware (e.g. AiroInfo element see: http://www.pdos.lcs.mit.edu/click/do
that will not work under the ns-2 simulation environment. Due to the diverse nature of the hardware interfaces,
we have not attempted to mimic them in nsclick .
15
6.5.2
Event vs. Polling Driven Simulation
Ns-2 is an event driven simulator, while Click uses polling of its input ports to drive the router. This difference
can be a problem if any Click element implicitly assumes it is being polled at a constant rate. For example,
a Click element may increment a counter every time its code is run and use this counter as a timer, assuming
it knows the intervals between polling. The ns-2 simulator will only run the code on an event based scheme,
destroying the counter-to-timer scheme.
A solution to this problem is to either fake polling in the ns-2 simulator or to carefully code the Click elements
to not use the polling nature of Click implicity. Using Click elements from other developers also requires going
through their code and identifying any possible problems of this nature.
A
Example Scripts
A.1 Simple Wired LAN
A.1.1
//
//
//
//
//
The Click Script
nsclick-simple-lan.click
This is a simple and stupid flat routing mechanism.
It broadcasts ARP requests if it wants to find a destination
address, and it responds to ARP requests made for it.
elementclass DumbRouter {
$myaddr, $myaddr ethernet |
class :: Classifier(12/0806 20/0001,12/0806 20/0002, −);
mypackets :: IPClassifier(dst host $myaddr,−);
myarpquerier :: ARPQuerier($myaddr,$myaddr ethernet);
myarpresponder :: ARPResponder($myaddr $myaddr ethernet);
ethout :: Queue −> ToSimDevice(eth0);
FromSimDevice(eth0,4096)
−> Print(eth0,64)
−> ToSimDump(in eth0)
−> HostEtherFilter($myaddr ethernet)
−> class;
10
20
// ARP queries from other nodes go to the ARP responder module
class[0] −> myarpresponder;
// ARP responses go to our query module
class[1] −> [1]myarpquerier;
// All other packets get checked to see if they’re meant for us
class[2]
−> Strip(14)
−> CheckIPHeader
−> MarkIPHeader
−> GetIPAddress(16)
−> mypackets;
// Packets for us go to “tap0” which sends them to the kernel
mypackets[0]
−> IPPrint(tokernel)
16
30
−> ToSimDump(tokernel,2000,IP)
−> ToSimDevice(tap0,IP);
40
// Packets for other folks or broadcast packets get discarded
mypackets[1]
−> Print(discard,64)
−> ToSimDump(discard,2000,IP)
−> Discard;
// Packets sent out by the “kernel” get pushed into the ARP query module
FromSimDevice(tap0,4096)
−> CheckIPHeader
−> IPPrint(fromkernel)
−> ToSimDump(fromkernel,2000,IP)
−> GetIPAddress(16)
−> myarpquerier;
// Both the ARP query and response modules send data out to
// the simulated network device, eth0.
myarpquerier
−> Print(fromarpquery,64)
−> ToSimDump(out arpquery)
−> ethout;
50
60
myarpresponder
−> Print(arpresponse,64)
−> ToSimDump(out arprespond)
−> ethout;
}
// Note the use of the :simnet suffix. This means that
// the simulator will be asked for the particular value
// for the variable in this node.
AddressInfo(me0 eth0:simnet);
u :: DumbRouter(me0,me0);
A.1.2
#
#
#
#
#
#
#
#
#
#
#
#
#
#
70
The TCL Script
Copyright 2002, Univerity of Colorado at Boulder.
All Rights Reserved
Permission to use, copy, modify, and distribute this software and its
documentation for any purpose other than its incorporation into a
commercial product is hereby granted without fee, provided that the
above copyright notice appear in all copies and that both that
copyright notice and this permission notice appear in supporting
documentation, and that the name of the University not be used in
advertising or publicity pertaining to distribution of the software
without specific, written prior permission.
17
10
#
#
#
#
#
#
#
#
#
#
#
#
#
UNIVERSITY OF COLORADO DISCLAIMS ALL WARRANTIES WITH REGARD TO THIS
SOFTWARE, INCLUDING ALL IMPLIED WARRANTIES OF MERCHANTABILITY AND
FITNESS FOR ANY PARTICULAR PURPOSE. IN NO EVENT SHALL THE UNIVERSITY
OF COLORADO BE LIABLE FOR ANY SPECIAL, INDIRECT OR CONSEQUENTIAL
DAMAGES OR ANY DAMAGES WHATSOEVER RESULTING FROM LOSS OF USE, DATA
OR PROFITS, WHETHER IN AN ACTION OF CONTRACT, NEGLIGENCE OR OTHER
TORTIOUS ACTION, ARISING OUT OF OR IN CONNECTION WITH THE USE OR
PERFORMANCE OF THIS SOFTWARE.
20
nsclick-simple-lan.tcl
A sample nsclick script simulating a small LAN
#
# Set some general simulation parameters
#
30
#
# Even though this is a wired simulation with non-moving nodes, nsclick
# uses the mobile node type. This means we have to set the size of the
# playing field and the topography even though it won’t matter.
#
set xsize 100
set ysize 100
set wtopo
[new Topography]
$wtopo load flatgrid $xsize $ysize
40
#
# The network channel, physical layer, and MAC are all standard ns-2.
#
set netchan
Channel
set netphy
Phy/WiredPhy
set netmac
Mac/802 3
#
# We have to use a special queue and link layer. This is so that
# Click can have control over the network interface packet queue,
# which is vital if we want to play with, e.g. QoS algorithms.
#
set netifq
Queue/ClickQueue
set netll
LL/Ext
LL set delay
1ms
#
# These are pretty self-explanatory, just the number of nodes
# and when we’ll stop.
#
set nodecount
4
set stoptime
10.0
#
# With nsclick, we have to worry
# port to use for communication.
#
Agent/Null set sport
Agent/Null set dport
Agent/CBR set sport
50
60
about details like which network
This sets the default ports to 5000.
5000
5000
70
5000
18
Agent/CBR set dport
5000
#
# Standard ns-2 stuff here - create the simulator object.
#
Simulator set MacTrace ON
set ns
[new Simulator]
80
#
# Create and activate trace files.
#
set tracefd
[open "nsclick-simple-lan.tr" w]
set namtrace
[open "nsclick-simple-lan.nam" w]
$ns trace−all $tracefd
$ns namtrace−all−wireless $namtrace $xsize $ysize
$ns use−newtrace
90
#
# Create the “god” object. This is another artifact of using
# the mobile node type. We have to have this even though
# we never use it.
#
set god [create−god $nodecount]
#
# Tell the simulator to create Click nodes.
#
Simulator set node factory Node/MobileNode/ClickNode
100
#
# Create a network Channel for the nodes to use. One channel
# per LAN.
#
set chan 1 [new $netchan]
#
# In nsclick we have to worry about assigning IP and MAC addresses
# to out network interfaces. Here we generate a list of IP and MAC
# addresses, one per node since we’ve only got one network interface
# per node in this case. Also note that this scheme only works for
# fewer than 255 nodes, and we aren’t worrying about subnet masks.
#
set iptemplate "192.168.1.%d"
set mactemplate "00:03:47:70:89:%0x"
for {set i 0} {$i < $nodecount} {incr i} {
set node ip($i) [format $iptemplate [expr $i+1]]
set node mac($i) [format $mactemplate [expr $i+1]]
}
110
120
#
# We set the routing protocol to “Empty” so that ns-2 doesn’t do
# any packet routing. All of the routing will be done by the
# Click script.
#
$ns rtproto Empty
130
#
# Here is where we actually create all of the nodes.
19
#
for {set i 0} {$i < $nodecount } {incr i} {
set node ($i) [$ns node]
#
# After creating the node, we add one wired network interface to
# it. By default, this interface will be named “eth0”. If we
# added a second interface it would be named “eth1”, a third
# “eth2” and so on.
#
$node ($i) add−wired−interface $chan 1 $netll $netmac \
$netifq 1 $netphy
#
# Now configure the interface eth0
#
$node ($i) setip "eth0" $node ip($i)
$node ($i) setmac "eth0" $node mac($i)
#
# Set
#
$node
$node
$node
140
150
some node properties
($i) random−motion 0
($i) topography $wtopo
($i) nodetrace $tracefd
#
# The node name is used by Click to distinguish information
# coming from different nodes. For example, a “Print” element
# prepends this to the printed string so it’s clear exactly
# which node is doing the printing.
#
[$node ($i) set classifier ] setnodename "node$i-simplelan"
#
# Load the appropriate Click router script for the node.
# All nodes in this simulation are using the same script,
# but there’s no reason why each node couldn’t use a different
# script.
#
[$node ($i) entry] loadclick "nsclick-simple-lan.click"
160
170
}
#
#
#
#
#
#
#
Define node network traffic. There isn’t a whole lot going on
in this simple test case, we’re just going to have the first node
send packets to the last node, starting at 1 second, and ending at 10.
There are Perl scripts available to automatically generate network
traffic.
#
# Start transmitting at $startxmittime, $xmitrate packets per second.
#
set startxmittime 1
set xmitrate 4
set xmitinterval 0.25
20
180
190
set packetsize 64
#
# We use the “raw” packet type, which sends real packet data
# down the pipe.
#
set raw (0) [new Agent/Raw]
$ns attach−agent $node (0) $raw (0)
200
set lastnode [expr $nodecount−1]
set null (0) [new Agent/Null]
$ns attach−agent $node ($lastnode) $null (0)
#
# The CBR object is just the default ns-2 CBR object, so
# no change in the meaning of the parameters.
#
set cbr (0) [new Application/Traffic/CBR]
$cbr (0) set packetSize $packetsize
$cbr (0) set interval $xmitinterval
$cbr (0) set random 0
$cbr (0) set maxpkts [expr ($stoptime − $startxmittime)*$xmitrate]
$cbr (0) attach−agent $raw (0)
#
# The Raw agent creates real UDP packets, so it has to know
# the source and destination IP addresses and port numberes.
#
$raw (0) set−srcip [$node (0) getip eth0]
$raw (0) set−srcport 5000
$raw (0) set−destport 5000
$raw (0) set−destip [$node ($lastnode) getip eth0]
210
220
$ns at $startxmittime "$cbr_(0) start"
#
# Set node positions. For wired networks, these are only used
# when looking at nam traces.
#
$node (0) set X 10
$node (0) set Y 50
$node (0) set Z 0
230
$node (1) set X 50
$node (1) set Y 50
$node (1) set Z 0
$node (2) set X 90
$node (2) set Y 50
$node (2) set Z 0
240
$node (3) set X 50
$node (3) set Y 10
$node (3) set Z 0
#
# This sizes the nodes for use in nam.
#
for {set i 0} {$i < $nodecount} {incr i} {
250
21
$ns initial node pos $node ($i) 20
}
#
# Stop the simulation
#
$ns at $stoptime.000000001 "puts \"NS EXITING. . .\" ; $ns_ halt"
#
# Let nam know that the simulation is done.
#
"$ns_ nam-end-wireless $stoptime"
$ns at $stoptime
260
puts "Starting Simulation. . ."
$ns run
A.2 Simple Wireless LAN
A.2.1
The Click Script
See A.1.1.
A.2.2
#
#
#
#
#
#
#
#
#
#
#
#
#
#
#
#
#
#
#
#
#
#
#
#
#
#
#
The TCL Script
Copyright 2002, Univerity of Colorado at Boulder.
All Rights Reserved
Permission to use, copy, modify, and distribute this software and its
documentation for any purpose other than its incorporation into a
commercial product is hereby granted without fee, provided that the
above copyright notice appear in all copies and that both that
copyright notice and this permission notice appear in supporting
documentation, and that the name of the University not be used in
advertising or publicity pertaining to distribution of the software
without specific, written prior permission.
UNIVERSITY OF COLORADO DISCLAIMS ALL WARRANTIES WITH REGARD TO THIS
SOFTWARE, INCLUDING ALL IMPLIED WARRANTIES OF MERCHANTABILITY AND
FITNESS FOR ANY PARTICULAR PURPOSE. IN NO EVENT SHALL THE UNIVERSITY
OF COLORADO BE LIABLE FOR ANY SPECIAL, INDIRECT OR CONSEQUENTIAL
DAMAGES OR ANY DAMAGES WHATSOEVER RESULTING FROM LOSS OF USE, DATA
OR PROFITS, WHETHER IN AN ACTION OF CONTRACT, NEGLIGENCE OR OTHER
TORTIOUS ACTION, ARISING OUT OF OR IN CONNECTION WITH THE USE OR
PERFORMANCE OF THIS SOFTWARE.
10
20
nsclick-simple-lan.tcl
A sample nsclick script simulating a small wireless LAN
#
# Set some general simulation parameters
30
22
#
#
# Unity gain, omnidirectional antennas, centered 1.5m above each node.
# These values are lifted from the ns-2 sample files.
#
Antenna/OmniAntenna set X 0
Antenna/OmniAntenna set Y 0
Antenna/OmniAntenna set Z 1.5
Antenna/OmniAntenna set Gt 1.0
Antenna/OmniAntenna set Gr 1.0
#
# Initialize the SharedMedia interface with parameters to make
# it work like the 914MHz Lucent WaveLAN DSSS radio interface
# These are taken directly from the ns-2 sample files.
#
Phy/WirelessPhy set CPThresh 10.0
Phy/WirelessPhy set CSThresh 1.559e−11
Phy/WirelessPhy set RXThresh 3.652e−10
Phy/WirelessPhy set Rb 2*1e6
Phy/WirelessPhy set Pt 0.2818
Phy/WirelessPhy set freq 914e+6
Phy/WirelessPhy set L 1.0
#
# Set the size of the playing field and the topography.
#
set xsize 100
set ysize 100
set wtopo
[new Topography]
$wtopo load flatgrid $xsize $ysize
40
50
60
#
# The network channel, physical layer, MAC, propagation model,
# and antenna model are all standard ns-2.
#
set netchan
Channel/WirelessChannel
set netphy
Phy/WirelessPhy
set netmac
Mac/802 11
set netprop
Propagation/TwoRayGround
set antenna
Antenna/OmniAntenna
#
# We have to use a special queue and link layer. This is so that
# Click can have control over the network interface packet queue,
# which is vital if we want to play with, e.g. QoS algorithms.
#
set netifq
Queue/ClickQueue
set netll
LL/Ext
LL set delay
1ms
#
# These are pretty self-explanatory, just the number of nodes
# and when we’ll stop.
#
set nodecount
4
set stoptime
10.0
23
70
80
#
# With nsclick, we have to worry
# port to use for communication.
#
Agent/Null set sport
Agent/Null set dport
Agent/CBR set sport
Agent/CBR set dport
90
about details like which network
This sets the default ports to 5000.
5000
5000
5000
5000
#
# Standard ns-2 stuff here - create the simulator object.
#
Simulator set MacTrace ON
set ns
[new Simulator]
100
#
# Create and activate trace files.
#
set tracefd
[open "nsclick-simple-wlan.tr" w]
set namtrace
[open "nsclick-simple-wlan.nam" w]
$ns trace−all $tracefd
$ns namtrace−all−wireless $namtrace $xsize $ysize
$ns use−newtrace
#
# Create the “god” object. This is another artifact of using
# the mobile node type. We have to have this even though
# we never use it.
#
set god [create−god $nodecount]
110
120
#
# Tell the simulator to create Click nodes.
#
Simulator set node factory Node/MobileNode/ClickNode
#
# Create a network Channel for the nodes to use. One channel
# per LAN. Also set the propagation model to be used.
#
set chan 1 [new $netchan]
set prop [new $netprop]
#
# In nsclick we have to worry about assigning IP and MAC addresses
# to out network interfaces. Here we generate a list of IP and MAC
# addresses, one per node since we’ve only got one network interface
# per node in this case. Also note that this scheme only works for
# fewer than 255 nodes, and we aren’t worrying about subnet masks.
#
set iptemplate "192.168.1.%d"
set mactemplate "00:03:47:70:89:%0x"
for {set i 0} {$i < $nodecount} {incr i} {
set node ip($i) [format $iptemplate [expr $i+1]]
set node mac($i) [format $mactemplate [expr $i+1]]
}
24
130
140
#
# We set the routing protocol to “Empty” so that ns-2 doesn’t do
# any packet routing. All of the routing will be done by the
# Click script.
#
$ns rtproto Empty
#
# Here is where we actually create all of the nodes.
#
for {set i 0} {$i < $nodecount } {incr i} {
set node ($i) [$ns node]
150
160
#
# After creating the node, we add one wireless network interface to
# it. By default, this interface will be named “eth0”. If we
# added a second interface it would be named “eth1”, a third
# “eth2” and so on.
#
$node ($i) add−interface $chan 1 $prop $netll $netmac \
$netifq 1 $netphy $antenna
170
#
# Now configure the interface eth0
#
$node ($i) setip "eth0" $node ip($i)
$node ($i) setmac "eth0" $node mac($i)
#
# Set
#
$node
$node
$node
some node properties
($i) random−motion 0
($i) topography $wtopo
($i) nodetrace $tracefd
180
#
# The node name is used by Click to distinguish information
# coming from different nodes. For example, a “Print” element
# prepends this to the printed string so it’s clear exactly
# which node is doing the printing.
#
[$node ($i) set classifier ] setnodename "node$i-simplelan"
190
#
# Load the appropriate Click router script for the node.
# All nodes in this simulation are using the same script,
# but there’s no reason why each node couldn’t use a different
# script.
#
[$node ($i) entry] loadclick "nsclick-simple-lan.click"
}
200
#
#
#
#
#
#
Define node network traffic. There isn’t a whole lot going on
in this simple test case, we’re just going to have the first node
send packets to the last node, starting at 1 second, and ending at 10.
There are Perl scripts available to automatically generate network
traffic.
25
#
210
#
# Start transmitting at $startxmittime, $xmitrate packets per second.
#
set startxmittime 1
set xmitrate 4
set xmitinterval 0.25
set packetsize 64
#
# We use the “raw” packet type, which sends real packet data
# down the pipe.
#
set raw (0) [new Agent/Raw]
$ns attach−agent $node (0) $raw (0)
220
set lastnode [expr $nodecount−1]
set null (0) [new Agent/Null]
$ns attach−agent $node ($lastnode) $null (0)
#
# The CBR object is just the default ns-2 CBR object, so
# no change in the meaning of the parameters.
#
set cbr (0) [new Application/Traffic/CBR]
$cbr (0) set packetSize $packetsize
$cbr (0) set interval $xmitinterval
$cbr (0) set random 0
$cbr (0) set maxpkts [expr ($stoptime − $startxmittime)*$xmitrate]
$cbr (0) attach−agent $raw (0)
230
240
#
# The Raw agent creates real UDP packets, so it has to know
# the source and destination IP addresses and port numberes.
#
$raw (0) set−srcip [$node (0) getip eth0]
$raw (0) set−srcport 5000
$raw (0) set−destport 5000
$raw (0) set−destip [$node ($lastnode) getip eth0]
$ns at $startxmittime "$cbr_(0) start"
250
$node (0) set X 10
$node (0) set Y 50
$node (0) set Z 0
$node (1) set X 50
$node (1) set Y 50
$node (1) set Z 0
260
$node (2) set X 90
$node (2) set Y 50
$node (2) set Z 0
$node (3) set X 50
$node (3) set Y 10
26
$node (3) set Z 0
#
# This sizes the nodes for use in nam. Currently, the trace files
# produced by nsclick don’t really work in nam.
#
for {set i 0} {$i < $nodecount} {incr i} {
$ns initial node pos $node ($i) 20
}
#
# Stop the simulation
#
$ns at $stoptime.000000001 "puts \"NS EXITING. . .\" ; $ns_ halt"
270
280
#
# Let nam know that the simulation is done.
#
$ns at $stoptime
"$ns_ nam-end-wireless $stoptime"
puts "Starting Simulation. . ."
$ns run
290
A.3 Wireless Bridge
A.3.1
The Click Script
For the regular wired and wireless nodes, see A.1.1. The script for the bridge node follows.
//
//
//
//
//
//
nsclick-simple-bridge.click
This is a simple and stupid network “bridge.” Packets coming
in off of eth0 are pumped out on eth1, and packets coming
in off of eth1 are pumped out on eth0.
FromSimDevice(eth0,4096)
−> Queue
−> ToSimDevice(eth1);
10
FromSimDevice(eth1,4096)
−> Queue
−> ToSimDevice(eth0);
27
A.3.2
#
#
#
#
#
#
#
#
#
#
#
#
#
#
#
#
#
#
#
#
#
#
#
#
#
#
#
The TCL Script
Copyright 2002, Univerity of Colorado at Boulder.
All Rights Reserved
Permission to use, copy, modify, and distribute this software and its
documentation for any purpose other than its incorporation into a
commercial product is hereby granted without fee, provided that the
above copyright notice appear in all copies and that both that
copyright notice and this permission notice appear in supporting
documentation, and that the name of the University not be used in
advertising or publicity pertaining to distribution of the software
without specific, written prior permission.
UNIVERSITY OF COLORADO DISCLAIMS ALL WARRANTIES WITH REGARD TO THIS
SOFTWARE, INCLUDING ALL IMPLIED WARRANTIES OF MERCHANTABILITY AND
FITNESS FOR ANY PARTICULAR PURPOSE. IN NO EVENT SHALL THE UNIVERSITY
OF COLORADO BE LIABLE FOR ANY SPECIAL, INDIRECT OR CONSEQUENTIAL
DAMAGES OR ANY DAMAGES WHATSOEVER RESULTING FROM LOSS OF USE, DATA
OR PROFITS, WHETHER IN AN ACTION OF CONTRACT, NEGLIGENCE OR OTHER
TORTIOUS ACTION, ARISING OUT OF OR IN CONNECTION WITH THE USE OR
PERFORMANCE OF THIS SOFTWARE.
10
20
nsclick-simple-hybrid.tcl
A sample nsclick script simulating a small hybrid wired/wireless
#
# Set some general simulation parameters
#
30
#
# Unity gain, omnidirectional antennas, centered 1.5m above each node.
# These values are lifted from the ns-2 sample files.
#
Antenna/OmniAntenna set X 0
Antenna/OmniAntenna set Y 0
Antenna/OmniAntenna set Z 1.5
Antenna/OmniAntenna set Gt 1.0
Antenna/OmniAntenna set Gr 1.0
#
# Initialize the SharedMedia interface with parameters to make
# it work like the 914MHz Lucent WaveLAN DSSS radio interface
# These are taken directly from the ns-2 sample files.
#
Phy/WirelessPhy set CPThresh 10.0
Phy/WirelessPhy set CSThresh 1.559e−11
Phy/WirelessPhy set RXThresh 3.652e−10
Phy/WirelessPhy set Rb 2*1e6
Phy/WirelessPhy set Pt 0.2818
Phy/WirelessPhy set freq 914e+6
Phy/WirelessPhy set L 1.0
#
28
40
50
# Set the size of the playing field and the topography.
#
set xsize 100
set ysize 100
set wtopo
[new Topography]
$wtopo load flatgrid $xsize $ysize
60
#
# The network channel, physical layer, MAC, propagation model,
# and antenna model are all standard ns-2.
#
set wirelesschan Channel/WirelessChannel
set wiredchan Channel
70
set wirelessphy Phy/WirelessPhy
set wiredphy Phy/WiredPhy
set wirelessmac Mac/802 11
set wiredmac Mac/802 3
set netprop Propagation/TwoRayGround
set antenna Antenna/OmniAntenna
#
# We have to use a special queue and link layer. This is so that
# Click can have control over the network interface packet queue,
# which is vital if we want to play with, e.g. QoS algorithms.
#
set netifq
Queue/ClickQueue
set netll
LL/Ext
LL set delay
1ms
#
# These are pretty self-explanatory, just the number of nodes
# and when we’ll stop.
#
set wirednodecount 3
set wirelessnodecount 3
set bridgenodecount 1
set nodecount
7
set stoptime
10.0
#
# With nsclick, we have to worry
# port to use for communication.
#
Agent/Null set sport
Agent/Null set dport
Agent/CBR set sport
Agent/CBR set dport
80
90
about details like which network
This sets the default ports to 5000.
100
5000
5000
5000
5000
#
# Standard ns-2 stuff here - create the simulator object.
#
set ns
[new Simulator]
110
#
# Create and activate trace files.
29
#
set tracefd
[open "nsclick-simple-hybrid.tr" w]
set namtrace
[open "nsclick-simple-hybrid.nam" w]
$ns trace−all $tracefd
$ns namtrace−all−wireless $namtrace $xsize $ysize
$ns use−newtrace
120
#
# Create the “god” object. This is another artifact of using
# the mobile node type. We have to have this even though
# we never use it.
#
set god [create−god $nodecount]
130
#
# Tell the simulator to create Click nodes.
#
Simulator set node factory Node/MobileNode/ClickNode
#
# Create a network Channel for the nodes to use. One channel
# per LAN. Also set the propagation model to be used.
#
set wired chan [new $wiredchan]
set wireless chan [new $wirelesschan]
set prop [new $netprop]
#
# In nsclick we have to worry about assigning IP and MAC addresses
# to out network interfaces. Here we generate a list of IP and MAC
# addresses, one per node since we’ve only got one network interface
# per node in this case. Also note that this scheme only works for
# fewer than 255 nodes, and we aren’t worrying about subnet masks.
#
set iptemplate "192.168.1.%d"
set mactemplate "00:03:47:70:89:%0x"
for {set i 0} {$i < $wirednodecount} {incr i} {
set wired node ip($i) [format $iptemplate [expr $i+1]]
set wired node mac($i) [format $mactemplate [expr $i+1]]
}
set iptemplate "192.168.2.%d"
set mactemplate "00:03:47:70:8A:%0x"
for {set i 0} {$i < $wirelessnodecount} {incr i} {
set wireless node ip($i) [format $iptemplate [expr $i+1]]
set wireless node mac($i) [format $mactemplate [expr $i+1]]
}
#
# We set the routing protocol to “Empty” so that ns-2 doesn’t do
# any packet routing. All of the routing will be done by the
# Click script.
#
$ns rtproto Empty
#
# Here is where we actually create all of the nodes.
30
140
150
160
170
# We’ll create the wired, wireless, and the bridge node
# separately.
#
#
# Start with the wireless nodes
#
for {set i 0} {$i < $wirelessnodecount } {incr i} {
set wireless node ($i) [$ns node]
180
#
# After creating the node, we add one wireless network interface to
# it. By default, this interface will be named “eth0”. If we
# added a second interface it would be named “eth1”, a third
# “eth2” and so on.
#
$wireless node ($i) add−interface $wireless chan $prop $netll \
$wirelessmac $netifq 1 $wirelessphy $antenna
190
#
# Now configure the interface eth0
#
$wireless node ($i) setip "eth0" $wireless node ip($i)
$wireless node ($i) setmac "eth0" $wireless node mac($i)
#
# Set some node properties
#
$wireless node ($i) random−motion 0
$wireless node ($i) topography $wtopo
$wireless node ($i) nodetrace $tracefd
200
#
# The node name is used by Click to distinguish information
# coming from different nodes. For example, a “Print” element
# prepends this to the printed string so it’s clear exactly
# which node is doing the printing.
#
[$wireless node ($i) set classifier ] setnodename "wirelessnode$i-hybrid"
210
#
# Load the appropriate Click router script for the node.
#
[$wireless node ($i) entry] loadclick "nsclick-simple-lan.click"
}
220
#
# Now create the wired nodes
#
for {set i 0} {$i < $wirednodecount } {incr i} {
set wired node ($i) [$ns node]
#
# After creating the node, we add one wired network interface to
# it. By default, this interface will be named “eth0”. If we
# added a second interface it would be named “eth1”, a third
# “eth2” and so on.
#
$wired node ($i) add−wired−interface $wired chan $netll $wiredmac \
31
230
$netifq 1 $wiredphy
#
# Now configure the interface eth0
#
$wired node ($i) setip "eth0" $wired node ip($i)
$wired node ($i) setmac "eth0" $wired node mac($i)
#
# Set some node
#
$wired node ($i)
$wired node ($i)
$wired node ($i)
240
properties
random−motion 0
topography $wtopo
nodetrace $tracefd
#
# The node name is used by Click to distinguish information
# coming from different nodes. For example, a “Print” element
# prepends this to the printed string so it’s clear exactly
# which node is doing the printing.
#
[$wired node ($i) set classifier ] setnodename "wirednode$i-hybrid"
#
# Load the appropriate Click router script for the node.
# All nodes in this simulation are using the same script,
# but there’s no reason why each node couldn’t use a different
# script.
#
[$wired node ($i) entry] loadclick "nsclick-simple-lan.click"
250
260
}
#
# Finally make the bridge node
#
set bridge node [$ns node]
$bridge node add−wired−interface $wired chan $netll $wiredmac \
$netifq 1 $wiredphy
$bridge node add−interface $wireless chan $prop $netll \
$wirelessmac $netifq 1 $wirelessphy $antenna
270
$bridge node random−motion 0
$bridge node topography $wtopo
$bridge node nodetrace $tracefd
[$bridge node entry] loadclick "nsclick-simple-bridge.click"
[$bridge node set classifier ] setnodename "bridgenode-hybrid"
#
#
#
#
#
#
#
280
Define node network traffic. There isn’t a whole lot going on
in this simple test case, we’re just going to have the first wireless node
send packets to the first wired node, starting at 1 second, and ending at 10.
There are Perl scripts available to automatically generate network
traffic.
290
#
# Start transmitting at $startxmittime, $xmitrate packets per second.
32
#
set
set
set
set
startxmittime 1
xmitrate 4
xmitinterval 0.25
packetsize 64
#
# We use the “raw” packet type, which sends real packet data
# down the pipe.
#
set raw (0) [new Agent/Raw]
$ns attach−agent $wireless node (0) $raw (0)
300
set null (0) [new Agent/Null]
$ns attach−agent $wired node (0) $null (0)
#
# The CBR object is just the default ns-2 CBR object, so
# no change in the meaning of the parameters.
#
set cbr (0) [new Application/Traffic/CBR]
$cbr (0) set packetSize $packetsize
$cbr (0) set interval $xmitinterval
$cbr (0) set random 0
$cbr (0) set maxpkts [expr ($stoptime − $startxmittime)*$xmitrate]
$cbr (0) attach−agent $raw (0)
#
# The Raw agent creates real UDP packets, so it has to know
# the source and destination IP addresses and port numberes.
#
$raw (0) set−srcip [$wireless node (0) getip eth0]
$raw (0) set−srcport 5000
$raw (0) set−destport 5000
$raw (0) set−destip [$wired node (0) getip eth0]
310
320
$ns at $startxmittime "$cbr_(0) start"
330
$wireless node (0) set X 10
$wireless node (0) set Y 50
$wireless node (0) set Z 0
$wireless node (1) set X 50
$wireless node (1) set Y 50
$wireless node (1) set Z 0
$wireless node (2) set X 90
$wireless node (2) set Y 50
$wireless node (2) set Z 0
340
$bridge node set X 50
$bridge node set Y 10
$bridge node set Z 0
$wired node (0) set X 10
$wired node (0) set Y 0
$wired node (0) set Z 0
350
33
$wired node (1) set X 50
$wired node (1) set Y 0
$wired node (1) set Z 0
$wired node (2) set X 90
$wired node (2) set Y 0
$wired node (2) set Z 0
#
# This sizes the nodes for use in nam.
#
for {set i 0} {$i < $wirelessnodecount} {incr i} {
$ns initial node pos $wireless node ($i) 10
}
360
for {set i 0} {$i < $wirednodecount} {incr i} {
$ns initial node pos $wired node ($i) 10
}
$ns initial node pos $bridge node 10
370
#
# Stop the simulation
#
$ns at $stoptime.000000001 "puts \"NS EXITING. . .\" ; $ns_ halt"
#
# Let nam know that the simulation is done.
#
$ns at $stoptime
"$ns_ nam-end-wireless $stoptime"
380
puts "Starting Simulation. . ."
$ns run
References
[1] K. Fall and K. Varadhan.
ns notes
http://www.isi.edu/nsnam/ns, Nov 1997.
and
documentation.
available
from
[2] Eddie Kohler, Robert Morris, Benjie Chen, John Jannotti, and M. Frans Kaashoek. The click modular router.
ACM Transactions on Computer Systems, 18(3):263–297, August 2000.
[3] D. Maltz, J. Broch, and D. Johnson. Experiences designing and building a multi-hop wireless ad hoc network
testbed. Technical Report CMU-CS-99-116, School of Computer Science, Carnegie Mellon University,
Pittsburgh, Pennsylvania, March 1999.
[4] Josh Broch, David A. Maltz, David B. Johnson, Yih-Chun Hu, and Jorjeta Jetcheva. A performance comparison of multi-hop wireless ad hoc network routing protocols. In MobiCom, number 4 in 98. ACM/IEEE,
1998.
34
[5] Samir R. Das Charles E. Perkins, Elizabeth M. Royer and Mahesh K. Markina. Performance comparison of
two on-demand routing protocols for ad hoc networks. IEEE Personal Communications, 8:16–28, 2001.
[6] Charles E. Perkins and Elizabeth M. Royer. Adhoc on-demand distance vector routing. In Proceedings of
the 2nd IEEE Workshop on Mobile Computing Systems and Applications, pages 90–100, Feb. 1999.
[7] David B Johnson and David A Maltz. Dynamic source routing in ad hoc wireless networks. In Imielinski
and Korth, editors, Mobile Computing, volume 353. Kluwer Academic Publishers, 1996.
35