1
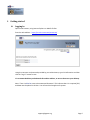
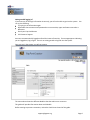
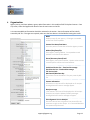
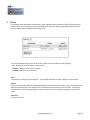
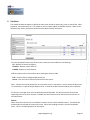
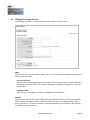
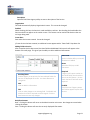
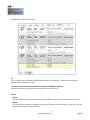
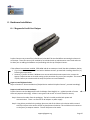
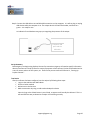
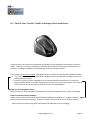
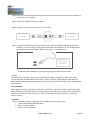
NIC TN PayPort Counter The Point-of-Sale Solution Administrator’s User Manual NIC Services LLC. All Rights reserved. PayPort Counter is a service mark of NIC Tennessee. Any other trademarks or product names are the property of their respective owners. This document may be reproduced in any form only if this copyright statement is included in its entirety. Contact NIC Tennessee NIC TN PayPort Support Local 615.313.7796 M-F 8am – 5PM, CST Or Toll Free 888.765.9188 PayPort Email [email protected] (Help Desk) Mailing Address 150 4th Avenue North Suite 510 Nashville, TN 37219 [email protected] Page 2 Contents 1 Introduction ............................................................................................................................................................... 4 1.1 What is NIC TN PayPort Counter?................................................................................................................. 4 1.2 Forms of Payment ......................................................................................................................................... 4 1.3 Refunds ......................................................................................................................................................... 4 1.4 Administrative Fees (the Electronic Processing Fee) .................................................................................... 4 2 Getting started .......................................................................................................................................................... 5 2.1 Logging In ...................................................................................................................................................... 5 3 Completing a Transaction .......................................................................................................................................... 7 3.1 New Transaction ........................................................................................................................................... 7 3.2 Daily Report ................................................................................................................................................ 11 4 Organization ............................................................................................................................................................ 14 5 Users ........................................................................................................................................................................ 16 6 Services .................................................................................................................................................................... 19 6.1 Editing/Creating a Service........................................................................................................................... 20 7 Locations.................................................................................................................................................................. 22 8 Lookup Transaction ................................................................................................................................................. 24 9 Reporting ................................................................................................................................................................. 28 9.1 User Access Report ..................................................................................................................................... 28 9.2 Service Summary Report ............................................................................................................................ 28 9.3 Bad Transactions Report ............................................................................................................................. 30 9.4 User Activity Report .................................................................................................................................... 31 10 Logout.................................................................................................................................................................... 32 11 Setting Up PayPort Counter .................................................................................................................................. 33 11.1Steps for Configuring PayPort Counter ....................................................................................................... 33 12 Driver Installation of Swiper Devices used with PayPort Counter ........................................................................ 34 13 Hardware Installation ............................................................................................................................................ 35 13.1Magnesafe Credit Card Swiper ................................................................................................................... 35 13.2The NIC eGov “Excella” Credit Card Swiper/Check Scan Device................................................................. 37 [email protected] Page 3 1 Introduction 1.1 What is NIC TN PayPort Counter? It is an application that offers agencies in the State of Tennessee the convenience of submitting securely encrypted credit card account information for goods and services from customers who pay in person, “at the counter.” The complete solution includes a variety of supported devices, called credit card swipers and dual card/check readers. Each device is developed by MagTek, Inc., a global provider of secure electronic payment technology. 1.2 Forms of Payment The current methods of payment accepted are Visa, MasterCard, and Discover as well as acceptance of Checks – processed as an eCheck; scanned, then returned to the customer. 1.3 Refunds Credit Card payments through NIC TN Payment Counter may be refunded by simply looking up the transaction and clicking the refund button. The administrative processing fee is automatically refunded as well. Check payments may not be refunded through NIC TN Payment Counter. The county or agency will need to provide a refund to the customer using their existing process. 1.4 Administrative Fees (the Electronic Processing Fee) NIC TN charges a fee for the direct and indirect costs associated with the development and maintenance of PayPort Counter software, called an administrative fee. Such costs include equipment, personnel, office space, telecommunications and computing infrastructure, utilities costs, and banking costs. These fees are determined by contract and may not be changed within the NIC TN PayPort Counter software. [email protected] Page 4 2 Getting started 2.1 Logging In Open a web browser, using Internet Explorer or Mozilla Firefox. Enter the web address: https://otc.cdc.nicusa.com/tennessee/ Using the username and password provided by your administrator, type this information and then click the “Log In” button to start. It is recommended that you bookmark this website address, or save a shortcut to your desktop. Note: There is a blue bar next to Username and Password. This indicates that it is a required field, and data must be placed in this box. You will see this throughout this system. [email protected] Page 5 Having trouble logging in? If you enter any of the login information incorrectly, you will not be able to get into the system. You can try the following: Try typing in the information again Remember that usernames and passwords are case sensitive, upper and lower cases make a difference Check your Caps Lock Button Call Customer Support Accounts are automatically logged out after 20 minutes of inactivity. If a message appears indicating you are logged out, log in again. There is no waiting period to log back into the system. Once you are in the system, you will see a menu. The menu above shows the different Modules that the Admin user can access. This guide will provide information about each Module. Before starting to process transactions, review the checklist at the end of this guide. [email protected] Page 6 3 Completing a Transaction 3.1 New Transaction It is within the Cashier Menu that an actual transaction will be input and processed. Select Cashier. Cashier This is where an actual transaction will occur Reporting Optional: This section will allow you to review reports Logout Click on Logout to close the current session [email protected] Page 7 Services Select the Service Type from the drop down menu; examples for Service Type include a court fees & fines, restitution, traffic, registration fee, property tax, utilities (You will have the option later to select a default service.) Amount Type in the dollar amount for the Service; say $100.00 (You will have the option to select a default amount with a specific service.) Add Service/Cancel After the Service(s) have been selected and amount typed into the screen, click the “Enter-Return” button. It is possible to Cancel the transaction at this point by clicking the Home menu. The image on the following page indicates the Service was added and the user is prompted to select additional services if desired. Each additional Service originates automatically with a set default. [email protected] Page 8 Payment Option To now process a transaction, Select the Payment method from the list, options include either “swipe or manual entry mode” as well as payment type; either credit card, eCheck, or cash. Credit Card Swipe Mode is shown. [email protected] Page 9 Swipe Entry Mode The card swipe or check scanner machine will be used for this option. (Refer to setup instructions in the Administration Manual). The customer will swipe their card or check allowing their information to automatically populate into the boxes (data fields). Manual Entry Mode This entry mode enables you to manually type required information in the boxes designated with a blue bar instead of swiping a card or scanning a check. The remaining boxes are optional information. E-Mail You have the option to send the end user an email as confirmation of his/her payment and can do so to multiple email addresses. Submit Payment After the payment information has been entered, select the button marked “Submit Payment” to process the payment. A pop up window will appear and before proceeding further, asking whether the dollar amount is correct. Click OK to continue, or Cancel to not process the payment. After clicking PROCESS, the payment is processed, generating a receipt that will pop up on a subsequent screen. It will appear similar to what is shown below. [email protected] Page 10 Print Option: Cashier can choose the number of copies of the receipt to print out by selecting the quantity at the top of the receipt page. Additionally, the option exists to print additional receipts after the transaction has been completed. To exit this screen, click the “Return to Cashier” link at the top or bottom of the page. 3.2 Daily Report The report function gives the Cashier the ability to review his/her processed transactions. [email protected] Page 11 Locations Transactions can be viewed within a report for either a single, multiple or of all Locations. Services Transactions can be viewed within a report for either a single, multiple or of all Services. Cardholder Name Administrator has a choice to review transactions of a particular customer by typing the exact name or last name of the cardholder. If data field is left blank, all card transactions will be displayed. This field is case sensitive and must include the correct capitalization of the name. Last Four Digits on Credit Card Used to only display transactions with the credit card matching these four digits. To include all cards in a search, leave box blank. Status Enables Cashier viewing of transactions based on status in the system. All – displays all transactions Closed – displays only closed transactions (successfully processed) Pending – displays only pending transactions (those that have not yet been successfully processed) Faileddisplays only failed transactions (those that were not successfully processed) Refund View Will display transactions based on refund information, Cashier can narrow the scope of transactions to appear in the report. Show All Transactions – displays all transactions Hide Refunded Transactions – will not display refunded transactions Show Only Refunded Transactions – displays only transactions that were refunded Method of Payment Cashier can further narrow a report search by selecting the method of payment. All – displays all transactions, regardless of payment type Credit Card – displays only transactions used with credit cards Check – displays only transactions used with a check Cashdisplays only transactions used via cash Date From Enables Cashier to set a start date for looking up of transactions. Click box to have calendar appear, then click date to start the search. [email protected] Page 12 Time From Enables Cashier to look up by certain time of day. NIC TN PayPort Counter uses military time. Example: 3:00pm would be displayed as 15:00 Date To Enables Administrator to select the end date when looking up transactions. Click box to have calendar appear, then click date to end the search. Time To Enables Cashier to search by time of day. The NIC TN PayPort Counter uses military time. Lookup Clicking this button will display the transaction report, with the parameters as selected from the above options. Refer to sample report on the following page. [email protected] Page 13 4 Organization Agency sets up, and later updates, agency-wide information in this module of NIC TN PayPort Counter. From any screen, select the Organization button from the main menu on the left. It is recommended that information details be reviewed in the section. Some information will be initially entered by NIC TN. If changes are required, make sure the Save button is clicked before leaving the screen. Name Displays name of your agency. If changes are needed, contact NIC TN for updates. Contact First Name/Last Name Enter the person’s name that will be the Agency contact. Address/City/State/Zip Enter Agency mailing address. Correspondence and updates are mailed to this address. Phone/Alternate phone/Email Enter Agency main phone number. Option exists to enter a second phone number and email address. Credit Card Service Fee – Fixed and Percentage Check Service Fee – Fixed and Percentage TPE Service Code Merchant ID/Merchant Key These items cannot be edited. They are preset by NIC TN. Contact Information Information in this box will be displayed on all receipts. Leaving blank will have no message appear. Receipt message Information in this box will be displayed on all receipts. Example Use Include: Updates/Holiday messages. Leaving blank will have no message to appear. Show Signature Line on Receipts Check this box to have a signature line printed (for the customer to sign) on the receipt. It is recommended that this option always be used. [email protected] Page 14 Show Data Fields On Receipts Check this option to include these additional fields for each service (service index code, sub-object code) on the receipt. Receipt Printer If Agency uses a receipt printer (that is not a standard 8.5 x 11 inch laser jet or inkjet printer) check this option for receipts. When checked, the receipt will be formatted for tall, narrow output. It will still work on 8.5 x 11 inch output, yet it may look odd. Receipt Copies Select the number of copies of receipt to be printed with each transaction (up to four). Quantity depends on Agency’s business practices. Customer should always be given a copy. It is Agency’s choice to keep a copy for internal records. Enabled This is a display only field. This box indicates that your organization is active in the NIC TNeGov PayPort Counter. Create Date This is a display only field. It shows the date that your organization was first created in NIC TN eGov PayPort Counter. Back/Save Buttons Clicking the back button will return to the Administration main menu. No changes are saved when clicking this button. Clicking the Save button, will save the information that is currently displayed on the Organization screen. [email protected] Page 15 5 Users This module allows the Agency administrator to give individuals access and use of NIC TN PayPort Counter. Different levels of access to the system can be defined for each User. Select on the left side of any screen, the User button from the Administration main menu. From the drop down menu at top of this screen, selection can be made from the following: All – displays all Users for Agency’s organization Disabled – displays inactive User accounts Enabled –displays all active accounts Edit To edit a user’s settings, click the Edit link. This provides the ability to make changes to User accounts. Delete A User can only be deleted if no transactions have been processed in their account. Once a transaction has been processed with that User account, this User becomes a permanent part of the system. Clicking the edit feature, and then selecting disable, is used to prevent the User name from appearing in active list of Users. New User Creates a new User. [email protected] Page 16 Click the New User button and the following screen will appear. Username The name typed in this box will be used to log into the system. This can have 1-16 characters, of any combination of lower/upper case letters and numbers 0-9. Password User’s password to get into the system. Password must contain 6-16 characters, and include a capital letter or number. Verify Password Retype password for verification. First name/Last name Enter User’s first and last name. This will display on screen when User is logged into the system. User Roles Cashier Processes payments and by using the daily report, can review his/her account history. Administrator Manages the system by creating new Services and Users. User Functions Reporting Function gives User access to view and export reports. Refunds Function allows User to generate a refund. At this time, only entire refunds of a transaction is possible. No partial refunds can be given. Organization Displays the Organization name and cannot be changed. [email protected] Page 17 Location Choose which Location(s) the User will operate from or need access to within NIC TN PayPort Counter. Option exists to select all or no locations. Note: if no Locations have been created, this section will be blank. Return to this module after a Location has been created. Services Choose the Services the User will be allowed to process. Note: if there no Services have been created, this section will be blank. Return to this module after a Service has been created. Enabled Checking this box will give ability to activate or deactivate a User. After a User has been deactivated, the User will no longer be able to log into the system. Create Date Display only field which shows the date that the User account was created. Back/Save Buttons Back – returns to the Administration main menu. Changes will not be saved. Save – Accepts any changes made to this screen module. [email protected] Page 18 6 Services This module enables the Agency to define the items it will accept for payment(s), such as License fees, utility payments, real estate taxes, etc. This module is used to create, update, and disable Services. Select on the left side of any screen, the Service button from the Administration main menu. From the drop down menu at top of this screen, selection can be made from the following: All – displays all Services for Agency Disabled – displays inactive Services Enabled –displays all active Services Different options exist to choose from when viewing the Services Table. Edit – Click this link to change/update the Service Delete – Click this link to remove the Service from the system. Note: A Service can only be deleted if it has never been used in a transaction. Once a Service has been used in a transaction, it is part of the permanent record. It needs to be able to be accessed for future reference. If a Service is no longer used, click the edit button and click disable. This will prevent the Service from appearing in the list of active Services. If needed, the same method can be used to return the Service to activation status. Default When more than two Services are available, the option exists to select a default service. The default will automatically be selected on the Services screen, rather than needing to select it from the drop down menu. This is a timesaving feature for the Cashier. [email protected] Page 19 6.1 Editing/Creating a Service The following screen shot is an example for the option to edit or create a Service. Name Name the Service, using up to 100 characters. Note: This field cannot be changed 24 hours after the Service has been created. Service Index Code Optional Field: Accounting department may require a Service code to ensure revenue collected is attributed to the proper fund. This is useful if the Agency has separate billing needs or reporting requirements. Sub Object Code Optional Field: Gives Agency the option to designate further separation. Amount If dollar amount for a Service never changes, then it would be inserted here. This will automatically appear when processing this Service. Cashier always has the option to change the dollar amount during a transaction. If this box is left blank, $0.00 will appear during the transaction thus requiring the cashier to insert an amount. [email protected] Page 20 Description Optional Field: Gives Agency ability to enter a description of the Service. Organization This field automatically displays Organization’s name. This cannot be changed. Enabled When checking this box, the Service is made available to cashiers. Not checking the box disables the Service and will not appear on the cashier screen. This feature can be used to hide Services that are no longer being used. Create Date Date when Service was created. Cannot be changed. If a new Service has been created, an additional screen appears with a “Data Fields” drop down list. Adding Fields to Service After a new Service has been saved, the Data Fields and Add New Field controls will appear at the bottom of the edit page. This gives you the ability to collect additional information. Data Fields Option includes ability to view All, Disabled or Enabled Name Name the field, up to 100 characters. Rank Up/Down Enables Agency to set priority for how multiple fields of a Service are displayed on screen. Use these buttons to reorganize. Add Click to add this information Edit Click to make changes to an existing field. Field label and whether the field is required can be changed. Click the Save button to save any changes. Required If Agency will require cashier to use these fields, then check the box to set this feature. Do not check the box if field will not be required. Enabled Check this box if Agency wants this field to appear as part of the Service. Back/Save Buttons Back – Clicking this button will return to the Administration main menu. No changes are saved when clicking this button. Save – Clicking this button will save the currently displayed information. [email protected] Page 21 7 Locations This module is used to set-up or update information specific to a Location. The option is provided to create multiple Locations within an Organization. For example: If the Agency is using NIC TN PayPort Counter in one building, on three different floors, Locations could be grouped by floor, by Services sold, or any other method or combination required of business need. Select on the left side of any screen, the Location button from the Administration main menu. From the drop down menu at top of this screen, selection can be made from the following: All – displays all Locations setup by Agency Disabled – displays inactive Locations Enabled –displays all active Locations in the system Edit Provides the ability to make changes to a Location Delete Provides the ability to remove a Location Note: Locations can only be deleted if they have never been used in a transaction. Once a Location has been used in a transaction, it is part of the permanent record. It needs to be able to be accessed for future reference. If a Location is no longer used, click the edit button and click disable. This will prevent the Location from appearing in the list of active Locations. If needed, the same method can be used to return the Service to activation status. [email protected] Page 22 New Location Click the New Location button and the following screen will appear. Name Name the Location, up to 100 characters. This field cannot be changed 24 hours after the location has been created. Location Code Unique identifier corresponding to the Location and a requirement of the system and NIC TN. Organization Display field only. NIC TN will set this up. Use Organization Receipt Options If custom information is to appear and be printed on the receipt, uncheck this box. Doing so activates the fields for Contact Information, Receipt Message, Show Signature Line on Receipts, Show Data Fields on Receipts, Receipt Printer and Receipt Copies. If master receipt options is to be used as was set- up in the Organization module, then leave this box checked. Show Signature Line on Receipts Ability to have signature line appear for customer to sign on printed receipts for his/her charge. Show Data Fields on Receipts Ability to include data fields (index code, sub-object code) of each Service printed on receipts. Receipt Printer and Print Format Check box(es) if Agency uses a receipt printer instead of a standard LaserJet or inkjet printer; and for size of paper. Send Receipt via Email Check box if Agency wants to provide this enduser option. Only available if “Use Organization Receipt Options” is not Contact Information Ability to have Location contact information printed on receipts. Receipt Message Ability to customize messages, such as seasonal greetings, etc. and have printed receipts. Check this box if Agency uses a receipt printer instead of a standard LaserJet or inkjet printer. Enabled If a Location is not enabled, it will remain stored in the system, yet not available to be selected for a transaction. Create Date Displays date the Location was created for organization. Back/Save Buttons Back – This button will return you to the admin main menu. It will not save any changes made to the page. Save – The Save button will save any changes made to this section. [email protected] Page 23 8 Lookup Transaction This module gives Administrator the ability to look up all transactions processed by the NIC TN PayPort Counter. Different filters provide Administrator options to narrow results to specific Services, Locations, dates, etc. Whereas, the basic cashier role is able only to review their completed transactions over the past 24 hours. User Transactions completed by all or a single User. Organization Transactions for a specific Agency organization. Locations View transactions for all or a specific Location. Services View transactions for all or a single Service. Cardholder Name Administrator has a choice to review transactions of a particular customer by typing the exact name or last name of the cardholder. If data field is left blank, all card transactions will be displayed. This field is case sensitive and must include the correct capitalization of the name. Last Four Digits on Credit Card Used to only display transactions with the credit card matching these four digits. To include all cards in a search, leave box blank. Status Enables viewing of transactions based on status in the system. All – displays all transactions Closed – displays only closed transactions (successfully processed) [email protected] Page 24 Pending – Failed- displays only pending transactions (those that have not yet been successfully processed) displays only failed transactions (those that were not successfully processed) Refund View Will display transactions based on refund information. Show All Transactions – displays all transactions Hide Refunded Transactions – will not display refunded transactions Show Only Refunded Transactions – displays only transactions that were refunded Method of Payment Administrator can further narrow a report search by selecting the method of payment. All – displays all transactions, regardless of payment type Credit Card – displays only transactions used with credit cards Check – displays only transactions used with a check Date From Enables Administrator to set a start date for looking up of transactions. Click box to have calendar appear, then click date to start the search. Time From Enables Administrator to look up by certain time of day. NIC TN PayPort Counter uses military time. Example: 3:00pm would be displayed as 15:00 Date To Enables Administrator to select the end date when looking up transactions. Click box to have calendar appear, then click date to end the search. Time To Enables Administrator to search by time of day. The NIC TN PayPort Counter uses military time. Lookup Clicking this button will display the transaction report, with the parameters as selected from the above options. Refer to sample report on the following page. [email protected] Page 25 Sample Report: Transaction Lookup ID This is a system generated unique identification number for a transaction. Transaction details will be displayed when clicking this number. Customer/Cashier/Location/Time/Total Amount/Status/Method of Payment Specific information for each item will be displayed of each transaction Action Receipt This link will display the receipt for this transaction. Additional copies can be printed from this screen. Refund This link generates a screen to appear to give ability to refund an entire transaction. At this time, only full refunds can be issued, no partial refunds. [email protected] Page 26 Services Total/Refund-Refunds Total Displays dollar amount for each category. Export Drop Down List Provides various options and formats to view an exported report. This is beneficial if saving a report is desired or required. Options used to separate the fields within the export file. Comma Tab Semicolon Space Export Button Click to export and display report. Any spreadsheet software which uses a standard CSV file format can be used to open this export document. This document can be saved to an external hard drive/system. [email protected] Page 27 9 Reporting NIC TN PayPort Counter offers four different types of reports in addition to Daily Reports. Note: This Reporting capability may not be visible to all Cashiers; permission is set by the administrator. 9.1 User Access Report Displays a table summarizing users, services and locations. Clicking the Username, will forward you to the user page, where you can edit information. The option exists to export this report into a spreadsheet. 9.2 Service Summary Report Enables customizing a report by the type of service/product sold by the Agency. Service Name Individual or all Services can be viewed User All or a single User can be viewed Location All or a single Location can be viewed Status Enables the option to look at all, closed, or pending Services sold by your agency Date From / To Timeframe you desire to review the Services sold by your agency [email protected] Page 28 (The Service Summary Report is used to identify processed “Transactions”) Search Click the search button to display the Service Summary Report. By clicking the search button, the report shown above will appear. A list of individual Services, Locations, Codes, Dollar Amounts and quantity of Transaction are displayed. Export Enables for export of this information to be viewed and saved in as a CSV/spreadsheet file format. [email protected] Page 29 9.3 Bad Transactions Report Report displays failed transactions; for any reason, including insufficient funds, failed communication attempts, etc. User All or a single User can be viewed Locations All or a single Location can be selected Services All or a single Service offered by the Agency can be selected Method of Payment Searches can be limited to all or a single payment type Date From / To Timeframe you desire to review the Services sold by your agency Lookup Click the Lookup button as shown above to view the Bad Transactions Report [email protected] Page 30 This report shows the Transaction ID, Customer Name, Cashier, Location, Time of Transaction, Total Dollar Amount, Status, Method of Payment and Action. Export Button Click to Export and display report. Any spreadsheet software which uses a standard CSV file format can be used to open this export document. This document can be saved to an external hard drive/system. 9.4 User Activity Report Report displays a table summarizing activity of individual or all Users by a single or multiple Locations over a predefined period of time. [email protected] Page 31 10 Logout To finish using and exit the NIC TN PayPort Counter, click Logout, the last menu item found on the left side of the screen. This will “Logout” the user from the application. [email protected] Page 32 11 Setting Up PayPort Counter Configuration of PayPort Counter shall be completed by an Administrator, or “Admin” designated by the Agency. This can be a City/County Treasurer, specific staff member, or an IT specialist. It is recommended that more than one person be assigned an Administrator role. The easiest way to do this is to: Log in Step through the main menu pages Make changes/updates as needed Note: Agency account is initially set up by NIC TN prior to training and/or use by Agency. Therefore, Agency is requested to first verify that information and Services have been set up correctly. 11.1 Steps for Configuring PayPort Counter The following steps will guide Agency to verify that the system is current and accurate. After these steps are complete, Agency shall be ready to use the system! TEST a Transaction. Organizations module o Verify contact and receipt information. This information can be changed if and as necessary. Users module o NIC TN will set up an initial, first Administrator. The Admin will need to create User accounts for Agency staff that have been authorized to use this system. User accounts are defined by roles which allow access to a specific set of functions, and options that specify extra abilities for that User. Services module o Verify the list of Services that the Agency plans to offer to the public. This may include Driver License, Real Estate Payments, etc. It is in this section/step that additional services can be added. Locations module o Verify Location information. Agency has ability to change/modify this information as needed. Note: PayPort Counter uses a specific field on this menu, called the Location Code, as a unique identifier within its billing database to correspond to an Agency Location. This Location Code is Not to be changed. Contact NIC TN to make necessary changes if information is found to be incorrect and cannot be changed by Agency. [email protected] Page 33 12 Driver Installation of Swiper Devices used with PayPort Counter It is important that Agency install the Driver Files Before connecting the Swipe Device to a computer. Installing the Drivers Agency must utilize a User Account in conjunction with Windows administrative permission. Consult the Agency IT Administrator for questions and/or if User Account permission is needed. Agency must also be an NIC TN eGov Payment Counter partner with both Cashier and Administrator user roles previously set up before Drivers can be installed. Login to PayPort Counter Click the Help link located on the right side of the Menu screen, underneath the customer support phone number. Click on Configure Swiper, located on the right side of the Menu screen, last item listed Two choices are provided: Excella and Magnesafe Select the choice that matches the physical device you plan to use, click the button. Now, connect the device to be used with PayPort Counter to the designated computer. Proceed to the test swipe page and verify that it is working; do this by clicking on the underlined words in blue (test swipe page.) Note: If for any reason the computer does not install the driver files properly, as an alternative, NIC TN can email the “Driver files” with installation instructions to the Agency. Improper installation comes about if/when the test swipe page or Cashier page does not “read” a credit card when it is swiped. [email protected] Page 34 13 Hardware Installation 13.1 Magnesafe Credit Card Swiper PayPort Counter uses custom files (called Drivers) that MUST be installed before connecting the electronic card swiper. These files can only be installed by an individual with an Administrative access level and must be done prior to adding the hardware and proceeding with Set Up of PayPort Counter. If the software has not been installed, STOP NOW and do not attempt to install the device hardware. Rather, If you have administrative access level with a Windows account, proceed with installing these files, by following the steps below. However, if you do not have a Windows user account with administrative permission, contact the Agency IT Administrator to schedule setting up this permission for you on your computer. This must be in place, before you continue with the steps and process to install hardware. Steps to Install Software Drivers Refer to Section 12 “Driver Installation of Swiper Devices used with PayPort Counter”, proceed accordingly. Steps to Install and Connect Hardware PayPort Counter uses the Magnesafe Credit Card Swiper from MagTek, Inc., a global provider of secure electronic payment technology. All data is encrypted “end-to-end” to ensure maximum security. Step 1: Remove the reader from the packaging. The built-in cable provides both power and communication. There is no need for an AC adaptor or power supply. Step 2: Using Velcro provided in the package, place one side of the Velcro to the device and the second side of the Velcro to the surface chosen to place/mount the device. This could be on the counter or on the face of a computer monitor. This will help secure the reader. [email protected] Page 35 Step 3: Connect the USB cable to an available USB connection on the computer. It is safe to plug or unplug USB devices while the computer is on. The swiper device’s LED will flash amber, and then turn green….it is ready for use. An indication from Windows may pop up recognizing the presence of the swiper. Computer USB ports and the USB cable Computer USB ports and the USB cable Set Up Summary Before Agency can begin using PayPort Counter for transactions, Agency will need to specify information about its business to include a) items for receipt of payment at each counter, b) who will be authorized as Users for access and use of the system, etc. Refer to the process outlined in Section 11, “Setting Up PayPort Counter”. Test Device After the software has been configured, test the swiper by following these steps: Login to the Administrator Main Menu Click the Cashier module Add an item to the Services Make a transaction by using a credit card and swipe the device Note: As long as the Submit button is not clicked, no payment will actually be collected. This is a safe and effective way to determine if swiper is functioning correctly [email protected] Page 36 13.2 The NIC eGov “Excella” Credit Card Swiper/Check Scan Device PayPort Counter uses custom files (called Drivers) that MUST be installed before connecting the electronic reader. These files can only be installed by an individual with an Administrative access level and must be done prior to adding the hardware and proceeding with Set Up of PayPort Counter. If the software has not been installed, STOP NOW and do not attempt to install the device hardware. Rather, If you have administrative access level with a Windows account, proceed with installing these files, by following the steps below. However, if you do not have a Windows user account with administrative permission, contact the Agency IT Administrator to schedule setting up this permission for you on your computer. This must be in place, before you continue with the steps and process to install hardware. Steps to Install the Software Drivers Refer to Section 12 “Driver Installation of Reader Devices used with PayPort Counter”, proceed accordingly. Steps to Install and Connect Hardware PayPort Counter uses the Excella Dual Credit Card/Check Reader from MagTek, Inc., a global provider of secure electronic payment technology. All data is encrypted “end-to-end” to ensure maximum security. Step 1: Remove the reader along with its AC adapter and USB cable from the packaging. [email protected] Page 37 Step 2: Place the reader on the surface where it will be used and can be easily accessed. This could be on the counter or on a desktop. Step 3: Plug the AC adapter into an AC receptacle Step 4: Plug the other end of the power cord in to the read. USB Connector Power Cord On the left On the right Step 5: Connect the USB cable to the reader and the other end to an available USB connection on the computer. It is safe to plug or unplug USB devices while the computer is on. The reader device’s LED will illuminate red and amber, and then turn green….it is ready for use. Computer USB ports and the USB cable An indication from Windows may pop up recognizing the presence of the reader. Computer USB ports and the USB cable Optional: The Excella device includes a “strain relief” module that the Agency may wish to install which would connect the power and USB cables to the reader. If option is chosen, unplug the two cables from the device, and then thread the connectors through the plastic strain relief, now plug the entire assembly back into the device. Set Up Summary Before Agency can begin using PayPort Counter for transactions, Agency will need to specify information about its business to include a) items for receipt of payment at each counter, b) who will be authorized as Users for access and use of the system, etc. Refer to the process outlined in Section 11, “Setting Up PayPort Counter”. Test Device After the software has been configured, test the reader by following these steps: Login to the Administrator Main Menu Click the Cashier module Add an item to the Services [email protected] Page 38 Make a transactions by using a credit card and swipe the device Note: As long as the Submit button is not clicked, no payment will actually be collected. This is a safe and effective way to determine if swiper is functioning correctly. [email protected] Page 39