1
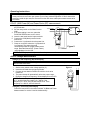
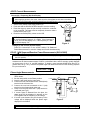
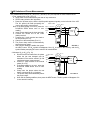
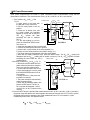
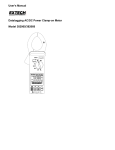
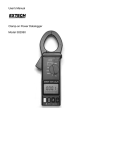
User's Manual
Model 382075
3φ/1φ Power Clamp-on Meter
Introduction
Congratulations on your purchase of the Extech Model 382075 Auto Range Power Clamp-On Meter.
Careful use of this device, will provide years of reliable service.
Meter Functional Description
1. Transformer Jaw
Used to sense current signal. To measure current or power,
the conductor under test must be fully enclosed by the jaw.
Figure 1
2. Transformer Trigger
Press to open the jaw.
3. Data Hold Button
Press to freeze most recent reading on the LCD. Press
again to release.
4. Function Select and On/Off Switch
Select desired function, such as KW, V, A, KVA, or 3φ.
5. LCD Display
4-digit (9999 count) display with function symbols, units,
decimal point, low battery icon, and zero indication.
6. Units Symbols
Once a function is selected, the corresponding unit (KW, V,
A, Phase, KVA, or 3φ) will be displayed.
7. 3φ3W and 3φ4W Select Button
If the 3φ system is not a balanced system, users can press
this button to select 3φ3W, 3φ4W or a balanced system.
Once the button is pressed, the LCD displays 3φ3W or
3φ4W depending on the function selected.
8. Read/Next Button
• When the rotary switch is set to the 3φ function, the READ/NEXT button is used as a NEXT button.
In the 3φ balanced mode, pressing the NEXT button will display W+PF, KVA+KVAR, or V+A data.
• In the 3φ3W mode, pressing the NEXT button stores the measured values WRS(L1L2) and WTS(L3L2).
After two values are measured and stored, the meter adds the two values, displays the result with
the symbol WRST to represent W3φ3W. To start another W3φ3W measurement, press the NEXT button
again.
• In the 3φ4W system mode, press the NEXT button to store the measured values WR(L1), WS(L2) and
WT(L3). After three values are measured and stored, the meter adds the three values, displays the
result with the symbol WRST to represent W3φ4W. To start another W3φ4W measurement, press the
NEXT button again.
• If the rotary switch is not set to the 3φ function, the READ/NEXT button is used as a READ button.
Stored data in memory (saved by pressing the REC button) can be read by pressing READ.
9. & 10. V and COM Input Terminals
Used as positive and negative (common) inputs for voltage measurements.
11. DC A/W ZERO button
Press this button once to zero the Amp or Watt display. While the meter is zeroing, the word ZERO
appears the LCD.
12. REC button
Press the REC button to store up to 4 data points in meter memory.
Operating Instructions
NOTE: Ensure that the jaws are clear of any conductors before applying power to the meter. The
meter performs an auto zero upon power-up to null any residual magnetism. If this is done with a
conductor inside the jaw area, the auto zero function will cause subsequent measurements to be
inaccurate.
DC/AC 1φ2W Power (W) and Power Factor (PF) measurements
1. Apply power to the meter with the jaws clear of
any conductors.
2. Set the rotary switch to the Watts function
(KW).
3. If the watt reading is not zero, press the
DCA/DCW ZERO button once to zero it.
4. Insert the test leads into the input terminals.
5. Connect the COM (black) terminal to the
neutral line.
6. Connect the V (red) terminal to the power line.
7. Clamp on to the line where the V (red) terminal
is connected. The power clamp will
automatically select the proper measurement
range. Read the Watt and PF (Power Factor)
values displayed on the LCD.
1 Phase 2 Wire
Current >
1 Phase
Load
Figure 2
NOTE: The "+" sign printed on jaw must face the power source for accurate measurements.
AC/DC Voltage Measurements
Voltage (V) and Frequency (Hz) Dual Display
WARNING: Maximum input voltages: 1000VDC and 750VAC. Do not attempt to measure voltage
that exceeds these limits.
1. Set the rotary switch to the Voltage position (V).
2. Insert the test leads into the input terminals.
3. Connect the test leads in PARALLEL with the circuit to be
measured.
4. The power clamp will automatically select the proper range.
5. Read the voltage and Frequency values displayed on the LCD.
NOTE: The sensitivity for voltage/frequency measurements
is 1V, and the frequency range is 10 - 400Hz. If the
frequency is < 10 Hz, the LCD will indicate 0 Hz. If the
frequency is > 400 Hz, LCD will show OL.
Voltage(V) / Current (A) Dual Display
Follow the instructions in the section entitled "3φ Balanced Power
Measurements" to monitor V and A simultaneously.
Figure 3
AC/DC Current Measurements
Current (A) + Frequency (Hz) Dual Display
WARNING:
1. When applying power to the meter, make sure the clamp jaws are not near a conductor.
2. Make sure that test leads are disconnected from the meter during current measurements.
1. Set the rotary switch to the Amps position (A).
2. Push and hold the DCA/DCW ZERO button to zero the reading.
3. Press the trigger to open the jaw and fully enclose the conductor
to be measured. The Jaws must be completely closed to make a
measurement (see Fig.4).
4. Read the current/frequency values on the LCD.
NOTE: The sensitivity for current/frequency measurement is
5A, and the frequency range is 10 - 400Hz. If the frequency is
< 10 Hz, the LCD will display 0 Hz. If the frequency is > 400
Hz, LCD will display "OL".
Figure 4
Voltage (V) and Current (A) Dual Display
Follow the instructions in the section entitled "3φ Balanced
Power Measurements" to monitor Voltage and Current simultaneously.
DC/AC 1φ2W Apparent/Reactive Power Measurements (KVA+KVAR)
NOTE: Before taking any measurements, zero the current (A) reading and set the rotary switch to
the KVA position.
Follow the steps listed in section entitled DC+AC 1φ2W Power (W) and Power Factor (PF)
measurement for these measurements. KVAR is a calculated value, and its accuracy greatly depends
on the accuracy of the V, A, and KW readings. To obtain a more accurate KVAR value when PF is
greater than 0.91 (φ < 25°), measure the phase angle and obtain the KVAR from the following equation
for a pure sine wave:
KVAR = KVA * sin φ
Phase Angle Measurements
1.
2.
3.
4.
5.
6.
7.
8.
Set the rotary switch to the A position. If the current reading is not zero, press the DCA
ZERO button.
1 Phase 2 Wire
Current >
Set the rotary switch to the Phase position.
1 Phase
Insert the test leads into the input jacks.
Connect the test lead inserted in the COM (black)
Load
terminal to the reference line.
Connect the test lead connected to the V (red)
V
terminal to the voltage signal under test.
-23.8
Clamp on to the wire where the V (red) terminal is
XL
o
A
connected (see Fig.5).
If current signal is detected from the jaws, the
phase angle will be displayed in degrees on the
LCD together with the frequency of the voltage.
If current is not detected, only the frequency of the
Figure 5
voltage will be displayed while the phase angle
display will be left blank.
NOTE: Zero the current (A) reading before measuring to avoid incorrect Phase Angle readings.
INDUCTIVE LOAD: A negative phase angle indicates that the current signal lags the voltage
signal. A negative phase angle also indicates an inductive load.
CAPACITIVE LOAD: A positive phase angle indicates that the current signal leads the voltage
signal. A positive phase angle also indicates a capacitive load.
NOTE: The "+" sign printed on the clamp jaw must face the power source for correct readings.
3φ Balanced Power Measurements
Power (W) and Power Factor (PF) Dual Display
1. Apply power to the meter with the jaw clear of any
3 Phase 4 Wire
R(L1)
conductors.
S(L2)
2. Set the rotary switch to the 3φ position.
T(L3)
3. The LCD will show 3φ3W, 3φ4W, and BAL
N
symbols to indicate balanced mode.
4. If the watt reading is not zero, press the DCA/DCW
ZERO button once to zero reading
5. Insert the test leads into the input terminals.
6. Select one phase (R or L1) as COM and Connect
Figure 6
the COM (black) terminal to the same phase just
selected (R or L1).
7. Connect another test lead to the second phase (S or L2). See Fig. 6.
8. Clamp on to the third phase (T or L3).
9. The power clamp will automatically select proper range.
10. Read the Watt and PF values displayed on the LCD.
11. To view the KVA and KVAR data, press the NEXT button.
12. To view V and A, press the NEXT button again.
13. To return to the W and PF display, press the NEXT button again.
Current >
3-phase
Bal. Load
KVA/KVAR Dual Display
Follow steps 1 through 10. in the above section and press the NEXT button. Wait approx. 2 seconds
for the LCD to display the KVA and KVAR.
Voltage (V) and Current (A) Dual Display
Follow steps 1 through 10 in the above section and press the NEXT button twice. Wait approx. 2
seconds for the LCD to display Voltage (V) and Current (A).
NOTE: Specific selection of each phase is not required in 3φ balanced power measurement
mode. As long as each test lead and the jaws are connected to different phases, the reading is
always correct. The "+" sign printed on jaw must face the power source for accurate
measurement.
NOTE: To find out if a load is capacitive or inductive, refer to the section entitled "Phase Angle
Measurements".
3φ3W Unbalanced Power Measurements
Two measurements WRS (or WL1L2) and WTS (or WL3L2) are required. Refer to Fig. 7.
1. First measure WRS (or WL1L2)
a. Apply power to the meter with the jaw clear of any conductors.
b. Set the rotary switch to the 3φ position.
c. Press the 3φ button once, the 3φ3W symbol will display on the LCD. At this moment, the WRS
symbol flashes prompting the user to begin measurement of WRS.
d. If the watt reading is not zero, press the DCA/DCW ZERO button once to zero reading
e. Insert the test leads into the input terminals.
f.
Select one phase (S or L2, for example) as COM and connect the COM (black) terminal to that
phase (S or L2).
g. Connect V (red) terminal to the second phase (R or L1).
h. Clamp on to the same phase as in step g. (R or L1).
The power clamp will automatically select the proper range.
i. Wait until the reading stabilizes, then press the NEXT button. The WRS (WL1L2) symbol will
disappear. At this moment, WRS is stored in memory, and the WT (WL3L2) symbol appears
flashing to prompt the user to take the WTS (WL3L2) measurement.
2. Secondly, measure WTS (or WL3L2 ). Refer to Fig. 8.
a. Disconnect the test leads and jaws from the lines in the previous measurement.
b. Connect the test leads to the third phase (T or L3).
c. Open and close the jaws, be sure that no conductor is in the jaws.
d. If the watt reading is not zero, press the DCA/DCW ZERO button once to zero the reading.
e. Clamp on to the third phase where the test lead is connected (T or L3)
f. The power clamp will automatically select proper range.
g. Wait until the reading stabilizes, then press the NEXT button. The WT (or WL3L2) symbol will
disappear. At this moment, WTS (or WL3L2) data are stored in memory,
Once the NEXT button is pressed (after measurements of WRS (or WL1L2) and WTS (or WL3L2)), the power
clamp will add the two values and display the result on the LCD. The WRST symbol appears indicating
that the reading shown is the wattage of the 3φ3W unbalanced Power. PF is not shown in the 3φ3W
unbalanced power mode.
W3φW = WRST = WRS(L1L2) + WTS(L3L2)
3 Phase 3 Wire
WRS (L1L2)
3 Phase 3 Wire
WTS (L3L2)
R(L1)
Current >
R(L1)
S(L2)
3 Phase
Load
3 Phase
Load
S(L2)
T(L3)
Current >
T(L3)
FIGURE 8
FIGURE 7
NOTE: Once a phase is selected as the COMMON connection, users cannot change this
selection in the subsequent measurements. For example, if S (or L2) phase is selected, S (or L2)
phase is always connected to the COM of the power clamp during measurements of WRS (or
WL1L2) and WTS (or WL3L2) in 3φ 3W unbalanced power mode.
NOTE: The "+" sign printed on the jaw must face the power source.
NOTE: In the 3φ3W unbalanced power measurement mode, WRS or WTS could be a negative
value. Users must make sure all the connections are correct to obtain correct power readings.
3φ4W Unbalanced Power Measurements
The measurements of WR(or WL1), WS(or WL2), and WT(or WL3) are required for these measurements.
1. First, measure WR (or WL1) (Fig. 9).
a. Apply power to the meter with the jaw clear of any conductors.
b. Set the rotary switch to the 3φ position.
c. Press the 3φ button twice, and the 3φ4W symbol appears singularly on the left side of the LCD.
The WR symbol will flash prompting the
3 Phase 4 Wire
WR (L1)
user to take the WR. measurement
Note: If the watt reading is not zero, press the R(L1) Current >
DCA/DCW ZERO button once to zero S(L2)
3 Phase
reading
T(L3)
Load
d. Insert the test leads into the input terminals
N
e. Connect the neutral line to the COM
(black) terminal.
f. Connect the V (red) terminal test lead to
the first phase (R or L1).
g. Clamp on to the same phase (R or L1).
h. The power clamp meter will automatically
select the proper range.
FIGURE 9
i. Wait until the reading is stable, then press
the NEXT button. The WR symbol will disappear. Now, WR is stored in the memory, and the WS
symbol flashes prompting the user to take the WS measurement.
2. Measure WS (or WL2) (Fig. 10).
WS (L2)
3 Phase 4 Wire
a. Disconnect the test leads from the phase
where the jaw was clamped onto as R(L1)
Current >
described in the section entitled "3φ 3W S(L2)
3 Phase
T(L3)
unbalanced power measurements".
Load
b. Connect V (red) terminal to the second N
phase (S or L2).
d. If the watt reading is not zero, press the
DCA/DCW ZERO button once to zero
reading
e. Clamp onto the phase where the test
lead is connected to (S or L2 phase)
FIGURE 10
f. The power clamp will automatically select
the proper range.
g. Wait until the reading stabilizes, then press the NEXT button. The WS symbol will disappear. WS
is now stored in memory.
3.Thirdly, measure WT (or WL3). See Fig. 11.
3 Phase 4 Wire
a. Disconnect the test lead from the phase
WT (L3)
R(L1)
where the Jaw was connected in the
S(L2)
section entitled "3φ3W Unbalanced
3 Phase
Current >
T(L3)
Power Measurements".
Load
b. Connect the test lead inserted in the V N
(red) terminal to the third phase (T or
L3 phase).
d. If the watt reading is not zero, press the
DCA/DCW ZERO button once to zero
reading
e. Clamp onto the phase where test lead
FIGURE 11
is connected to (T or L3).
f. The power clamp will automatically
select the proper range.
g. Wait until the reading stabilizes, then
press the NEXT button. The WT symbol will disappear and WT will be stored in memory,
4. Once the NEXT button is pressed (after measurements of WR WS, and WT), the power clamp will add
the three values WR, WS, and WT together and display the result on the LCD. The WRST symbol will
appear indicating that the reading shown is the wattage of the 3φ4W unbalanced circuit. PF is not
shown in the 3φ4W unbalanced power measurement mode.
W3φW = WRST = WR(L1) + WS(L2) + WT(L3)
NOTE: The "+" sign printed on jaw must face the power source.
NOTE: In the 3φ4W unbalanced power measurement mode, all three WR or WS and WT readings
must be positive. If one is negative, check the connection of the test leads and the clamping of
jaw. Make sure test lead and clamp connections are correct to obtain useful power readings.
1φ3W Power Measurement
1φ3W power measurements are similar to 3φ3W unbalanced power measurements except that the
nomenclature is different. Two measurements of WRS (or WL1G) and WTS (or WL2G) are required
1. First, measure WRS (or WL1G). See
1 Phase 3 Wire
WL1
Fig.12.
Current >
a. Apply power to the meter with L1
the jaw clear of any conductors
1 Phase
Load
b. Set the rotary switch to the 3φ
G
position.
c. Press the 3φ button once, and L2
the 3φ3W symbol will singularly
appear on the left side of the LCD.
1 Phase
The WRS symbol will flash
Load
prompting the user to measure
WRS(L1G).
d. If the watt reading is not zero,
FIGURE 12
press the DCA/DCW ZERO button
once to zero it.
e. Insert the test leads into the input terminals.
f. Connect the COM (black) terminal to ground.
g. Connect the V (red) terminal to the second phase (L1).
h. Clamp on to the same phase as connected in step g. (L1).
i. The power clamp will automatically select the proper range.
j. Wait until the reading stabilizes, then press the NEXT button. The WRS (WL1G) symbol will
disappear and the WRS(L1G) reading will be stored in memory. The WT (WL2G) symbol will flash
prompting the user to take WTS (WL2G)
1 Phase 3 Wire
WL2
measurements.
L1
2. Secondly, measure WTS (or WL2G). Fig. 13.
1 Phase
Load
a. Disconnect the test leads from the
G
phase where the jaws were clamped
onto in the previous measurement.
b. Connect the test lead to the L2 line.
L2
Current >
d. If the watt reading is not zero, press
1 Phase
the DCA/DCW ZERO button once to
Load
zero reading
e. Clamp on to the L2 line where the
test lead is connected.
f. The power clamp will automatically
FIGURE 13
select the proper range.
g. Wait until the reading is stable, then
press the NEXT button. The WT (or
WL2G) symbol will disappear. At this
moment, WTS (or WL2G) is stored in the
memory,
3. Once the NEXT button is pressed after measurements of WRS (or WL1G) and WTS (or WL2G) are taken,
the power clamp will add the two values together and show the result on the LCD. The WRST symbol
will display along with the wattage of the 1φ3W unbalanced Power. PF is not shown in 1φ3W
unbalanced power mode. See equation below.
W1φW = WRST = WRS(L1G) + WTS(L2G)
Calculation of 3φ4W Power Factor (PF)
When measuring 3φ4W unbalanced power, use the REC button to record the individual power factors
(KWR(L1), PFR(L1), KWS(L2), PFS(L2), KWT(L3), and PFT(L3)) of each phase in memory. 3φ4W power factor can
be calculated using the following equation:
KVA
KW
KW
KW
R(L1)
S(L2)
S(L3)
=
;KVA
=
;KVA
=
R(L1) PFR(L1)
S(L2) PFS(L2)
T(L3) PFT(L3)
KVA
3φW
PF
3φW
= KVA
R(L1)
+ KVA
S(L2)
+ KVA
T(L3)
KW
3φW
= KVA
3φW
Improving the Power Factor of a 3φ4W Power System
Measure the KVARR (or KVARL1), KVARS (or KVARL2 ), and KVART (or KVARL3) values of each phase.
Based upon the measured values, a 3φ or 1φ capacitor at the rated voltage and frequency can be used
to improve the power factor. To find the value of capacitance, refer to the following equation.
Where:
KVAR*1000
Capacitance(Farad) =
2
2πfV
f: frequency in Hz
V: phase voltage
It is recommended that the KVAR value of the capacitor a somewhat less than the value measured.
Improving the Power Factor of a 3φ Balanced Power System
1. Measure the KVAR 3φ value of a balanced system.
2. Based upon the measured value, a 3φ capacitor at the rated voltage and frequency can be used to
improve power factor.
3. To find the value of capacitance, refer to the equation in the section above.
4. It is recommended that the KVAR value of the capacitor be somewhat less than the value
measured.
Improving Power Factor of a 1φ2W Power System
1. Measure KVAR value of a 1φ2W power system.
2. Based upon the measured value, users can purchase required capacitor at rated voltage and
frequency to improve power factor.
3. If value of capacitance is needed, obtain the value via the equation in the section entitled
"Improving Power Factor of 3-phase 4-wire System".
4. It is recommended that the KVAR value of the capacitor should be a little less than the value
measured.
NOTE: The indication of phase sequence is not limited to 3φ balanced power. It can be used in
general as long as the Power Factor is greater than 0.1.
Phase Sequence Indication (for Power Factor > 0.1)
In the 3φ balanced power mode the meter will automatically
L3
detect the phase relationship between three individual
phases.
L3
1. Set the rotary switch to the 3φ position.
L2
L1
2. Connect the voltage input (red terminal) to the ‘R’ (or
L1) phase, connect the COM input (black terminal) to
the ‘S’ (or L2) phase, and clamp on the T (or L3)
L3
phase. When clamping onto the T (or L3) phase, the
power clamp must face the power source.
3. If the phase sequence is clockwise, R, S, T sequence
L1 L2
will flash on the display.
L2
L1
4. If the phase sequence is counterclockwise, T, S, R
FIGURE 14
sequence will flash.
5. If current is not detected, only one of the R, S or T phases will be represented on the LCD. See Fig.
14.
NOTE: The "+" sign printed on jaw must face the power source for correct measurement.
Recording Data
The power clamp can store 4 data points in memory. To store data displayed on the LCD, press the
REC button. If the power clamp already has 4 data points memorized, the LCD will display FULL.
The REC symbol will be displayed on the LCD if any data is currently stored in memory. To clear
the meter memory, power the meter down.
Recalling Data from Memory
To retrieve data from memory, press the READ button. NOTE: The rotary switch must not be set to
the 3φ function when reading memory data. Once the READ button is pressed, the reference
number of the data will be displayed first; the stored measurement data will then be displayed.
While in the READ mode, the REC. and No. symbols will be displayed on the LCD. To exit the
READ function, select another function using the rotary switch.
NOTE: If both the REC and the No. symbols are shown on LCD, the reading shown on the
LCD is the data stored in memory, not actual measurement data.
Specifications
General Specifications
Conductor Size
Display
Sampling time
Overload Indication
Power
Power consumption
Operating conditions
Dimensions
Weight
Cable Φ55mm. (approx.) Bus Bar 65mm (D) x 24mm (W)
Dual 4-digit 9999 count LCD
0.5 seconds for Voltage and Current; 1.6 seconds for Watts
‘OL’ displayed on LCD
9V Battery (Heavy Duty Type)
Approx. 28mA
4°C to 50°C <85% RH
10.7" (L) x 4.4" (W) x 1.8" (H)271mm (L) x 112mm (W) x 46mm (H)
22.8 oz. / 647g (with battery)
AC/DC KW True Power (PF 0.2 - 1.0, 3φ3W, 3φ4W, 1φ2W, and 1φ 3W) Balanced
Range
Resolution
0 - 99.99KW
0 - 999.9KW
10002000KW
0.01KW
0.1KW
1KW
Accuracy
(of reading)
±2.0% ±0.5KW
±2.0% ±0.5KW
±2.0% ±5KW
Maximum Input
Current
Voltage
200A
500V AC/DC
2000A
600VAC 800VDC
AC/DC Voltage (True RMS, Crest Factor < 4, Autorange, Overload Protection 800VAC)
Range
0-200V
200-500V
500 - 600VAC
500 - 800VDC
Resolution
0.1V
0.1V
1V
Accuracy (of reading)
DC, 50 / 60 Hz
40 - 400Hz
±1.5% ±5dgts
±2.0% ±5dgts
±1.5% ±5dgts
±2.0% ±5dgts
±1.5% ±5dgts
±2.0% ±5dgts
Input Impedance
10MΩ
AC/DC Current (True RMS, Crest Factor < 4):
Range
0 - 200A
200 - 500A
500-2000A
Resolution
0.1A
0.1A
1A
Accuracy (of rdg)
DC, 50 / 60 Hz
40 - 400Hz
±1.5% ±5dgts
±2.0% ±5dgts
±2.0% ±5dgts
±2.5% ±5dgts
±2.5% ±5dgts
±3.0% ±5dgts
Overload Protection
AC 3000A
AC/DC KVA (Apparent Power)
KVA = V*A / 1000
AC KVAR (Reactive Power, PF < 0.91)
Range
0 – 1200KVAR
Resolution
0.1 / 0.01
Accuracy
Remark
1 KVAR or +/-3%rdg+9d
(whichever is greater)
For more information, refer to the section
entitled "DC/AC 1φ2W Apparent/Reactive
Power measurements"
Phase Angle (User must zero the current reading before taking measurements)
Range
Accuracy
Sensitivity
Remark
50/60 Hz
V > 100V, A > 10A
Zero Crossing Detection
± 2.0°
Note: If current signal is not detected, the phase angle will be left blank in LCD.
Frequency (if < 10 Hz, then the Hz Display = 0)
Range
50/60 Hz
10 - 400 Hz
Accuracy
±2 dgts
0.5% ± 2dgts
Sensitivity
V > 1V, A > 5A
Battery Replacement
When the low battery symbol appears on the LCD, replace the 9V battery.
1. Remove power to the meter and disconnect all test lead and jaw connections.
2. Remove the screws from the bottom of the meter housing.
3. Lift and remove the meter battery compartment.
4. Replace the 9V battery.
5. Replace the case and secure the screws.
Repair and Calibration Services
Extech offers complete repair and calibration services for all of the products we sell. For periodic
calibration, NIST certification or repair of any Extech product, call customer service for details on
services available. Extech recommends that calibration be performed on an annual basis to insure
calibration integrity.
Warranty
EXTECH INSTRUMENTS CORPORATION warrants the basic instrument to be free of defects in parts and workmanship for one year
from date of shipment (a six month limited warranty applies on sensors and cables). If it should become necessary to return the
instrument for service during or beyond the warranty period, contact the Customer Service Department at (781) 890-7440 for
authorization. A Return Authorization (RA) number must be issued before any product is returned to Extech. The sender is
responsible for shipping charges, freight, insurance and proper packaging to prevent damage in transit. This warranty does not apply to
defects resulting from action of the user such as misuse, improper wiring, operation outside of specification, improper maintenance or
repair, or unauthorized modification. Extech specifically disclaims any implied warranties or merchantability or fitness for a specific
purpose and will not be liable for any direct, indirect, incidental or consequential damages. Extech's total liability is limited to repair or
replacement of the product. The warranty set forth above is inclusive and no other warranty, whether written or oral, is expressed or
implied
Copyright © 2000 Extech Instruments Corporation.
All rights reserved including the right of reproduction in whole or in part in any form
Ver. 1.7
Oct 17, 2001