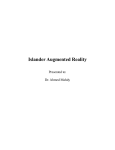
1
Ex-Sight.Com Sight.Com OZ-LEHAVA LEHAVA User Manual Last Update: 29/10/2014 Ex-Sight.Com – ‘Oz-Lehava’ Page 1 Contents 1 OZ-LEHAVA Setup .................................................................................................. 4 2 Overview .............................................................................................................. 5 3 4 2.1 OZ-LEHAVA Architecture ................................................................................................ 6 2.2 OZ-LEHAVA outputs in case of fire alerts ....................................................................... 7 2.3 Fire Detection Preset Cycle ............................................................................................ 8 Technical Specifications ......................................................................................... 9 3.1 Fire Detection Range ...................................................................................................... 9 3.2 OZ-LEHAVA Motorized Camera Scheme ...................................................................... 10 3.3 Time Division Multiple Access (TDMA) Wiring ............................................................. 11 Hardware Configuration ...................................................................................... 12 4.1 Decoder Configuration – Receiving DO from Encoder ................................................. 12 4.2 Encoder Configuration.................................................................................................. 13 4.3 5 4.2.1 Set Device Heartbeat ....................................................................................... 13 4.2.2 Set output image size 640X480(VGA).............................................................. 15 4.2.3 Set UART1 ........................................................................................................ 16 4.2.4 Set UART2 ........................................................................................................ 17 4.2.5 ‘Send DO to Decoder’ Configuration: .............................................................. 18 Testing Configuration ................................................................................................... 31 Software Usage ................................................................................................... 33 5.1 First Time Usage (configure OZ-LEHAVA settings) ....................................................... 33 5.1.1 Logging-in ........................................................................................................ 34 5.1.2 Quick configuration: ........................................................................................ 35 5.2 Live Video ..................................................................................................................... 37 5.3 PTZ Panel ...................................................................................................................... 38 5.4 The Presets Panel ......................................................................................................... 39 5.5 Fire Detection Time Zones............................................................................................ 42 5.6 Fire Detection Panel ..................................................................................................... 46 Ex-Sight.Com – ‘Oz-Lehava’ Page 2 5.6.1 5.7 Fire Detection Example ................................................................................... 48 Live Indicators & Messages .......................................................................................... 49 5.7.1 Status bar......................................................................................................... 50 5.7.2 Messages Panel ............................................................................................... 51 5.8 Layout Manipulation .................................................................................................... 53 5.9 Thermal Camera Settings ............................................................................................. 54 5.10 5.9.1 Operational Tab ............................................................................................... 56 5.9.2 Maintenance Tab............................................................................................. 57 Settings ......................................................................................................................... 58 5.10.1 Device .............................................................................................................. 58 5.10.2 Oz Lehava ........................................................................................................ 59 5.10.3 Oz -Lehava Learning Mode .............................................................................. 61 5.10.4 PTZ Control ...................................................................................................... 62 5.10.5 Security ............................................................................................................ 63 5.10.6 Video Sources .................................................................................................. 63 5.11 Oz-Lehava Garbage Collector ....................................................................................... 66 6 OZ-LEHAVA Registration/Activation..................................................................... 68 7 Trouble Shooting ................................................................................................. 69 8 Appendix A: PTZ Control ...................................................................................... 70 8.1 Main PTZ Panel ............................................................................................................. 70 8.2 Presets+ Panel .............................................................................................................. 71 8.3 Record/Play PTZ Scripts Panel ...................................................................................... 72 8.4 Annex Encoder Event Profile Settings (BAZAN, Haifa Oil Refineries) ........................... 73 Ex-Sight.Com – ‘Oz-Lehava’ Page 3 1 OZ-LEHAVA Setup etup 1) Click Next to continue, or Cancel to exit setup 2) Select “I agree” and click Next 3) Select the installation folder and hit Next 4) Press Next to install 5)Wait for the installtion to finish Ex-Sight.Com – ‘Oz-Lehava’ 6) “OZ-LEHAVA” is installed Page 4 2 Overview OZ LEHAVA integrates perimeter surveillance, long-range area observation, and fire detection analytics in a single PTZ camera. The system's day and thermal sensors are embedded in a superior PAN TILT platform with IP (Ethernet) interface. OZ LEHAVA provides a reliable response to major safety risks by enabling the user to continuously monitor target sites in the range of a few kilometres from the epicentre. The area scanning is performed according to configurable zones of interests and temperature thresholds. Once a flame has been detected, OZ LEHAVA activates its risk-communication mechanisms, such as transmission of the target's location coordinates (x; y). The false alarm risk is kept to a minimum due the embedded risk assessing algorithm. This enables the system to determine whether a given target represents a fire or is the result of environmental temperature changes. If a designated preset exceeds the defined temperature threshold, alert notifications are sent to the user's interface. Ex-Sight.Com – ‘Oz-Lehava’ Page 5 2.1 OZ-LEHAVA Architecture PWR 24V AC RTSP video IP Alert PC TCP Commands IP Alert PTZ Camera Decoder Digital Output Visual Alert Ex-Sight.Com – ‘Oz-Lehava’ Page 6 2.2 OZ-LEHAVA Outputs in Case of Fire Alerts 1. Thermal Camera Video (on local and remote PCs) The fire sources detected in the video stream are signaled by fire alerts and marked by circles. 2. Audio Alert Audio alerts are set on the OZ LEHAVA PC application and can be manually altered. Fire Alerts Log (on the PCs with installed application) The daily fire alerts record 3. Digital Output Digital output is released at each fire detection and can be used for remote detection alerts, such as audio or visual warnings. Ex-Sight.Com – ‘Oz-Lehava’ Page 7 2.3 Fire Detection Preset Cycle For each preset, OZ-LEHAVA takes the following steps: # Step Text Notification 1 Stop Fire Detection preset name[P,T,Z] 2 Go to Location Pan preset name[P,T,Z] 3 Go to Location Tilt preset name[P,T,Z] 4 Verify Position Pan preset name[P,T,Z] 5 Verify Position Tilts preset name[P,T,Z] 6 Camera Stabilization preset name[P,T,Z] 7 Start Fire Detection Detecting[preset name] Audio alarm On fire detection Digital output True on fire detection else False Ex-Sight.Com – ‘Oz-Lehava’ Page 8 3 Technical Specifications 3.1 Fire Detection Range Ex-Sight.Com – ‘Oz-Lehava’ Page 9 3.2 OZ-LEHAVA Motorized Camera Scheme Ex-Sight.Com – ‘Oz-Lehava’ Page 10 3.3 Time Division Multiple Access (TDMA) Wiring Decoder 1 2 C + Aout DO ‘I am OK’ signal RS-485 Error/Fire Alert signal 24V+ A1 15 B1 1 10S B 24V Switch 16 18 A2 + 24V- Buzzer Ex-Sight.Com – ‘Oz-Lehava’ Page 11 4 Hardware Configuration 4.1 Decoder Configuration – Receiving DO from Encoder Ex-Sight.Com – ‘Oz-Lehava’ Page 12 4.2 Encoder Configuration 4.2.1 Set Device Heartbeat Ex-Sight.Com – ‘Oz-Lehava’ Page 13 Set Device Heartbeat – continue Ex-Sight.Com – ‘Oz-Lehava’ Page 14 4.2.2 Set Output Image Size 640X480(VGA) Ex-Sight.Com – ‘Oz-Lehava’ Page 15 4.2.3 Set UART1 Ex-Sight.Com – ‘Oz-Lehava’ Page 16 4.2.4 Set UART2 Ex-Sight.Com – ‘Oz-Lehava’ Page 17 4.2.5 ‘Send DO to Decoder’ Configuration: The OZ LEHAVA application sends two digital outputs via the encoder to the decoder • DO1 for saying “I’m Ok”, a pulse (signal ‘true’ followed by signal ‘false’) that is sent every few seconds to initial the timer unit. • DO2 for ‘Fire Alert’ or an error: a signal ‘true’ is sent. “No fire detected” disables the ‘Fire Alert’ signal (set it ‘false’). If DO1 pulse has not been received by the decoder for more than 10 seconds, or DO2 has signaled “true”, the buzzer sends an alert. Ex-Sight.Com – ‘Oz-Lehava’ Page 18 4.2.5.1 Setting DO 1 ‘Active’ event To add a new event, follow these steps: 1. Event configuration->Event profile 2. Follow the screenshots below to complete the process. Ex-Sight.Com – ‘Oz-Lehava’ Page 19 Ex-Sight.Com – ‘Oz-Lehava’ Page 20 4.2.5.2 Setting DO 1 ‘Inactive’ event To add a new event, follow these steps: 1. Event configuration->Event profile 2. Follow the screenshots below to complete the process Ex-Sight.Com – ‘Oz-Lehava’ Page 21 Ex-Sight.Com – ‘Oz-Lehava’ Page 22 4.2.5.3 Setting DO 2 ‘Active’ event To add a new event, follow these steps: 1. Event configuration->Event profile 2. Follow the screenshots below to complete the process Ex-Sight.Com – ‘Oz-Lehava’ Page 23 Ex-Sight.Com – ‘Oz-Lehava’ Page 24 4.2.5.4 Setting DO 2 ‘Inactive’ event To add a new event, follow these steps 1. Event configuration->Event profile 2. Follow the screenshots below to complete the process Ex-Sight.Com – ‘Oz-Lehava’ Page 25 Ex-Sight.Com – ‘Oz-Lehava’ Page 26 4.2.5.5 Setting DO 1 send ‘Active’ event to decoder Decoder IP Decoder Port Decoder Login Ch. 0 Signal – ‘on’ Message: /nvc-cgi/admin/param.cgi?action=update&group=DIDO.DO.Ch0&trig=on Note: Decoder default port is 80 Ex-Sight.Com – ‘Oz-Lehava’ Page 27 4.2.5.6 Encoder settings DO 1 sends ‘Inactive’ event to the decoder Decoder IP Decoder Port Decoder Login Ch 0 Signal – ‘off’ Message: /nvc-cgi/admin/param.cgi?action=update&group=DIDO.DO.Ch0&trig=off Note: Decoder default port is 80 Ex-Sight.Com – ‘Oz-Lehava’ Page 28 4.2.5.7 Encoder settings DO 2 sends ‘Active’ event to the decoder Decoder IP Decoder Port Decoder Logon Ch 1 Signal – ‘on’ Message: /nvc-cgi/admin/param.cgi?action=update&group=DIDO.DO.Ch1&trig=on Note: Decoder default port is 80 Ex-Sight.Com – ‘Oz-Lehava’ Page 29 4.2.5.8 Encoder settings DO 2 sends ‘Inactive’ event to the decoder Decoder IP Decoder Port Decoder Logon Ch 1 Signal – ‘off’ Message: /nvc-cgi/admin/param.cgi?action=update&group=DIDO.DO.Ch1&trig=off Note: Decoder default port is 80 Ex-Sight.Com – ‘Oz-Lehava’ Page 30 4.3 Testing Configuration Set new DO in the Encoder settings window: Use these buttons to send DO for the Encoder Ex-Sight.Com – ‘Oz-Lehava’ Page 31 Check Decoder’s DO in the Decoder settings window: Refreshing Decoder’s settings window should reflect DO of the Encoder Ex-Sight.Com – ‘Oz-Lehava’ Page 32 5 Software Usage 5.1 First Time Usage (configure OZ-LEHAVA settings) To start the software for the first time, click on the Oz-Lehava desktop shortcut. The following screen will appear: Expand Expand the configurations panel by double-clicking the panel or hitting the Expand button Oz-Lehava Garbage Collector functionality is loaded with the main application. The corresponding icon will be added to the Windows notifications area as shown on the right -> For more information, see section 5.11 ‘Oz-Lehava Garbage Collector ’. Oz-Lehava Garbage Collector Ex-Sight.Com – ‘Oz-Lehava’ Page 33 5.1.1 Logging-in The system’s configuration is login- password protected. In order to log-in, expand the configurations panel. The following panel will appear: :ברירת המחדל root: pass Enter the username composed of a password (default = root: pass) and a login to view the configurations panel. Ex-Sight.Com – ‘Oz-Lehava’ Page 34 5.1.2 Quick configuration: After your logging-in, the configurations panel will look like this: The configurations panel Ex-Sight.Com – ‘Oz-Lehava’ Page 35 Quick configuration (Continued) • Configure the settings marked in red and leave the he rest in their default values. • After the changes are made, made the “Apply” button will light up ( Thermal Camera IP ). Press it to apply changes. • At this point, the system is ready to be activated (For more information, see section 5.10 ‘Settings’).. • CCD Camera IP See section 5.2 ’Live Live Video’ Video for information about playing the Thermal & CCD videos. • In order to manually move the camera, see section 5.3 ‘PTZ Panel’. • Before activation,, configure the presets preset which set the camera’s scanning zones (see section 5.4 ‘The Presets Panel’). Panel’ Ex-Sight.Com – ‘Oz-Lehava’ Page 36 5.2 Live Video After setting the IP address of the 2 cameras, view the live video by right-clicking the video panel and hitting ‘Play Video’ as can be seen below: Then the thermal and CCD (day) video will be shown (as can be seen below): Ex-Sight.Com – ‘Oz-Lehava’ Page 37 5.3 PTZ Panel The PTZ (Pan/Tilt/Zoom) panel controls the PTZ thermal camera. When Oz-Lehava is active/on on ( ) the panel is disabled, as shown below: Oz Lehava On/Off The PTZ Panel To enable this panel, press the Oz-Lehava Oz button ( ) and set it to deactivated/off ( ). Now PTZ Panel is enabled, as shown below: Pan/Tilt controls Zoom In/Out Focus Near/Far Iris Close/Open Current PTZ locations (write a number and press Enter to go to a position) In most cases, the above described basic PTZ operation will be enough nough for Oz-Lehava. Oz For more information, see section 8 ‘Appendix A: PTZ Control’. Ex-Sight.Com – ‘Oz-Lehava’ Page 38 5.4 The Presets Panel The Presets Panel appears under the Configurations panel, as shown below: Oz Lehava On/Off The Presets Panel allows the user to define scanning zones, in which fire is to be detected. In order to enable the presets panel, panel you will first need to turn Oz-Lehava Lehava off by using the Oz-Lehava On/Off button on (as shown above). Then the panel will be enabled (as shown below): The default prefix for region names Buttons: Add a new preset either manually (by typing the coordinates), or automatically (by by directing the camera to the right position and and clicking on the ‘Add’ button). Delete a specific highlighted preset. Save preset changes. Ex-Sight.Com – ‘Oz-Lehava’ Page 39 Load/reload presets. Go to the highlighted preset’s location. Test all presets locations by pressing the ‘Simulate Presets’ button. button Remove the selected preset regions. Remove all regions from all presets p in the table. Press on ‘Configure Detection/Non Detection Detectio Regions for Selected Preset’. The T Fire Detection Regions window will appear on top of the application: Press to receive the image in the given preset (if it has not been received yet). Press to receive the image the camera is currently on (regardless of the preset) Ex-Sight.Com – ‘Oz-Lehava’ Page 40 To set the non detection region as unmarked, follow these steps: Right click on the screen. The “Add Region” icon will appear: Left click the icon and drag the cursor until the desired region is covered. The Time Zone in which the region rule is valid Ex-Sight.Com – ‘Oz-Lehava’ Page 41 After the non-detection detection region is marked, the time period during which detection must be ignored, is displayed. In order for the region rule to be valid, at least one Time Zone should be configured (for more about Time Zones see section 5.5 ‘Fire Fire Detection Time Zones’). Zones To remove the marked region, right click click on the screen. You will get the “Remove Region” icon. Left click this icon to remove the region. Press to save your changes and exit the regions window. Press or to discard your changes and exit the regions window (closing the window does the same). 5.5 Fire Detection Time Zones The Time Zones Panel appears under the Configurations panel, as shown below: Ex-Sight.Com – ‘Oz-Lehava’ Page 42 Oz Lehava On/Off The Time Zones allow the user to define time zones, in which fire is to be detected/ignored (For example, create a time zone that commands the application to ignore fire detections on working days & hours in a facility with permanent fire environment). In order to enable the time zones panel, first turn Oz-Lehava off by using the Oz-Lehava On/Off button (as shown above). Then the panel will be enabled (as shown below). Ex-Sight.Com – ‘Oz-Lehava’ Page 43 To add a Time Zone right-click the time zone grid and click ‘Add Time Zone’ (as seen below). Name the time zone and then right-click the row and click ‘Add Rule’ (as seen below). Ex-Sight.Com – ‘Oz-Lehava’ Page 44 Select the date span and the times of day by clicking on the ‘Add Day Rule’ button ( ) Delete Rules List The Date Span Remove Day Rule Add Day Rule Expand /Collapse Add dd the day rule for a specific day or for all days in that date span and set the times of the day. You can add multiple time zones and multiple time zone rules to the same time zone as shown below: Buttons: Save time zone changes. Load oad previously saved time zones. Validate alidate the time zones. zones Ex-Sight.Com – ‘Oz-Lehava’ Page 45 5.6 Fire Detection Panel The Fire Detection Panel allows the user to actively control the detection process as well as simulate fire alarms. The panel is located under the Live Controls Panel as shown below: The current preset is highlighted in a color according to the step Oz-Lehava Lehava On/Off (activate/deactivate) button: button Pressing this button turns the fire detection process on/off. This button must be off in order to configure Thermal Camera settings, presets & time zones, as well as to enable the PTZ panel. Note: If connection is lost, lost, the application will try to reconnect every few seconds. Go to Next Preset: Stops tops current thermal camera action and skips to the next preset. Focus Near (Thermal):: Is used to closely focus the thermal camera Focus Far (Thermal): Is used sed to focus the thermal camera far. Fire Simulation: Pressing this button will simulate mulate fire according to the following parameters--> • Preset: The preset in which ‘fire’ occurs. • Location: The he location of the ‘fire’ (in Ex-Sight.Com – ‘Oz-Lehava’ Page 46 screen coordinates). • The time of the ‘fire’. If the parameters of the ‘fire’ match, the application will raise a real fire alarm. Ex-Sight.Com – ‘Oz-Lehava’ Page 47 5.6.1 Fire Detection Example Below is real-life fire detection as it appears in the application: Fire! (Marked by the Green circle) The Visual Fire Alert Ex-Sight.Com – ‘Oz-Lehava’ Page 48 Oz Lehava On/Off 5.7 Live Indicators & Messages Oz-Lehava constantly updates its live indicators & message box, as can be seen below: The current preset is highlighted in a color according to the step Status bar Ex-Sight.Com – ‘Oz-Lehava’ Messages panel Page 49 5.7.1 Status bar Summarized notifications • • Visual Alerts Error Notification Summarized notifications: notifications Displayss the current step of the Fire Detection Preset Cycle (see section 2.3 for all steps). o When the step is ‘Detecting fire’, fire’ the bar will fill up according to the detection time frame detection for the current preset. Visual Alerts: Shows graphic fire alerts in Red (in addition to voice alerts ) and failure alerts in Yellow as can be seen below: Visual alerts can be dismissed by right-clicking right them and nd pressing “Dismiss”: • Error Notification: o Green ( ): “Oz-Lehava” “Oz works without any errors. o Red ( Ex-Sight.Com – ‘Oz-Lehava’ ): Either ither an error has occurred, or “Oz-Lehava”” has been disabled. Page 50 5.7.2 Messages Panel The messages log Clear log Minimal Verbosity/Severity • • Color by Severity Maximum number Save Modules of lines in log Log Minimal Verbosity/Severity: Minimal message classification o Debug: All messages o LowSeverity: Critical alerts and camera status o Critical: Fire alerts, Oz-Lehava enabled/disabled, connection failures and exceptions Color by Severity: Press this button to color/uncolor messages according to their severity. Ex-Sight.Com – ‘Oz-Lehava’ Page 51 • Save Log: Pressing this button will open the “Save Log Dialog” as shown below: The log file must be saved as: • Text Files – Regular text file format. • Text Files – Unicode for preserving special characters • RTF (Rich Text Format) for preserving the line colors as well. Note: Only the messages that currently appear in the messages panel can be saved as described above. • Modules Check/Uncheck this button in order to see all the modules that can send messages (Uncheck a module if you want to stop seeing messages sent by it). • Clear Log Clears all the current messages from the panel Ex-Sight.Com – ‘Oz-Lehava’ Page 52 5.8 Layout Manipulation When you right-click any panel in the application, you will get the options below: • • These options enable you to manipulate the application’s layout as follows: o Change the panels order o Stretch the selected panel over the entire blank region in the panel containers. o The panel containers are the following: The Live Controls Panel The Main Panel The Configurations Panel Video 2(CCD) panel has a special dragging capability. o You can drag this panel’s header in order to move it to any panel container as can be seen below: o After stretching the Video 2 (CCD) panel, you can get the layout below in which video 1 & video 2 are seen side by side: Ex-Sight.Com – ‘Oz-Lehava’ Page 53 5.9 Thermal Camera Settings Note: Thermal camera changes should be handled with care and only after getting professional help regarding the thermal camera. When Oz-Lehava is off the thermal camera settings will be enabled, as shown below: Oz Lehava On/Off Thermal Camera Settings Open Settings Press the ‘Open Settings’ button and the following window will appear (Connection Tab): Thermal Camera Messages log Connection tab Modes • • • Modes Maintenance: Press this button if you want to get/set values that appear in the maintenance tab. NUC: Performs thermal sensor initialization (you can hear it happening). Operational Press this button if you want to change values in the operational tab. Ex-Sight.Com – ‘Oz-Lehava’ Page 54 o Note: Before exiting the thermal settings window you must press this button in order to make sure that the camera is in the operational mode, so it could continue to detect fire. • • Connection Tab Connect/Disconnect After setting the correct values of IP, port & baud rate, you can connect/disconnect to/from the thermal camera. SaveToFlash Saves the changes you have made in the maintenance mode to the camera’s memory. Ex-Sight.Com – ‘Oz-Lehava’ Page 55 5.9.1 Operational Tab Operational Tab Fire Detection Alerts • Enable Fire Detection: Enables/Disables the fire detection capability of the camera. • Enable High Risk: When checked, the bodies above the temperature threshold will appear in red, as can be seen in the example on the right (the glass is full with hot water, which appears red in the thermal video). In order to apply these settings, check/uncheck the relevant checkboxes and click the Set button. Flip Image In this section, you can flip the thermal image right/left, up/down. Polarity • Hot White: When checked, hot bodies in the thermal image appear white, while cold bodies appear black, and vice versa. Ex-Sight.Com – ‘Oz-Lehava’ Page 56 5.9.2 Maintenance Tab Maintenance Tab Here you can get/set various thermal parameters as shown above. Ex-Sight.Com – ‘Oz-Lehava’ Page 57 5.10 Settings 5.10.1 Device General note: These settings apply to both Thermal & CCD encoder devices. • Authentication: Password: The password used to log into to the device may remain blank when the device does not require credentials to retrieve snapshots. • Authentication: Username The username used to log into to the device may remain blank when the device does not require credentials to retrieve snapshots. • Device Channel # The Device's Channel Number (0 by default) must remain 0 in most cases. • Device Type The device is VACAM. • HTTP Authentication: Enabled Enable/Disable HTTP authentication (by “Authentication: Username” and “Authentication: Password”). • HTTP Port The HTTP port is used for communicating with the device and for displaying the web view (80 by default). • TCP Events Port The TCP Events port is used by the device for notifying events (2555 by default). Ex-Sight.Com – ‘Oz-Lehava’ Page 58 5.10.2 Oz Lehava • Audio Alarm File Name (wav) Sets the fire detection alarm sound. • Auto-Hide Fire Alerts When set to True, the Fire Alerts display is hidden automatically. Note: Auto-Hide Fire Alerts are relevant only when ‘Use Audio Alert’=True. • Enable Text on Video Enables burnt text on the encoder. • EyeSec Baud Rate The thermal camera baud rate for serial communication. • EyeSec Camera IP Thermal camera’s IP. • EyeSec Communication port The thermal camera’s RS232 communication port. • EyeSec Response Timeout (mSec) The maximum time (in milliseconds) it takes the thermal camera or a motorized PTZ to respond. • Fire Status Interval (mSec) The time spent by the camera between two fire detection requests (in milliseconds). • Ignore 0,0 coordinate Ignore the 0,0 coordinate on fire detection. • I’m OK Interval (ms) The time interval needed by the system to report failure. • Minimum Fire Detections for Fire Alert The minimum number of fire detections to occur on a single preset before raising a fire alert. • Repeated Verification Counter The number of times needed to verify the camera’s position before sending an error. • Stabilization interval (mSec) The camera’s stabilizing time before fire detection. Note: Unstabilized camera may cause unexpected results, such as false alarms. • Stop Verification Time Interval (mSec) Ex-Sight.Com – ‘Oz-Lehava’ Page 59 The time needed to verify the camera’s position. • Time to Detect (mSec) The time spent by the camera on ‘fire detection’ for each preset. • Use Audio Alert Enable/Disable the Audio fire alert. Ex-Sight.Com – ‘Oz-Lehava’ Page 60 5.10.3 Oz -Lehava Learning Mode • Learning Mode Enabled When set to ‘True’, this functionality enables automatic generation of ignored regions for presets. For example, when Learning Mode is enabled, every fire detection coordinate is added as an ignored region for the preset in which it is detected. Thus next time fire is detected on identical coordinates, it will be ignored, and no fire alert will be raised. • Region Size The default size of the ignored region generated for each fire detection. • Time Zone The Learning Mode time-zone Note: If left blank the first time-zone item of the time-zones list will be used. Ex-Sight.Com – ‘Oz-Lehava’ Page 61 5.10.4 PTZ Control • Baud Rate The serial communication baud rate Note: Baud rate is relevant only when ‘PTZ Connection Type’ is DirectCOM (not in use in most cases). • Device Address Pelco ID number (1 by default). • IP Address of the PTZ Device (if any) In case of Serial Over IP communication (most cased), this field contains the IP address of the CCD (day) encoder. During direct serial communication, this field is ignored. • Port number of the PTZ Device (if any) The Port Number used for Serial Over IP communication. • PTZ Com Port In case of direct serial communication (rarely used), this field contains the port name. During serial over IP communication, this field is ignored. • PTZ Connection Type Serial over IP (most cases) or direct serial (DirectCOM). • PTZ Protocol PTZ Protocol used (Pelco D in most cases). Ex-Sight.Com – ‘Oz-Lehava’ Page 62 5.10.5 Security • Login: Password The login password for the configurations section • Login: Username The login username for the configurations section. Note: The default username & password are “root: pass”. 5.10.6 Video Sources *For both Video 1(Thermal) & Video 2(CCD) • Aspect Ratio: Height The Height element in the Aspect Ratio (relevant only when 'Aspect Ratio: Stretch to Fit'=’False’). Enter 0 to use the default Aspect Ratio of the video. • Aspect Ratio: Width The Width element in the Aspect Ratio (relevant only when 'Aspect Ratio: Stretch to Fit'=’False’). Enter 0 to use the default Aspect Ratio of the video. • Aspect Ratio:Stretch to Fit – True -> Aspect Ratio of the video will be calculated to fit the window size. • Auto Start Automatically start playing the video when the program starts. • Caching Value (ms) This value indicates the time period (in milliseconds) between grabbing a video image from the video stream and displaying it on the screen. Note: Small values will make the video arrive faster (shorter delay) but might cause the video to be unsmooth or even cause the video to stop (!). • Device Channel # The Device's Channel Number (0 by default) must stay 0 in most cases. • IP Address(Readonly) – shows the IP address of the video device. • Media URL - The camera’s video address. Ex-Sight.Com – ‘Oz-Lehava’ Page 63 Note: Media URL can be either automatically set (auto), or user-set (custom). To edit the address, set ‘Media URL Generation’ to custom. • Media URL Generation o Auto - Media URL is generated automatically based on VACAM cameras default stream names. o Custom - User specifies the media URL. • OSD Video OSD (On Screen Display) can be added to each one of the video sources. The OSD appears only on the video panels, as shown on the right. In order to see the changes, you may need to play the video again after you apply the changes (see section 5.2 ‘Live Video’ for more). o Apply Delay (ms) The Video OSD Apply Delay (in milliseconds). If the OSD is not shown try to increase this value. In certain cases, decreasing this value will cause the video to appear faster. o Apply Delay(ms) – On App. Load The Video OSD Apply Delay (in milliseconds) to be used when the application is loading. If the OSD is not shown, try to increase this value. In certain cases, decreasing this value will cause the video to appear faster. o Color The Video OSD Color o Enable Enable/Disable the Video OSD text o Font Size The Video OSD text Font Size o Opacity The Video OSD text Opacity ranging from0 (completely transparent) to 255 (completely opaque) Ex-Sight.Com – ‘Oz-Lehava’ Page 64 o Position The Position of the Video OSD text o Text The Video OSD text • RTSP Authentication: Enabled Enable/Disable RTSP Authentication by 'Device->Authentication: Username' and 'Device->Authentication: Password'. • RTSP Port The RTSP port used for streaming the device video (554 by default) • Session Name Allowed characters: Numbers, Digits and '_' Maximum name length: 64 characters. Usually, there is no need to change the default value. Note: Any change to this property must correspond to the encoder’s values. Otherwise, it is impossible to view the video on the device. • Video Stream Type The video transmission method o Unicast->every viewer gets the video directly from the device. In this case, more CPU power needed from the device. o Multicast->The video is transmitted from the device only to the router, which multicasts the video to the viewers. In this case, less CPU power is needed from the device. Note: Any change to this property must correspond to the encoder’s values. Otherwise, it is impossible to view the video on the device. Ex-Sight.Com – ‘Oz-Lehava’ Page 65 5.11 Oz-Lehava Garbage Collector This application keeps OZ LEHAVA working non-stop and removes old data files. The “Oz-Lehava Garbage Collector” must run at all times. The application can be found on the taskbar/notification area. Right click on the icon ( ) and then click on ‘Settings’. Properties: • • Always show Last Delete time notification Determines whether to always show the ‘Last Delete notification’ Note: this info is also shown when you click on the ‘OZ-LEHAVA Garbage Collector icon’. Application ‘logs’ Path The path in which the “Logs” directory is located • OzLehavaApp.exe file Location The ‘OzLehavaApp.exe’ file path. This functionality is necessary for the Oz Lehava Garbage Collector to work as a watchdog. • Perform Delete Interval (Minutes) The time interval between two “excess data files checks”. • Time to Hold Old Temporary Data (Days) Indicates how many days the “data files” must be kept in hard drive from the moment they are created to the moment they are deleted. • Watch Dog Oz-Lehava Process name The process name to be inserted in order for the process to be viewed Ex-Sight.Com – ‘Oz-Lehava’ Page 66 After settings new values in Oz Lehava Garbage Collector, save the parameters by clicking on the Apply button. Ex-Sight.Com – ‘Oz-Lehava’ Page 67 6 OZ-LEHAVA Registration/Activation Registration To register/activate your product, product press the ”OZ-LEHAVA Activation”” icon located on your desktop ( ). The following window will appear: To receive the license, copy the hardware ID and send it to Ex-Sight. After you receive the license file, copy it to the installation folder. You can do this by clicking on Activation and then selecting the received license, or simply by copying the received license to the application folder (“C:\Program Program Files\ExFiles Sight.Com\OZ-LEHAVA”” by default). default) Ex-Sight.Com – ‘Oz-Lehava’ Page 68 7 Trouble Shooting Issue “Error: PTZ Request Timeout” Cause can’t get motorized PTZ response How to fix 1. 2. 3. 4. “Error: Thermal Request Timeout” can’t get thermal camera response 1. 2. 3. 4. “Error:Timer too fast” False alarms ‘Stop Verification time interval’ value is too low The camera isn’t steady PTZ new locations aren’t showmen on PTZ Control Panel VideoTech switches are configured as ‘One way’ mode Camera’s manual PTZ control doesn’t work Camera network connection issue or ‘OZ-LEHAVA’ is enabled Ex-Sight.Com – ‘Oz-Lehava’ 1. 1. 2. 1. 1. 2. Set higher value for ‘Eysec Response Timeout’. Check IP number in ‘IP Address in the PTZ Device’ Check port number in ‘’PTZ Com Port’. Check physical motorized PTZ network connections. Set higher value for ‘Eysec Response Timeout’. Check IP number in ‘IP Address in the PTZ Device’ Check port number in ‘’EyeSec Communication Port’. Check physical thermal camera network connections. Set higher value for ‘Stop Verification time interval’. Set higher value for ‘Stabilization interval’. Stabilize the camera physically. Switches 9 and 10 in VideoTech should be ‘On’ (up) for ‘Two ways’ mode Insure ‘OZ-LEHAVA’ is disabled. Check camera network connection. Page 69 8 Appendix A: PTZ Control 8.1 Main PTZ Panel C H D I E J F GK L (A) P/T Wheel Allows the user to Pan/Tilt in all directions (the central button stops the camera). (B) PTZ Current position Shows the current Pan/Tilt/Zoom position Note: You can insert values inside the P/T/Z boxes to tell the camera to go to a specific P/T/Z position. (C) Zoom In/Out (D) Focus Near/Far (E) Iris Close/Open (F) Stop the current action. (G) Reconnect to the PTZ server. (H) By filling this checkbox, you can direct the camera to perform a certain action for a given amount of time (for example, pan right for 500 ms). (I) Pan Turbo On/Off (Pan Turbo is the maximum available pan speed of the camera). (J) Change the current Pan/Tilt speed. (K) Open the Presets+ Panel. (L) Open the Record/Play PTZ Scripts Panel. A B Ex-Sight.Com – ‘Oz-Lehava’ Page 70 8.2 Presets+ Panel A click on the Presets+ button ( ) will open the panel shown on the right: (A) Preset Numpad : Here you can input preset numbers. (B) Preset Actions : • Go To Preset Goes to a preset position/performs a preset action provided by the camera. (For example, preset 95 in most Pelco D cameras initiates the camera menu). Usage: input the preset number and then press ‘Go To’. • Set Preset Saves the current position as a preset of the camera Usage: input the preset number and then press ‘Set’. • Clear Preset Clears the selected preset number from the camera’s presets Usage: input the preset number and then press ‘Clear’. (C) Continuously Query Position B D E A C F (D) When checked ( ), the program continuously asks the camera for its current position, and records it in the PTZ Current Position boxes (B ( on the Main PTZ Panel). Right-click click it to see the menu on the right -> • Check the ‘Estimate Responses Opcodes’ in case the PTZ positionss are not updated upon change of position. (Some cameras do not fully follow the Pelco D protocol, and with this property we attempt to fix it) • The query interval can be changed by selecting a value from the drop-down drop list and hitting ‘Update Query Interval (ms)’ Note: PTZ devices cannot handle too many commands/queries in a short period of time. (In this case, the interval must be increased). Vice Vi versa, if positions are refreshed too slowly, the interval may be decreased. Fixed Commands : Select one command from the list (for example, ‘Flip 180 degrees’) (E) and hit Go( ) Note: An action will be done only if it is supported by your camera. Extended Commands 1 : Select one command from the list (for example, ‘Set Zoom (F) Speed[0-3]’) 3]’) , enter a value below and hit Go( ) Note: An action will be done only if it is supported by your camera. Extended Commands 2: Select one command from the list (for example, ‘Set Pan Position’), enter a value below and hit Go ( ) Note (1): An action will be done only if it is supported by your camera. Note (2): Some actions require to also set the checkbox type type (as can be seen on the right). Value input Ex-Sight.Com – ‘Oz-Lehava’ The Action Type Go! Checkbox Page 71 8.3 Record/Play PTZ Scripts Panel In some cases you may wish to use PTZ scripts in order to perform daily tasks on your camera. For example, you might want to change the position of the camera at specific times of the day, or change the day/night camera mode at specific times (in case your camera does not have this option built-in). In this software you have support of PTZ scripting that enables you to record and play a script. The following actions are available: • Record: When you hit the Record button, it will light up ( ) to signify a PTZ recording session. In Record Stop this session, until you will press the Record button again, you can command the camera to perform Script actions while using the Main PTZ Panel or the Pause Presets+ Panel. Every command will be added as a Script line in the PTZ script, as shown below: Load PTZ Script Save PTZ Script Play Script Clear Commands Play Current Command • Note: Every line consists of a command and a delay, which is the time (in milliseconds) to pass until executing the next command. Stop Script : Stops the script and moves the player cursor to the first line (as shown below): • Pause Script : Stops the script at the current cursor position (as shown below): • Play Script :Plays the currently loaded script from the current cursor position (or from the beginning if the cursor is not set) Play Current Command : Plays only the command that is under the player cursor Clear Commands : Clears all the script commands Save PTZ Script : Saves the current script to a file Load PTZ Script : Load a PTZ script from file • • • • Ex-Sight.Com – ‘Oz-Lehava’ Page 72 8.4 Annex Encoder Event Profile Settings (BAZAN, Haifa Oil Refineries) Decoder DO1 On No alarm, lights on, ventilator 0n DO2 On Profile Name DO1 Active DO DO1 Active Http:server1 ch0=”on” Profile Name DO1 Inactive DO DO1 Inactive Http:server2 Ch0=”on” Profile Name DO2 Active DO DO2 Inactive Http:server3 Ch1=”on” (NVD DO2 “on”) Profile Name DO2 Inactive DO DO2 Active Http:server4 Ch1=”off” (NVD DO2 “off”) Ex-Sight.Com – ‘Oz-Lehava’ Page 73