1
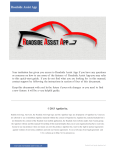
A guide to ISBoxer for WoW PwnBoxer refugees
Switching to ISBoxer is easy, and it should only take you a few minutes. A former well-known
PwnBoxer user says that he switched over and did a heroic instance within 10 minutes, after only
resetting his in-game key bindings and spending a few minutes with the Quick Setup Wizard and a few
tweaks afterward.
PwnBoxer feature equivalents in ISBoxer
PwnBoxer
ISBoxer
Layout
Window Layout
Dockable Clickmapping
Click Bars
Fast Game Switch
Swap Hot Character to main region (found in
Window Layout, enabled by default) with Instant
Swap disabled
Key Broadcasting
Repeater white/black lists*
Mouse Broadcasting
Mouse Repeat
Key Remapping
Mapped Keys
Autofocus Game Windows on Mouse Hover
Focus follows mouse (found in Window Layout)
• The true equivalent of Key Broadcasting is a series of Mapped Keys, which can be created all at
once with “Many new Mapped Keys”. See “alternative method” section below
Getting started
Start by using the Quick Setup Wizard as demonstrated in the 40-second configuration video at
http://www.youtube.com/watch?v=xoZG6b9HjnM. This sets up a basic working configuration,
complete with auto-assisting (via “FTL”, see http://isboxer.com/wiki/WoW:FTL) Action Bar hotkeys 1
through =. For a list of hotkeys created by the wizard, see http://isboxer.com/index.php/guides/45wow-guide-quickref.
Getting the same baseline performance you had with PwnBoxer
One of the things the Quick Setup Wizard sets up is Instant Swap. What this feature does is sync the
actual resolution of all of the game windows, such that even when shrunk, the windows are still
rendering at the full resolution. This will somewhat reduce your framerate (FPS), but is required to
enable Instant Swap and provide perfect mouse broadcasting. If you don't need Instant Swap or perfect
mouse broadcasting, the same level of performance you had with PwnBoxer can be achieved by simply
disabling this option in your Window Layout.
To disable Instant Swap:
1. In the top pane, click on your Window Layout under Window Layouts. It will usually have the
same name as your Character Set
2. In the bottom right pane near the top under Main region switcher, uncheck Instant swap
Importing Key Broadcasting Configuration
So you already took the time to set up PwnBoxer, you've already got dozens of hotkeys configured in
the game based on your PwnBoxer configuration, and you just want them to f'ing work in ISBoxer
already. ISBoxer has a feature for creating Mapped Keys described as “Import from other software”,
which will read your PwnBoxer configuration and import a Key Set white list including remapped
keys.
1. In the top pane, click on “FTL DPS Keys” under Key Maps
2. In the bottom left pane, where it now shows “FTL DPS Keys” and then “Mapped Keys” with
DPS 1 through = listed, right click on Mapped Keys and select Import from other software.
3. Point it to your pwnboxer.pbcfg file and click OK. If you had multiple key sets configured in
PwnBoxer, a window will pop up for you to select the desired key set
4. After it imports, if you had 1 through = white listed you will now have some duplicate keys in
this Key Map, and it may be important to remove them. If you choose to destroy the previously
existing DPS 1 through DPS =, be aware that you are destroying the auto-assisting functionality
built into those mappings. You can instead destroy the newly created 1 through = Mapped Keys.
5. If you would like to add auto-assist to any of the newly created Mapped Keys (and note that if
you're doing this to a lot of them, it's much quicker to do this another way – see “Alternative
method” below):
i. Select the Mapped Key in the bottom left pane
ii. On the right you should see the top option is the Hotkey for this Mapped Key. Directly
beneath the Hotkey option is a “Hold” option that was set to On by the import. Set Hold to
Off
iii. Expand the Mapped Key in the bottom left pane, so you see Steps, 1 under it
iv. Click on Step 1 (the 1 under Steps)
v. On the right, you now see Actions, with an Action that sends the keystroke to all windows.
Right click Actions and under “Key Map Actions” select “Do Mapped Key Action”
vi. Set the Target to “Window:Current”
vii. Set the Key Map to “General”
viii.
Set the Mapped Key to “FTL Assist Me”
ix. The new Action for auto-assist is below the keystroke being passed to all, which means that
it's going to happen afterward. You want it to happen before instead. Right click on your
new Action (under Actions) and select Move Up
Alternative method to quickly add many hotkeys, optionally with
auto-assist
1. In the top pane, click on “FTL DPS Keys” under Key Maps
2. In the bottom left pane, where it now shows “FTL DPS Keys” and then “Mapped Keys” with
DPS 1 through = listed, right click on Mapped Keys and select Many new Mapped Keys.
3. At the top of the Many new Mapped Keys window is a box labeled “Press a key combination
here”. Click in that box, and press each and every combination of keys you want to set up right
now, which may include any combination of alt,ctrl,shift with whichever non-modifier key you
like.
4. If you are using this feature in the FTL DPS Keys map, then the rest of the window is already
5.
6.
7.
8.
filled in for each of these keys to auto-assist and broadcast. If that's the case and this is what
you want, just click OK and you're done with this part of the guide. Otherwise continue with #5
below.
The “Target for keystrokes” box lets you pick the intended target windows for the keystroke to
be passed to. Typically this would be “Window:All w/ current” which will pass the keystroke to
every window including the one you are in. Likewise, “Window: All w/o current” will pass the
keystroke to every window excluding the one you are in (aka “all other”).
The “Do this Mapped Key first” box lets you pick a Mapped Key to perform before the
keystroke is passed. This would typically be used for auto-assist. If you would like to add autoassist:
i. Click the < to pick a Mapped Key
ii. Target should be Window:Current
iii. Key Map should be General
iv. Mapped Key should be FTL Assist Me
The “Do this Mapped Key after” box lets you pick a Mapped Key to perform after the
keystroke is passed. For true “targetless” operation, this might involve a macro to /cleartarget.
In this case just leave it empty.
Click OK!
Replicating Key Remapping for new hotkeys
Key Remapping in PwnBoxer is used to map a key in one window to another key in other windows.
With ISBoxer, this is done by assigning multiple Actions to a Mapped Key. You can send any
combination of keys to any particular window or set of windows, regardless of the Hotkey used to
activate the Mapped Key.
To create a Mapped Key that sends different keys to different windows:
1. In the top pane click on FTL DPS Keys under Key Maps
2. In the bottom left pane, right click on Mapped Keys and select New Mapped Key
3. Rename your Mapped Key so that it's not titled “New Mapped Key”. Usually you want to name
it something related to what the key actually does, as opposed to the name of the key you press
to activate it. You can rename your Mapped Key at any time by right clicking on it in the
bottom left pane and selecting Rename.
4. Left click on the Mapped Key in the bottom left pane
5. The bottom right pane now shows the basic settings for the Mapped Key itself, such as the
Hotkey, whether to hold any keystrokes passed while you hold the Hotkey, and so on. Click the
< next to the Hotkey setting to set the Hotkey
6. Expand the Mapped Key in the bottom left pane so that you see Steps, 1 underneath it
7. Click on Step 1 (the 1 under Steps) so that you now see Actions in a box to the right
8. For each window or set of windows you want to send a key to:
i. Right click on Actions, and under Keystoke Actions select New Keystroke Action
ii. Set the Target to the desired window or set of windows
iii. Set the Key combination to the desired key combination for the selected Target to receive
Using multiple WoW folders
If you are currently using multiple WoW folders to keep separate configurations, this section is for you.
If you do not currently use multiple WoW folders, , the TL;DR version is that ISBoxer provides file
virtualization for your Config.WTF file automatically, so there is no reason to use multiple folders.
Firstly, be advised that you do not need multiple WoW folders. Using multiple folders has several
disadvantages, including but not necessarily limited to performance hits and having to fix multiple
folders on patch days. The disadvantages are somewhat mitigated by using symlinks/junctions. The
sole purpose of using multiple folders is to keep multiple configurations. However, ISBoxer provides a
feature called Virtual Files, which is used by the Quick Setup Wizard to keep a different Config.WTF
file per character – even with a single WoW folder. Config.WTF stores your account name, server, and
selected character, as well as video and sound options. So even with a single folder, you can keep
different video and sound settings for each character.
With that in mind, if you still want to use multiple folders (and that's fine – people like to continue
using what they already had set up), then for each WoW folder, do the following:
1. Right click the Inner Space crosshairs icon in the system tray (next to the system clock...)
2. Select Add Game from the menu
3. For the Name, it's probably a good idea to name it similar to how your WoW folder is named,
e.g. WoW1 or something.
4. Click the “...” button for Game executable
5. Point it to the wow.exe in the WoW folder you want to add and click OK
After you finish adding each of the WoW folders in this way, close Inner Space and restart ISBoxer.
This will make sure that Inner Space saves the changes, and ISBoxer loads them.
To make ISBoxer use your multiple folders that are now configured in Inner Space, do the following
for each Character:
1. Select the Character in the top pane under Characters
2. In the bottom right pane under Inner Space launch information, set Game to the desired Game
as you configured with Add Game
3. Set Game Profile to the Default Profile for the Game
Replicating your Dockable Clickmapping
“Dockable Clickmapping” is a strange term that means buttons in a dockable, always on top window
that you can click to send keystrokes to the game. ISBoxer has a feature called Click Bars (see
http://isboxer.com/wiki/Click_Bar), which lets you create grids of buttons – of nearly any size – that
actually show up in-game, with changeable images (e.g. icons) and/or text. Buttons on Click Bars can
interpret left or right clicks in combination with modifier keys (alt,shift,ctrl) to perform a Mapped
Keys. For example, you might have a button that casts one spell when left clicked, but another when
right clicked.
A Click Bar in action in game, note that the blue background is from the WoW login screen, and the
images with transparency are from the Click Bar.
Positioning Click Bars in game
The following is taken from the Click Bar link above.
Once a Click Bar is activated and visible in game, the first thing you will want to do is move it to
where you would like it to be. To do so, you must have an In-game ISBoxer GUI Toggle hotkey
configured in your Character Set; the Quick Setup Wizard sets this Hotkey to Ctrl+Shift+Alt+G by
default. When the In-game GUI is toggled on, a title bar will appear on all of your Click Bars, which
can be used to drag the Click Bar to the desired location. Once placed, you can copy the position of the
Click Bar to all windows by clicking the Sync button. There is also a "Window shade" (like minimize)
button and a Close button that can be used to temporarily or permanently hide the Click Bar.
After moving the Click Bar, click the Save button in the in-game ISBoxer Control Panel (visible while
the GUI is toggled on by the hotkey).
Other resources
•
Ualaa's Guide to ISBoxer: http://isboxer.com/index.php/guides/9-wow-ualaa-isboxer-guide
•
ISBoxer User Manual: http://isboxer.com/wiki/User_Manual
•
Configuring multiple computers: http://isboxer.com/index.php/component/content/article/3general/22-using-multiple-computers