1
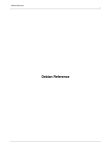
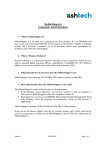
澳門理工學院學科處理系統
Class Preparation Management System
(CPMS)
User Manual
Version 1.0
(2005-06-10)
Prepare by CSC Chris Ma
Content
Content ................................................................................. 2
1.0 Preface ............................................................................ 3
2.0 Features........................................................................... 3
3.0 Login to CPMS................................................................... 4
4.0 Main Menu........................................................................ 4
5.0 Modules Summary ............................................................. 5
5.1 Teaching Assignments & Class Information Management.... 5
Update subjects information. For example, language, quota, class
group and software requirements, etc. ................................. 5
5.2 Extra Program and Study Plan Management..................... 5
5.3 Printing & Version Control ............................................. 6
5.4 Room Assignments Maintenance .................................... 6
5.5 Advanced Room Management & Report Tracking ............... 6
5.6 Users Management....................................................... 6
6.0 Teaching Assignments ........................................................ 7
6.1 Update subjects information .......................................... 7
6.2 Class section for subject................................................ 7
6.3 Insert Teaching Schedule .............................................. 8
6.3.1 Q & A ...................................................................... 9
6.4 Join class to other related class. ..................................... 9
7.0 Extra Program and Study Plan ........................................... 11
7.1 Add/Update new program............................................ 11
7.2 Add/Update new subject ............................................. 12
8 .0 Printing & Version Control ................................................ 13
8.1 Steps to print a new version report............................... 13
8.2 Flow of Print Report .................................................... 14
9.0 Room Assignments Maintenance ........................................ 15
10.0 Advanced Room Management .......................................... 16
10.1 Track teaching assignments ....................................... 16
10.2 Automatic Room Assignment...................................... 16
11.0 Users ........................................................................... 17
1.0 Preface
In order to extend and smooth the function of existing student
information system (SIGA) and cooperate the MPI’s centralization
policy, Computer Service Centre and five schools work together to
draft an extended system to collect teaching assignment and manage
the venue assignment. Besides the resource management, the new
system CPMS linked with HRMS (Human Resource Management
System) and SIGA (Student Information Management System) to
achieve the goal information exchange. Finally, CPMS provides
version-reports to PES and DAP, they are some incremental reports
and they print the changes only.
2.0 Features
z
z
z
z
z
z
z
z
Prepare teaching assignments and room assignments.
Centralized class information and schedules.
Human resource scheduling management.
Venues scheduling management.
Link to Resource Management System, SIGA, Human Resource
Management System.
Automatic classroom assignment according to class requirements
and classroom features.
Reports' version control.
Track all assignments changes.
3.0 Login to CPMS
Open you browser in IE or Netscape
Type “csc/cpms” in the address bar and press Enter.
Figure 3.1
Input your NetID and Password.
Click “LOGIN”
4.0 Main Menu
Figure 4.1
There are mainly four groups in this system, they are School Admin,
Room Administrator, Personnel Users and System Administrator.
Different user group can access their own modules and they list as
following:
Table 4.1
Modules
School
Room
Personnel
System
Admin
Admin
Users
Admin
Teaching Assignments & Class Information Management
Yes
Yes
Extra Program and StudyPlan Management
Yes
Yes
Printing & Version Control
Yes
Yes
Yes
Yes
Room Assignments Maintenance
Yes
Yes
Advanced Room Management
Yes
Yes
Users
Yes
Yes
Yes
Yes
Logout
Yes
Yes
Yes
Yes
* User can open the “Users” module to check for their user group.
5.0 Modules Summary
5.1 Teaching Assignments & Class Information Management
Update subjects information. For example, language, quota, class
group and software requirements, etc.
z Create classes for subject.
z Join class to other related class.
z Add teaching schedule and assignment to subject.
z Define supplementary information of teaching assignment. Such
as payment rate, required room type and teaching type, etc.
5.2 Extra Program and Study Plan Management
z
z
Add/Update extra program which is not in the standard study
plan.
Add/Update subjects within a program.
5.3 Printing & Version Control
On subjects changed their status to “Track”, every report keeps a
version no. and the report content can not be changed after the
version of report is closed. In this way, this module provides functions
to close version of report and print reports of different versions.
z
z
z
Close current printing version
Print Payment Proposal
Print Classroom Arrangement Report
5.4 Room Assignments Maintenance
It is used to assign venue to different class schedules. In general, DAP
will responsible to do this venue assignment, for better management
of special function venue, ESA and ESEFD will manage their own class
venue themselves.
5.5 Advanced Room Management & Report Tracking
This is a new and advanced function for assigning venues to different
class schedule according to some criteria automatically.
On the other hand, “Report Tracking” function is also implementation
in this module; user can track any changes of teaching assignments
after the status of a subject is set to “Track”.
5.6 Users Management
z
z
z
z
Set user name.
Check user group.
Enable/Disable to receive system mail.
Set Semester’s date
6.0 Teaching Assignments
6.1 Update subjects information
1)
2)
4)
3)
7)
5)
6)
8)
9)
Figure 6.1
1.
2.
3.
4.
Select Program.
Click to open subject.
Update subject information.
Save changes.
6.2 Class section for subject.
A class section is a container and identifier for identity a unique
subject class. It groups a collection of teaching schedules and it is
used to make the uniqueness of a class code.
z
z
z
Create a section for a class. (Ref. Fig 6.1-5)
Remove a section. (Ref. Fig 6.1-6)
Select a section to open its schedules. (Ref. Fig 6.1-7)
6.3 Insert Teaching Schedule
To insert a teaching schedule, you should select a subject and section
group, and then follow the instructions below:
1a)
1b)
1c)
2)
6)
3)
4)
5)
Figure 6.2
Steps
1) Input teacher by selection fields.
A. Select teacher’s group.
B. Select teacher’s name
C. Input teacher’s name when the teacher is not register in HR
system.
2) Select “Teaching Type”
3) Input “Payment Rate”
4) Select teaching date and time. (User should choose at least one
day of a week and time of the day, “Select Time” button allows user
to choose time interval every 30 mins and “Time-Q” allows user to
select time interval every 15 mins)
5) Select type of teaching venue.
6) Click Save button.
6.3.1 Q & A
1) How to input the irregular teaching schedule?
Answer: Refer to Figure 6.2-6-Extra Works Hours, user can input the
total working hour of the teaching instead of input the teaching
schedules. (As Day and Time are the mandatory fields in this module,
user should enter a random day and a “Fr:” date is advanced the “To:”
date by one day. E.g. Fr: 2005/01/15 To: 2005/01/14.)
2) How to input the fixed payment amount?
Answer: User can use the fields as Figure 6.2-3 “Payment Rate”, 6.2-6
“Total working hours” to fit the fixed payment amount. E.g. $30000 =
(1 hour, $30000/hr) or (10 hours, $3000/hr) or (100 hours, $300/hr)
etc.
6.4 Join class to other related class.
2)
1)
Figure 6.3
This function is to join two classes of students to study together; user
should create primary class schedules first then join the secondary
class to the primary class. After joining, system will create the links in
the secondary class which is pointing to the schedules of primary class.
In this way, change on the primary class will also change the data of
secondary class, besides that, user can not do change on secondary
class except deletion, but the delete operation on secondary class will
not make any effect on the primary class.
The following steps are to join a secondary class to a primary class:
1)
2)
3)
4)
Select Program and Subject
Refer to Figure 6.3-1, click on “Join Sch.”
Refer to Figure 6.3-2, enter the primary class code to be join.
Press OK.
A joined schedule will have a start * next to its section ID
Figure 6.4
7.0 Extra Program and Study Plan
Sometimes, school may delegate teacher to teach courses outside
MPI which is not defined in study plan. In this case, school admin have
to input the courses and the teaching assignments of the courses in
order to manage the human resource of their school. On the other
hand, PES also needs that information to calculate the total working
hours of teachers.
1)
3)
2)
4)
Figure 7.1
7.1 Add/Update new program
1)
2)
3)
4)
Click “Add” button to add a new program. (Ref. Figure 7.1-1)
Click on the new added program row to edit the program content.
Edit the program content (Ref. Figure 7.1-3)
Click “Update Program Content” button to save the changes.
7.2 Add/Update new subject
1)
2)
4)
3)
5)
Figure 7.2
1)
2)
3)
4)
5)
Click to select a program.
Click “Add” button and input a subject code for new subject.
Click to select the new subject.
Update subject content.
Click “Update Plan content” to save changes.
8 .0 Printing & Version Control
An advanced feature of this system allows users to print report by
version, whenever there is any changes on data, the content of report
of any versions will not be change.
1)
2)
3)
Figure 8.1
8.1 Steps to print a new version report
1)
2)
3)
4)
5)
6)
Confirm the related teaching assignments are marked “Track”.
Select a suitable school, semester and year. (Figure 8.1-1)
Click “Close Current Printing Version” button to close the version.
Select a report version. (Figure 8.1-2)
Input remark if necessary. (Figure 8.2-3)
Click the report button to print report.
(For more detail, please see next section, 8.2 Flow of Print Report)
8.2 Flow of Print Report
9.0 Room Assignments Maintenance
After finishing input the teaching assignments, user can assign a
suitable classroom for the class. Although this module is to do the
room assignment for classes, the most tasks should be done by
“Advanced Room Assignment Module” and this module should be a
supplementary for the exception case.
3)
1)
2)
Figure 9.1
Steps to assign a classroom to a teaching assignment
1) Select a subject. (Figure 9.1-1)
2) Click to open a schedule. (Figure 9.1-2)
3) Select a venue.
4) Click “Save” button to save changes.
10.0 Advanced Room Management
This module is to help user assign venue to select schedules according
to selected room type in teaching assignment automatically.
On the other hand, the function for enable/disable “Track” action also
implement in this module.
1)
3)
4)
2)
Figure 10.1
10.1 Track teaching assignments
1) Select school, semester and academic year.
2) Click “Trace assignments” button to start tracking.
3) Or Click “Release tracing of assignments” button to release the
tracking.
10.2 Automatic Room Assignment
1) Select school, semester and academic year.
2) Input a number of extra quota for each class when room
assignment. (Figure 10.1-3)
3) Check the checkbox if you want all schedules within the same
section using the same venue.
4) Click “Automatic Room Assignments” button to start assignment.
3) Or Click “Clear room assignments” button to cancel selected period
of assignment.
11.0 Users
This module allow user to edit their “Full Name” and some
personalized information. User can change their attribute and click
“Update” button, the information will be effective on next logon.
The following are the updatable attributes.
z Full Name
z GetMail – Enable/Disable to receive system mail.
z 1st Semester Start Date – default first semester start date.
z 1st Semester End Date – default first semester end date.
z 2nd Semester Start Date – default second semester start date.
z 2nd Semester End Date – default second semester end date.