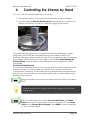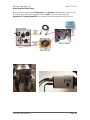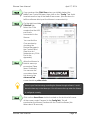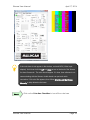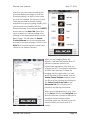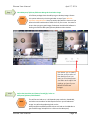
1
Xtreme Camera Revision Sheet [Version 1.0] Michael Burns Rock Mallin [Xtreme User Manual] This document will introduce you to the wonders of the MallinCam Xtreme Camera. It will include instructions on how to connect the Xtreme to your computer along with explanations of the camera’s various settings. Imaging techniques with the various hardware and software options will be covered. Both the standard Composite Video output and SVideo output will be discussed along with hints and suggestions on how to resolve any problems that you encounter with this camera. Enjoy the adventure with Rock Mallin’s professional Deep Sky Video camera, which will provide you with amazing images in near Real Time. Xtreme User Manual Page i Revision Sheet Revision History Version Date Revision Description 1.0 3/25/2014 Template Creation Xtreme User Manual Page ii Table of Contents Contents Revision History ................................................................................................................................... ii Table of Contents .......................................................................................................................... 0 1. Introduction.......................................................................................................... 4 The Contents of the Xtreme Package .................................................................................... 5 MallinCam Xtreme Deluxe: ................................................................................................................... 5 MallinCam X2 Deluxe: .......................................................................................................................... 5 MallinCam Xtreme/PC version: ............................................................................................................. 5 MallinCam X2/PC version: .................................................................................................................... 5 The Camera (Just the Facts) ................................................................................................... 6 The Camera (its Anatomy) ....................................................................................................... 7 2. Making Connections ............................................................................................................. 9 The Camera (Connection Diagram) ........................................................................................ 9 Connecting Xtreme to Monitor .............................................................................................................. 9 Composite .............................................................................................................................................. 9 SVideo ................................................................................................................................................. 10 Checking out the Xtreme for the First Time ........................................................................................ 12 3. Operating the Xtreme ......................................................................................... 14 Fixed: .................................................................................................................... 14 Extended: .............................................................................................................. 14 Hyper Mode:.......................................................................................................... 15 4. Controlling the Xtreme by Hand .......................................................................... 16 The Moon (Fixed Exposure) ................................................................................................................ 16 A Bright Star or Bright Deep Sky Object (Extended Exposure) .......................................................... 19 HYPER MODE (Deep Sky Objects) ................................................................................................... 21 5. Controlling the Xtreme by Computer................................................................................ 25 Connecting Xtreme to Computer .......................................................................................... 25 Controlling the Xtreme using Software ................................................................................. 26 Attaching the RS232 Cable .................................................................................................................. 27 Attaching the Video Cable ................................................................................................................... 28 Using MallinCam Control Xtreme Software ....................................................................................... 29 Checking out the Xtreme with the Xtreme Control Software .............................................................. 32 Using Miloslick Software .................................................................................................................... 35 Video Mode (the Moon and Daytime Objects) .................................................................................... 39 Sense Up Mode (Bright Stars and Dim Planets) .................................................................................. 40 Hyper Mode (Deep Sky Objects) ......................................................................................................... 41 Connecting to Night Skies Network (NSN) using Miloslick Software ................................................ 43 Xtreme User Manual 6. April 17, 2014 Appendix ........................................................................................................... 52 Appendix A – On Screen Display (OSD) Menu .................................................................. 52 MENU.................................................................................................................................................. 52 TITLE .................................................................................................................................................. 52 SENSE UP ........................................................................................................................................... 52 ALC/ELC ............................................................................................................................................. 53 ALC ..................................................................................................................................................... 53 ELC ...................................................................................................................................................... 53 BLC...................................................................................................................................................... 54 PEAK ................................................................................................................................................... 56 AGC ..................................................................................................................................................... 57 White Balance ...................................................................................................................................... 58 ATW .................................................................................................................................................... 58 AWC .................................................................................................................................................... 58 Manual (MANU) ................................................................................................................................. 59 SYNC ................................................................................................................................................... 60 OPTION ............................................................................................................................................... 61 MASK A, MASK B, MASK C, MASK D .......................................................................................... 61 POSI/NEGA......................................................................................................................................... 61 H-REV ................................................................................................................................................. 61 V-REV ................................................................................................................................................. 61 FREEZE ............................................................................................................................................... 61 PRIORITY ........................................................................................................................................... 62 GAMMA.............................................................................................................................................. 62 APC...................................................................................................................................................... 63 HIGH LIGHT ...................................................................................................................................... 64 COLOR BAR ....................................................................................................................................... 64 ZOOM .................................................................................................................................................. 65 MOTION DETECT ............................................................................................................................. 66 Appendix B – On Screen Display (OSD) MAP.................................................................... 68 Appendix C – Special Button Power Sequences................................................................ 71 Appendix D – Installing the MCV .......................................................................................... 72 Appendix E – Installing RS232 Communications ..................................................... 75 RS232 Communications ...................................................................................................................... 75 The USB to RS232 Adapter ................................................................................................................. 75 Installing the USB to RS232 Adapter (Windows 7/8 Specific) ........................................................... 76 Oh No, Driver did not install correctly. ............................................................................................... 77 RS232 Cable Points of Concern........................................................................................................... 78 Appendix F – Installing the Wireless Exposure Controller (WEC) ................................... 79 Appendix G – Accessories for the Xtreme........................................................................... 84 Appendix H- Focal Reduction ................................................................................................ 86 Appendix I – First Aid for the Xtreme ................................................................................... 93 The Image from the Xtreme is Blinking and Flashing Constantly ....................................................... 93 My Image has evenly spaced Horizontal lines ..................................................................................... 93 When I have Miloslick connect to my Mallincam through my MCV-1 adapter I only see a Blue screen. .................................................................................................................................................. 93 When I start Miloslick I receive the error “NilOjectexception “, and the program will run. ............... 94 Xtreme User Manual Page 1 Xtreme User Manual April 17, 2014 My MallinCam is frozen, or the commands do not seem to be working correctly, the camera is acting strangely. .............................................................................................................................................. 94 My stars look elongated. I have checked my focus and collimation and I know it is not an optical effect, since my hot pixels are also elongated. ..................................................................................... 95 I have been imaging for a while and now my images on the screen are looking washed out almost foggy like. ............................................................................................................................................ 95 Appendix J – Xtreme’s Settings Notes ................................................................................. 96 MallinCam – Hyper Mode – Daytime Viewing – Settings - TEC ....................................................... 96 MallinCam - Moon .............................................................................................................................. 96 MallinCam - Planetary Viewing .......................................................................................................... 96 MallinCam –Moon / Planets - Highlight feature .................................................................................. 96 MallinCam - Daytime Viewing – lunar settings .................................................................................. 97 MallinCam - Planets – Filters –B/W – Star Collimation...................................................................... 97 MallinCam - Comets - Settings ............................................................................................................ 97 MallinCam – W/B – MANual - Refractor – Color Balance – focus .................................................... 97 MallinCam - Planetary Nebula ............................................................................................................ 97 MallinCam – FOV - Calculation .......................................................................................................... 97 MallinCam - Planetary Nebula – Rock’s Daytime Picture - Gain ....................................................... 98 MallinCam – Hyper Color B/W images – MANual – red - blue ......................................................... 99 MallinCam - Lunar Occultation’s – AGC – Lunar Dark Shadow........................................................ 99 APC (Advanced Pixel Control) ......................................................................................................... 99 APC – Nebulas / bright Star ringing .................................................................................................... 99 APC – Imaging .................................................................................................................................... 99 APC – Live Observing - Imaging ........................................................................................................ 99 APC...................................................................................................................................................... 99 APC – stars - imaging ........................................................................................................................ 100 APC.................................................................................................................................................... 100 APC – Sun - Moon ............................................................................................................................. 100 APC – Menu – Star Artifacts ............................................................................................................. 100 APC - DSP (Digital Signal Processing) – Options – Anti-blooming ................................................. 100 APC – Live Observation - Imaging ................................................................................................... 100 APC – DSP – ring around stars .......................................................................................................... 101 AGC (Automatic Gain Control) ..................................................................................................... 101 AGC - Options ................................................................................................................................... 101 AGC – Planets ................................................................................................................................... 101 AGC – Amp Glow ............................................................................................................................. 101 AGC - Gain ........................................................................................................................................ 101 AGC – Gain Control .......................................................................................................................... 101 AGC – solar – deep sky - daytime ..................................................................................................... 101 AGC – Manual - Sense – Integration - Monitor................................................................................. 101 AGC – Manual – Amp Glow ............................................................................................................. 102 AGC – Integration - Image drop out .................................................................................................. 102 AGC – Light Gathering and Moon Interference ................................................................................ 102 AGC – ON/OFF - Deep Sky – Adjustments ...................................................................................... 102 ALC (Automatic Level Control)/ELC (Electronic Level Control) .............................................. 102 ALC ................................................................................................................................................... 102 ELC .................................................................................................................................................... 103 ELC – shutter speed ........................................................................................................................... 103 ALC – Planets – Shutter Speed - Filters ............................................................................................ 103 Color Bar .......................................................................................................................................... 103 Color Bar Generator ........................................................................................................................... 103 Color bar / Monitor ............................................................................................................................ 103 Color Bar - Camera ............................................................................................................................ 103 Color Bar............................................................................................................................................ 103 Zoom ................................................................................................................................................. 103 Zoom Laptop...................................................................................................................................... 103 Zoom – Barlow .................................................................................................................................. 104 Xtreme User Manual Page 2 Xtreme User Manual April 17, 2014 Gamma (The way brightness is distributed across the intensity spectrum by a monitor, printer or scanner.) ....................................................................................................................................... 104 Gamma – (back ground) .................................................................................................................... 104 Gamma – (back ground / image / TV) ............................................................................................... 104 Gamma –light pollution – background-imaging ................................................................................ 104 Gamma – Background – LCD - Option menu ................................................................................... 104 Gamma – LCD/CRT - AGC .............................................................................................................. 104 Integration – Sense ........................................................................................................................... 105 Sense – Integration – How it Works .................................................................................................. 105 Sense – shorter exposures .................................................................................................................. 105 Sense – Hyper mode .......................................................................................................................... 105 Sense – Hyper - CCD "imager like" camera ...................................................................................... 105 Sense – Hyper mode – AGC Adjustment .......................................................................................... 106 Integration - Reset - Safemode – Flashing Image – SafeGuards........................................................ 106 W/B (White Balance) ....................................................................................................................... 106 W/B (White Balance) – Manual – Red – F Ratio .............................................................................. 106 W/B .................................................................................................................................................... 107 W/B - AWC – Color Balance ............................................................................................................ 107 W/B – Deep Sky ................................................................................................................................ 107 W/B - AWC ....................................................................................................................................... 107 Imaging Settings ............................................................................................................................... 107 Imaging – Capture Device – ring around stars - APC ........................................................................ 107 Imaging – Deep Sky – (nothing see live) - Settings ........................................................................... 107 Imaging – BNC / S-VHS – High Resolution Monitor ....................................................................... 107 Imaging - Solar – Sun ........................................................................................................................ 108 Imaging - Monitor .............................................................................................................................. 108 Imaging - USB 2.0 Adapter – Color / B/W ........................................................................................ 108 Appendix K – Suggested Item Specific Settings .............................................................. 109 Appendix L – Notes ............................................................................................................... 113 Xtreme User Manual Page 3 Xtreme User Manual April 17, 2014 1. Introduction Welcome to the world of the MallinCam Xtreme, a hand-crafted Colour Astronomical Video CCD Cameras with a fourth generation hyper-circuit, allowing a choice of a variable shutter with extended exposures from three seconds to a hundred minutes - all with automatic refresh. Your purchase will provide you with years of discovery and adventure as you view, record, share, and broadcast the wonders of the Night Sky. The Xtreme captures images that range from Deep Sky Objects to local Solar System favorites, and it does this in near Real Time. You will discover that this camera can be used in urban skies where light pollution normally prevents you from viewing images the sky, to rural locations where you can pull out even those faintest celestial wonders; this camera can do it all. To provide the broadest possible applications, the Xtreme has two video output ports (Composite Video and S-Video) both of which can simultaneously display images. The Xtreme comes in a variety of models, to satisfy the all users, from those who like minimal attachments, to others who want complete computer control and capture capabilities all from the comfort of home. The Xtreme also has a variety of attachments and enhancement accessories available, which will allow your system to grow with your future needs and adventures. This manual is in the way the work of the MallinCam Xtreme users before me. I have borrowed their ideas and even some of their documents and have placed them in the manual so that we have everything is in one place. One of the first chapters you should read in this manual is actually the First Aid for the Xtreme in Appendix G. This will let you know what you may encounter when you have the wrong setting selected on the Xtreme, especially when using the Xtreme for the first time. Special thanks to Jack Huerkamp, Chris Appleton and Rock Mallin who expertise and experience are way beyond my capabilities. So thank you for your purchase, and let the adventure begin Xtreme User Manual Page 4 Xtreme User Manual April 17, 2014 The Contents of the Xtreme Package Depending upon the Xtreme Model purchased, the contents may vary, but all Xtreme cameras include the following standard equipment: MALLINCAM XTREME COLOR Camera (with Class 1 video CCD sensor). Regulated Power Supply 120 volts to 12 Volts D/C Adapter (PAL export version comes with 220 Volts to 12 Volts D/C Adapter). 25' (8 Meters) High Grade Dual Shielded Power/Composite Video Cable Combination. High Precision 1.25" Eyepiece Adapter / Heat Transfer Unit Custom Made for the MallinCam. BNC Male to RCA Female Adapter. MallinCam Xtreme Deluxe: Comes with all of the standard equipment, plus: 25' RS 232 PC CABLE. Side socket is wired for Wireless Exposure Controller Rear Yellow LED Peltier status indicator MallinCam X2 Deluxe: Comes with all of the standard equipment, plus: 25' RS 232 PC CABLE. HDX2-F Kit Side socket is wired for Wireless Exposure Controller Rear Yellow LED Peltier status indicator MallinCam Xtreme/PC version: Comes with all of the standard equipment, plus: 25' RS 232 PC CABLE. MallinCam X2/PC version: Comes with all of the standard equipment, plus: 25' RS 232 PC CABLE. HDX2-F Kit These accessories will provide you with the ability to connect the Xtreme Video camera to your telescope, power it using to a 120V AC power source, and displaying your image on any device that accepts analog video via a composite RCA or S-Video connection. See the Appendix G for a list of accessories available for the Xtreme. Xtreme User Manual Page 5 Xtreme User Manual April 17, 2014 The Camera (Just the Facts) The MallinCam Xtreme Camera is the ultimate video camera that provides near Real Time images of Deep Sky Objects, Planetary, Lunar, and Solar. This scientific instrument contains the following specifications: Model Xtreme/EX Image Sensor ICX418AKL class 1 (Class 0 available) ceramic XtremeEX ICX428AKL ceramic CCD Pixels: 768(H) by 494(V) 8.4 um x 9.8 um Pixel size 4.8 mm x 6.5 mm Chip Dimensions CCD Size: 1/2“ Video Output Format: There is both a PAL and NTSC version available Composite Video BNC Female Connector S-VHS Out S-Video Female Connector Gain Control: Auto/Manual Exposure Control: Auto/Manual Auto Iris: AES (Rolling Shutter), ALC 1/100, 1/120, 1/180, 1/250, 1/350, 1/500, 1/750, 1/1000, 1/1500, 1/2000, 1/3000, 1/4000, 1/6000, 1/8000, and 1/12000 Fix Shutter (seconds) Extended Shutter (seconds) 2X, 4X, 6X, 8X, 12X, 16X, 24X, 32X, 48X, 64X, 96X, and 128X or 1/32th of a second to 2.1 seconds Hyper Mode 3.3 seconds to 100 minutes Gamma Selection 0.45/1.0 White Balance -Automatic White Balance Control (AWC) -Auto Trace White Balance Control (ATW) -Manual White Balance Control with presets Digital Zoom 2x in 16 increments Communication RS232 Protocol Operating -30oC to 50oC ( -4oF to 122oF) Temperature Power Supply 12±1V DC at 1A Xtreme User Manual Page 6 Xtreme User Manual April 17, 2014 The Camera (its Anatomy) The Xtreme camera is 4.5” x 2” x 2” and weighs in at about 11.50 ounces (326 grams). Xtreme User Manual Page 7 Xtreme User Manual April 17, 2014 The Extreme Camera also comes with comes with a 120 Volt AC Power Supply, 1.25" Eyepiece Adapter, 25 foot Power / Video (analog) Combination Cable, and a BNC to RCA adapter plug. Xtreme User Manual Page 8 Xtreme User Manual April 17, 2014 2. Making Connections The Camera (Connection Diagram) 1 2 3 4 5 6 7 8 9 10 11 Video Out (BNC) 12V Power in (12V) Red Power on LED SVideo in (S-VHS) Auto iris select switch Computer/Wired adapter plug Enter Key Up Arrow Down Arrow Left Arrow Right Arrow Connecting Xtreme to Monitor The MallinCam Xtreme provides two Video Out Ports that allow the video signal to be distributed to Video monitors. One Video Out Port provides standard Composite video out by the BNC connector on the back of the Xtreme (1 on the above Connection Diagram), while the other Video Out Port provides a SVideo signal. Both Ports provide a simultaneous video signal output. Composite The Composite Signal is obtained by connecting the included MallinCam Video Cable from the back of the Xtreme to the Composite Video-In Port on your monitor (since in most monitors, the Composite Video-In connector is a RCA style, MallinCam provides a BNC to RCA adapter to facilitated that connection). To connect, just align the two little openings on the BNC cable (male) with the two notches on the Xtreme’s BNC (female) connector, push and twist so the notches slide into place. This locks the cable to the Xtreme. Once connected, and with the Xtreme attached to your Telescope and the Telescope opening covered (you may not have yet have the opportunity to Xtreme User Manual Page 9 Xtreme User Manual April 17, 2014 adjust the settings on the Xtreme, so it safer to block any light from entering the camera) so that the camera is seeing a dark image, power up the Xtreme (plug in the power adapter), and power up the Monitor (don’t forget to have the monitor use the composite port). Now Jump to the section after SVideo, Checking out the Xtreme, to see how to activate the Xtreme. SVideo The SVideo signal is obtained by connecting an optional SVideo cable (malemale) from the back of the Xtreme (S-VHS, ④ on the Connection Diagram) to the SVideo-In Port on your monitor. Always use a professional quality shielded SVideo cable. Preferably a cable that is both grounded and has baluns on both ends. Be careful when you are attaching a SVideo cable as you can damage and even break off pins if you try to force the connection. The images below show both the Xtreme SVideo Port and a SVideo cable end. Notice that the Port has a rectangular hole as well as a small notch cut out. The cable also has a plastic rectangular peg (which is on the opposite side of that flat external part of the cable). Xtreme User Manual Page 10 Xtreme User Manual April 17, 2014 Orient the cable so that the rectangular peg will slide into the rectangular hole. You should have the flat part of the cable facing the outside of the Xtreme if the orientation is correct. Push the SVideo cable into the connector on the Xtreme. The fit will be snug so a little pressure is required. Once connected, with the Xtreme attached to your Telescope and the Telescope opening covered (you may not have yet have the opportunity to adjust the settings on the Xtreme, so it safer to block any light from entering the camera) so that the camera is seeing a dark image, power up the Xtreme (plug in the power adapter), and power up the Monitor (don’t forget to have the monitor use the SVideo in Port). Both cable types have their benefits, but most aficionados prefer the capabilities of the Svideo cable for the final image (even though most won’t see a difference). If you are going the SVideo route then about 50ft is the maximum distance without boosting the signal with a SVideo booster. Also be careful about crossing a SVideo cable with unshielded power cable as interference is possible If you observe Horizontal banding (lines) rolling on your image, most likely culprit you are getting interference inside your SVideo Cable. For those of you who want to display the analog signal from the Xtreme on a HDMI monitor, Mallincam provides an analog to HDMI upscaler. This device Up-Scales Composite Video, S-Video, and HDMI to 720p/1080p (selectable) HDMI. Motion Compensated 3D Wavelet Video Coding Technology is applied to make the converted picture rich in color and more vivid. Input video systems - NTSC and PAL is automatically detected and adjusted and it provides a built-in Time Base Correction (T.B.C) for signal synchronization. Xtreme User Manual Page 11 Xtreme User Manual April 17, 2014 Checking out the Xtreme for the First Time Now is the time to do a quick check of the Xtreme to see if you can obtain a video signal. This walk through assumes you have a monitor with either a SVideo or Composite input capabilities (or a Laptop with a Video Capture Device) Hold down the Centre Button (⑦ on the Connection Diagram) on the Back of the Xtreme for about 2 seconds. If everything is connected and powered correctly, you should see the following image with TITLE flashing. The actual values of the options may be different, but the <MENU> should now be displayed on your Monitor. Next we need to check the colour signal coming from the Composite Port (SVideo), so using the Down Button (⑨ on Connection Diagram), move the little Arrow until it points to OPTION. Press the Centre Button (⑦), and you should see the <<OPTION>> menu. Now, using the Down Button (⑨) move the select the last entry Return, and press the Right Arrow Button (⑪), and the Return will change to NEXT Xtreme User Manual Page 12 Xtreme User Manual April 17, 2014 Press the Centre Button (⑦) and the Xtreme will display the <<OPTION2>> screen. Now using the Back Arrow Buttons, move to the COLOR BAR option (which should say OFF), and activate it by pressing the RIGHT Button (⑪). Now adjust the colour on you Monitor to sharpen the image and thus providing a set of distinguished colours. Once you are comfortable with the colours, you can again navigate to the COLOR BAR Option (which now says ON), and activate the option with the RIGHT Button (⑪), which toggles off the Color Bar. Now using the DOWN Button (⑨), move to RETURN. Press the CENTRE Button (⑦) to return to the << OPTION>> menu. Press the CENTRE Button (⑦) to return to the <MENU> screen. Use the DOWN Button (⑨) to move to EXIT. Press the CENTRE Button (⑦) to turn off the menu display. Xtreme User Manual Page 13 Xtreme User Manual 3. Operating the Xtreme April 17, 2014 The MallinCam Xtreme is a scientific grade instrument whose capabilities are in the hands of the user. As you will discover, when you become more confident with the camera, that your images will the result of the combination both artistic prowess and scientific skill. Both of these components will become enhanced as your journey progresses and suggestions and advice from fellow explorers sharpen your skills and enrich your adventure. One of the first pieces of advice we can offer you is that every telescope system is different, the variety of optical sizes, and attached accessories combined with the ever changing seeing conditions makes it impossible to determine the precise setting for the Xtreme to use with your telescope setup. What we can do is provide suggestions that will get you started in the right direction. We recommend that you experiment and tweak the settings that we offer to see what works best for you. Patience will be your best friend as you learn what the Xtreme can do, and what you can adjust. Do not be afraid to visit Night Skies Network or the Mallincam Group on Yahoo and ask questions The Xtreme provides three modes of exposure control: fixed, extended, and Hyper. Fixed: This mode allows you to set short exposure time from 1/100 of a second to 1/12000 of a second. These settings can be directly controlled by the Xtreme itself and no extra hardware is required. This mode allows the Xtreme to image daytime objects such as the Sun, as well as bright nighttime objects such as the Moon and some planets. 1/100, 1/120, 1/180, 1/250, 1/350, 1/500, 1/750, 1/1000, 1/1500, 1/2000, 1/3000, 1/4000, 1/6000, 1/8000, and 1/12000 seconds Extended: This mode allows you to do longer exposures from 1/30 to 2.1 seconds in fixed steps. Like the Fixed mode, these exposure settings can be selected from within the Xtreme itself so no extra hardware is required. This mode allows you to image those fainter planets, along with bright stars. 1/30, 1/15, 1/10, 2/15, 1/5, 4/15, 2/5, 8/15, 4,5, 1.1, 1.6, 2.1 seconds Xtreme User Manual Page 14 Xtreme User Manual April 17, 2014 Hyper Mode: This mode allows you perform long exposures anywhere from 3 seconds to about 99 minutes. Unlike the Fixed or the Extended Mode, the Xtreme needs to be controlled by an external devise to trigger and control this mode. If you are using the Xtreme manually, you will need the optional Wireless Exposure Controller. This devise attaches to the side of the Xtreme and allows you to set and control the Hyper Mode. Alternatively, you can set and control the Xtreme in Hyper Mode by using a computer attached to the camera via the RS232 Port. There many software packages available that provide all the control options, some are free while others are fee based (See section Controlling the Xtreme using Software). One of the great features of the MallinCam Xtreme is its ability to be used in the field without the need to attach it to a computer. This reduces the number of cables and the power requirements that using a computer needs. Yet, as technology gets smaller and more efficient, the ability to use the computer is already built into the Xtreme and some of the Xtreme users the computer provides them with the tools they need. Whatever your preference (computer or manual), the Xtreme can handle both. See the Optional Accessories in Appendix G for some devices that will make both scenarios more effective. Xtreme User Manual Page 15 Xtreme User Manual 4. April 17, 2014 Controlling the Xtreme by Hand You can control the Xtreme manually in two ways: 1) Pushing the buttons on the back of the Xtreme by using your fingers. 2) Using the optional Remote Wired Keypad which allows you to press those buttons, but without actually touching (thus jiggling) the Xtreme. These instructions will guide you in using the Xtreme and obtaining an image using each of the 3 modes. Remember that you may need to adjust your particular settings to obtain the best image. Once you get the hang of changing the settings, it will be worth your time to peruse the Chapter Understanding the Xtreme Settings to get a deeper comprehension how the adjustments affect your image. The Moon (Fixed Exposure) You have the telescope set-up (with it covered) and the Xtreme attached to the eyepiece holder, the video cables are attached to a monitor, and power is connected to everything. You are feeling a bit of apprehension and excitement after all you have invested in an amazing scientific tool. So take a deep breath, and let’s have some fun. Step 1 Using your finder scope, point your telescope at the Moon (it’s hard to miss). The Moon is always the best object to look at when learning how to use a new imaging device. Step 2 With your Telescope still covered, Press and Hold Down the Centre Button on the back of the Xtreme for about 2 seconds (or the Centre Button on the Remote Wired Keypad). The <MENU> screen will appear on your monitors screen. Xtreme User Manual Page 16 Xtreme User Manual April 17, 2014 The Moon is a very bright object, so we need to prepare the Xtreme for that scenario before we remove the cover from your telescope. The recommend setting for the Moon are: TITLE: (leave black) SENSE UP: OFF (this allows you to set the FIX exposure rate ELC/ALC: ALC ALC: 1/12000 (as a starting point) AGC: OFF (the Moon is bright enough without trying to brighten it more) W/B: ATW or MANU (you will play with this later) SYNC: INT (Always leave at INT) OPTION: SET GAMMA at 0.45 (Staring Point) MOTION DET: ON (This is the lowest cooling rate) High Level at 60 sec So, let’s adjust the Xtreme to match those settings. Xtreme User Manual Page 17 Xtreme User Manual Step 3 April 17, 2014 It won’t take long for you to become familiar in how to move around the menu settings in the Xtreme using the back buttons, so literally I will step you through it to match the above settings. TITLE will be flashing Press DOWN Button (moves to SENSE UP) Press RIGHT Button (to ensure SENSE UP settings are OFF) Press DOWN Button (moves to ALC/ELC) Press RIGHT Button (to toggle to to ALC) Press CENTRE Button (to enter <ALC> Menu Press RIGHT Button (to set to 12000) Press DOWN Button (to move to the RETURN) Press CENTRE Button (to return to <MENU>) Press DOWN Button (to get to AGC) Press RIGHT Button (to set to OFF) Press DOWN Button (to get to OPTION) Press CENTRE Button (to enter <<OPTION>> menu) Press DOWN Button (to get to GAMMA) Press RIGHT Button (to set to 0.45) Press DOWN Button (to get to RETURN) Press CENTRE Button (to return to <MENU>) Press DOWN Button (to get to MOTION DET) Press RIGHT Button (to set to ON) Press CENTRE Button (to enter <MOTION DETECT > Menu Use DOWN and RIGHT Buttons to Match image in previous page Press DOWN to get to Return Press CENTRE Button to return to <MENU> Press Down Button (to get to Exit) Press Centre Button to turn off the Menu Display Step 4 We have set the Xtreme to have an exposure of 1/12000 sec, and are ready to look at the image of the moon. So remove the cover form the telescope. Step 5 You should be able to see something (it may be out of focus, or it may be too dim). First Play with the focus to make the image as sharp as you can. Step 6 If the image is too dim, the go back to the ACL and increase the exposure from 1/12000 to a value where the image of the Moon is bright enough. Step 7 Now is the time to change GAMMA from 0.45 to 1.00 to see if what works best for your monitor (see Step 2 on how to activate the On Screen Display). Don’t forget your monitor also has adjustments, so you may need to play with them as well. Xtreme User Manual Page 18 Xtreme User Manual April 17, 2014 I would read about White Balance (W/B) in the Appendix so that later on you can play with those settings. Again use the contrast capabilities of your monitor to help bring out all of the lunar details. Have fun observing. If you set ALC to OFF, then the exposure rate is 1/60 th of a second. When have finished observing the Moon, all you need to do is power off the Xtreme. There is no special instructions for shutting down when using the Fixed Shutter Mode. A Bright Star or Bright Deep Sky Object (Extended Exposure) Now that you have success with imaging the Moon or bright planets, now is the time to jump to the next level, Bright stars or Bright Deep Sky Objects. You have the telescope set-up (with it covered) and the Xtreme attached to the eyepiece holder, the video cables are attached to your monitor, and power is connected to everything. You are feeling a bit more confident with the equipment and using the buttons to selection the setting options on the Xtreme. Time for some more fun. You will be using SENSE UP in this Mode. The Xtreme will actually build up the image with the settings you have made. You can watch the image brighten as the camera gets to your setting. At X128 this process can take up to 3 minutes as it needs to run through the previous multiplier settings until reaching X128. SENSE UP has some smarts, it won’t brighten the image and overload the sensors. That is, you may find that having SENSE UP set at x96 or set to X6 that the image is the same brightness. This is because X6 is the brightest that this object should go before overloading the Xtreme. Step 1 Using your finder scope, point your telescope at the Bright star (or Bright Deep Sky Object). Xtreme User Manual Page 19 Xtreme User Manual April 17, 2014 At this stage we are imaging objects that we can see in the finder scope, therefore we know it should be in the main telescope’s field of view. Of cause it depends on how accurately the finder and the telescope are aligned, so sometimes you may need to do some hunting. Step 2 With your Telescope still covered, Press and Hold Down the Centre Button on the back of the Xtreme for about 2 seconds (or the Centre Button on the Remote Wired Keypad). The <MENU> screen will appear on your monitors screen with TITLE flashing. Before uncovering the telescope, we just want to make sure that the Xtreme is not in Hyper Mode, but rather has SENSE UP set as OFF. Go into the ALC menu (see STEP 3 in Fixed Exposure Section) and ensure that SHUTTER is also OFF and that the LEVEL bar is all the way to the right then return to the <MENU> Step 3 Remove the cover form the telescope. Don’t worry if you don’t see anything in your monitor, the Xtreme is still most likely in FIX SHUUTER Mode and the star may be too dim to see. Step 4 Using the DOWN Button, select SENSE UP Xtreme User Manual Page 20 Xtreme User Manual April 17, 2014 Step 5 Now press the RIGHT Button and SENSE UP will change to X2 (you have just doubled the exposure to 1/30th of a second, did you see it slowly brighten). Step 6 Do you see your star? If not, press the RIGHT Button again and SENSE UP will now say X4 (or 4 times the exposure, 1/15th of a second). Keep increasing the EXTENDED EXPOSURE until the object is bright enough to see. Recall: X2=1/30, X4=1/15, X6=1/10, X8=2/15, X12=1/5, X16=4/15, X24=2/5, X32=8/15, X48=4/5, X64=1.1, X96=1.6, and X128=2.1 seconds Don’t forget to adjust the image on the Monitor that you are using to improve the gain and brightness. Most users find that setting the Xtreme to X128 is a great setting to work on using a focus mask to assist in focusing their telescope. Now is the time to also play with the AGC level on the Xtreme, this will give you the ability to increase or decrease the brightness of the image (including noise). Remember as AGC is changed, the XTREME will need to refresh the SENSE UP and that can take up to 3 minutes (depending upon the Sense Up X factor). HYPER MODE (Deep Sky Objects) You have pushed the Xtreme to 2.1 seconds, but now you need to take the plunge and do exposures way into the minutes. The Xtreme is ready for you. To make this happen, you will need the MallinCam Wireless Exposure Controller or a computer and computer software. In this Section, I will discuss how to activate this mode using the MallinCam WEC device, you can jump to the Controlling the Xtreme by Computer Section to see how to activate this mode using software. Xtreme User Manual Page 21 Xtreme User Manual April 17, 2014 The Wireless Exposure Controller consists of two elements: a Receiver which attaches to the Xtreme, and a Transmitter thru which you send the exposure duration to the receiver. See Installing the Wireless Exposure Controller (WEC) in the Appendix F for detailed instructions on how to attached and use this device. You have the telescope set-up (with it covered) and the Xtreme attached to the eyepiece holder, the video cables are attached to your monitor, and power is connected to everything. The Wireless Exposure Controller is attached and channels are set. You have the telescope pointing to some Deep Sky Object and are ready to explore what the Xtreme can do. You will be using SENSE UP in this Mode. The Xtreme will actually build up the image with the settings you have made. You can watch the image brighten as the camera gets to your setting. At X128 this process can take up to 3 minutes as it needs to run through the previous multiplier settings until reaching X128. Step 1 Using your finder scope, point your telescope at the Bright star (or Bright Deep Sky Object). At this stage we are imaging objects that we may not be able to see in the finder scope. So sometimes you may need to do some hunting to get the object in the image window. Step 2 With your Telescope still covered, Press and Hold Down the Centre Button on the back of the Xtreme for about 2 seconds (or the Centre Button on the Remote Wired Keypad). The <MENU> screen will appear on your monitors screen with TITLE flashing. Xtreme User Manual Page 22 Xtreme User Manual April 17, 2014 Go into the ALC menu and ensure that SHUTTER is also OFF and that the LEVEL bar is all the way to the right. Go into the AGC menu and manually see if it set to 3 or 4. (I would keep AGC at this setting when using Hyper Mode initially, remember when you change the value AGC it will take the Xtreme about 3 minutes to reinitialize everything. Step 3 Remove the cover form the telescope. Don’t worry if you don’t see anything in your monitor, the object is most likely not bright enough to be visible. Step 4 Using the DOWN Button, select SENSE UP. Step 5 Using the RIGHT Button, set SENSE UP to X128 (watch the image slowly build up, if it is bright enough) The Xtreme is now at about 2.1 seconds. There may be just a hint of the object you are trying to image. If so this is a good time to make sure it is centred. Step 6 Press the POWER button on the WEC Receiver for 3 to 4 seconds to turn it ON. Step 7 Press any button on the WEC Transmitter to turn it ON, check to make sure that both the Transmitter and Receiver have the same Channel number. Xtreme User Manual Page 23 Xtreme User Manual April 17, 2014 Step 8 Press the Left or Right arrow on the Transmitter to get LONG displaying in its window. Step 9 Press the Centre button on Transmitter and the last two digits will start to flash. Step 10 Press the Up arrow on Transmitter to select TIME (try 30 seconds). Step 11 Press the Centre button on Transmitter to lock that exposure time. Step 12 Press the Upper Right Button to start the exposure on the Xtreme (Pressing that button again will stop the exposures) Receiver’s RED LED will remain solid. The Receiver’s GREEN LED will light up during Image transfer. Step 13 At the end of the Observing session, stop any exposures you may be taking. Then turn OFF the Receiver by pressing its POWER Button for about 4 seconds. The Transmitter turns OFF automatically after about 1 minute. The following are warnings about changing Xtreme settings during when exposing. Do Not adjust AGC during an exposure Xtreme User Manual Page 24 Xtreme User Manual 5. April 17, 2014 Controlling the Xtreme by Computer Connecting Xtreme to Computer Requirements: Computer with video display software such as AMCAP, Miloslick USB Video capture adapter such as MallinCam MCV Mallincam dual power/video cable or optional S-Video cable Xtreme AC to DC power adapter Xtreme camera Procedure: 1. Power on your computer, but do not power the Xtreme 2. Connect Xtreme Camera to Telescope and connect either the Composite Video cable (BNC end) to the Video Out jack on the back of the MallinCam or the S-Video cable to the S-Video port on the back of the MallinCam. Keep lens cap on Telescope. 3. Connect the USB Video Adapter to computer (see Installing MCV in the Appendix D for instructions on how to install the MallinCam MCV Video adapter). 4. Connect other end of Video cable (RCA) to the Video Capture Device (MCV) (or connect the S-Video cable to the Video Capture Device (MCV). 5. Power the Xtreme (plug in the AC to DC adapter and connect to the Xtreme). 6. Start the video display software (AMCAP), Miloslick. 7. Choose the Video Source for the software (USB 2828x Device for the MCV). 8. If necessary select Crossbar from AMCAP to choose the RCA connection on MCV rather than the S-video. 9. Hold down the Centre button on the back of the Xtreme for about 2 seconds (release when you see OSD menu on your Video Display Software) See Making Connections in Chapter 2 for instructions on how to check out the camera Xtreme User Manual Page 25 Xtreme User Manual April 17, 2014 Controlling the Xtreme using Software As of this writing, there are a few Software packages that can control the Xtreme camera some even with the ability to display and capture images from the Camera itself. the The current software packages are: Free: MallinCam Control Xtreme by Stephan Lalonde MallinCam Control by Andy Galasso at agdsoftware.com Xtreme Control by Tom Viek Paid: Miloslick by Bill Koperwhats Astrolive by Kyle Goodwin at Astro Precision Each software has its pros and cons, depending upon what you require the software do. This manual will introduce you to two packages (one free and one paid). The goal is to guide you in getting these pieces of software up and running. More detailed instructions will be found in the appropriate vendor’s site. Hardware Requirements Both of these packages will require two hardware components: A USB to RS232 adapter that attaches to MallinCam’s Optional RS232 cable. This combination allows software to communicate from the computer to the Xtreme. Xtreme User Manual Page 26 Xtreme User Manual April 17, 2014 A USB video capture device, such as MallinCam’s MCV. This device will allow the output from the Xtreme (either composite or SVideo) to be captured and displayed by the software. Attaching the RS232 Cable Once the USB adapter is installed and the drivers loaded (see Appendix E, Installing RS232 Communications) and the MallinCam RS232 cable is attached, it is time to connect it to the Xtreme. Locate the small guide notch on both the cable and the AUX Port on the Xtreme (will be on left when looking at the back of the camera). Align the notches and plug in the RS232 cable. The flat end will also be pointing towards the left. The fit will be snug so a little pressure will be required to properly seat the cable into the Xtreme. You will notice that will all of the cables connected, the back of the Xtreme gets a little busy. Xtreme User Manual Page 27 Xtreme User Manual April 17, 2014 Attaching the Video Cable Now you attach either the Composite or the SVideo cable from the back of the Xtreme to the USB Video Capture Device (MCV) that you are using (see Appendix D, Installing the MCV) to capture the video signal from the Xtreme. Xtreme User Manual Page 28 Xtreme User Manual April 17, 2014 Using MallinCam Control Xtreme Software This assumes you have connected the Xtreme to your Serial or USB to Serial port on your computer and are ready to control the Xtreme from the computer rather than the buttons on the back of the Xtreme. Step 1 Double Click on the MallinCam Software Icon from your computer screen. If this is the first time using the Mallincam Xtreme Control Software, you may receive the above error message. Do not worry. This is telling you that the Xtreme software expects the camera to be connected to Com1 on the computer. This may not be the case. You will have the opportunity in the software to indicate what port the Xtreme is actually connected to. Step 2 Click on the <OK> button to continue. The MallinCam Xtreme Control Basic Screen will open. Xtreme User Manual Page 29 Xtreme User Manual April 17, 2014 Step 2 If you received the COM1 Error when you initially started the MallinCam Control Software, then click on the “Config” Tab that is located near the top of the MallinCam screen. (We are about to tell the software which port the Xtreme is connected to). Step 3 On the right hand side, you will see a pull down menu beside the COM Port title. Select the COM number that the USB port that is connected to the Xtreme. You can find the Com number by checking the Device Manager in the Control Panel (See How do I determine my COM Port in the Appendix) Step 4 Allow the Xtreme to finish its warm-up procedure (Takes about 3 minutes). You can see the countdown timer tick down in the Advanced Tab screen beside a yellow circle. If this is your first time using controlling the Xtreme through software, I would leave the lens cap on the telescope. You will remove the cap when the Xtreme is configured correctly. Step 5 Click on the <Read From> button located on the bottom left corner of the screen under Camera (in the Config Tab). This will synchronize the Xtreme Camera with the Control software (this takes about 30 seconds). Xtreme User Manual Page 30 Xtreme User Manual First Time Using April 17, 2014 If this is your first time using Xtreme Control Software, you will want to configure the video capture device and file saving locations. Select the “Video Tab” at the top of the screen. Under Video Capture title, click on <Path> button to set the location to save captured video files. Click on either AVI or MPG button to choose saved video format. Under the Frame Capture title, click on <Path> button to set the location to save snapshot files. Click on BMP, JPG, or Tiff box to select what format to save your snapshot. Select the “Config Tab” at the top of the screen. Under the Save Software Configuration title, click on the <Save> button to save these selections Xtreme User Manual Page 31 Xtreme User Manual April 17, 2014 Checking out the Xtreme with the Xtreme Control Software Step 6 To let the Xtreme Control Software know what capture devices you are using with the Xtreme, select the <Device> Button in the Video Tab. When the Devices window pops-up select the Video Capture Device you are using (USB 2828x Device for the MCV) on your system and click OK to accept. Step 7 Now click in the Preview CheckBox and a window displaying what the Xtreme is imaging will open up (if telescope is covered your may be seeing a black image). Step 8 Select the Advanced Tab at the top of the screen and when there, click on the Color Bars CheckBox (top row, near middle). If the computer and software are communicating correctly with the Xtreme, you should see the color test bar pattern on your screen. Xtreme User Manual Page 32 Xtreme User Manual April 17, 2014 If the color bars do not appear in the window, re-check MCV (Video input adapter). Hold down both the UP and Down arrow on the back of the Xtreme for about 2 seconds. The color should appear. If it does, then software is not communicating with the Xtreme, double check com port and cable connection. If No color Bar appears, then follow Checking out the Xtreme Manually to help determine the issue Step 9 Click on the Color Bars CheckBox to turn off the color bars Xtreme User Manual Page 33 Xtreme User Manual April 17, 2014 Now that you are communicating with and can display an image of what the Xtreme is seeing. It is time to have some fun with the camera. The Xtreme Control Software provides automatic setting adjustments to get you going quickly (until you become more familiar with the Xtreme features). These automatic PRESETS are located in the Basic Tab. Select the type of object you will be looking at by clicking on the appropriate button in the Basic screen. This will load the Xtreme Control Software with the recommended pre-sets for this type of object. Click on the Write To on the bottom left to send these values to the Xtreme Camera. When you are imaging Deep Sky objects, it will take the Xtreme about 3 minutes to prepare itself for this Hypermode experience (any time you change the AGC, the Xtreme will require another three minutes). If Deep Sky Imaging was the nights plan, you can abort the initial 3 minute delay that the Xtreme Control Software imposes when you first start the software by clicking on the Yellow Count Down Timer in the Advanced Tab, This will save you 3 minutes in the startup procedure. When your imaging session is over, click on the Park button in the Config Tab and allow the Xtreme a couple of minutes to complete this procedure before powering down the camera (a pop-up window will let you know when it is ready). Xtreme User Manual Page 34 Xtreme User Manual April 17, 2014 Using Miloslick Software I will assume that you have installed the software, but this is the first time using Miloslick. For more detailed instruction in using this powerful piece of software, please read the Manual that came with its download. Step 1 Double click on the MallinCam Control icon on your desktop. The Step 1 of 6 Splash screen will appear. Click on Next to continue. Step 2 The Step 2 of 6 Window will appear. Select your Type of Camera, Type of Chip, and Video Format and Click Next to Continue. Xtreme User Manual Page 35 Xtreme User Manual April 17, 2014 Step 3 The Step 3 of 6 Window will appear. Select the Serial Port that your USB to Serial adapter is using and Click Next to Continue. Step 4 The Step 4 of 6 Window will appear. Select the Video Device you are using (USB 2828x Device for the MCV) and Click Next to Continue. Xtreme User Manual Page 36 Xtreme User Manual April 17, 2014 Step 5 The Step 5 of 6 Window will appear. Select the Video Input (Composite or SVideo) that you are using with your Xtreme and Click Next to Continue. Step 6 The Final Flash screen will appear informing you that you are ready to use Miloslick. Click Finish to continue. The Miloslick Main Screen will appear. It is from here that you will control the Xtreme camera. There are usually three type of observing you will do with your Xtreme: Video Mode: for daytime imaging of bright planets, Lunar or Solar. SenseUp Mode: for Planets, Bright Stars, Collimating and Focusing Hyper Mode: for Deep Sky Objects Xtreme User Manual Page 37 Xtreme User Manual April 17, 2014 After Miloslick gets going, you should see the name of the MallinCam Camera you have previously told Miloslick that you are using. (in the above image you can see Miloslick is currently getting camera settings). Miloslick will read the current setting from your camera so that they are both in agreement. Your image window may be a black screen (if you have your lens cap on your telescope). It is always a good idea to see if all the connections are working properly between Miloslick and the MallinCam. So, In the Camera Setting Tab scroll down to the Camera Output heading and click in the Color Bars CheckBox. If everything is working correctly, you will see Color Bars in the Video Window. If you successfully obtained the Color Bars, un-check the Color Bar Feature, for you are ready to Image. Xtreme User Manual Page 38 Xtreme User Manual April 17, 2014 Video Mode (the Moon and Daytime Objects) Step 1 Set the Exposure to Video Mode and select the time to something like 1/500s. Turn AGC to OFF. Step 2 Set White Balance to AWC and press the Set Button. Now you can move White Balance to ATW and leave it there. Step 3 Try both 0.45 and 1.0 in Gamma to see which one you like the best. Step 4 Set Peltier Cooler to 0 Step 5 In the Filter Settings Tab (looks like a pair of glasses), Enable the Histogram. Play with the both the Left and right arrows to see how they improve your images appearance. Have fun playing with the other features, remember read the Miloslick’s Manual. Xtreme User Manual Page 39 Xtreme User Manual April 17, 2014 Sense Up Mode (Bright Stars and Dim Planets) This mode is ideal for verifying what your Telescope is looking at, as this mode allows exposures up to 2.1 seconds. A large number of MallinCamers use this for collimating and focusing their scope. Using SenseUP Mode along with AGC, you may start imaging some dimmer objects. Step 1 In the Camera Settings Tab, select SenseUp Mode and select a Sense multiplier by moving the slider between X2 and X128. It takes the Xtreme some time to build up the image when moving from one X value to the next. It is fun to watch the image build up. Step 6 Do you see your star? If not, then keep increasing the slider to a higher value. Keep increasing the EXTENDED EXPOSURE until the object is bright enough to see. Recall: X2=1/30, X4=1/15, X6=1/10, X8=2/15, X12=1/5, X16=4/15, X24=2/5, X32=8/15, X48=4/5, X64=1.1, X96=1.6, and X128=2.1 seconds Most users find that setting the Xtreme to X128 is a great setting to work on using a focus mask to assist in focusing their telescope. Other jump back down to SenseUp Mode from HyperMode when they are moving their telescope from one object to another. This way they can see quickly if their telescope is pointing at the correct location. Now is the time to also play with the AGC level on the Xtreme, this will give you the ability to increase or decrease the brightness of the image (including noise). Remember as AGC is changed, the XTREME will need to refresh the SENSE UP and that can take up to 3 minutes. Xtreme User Manual Page 40 Xtreme User Manual April 17, 2014 Hyper Mode (Deep Sky Objects) You have pushed the Xtreme to 2.1 seconds (x128 in SenseUp Mode), but now you need to take the plunge and do exposures way into the minutes as those Deep Sky Objects are beckoning. Most objects that you will be imaging in this mode will not be seen in the SenseUP mode, so ensure your Telescope has accurate go to capabilities. One of the big decisions you will be making in this mode is what AGC value you will use. I recommend starting with 4. Recall, every time you change the AGC value the Xtreme will require 3 minutes to structure itself for the new value. Step 1 From the Camera Settings Tab set AGC to 3 Step 2 Set the exposure to Hyper Mode. You will notice that MiloSlick automatically starts a timer see Waiting: 00:02:57 at the top of the Miloslick window. Xtreme User Manual Page 41 Xtreme User Manual April 17, 2014 In Hyper Mode the Xtreme will heat up producing warm pixels (little white dots that appear on the screen). The number and severity can be reduced by a couple of techniques, but cooling the camera in the best. The Xtreme can be cooled by using the built in Peltier Cooler. Step 3 Again in the Camera Settings Tab at the bottom of the Tab, set Peltier Cooler to a value that matches your seeing conditions. If you have the Pelktier Cooler too high, you may get frost on your sensor (looks fuzzy at the centre of your image). Use Trial and Error to match your seeing conditions (and humidity). Now is the time to play with the various settings and features of Miloslick (and the Xtreme). Having read the Miloslick Manual you will know how to stack, save, enhance, and perform hundreds of other tweaks on your image. Patience and asking for assistance on the Yahoo’s MallinCam Group site is the best advice I can give. Xtreme User Manual Page 42 Xtreme User Manual April 17, 2014 Connecting to Night Skies Network (NSN) using Miloslick Software Introduction I found that when I first started connecting to NSN, things started happening too fast for me to keep track of everything at once. So, pre-planning was the most the most crucial step for me. I found that by doing test runs in the comfort of my house allowed me to develop my techniques that work for the equipment and software that I use. Below are the results and steps that I use to broadcast on NSN, feel free to follow them and/or made modification as you deem as necessary. Note Computer real-estate will be your nemesis. So, depending upon the size of the monitor (laptop), then number of screens that you are using, then number of software programs that using are simultaneously are using, will dictate how you will manage your windows. I will describe how I have organized my windows under a variety of situations (1 computer, 1 computer with 2 monitors, which software packages am I using, and what am I trying to do this session). Remember, it’s all about having fun, and time and patience are your best friends (not to mention all the guys and gals, and the Yahoo – MallinCam site : http://tech.groups.yahoo.com/group/mallincam/messages One of the most important decisions you will need to make with broadcasting the image of the XTREME is what Video capture software are you going to use. Some simple suggestions: Currently Miloslick’s Xtreme Control Software is not capable of modifying the Video Image and having that Video Image be directly captured by NSN Flash. So if you want to use all the features of the Miloslick software and broadcast those results, as well as save screen shots and videos of your images, then we need another program to capture Miloslick’s output and have the output from that program linked to NSN’s Flash grabber. You currently have three choices for that other program: Splitcam, Manycam, WebcamMax. All three have about the same features, some of these have versions that will cost you, but all have a version that is free (reduced functions, advertisements, etc…). My current program of choice is Splitcam (I can live with the Advertisements, but it has some amazing extras such as the ability to change Video Input from Svideo to composite, a must if you use MallinCam’s MCV device with a variety of cameras. You will then use Manycam/Splitcam/Webcam Max along with Miloslick Xtreme Control Software. Xtreme User Manual Page 43 Xtreme User Manual Step 1 Plug in the XTREME camera into a usb port (MCV) on your computer. Note Step 2 April 17, 2014 Always use the same port for your connected devices. I even mark on my laptop which usb port is for which device. I even use a specific usb port for my Video input devices (MCV, XTREME, Dazzle), and a specific port for by RS232, RS485 devices. For example if you only have 2 ports, then 1 port is for video input (MCV), and the other port is for RS485 control. Double Click on the Miloslick Xtreme Control Software icon. Get the image of your object on the Image Window of Miloslick (see the Introduction Note if you get a blue screen rather than an image when selecting MCV), adjust the settings on the software for your planned object and size the window so you have room for other software on your monitor real-estate. If you have a dual Monitor system, move Miloslick to the second monitor. Note Step 3 During your initial NSN experience, you will find it easier to even get the object of interest onto the Miloslick Software window. This allows you to spend some time playing and adjusting the settings prior to connecting to NSN. As you become more comfortable, you will not worry about that and will adjust while connected to NSN (with the whole universe watching you live). Start Manycam/Splitcam/WebcamMax Note Size the Manycam/Splitcam/WebcamMax window so that is beside the Miloslick Window and you can see both with little overlap. If you have a dual monitor system you can slide both the Miloslick Software Window and the Manycam/Splitcam/WebcamMax window to the second monitor. Xtreme User Manual Page 44 Xtreme User Manual Step 4 April 17, 2014 Have Manycam/ Splitcam/Webcam Max grab the window image Note All of these packages have the ability to get a desktop image. Choose this option and overlay the sizing window on top of your Miloslick Software Image Window. You may need to play with the sizes until you obtain the ideal combination of both the fit in your screen. You want to ensure that you get a good image of whatever the Miloslick Software is looking at inside the Manycam/Splitcam/Webcam Max window. This allows you to select the size and location of the desktop that you want on the Manycam. Just slide and adjust the overlay on top of your Miloslick Software image. Step 5 Adjust the Resolution and frames/second (fps) value on Manycam/Splitcam/WebcamMax Note This will be trial and error; it all depends upon resolution, bandwidth, and what over members on NSN experience from your broadcasted image. You will end up adjusting both on the Manycam/Splitcam/Webcam Max side as well and on the NSN side to get the best image. A helpful hint: I slide over the Manycam/ Xtreme User Manual Page 45 Xtreme User Manual April 17, 2014 Splitcam/Webcam Max window so that some of the text appears in the Manycam/Splitcam/Webcam Max window. Can the members on NSN read the words? If not, adjust. Remember, this may take a couple of sessions until you obtain the ideal resolutions for your particular setup. For me I have set both Manycam /Splitcam at 800x800 and NSN at HDCAM. Step 6 Minimize the Manycam/Splitcam/Webcam Max software window Click on the little underscore on the top right side of the Manycam/Splitcam/Webcam Max window. This will eliminate the Manycam/Splitcam/Webcam Max window from your desktop (it should now appear on the bottom of your desktop monitor), but note that the software is still running and still has hold of your desktop (XTREME VIDEO Software) image location. Note Do not move the Miloslick Window around your desktop when broadcasting, since Manycam /Splitcam/WebcamMax is just grabbing the real-estate location that currently your Miloslick Software image is situated at. If you move the Miloslick Software Window, then Manycam /Splitcam/ Webcam Max will still grab the desktop location, but may not grab the whole Miloslick Video Image. Don’t be afraid to practice moving the Miloslick Software window when not broadcasting to learn how it affects the displayed Manycam/ Splitcam/ WebcamMax Window. If you need to, you can again use the Manycam/ Splitcam/ WebcamMax desktop select icon and select or change the location or size of the window for it to grab. If you have a dual monitor, you can leave the Manycam/Splitcam/WebcamMax window open on the second monitor since real-estate will not be an issue in the situation. In fact with Splitcam, you have an option to view the displayed image in full screen mode by clicking on the”[ ]” symbol in the upper right side of the screen (the escape key returns you back to normal size). Step 7 Start your Web Browser of Choice You may have to play with a number of Browsers to see which one works well with your particular computer setup. I have had success with 3 browsers: Chrome, Internet Explorer, and Maxthon. My current favourite browser to use for NSN broadcast is Maxthon. Xtreme User Manual Page 46 Xtreme User Manual Step 8 April 17, 2014 Log into Night Skies Network (NSN) Have your Web Brower go to the location: http://www.nightskiesnetwork.com/ . Locate and click on the BROADCASTERS AND MEMBERS SIGN IN button. The next Login screen will ask you to enter your username and password. You will next be presented with the Channel Line Up screen for Night Skies network. Click on the Login selection on the upper right hand side of the screen. You will be presented with the Channel Launch Sign In screen for NSN. Again enter your Username and Password and click on Publish Channel button. Step 9 Allow Adobe Flash to use your Manycam/Splitcam/WebcamMax The Adobe Flash Player Settings window will pop up on your screen asking you for permission to use your camera and your microphone. Select Allow. Xtreme User Manual Page 47 Xtreme User Manual Step 10 April 17, 2014 Turn off your Microphone Until you have your microphone figured out, it is best to initially turn it off. If you do not, the viewers on NSN may hear an extreme loud buzzing (feedback noise). Later on we will look at using the microphone, but until then I recommend CLICKING on the little microphone symbol on the upper right corner of the NSN video display window to disable the microphone. Step 11 Set a message for the NSN observers It is a good idea to display a message above the NSN display window, so that the other NSN views understand what you are doing. When initially setting up (which usually takes longer when you are learning), I usually type the message “Setting Up the Camera” then CLICK on the SEND button to have it displayed. Note When you are us and running and everything is working as it should, you will change the message to indicate, what telescope, mount, and camera you are using. For that is the most frequently asked question from the NSN viewers. Step 12 Select the Camera Now is the time to activate the camera, or in our case have NSN driver point to our Manycam/Splitcam/Webcam Max output. RIGHT CLICK inside the NSN Video window to bring up a Settings Window Xtreme User Manual Page 48 Xtreme User Manual April 17, 2014 CLICK on the Settings choice and you will be presented with the Adobe Flash Player Settings Window. CLICK on the Camera Icon and you will be presented with a pull down menu to select your camera. CLICK on the Pull Down list to select your camera of choice. CLICK on CLOSE to Continue. NSN will remember what camera you chose from the last visit. So usually you only have to go through this process whenever you want to change what camera device you would like the NSN flash driver to use. Step 13 Choose your Camera Settings We will now select the settings for our camera. We have the option of changing: The Bandwidth, Picture, Resolution, Framerate, and even the microphone rate (when you are ready). The changes will not be activated until you CLICK on the Green OK symbol in the window. Xtreme User Manual Page 49 Xtreme User Manual April 17, 2014 LEFT CLICK inside the NSN video Window to bring up the Camera Settings Window. Use the sliders for Band Width and Picture values. I usually have both of my sliders way on the right. Over time you will find the sweet spot for your system. Select your Resolution from the Pull Down Menu. I select HDCAM (800 x 600) for my system (this seems to give the sharpest image with my 800 x600 settings in Manycam/Splitcam). Again, play with these to see what settings the NSN viewers say is the best. Select your Frame Rate. From its Pull Down Menu. I usually leave it at 15 fps, but I have used 30 fps at times. Again trial and error for your system. CLICK on the green OK symbol to accept these settings That’s it, you are done. If everything is working well and the Window’s gods are in a good mood, you should be broadcasting whatever object the XTREME is capturing. You should now enter another Message and SEND it out to indicate what system you are using and what object you are viewing. Note Note There is a time delay on what you say (if you have you microphone activated) and do on your computer as compared to what others see (and hear) on the NSN broadcast. You will freeze (and I don’t mean like what Chris does when he broadcasts in winter till 3am), I mean from time to time your NSN connection will freeze for no apparent reason. It happens to us all. When this happens, you can simply terminate the Web browser program (Ctrl –Alt-Del). Then restart your browser and Log back into NSN. This usual is a very quick process. But, sometime we all have to restart our computer (this takes longer for we need to power down hardware and software) and reactivate everything before login back in. Don’t worry, the NSN viewers sense what is happening and will keep the conversations going while waiting for you to come back on. Xtreme User Manual Page 50 Xtreme User Manual April 17, 2014 Don’t be afraid to ask for advice by typing in on the Video chat window, as we are all learning and are willing to assist whenever we can. When ready, try activating the microphone (click on the microphone symbol). Other will let you know if they can hear you, or if there is noise. Remember there are settings for the microphone in the camera settings window. I have become hooked on Splitcam. With my dual monitor system I have Splitcam grab my Video device (USB 2828x Device) directly. Splitcam can adjust brightness, contrast, etc. I can also call up the USB 2828x Device control panel (located in File/Video settings) which gives you some more control of the MCV’s image output by again allowing you to change the brightness contrast, sharpness over and above what the Miloslick software does. Since I place Splitcam on its own monitor (the second monitor), I can make it full screen to see all the detail, while my fist monitor has the NSN connection screen with its preview and chat window. Note When you are finished with your session, you simply say your good nights to the crowd of NSN viewers to let them know that your session is ending. CLICK on the red STOP button on your NSN Window and NSN will shut down your channel and you can power down your system and call it an evening (It won’t force the NSN viewers off the channel and some viewers will continue chatting long after you have gone to bed). Xtreme User Manual Page 51 Xtreme User Manual 6. April 17, 2014 Appendix Appendix A – On Screen Display (OSD) Menu MENU This is the main menu for the Xtreme. It is from here that you select which setting you would like to adjust. TITLE You can create a Title containing up to 12 characters chosen from the ones listed. The Title can obscure parts of your image so most users leave this in the OFF setting. When set to ON, you can hit the CENTRE Button to then select the characters by using the Arrow Buttons with CENTRE to This setting is used to place a small Title select the flashing character. on the screen. LOCATION allows you to place the message in one of the 4 corners SENSE UP When SENSE UP is set to OFF you can use ALC to change the exposures in the Fixed Shutter Mode. You activate the Extended Shutter Mode by pressing the RIGHT Button and changing the value away from OFF. SENSE is adjusted in defined increments increasing the Xtreme User Manual Page 52 Xtreme User Manual April 17, 2014 sensitivity of 1/60 second by – 2X, 4X, 6X, 8X, 12X, 16X, 24X, 32X, 48X, 64X, 96X, and 128X. These exposure settings are ideal for beginning DEEP SKY OBSERVING or to assist in the focusing on a star. When using the Hyper Mode, you must This control will try to control the shutter, set SENSE Up to X128. Set ALC/ELC to but was designed for daytime use. ALC and in the ALC Menu set SHUTTER to OFF with the LEVEL moved all the way to the RIGHT ALC/ELC This function allows you to choose which Exposure Control you would like the Xtreme to use. You get to choose between the ALC and ELC option, by pressing the RIGHT Button. ALC stands for Automatic Level Control and ELC stands for Electronic Level Control. In the ALC mode, pressing the CENTRE Button calls up the <<ALC>> menu which allows you to change the Fixed Shutter‘s speed or turn ALC OFF. There is a LEVEL bar for selecting the amount of ALC automatic control you want the camera too apply, but this LEVEL bar is Xtreme User Manual ALC When the Xtreme is in ALC Mode, the camera will automatically adjust the outputted image for variations in both the sky brightness and lighting levels. The LEVEL bar in the ALC Menu is deactivated in the Xtreme. When you are using HYPER Mode, the SHUTTER setting must be set to OFF and the LEVEL bar must be all the way to the RIGHT ELC Page 53 Xtreme User Manual April 17, 2014 deactivated in the Xtreme. Use ALC for Planetary and Lunar observing. In the ELC mode, a similar <<ELC>> menu is displayed with a variable LEVEL of the shutter adjustments to suit seeing conditions. The ELC setting is not too useful for astronomical applications, so we won’t discuss it beyond showing you its Menu. We do not use this setting in Astronomy applications. But the LEVEL bar is used When the camera is in the ALC mode, by the Xtreme to determine how much the Xtreme automatically adjusts the adjustment it should automatically apply output for variations in sky brightness and to the image. background lighting levels based on the SHUTTER setting. When using the HYPER Mode, the ALC/ELC setting must be set to ALC, the SHUTTER must be OFF, and the LEVEL setting must be set to the extreme RIGHT. BLC ON BLC or Back Light Compensation is an When BLC is set to ON and you press the advanced setting for the Xtreme that CENTRE Button, the above menu some experienced users like to play with. appears. From here you can set the Xtreme User Manual Page 54 Xtreme User Manual April 17, 2014 This feature allows you to select an area PRESET to ON which activates from one of 48 Zones that you would like augmentation of the Centre Zone of the to increase or reduce the gain. This CCD chip, while leaving the outside area feature can be used to help reduce the of the chip with reduced sensitivity. The amp glow that can occur during long amount of gain sensitivity is set with the exposures. PEAK feature When shaded grey, that Zone is If PRESET is set to OFF, then the Xtreme augmented to increase the sensitivity of uses what you have set with the AREA the CCD in that Zone. SET function. When black, the sensitivity is reduced in To set your own area of augmented and that zone. non-augmented Zones, select AREA SET and press the CENTRE Button. The BLC offers three settings, OFF, ON, and following screen should appear (unless PEAK. you have already created a pattern). Only PEAK and ON have Sub Menu’s This pattern matches the PRESET ON that can be accessed by the CENTRE with the CCD being more sensitive in the Button. middle and less sensitive in the outside. The WHITE flashing square in the upper left is your current zone. Using the ARROW Buttons you can move around the screen from Zone to Zone. Pressing the CENTRE key at any Zone, toggles the zone GREY or BLACK. (GREY is Xtreme User Manual Page 55 Xtreme User Manual April 17, 2014 augmented sensitivity, BLACK is reduced sensitivity). To exit this mode just hold the CENTRE Button for a second and you will be returned to the <<BLC>> menu. The follow screen would be your worst nightmare for amp glow. PEAK Select Peak to adjust the amount of total Back Light Compensation. You can manually adjust the level from 0 (left) to 8 (right) by adjusting the bar. Xtreme User Manual Page 56 Xtreme User Manual AGC April 17, 2014 AGC has three settings: OFF, ON, and MANU. ON is an automatic mode which the Xtreme uses to adjust the image. This is only useful for non-astronomical daytime imaging. OFF has the cleanest image, no amplification of signal (or noise) is AGC or Auto Gain Control instructs the generated. Use this setting for Planetary Xtreme how much amplifier gain you imaging in FIX SHUTTER MODE. would like to apply to the signal coming out of the CCD chip (it is equivalent to MANU (manual setting), allows you to cranking up the ISO setting on your manually adjust the gain used by the photographic camera. Xtreme. Selecting this option and pressing CENTRE Button, will display the This function is one of the most important <<AGC>> Sub Menu. functions for imaging Deep Sky Objects when in HYPER Mode, but can also be used in both FIXED SHUTTER and EXTENDED SHUTTER Mode. There are two simple rules for setting the AGC: 1. Set it as low as you can. A lower AGC will give you cleaner pictures at the From here you can adjust the LEVEL with expense of a longer exposure time. A the LEFT and RIGHT Buttons. higher AGC will let you use shorter Note: you cannot change the AGC when exposures at the expense of more noise. the Xtreme is in HYPER Mode and is Where you set this depends on how well actively capturing an image. You have to your telescope can track and how long stop the exposure. Make a single change you want to wait for new pictures. I Xtreme User Manual Page 57 Xtreme User Manual April 17, 2014 generally place AGC to 3 or 4 for most (this will take about 3 minutes to reset all Deep Sky Objects and set it OFF for registers). Planetary Objects. 2. You cannot reset the AGC while in Hyper Mode and the Xtreme is going an extended exposure. You must stop the integration. Then set your new gain level and then re-enable the Hyper Mode. If you don’t do this, the camera can get into any number of odd states, at which time you must reboot it (turn it off for 10 seconds). Changing an AGC value will require the Xtreme to reset its internals and reinitialize its processes; This will take about 3 minutes to perform at X128. White Balance ATW Colours are adjusted automatically. This is ideal for most viewing. AWC Allows the Xtreme to set the White Balance based on image that is currently on the screen. Press the Centre Button to activate. The AWC is for calibrating the White Colour Balance for the Xtreme camera is controlled with the White Balance menu. This menu has two Automatic states and one Manual state. Xtreme User Manual Balance on the target you are currently viewing. If you change targets, you will need to recalibrate it again or leave it on ATW (since ATW will auto track the White Balance you previously calibrated on). Page 58 Xtreme User Manual April 17, 2014 The automatic states are called Auto The recommend technique when imaging Trace White Control (ATW) and Auto is just select AWC at the start of your White Control (AWC). imaging (and activate it), then put the Xtreme in to ATW mode for the rest of the The Manual State allows you to select evening (or move between ATW and from two fixed temperature wavelengths MANU modes depending upon what when imaging. Each of these fixed objects you are imaging. settings (3200K and 5600K) has its own benefits. Manual setting also gives you the opportunity to adjust the Blue and Red to help compensate for light pollution. Manual (MANU) The most important control features of White Balance on the Xtreme when viewing Deep Sky Objects. When MANU is selected and you are in its Sub Menu, you have three selections available to you in the PRESET feature: 3200K, 5600K, and OFF. 3200K allows Xtreme to see about 80% more into the near infrared. This will allow some of the Deep Sky Objects to be viewed in a slightly different detail. Slight Haze punching capabilities while imaging in this mode. Xtreme User Manual Page 59 Xtreme User Manual April 17, 2014 5600K allows Xtreme to capture mostly in the visual range. Different Nebula can have subtle colour shifts and detail in this setting. OFF allows for adjustment of the Red and Blue color. By augmenting or reducing either the Blue or the Red you can change the colour to compensate for light pollution and other seeing conditions. SYNC DO NOT TOUCH THIS SETTING. It should be in INT mode. Xtreme User Manual Page 60 Xtreme User Manual April 17, 2014 OPTION The OPTION menu has a lot to offer in the Xtreme Camera. Masking features, MIRROR effects, POSITIVE/NEGATIVE effects, and image PRIORTY sensitivity Settings are many of the features that can be used for various situations with any given telescope. Press the CENTRE BUTTON to enter the OPTIONS SubMenu. One OPTION is PRIORITY and its two Sub-Menu items are AGC and SENS. This switches the signal detection from the MASK A, MASK B, MASK C, MASK D These don’t have an application in astronomy imaging so there is no need to talk about them (doesn’t mean you cannot experiment with them). POSI/NEGA When selected, Pressing the Left or Right Arrow Button makes the image either the Positive (Normal), or Negative (complement) H-REV When selected, pressing the LEFT or RIGHT Button will flip the image AGC section (the amplifier) to the SENS HORIZONTALLY. section V-REV (CCD input). Once a bright object is When selected, pressing the LEFT or detected, either the CCD sensor (SENS) RIGHT Button will flip the image detects VERTICALLY. FREEZE When selected, pressing the CENTRE Button will FREEZE the image (not the camera). Pressing the CENTRE Button again will UN-FREEZE the image. Xtreme User Manual Page 61 Xtreme User Manual April 17, 2014 Pressing the RIGHT Button will alternate between FRAME and FIELD. (Leave as default) PRIORITY Leave in AGC mode (the other mode is SENSE) GAMMA When selected, pressing the LEFT or RIGHT Button will switch form a GAMMA setting of 0.45 (provides a brighter image) or 1.00 (provides a darker image). Use this feature to match your monitor’s performance. RETURN Pressing the CENTRE Button on RETURN, returns you to the MAIN MENU. Pressing the RIGHT Button on RETURN, changes the word to NEXT. Pressing the CENTRE Button on NEXT takes you to the OPTION2 MENU Xtreme User Manual Page 62 Xtreme User Manual April 17, 2014 This OPTION2 MENU is important, for it is in here that you find the COLOR BAR feature. APC This is Advanced Pixel Control and it is useful if your stars do not look perfectly round, APC can help adjust their shape. When selected, pressing the CENTRE Button takes you to the APC settings screen. Leave PRESET at OFF By sliding the two adjustment bars to the LEFT, sharpening and digital antiblooming are held to an absolute minimum. When the two adjustments are to the RIGHT position, maximum sharpening and digital ant-blooming occurs. The default position is with both sliders to the CENTER position. The higher the level the more “blocky” stars Xtreme User Manual Page 63 Xtreme User Manual April 17, 2014 look but the higher settings can tease details out of faint galaxies and nebula. Generally higher settings are best used for lunar and planetary targets, medium levels for galaxies or nebula with structures and APC: 0 on stellar targets like open or globular clusters. APC can be changed on the fly. If both AGC is turned OFF and the APC sliders are to the LEFT, then there is NO GAIN – the camera is converted into a straight through CCD imager. HIGH LIGHT Once selected by the CENTRE Button, you will be allowed to adjust its setting via the LEFT and RIGHT Buttons. This feature is like a CORONAGRAPH and is used to artificially darken bright areas on the video image. When viewing the sun through a Hydrogen Alpha filter, the “Highlight (Coronagraph)” slider can be used to effectively block out the bright surface of the sun allowing the solar prominences to be seen more easily. COLOR BAR Xtreme User Manual Page 64 Xtreme User Manual April 17, 2014 Use this feature to show a colour bar on the screen. It is a great way to see if the Xtreme is outputting an image (specifically if you are not sure). When selected, use the RIGHT Button to toggle the colour bars ON and OFF. ZOOM Press the RIGHT or the LEFT Button to activate Zoom, and then press the CENTRE Button to select the SUB MENU. Moving the slider bar Left and Right changes the Zoom Level from 1X to 2X, with numerous steps in between. The ZOOM feature can be very useful in planetary and lunar observing. It allows the user to electronically change the focal length of any given telescope. For example, at maximum Zoom, an f/10 telescopes behaves like an f/20. It is also possible to achieve f/ratios between 10 and 20 simply by adjusting the Zoom Slider Bar. This allows zooming in on features of interest on the object being observed. Xtreme User Manual Page 65 Xtreme User Manual April 17, 2014 MOTION DETECT When selected, the RIGHT or LEFT Leave the AREA SET alone, not useful for Button allows you to toggle between astronomical usage. Motion detect ON or OFF. If ON is selected the pressing the CENTRE PRESET ON selects the whole chip Button takes you to the MOTION DETECT MENU. Adjust level with the LEFT and RIGHT Button to match environment. MOTION DETECT is the TEC (Thermal Adjust TIMER to match environment. Electric Cooler) for the XTREME. When the rear Yellow LED is ON, this The TEC control helps with noise indicates that the CCD cooling is OFF reduction and thus helps reduce warm LINE (actually a very small amount of pixels, the control provides two simple warmth is sent to the CCD sensor helping choices ON or OFF. These choices refer remove dew and stabilizing the to whether noise detection is turned on temperature at a minimal level to avoid or not, rather than the cooler itself. When thermal shock to the CCD). You should noise detect is turned ON, the current see the Yellow LED turn ON and OFF as frame is analyzed for noise. If noise is the Peltier Cooler turns OFF and ON then detected the Peltier cooler is turned on during the next frame. If noise is LED ON -> Peltier Cooler OFF detected on that frame, then the cooler LED OFF-> Peltier Coolr ON stays on, if not the cooler is turned off. Xtreme User Manual Page 66 Xtreme User Manual April 17, 2014 ON: Should be used for short duration lunar and planetary integrations with the Preset checked (which activates the dew removal for the entire CCD chip). It is recommended that you set the TIMER to 60 seconds and the Level to 8 which is the most sensitive noise detection setting. You can also manually change the duration time and chip location for Dew Removal assistance. OFF: For longer integrations like DSOs, the noise detect should be turned OFF, (which means the cooler runs continually for every frame). Any integration over 14 seconds should have the MOTION DETECT turned OFF so the cooler runs continuously for every frame Xtreme User Manual Page 67 Xtreme User Manual April 17, 2014 Appendix B – On Screen Display (OSD) MAP Xtreme User Manual Page 68 Xtreme User Manual April 17, 2014 Xtreme User Manual Page 69 Xtreme User Manual April 17, 2014 Xtreme User Manual Page 70 Xtreme User Manual April 17, 2014 Appendix C – Special Button Power Sequences The Xtreme camera has a Quick set feature using the back buttons. Press both buttons for about 2 seconds. Button Function Turns on/off COLOR BAR UP and DOWN Xtreme User Manual Page 71 Xtreme User Manual April 17, 2014 Appendix D – Installing the MCV The MCV-1 and the MCV-1e both come nicely packed in its own see-through packaging. The installation procedures will be the same for either package. The following are the techniques I have used on 4 different computers (3 laptops and 1 desktop). Some are 32 bit and others are 64 bit, all run windows 7. I have not encountered any problems installing this way. Note Do some pre-planning to minimize frustration that may occur when Windows gets a bit temperamental. I use both the MallinCam Xtreme and the MallinCam Signature exclusively with computer control, so I needed to assign one USB port for my video input (MCV) and another USB port for my serial cable (Belkin USB Serial cable). I even label which port is which on my lap-top (just in case I forget). I will always use the same port for each device, so that I will not have multiple versions of the drivers for multiple USB ports (you are just teasing the windows gods if you mix and match, and they will get even). The MCV-1 and MCV-1e are heavy and depending upon your computer’s manufacturer, the MCV may put some strain on the USB port. Therefore I use a small 6” USB cable extender, and plug the extender into the USB port for and plug the MCV into the other end of the extender. Step 1 Open the Package When you open the package you will find: 1 mini CD 1 User’s Manual MCV-1 (1e) Do not inset this into USB port until instructed Take the instruction booklet and the mini CD and place them on the table. If your computer cannot handle a mini CD (you cannot physically lock the CD into the centre hole of the CD drive), then you can down load the software by following the next step Go to the MallincamUSA website and download the latest drivers for the MCV device: http://www.mallincamusa.com/Files/MVC-1%20Software%20CD.zip This file is in a zip format, so you will need to unzip the file. You should see 5 folders and about 4 other files inside the unzipped folder. Xtreme User Manual Page 72 Xtreme User Manual Step 2 April 17, 2014 Insert the MCV-1 or MCV-1e Remember the USB port you choose for the MCV; you will always use this USB port for the MCV. The Windows will find new hardware and will attempt to load drivers. It will most likely fail on one driver. Don’t worry that is why you have the driver installation software. Either insert the CD or run the program autorun.exe in the folder of the file you downloaded. When you see the green USB 2.0 HD HV Grabber screen, CLICK on the option: Install Drivers. You may receive a Windows warning asking you if you want to allow the installation to run, Click Yes. Follow the instructions on the Installation of USB Video/Audio Device Driver Wizard that is displayed on the desktop. The installation takes under a minute. Once complete, you will be presented with a notification windows, click Finish with the “Yes, I want to restart my computer now” option selected. The computer will restart. Login in as you normally would. You don’t need to install any of the other files from the HD AV Grabber installer. Step 3 Checking out the MCV-1 or MCV-1e It is always a good idea to check out the MCV-1e to see if it is running correctly after you have done a first time installation. Start the Image software that you will using to display your Xtreme Video image such as: AmpCap, SharpCap, VirtualDub,..) Xtreme User Manual Page 73 Xtreme User Manual April 17, 2014 In the Video Device menu, you should see a Video Source called “USB 2828x Device”. This is the driver for either the MCV-1 or MCV-1e device. This is the one we want. Select it Power up your Signature, and you should be able to see the camera’s images on the video window of your software. Note Oh No, the video is not working correctly, strange stuff is happening and it is not my camera After you have checked all of the obvious: Power to the Xtreme, Software (AMCAP) is pointing to the correct input device on the MCV (remember it has 2 connection types: RCA and SVIDEO). Down load the updated MCV-1 or MCV-1e driver from the Mallincam Software Links Site: I have put a copy here on my own site of the latest driver called: BDA_UAC_WHQL_082311_Setup.rar My file location: http://sdrv.ms/Lb3wV3 Note this is a RAR file, and you will need a free RAR extractor program to unzip this file. A good free RAR extractor is called: 7-Zip Xtreme User Manual Page 74 Xtreme User Manual April 17, 2014 Appendix E – Installing RS232 Communications RS232 Communications The MallinCam Xtreme communicates via a Computer Adapter Port (see 8 on the Connection Diagram) on the back of the camera. An Optional MallinCam Xtreme RS232 cable is required to connect the camera to a RS232 Port on your computer. As most computers no longer include a RS232 Port, you will also require a USB to RS232 Serial adapter. The MallinCam RS232 cable is then connected to the USB to RS232 adapter which in turn is connected to a USB Port on your computer. Different models of MallinCam camera used a alternative version of the communication cable. These communication cables are distinguished by a GREEN dot on the cable. This GREEN dot matched the GREEN LED on that model of camera. Ensure you order the XTREME RS232 cable from your vendor. The USB to RS232 Adapter To control the camera through the Xtreme RS232 Port you will require a USB to RS232 Adapter Cable on the computer side and a MallinCam RS2332 adapter cable on the Xtreme side. Xtreme User Manual Page 75 Xtreme User Manual April 17, 2014 The ideal USB to RS232 Adapter is usually computer specific (and sometimes Operating system specific). When you purchase a USB to RS232 adapter, purchase a brand name one that specifically states that it is 100% compatible with your operating system. There are some cheap prolific chip set knock offs that are incompatible with updated drivers (Error -10 (failure to load drivers). MallinCam users have had no issue with USB to RS232 Adapters with the FTDI chipset. On the Macintosh, excellent results with adapters from Tripplite (formerly Keyspan), IOGear, FTDI and TrendNet, since these manufactures provide upto-date drivers compatible with most versions of Mac OS X Installing the USB to RS232 Adapter (Windows 7/8 Specific) Most USB to RS232 Adapters come with a CD that contains the driver for the adapter. I recommend using that CD as a last resort, as Windows Operating system (Windows 7, Windows 8, Windows 8.1) usually goes a fine job in automatically downloading the latest drivers for your adapter. Step 1 Insert you USB to RS232 Adapter into a free USB Port on your computer Windows will beep to recognize that an adapter has been inserted into a USB Port. After a few seconds the following message singular to the one below should appear on the bottom right of your Windows screen. The little green shade will move around the icon that the Installing device driver software message is pointing to while the driver is being installed (may take about a minute). Once completed, the following pop-up message should appear (name of driver may be different, depending upon which USB to RS232 adapter you are using) Xtreme User Manual Page 76 Xtreme User Manual April 17, 2014 The driver has been successfully downloaded and installed. Make note of both the Port that you have used for your USB to RS232 Adapter (you should always use the same Port) and what COM value Windows has assigned for this adapter (5 in image above). Oh No, Driver did not install correctly. Sometimes the Window’s gods are having a bad day and they decide to take it out on you. Don’t Panic. If you check the Ports (COM & LPT) or Other devices list item in the Device Manger from the Control Panel, you may see a yellow warning beside the Adapter, this indicates the current driver is incompatible. There could be many reasons for the driver not to install, the most common being that there already is an old incompatible driver already in the system, or Windows could not locate the driver for you particular USB to RS232 Adapter. Step 1 Check to see if you already have a driver installed and remove it if necessary from your system. With the USB to RS232 Adapter still inserted in a USB Port. From the Control Panel, go into the Device Manager, and click on the Ports (COM & LPT) arrow. Right Click on the driver name (Prolific USB-to-Serial Com Port (Com4) in my image above) and Choose Uninstall when Pop-up List appears. Let Windows do its uninstall thing and when completed, remove the USB to RS232 Adapter from the Port. Step 2 Download and install latest driver specifically for your Device (or use the installation CD that came with the Adapter) Xtreme User Manual Page 77 Xtreme User Manual April 17, 2014 Now visit the site of the USB to RS232 Adapter you own and download the latest driver and follow the installation instructions from the site. (If you are using the CD, follow the instruction that came with the Adapter). The Final step in either the download or CD option you chose will be to reinsert the USB to RS232 Adapter back into you USB Port, and windows should finish the installation process and then display success popup menu with the COM Port it has assigned to your Adapter. RS232 Cable Points of Concern Distance: At 9600 baud, the distance should be no more than 50 feet and, at 19200 baud, the cable length should be no more than 20 feet. Interference: Cheap Power cables can cause interference; always use shielded cables when moving data (or Power) from one location to another. Secure: Always make sure your connectors are securely attached to the Xtreme port. You may want to make a loop and attach that with Velcro to your scope to help reduce the risk of it being pulled out. Xtreme User Manual Page 78 Xtreme User Manual April 17, 2014 Appendix F – Installing the Wireless Exposure Controller (WEC) Step 1 Step 2 Insert the receiver 4 pin plug into the side socket of the camera as shown in picture above and below. Connect the other end of the cable into the receiver as shown below Xtreme User Manual Page 79 Xtreme User Manual Step 3 Step 4 April 17, 2014 Now turn on receiver by holding the left button called POWER for 3 to 4 seconds. The display will show either a blank channel or a channel number as shown in the picture below. You can change channel by pressing both buttons at the same time for 3 to 4 seconds until display flashes. Then select the Channel of your choice. Now take the wireless hand controller (the Transmitter) and press any button to turn it on. The hand controller will show a channel on the display as shown below. Press the left or right arrows on the Transmitter until CH in the upper display. Press the Center Button located between the arrows until the display flashes. Now match the Channel Number in the display window to the Receiver Channel Number by pressing the Up or Down Arrow Button. Press Center Button to lock in the channel. Xtreme User Manual Page 80 Xtreme User Manual Step 5 April 17, 2014 Now press the Right or Left arrow Button until upper display indicate LONG as indicated by the picture below. This is where the integration time is entered. For this example, we will use 7 seconds integration Step 6 Press the Center Button located between the arrows until the last two digits flash. Using the Up Arrow, press it 7 times or hold down the Up Arrow to scroll in fast mode to 7 seconds. Press the Center Button to lock in this value. Now display will look like the picture below. Xtreme User Manual Page 81 Xtreme User Manual Step 7 April 17, 2014 To active the camera into a 7 seconds integration with AUTO REFRESH, simply hit the upper Right Button which activates or stops the countdown as shown in picture below. Note the picture showing countdown to 2 seconds and will start over automatically to 7 seconds once the image has been taken and transferred to monitor. To confirm image integration and/or transfer, look at the Receiver’s LED indicator as demonstrated in the picture below. When taking an exposure (integration) the LED on the Receiver will be solid RED. Once the image is transferred, it will momentarily turn GREEN indicating that the image is being transferred to monitor. The RED LED will automatically light back up while taking another exposure (integration). This will repeat as long as the hand controller has been activated with the Upper Right Button. To stop exposure simply press the Upper Right Button on the Transmitter. Xtreme User Manual Page 82 Xtreme User Manual Step 8 April 17, 2014 After the observing / imaging session, please remember to turn OFF the Receiver by pressing POWER Button for 4 seconds or until display goes blank. The Transmitter will automatically shut down by itself in about one minute. The background light can be turned on momentarily on the Transmitter by pressing the Upper Left Button for 4 seconds or until display light comes on. It will turn off automatically after 6 seconds or more to save battery power. For long term storage, remove batteries from both the Transmitter and Receiver. Xtreme User Manual Page 83 Xtreme User Manual April 17, 2014 Appendix G – Accessories for the Xtreme Upscaler Digital View Finder Digital View Finder Kit 8” Monitor 12” and 15” Monitor 2” c-mount adapter HDX2-F Remote wired Keypad Xtreme User Manual Page 84 Xtreme User Manual April 17, 2014 MCV-1 (MCV-1-E) MallinCam IR Filter Mallincam 2.5X Barlow Mallincam 0.5x Focal Reducer Mallincam 0.75x Focal Reducer MFR-3 Focal Reducer MFR-5 Focal Reducer Spacers for MFR-3 and MFR-5 Xtreme User Manual Page 85 Xtreme User Manual April 17, 2014 Appendix H- Focal Reduction Here are three images of a MFR-5 focal-reducer. It’s a two-piece design and is made to mount on Cmt. video cameras, is 1.25” in diameter and has 1.25” filter threads on the end of the larger part I call the “A” part. Depending on how you configure this unit, it can achieve different amounts of focal-reduction – from 0.8x to 0.3x or even more. The MFR-5 is ideal for all telescope designs but particularly refractors, SCTs, RCs and DK optical designs. It has been used successfully on curved-field and flat-field scopes and astrographs. The MFR-5 has two parts that unscrew from each other. I call the left shorter part the “B” part and the longer part on the right the “A” part. Since both parts have male C-mt. threads, both parts can be attached to the camera. Just mounting the “B” part results in about a 0.8x focal-reduction. I’ve never used just the “A” part but I’ve been told it provides about a 0.75x focal-reduction by itself. Standard 1.25” astronomical filters can be threaded into the end of the “A” part. Xtreme User Manual Page 86 Xtreme User Manual Xtreme User Manual April 17, 2014 By separating the two parts and just screwing the shorter “B” part (a.k.a. MFR-6 and sold separately now) into the camera – you get the lowest amount of focal-reduction. Depending on your scope and configuration, you can expect about 0.8x focal-reduction. Many solar imagers find this configuration handy to fit the entire solar disk into their FOV. But this is too short to insert into a focuser by itself. You need to add a 1.25” adapter to this to fit it into a focuser. Page 87 Xtreme User Manual April 17, 2014 Here’s the complete MFR-5 screwed together and mounted on the camera. This results in about a 0.6x focalreduction. The amount of focal-reduction is dependent on each scope design, primary mirror position, thickness of external focusers on SCT scopes, etc. So different setups will result in different amounts of focalreduction—even with seemingly similar scopes or MFR5 configurations. For additional focal-reduction you can add extension tubes. The more you add – the more focal reduction you get. I’m an “Old-School” photographer and we called these things extension tubes in the day. So that’s what I still call them. Schneider calls them extension tubes also. But many people call these things “spacers” or “extension rings” or “ERs” for short. They’re all the same thing. Here’s a setup I’ve successfully used on a Celestron C9.25” SCT with a JMI EV-1cm external focuser attached. I’m guessing this results in about a 0.4x reduction. So for a C9.25 that reduces the focal-length from 2350mm down to about 940mm (2350 x .4 = 940). I’m guessing on the reduction here so don’t quote me or blindly believe me. But it’s a substantial amount of focal-reduction. Xtreme User Manual Page 88 Xtreme User Manual April 17, 2014 You can also put extension tubes between the camera and the MFR5. This also increases the amount of focal-reduction. There is one potential advantage to placing the extension tubes here – to remove internal reflections between the back of the MFR-5 and the camera’s sensor – if you’re getting one. NOTE: Let me point out here that when you add the MFR-5 your focus point changes – a lot. And when you put extension tubes between the MFR-5 and camera – focus changes even more. And you can combine extension tubes between part “A” and part “B” at the same time as adding an extension tube between the camera and the back of the MFR5. This can result in a LOT of focalreduction – even too much! The following charts come from Jim Thompson’s incredible paper: Detailed Look At Focal Reducers. I cannot imagine how many hours it took Jim to produce the document, but it is worth reading to obtain a deeper understanding about Focal Reduction. Xtreme User Manual Page 89 Xtreme User Manual April 17, 2014 Basic Focal Reduction Results by Jim Thompson Table 1 summarizes the measurements. Vignetting and Coma observations were scored from 0 to 3 based on the following: 0 = none observed 1 = hint observed 2 = clearly observed by not obtrusive 3 = very apparent and affects viewing Test # FR focus distance [mm] delta focus distance [mm] FR-toCCD distance [mm] ref. star distance [pixels] f/ratio [non] reduct. factor [non] vignette score [non] coma score [non] 0 nothing 221.6 0 0 264.61 8 1 0 0 1 MFR2" on 2" c-thread adapter 172.9 -48.7 45.3 126.46 3.82 0.478 0 1 2 MFR2" on 2" c-thread adapter + 5mm 154 -67.6 50.3 113.27 3.42 0.428 0 2 3 MFR2" on 2" c-thread adapter + 10mm 128.3 -93.3 55.3 99.58 3.01 0.376 1 3 4 MFR2"-RC 198.9 -22.7 75.5 204.50 6.18 0.773 0 0 5 MFR2"-RC + pull out 6.1mm 194.5 -27.1 81.6 200.82 6.07 0.759 0 0 6 MFR2"-RC + pull out 10.2mm 188.8 -32.8 85.7 198.31 6.00 0.749 0 0 7 MFR2"-RC + pull out 16.6mm 183.7 -37.9 92.1 194.61 5.88 0.735 0 0 8 9 MFR2"-RC + pull out 24.1mm MFR5 179.5 195.6 -42.1 -26 99.6 28.5 189.93 132.51 5.74 4.01 0.718 0.501 0 0 0 0 10 MFR5 + 5mm spacer in front 176.1 -45.5 33.5 108.29 3.27 0.409 2 0 11 12 MFR5 + 10mm spacer in front MFR5 + 5mm between 141.1 183.6 -80.5 -38 38.5 31 82.19 120.42 2.48 3.64 0.311 0.455 3 1 1 0 13 MFR5 + 5mm between + 5mm in front 160.6 -61 36 96.65 2.92 0.365 2 2 14 15 MFR5 + 5mm between + 10mm in front short half MFR5 (=MFR6) 117.1 221 -104.5 -0.6 41 14.5 73.40 223.33 2.22 6.75 0.277 0.844 3 0 3 0 16 short half MFR5 + 5mm in front 218.5 -3.1 19.5 207.94 6.29 0.786 0 0 17 short half MFR5 + 10mm in front 215 -6.6 24.5 191.94 5.80 0.725 0 0 18 short half MFR5 + 15mm in front 209.5 -12.1 29.5 175.24 5.30 0.662 0 0 19 short half MFR5 + 19.5mm in front 202.5 -19.1 34 160.51 4.85 0.607 0 1 20 long half MFR5 209.6 -12 32.5 180.66 5.46 0.683 0 0 21 long half MFR5 + 5mm in front 203.1 -18.5 37.5 168.79 5.10 0.638 0 0 22 long half MFR5 + 10mm in front 195.1 -26.5 42.5 155.26 4.69 0.587 0 0 23 long half MFR5 + 15mm in front 183.6 -38 47.5 141.74 4.29 0.536 1 0 24 Meade Telecompressor 07051 184.6 -37 56.5 152.82 4.62 0.578 0 0 25 Meade Telecompressor pullout 8mm 162.6 -59 64.5 135.91 4.11 0.514 0 0 26 Meade Telecompressor pullout 18mm 127.6 -94 74.5 116.36 3.52 0.440 1 1 27 meade f/3.3 spacing #1 (5.8, min) 182.8 -38.8 43.9 132.92 4.02 0.502 0 0 28 meade f/3.3 spacing #2 (8.5) 175 -46.6 46.6 125.07 3.78 0.473 0 1 29 meade f/3.3 spacing #3 (11.7) 162.7 -58.9 49.8 116.37 3.52 0.440 0 1 30 meade f/3.3 spacing #4 (12.3, max) 159.3 -62.3 50.4 114.00 3.45 0.431 0 2 31 meade f/3.3 spacing #5 (taped in focuser) 139.6 -82 61.5 97.42 2.95 0.368 0 2 32 33 meade f/3.3 + new adapt + 2 filters tween meade f/6.3 spacing #1 (5.2, min) 132.2 212.7 -89.4 -8.9 75.9 43.3 88.19 205.25 2.67 6.21 0.333 0.776 0 0 2 0 34 meade f/6.3 spacing #2 (7.7) 208.7 -12.9 45.8 201.97 6.11 0.763 0 0 35 meade f/6.3 spacing #3 (13.3) 198.7 -22.9 51.4 194.93 5.89 0.737 0 0 36 meade f/6.3 spacing #4 (30.1) 162.2 -59.4 68.2 173.63 5.25 0.656 0 0 37 meade f/6.3 spacing #5 (34.5, max) 152.2 -69.4 72.6 167.73 5.07 0.634 0 0 Xtreme User Manual Page 90 Xtreme User Manual April 17, 2014 focus distance [mm] delta focus distance [mm] FR-toCCD distance [mm] ref. star distance [pixels] f/ratio [non] reduct. factor [non] vignette score [non] coma score [non] 125.6 -96 44.3 82.38 2.49 0.311 3 2 long half MFR5 + Meade f/6.3 (41 between) 142.6 172.6 -79 -49 41.65 53 89.07 114.28 2.69 3.46 0.337 0.432 3 0 2 1 41 long half MFR5 + Meade f/6.3 (64 between) 129.1 -92.5 64.5 96.05 2.90 0.363 1 2 42 5mm+long half MFR5 + Meade f/6.3 (41 tween) 145.6 -76 69.5 97.31 2.94 0.368 1 2 124.1 155.4 -97.5 -66.2 74.5 50 89.63 117.89 2.71 3.56 0.339 0.446 2 0 2 1 17mm tween 142.6 124.1 -79 -97.5 65.45 68.95 101.79 93.30 3.08 2.82 0.385 0.353 0 0 1 2 47 22mm tween 113.1 -108.5 71.45 91.59 2.77 0.346 0 3 48 final (2filters+empty ring, 19.2mm tween) 119.6 -102 70.05 92.31 2.79 0.349 0 2 long half MFR5 + MFR2"-RC (20 tween) 112 183.3 -109.6 -38.3 39.6 51.3 96.83 137.24 2.93 4.15 0.366 0.519 1 0 0 0 51 short half MFR5 + MFR2"-RC (40 tween) 194.7 -26.9 48 171.21 5.18 0.647 0 0 52 whole MFR5 + MFR2"-RC 157.3 -64.3 48.3 98.47 2.98 0.372 0 2 53 long half MFR5 + M f/6.3, Woadapt, 2filters tween 137 -84.6 61.35 98.99 2.99 0.374 0 2 54 long half MFR5 + MFR2-RC + 3 filters tween + 5mm in front 142 -79.6 60 121.20 3.66 0.458 0 0 Test # FR Compound Focal Reducer Point Tests (Aug. 18th, 2013) 38 39 40 43 44 long half MFR5 + Meade telecomp (23.5 tween) long half MFR5 + Meade telecomp (18.2 tween) 5+longhalfMFR5+M f/6.3 pull out 10 (51 tween) telecomp + m f/6.3 (50 tween) Final Compound Focal Reducer Tests (Aug. 20th, 2013) 45 46 long half MFR5 + M f/6.3, Woadapt, 10mmtween Additional Compound Focal Reducer Tests (Aug. 23rd, 2013) 49 50 short half MFR5 + Meade telecomp (40 tween) Xtreme User Manual Page 91 Xtreme User Manual April 17, 2014 Jack Huerkamp has also done some incredible research on attaching various Focal Reducers to the Mallincam Cameras. Below are options on using a diagonal with a Mallincam Camera. For those wanting to use their Meade f/3.3 focal reducer with either their SCT or refractor and 2” diagonal, follow the steps below. An additional part will be needed from ScopeStuff – a 2” Female Barrel to Female Schmidt Thread Adapter with Compression Ring (Part Number ADT3). By placing the Meade f/3.3 Focal Reducer after the 2” Diagonal (between the Diagonal and the Camera), it is still possible to attain focus and an f/10 SCT will be operating at f/3.3. If the ScopeStuff 2” Female Barrell to Female Schmidt Thread Adapter with Compression Ring is removed, then the assembly can be placed into a 2” focuser on a refractor for wide field viewing Xtreme User Manual Page 92 Xtreme User Manual April 17, 2014 Appendix I – First Aid for the Xtreme The Image from the Xtreme is Blinking and Flashing Constantly Diagnosis: This camera is incredibly sensitive to light and any stray light or an overload of light (too long an exposure on a very bright object) may trigger the safety inside the camera that will prevent overloading the internal camera electronics. If you do trigger the safety, you will see a flashing screen. Cure: Simply unplug the camera for about 5 seconds, and reconnect the power and wait about 3 minutes for electronics to settle. Change the exposure settings to eliminate the re-occurrence of the same event. If Day Time viewing: Set Sense UP to OFF (Set to Video Mode if using Miloslick), Set AGC to OFF, Set ALC to 1/12000 (Set Shutter to 1/12000 in Exposure if using Miloslick). My Image has evenly spaced Horizontal lines. Diagnosis: The horizontal lines are caused by interference. The cause of this interference can be anything from a loose connection, bad wire, external interference from another power source, or even a PAL version MallinCam set to NTSC settings. The most likely cause though is Power Interference from your Power Supply. Cure: Try to isolate the power for the MallinCam (don’t plug into multi jack power source). The best recommendation is to have an isolated 12V DC power supply (battery) solely for the MallinCam. It is also recommended that you try not to have your power cable and your video cable running parallel to each other. When I have Miloslick connect to my Mallincam through my MCV-1 adapter I only see a Blue screen. Diagnosis: The MCV-1 or other adapters can have multiple video input connections. For example the MCV-1 has both composite and Svideo. The cause of this symptom is that MallinCam is looking at one of those input ports, while the camera is sending the image through the other. Milloslick then just gives a Blue screen to say that I see nothing at the MCV-1 source. Xtreme User Manual Page 93 Xtreme User Manual April 17, 2014 Cure: Miloslick can change the port choice of the MCV-1. Just go into the Video Tab and in the Drop Down list choose Video Input. Inside this drop down will be the choice of input ports. When I start Miloslick I receive the error “NilOjectexception “, and the program will run. Diagnosis: This is an error most likely caused by a hardware configuration changed in your system (at least the Operating System thinks so, sometime just using another camera or port sets up a change in Windows configuration), yet the Miloslick Preference file expects no change and this causes the error message to appear when both collide. Cure: You can force the program to delete the preferences and start fresh by launching while holding down the "Alt" key (Windows) or "Option" key (Mac OS). In some versions of windows holding down the “Alt” key while double clicking the "MallinCam Control" icon will simply bring up the "Properties" dialog rather than launching. In this case, right click on the application icon, hold down the "CTRL" key and chose "Open" from the popup menu. My MallinCam is frozen, or the commands do not seem to be working correctly, the camera is acting strangely. Diagnosis: Somehow the MallinCam internals have become corrupted (power surge, static, cosmic ray) and all we need to do is reset everything back to factory settings. Cure: The first thing you should do is turn off MallinCam for about 30 seconds, then power it up as you normally would (this fixes about 95% of the issues). If this didn’t help, you can reset the MallinCam to its Initial Factor Settings by following this sequence: Press the Center Button for about 2 seconds until the menu appears. Press the Upper Button once which will send the cursor to the last line <SAVE>. Next press Right Button once. Word <SAVE> will change to <PRESET> Press Center Button once to execute ‘Preset’. This will send the camera to factory ‘Preset’ and the camera should be ready for you in about 5 seconds. Xtreme User Manual Page 94 Xtreme User Manual April 17, 2014 My stars look elongated. I have checked my focus and collimation and I know it is not an optical effect, since my hot pixels are also elongated. Diagnosis: Since you have eliminated mount and telescope optic issues. Then the star images are being affected by the APC settings in the Camera. Cure: You will need to adjust the APC settings in the Camera (either by the back buttons or through software). First ensure that both the Horizontal and Vertical APC settings are set to 0. Next start with the Vertical APC, move it up one setting (to 1) and see how the images of the stars look. If better, but not perfect, move it up to 2 and again check. Keep adjusting Vertical or Horizontal, if Vertical makes it worse. Most find Horizontal at 0 and Vertical at 1 or 2 is the best. I have been imaging for a while and now my images on the screen are looking washed out almost foggy like. Diagnosis: This most likely is cause by dew or frosting on the sensor (depending upon the season and settings). Usually caused by attaching reducers or filters in a humid environment and thus trapping humid air next to the sensor. Cure: First advice is to clean sensors or make attachment adjustments inside where there is little humidity. Use Desiccant (Silica Gel) Packs when storing camera. You will need to adjust the level of cooling that the camera is providing for the sensor. Less in winter, More in summer If Using Miloslick the setting range from 0 to 8 with 0 being the minimal cooling and 8 the highest. There also is an ON setting witch keeps the cooling running at 100% (this can cause condensation on the outside of the chip). If using button you will need to adjust the Motion Detect (TEC) settings, Note: PRESET: OFF, NOISE DETECTION: OFF means cooling runs at 100% For Minimum Cooling: NOISE DETECTION: ON Xtreme User Manual PRESET: ON (the whole chip is selected) LEVEL: 8 (all the way to the right) DEW REMOVAL: 60 Page 95 Xtreme User Manual April 17, 2014 Appendix J – Xtreme’s Settings Notes The following pages are due to the hard work of Dean Herring. I have included his worksheets and settings here (lots of valuable information in these pages obtained from questions and posted answers about the Xtreme. Worth reading): MallinCam – Hyper Mode – Daytime Viewing – Settings - TEC Never turn the Hyper mode on during bright conditions. This will overload the electronics. Or that, I have implemented a safety factor in each cameras. If bright lights enter the ccd sensor while in 6 or 12 seconds mode, the camera will revert to a lower frame accumulation reducing overload of the electronics. Here's what I suggest to do daytime viewing: SENS: OFF ALC: Shutter setting 350~ 12,000 AGC: OFF W/B: ATW (auto white balance) With these guidelines, you will be able to do daytime viewing. Try the Moon "setup" on the quick sheet provided with the camera. This will give you a good starting point. Simply change the ALC Shutter to obtain the best view in your monitor. Do not turn on the TEC, it is not needed for aytime. The TEC should be used at the 2 seconds and above exposure only. Beside, daytime heat may produce some condensation on the ccd sensor. The TEC is designed to be used at night time ambient temperature. MallinCam – Daytime For daytime use, start with the lunar settings for the camera. Make sure the SENSE is in the OFF position - you don't need 2.1, 6 or 12 seconds for daytime shots. Make sure ALC/ELC is set to ALC and start with 4000 to 12000 (1/4000th to 1/12000th of a second exposure). Turn the AGC down (full left). Using my friend's Meade 8" at f/6.3 on the Friday before New Year’s we looked at the moon in the afternoon under a blue sky. We were using the ALC at around 4000 to 6000. If your 6" SCT is set up at f/10, you may have to change the ALC to something less than 4000. MallinCam - Moon For Moon stuff, you want it as an ordinary video camera, no gain and no sense-up at all, Maybe set the gamma to 1.0 for better contrast and experiment with fast shutter speeds. Certainly there is no problem with using a neutral density filter as well if you wish. MallinCam - Planetary Viewing To view Jupiter, first you must remove the focal reducer. Next, the AGC has to be turned OFF in the menu. Next go to ALC then choose at least 1/6000 to 1/12,000 seconds in order to increase shutter speed. Also under W/B have the setting at ATW for Auto White Balance. A Barlow will decrease sensitivity and increase image size. An infrared blocking filter would help. Planetary viewing must be well setup in order to get best result for any telescopes. Once these settings are achieved, you should be able to get Jupiter in glorious colors. MallinCam –Moon / Planets - Highlight feature The highlight feature is a cool one. Try it on the moon. Get an area on the moon where half is fine and half is overexposed. Try the Highlight Feature. On the over exposed part, the section will become darker. Adjusting the slider bar will result on sensitivity of this effect. Its like a mask that becomes active on very bright areas that can be helpful in obtaining the right combination of brightness level while viewing the moon. F/ratio will also play a major role in combination of the right shutter speed. Also try it on a bright planet where it becomes over exposed with the SENS from about 8X to 128X. You will see the moons and other stars behind the planet while the Highlight feature is activated. Xtreme User Manual Page 96 Xtreme User Manual April 17, 2014 MallinCam - Daytime Viewing – lunar settings Yes, you can use the MCH in the daytime. In fact, 2 years ago at the first International Video Star party in Foymount Ontario Canada, several observers had their MallinCam among other brands, on targets through their telescope on a owl eating a mouse on top of a poll at 2000 feet. The MallinCam Color gave the best view through Fred Waucaush's 9 ¼ Celestron SCT. Colors were stunning. Tried it on my 10" Meade SCT but the Celestron gave a sharper view with vivid colors. Daytime conditions were hazy but sunny, evenings were cloudy. It figures. If you are going to try the camera in the daytime, avoid exposing the ccd sensor to direct sunlight while installing the camera on a lens or on your telescope. Direct sunlight will desensitize the ccd sensor with time and start a irreversible damage process. Keep your hand over the opening of the camera while installing on the telescope. Also, do not use the Hyper mode of 7-14-28-56 integration . It will result in a white out screen. Use the lunar settings supplied with the camera as a starting point. MallinCam - Planets – Filters –B/W – Star Collimation If you want more detail out of a MallinCam B/W, try a green filter. This will cut IR. and pull details plus ease of focusing. Make sure telescope is collimated to the best of your ability. Very crucial for lunar and planetary observing. This will make the difference of seeing cloud bands on Saturn or not. Use the camera on a star to collimate. It makes a great precise collimating tool. Use the zoom feature to further refine collimation. MallinCam - Comets - Settings Try the deep sky settings in 2.1 seconds. Comets are usually bright. At least this is how some have done it. No need to turn the Hyper mode of 6-12 sec. Use only the 128X under the SENS. Make sure you have the AGC set to MAN and slider bar at 3/4 way to the right. MallinCam – W/B – MANual - Refractor – Color Balance – focus Thank you for sharing the report about the refractor behavior with the color video camera. It is known that refractors do not focus red, blue colors at the focal point. Even with the most excellent optics such as APO's, a lens is a lens to the ccd sensor which picks up a lot wider range than the human eye. The clear solution is a reflector. Also we have to consider the lens in the focal reducers. Using the same focal reducer on a Newtonian, Result vary immensely compared to a refractor with some of the test I've done. Other focal reducers such as Meade etc, have the same results. When going through too many lenses, red will focus at a different point compared to blue for instance. The beauty of the Hyper Color is in the W/B using the MANual menu, the red and blue can be adjusted to some ones specific telescope. To get a good color balance, the key is to get a sky background close to dark brown / black in color. By achieving this, the result will be getting the best color balance to true life. Often I use the sky background to get the right color balance with various telescope including refractors. Once I have a dark brown / black sky background, I know I'm very close to the best color balance allowing me to focus on all stars including red, and blue. Try this setting: Go in the W/B and set it to ATW Auto White Control. Also reduce the sensitivity Red will appear bigger with many refractors dependent of their quality glass. Camera picks up what you feed it. Id say to reduce sensitivity and try the setting mentioned above. Make sure the AGC is set to MAN for MANual and select the red, blue settings by reducing the RED. You can also experiment with setting the MAN in 5600K. I have not fully finish experiment with refractors yet. MallinCam - Planetary Nebula You are over exposing the target. On most planetary nebulae, treat them as if they were planets. Use similar setting for planets and results will be excellent. Run the camera at about 36X or so, and try the AGC MAN only with the slider to full right. Or try this: Run the SENS at OFF, and try the Shutter at 100 to 250. Also, Adjust the brightness and contrast of your monitor. MallinCam – FOV - Calculation PS: I have found the formula for FOV using the effective focal length and the CCD pixel array size... ...To calculate your camera FOV, divide 57.3 by the scope's effective focal length in millimeters to Xtreme User Manual Page 97 Xtreme User Manual April 17, 2014 get the lens's plate scale in degrees per millimeter, and then multiply the scale number by the dimensions of the CCD's pixel array in millimeters. For example, a Meade 12" f/10 (3000mm FOV) SCT will have a plate scale of approximately 57.3/3000 = 0.0191 degree per millimeter. When coupled to MallinCam with a pixel array 7.40mm x 12.7mm), the camera will record a FOV of about 0.0191X7.40, 0.0191X5.95 = 0.141° by 0.113°... MallinCam - Planetary Nebula – Rock’s Daytime Picture - Gain Nice to hear from you again on the list! You are right about focus. I could not have a good enough live view of M 57 to fully have a firm focus. It was greatly affected by the heat waves of the late afternoon time. So, I left it that way and started to image a bunch of BMP snaps. Beside I had the focus setup for the night before observing / imaging run, so I figure it would be close enough. Capturing a nebula such as M 57 is far more difficult than M3 back in April 2006. At least with M3 I had stars to focus on. Not so for M 57. The camera setting was standard mode without any integration. SENS was OFF, AGC was set at MANual and full right to get the maximum gain possible without integration. Next I had the ALC set to OFF and the slider to full right. I might of have the ALC/ELC set to ELC> I can't remember but I 'm pretty sure it was set to ALC OFF. What I saw live was a shape, that's all. Not sure if it was M 57, I confirmed it by slewing the scope to Vega which can be seen live in the day time with the camera. Once I did the sync, I punched M57 on the keypad and the telescope brought me to M 57. I took near 50 minutes studying the live view to see if I could actually see something. I did but very faintly and once in a while. That's where I decided to snap a bunch of BMP images and see if I could pull something out. There was on frame that came out quite clearly while stacking them with RegiStax (got to love that program!). Not sure if the 16" larger aperture helped. I know I had to use F/10 to reduce the daytime glow of the blue sky. I tried with F/3.3 and F/6.3 but the background was way too bright. Only at F/10 I was able to reduce the blue sky glow enough to find a contrast. The part that amaze me the most is similar result with M 3 in the daytime was the excellent signal to noise ratio and color result and dynamics of the camera at high gain settings. Some have commented about the high gain I use in the MallinCam but this is useful under situation as presented here. High gain is important. That's why I change some IC's in the camera to obtain a cleaner gain at high gain settings. Gain is very important contrary to some who commented on other lists. Once gain is augmented, circuit redesign must be done to filter or reduce the noise to achieve the best signal to noise ratio. Once coupled with integration, result are spectacular for all astronomical subject to be viewed or maged. MallinCam - Sun / Solar Here's my settings when I view / image solar prominence. With the menu open on the camera, choose W/B. press the left or right button until it reads MAN for manual. Once in MAN, press the center key. You will be able to choose between 3200K, 5600K and RED, BLUE,. I choose RED, BLUE. While watching the monitor, adjust the RED to Minimum (left). From that point, either increase the BLUE or REDUCE the BLUE. You will have to experiment with your own telescope / solar setup for best view. I had to retune my adjustment on my H Alpha filter in order to make the prominence come out, this is very important. Adjusting your filter on prominence will make the big difference while viewing live on a monitor. After, you may adjust the RED and BLUE to increase / decrease the visual of the prominence on the camera. Took a while to get it right but it was well worth it. This is very important: make sure the AGC is set to OFF. Use the same settings as LUNAR as stated on the quick sheet I made for the camera. If I remember right, I had the SHUTTER set to 750 to get the best contrast ratio on the live monitor to see all the prominence. I use a Thousand Oaks H Alpha Prominence filter for ease of adapting to my various telescopes which they include 10", 14" and 16" among a few others. I just finish making an adapter for the 14" SCT and hoping to capture some solar image soon. The opening in front of the energy rejection filter is 3 ". Hope this help a little Xtreme User Manual Page 98 Xtreme User Manual April 17, 2014 MallinCam – Hyper Color B/W images – MANual – red - blue I was out late last night in my backyard testing the Hyper color I just recently put together with a class 0 CCD sensor and I did managed to get a B/W image using the USB2.0 adapter. In one of the settings I used Saturation and turn it all the way down to minimum. Results were a black and white image in the observing monitor and on the computer imaging monitor. There is a menus on the MC Hyper where you can choose manual RED and manual BLUE with Green being fixed. It won't provide any black and white image but I was able to "dial up" the sensitivity to provide the best black and white image using the USB 2.0 adapter with the Saturation set to minimum or zero. It worked well. Increasing the RED on the camera and having the Saturation turned all the way down on the USB 2.0 adapter provided sensitivity that rivaled the Hyper B/W. Also, by turning down the RED on the camera, I was able to "control" the amount of Infrared being displayed. MallinCam – Color Vs. B/W - Sensitivity I did more extensive testing last night measuring sensitivity compared to the Hyper B/W and the Hyper Color. Results were very close and productive. So far I estimate about 15% to no more than 20% less sensitivity between the Hyper B/W and the Hyper Color. This is just a rough guess for the moment and not conclusive. Rock MallinCam - Lunar Occultation’s – AGC – Lunar Dark Shadow You should be able to do occultation with all MallinCam providing the Hyper mode is turned off and the SENS is turned off . Use the AGC in MANual mode to get the maximum gain. The MallinCam has the highest gain available with the lowest noise for such work. The AGC amplifier is a high gain type plus we have redesigned the circuit to accommodate lots of gain available without having to engage the SENS and, or, the Hyper mode as long the SENS is turned off, have the SHUTTER wide open and control your image with the AGC in MAN mode. Never use the camera' s AGC in the ON position for astronomical targets unless lunar dark shadow is what you want to look at or daytime scenes. APC (Advanced Pixel Control) APC – Nebulas / bright Star ringing click on option menu and scroll to exit. on exit, hit left or right arrow to get "next". select next to get option 2 menu. Both sliders are set all the way to the right = maximum digital processing which will enhance nebulas and such. It will also increase ringing around bright stars. APC – Imaging if both sliders are all the way to left, the processing is held to a minimum. When imaging set it all the way to left and put the vertical up one notch to keep the stars round. APC – Live Observing - Imaging If your going to do live observing I would recommend both APC adjustment sliders in the middle position to give you high resolution on the monitor. If you are going to image then these two APC sliders should always be to far left. For live viewing of deep sky object the APC set at 3/4 way to the right will give you incredible sharpness and resolution unmatched in the industry. APC APC controls the amount of internal digital signal processing that the camera performs. If the APC settings are too high, stars can appear to be "square" and bright stars start to show black halos. Lowering the H and V values for APC will reduce this phenomenon. When dealing with objects like galaxies with nuclear detail - like M82 - increasing the APC will increase the detail seen in the galaxy. So in my estimation, lower the APC values when dealing with star clusters and globulars and increase it for diffuse nebulae and galaxies. Xtreme User Manual Page 99 Xtreme User Manual April 17, 2014 APC – stars - imaging Turn down the APC on the camera settings. Some stars are square and some have ring around them. APC setting must be turned down in Astrophotography. For visual, APC is a wonderful feature to experiment with offering a more" hi res" live image.. APC One thing you may want to try, if you have not done so yet, is adjusting the APC in the OPTIONS sub-menu. The APC regulates the amount of digital signal processing performed by the camera. I usually set the horizontal and vertical values to full left when I ship the cameras to minimize any artifacts around bright stars. However, John and I experimented with the APC on M82 and M51 and found that more detail was revealed with higher values for H and V APC APC – Sun - Moon The importance of the APC function is not talked about too much. When I view the sun in H Alpha, the moon, I use the APC from half way point to near full at times. When I view galaxies live, same applies. The careful adjustment of the APC will blow away any cameras as far as resolution is concern and will benefit the user to do serious observing of deep sky targets using any telescope. Again, careful adjustment must be observed since some star artifact can be seen if adjusted incorrectly on bright stars only. APC – Menu – Star Artifacts Your image seem to have light leak. Light is entering in the system somewhere near the 1.25" adapter or nearby. One thing I noticed was the round artifact around the stars. Go into the MENU and select OPTION. Once in OPTION, bring the cursor at the bottom to RETURN. Press the right key. It will now say "NEXT". PRESS the CENTER key. Once on the MENU 2, you will see a feature called APC. Select APC and lower both sliders to the far left. This will reduce the DSP to a minimum removing all-star artifact. APC - DSP (Digital Signal Processing) – Options – Anti-blooming The DSP is always on no matter what. This results in high resolution with the lowest noise in the industry. If you chose to reduce the DSP (Digital Signal Processing), you can do so by accessing the APC mode and selecting the vertical settings and the horizontal settings by lowering their values. This is accessible through the OPTION settings. Once in the OPTION, bring down the cursor to SAVE. At this point hit the right key or left key. This will now change into NEXT. Hit the center key. You are now under the second menu as OPTION 2. APC is the first selection. Next is the HIGH LIGHT Feature, next is the COLOR BAR GENERATOR or GRAY SCALE BAR GENERATOR. By lowering the APC settings towards the left, you reduce the DSP to its minimum. Having the APC set in the middle will increase resolution and some sensitivity to a certain point. This will result in small artifact around BRIGHT STARS ONLY. It is the ANTIBLOOMING feature kicking in. If you keep both APC sliding bars to the far left, this effect is eliminated totally making the image as clean and free of all artifacts. Then only the CCD sensor anti-blooming is active. Images produced with the APC on or at minimum will provide the highest dynamic range ever seen in any video ccd camera for astronomical purpose on the market today. A lot of research and development done right here in Ottawa Ontario Canada went into our cameras to offer the user the finest available. APC – Live Observation - Imaging The APC is a enhance mode feature for live observation. If you are going to take images it is suggested to set the V and H to their lowest settings towards far left. Increase the V will adjust stars to a perfect round shape compensating for the 4:3 ratio. The APC is similar to sharpening algorithm that allows the sharpened observation on all targets during live observation. It stands for Advance Pixel Control. You can actually adjust the height and width of the Vertical or Horizontal pixels. As mentioned above, having both settings at far left will run the Enhance feature to a minimum allowing a more "photographic feel" without any artifact. In live mode or observation mode, APC can be left in the middle position which will enhance the image significantly. Xtreme User Manual Page 100 Xtreme User Manual April 17, 2014 APC – DSP – ring around stars You are correct. By turning down the APC to minimum, the DSP ( Digital Signal Processing) mode is greatly reduced to an absolute minimum removing ring around stars. (Talking about ring around stars, even Hubble Telescope does have ring around stars. I just checked out a site where planetary nebula are displayed with Hubble images for comparison and Hubble have some ring around stars. Its just an artifact in the software that's all.) AGC (Automatic Gain Control) AGC - Options The AGC has 3 options. By having the cursor next to the AGC, simply press the right or left key and you should be able to toggle from ON, MAN or OFF. Always use MAN for deep sky targets with the slider in the mid position for starter. Use the OFF position for all lunar, planetary and solar (with proper solar filter of course). AGC – Planets Make sure the settings for the AGC is set to OFF when observing lunar and planets otherwise bright light protection in the camera will be activated and will take several seconds if not minutes to regain sensitivity. Simply unplug the dc cord from the camera for at least 20 seconds and reconnect. AGC- Tracking error – star smear Try shorter exposure and increase the gain (AGC). This will make star pattern a little rounder due to less tracking error. AGC – Amp Glow The glow in the upper left is amp glow. To reduce it, you need to lower the AGC (gain)… The upper left corner glow is caused by the internal ccd amplifier causing electro luminescence during long exposures. It can be controlled by lowering the AGC. AGC - Gain It is pointless to have 3-4-5-6 seconds when you can get the same affect with 2 seconds with the gain turned up. The increase factor would not be worth the trouble to have such 3-4-5-6 seconds integration. The current settings are based on extensive testing done where these exposures are the best to use to gain a substantial amount of image brightness. Use the AGC in the Manual mode to compensate between all other settings. AGC – Gain Control The CCD sensor in the MallinCam series of video CCD camera are more sensitive than most cooled ccd imagers with its variable gain control which can be increased to specific levels where the image would rival a 5 seconds exposure using only 1 second exposure on the camera. For example, if the camera is set at 2 seconds integration, having the AGC MANual mode set at maximum a exposure can rival easily a 7 seconds exposure under dark skies. AGC – solar – deep sky - daytime I had a pretty good afternoon imaging the Sun through a 1000 Oaks H- Alpha filter system on my LX-200 GPS 10" using the Mallin*Cam Hyper BW. I set Sensitivity to OFF, ALC to 1/350th ... and had good definition of small prominences. Any other set variables? Your settings are correct. The AGC should be set to OFF. In the menu, the AGC has 3 mode. OFF, ON, and MANUAL. For solar (with proper filter), lunar, and planets, always have the AGC set to OFF. For deep sky, always use the MANUAL mode and adjust accordingly. For daytime > observation through an optical system of daytime subject, the AGC would operate better to ON position. Having the AGC set to OFF will make the MallinCam operate at unity gain similar to a ccd camera. AGC – Manual - Sense – Integration - Monitor Now, if the integration is augmented such as 7-14-28-56 seconds, the AGC in MANual mode must be lowered! This is a must. What that does is it lowers the output . Since increasing the integration augments the signal as well, it must be lowered at the output. Otherwise overload of the monitor will occur and the internal AGC of the monitor will not be able to handle a high signal as such. All t.v. receivers have a AGC input. AGC stands for Automatic Gain Control. Any device that receive R.F. such as you car radio, your home t.v., receiver scanners, Ham radio all have AGC in the front end. In the case of a video signal, same applies. By lowering the signal output of the camera with the AGC set in MANual mode, the user no longer over drive the monitor thus Xtreme User Manual Page 101 Xtreme User Manual April 17, 2014 allowing a greater signal to noise ratio and a clearer and better color reproduction. If a capture card is used, the majority don't have a internal AGC such as TV. monitor have. They have a fix settings. Lowering the Brightness and augmenting the Contrast will bring back the color intensity and image quality while capturing. AGC – Manual – Amp Glow You are right. The adjustment of the AGC to full left and one "notch" will equal to about 15% gain. Amp glow is minimized. To get the best result from a high gain circuitry like the MallinCam, is to have the AGC in MANual mode correctly adjusted. This take a while to get it right for proper background and amp glow reduction. Once achieved, it is saved permanently into the memory settings of the camera. AGC – Integration - Image drop out When I dropped the AGC and set the integration to 28 sec, the image would appear then disappear. It did this at each integration. Did you have the white balance (W/B) set to ATW? I tried using ATW last Saturday night, and experienced something similar. I think what is happening is the camera is detecting too much light with the way it is set up and shuts off the image as a protection. When I re-set the W/B to MANU with Red 2 to the left of center and Blue 1 to the right, the image appeared and stayed. I had AGC on MANU and 2 from the far left. AGC – Light Gathering and Moon Interference I had the AGC in MAN mode which is mandatory to have in order to use the Hyper mode. This setting was set at 1/4 way from the left to give me an image that was not affected my the moon glow who happens to be out in full force in the last couple of nights. Large aperture does have its draw back when it comes to light gathering and moon interference. Careful adjustment of the AGC in the MAN mode is important to get the best balance in background glow and color balance / contrast. AGC – ON/OFF - Deep Sky – Adjustments "When using the HYPER Mode, the AGC must be set to MAN for use of the 6 or 12 second exposure limits." Since I did not follow that and had been trying AGC with ON and OFF, did I really mess something up? I've noticed a number of "must haves in "MallinCam Menu Settings.pdf"--I had thought that not following them would just prevent the hyper mode from turning on. Since I was actually getting useful results at times I continued to try. Have I hurt anything that a PRESET won't fix? Never use the camera's AGC in ON mode while doing deep sky observation especially under light polluted environment. Always use the AGC in MAN mode and adjust the camera to suite you F ratio / aperture/ seeing conditions. If any settings from the AGC is going to be performed, always have the camera running in the 7 sec. mode. This will allow the auto reset to keep all figures set as before with the exception of the AGC of course. Once the AGC slider adjustment has been moved, the camera will hold the settings for 7 seconds, then it will go off by itself then, a black image will appear for 7 seconds. Your next image will be instant 7 seconds integration. If the image is too bright, simply lower the AGC further more. Always have the camera running at SENS 128X. while in 7-14-28-56 sec mode as the Hyper circuits dependent on that frame count for a proper refresh and safeguard of electronics. ALC (Automatic Level Control)/ELC (Electronic Level Control) ALC There are two ALC/ELC settings. Put the camera into the ALC settings. It will display a series of pre fixed value on the screen. Xtreme User Manual Page 102 Xtreme User Manual April 17, 2014 ELC If you put the ALC/ELC menu into the ELC menu, no value is determined. Simply adjust to suit the best live view with the AGC turned to OFF position. Do not use ALC / ELC function if you are going to use the integration mode such as 128X and the Hyper mode of 7-14-28-56 seconds. Only use the shutter speed or variable speed to achieve best lunar / planetary view or if using a solar filter. The ELC is totally variable to suite your specific needs and view. I never use it while in deep sky mode. I use the pre fixed values in the ALC mode. To switch from ALC /ELC simply press the right key or left key when the cursor is next to the ALC/ELC, then press the center key to access the full menu for the specific shutter speed value. ELC – shutter speed A wider extended range of shutter speed effect when used in the ELC mode which can be better for certain observation you may have. For example, if 1/12,000 is not enough, try the ELC mode and slide the adjustment far left. You will exceed the range of 1/12,000 when the AGC is set to off. ALC – Planets – Shutter Speed - Filters Setup the scope without a focal reducer. If too bright, increase the ALC to 8000. Cameras that has only 1/2000 will not possibly get the full benefit of true planet and lunar views without using a polarized filter. Something the MallinCam don't need. The ALC goes as high as 1/12,000 for shutter speed allowing full coverage of all astronomical targets without filters. Color Bar Color Bar Generator Have you tried to calibrate capture card using the built in color bar generator in the MallinCam? To access the color bar generator you need to go through the second menu or while in the 2 seconds mode (128X), press the upper button and lower button at the same time for about 2 seconds and you will have the color bar generator on screen to adjust all the settings of the video capture card. It is a reference to adjust monitor, capture devices etc. Very handy to have. This feature is in every MallinCam Hyper and Hyper PLUS COLOR or B/W models. Color bar / Monitor WRT the Speco, it has performed WONDERFULLY! Everyone has marveled at the rich colors shown on it. When you actually get it out under the stars, you will forget the color bar and tweak the monitor to give the best live appearance. Color Bar - Camera There is a built in color bar generator in the camera. Just depress the top and button menu buttons while the camera is running and it will pop into view. For info on color bar generator, check out the following link: http://www.mivs.com/products/videoproducts/tsg/index.html Color Bar I would call up the Color Bar from the OPTIONS sub-menu to see what it looks like on your Sanyo monitor. Tweak the monitor functions to get the colors to show correctly. See the following link: http://www.videouniversity.com/tvbars2.htm Once the monitor is set correctly, try checking the W/B on the camera's menu. Is it set too red? If so try lowering the red scale. You can also change from MANU to ATW to see if it helps. Zoom Zoom Laptop I observed and imaged the Ghost of Jupiter (NGC3242) last night with my 24" and the MCHC+. I found that exposures of just 2 seconds were all that were needed with the MallinCam zoom feature on. When the image came up on my laptop, using the AVerTVMedia Express MCE card, I then needed to turn the contrast down sharply to get central detail and the center star. I am Xtreme User Manual Page 103 Xtreme User Manual April 17, 2014 posting an image of the Ghost of Jupiter in my gallery (astroimaging by Tom O) in the Photos section. The color in both that image and the one I saw on the screen is amazing. Zoom – Barlow Ring Nebula/M57. It was as enjoyable as M27. We had no difficulty seeing the central star and the one star in the central region that is off center. The coloration was wonderful; contrast was excellent. The nice thing about this object in color is the "core" color that gently contrasts the ring color. The picture held nicely with the Zoom set at maximum on top of 2 inch Televue Barlow. Gamma (The way brightness is distributed across the intensity spectrum by a monitor, printer or scanner.) Gamma – (back ground) Try setting the Gamma to 1.0. There are several setting to get the right background. Under W/B, 2 settings are usable. ATW is automatic White balance. AWC is Auto Trace White balance which requires you to push the center key to take a sample through the camera to adjust itself for the best white balance. This method is for one object at a time. My favorite is MAN for manual. Once in the manual settings, you have a choice of 3200K (infrared), 5600K (visual and some iInfra). My favorite is PRESET which allows you to set the RED and BLUE so the red background can be reduced. This is very important to achieve the right background. All ccd sensors not matter who makes it are always more sensitive in the RED. It must be reduced using the adjustment. Light pollution and star light reflects in the atmosphere and is seen by the camera in the red spectrum. Keep the AGC down and adjust the W/B settings Depending on which monitor used, set the GAMMA at 1.00. This will keep the background darker. It is a little bit difficult to get the right adjustment ratio achieved. When I observe or image from my light polluted backyard, I always turn down the RED to one notch up from the left. If conditions are better, I sometime set the camera to ATW with luck. You may want to consider going to F/3.3 to reduce sensitivity increasing background darkness. Gamma – (back ground / image / TV) Go into the Main menu. Point the cursor to OPTION. Click center key. This will bring you to the 2nd menu. Near the bottom look for GAMMA. Standard it 0.45 and option is 1.00. This will darken the background considerably. Excellent if you are going to image, or use a regular TV to view object. You may loose a bit of sensitivity though depending what type of monitor you use. Gamma –light pollution – background-imaging When imaging under sever light pollution like you have, put the GAMMA at 1.0. This will darken the background to an acceptable level. You will have to increase the AGC accordingly to increase the loss of gain. Make sure both APC the Vertical and Horizontal are set to far left. If you use these settings you may be able to go to 28 seconds. Gamma – Background – LCD - Option menu By adjusting the gamma from 0.45 which is the default to 1.00 in the OPTION menu, this mode will not make the background whiter when using the USB 2.0 adapter or a LCD observing monitor. By having the gamma to 1.00 the sky back ground is much darker. Normally I would have to turn down the Brightness and augment the Contrast in the USB 2.0 menu to reduce the white background. If you use a LCD monitor to visually observe it is strongly recommended to put the camera in the 1.00 gamma setting. If you use a CRT observing monitor, the AGC and dynamic range in such monitor is continually self-adjusting to the signal being fed to the CRT monitor then it’s a known issue with such monitor. Gamma – LCD/CRT - AGC The camera has two settings for GAMMA. if you are going to use a LCD display, set the camera to GAMMA 1.0. If you are going to use the a CRT, use 045. and adjust your monitor brightness and contrast for the best dark background, image contrast. This is a personal setting for each individual taste and setup. Use the AGC to lower the output of the camera to get the right combination of image brightness, best background possible. Each monitor, telescope and F ratio is different from one owner to another and adjustment must be perform using your own setup Xtreme User Manual Page 104 Xtreme User Manual April 17, 2014 combination. Same applies if a capture device will be used to capture images. Calibration of the capture device must be perform before you can take images to computer. This is live video with many parameters to be adjusted to suit your own telescope / F ratio / monitor/ combination. If a proper adjustment is achieved no need for histogram. Your monitor will act as if it was a "live" histogram by adjusting the contrast and brightness controls. Integration – Sense Sense – Integration – How it Works How the Mallincam integration works? The camera is always running in full video mode. Once you activate the X2, X 4, etc under the SENS, what happens is the shutter opens like a ccd camera would under exposure. Once the shutter close, the image is sent to the memory while another exposure is taken. This is repeated instantly and forever for as long the shutter or the SENS is set to any settings. While the image is stored in the memory, an exposure is taken once the exposure is taken the previous image is displayed into the video section through the video chip Once you change the settings of, say, AGC, or SENS, or ALC /ELC, the memory has to emptied itself and the SENS count start with the new settings you have chosen.. If you choose for example X64, it take a few minutes to reach the proper count. Several things are happening here. The AGC / SENS must keep a steady video stream in order to produce a viewable image until the maximum SENS is reached without overloading the video section and keeping the electronics safe. Something the competition lacks. Sense – shorter exposures Don't use the 7, 14 or the X4 switch with SENSE in any setting other than 128X. To get shorter exposures, place the switches in their respective OFF positions and lower the SENSE. 64X is 1 second, 32X is 1/2 second, etc Sense – Hyper mode First the camera must be running in 2 seconds mode via the main menu with SENS set at 128X. That equals to about 2.1 seconds. Once this is achieved, you can now activate the Hyper switch: the 7 and 14 seconds integration. What that does, it opens the shutter just like a ccd imager for either 7 or 14 seconds depending what you have selected. Once the image has been accumulated on the ccd, it then sends it the memory then to a converter to convert the data into video output. Image is displayed instantly and refreshed at every 7 or 14 seconds depending which integration was used. Once you got the Hyper mode going, the next switch is for multiply the integration. Example: at 7 seconds ( Hyper switch down) once the X4 has been activated (up), you now have 28 seconds integration happening. Shutter is open for about 28 seconds. If you had the Hyper switch selected to 14 seconds, then the X4 switch becomes 14X4= 56 seconds. All of this is refreshed automatically. The X4 switch only works with the 7 and 14 seconds integration switch (Hyper mode) Its that simple. Sense – Hyper - CCD "imager like" camera Let's come back to the SENS. Once you have the camera set to 128X under SENS menu, Activating the Hyper switch on the side of the camera to increase the integration to 7 or 14, 28 or 56 seconds, our own circuits becomes active and the ccd sensor is in part independent from the rest of the camera. It is now a full blown ccd "imager like" camera. The only difference from a full ccd imager is each image are stored independently into a 32 megs memory until the next image become available after the exposure. This is done instantly through two independent CPUs inside the camera. The DSP (APC) feature is self-adjusted, filtration is augmented, and speed is running at maximum on both CPU inside the camera. SYNC is also affected to give the readable image at the video output circuitry. This is why at 7-14-28 or 56 seconds integration a small variation will occur as far as time integration is concerned. SYNC and other video section must be handled to keep a 29.970 frame per seconds output. All this is done through the CPU and the Hyper Circuit which takes over the whole camera as soon the Hyper mode is engaged. This is why we called it the Hyper camera. When you hit the switch on the side there is a lot of things are happening in there to give the finest, most noise free, artifact free and most sensitive image available today compared to any video ccd cameras. One must learn to access these features and learn the correct procedures in order to get the most out of the camera. The Hyper camera sensitivity will beat anything out there as far as integration is concern especially at 14 seconds Xtreme User Manual Page 105 Xtreme User Manual April 17, 2014 integration. If one is using a Hyper B/W, look out! With the EX type ccd sensor we use being of class 1, which WE INSTALL IN EVERY CAMERAS, sensitivity will go beyond anything seen to date on the market for astro ccd camera. Sense – Hyper mode – AGC Adjustment There are a few steps to look for when using the MallinCam. When changing AGC settings, the Hyper mode (7-14-28-56 seconds integration) must be off. Once you have adjusted your AGC setting, the refresh rate must be up to 128X in order to get the the Hyper mode to run again. It takes about 2 to 3 minutes to get the full 128X ot 2 seconds integration mode. Once this is achieved, then you may flip the switch to 7-14-28-56 to see instant result once the integration has been done. Sense – Hyper Mode – 128X – AGC Adjustment Also, if you are going to try this on M 42 or any targets that are too bright, the SENS will go from 128X to 96 then 64, 48 etc. automatically and eventually to a level where protection of the electronics will occur. If this happens, the Hyper mode of 7-14-28-56 will lose the frame rate. The Hyper mode is made to operate with SENS at 128X only. You may get decent results at 64X, but for protection of ccd sensor and associated electronics, the SENS must be at 128X while using the 7-14-28-56 mode. If this happens, the refresh rate will be a quick image then a dark one. This is an indication that either the 128X SENS has dropped down due to image being too bright (protection mode), or the SENS 128X was not up to its full 128X (2 seconds) refresh rate after an AGC adjustment was made. It does explain this in the sheet included with the camera. Integration - Reset - Safemode – Flashing Image – SafeGuards There is a reset on the camera, there is two way to do it. First, the problem you had by having a flashing image, was caused by the 128X count loss. If the camera is exposed to a too bright environment, it will lose the 128X count automatically allowing the safety to kick in. The view were not suitable and the camera goes into safe mode by losing 128X count so no image is kept for long period in the memory. This also avoid electronics overloads. If you want to reset the camera completely, simply go to the SAVE at the bottom of the on screen display and hit the right KEY. It will now say RESET, hit the center key. You will loose all info and settings. You will have to start over from scratch by adjusting all your settings. Always perform a hard reset with the Hyper mode off (7-14-28-56 sec.) W/B (White Balance) W/B (White Balance) – Manual – Red – F Ratio At 5600K the sky is an amazing red, and it got redder with longer settings. So much so that the target is somewhat washed out. I ended up viewing at 3600K which was much better. I tried all kinds of setting to get rid of the red but no luck and I did have the user guide trying to eliminate finger trouble. What in the world am I doing wrong. >Do not use the 3200K or 5600K. In the W/B (white balance) there is the ATW for Auto Trace White balance, AWC Auto With Control., and MANUal mode. Go into the manual mode, you will see 3200K which is near infrared, 5600K is visible and some near infrared, next is preset <USER>. There, you will have the red adjustment, blue adjustment. Since ccd sensors are more sensitive to RED, simply lower the RED adjustment by 2 notches, and increase the BLUE adjustment by one notch. This should provide a good starting point. If the image is too red, lower the RED adjustment some more. If hazy atmospheric conditions is evident, the RED will have to be lowered even more since light pollution can reflect from haze making the background in the image red. Once this setting is saved, it will remain permanently in the memory until you play with it again. Also, check the F ratio used. If F 3.3 and below is used to view an image, this will make the background more sensitive to red. Increase the F ratio to F/5 or F/6.3. Xtreme User Manual Page 106 Xtreme User Manual April 17, 2014 W/B All ccd sensors are more sensitive in the red spectrum One reason why the LED on the camera is green. Try to lower the RED setting under W/B (white balance) menu, or set the W/B to ATW (Auto White Balance). Are you imaging from the city or dark sky? If from the city, light pollution is reflected as red. High humidity condition will also reflect as red. W/B - AWC – Color Balance Doing a white balance is mandatory in order to have the right color balance. Use the AWC. To do so, while AWC flashing, press the center button again to capture an auto white balance into the memory of the camera which will be used for all other settings in the W/B mode. I find the color MallinCam requires more adjustments and experiment to achieve good color balance. It is part of the fun. W/B – Deep Sky Keep the W/B (white balance) in the MAN mode with the red slider left and one notch up from the left. Keep the BLUE in the middle or so. The lower the F ratio the darker skies you will need. Light pollution, air pollution reflect easily in the red spectrum. If you have humidity same applies. Keep the RED down as all ccd sensors are more sensitive in the RED region. W/B - AWC Have you done a AUTO WHITE BALANCE? Go into the MENU under W/B and choose AWC. once there, with your image centered, hit the center key. You will notice the AWC will now flash. Hit the center key again. The camera will now be calibrated for white balance on the target you have chosen. The RED should now be lowered by a large margin. Go back in the MAN mode and set the RED so the background will now be set to your aperture/F/Ratio. By doing a one push AUTO WHITE BALANCE, it will fix the current environmental color as a standard white balance. Imaging Settings Imaging – Capture Device – ring around stars - APC Your image is fine. I have a feeling the settings on your capture device are not quite to the point. I think it may lack brightness. Also if you have a MC Hyper 12 bits CPU camera, make sure the APC is all the way down. This will eliminate all ring around the stars and produce a smoother image. The APC is mainly used for visual observation through a monitor which increase resolution and sharpness. For imaging this function should be turned all the way down to the left on both slider control, the H and V (Vertical pixels control and Horizontal pixels control). Give is a try and let us know the results. Imaging – Deep Sky – (nothing see live) - Settings Here's how I did some daytime shot of deep sky objects: Camera settings were: SENS: OFF ALC: OFF (wide open) AGC: MAN. 1/4 from left W/B: ATW or MAN ( you have to experiment with this for color model only) Options: Gamma> 1.00 Grab as many frames as possible. You may or may not see anything live for the moment. Coadd everything you have then process it to retrieve the information especially using the brightness and contrast of any software that allows such adjustment. I used Photoshop "Curve" Imaging – BNC / S-VHS – High Resolution Monitor We recently did some experiments with a Hyper B/W using the composite (BNC connector output) and S-VHS. There is actually a difference between the two especially when using a high resolution monitor. Capturing an image with a high resolution capture device will provide the better result using S-VHS. I now use exclusively S-VHS when possible to capture images. When I use the high resolution monitor to observe the image while capturing, I still use the composite BNC camera output. The MallinCam can use both at the same time with no loss in signal and Xtreme User Manual Page 107 Xtreme User Manual April 17, 2014 signal quality. The best performance for serious observing would be to use S-VHS with either model of the MallinCam Hypers, the B/W the color camera. I have noticed that certain type of capture devices won't show as much of a difference, but when a high resolution unit is used, the difference is remarkable. Imaging - Solar – Sun Here's some more detail on how I've captured the solar image I posted today. I use 2 separate images. The first one was the prominence which were taken at shutter speed of 350/sec at F 6.3 with the 10 SCT. The seconds set of images were the surface structure which was taken at 12,000/sec shutter speed at F/6.3 with the same 10" SCT. I combined the two, then change the monochrome image into red / orange. This was very simple using Photoshop. This is a result of only 4 coded images. The image shows the excellent dynamic response of the camera without having to take hundreds of frames and coding them like most do. The high gain circuitry really shines here resulting in a excellent signal to noise ratio. High gain is very important in video ccd camera for astronomy work. Imaging – Sun Here's an image just taken this afternoon (Dec 4 2006) from my Downtown location in Ottawa. Sun was only 22 deg above horizon and just above the roof line of the house. Imaged with a LX 200 GPS 10" with F/6.3 focal reducer in ALT-AZ with a Thousand Oaks H Alpha Solar filter 0.9 A. 4 images coded with RegiStax 4.0. Camera was MallinCam Hyper B/W (monochrome) Video CCD Camera. Color done with Photoshop 7, processed with RegiStax 4.0. This is my first H Alpha complete with surface details. Settings on the camera were: ALC Shutter Speed: 12,000/sec. (Something SC II or III can't do) AGC: OFF Gamma: 1.0 APC: Horizontal and Vertical turned all the way down (left) with V set at one step up. Imaging - Monitor When I observe and image in color, I use a monochrome monitor on my color camera. When I capture the image to computer it is in color. Using a monochrome monitor on a color camera gives me a much sharper and brighter image to allow a more precise focus. I try to adjust the color USB 2 adapter settings to match the view of the monochrome monitor as far as brightness and sharpness is concern. I then adjust the color on the camera to give me the best color combination using the computer monitor. Imaging - USB 2.0 Adapter – Color / B/W The USB 2.0 adapter is a device that allows you to connect the 75 Ohms or S-Video NTSC or PAL video signal output of the camera to computer so you may see the live image on computer. This device is a converter that digitize the signal mentioned above. If you have a high resolution video card in your computer that allows you to connect a video signal in, you do not need the USB 2.0 device. The camera is strictly video output to be use on a viewing monitor. It cannot be connected to computer unless you have a video card that will allow you to do so. Using the USB 2.0 software called AMCAP or ULEAD Video Studio 6 or version 7 (which is included in the USB 2.0 adapter) you can turn down the function "Saturation" in order to see the image in black and white using a color camera. This function cannot be done through the camera. You can control the RED and BLUE by turning the adjustment in the camera MENU but the GREEN is fixed. Xtreme User Manual Page 108 Xtreme User Manual April 17, 2014 Appendix K – Suggested Item Specific Settings SENSE UP ALC SATURN MOON M 13 M3 OFF OFF 128X 128X OFF OFF OFF 1/250 1/3000 BLC OFF OFF OFF AGC OFF OFF ON, MAX LEVEL = 3 ON, 3 W/B MAN=OFF R=2,B=2 MAN=OFF R=2,B=2 MAN=OFF R=2, B=2 SAME OFF OFF OFF OFF PRESET = ON PRESET = ON OFF OFF LEVEL = 8 LEVEL = 8 DEW = 60 DEW = 60 ZOOM TEC Xtreme User Manual Page 109 Xtreme User Manual April 17, 2014 M104 M64 NGC 4565 NGC 4725 SENSE UP 128X 128X 128X 128X ALC OFF OFF OFF OFF BLC OFF OFF OFF OFF AGC ON, 2 ON, 2 ON, MAX LEVEL = 2 ON, 2 MAN=OFF R=2, B=2 SAME W/B MAN=OFF R=2,B=2 MAN=OFF R=2,B=2 ZOOM OFF ON, 8 ON, 8 OFF TEC OFF OFF OFF OFF 14 SEC 14 SEC 14 SEC 28 SEC INTEGRATION Xtreme User Manual Page 110 Xtreme User Manual April 17, 2014 M57 M27 SENSE UP 128X 128X 128X 128X ALC OFF OFF OFF OFF BLC OFF OFF OFF OFF AGC ON, 2 ON, 2 ON, 2 ON, 2 W/B SAME SAME SAME SAME ZOOM ON, 3 OFF ON, 4 ON, 3 TEC OFF OFF OFF OFF 7 SEC 14 SEC 14 SEC 14 SEC INTEGRATIO N Xtreme User Manual M82 M106 Page 111 Xtreme User Manual April 17, 2014 SENSE UP ALC BLC AGC W/B ZOOM TEC INTEGRATION Xtreme User Manual Page 112 Appendix L – Notes _______________________________________ _______________________________________ _______________________________________ _______________________________________ _______________________________________ _______________________________________ _______________________________________ _______________________________________ _______________________________________ _______________________________________ _______________________________________ _______________________________________ _______________________________________ _______________________________________ _______________________________________ _______________________________________ _______________________________________ _______________________________________ _______________________________________ _______________________________________ _______________________________________ _______________________________________ _______________________________________ _______________________________________