1
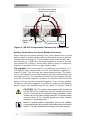
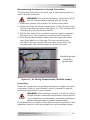
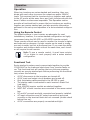
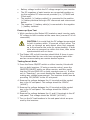
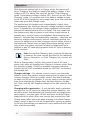
ME-SSI
Series Stacking Interface
Owner’s Manual
Disclaimer of Liability
The use of this manual and the conditions or methods of
installation, operation, use, and maintenance of the ME-SSI (Series
Stacking Interface) are beyond the control of Magnum Energy, Inc.
Therefore, this company assumes no responsibility and expressly
disclaims any liability for loss, damage, or expense whether direct,
indirect, consequential, or incidental that may arise out of or be
in any way connected with such installation, operation, use, or
maintenance.
Due to continuous improvements and product updates, the images
shown in this manual may not exactly match the unit purchased.
Restrictions on Use
The ME-SSI may only be used in life-support devices or systems
with the express written approval of Magnum Energy. Failure
of the ME-SSI can reasonably be expected to cause the failure
of that life-support device or system, or to affect the safety or
effectiveness of that device or system. If the ME-SSI fails, it is
reasonable to assume that the health of the user or other persons
may be endangered.
Contact Information
Magnum Energy, Inc.
2211 West Casino Rd.
Everett, WA 98204
Phone: (425) 353-8833
Fax: (425) 353-8390
Web: www.magnumenergy.com
Revisions Required
Your MS4024 inverter and remote control (if used) must have the
correct revision level in order to work in a series stacked configuration. The MS4024 requires a revision of 2.0 or higher. To use a
remote control (i.e., ME-RC50 or ME-ARC) with this product, you
need a revision of 1.2 or higher.
i
© 2010 Magnum Energy, Inc.
Safety symbols
To reduce the risk of electrical shock, fire, or other safety hazard,
the following safety symbols have been placed throughout this
manual to indicate dangerous and important safety instructions.
WARNING: This symbol indicates that failure to take a
specified action could result in physical harm to the user.
CAUTION: This symbol indicates that failure to take a
specified action could result in damage to the equipment.
Info: This symbol indicates information that emphasizes
or supplements important points of the main text.
IMPORTANT PRODUCT SAFETY INSTRUCTIONS
This manual contains important safety instructions that must be
followed during the installation and operation of this product. Read
all instructions and safety information contained in this manual
before installing or using this product.
• All electrical work must be performed in accordance with local,
state, and federal electrical codes.
• This product is designed for indoor/compartment installation.
DO NOT expose to rain, snow, moisture, or liquids of any type.
• Use insulated tools to reduce the chance of electrical shock or
accidental short circuits.
• Remove all jewelry such as rings, watches, bracelets, etc., when
installing or performing maintenance on an inverter.
• Always disconnect the batteries or energy source prior to
installing or performing maintenance on an inverter. Live power
may be present at more than one point since an inverter utilizes
both batteries and AC. Turning off the inverter may not reduce
this risk. As long as AC power is connected, it will pass through
the inverter regardless of the ON/OFF power switch setting.
• Always verify proper wiring prior to starting an inverter.
• Do not operate an inverter if it has been damaged.
• Do not dismantle an inverter; there are no user-serviceable
parts contained in this product. Attempting to service the unit
yourself could cause electrical shock. Internal capacitors remain
charged after all power is disconnected.
• No AC or DC disconnects are provided as an integral part of the
inverter. Both AC and DC disconnects must be provided as part
of the system installation.
© 2010 Magnum Energy, Inc.
ii
• No overcurrent protection for the battery supply is provided as
an integral part of the inverter. Overcurrent protection of the
battery cables must be provided as part of the installation.
• No overcurrent protection for the AC output wiring is provided as
an integral part of the inverter. Overcurrent protection of the AC
output wiring must be provided as part of the installation.
IMPORTANT BATTERY SAFETY INSTRUCTIONS
• Wear eye protection (safety glasses) when working with
batteries.
• Remove all jewelry such as rings, watches, bracelets, etc., when
installing or performing maintenance on the inverter.
• Never work alone. Always have someone near you when working
around batteries.
• Use proper lifting techniques when working with batteries.
• Never use old or untested batteries. Check each battery’s label
for age, type, and date code to ensure all batteries are identical.
• Batteries are sensitive to changes in temperature. Always install
batteries in a stable environment.
• Install batteries in a well ventilated area. Batteries can produce
explosive gasses. For compartment or enclosure installations,
always vent batteries to the outside.
• Provide at least one inch of air space between batteries to
provide optimum cooling.
• Never smoke when in the vicinity of batteries.
• To prevent a spark at the battery and reduce the chance of
explosion, always connect the cables to the batteries first. Then
connect the cables to the inverter.
• Use insulated tools at all times.
• Always verify proper polarity and voltage before connecting the
batteries to the inverter.
• To reduce the chance of fire or explosion, do not short-circuit the
batteries.
• In the event of accidental exposure to battery acid, wash
thoroughly with soap and water. In the event of exposure to the
eyes, flood them for at least 15 minutes with running water and
seek immediate medical attention.
• Recycle old batteries.
SAVE ALL INSTRUCTIONS
iii
© 2010 Magnum Energy, Inc.
Table of Contents
Introduction ........................................................................1
Installation .........................................................................2
DC Wiring............................................................................ 2
Battery Connections for Series Stacked Inverters ................. 3
DC Wiring Using One Battery Cable Pair ........................... 4
DC Wiring Using Two Battery Cable Pairs .......................... 5
Incorrect DC Wiring ....................................................... 6
The Stacker Cable ................................................................ 7
Connecting the Series Stacking Cable ................................. 7
AC Wiring ............................................................................ 8
AC Input Source .............................................................. 8
AC Input ......................................................................... 9
AC Output ......................................................................10
AC Terminal Block ...........................................................10
Determine Which AC Wiring Configuration to Use ..............11
Neutral to Safety Ground Bonding (Mobile applications)........13
Grounding ......................................................................14
Operation ..........................................................................15
Using the Remote Control .....................................................15
Functional Test ....................................................................15
Power-up Sync Test .........................................................16
Testing Invert Mode .........................................................16
Testing AC Transfer/Charge Mode ......................................17
Inverter Operation ...............................................................18
Charger Operation ...............................................................18
Troubleshooting ................................................................20
Inverter Faults ....................................................................20
Stacking Faults ...................................................................20
Troubleshooting Tips ............................................................20
Warranty/Service Information ..........................................21
How to Receive Repair Service ..............................................22
Table of Figures
Figure
Figure
Figure
Figure
Figure
Figure
Figure
Figure
Figure
Figure
Figure
1, Series Stacking Interface (ME-SSI) Components........... 1
2, ME-SSI Components Connected to Stacked Pair ........... 3
3, DC Wiring Using One Battery Cable Pair ...................... 4
4, DC Wiring Using Two Battery Cable Pairs ..................... 5
5, Incorrect DC Wiring .................................................. 6
6, Stack Port Location (on MS4024)................................ 7
7, Single In/Single Out (30A with 120/240VAC source) ....11
8, Single In/Single Out (30A with 120VAC only source) ....11
9, Single In/Single Out (60A with 120/240VAC source) ....12
10, Single In/Single Out (60A with 120VAC only source) ..12
11, AC Wiring compartment (MS4024 model) .................14
© 2010 Magnum Energy, Inc.
iv
Introduction
Introduction
Magnum Energy’s Series Stacking Interface (ME-SSI) kit allows
two MS4024 models to be connected together in a “series stacked”
configuration to provide 120VAC and 240VAC outputs. When connected together in a series, the AC output of each inverter continues
to provide 120VAC, but the two 120VAC output waveforms are also
phase locked and synchronized 180° out-of-phase from each other
to provide 240VAC. This is commonly referred to as a 120/240VAC
split-phase or as a 240VAC single-phase with a center-tap neutral,
and is the same AC voltage configuration that most utility companies
connect to houses.
While inverting, a series stacked configuration allows you to operate 240VAC loads at twice the power that is available from a single
inverter; and, the ability to provide the power of each inverter separately to operate 120VAC loads.
While charging, a series stacked configuration allows the battery
bank to be independently charged up to twice the power available
from a single inverter; and if needed, provides back-up power for
your 120/240VAC loads during a utility black-out.
The ME-SSI kit consists of:
• ME-SSI Owner’s Manual
• Two DC interconnects cables (red and black)
• Two DC terminal insulators (red and black)
• Series Stacker cable
Red and Black DC
Interconnects
Cables
Series Stacker Cable
Red and Black DC
Terminal Insulators
Figure 1, Series Stacking Interface (ME-SSI) Components
1
© 2010 Magnum Energy, Inc.
Installation
Installation
When connecting inverters in a series stacked configuration,
certain installation requirements are needed to obtain optimum
performance.
This section provides information on DC and AC wiring and connecting the stacker cable. Use the information in this section along
with the installation requirements provided in the owner’s manual
for your inverter to ensure a successful installation.
IMPORTANT - Before you begin your installation:
•
Series stacking allows two MS4024 (120VAC inverters) to be combined to provide a higher AC voltage (two MS4024 series stacked
= 8000 watts @ 120/240VAC). Magnum also has inverters that
can be installed in a configuration known as “parallel stacking”.
This configuration allows you to increase your inverter output
power using a maximum of four MS-PAE units. For example, four
MS4024PAE Series inverters (using the ME-RTR router) can be
combined to provide 16,000 watts of inverter power (MS4024PAE
x 4 = 16,000 watts @ 120/240VAC).
Info: The MS4024 (120VAC unit) cannot be reconfigured
to allow parallel stacking. Only the MS-PAE Series
(MS4024PAE or MS4448PAE) can be paralleled stacked.
CAUTION: All wiring must be done in accordance with
local and national electrical safety standards.
DC Wiring
The success of an inverter system installed in a series stacked configuration is dependent on the quality and maintenance of the DC
connections and proper cable sizing. When inverters are stacked
and required to perform optimally, the DC connections must be
tight and the cables must not be too long or undersized. Refer to
the owner’s manual for your inverter to determine the required
cable size and overcurrent protection device for each inverter.
CAUTION: Before making any DC connection, ensure
the cable polarity at both the battery and the inverter
are correct. Positive must be connected to positive;
negative must be connected to negative. Reversing the
positive and negative battery cables will damage the
inverter. This type of damage is easily detected and will
void your warranty.
For help against accidental shorts, the ME-SSI kit provides two
DC terminal insulators. These are to be used where both the battery cables and DC interconnects are connected (see Figure 2).
Alternately, a DC Conduit Box (PN: ME-CB) or Mini Magnum Panel
(MMP250-60S) may be used to protect the DC terminals.
© 2010 Magnum Energy, Inc.
2
Installation
DC interconnect cables
(positive and negative)
Stacker
Cable
DC terminal insulators
(negative and positive)
Figure 2, ME-SSI Components Connected to Stacked Pair
Battery Connections for Series Stacked Inverters
When inverters are series stacked, they must operate from a single
battery bank. A single battery bank configuration helps to balance
charging and discharging. If your battery bank uses multiple battery strings (i.e., batteries connected together in series to provide
the required DC voltage), ensure each battery string is connected
together in parallel to form a single battery bank.
For example: If you have eight 6 volt batteries and require a 24
volt battery bank, connect four of the 6 volt batteries together to
make 24 volts. This is known as a series battery string. The other
four 6 volt batteries connected together will also make another series battery string. The negative ends of these two battery strings
must be connected together. Likewise, the positive ends of the two
battery strings must be connected together. Then, the two battery
strings are connected together in parallel to make a single battery
bank to power the stacked inverters (as shown in Figures 3 and 5).
CAUTION: The DC negative interconnect cable provided in
the ME-SSI kit is a crucial part of the DC wiring and must be
used. It ensures that the negative battery terminals of both
inverters are at the same voltage potential. This allows proper
communication of the clocking signals and helps prevent
damage to the stacking ports.
Info: If multiple battery temperature sensors are installed,
ensure that they are all connected to the battery bank in the same
location. This will help balance the charging from each charger.
3
© 2010 Magnum Energy, Inc.
Installation
This diagram is for a 24 VDC
battery system . Ensure your
battery bank is wired correctly .
MS4024
L1
inverter
DC Positive and
Negative Interconnects
(from ME-SSI kit )
Stacker cable
(from ME-SSI kit)
MS4024
L2
inverter
DC disconnect and
overcurrent
protection
6 volt
battery
6 volt
battery
6 volt
battery
6 volt
battery
6 volt
battery
6 volt
battery
6 volt
battery
6 volt
battery
This battery bank uses two battery strings . They must
be connected together in parallel to provide a single
battery bank to the inverters .
Figure 3, DC Wiring Using One Battery Cable Pair
• DC Wiring Using One Battery Cable Pair – Both inverters
share a single battery cable pair (one positive and negative). It is
divided between the two inverters and is protected by a single DC
disconnect/overcurrent device. The positive battery cable is connected to the positive terminal of one inverter and the negative
battery cable is connected to the negative terminal of the other inverter. This is to ensure an even charge and discharge through the
batteries. The positive and negative interconnect cables provided
are used to place the inverters as close to each other as possible.
© 2010 Magnum Energy, Inc.
4
Installation
This diagram is for a 24 VDC
battery system . Ensure your
battery bank is wired correctly .
MS4024
L1
inverter
DC Negative
Interconnect
(from ME-SSI kit )
Stacker cable
(from ME-SSI kit)
MS4024
L2
inverter
DC disconnects and
overcurrent protection
6 volt
battery
6 volt
battery
6 volt
battery
6 volt
battery
6 volt
battery
6 volt
battery
6 volt
battery
6 volt
battery
This battery bank uses two battery strings . They must
be connected together in parallel to provide a single
battery bank to the inverters .
Figure 4, DC Wiring Using Two Battery Cable Pairs
• DC Wiring Using Two Battery Cable Pairs – Each inverter
has its own battery cable pair (positive and negative for each
inverter) connected to the battery bank. There are two DC disconnect/overcurrent devices, one for each positive battery cable. Use
only the DC negative interconnect cables from the ME-SSI kit between the two inverters in this configuration. The positive interconnect cable is not used in this installation as it may not meet electrical code requirements, and would cause performance issues if only
one DC disconnect/overcurrent device inadvertently opens.
5
© 2010 Magnum Energy, Inc.
Installation
INCORRECT WAY TO CONNECT THE BATTERY
BANK TO THE SERIES STACKED INVERTERS .
**DO NOT WIRE THIS WAY**
The battery bank
cables are going to
one inverter, this is
NOT RECOMMENDED
MS4024
L1
inverter
DC Positive and
Negative
Interconnects
(from ME-SSI kit )
Stacker cable
(from ME-SSI kit)
MS4024
L2
inverter
DC disconnect and
overcurrent protection
6 volt
battery
6 volt
battery
6 volt
battery
6 volt
battery
6 volt
battery
6 volt
battery
6 volt
battery
6 volt
battery
This battery bank uses two battery strings . They must
be connected together in parallel to provide a single
battery bank to the inverters .
Figure 5, Incorrect DC Wiring
• Incorrect DC wiring – As shown in Figure 5, do not attempt
to connect the positive and negative to one inverter and then
jumper the negative and positive to the second inverter. This will
not distribute the current into and out of the battery bank evenly
and may not allow the second inverter to receive sufficient current
if powering a heavy load. If you have a single battery cable pair,
use Figure 3 to guide you in wiring your DC battery cables to the
stacked pair of inverters.
© 2010 Magnum Energy, Inc.
6
Installation
The Stacker Cable
The stacker cable provided in the ME-SSI kit is specifically designed for series stacking two MS4024 model inverters. It allows
information exchange between the two stacked inverters for two
main purposes: to provide synchronization information while
inverting, and to send a shut down command if a fault condition
is detected. This shut down command prevents any 240VAC load
from receiving only 120VAC power.
CAUTION: Do not use a standard telephone or data cable
in place of the stacker cable or damage may occur.
Info: The stacker cable doesn’t allow programming or
access to the display from one inverter to the other. If
changes or monitoring are necessary, a remote control
must be connected to the affected inverter. It is highly
recommended that you use two remotes in order to
monitor and set each inverter.
Connecting the Series Stacker Cable
The stacker cable is a 48-inch, six-wire, twisted pair cable easily
indentified with a red “STACKER” label on each end. This cable also
has two RJ11 connectors on each end, which allows an easy connection to the Stack Port on each inverter. Once the inverters are
connected as described in the DC Wiring section, the stacker cable
can be installed as follows:
CAUTION: Ensure that no DC power is connected to
the inverter, and that the DC disconnect is open.
1. Locate the Stack Port on each inverter (see Figure 6).
2. Connect the series stacker cable from the Stack Port jack on
one inverter to the Stack Port jack on the other unit.
3. Once the series stacker cable is connected gently pull on the
cable at both ends, close to where they are plugged in, to ensure both connectors are secured in place.
Stack Port
(red label)
Figure 6, Stack Port Location (on MS4024)
7
© 2010 Magnum Energy, Inc.
Installation
AC Wiring
This section will discuss AC wiring that is unique to series stacking;
otherwise, refer to you inverter’s owner’s manual for any other information on AC wiring. When wiring the AC to your series stacked
inverters there are many variables that must be considered for a
safe and trouble-free installation. The following options should be
determined prior to any AC wiring:
Info: The AC source must be connected to both
inverters. An AC source connected to only one inverter
in a series stacked configuration is not supported and
will not work.
AC Input Source – When an AC source is connected to the inverter’s input and passing thru both inverters (Charge mode), the
AC output of the two series stacked inverters is determined by the
phase and voltage of the incoming AC source (utility or generator).
The series stacked inverters can be operated from the following
types of 120VAC/60Hz AC sources:
• Split-phase (120/240VAC) – This AC type provides both
120 and 240VAC. It has two 120VAC lines (L1 and L2), a
neutral and a ground. The two 120VAC lines are 180° out-ofphase with each other, so that the combination of the L1 and
L2 lines total 240VAC and the voltage between either L1 or L2
and neutral is 120VAC. When split-phase power is connected
to the HOT 1 IN of each inverter (L1 to one inverter and L2
to the other inverter) and passing through the inverters, the
incoming power is shared with the charger and the HOT 1 OUT
lines continue to be 180° out-of-phase. This source is the ideal
type as it will be able to provide 120/240VAC to power loads
when inverting and also in Charge/Transfer mode. See Figures
7 and 9.
• Single-phase (120VAC only) – This AC source has one
120VAC line, one neutral, and a ground. The 120VAC line
is fed to both the HOT 1 IN’s of each inverter and when in
Charge mode, it will pass thru to the HOT 1 OUT’s of each
inverter. The incoming power is shared with the charger, but
since the two lines come from the same source (unlike the
split-phase type), the two lines are in-phase and the voltage between the HOT 1 OUT lines will be zero. While this AC
source is used to charge your batteries, you must remember
that you will not be able to power any 240VAC loads (voltage
from L1 to L2 will be zero). Once the AC source is disconnected and the inverters again start inverting, you can reconnect
your 240VAC loads. See Figures 8 and 10.
• Three-phase (with neutral) – This AC source typically has
three 120VAC lines, a neutral and a ground. The output of
each line is 120° out-of-phase from each other, so the voltage
from one line to another is 208VAC and the voltage between
© 2010 Magnum Energy, Inc.
8
Installation
each line and neutral is 120VAC. When three-phase power is
connected to the HOT 1 IN of each inverter (one line to one
inverter and a different line to the other inverter) and passing
through the inverter (Charge mode), the incoming power is
shared with the charger. The voltage between each HOT 1 OUT
and neutral will be 120VAC, and between the inverters two
HOT 1 OUT lines it will be 208VAC. If this AC source is used,
you must remember that you may not be able to power any
240VAC loads (voltage from L1 to L2 will be 208VAC) until the
AC is disconnected and the inverters again start inverting.
240VAC only – The input of the series stacked system requires either 120VAC (from hot to neutral) or 120/240VAC
(with a common center “neutral” provided between the L1 and
L2 lines). If a 240VAC only AC source is connected to the AC
HOT input on the two inverters without a center neutral, the
inverters will not recognize the AC source nor allow charging.
If this AC source is required, an auto-transformer may be used
to obtain a center neutral to allow charging/pass-through.
•
WARNING: The output of the series stacked inverters is
120/240VAC when inverting; however, while in Charge
mode (AC is connected and charging/pass-thru), the AC
output voltage is determined by the input AC voltage. Be
aware that this voltage may be different from the inverting
voltage and the connected load may not work or could be
possibly damaged.
AC Input – Each inverter requires a two-conductor (hot and
neutral) plus ground cable, with the hot conductor fed by a circuit breaker. If you decide to use the Single In/Single Out (30A)
connection (see Figures 7 and 8), each inverter would require
a 120VAC hot conductor (protected by a maximum 30A circuit
breaker) connected to the HOT 1 IN terminal. The neutral conductor, which must be sized to handle the total current capacity of the
HOT 1 IN conductor, must be connected to the NEUT IN terminal
and a ground conductor connected to the AC ground terminal on
each inverter.
For a Single In/Single Out (60A) connection (see Figures 9 and
10), each inverter would require a 120VAC hot conductor (protected by a maximum 60A circuit breaker) connected to the HOT 1 IN
terminal and this connection jumpered to the HOT 2 IN terminal.
The neutral conductor (which must be sized to handle the total
current capacity of the HOT 1 IN conductor) must be connected to
the NEUT IN terminal, and a ground conductor must be connected
to the AC ground terminal on each inverter.
In most applications, these input conductors originate from an AC
distribution panel, providing a main disconnect and circuit breakers required for each conductor connected to the HOT 1 IN input
9
© 2010 Magnum Energy, Inc.
Installation
on each inverter. This panel, referred to as the “main panel,” also
provides the neutral and ground bus for connecting the neutral and
ground conductors to the inverter.
AC Output – The AC output from each inverter when series
stacked is 120VAC from HOT OUT to NEUT OUT. The inverters
can be wired as a HOT 1 OUT only or HOT OUT 1 and HOT OUT 2
connected together by a jumper – depending on your pass-thru
current requirements. One inverter is wired to provide one 120VAC
output (L1) and the other inverter is wired to provide the second
120VAC output (L2). These L1 and L2 outputs are 180° out-ofphase, so the combination of the two out-of-phase 120VAC outputs
will provide 240VAC.
The HOT OUT outputs of each inverter require a two-conductor
(hot and neutral) plus ground cable connected to a 120/240VAC
split-phase distribution panel for the loads. The panel, referred
to as the “sub-panel”, must be equipped with a 240VAC doublepole circuit breaker rated at 30 or 60 amps maximum depending
on which Single In/Single Out configuration you are using. The
inverters output should be wired to this circuit breaker and will
be used as the sub-panel main disconnect. The sub-panel then
provides circuit breakers for the 120VAC and 240VAC branch
circuits powering the loads.
AC Terminal Block – When wiring to the inverter’s six-pole
AC terminal block as a series stacked pair, four different wiring
configurations can be used. These different wiring configurations
depend on whether the output of your AC source can provide up to
30 or 60 amps, and whether you are using a split-phase (120/240
VAC) AC source or a 120VAC only source. If only wiring to the HOT
1 (Single In/Single Out @ 30 amps), it means you have up to 30
amps pass-thru and share the incoming power with the charger.
Wiring to the HOT 1 input with a jumper to the HOT 2 input (Single
In/Single Out @ 60 amps) provides up to 30 amps pass-thru on
each input (60 amps total).
Info: The Dual In/Dual Out wiring configuration is not
recommended with a series stacked system, as they
would conflict with one another.
© 2010 Magnum Energy, Inc.
10
Installation
Determine Which AC Wiring Configuration to Use:
Single In/Single Out (30 Amps) – Using a single line (HOT 1)
for the input and output provides up to 30 amps AC pass-thru and
shares power with the charger. Use this configuration if your AC
source is 30 amps or less. See Figures 7 and 8 below.
MS4024 (L1)
120V
HOT 1 IN
HOT 1 OUT
AC
SOURCE
HOT 2 IN
HOT 2 OUT
(120 /240 )
AC
LOADS
NEUT IN
NEUT OUT
(120 /240 )
L1
NEU
240V
120V
L2
GND
L1
GND
120V
NEU
MS4024 (L2)
HOT 1 IN
HOT 1 OUT
HOT 2 IN
HOT 2 OUT
NEUT IN
NEUT OUT
L2
240V
120V
GND
GND
Figure 7, Single In/Out (30A with 120/240VAC source)
MS4024 (L1)
AC
SOURCE
HOT 1 IN
HOT 1 OUT
HOT 2 IN
HOT 2 OUT
NEUT IN
NEUT OUT
( 120 only )
L1
GN D
HOT
120V
NEU
GND
AC
LOADS
( 120 / 240)
NEU
MS4024 (L2)
HOT 1 IN
HOT 1 OUT
HOT 2 IN
HOT 2 OUT
NEUT IN
NEUT OUT
L2
120V
240V
(Invert only)
120V
GND
GN D
Figure 8, Single In/Out (30A w/ 120VAC only source)
11
© 2010 Magnum Energy, Inc.
Installation
Single In/Single Out (60 Amps) – Using both inputs (HOT 1
and HOT 2) for the input and output provides up to 60 amps AC
pass-thru (30 amps each line). The HOT 1 line passes through
the unit and also shares power with the charger. The HOT 2 line
passes through the unit without sharing power with the charger.
Use this configuration if the output from your AC source provides
more than 30 amps. See Figures 9 and 10 below.
MS4024 (L1)
AC
SOURCE
( 120 / 240)
120V
240V
HOT 1 IN
HOT 1 OUT
HOT 2 IN
HOT 2 OUT
AC
LOADS
NEUT OUT
(120 /240 )
NEUT IN
L1
NEU
120V
L2
GND
L1
GND
MS4024 (L2)
HOT 1 IN
HOT 1 OUT
HOT 2 IN
HOT 2 OUT
NEUT IN
NEUT OUT
120V
NEU
240V
120V
L2
GND
GND
Figure 9, Single In/Out (60A with 120/240VAC source)
MS4024 (L1)
AC
SOURCE
HOT 1 IN
HOT 1 OUT
HOT 2 IN
HOT 2 OUT
AC
LOADS
NEUT IN
NEUT OUT
( 120 / 240)
( 120 only )
HOT
120V
NEU
GND
L1
GND
MS4024 (L2)
HOT 1 IN
HOT 1 OUT
HOT 2 IN
HOT 2 OUT
NEUT IN
NEUT OUT
NEU
L2
120V
240V
(Invert only)
120V
GND
GND
Figure 10, Single In/Out (60A w/ 120VAC source only)
Info: The dashed lines between the NEUT IN and NEUT
OUT in Figures 7 through 10 represent the RD and MSAE Series models. Those models have no internal relay
between the NEUT IN and NEUT OUT, as they are tied
together.
Info: Refer to the MS4024 Owner’s Manual for
information on how to connect the AC terminal.
© 2010 Magnum Energy, Inc.
12
Installation
Neutral to Safety Ground Bonding
Electrical safety standards for wiring mobile (RV, boat, or truck)
and AE (houses, cabin, or office) installations require: an AC
source such as the utility feed in your home, an inverter or
a generator, and the neutral conductor tied to ground. These
standards also require that the AC neutral be connected to safety
ground (often called a “bond”) in only one place at any time (often
called a “bond”). If more than one bond is established, currents
can circulate between neutral and ground and cause groundloop currents. These “ground-loops” can trip GFCIs and cause an
electric shock hazard.
The fundamental difference between using an inverter in a mobile
installation as opposed to an AE installation is how the neutral is
grounded in the AC system. There may be multiple AC sources in
mobile installations, which means there is the potential of having
multiple neutral to ground connections. Therefore, if you are
using an inverter as one of your AC sources along with another
AC source (i.e., utility power or generator), you must ensure that
the inverter does not also connect the neutral to ground while
the other AC source is actively powering the inverter loads. In AE
installations, the main service panel provides the neutral to ground
bond for the entire electrical system – not in the inverter.
The MS4024 inverter provides an internal relay that connects the
neutral to ground while inverting and opens this neutral-to-ground
connection automatically when connected to an active AC source,
such as utility power or a generator.
WARNING: Each MS4024 inverter in a series stacked
configuration provides a neutral-to-ground connection,
creating two “bonds” at the same time. Depending on the
installation, either one or both of the neutral-to-ground
connections inside the inverter must be disconnected to
prevent multiple neutral to ground connections.
In a mobile installation, the neutral-to-ground connection in one
of the MS4024 inverters in a series stacked configuration must be
disconnected; while leaving the neutral-to-ground connection in
place in the other MS4024 inverter to allow the automatic neutralto-ground switching to continue for the series stacked pair.
In an AE installation, the neutral-to-ground connection in both of
the MS4024 inverters must be disconnected, because the neutralto-ground connection is provided in the main AC panel.
WARNING: Any neutral-to-ground bond downstream
from the inverter must be removed to prevent multiple
bonds. If there is an inverter sub-panel — separate from
a “main” electrical panel — it should have a removable
wire that allows the neutral bus to be unbonded from
the ground bus.
13
© 2010 Magnum Energy, Inc.
Installation
Disconnecting the Neutral-to-Ground Connection
The following instructions will guide you in disconnecting the neutral-to-ground connection.
WARNING: Fire and Shock Hazard – Disconnect all AC
and DC sources before working with AC wiring.
1. Locate and remove the inverter’s AC access cover plate.
2. At the top of the AC wiring compartment, locate the green wire
with the insulated connector (see Figure 11). This connects the
neutral and ground inside the inverter.
3. Pull the two ends of the insulated connector apart to separate
the green wire. This prevents a neutral/ground connection.
4. Move the two disconnected ends away from each other and
push them back out of the way. The two connector ends
shouldn’t have any contact with any other wires within the
compartment. Use electrical tape to insulate the ends.
N e u tra l to g ro u n d
co n n e ctio n
(g re e n w ire )
Figure 11, AC Wiring Compartment (MS4024 model)
Grounding
Ensure all components are grounded properly for safety and codecompliance. Refer to your inverter’s owner’s manual for specific
grounding information on your inverter.
WARNING: When stacking inverters, ensure the chassis
of each inverter is connected to the same common ground
(i.e., in the utility or inverter panel); otherwise, a hazardous
voltage difference may be present between them.
The installation is complete, follow the information provided in the
Operation section to test and operate the series stacked system.
© 2010 Magnum Energy, Inc.
14
Operation
Operation
When two inverters are series stacked and inverting, they coordinate with each other to ensure the output can power 240VAC
loads. This requires that the inverters turn on together and switch
to the AC source at the same time; and, both inverters should shut
down if either one becomes inoperable. This Operation section
provides a functional test to ensure the two inverters are working
together as a series stacked pair, and also provides information
pertinent to the set-up and operation of a series stacked configuration.
Using the Remote Control
The default settings in your inverter are adequate for most
installations; however, in a series stacked configuration we highly
recommend using the ME-RC50 or ME-ARC50 remote controls.
These remote controls can be used to monitor the inverter’s status
and make set-up changes. A single remote can be used to configure each inverter, but not at the same time. If you want the ability
to monitor and configure both units at the same time, each inverter will require its own remote.
Info: To use a remote control, it must have revision
1.2 or higher to work properly with a series stacked
configuration.
Functional Test
Series stacked inverters must communicate together to provide
120/240VAC to the loads and shut down if any inverter faults occur. This functional test will confirm the two units are operating
correctly as a series stacked pair. Before performing the functional
test, ensure the following:
• All DC disconnects to the inverters are turned off.
• All AC input and output circuit breakers are turned off.
• Only the stacker cable provided in the ME-SSI is used.
• The stacker cable is connected to each inverter’s Stack Port
(red label).
• Only MS4024 inverter models are stacked together.
• NEUT OUT of both inverters are connected to the same neutral
bus.
• DC and AC grounds are both connected and properly installed.
• AC input connections and AC output connections are wired
correctly on the terminal block and not reversed (double-check
before turn-on).
• All DC connections are properly connected and tight.
15
© 2010 Magnum Energy, Inc.
Operation
•
Battery voltage is within the DC voltage range for your inverter.
•
The DC negatives of each inverter are connected together using the negative DC interconnect provided (i.e., 2/0 AWG and
3 feet max).
The positive (+) battery cable(s) is connected to the positive
(+) battery terminal through a DC disconnect and overcurrent
device.
The negative (–) battery cable(s) is connected to the negative
(–) battery terminal.
•
•
Power-up Sync Test
1. While monitoring the Status LED located on each inverter, apply
DC voltage to both inverters at the same time (ensure AC is not
connected).
CAUTION: It is crucial that the DC voltage be connected
to both inverters within 15 seconds of each other. The
units go through an auto-detect when first poweredup to synchronize the units for series stacking. If both
units are not powered up within this time, then series
synchronization will not occur.
2. The Status LED on both inverters should blink 9 times in sync.
This indicates that the two units have recognized each other
and are communicating as a series stacked system.
Testing Invert Mode
3. Press the Power ON/OFF switch on either inverter, this should
turn on both inverters. (If using a remote control, press the
INVERTER ON/OFF button on either remote, and then verify
that the INV and PWR LED on both remotes come on). If either
unit is “Searching”, you must disable the Search mode prior to
making any voltage measurement. The inverters should now be
providing 120/240VAC to the AC sub-panel.
4. Measure the voltage between the L1 terminal and the neutral
bus in the AC sub-panel. This voltage should be 120VAC
(±6VAC).
5. Measure the voltage between the L2 terminal and the neutral
bus in the AC sub-panel. This voltage should be 120VAC
(±6VAC).
6. Measure the voltage between the L1 and L2 terminals in the AC
sub-panel. This voltage should be 240VAC (±12VAC).
7. Turn on the AC load breakers in the sub-panel which are powered by the inverters.
© 2010 Magnum Energy, Inc.
16
Operation
8. Turn on a 120VAC load powered by the inverter feeding the L1
terminal and verify that it works. Turn on a 120VAC load powered by the other inverter which feeds the L2 terminal and
verify that both of these loads work. Turn on a 240VAC load
powered by the hot outputs of both inverters and verify that it
works correctly – leave all these loads on.
Testing AC Transfer/Charge Mode
9. Check the AC transfer. Apply AC power to both inverters, after a
few seconds:
a. If using the remote control – wait till the CHG LED on the
remote control for both units stops blinking and comes on solid. Press the INVERTER ON/OFF button to disable the Inverter
mode and verify the INV LED turns off, and that the loads connected in Step 8 continue to work.
b. Without the remote control – the Status LED on both inverters will come on. Press the inverter’s Power ON/OFF switch
and verify that the loads connected in Step 8 continue to work.
10. Check the Charge mode. Verify the batteries are being charged
– may take minutes before the charge current is actually seen.
a. If using the remote control – monitor the CHG LED on the
remote, if it is blinking on either remote, press the CHARGER
ON/ OFF button on that remote to turn the charger on. Verify
the CHG LED on both remotes are on solid (not blinking) and
the remote display shows that they are both in Charge mode
(i.e., “Bulk Charging”, “Absorb Charging”, etc.).
b. Without the remote control - the Status LED on both inverters will come on (the LED will be on solid or blink depending
on the Charge mode).
This completes the functional test. If the inverters are functioning correctly as a series stacked pair, continue to the Inverter
and Charger Operation sections. If any step did not operate correctly, refer to the Troubleshooting section in this manual or in the
owner’s manual for your inverter.
17
© 2010 Magnum Energy, Inc.
Operation
Inverter Operation
Invert Mode - The units are turned on by pressing the Power ON/
OFF switch on either inverter. Alternatively, they can also be started by pressing the INVERTER ON/OFF button on a remote control
connected to either inverter. When the two inverters are inverting,
they communicate over the Stacker cable. This cable communicates to monitor the AC output from each inverter and shift it 180°
out of phase from each other to provide 240VAC on both units,
and to verify that there are no faults on either unit to prevent only
one unit from inverting. The two units also use the DC negatives
as a reference point while they are communicating; hence, the
reason why the DC negatives must be tied together – to ensure
there is no negative voltage difference between the two units.
Inverter settings - When the units are inverting as a series
stacked configuration, certain settings must be coordinated in each
unit for proper operation. Without a remote control, the default
settings on each unit will be coordinated. If using a remote control, check that the following settings are the same between the
two units:
1. Ensure the Adj LowBatCutOut setting is the same for both units.
2. If the Search mode is needed, then set the Adj Search Watts
setting for each inverter to determine when to start powering
120VAC loads. The two inverters are independent, which means
one inverter can come out of Search mode and start inverting,
while the other unit continues in the Search mode until a load exceeds the search watts threshold of that unit. If powering 240VAC
loads, then the search watts sensibility is determined by combining
the ‘Search Watts’ setting on both units.
For example: Given a 15 watt Search Watts setting on the L1
inverter and a 10 watt Search Watts setting on the L2 inverter,
and a 20 watt/120VAC load on the L1 inverter and no load on the
L2 inverter. This would cause the L1 inverter to start inverting, but
the L2 inverter would continue in Search mode. With the same
Search Watts settings, a 25 watt/240VAC or greater load would
cause both the L1 and L2 inverters to come on and start inverting.
Charger Operation
Charge Mode – The series stacked configuration is designed to
accept 120VAC to each inverter, typically from a split-phase, 3 wire
120/240VAC power source. The HOT IN terminals of each inverter
accepts one line of 120VAC each and the NEUT IN terminals of
both inverters are tied together and connected to the AC power
source neutral line. When the AC line voltage and frequency are
good to both units, they both transfer and go to Charge mode and
begin charging – if enabled. However, it is not necessary for either
unit to have charging enabled for the pair to operate.
© 2010 Magnum Energy, Inc.
18
Operation
After the series stacked pair is in Charge mode, the remote will
show “Charging” and begin to sample the battery voltage. If the
voltage is 26.0 or above, the units will go into “Float Charging”
mode. If the battery voltage is below 26.0, they will go into “Bulk
Charging” mode. It is possible that if the battery voltage is close
to the 25.8-26.0V threshold, one charger may go to float while the
other may go to Bulk Charge mode.
The stacked pair of chargers work independently of each other,
and because of this, there can be some voltage regulation interactions. To handle this, the charge voltage regulation routine while
stacked will sample twice as much as usual. This may mean that
the chargers may take a minute or two before charge current is
actually seen, once AC input is first applied. Once charging has
started — because they are independent chargers — they may not
share the charge current evenly, but will individually provide current to the batteries up to their maximum current rating, which is
the maximum Charge Amps or Input/Shore Amps setting, whichever is less. Any power required for battery charging will be in
addition to any AC loads being powered while AC input is present
to the inverters.
Info: During Bulk Charging, both inverters will attempt
to balance the total current provided to the batteries.
During Absorption or Float Charging the current will
differ.
While in Charge mode, if either unit senses a loss of AC input
power, both units will transfer from Charge to Inverter mode. Once
this transfer is made, 120VAC is available from each individual
inverter and 240VAC is available across the HOT OUT terminals of
the stacked pair.
Charger settings – If a remote control is used, care should be
taken to insure that battery charger settings are the same for both
inverter chargers. Without a remote control, the default settings
on each unit will be coordinated. If you are using a remote control,
then check that the Adj Charge Rate, Adj Batt AmpHrs, Adj Battery Type, and Adj VAC Dropout settings on the two units are the
same.
Charging with a generator – If you manually start a generator
and use it as the AC source to charge the inverter batteries, you
should be aware that because both inverters will be charging the
same battery, one may taper off first and finish the Bulk Charge
stage before the other. When one inverter has reached the Float
Charge stage (after both units were charging in the Bulk Charge
stage), then it is best to turn off the generator; running a generator to only float charge your batteries is very inefficient and if possible, should be avoided.
19
© 2010 Magnum Energy, Inc.
Troubleshooting
Troubleshooting
Inverter Faults
Both units will shut down if either has an auto-resetting fault
condition (such as high battery, low battery, or over-temperature).
Both inverters will automatically come back on when the fault condition has been cleared.
If one or both units experience any of the manual reset fault conditions, like a continuous AC overload or internal faults, both units
will shut down. These types of faults require a manual reset by
pushing one of the inverters’ Power ON/OFF switch (or by pressing
the INVERTER ON/OFF switch on the remote control if available).
If there are remote controls used in the system, the inverter/remote combination with the fault will display the actual fault while
the other inverter will display “Stack Mode Fault”, which means the
other unit has the fault.
Stacking Faults
Info: Having a remote for each inverter (two remotes)
makes it easier to troubleshoot stacking faults.
In a series stacked configuration, your remote may display a fault
condition not possible on a single inverter installation:
Stack Mode Fault
There is a problem with the “other” inverter. Check the remote
display of the other unit to determine the fault condition that
must be cleared.
StackClock Fault
There is a stacker cable problem; or, one inverter is losing synchronization with the other inverter.
StackPhase Fault
There is a problem with the AC input wiring; or, one phase was
lost from the AC input source; or, one of the inverter’s internal
transfer relay is bad; or, the inverter’s AC input circuit breaker
may be open.
Troubleshooting Tips
If there is no 240VAC output, ensure that the Status LEDs on
both inverters blink in synchronization (the sync detection blinks
9 times total) when DC power is first connected. This is a stacker
test and signifies that both units have autoconfigured for Stacker
mode. The DC voltage must be connected to both inverters within
15 seconds of each other.
If both units are in Inverter mode and then shut down, inspect
the stacker cable and reconnect at both ends, ensuring an audible
“click” at both inverters. Try to watch when the shutdown happens
to determine the fault. If a remote control is available, monitor its
display to reveal which fault is happening.
© 2010 Magnum Energy, Inc.
20
Warranty/Service Information
Warranty/Service Information
24 Month Limited Warranty
Magnum Energy, Inc., warrants this ME-SSI to be free from defects
in material and workmanship that result in product failure during
normal usage, according to the following terms and conditions:
1. The limited warranty for the product extends for 24 months
beginning from the product’s original date of purchase.
2. The limited warranty extends to the original purchaser of the
product and is not assignable or transferable to any subsequent
purchaser.
3. During the limited warranty period, Magnum Energy will repair
or replace (with factory new or remanufactured replacement items)
at Magnum Energy’s option any defective parts, or any parts that
will not properly operate for their intended use – if such repair or
replacement is needed because of product malfunction or failure
during normal usage. The limited warranty does not cover defects
in appearance (cosmetic or decorative), or any structural or nonoperative parts. Magnum Energy’s limit of liability under the limited
warranty shall be the actual cash value of the product at the time
the original purchaser returns the product for repair, determined by
the price paid by the original purchaser. Magnum Energy shall not
be liable for any other losses or damages.
4. Upon request from Magnum Energy, the original purchaser must
prove the product’s original date of purchase by a dated bill of
sale, itemized receipt.
5. The original purchaser shall return the product prepaid to
Magnum Energy in Everett, WA. After the completion of service
under this limited warranty, Magnum Energy will return the product
prepaid to the original purchaser via a Magnum selected nonexpedited surface freight within the contiguous United States and
Canada; this excludes Alaska and Hawaii.
6. If Magnum repairs or replaces a product, its warranty continues
for the remaining portion of the original warranty period or 90 days
from the date of the return shipment to the original purchaser,
whichever is greater. All replaced products and parts removed from
repaired products become the property of Magnum Energy.
7. This limited warranty is voided if:
• the product has been modified without authorization
• the serial number has been altered or removed
• the product has been damaged through abuse, neglect
accident, high voltage, or corrosion
• the product was not installed and operated according to the
owner’s manual
BEFORE RETURNING ANY UNIT, CONTACT MAGNUM ENERGY FOR A
RETURN MATERIAL AUTHORIZATION (RMA) NUMBER.
21
© 2010 Magnum Energy, Inc.
Warranty/Service Information
How to Receive Repair Service
If your Product requires warranty service or repair, contact either:
1. An Authorized Service Center, which are listed on the Magnum
Energy Website at http://www.magnumenergy.com/ServiceCenters.htm.
2. Magnum Energy, Inc. at:
Telephone: 425-353-8833
Fax: 425-353-8390
Email: [email protected]
If returning your Product directly to Magnum Energy for repair, you
must:
• return the unit in the original, or equivalent, shipping container
• receive a Return Materials Authorization (RMA) number from
the factory prior to the return of the Product to Magnum Energy for repair
• place RMA numbers clearly on the shipping container or on the
packing slip
When sending your Product for service, please ensure it is properly
packaged. Damage due to inadequate packaging is not covered
under warranty. We recommend sending the Product by traceable
or insured service.
© 2010 Magnum Energy, Inc.
22
Magnum Energy, Inc.
2211 West Casino Rd.
Everett, WA 98204
Phone: (425) 353-8833
Fax: (425) 353-8390
Web: www.magnumenergy.com
PN: 64-0009 Rev A
© 2010 Magnum Energy, Inc.